How Nginx works, configuration
1. Nginx module
Nginx consists of a kernel and modules. The design of the kernel is very small and concise, and the work done is very simple. The client request is mapped to a location block only by looking up the configuration file (location is an instruction in the nginx configuration for URL matching), Each instruction configured in this location will start different modules to complete the corresponding work.
The modules of Nginx are structurally divided into core modules, basic modules and third-party modules:
-
Core modules: HTTP module, EVENT module and MAIL module
-
Basic modules: HTTP Access module, HTTP FastCGI module, HTTP Proxy module and HTTP Rewrite module,
-
Third party modules: HTTP Upstream Request Hash module, Notice module and HTTP Access Key module.
Modules developed by users according to their own needs belong to third-party modules. It is with the support of so many modules that the function of Nginx will be so powerful.
The modules of Nginx are functionally divided into the following three categories.
-
Handlers. This kind of module directly processes the request, outputs the content and modifies the header information. Generally, there can only be one handler module.
-
Filters. Such modules mainly modify the contents output by other processor modules, and finally output by Nginx.
-
Proxies (proxy class module). Such modules are modules such as HTTP Upstream of Nginx. These modules mainly interact with some back-end services, such as FastCGI, to realize functions such as service proxy and load balancing.
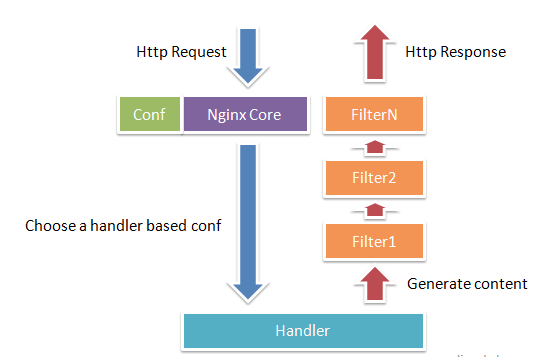
The Nginx module is a routine HTTP request and response process
2. Working principle of nginx
Nginx itself does little work. When it receives an HTTP request, it only maps the request to a location block by looking up the configuration file, and each instruction configured in the location will start different modules to complete the work. Therefore, the module can be regarded as the real labor worker of nginx. Usually, the instructions in a location will involve one handler module and multiple filter modules (of course, multiple locations can reuse the same module). The handler module is responsible for processing the request and generating the response content, while the filter module processes the response content.
The modules of Nginx are directly compiled into Nginx, so they belong to static compilation mode. After starting Nginx, the module of Nginx is loaded automatically. Unlike Apache, first compile the module into a so file, and then specify whether to load it in the configuration file. When parsing the configuration file, each module of Nginx may process a request, but the same processing request can only be completed by one module.
3. Process model of nginx
In terms of working mode, nginx is divided into two modes: single working process and multi working process. In the single working process mode, there is a working process in addition to the main process. The working process is single threaded; In multi worker process mode, each worker process contains multiple threads. Nginx defaults to single worker mode.
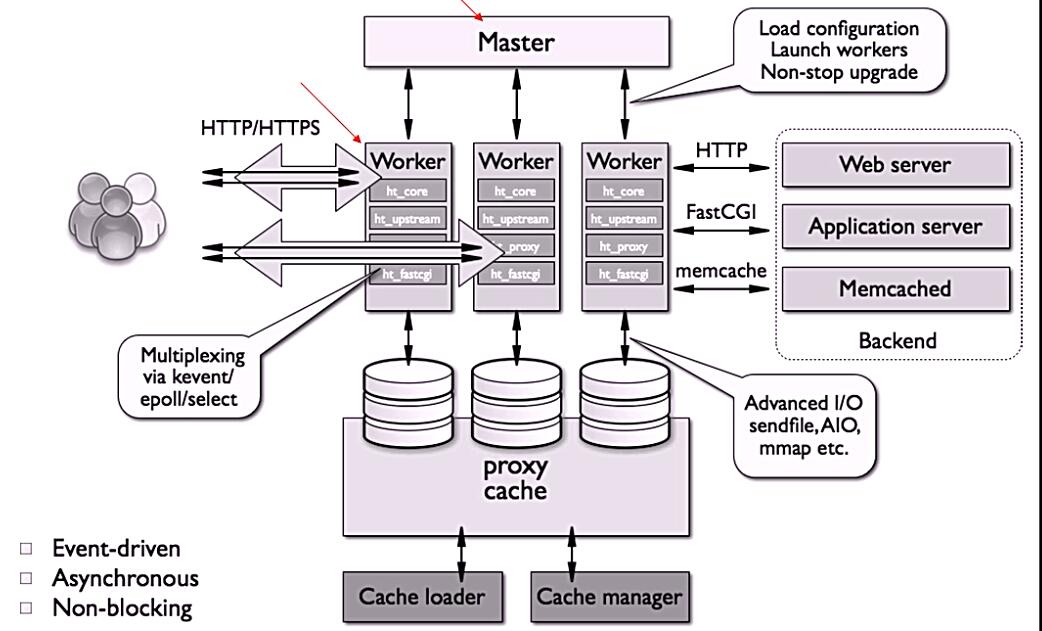
After Nginx is started, there will be a master process and multiple worker processes.
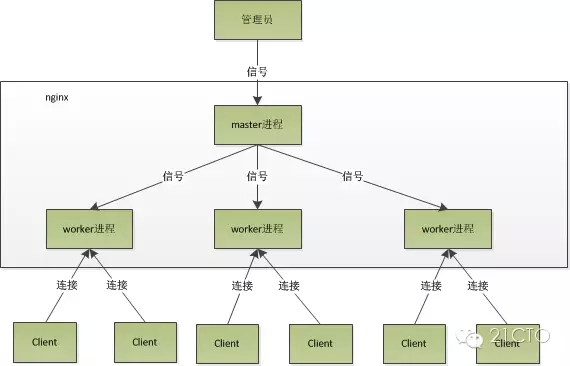
3.1 master process: management process
The master process is mainly used to manage the worker process, including the following four main functions:
- Receive signals from the outside.
- Send signals to each worker process.
- Monitor the running status of woker process.
- When the woker process exits (under abnormal circumstances), it will automatically restart the new woker process.
**User interaction interface: * * the master process acts as the interaction interface between the whole process group and users, and monitors the process at the same time. It does not need to deal with network events and is not responsible for business execution. It only realizes the functions of restarting services, smooth upgrading, replacing log files, and real-time validation of configuration files by managing worker processes.
**Restart the work process: * * to control nginx, we just need to send a signal to the master process through kill. For example, kill -HUP pid tells nginx to restart nginx calmly. We usually use this signal to restart nginx or reload the configuration. Because it is restarted calmly, the service is uninterrupted.
What does the master process do after receiving the HUP signal?
-
First, after receiving the signal, the master process will first reload the configuration file, then start the new worker process, and send a signal to all the old worker processes to tell them that they can retire with honor.
-
After starting, the new worker starts to receive new requests, while the old worker does not receive new requests after receiving the signal from the master, and exits after all unprocessed requests in the current process are processed.
-
Sending signals directly to the master process is a traditional operation method. After version 0.8, nginx introduced a series of command line parameters to facilitate our management. For example,. / nginx -s reload is to restart nginx, and. / nginx -s stop is to stop nginx. How? Let's take reload as an example. We can see that when we execute the command, we start a new nginx process. After the new nginx process parses the reload parameter, we know that our purpose is to control nginx to reload the configuration file. It will send a signal to the master process, and then the next action is the same as sending a signal directly to the master process.
3.2 worker process: processing requests
The basic network events are handled in the worker process. Multiple worker processes are peer-to-peer, they compete equally for requests from clients, and each process is independent of each other. A request can only be processed in one worker process. A worker process cannot process the requests of other processes. The number of worker processes can be set. Generally, we will set it to be consistent with the number of machine cpu cores. The reason is inseparable from the process model and event processing model of nginx.
worker processes are equal, and each process has the same opportunity to process requests. When we provide an http service with port 80, a connection request comes, and each process may handle the connection. How do we do it?
Nginx handles network events in an asynchronous and non blocking manner, similar to Libevent , the specific process is as follows:
-
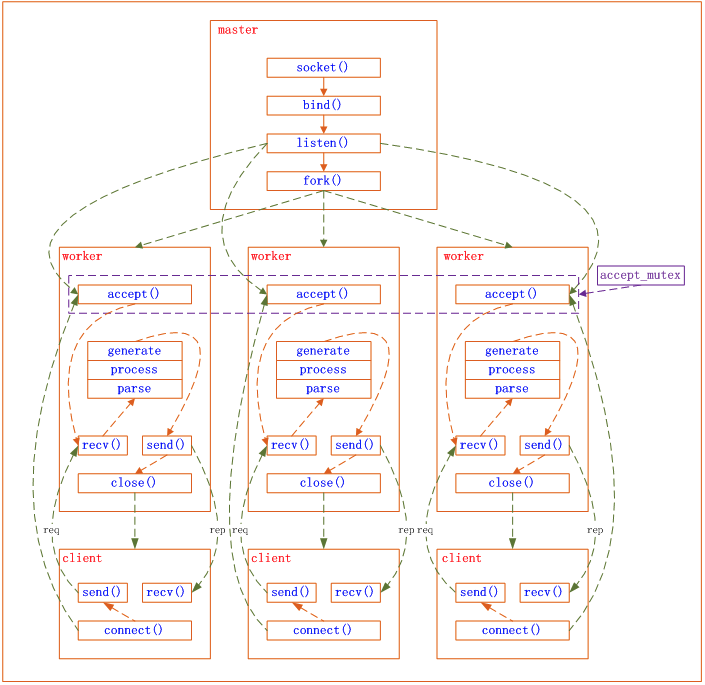
Receiving requests: first, each worker process forks from the master process. After the master process establishes the socket (listenfd) that needs to listen, then forks out multiple worker processes. The listenfd of all worker processes will become readable when a new connection arrives. Each work process can accept the socket (listenfd). When a client connection arrives, all accepted work processes will be notified, but only one process can accept successfully, and others will accept fail. To ensure that only one process handles the connection, Nginx provides a shared lock accept_mutex to ensure that only one work process is connected at the same time. All worker processes grab accept before registering the listenfd read event_ Mutex, the process that grabs the mutex registers the listenfd read event, and calls accept in the read event to accept the connection.
-
Processing request: After accept ing the connection, a worker process starts to read the request, parse the request, process the request, generate data, return it to the client, and finally disconnect. Such a complete request is like this.
-
We can see that a request is handled entirely by the worker process and only in one worker process. Worker processes are equal, and each process has the same opportunity to process requests.
The process model of nginx can be represented by the following figure:
4. Nginx configuration
Common configuration files of nginx and their functions
| configuration file | effect |
|---|---|
| nginx.conf | Basic configuration file of nginx |
| mime.types | Extension files associated with MIME types |
| fastcgi.conf | fastcgi related configurations |
| proxy.conf | proxy related configuration |
| sites.conf | Configure the websites provided by nginx, including virtual hosts |
Core functionality (nginx.org) Official reference documents
Detailed explanation of nginx.conf configuration
The content of nginx.conf is divided into the following paragraphs:
- Mainconfiguration segment: global configuration segment. The main configuration section may contain the event configuration section
- Event {}: define the working characteristics of the event model
- http {}: defines the configuration related to the http protocol
Configuration instruction: to end with a semicolon, the syntax format is as follows:
derective value1 [value2 ...];
Supported variables:
- Built in variable: the module will provide built-in variable definitions
- Custom variable: set var_name value
Configuration parameters for debugging and locating problems
daemon {on|off};    //Whether to run nginx as a daemon. It should be set to off during debugging
master_process {on|off};    //Whether to run nginx in the master/worker model. It can be set to off during debugging
error_log Location level;    //Configure error log
error_ The position and level in the log can have the following options:
| position | level |
|---|---|
| file stderr syslog:server=address[,parameter=value] memory:size | Debug: to use the debug level, you need to use the – with debug option info notice warn error crit alert emerg when compiling nginx |
Configuration parameters necessary for normal operation
user USERNAME [GROUPNAME];    //Specify the users and groups that run the worker process
pid /path/to/pid_file;    //Specifies the pid file for the nginx daemon
worker_rlimit_nofile number;    //Set the maximum number of files that can be opened by all worker processes. The default is 1024
worker_rlimit_core size;    //Indicates the overall maximum core file size that can be used by all worker processes. Just keep the default
Configuration parameters for optimizing performance
worker_processes n;    //Start n worker processes. In order to avoid context switching, n here is usually set to the total number of cpu cores - 1 or equal to the total number of cores
worker_cpu_affinity cpumask ...;    //Bind the process to a cpu to avoid frequent cache refresh
//cpumask: use 8-bit binary to represent the cpu core, such as:
    0000 0001   //First cpu core
    0000 0010   //Second cpu core
    0000 0100   //The third cpu core
    0000 1000   //The fourth cpu core
    0001 0000   //The fifth cpu core
    0010 0000   //The sixth cpu core
    0100 0000   //The seventh cpu core
    1000 0000   //The eighth cpu core
timer_resolution interval;    //Timer resolution. Lowering this value reduces the number of gettimeofday() system calls
worker_priority number;    //Indicates the nice value of the worker process
Event related configuration: configuration parameters in the event {} section
accept_mutex {off|on};    //The load balancing lock used by the master when scheduling user requests to each worker process; on means that multiple workers can respond to new requests in turn and serially
lock_file file;    //accept_mutex file path used by mutex
use [epoll | rtsig | select | poll];    //Indicate the event model used, and it is recommended that nginx choose by itself
worker_connections #;    // The maximum number of connections each process can accept
Network connection related configuration parameters
keepalive_timeout number;    //Timeout length of long connection. The default value is 65s
keepalive_requests number;    //The maximum number of resources that can be requested on a long connection
keepalive_disable [msie6|safari|none];    //Disables long connections for the specified type of UserAgent
tcp_nodelay on|off;    //Use TCP for long connections_ The nodelay option is usually set to on in order to improve the user experience
client_header_timeout number;    //Timeout length of reading http request message header
client_body_timeout number;    //Timeout length for reading the body part of http request message
send_timeout number;    //Timeout length of sending response message
//Service control mode, using nginx command
    -t  //Check configuration file syntax
    -v  //Output the version of nginx
    -c  //Specifies the path to the configuration file
    -s  //Send the service control signal. The optional values are {stop | quit | reopen}

//When nginx is started by default, the configuration file used is the installation path / conf/nginx.conf file
//You can specify the configuration file to read with the - c option when you start nginx

//worker_processes n;  Start n worker processes
[root@localhost nginx]# vim conf/nginx.conf
worker_processes  4;
[root@localhost nginx]# sbin/nginx -s reload
[root@localhost nginx]# ps -ef | grep nginx
root        2109       1  0 00:31 ?        00:00:00 nginx: master process nginx
nginx     299949    2109  0 03:53 ?        00:00:00 nginx: worker process
nginx     299950    2109  0 03:53 ?        00:00:00 nginx: worker process
nginx     299951    2109  0 03:53 ?        00:00:00 nginx: worker process
nginx     299952    2109  0 03:53 ?        00:00:00 nginx: worker process
root      300290  190531  0 03:54 pts/0    00:00:00 grep --color=auto nginx

//Specify profile
[root@localhost nginx]# cp conf/nginx.conf /opt/
[root@localhost nginx]# cp conf/mime.types /opt/
[root@localhost nginx]# cd /opt/
[root@localhost opt]# ls
ansible.cfg  inventory  mime.types  nginx.conf
[root@localhost opt]# head nginx.conf

#user  nobody;
worker_processes  4;

error_log  logs/error.log;
#error_log  logs/error.log  notice;
#error_log  logs/error.log  info;

pid        logs/nginx.pid;
[root@localhost opt]# nginx -s stop
[root@localhost opt]# nginx -c /opt/nginx.conf
[root@localhost opt]# ps -ef | grep nginx
root      338126       1  0 04:17 ?        00:00:00 nginx: master process nginx -c /opt/nginx.conf
nginx     338127  338126  0 04:17 ?        00:00:00 nginx: worker process
nginx     338128  338126  0 04:17 ?        00:00:00 nginx: worker process
nginx     338129  338126  0 04:17 ?        00:00:00 nginx: worker process
nginx     338130  338126  0 04:17 ?        00:00:00 nginx: worker process
root      338468  190531  0 04:17 pts/0    00:00:00 grep --color=auto nginx

//daemon {on|off};    # Whether to run nginx as a daemon. It should be set to off during debugging
[root@localhost opt]# head nginx.conf

#user  nobody;
worker_processes  4;
daemon off;
error_log  logs/error.log;
#error_log  logs/error.log  notice;
#error_log  logs/error.log  info;

pid        logs/nginx.pid;

[root@localhost opt]# nginx -s stop ;nginx -c /opt/nginx.conf

//Whether to work in master/worker mode
[root@localhost opt]# vim nginx.conf
[root@localhost opt]# head nginx.conf
#user  nobody;
worker_processes  4;
#daemon off;
master_process off;
error_log  logs/error.log;
#error_log  logs/error.log  notice;
#error_log  logs/error.log  info;

pid        logs/nginx.pid;
[root@localhost opt]# nginx -s stop ;nginx -c /opt/nginx.conf
[root@localhost opt]# ps -ef | grep nginx
root      356124       1  0 04:27 ?        00:00:00 nginx -c /opt/nginx.conf
root      356852  190531  0 04:28 pts/0    00:00:00 grep --color=auto nginx

//error log settings
error Log is location Nginx The best tool for the problem, we can set it properly according to our own needs error The path and level of the log.
/path/file The parameter can be a specific file, for example, by default logs/error.log File, it's best to put it in a place with enough disk space;/path/file It can also be/dev/null,In this way, no logs will be output, which is also closed error The only means of logging;/path/file It can also be stderr,The log is output to a standard error file.
level Is the output level of the log. The value range is debug,info,notice,warn,error,crit,alert,emerg,The levels increase from left to right. When it is set to a level, logs greater than or equal to this level will be output to/path/file In the file, logs smaller than this level will not be output. For example, when set to error Level, error,crit,alert,emerg All level logs will be output.
If the set log level is debug,All logs will be output, so the amount of data will be large, which needs to be ensured in advance/path/file There is enough disk space on the disk.
be careful If the log level is set to debug,Must be configure Join when–with-debug Configuration item.

[root@localhost opt]# head nginx.conf

#user  nobody;
worker_processes  4;
#daemon off;
master_process off;
#error_log  logs/error.log;
#error_log  logs/error.log  notice;
error_log  logs/error.log  info;

pid        logs/nginx.pid;
[root@localhost opt]# cat /usr/local/nginx/logs/error.log
2021/10/24 23:50:27 [emerg] 166235#0: bind() to 0.0.0.0:80 failed (98: Address already in use)
2021/10/24 23:50:27 [emerg] 166235#0: bind() to 0.0.0.0:80 failed (98: Address already in use)
2021/10/24 23:50:27 [emerg] 166235#0: bind() to 0.0.0.0:80 failed (98: Address already in use)
2021/10/24 23:50:27 [emerg] 166235#0: bind() to 0.0.0.0:80 failed (98: Address already in use)
2021/10/24 23:50:27 [emerg] 166235#0: bind() to 0.0.0.0:80 failed (98: Address already in use)
2021/10/24 23:50:27 [emerg] 166235#0: still could not bind()
.......

[root@localhost opt]# head nginx.conf
#user  nobody;
worker_processes  4;
#daemon off;
master_process off;
#error_log  logs/error.log;
#error_log  logs/error.log  notice;
#error_log  logs/error.log  info;
error_log logs/error.log emerg;
[root@localhost opt]# nginx -s stop ;nginx -c /opt/nginx.conf
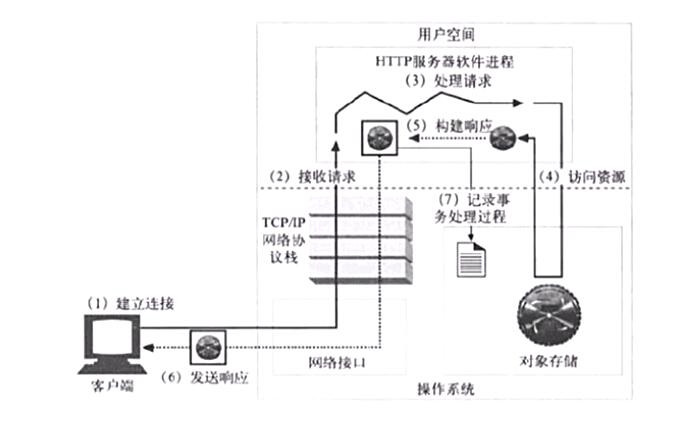
5.Web server resource request process
(1) Establish connection - accept a client connection or close it if you do not want to establish a connection with this client.
(2) Receive request - read an HTTP request message from the network.
(3) Process request - interpret the request message and take action.
(4) Access resource - access the resource specified in the message.
(5) Build response - creates an HTTP response message with the correct header.
(6) Send response - sends the response back to the client.
(7) Record transaction processing - records the contents related to completed transactions in a log file
opt/nginx.conf
## 5.Web server resource request process

(1)Establish connection - accept a client connection or close it if you do not want to establish a connection with this client.
(2)Receive request - read a message from the network HTTP Request message.
(3)Process request - interpret the request message and take action.
(4)Access resource - access the resource specified in the message.
(5)Build response - creates a response with the correct header HTTP Response message.
(6)Send response - sends the response back to the client.
(7)Record transaction processing - records the contents related to completed transactions in a log file

[External chain picture transfer...(img-xcTXFJDS-1635152019851)]