First of all, thank Xiaochen Master and Edison Chou for their reviews! Thank you for reading too!
Introduction
Usually, the resources and APIs exposed by services must be restricted to trusted specific users and clients. The first step in making API-level trust decisions is identity authentication -- determining whether a user's identity is reliable.
In micro-service scenarios, authentication is usually handled uniformly. There are generally two forms of implementation:
-
API Gateway Centralized Authentication: Require clients to access micro services through the Gateway. (This requires a security mechanism to authenticate that requests come from gateways.)
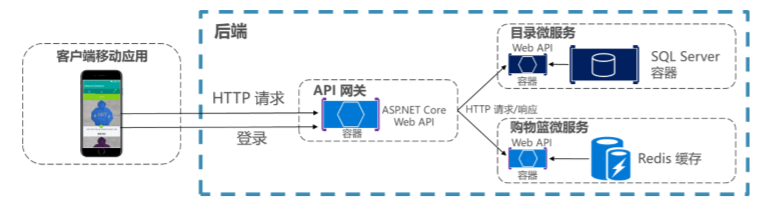 Centralized authentication based on API gateway
 -
Security Token Service (STS) Authentication: All clients first obtain the token from STS, and then carry the token to complete the authentication when they request.
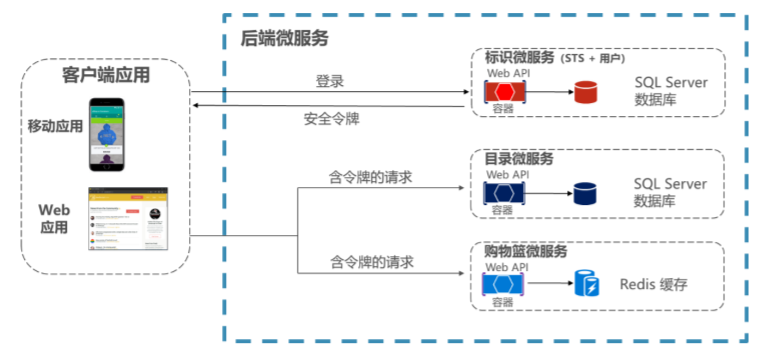 Security Token Service (STS) Authentication
The Identity microservice described in this section uses the second authentication method.
Service Brief
Identity microservice is mainly used for unified identity authentication and authorization, providing support for other services.
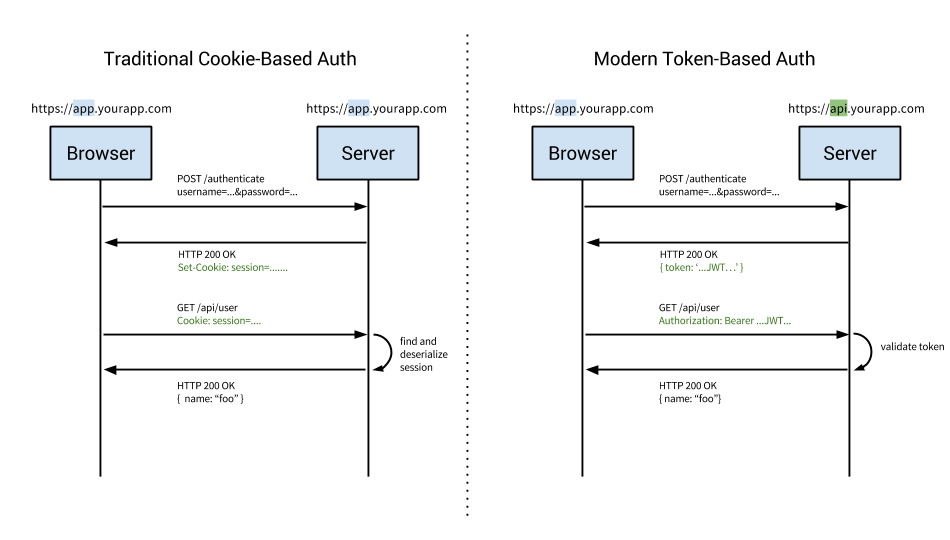
When it comes to authentication, the most familiar one is Cookie authentication, which is also the most used authentication method at present. But Cookie authentication also has its limitations: it does not support cross-domain, mobile unfriendly and so on. In view of the current architecture, cross-authentication and authorization among mobile, Web and micro-services need to be supported, so the traditional Cookie-based local authentication scheme is not feasible. We need to use remote authentication to provide a unified authentication and authorization mechanism.
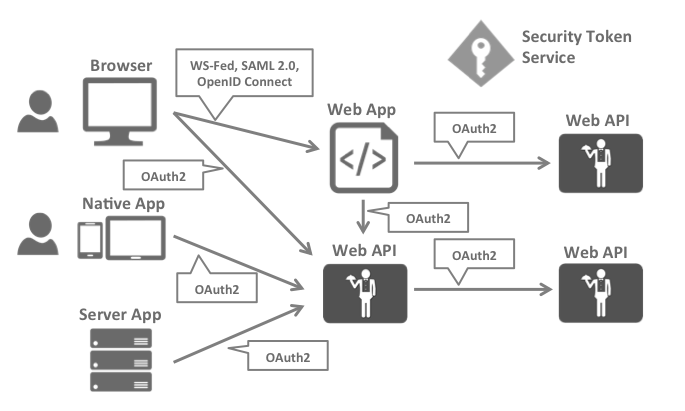
And remote authentication should belong to: OAuth2.0 and OpenID Connect. With the help of OAuth 2.0 and OpenID Connect, the authentication system similar to the following figure can be implemented:
And how to achieve it, with the help of:
- ASP.NET Core Identity
- IdentityServer4
The differences between ookie-based authentication and Token-based authentication are as follows:
Architecture mode
As a supporting service, the micro-service does not choose complex architecture mode. It uses MVC single-tier architecture and EF Core ORM framework for data persistence and SQL Server database. The default dependency injection framework was replaced by the Autofac IOC framework.
The project structure is as follows:

Core technology selection:
- MVC Single Layer Architecture
- EF Core
- ASP.NET Core Identity
- IdentityServer4
- SQL Server database
- Autofac
PS: Do not know ASP.NET Core Identity, Identity Server 4 and OAuth 2.0, please read the reference materials at the end of the article to make up for the lesson!!!
The following section focuses on the use of ASP.NET Core Identity and Identity Server 4 in this service.
Introduction to ASP.NET Core Identity & Identity Server 4
ASP.NET Core Identity is used to build membership system for ASP.NET Core Web applications, including membership, login and user data (including login information, roles and declarations).
ASP.NET Core Identity encapsulates identity information such as User, Role, Claim, etc. It is convenient for us to complete login function quickly, and supports third-party login (Google, Facebook, QQ, Weixin, etc.) to support out-of-the-box use.[ List of Third Party Identity Providers ] and dual authentication, with built-in support for Bearer authentication (token authentication).
Although ASP.NET Core Identity has accomplished most of its functions and supports third-party login (third-party issuing tokens for its users), to issue tokens for local users, it is necessary to implement the token issuance and authentication logic by itself. In other words, we need to implement the OpenId Connect protocol ourselves.
OpenID Connect 1.0 Based on OAuth 2.0 The simple identity layer above the protocol allows the client to ultimately confirm the identity of the end user and obtain basic user information based on the authentication results of the authorized server.
Identity Server 4 is an authentication and authorization middleware customized for ASP.NET Core, which implements OpenId Connect and OAuth 2.0 protocols. Identity Server 4 provides token issuance and authentication on the basis of ASP.NET Core Identity.
A Brief Introduction to Authentication Process
In ASP.NET Core, Claim-based authentication is used. What is Cliam?
Claim A statement about a subject of a person or organization, such as a person's name, role, personal preferences, race, privilege, community, ability, etc. It is essentially a key-value pair. It is a very general way to store user information. It can easily separate authentication from authorization. The former is used to indicate that the user is/No, the latter is used to indicate user capability./What can't be done? In the authentication stage, we get the user's information through the user's information. Claims,And that's what empowerment is about. Claims Verification, such as ownership Admin Role, name or not XXX Wait.
Authentication mainly deals with the following core objects:
- Claim (identity information)
- Claims Identity
- Claims Principal
- Authorization Token
- IAuthentication Scheme
- IAuthentication Handler (Authentication Processor Corresponding to Authentication Scheme)
- IAuthentication Service (providing a unified authentication service interface)
What is the certification process?
The user opens the login interface, enters the username password to login first, the server checks the username password validity first, and returns to the user instance (User) when it is valid, then enters the authentication preparation stage, creates the identity card (Claims Identity) according to the identity information carried by the user instance, and then gives the identity card to the holder of the identity card (Claims Principal). . Next, we enter the real authentication stage, using the corresponding authentication processor (IAuthentication Handler) to authenticate according to the configured authentication scheme. Authorization Token is issued after authentication is successful. The authorization token contains all the information required for subsequent authorization stages.
Brief introduction to authorization process
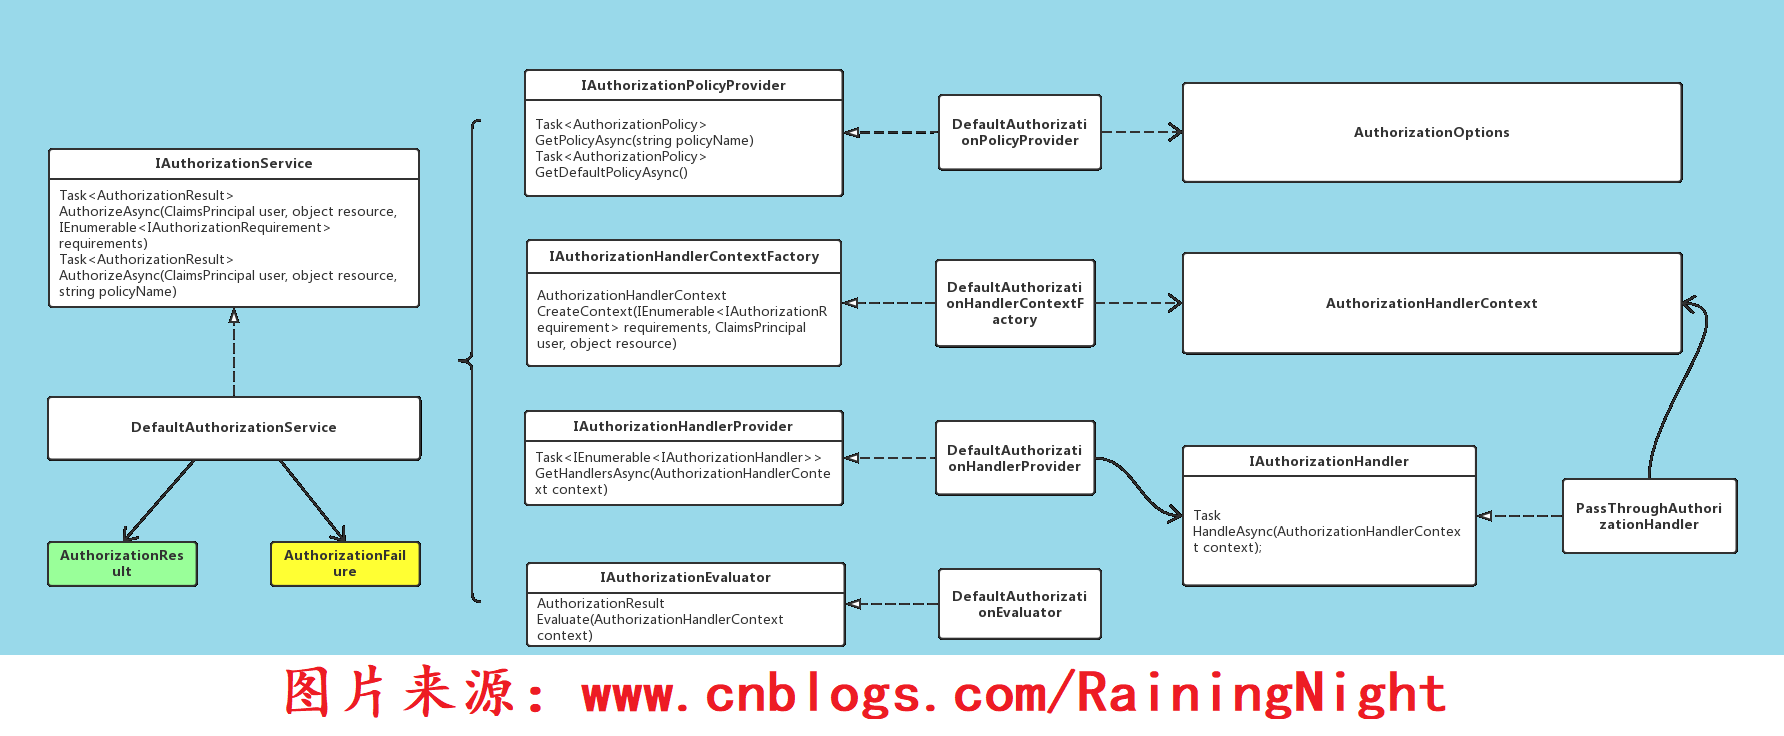
Authorization is the authentication of user identity information (Claims). Authorization can be divided into the following categories:
- Role-based authorization
- Authorization Based on Scheme s
- Policy-based authorization
Authorization deals mainly with the following core objects:
- IAuthorizationRequirement
- IAuthorizationService
- Authorization Policy
- IAuthorizationHandler
- Authorization Result
What is the authorization process?
When an authorization request is received, the IAuthorizationService determines whether the identity information contained in the authorization token satisfies the authorization condition and returns the authorization result according to the authorization condition (IAuthorizationRequirement) contained in the AuthorizationPolicy specified on the resource.
Middleware Integration
After a brief understanding of the authentication and authorization process, let's see how Identity microservice integrates related middleware.
1. First, map the User and Role of custom extensions
 // Mapping custom User, Role
services.AddIdentity<ApplicationUser, IdentityRole>()
    .AddEntityFrameworkStores<ApplicationDbContext>()//Configure to use EF persistent storage
    .AddDefaultTokenProviders();//Configure the default TokenProvider to generate Token when changing passwords and email
2. Configuring Identity Server Service
// Adds IdentityServer
services.AddIdentityServer(x =>
{
    x.IssuerUri = "null";
    x.Authentication.CookieLifetime = TimeSpan.FromHours(2);
})
.AddSigningCredential(Certificate.Get())
.AddAspNetIdentity<ApplicationUser>()
.AddConfigurationStore(options =>
{
    options.ConfigureDbContext = builder => builder.UseSqlServer(connectionString,
     sqlServerOptionsAction: sqlOptions =>
     {
         sqlOptions.MigrationsAssembly(migrationsAssembly);
         //Configuring Connection Resiliency: https://docs.microsoft.com/en-us/ef/core/miscellaneous/connection-resiliency
         sqlOptions.EnableRetryOnFailure(maxRetryCount: 15, maxRetryDelay: TimeSpan.FromSeconds(30), errorNumbersToAdd: null);
     });
})
.AddOperationalStore(options =>
{
    options.ConfigureDbContext = builder => builder.UseSqlServer(connectionString,
     sqlServerOptionsAction: sqlOptions =>
     {
         sqlOptions.MigrationsAssembly(migrationsAssembly);
         //Configuring Connection Resiliency: https://docs.microsoft.com/en-us/ef/core/miscellaneous/connection-resiliency
         sqlOptions.EnableRetryOnFailure(maxRetryCount: 15, maxRetryDelay: TimeSpan.FromSeconds(30), errorNumbersToAdd: null);
     });
})
.Services.AddTransient<IProfileService, ProfileService>();
Identity Server stores configuration data (client and resource) and operation data (token, code and user authorization information consents) directly in memory by default. This is obviously inappropriate in the production environment. If the host where the service is located goes down, the data in memory will be lost, so it is necessary to persist to the database.
Among them, AddConfiguration Store and AddOperational Store extension methods are used to specify configuration data and operation data for EF-based persistence.
3. Add Identity Server Middleware
public void Configure(IApplicationBuilder app, IHostingEnvironment env, ILoggerFactory loggerFactory)
{
     // .....
    // Adds IdentityServer
    app.UseIdentityServer();
}
4. Preset seed data
From a known architecture, we need to preset Client and Resource:
- Client
public static IEnumerable<Client> GetClients(Dictionary<string,string> clientsUrl)
{
    return new List<Client>
    {
        // SPA OpenId Client Client(Implicit)
        new Client
        // Xamarin Client(Hybrid)
        new Client
        // MVC Client(Hybrid)
        new Client
        // MVC TEST Client(Hybrid)
        new Client
        // Locations Swagger UI(Implicit)
        new Client
        // Marketing Swagger UI(Implicit)
        new Client
        // Basket Swagger UI(Implicit)
        new Client
        // Ordering Swagger UI(Implicit)
        new Client
        // Mobile Shopping Aggregattor Swagger UI(Implicit)
        new Client
        // Web Shopping Aggregattor Swagger UI(Implicit)
        new Client
    };
}
- IdentityResources
public static IEnumerable<IdentityResource> GetResources()
{
    return new List<IdentityResource>
    {
        new IdentityResources.OpenId(),
        new IdentityResources.Profile()
    };
}
- ApiResources
public static IEnumerable<ApiResource> GetApis()
{
    return new List<ApiResource>
    {
        new ApiResource("orders", "Orders Service"),
        new ApiResource("basket", "Basket Service"),
        new ApiResource("marketing", "Marketing Service"),
        new ApiResource("locations", "Locations Service"),
        new ApiResource("mobileshoppingagg", "Mobile Shopping Aggregator"),
        new ApiResource("webshoppingagg", "Web Shopping Aggregator"),
        new ApiResource("orders.signalrhub", "Ordering Signalr Hub")
    };
}
5. Migrating database context
Now let's migrate the seed data in advance to the database. What can we do? Identity Server defines DBContext for persistence for configuration data and operation data respectively. Configuration DbContext corresponds to configuration data and PersistedGrantDbContext corresponds to operation data. The code is as follows:
public static void Main(string[] args)
{
    BuildWebHost(args)
        .MigrateDbContext<PersistedGrantDbContext>((_, __) => { })//Migration operation database
        .MigrateDbContext<ApplicationDbContext>((context, services) =>
        {
            var env = services.GetService<IHostingEnvironment>();
            var logger = services.GetService<ILogger<ApplicationDbContextSeed>>();
            var settings = services.GetService<IOptions<AppSettings>>();

            new ApplicationDbContextSeed()
                .SeedAsync(context, env, logger, settings)
                .Wait();
        })//Migrating user databases
        .MigrateDbContext<ConfigurationDbContext>((context,services)=>
        {
            var configuration = services.GetService<IConfiguration>();

            new ConfigurationDbContextSeed()
                .SeedAsync(context, configuration)
                .Wait();
        })//Migration configuration database
        .Run();
}
So far, the core code of this service has been parsed.
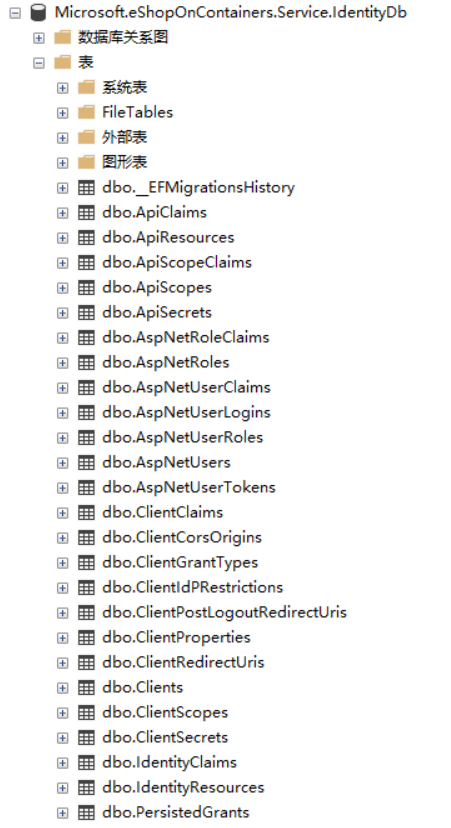
The resulting database is shown in the following figure:
Last
This paper analyses the service from business and technology, introduces its technical selection, and then briefly introduces ASP.NET Core Identity and Identity Server 4. Finally, it analyses the source code and unveils its mystery step by step. As for how clients and other micro services use Identity microservice to authenticate and authorize, I will explain it in a later article.
If you don't know much about ASP.NET Core Idenity and Identity Server 4, I suggest you read them in the blog park. Rainy night hazy,Dawn Master and Savorboard
After systematic study of the blog, reread this article, I believe you have a clear understanding of the implementation mechanism of Identity microservice.
Reference material
Rainy Night Obscurity - ASP.NET Core Authentication and Authorization: Initial Knowledge Authentication/Authorization
Savorboard - Introduction to Identity of ASP.NET Core (1)
Xiaochen Master - Identity Server (14) - Persistent configuration and manipulation of data through Entity Framework Core
Identity Server 4
How much does OAuth 2.0 know?