
Introduction: According to the needs of generating documents, find some introductions on CSDN to generate PDF blog posts from MARKDOWN documents. Test the printing effect according to the method they introduced. Especially for the cleaning of some newly added display elements in CSDN, a cleaner and complete PDF document can be generated.
Keywords: MarkDown, CSDN, PDF
§01 CSDN→PDF
1, Markdown editor for CSDN
the Markdown editor of CSDN is powerful and can contain rich content (text, formula, picture, dynamic diagram, table, flow chart, program code, film, etc.). Based on this editor, it is commonly used to:
- Edit wechat content and then use mdnice A vest is set outside to generate wechat tweets; In particular, CSDN allows you to paste and store pictures directly.
- Record the usual experimental research work. Thanks to the Markdown document, it is very convenient to record the experimental procedures, data, pictures and moving pictures.
- Record the work related to smart car competition. CSDN blog review is very rapid and 7 / 24, which is convenient for sorting out students' feedback in time, modifying and publishing relevant documents, and can achieve almost real-time.
it was sorted and released on CSDN yesterday Smart car competition rules (discussion draft) Quickly modify and iterate according to the students' feedback.
2, Convert Markdown file to PDF
it is still inconvenient to read the literature on the CSDN web page. If it is converted into PDF document, it is more convenient to print and read.
at present, the Markdown editor of CSDN only supports the output of Markdown files and HTML files, but does not support the output of Word and PDF files. If the Markdown file is downloaded and edited and displayed in the third-party MD editor, some CSDN Markdown features will be lost, and the display of some formulas and the drawing of flow chart will disappear.
according to the scheme introduced in many CSDN blog posts, the Markdown document is generated into PDF file by using the debugging function of Chrome browser itself. The following are related blog posts:
- Convert new CSDN articles to PDF and print (remove blank)
- How to convert CSDN article content to PDF
- CSDN blog to PDF
3, PDF conversion process
these methods generally follow the same process.
1. Open Chrome developer tools
you can directly open the developer tool interface of Chrome by pressing ctrl+shift+I on the Chome interface. Or open the developer tool interface through the developer tool under more tools in the menu in the upper right corner of the browser (with three vertical points). As shown in the figure below:

2. Paste the code in the Console interface
click the "console" page in the developer interface and paste the code in the input area below.
(1) Click "Console"
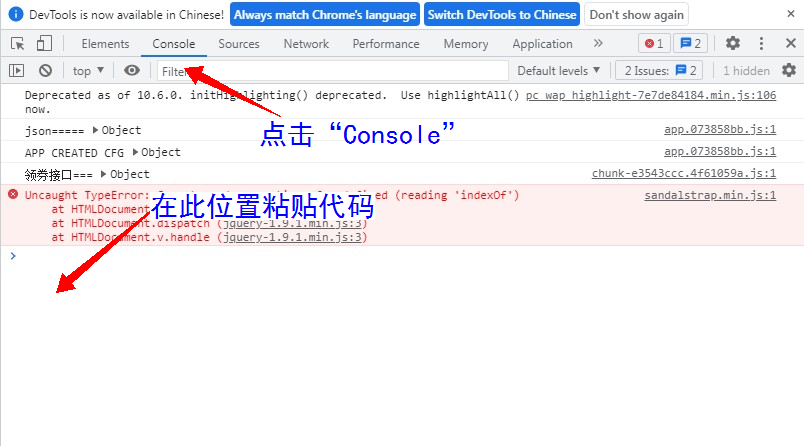
(2) Paste code
for CSDN page printing, paste the following code.
(function(){
    'use strict';
    var articleBox = $("div.article_content");
    articleBox.removeAttr("style");
    $("#btn-readmore").parent().remove();
    $("#side").remove();
    $("#comment_title, #comment_list, #comment_bar, #comment_form, .announce, #ad_cen, #ad_bot").remove();
    $(".nav_top_2011, #header, #navigator, #blogColumnPayAdvert, #toolBarBox, #csdn-copyright-footer").remove();
    $(".csdn-side-toolbar,.template-box,.reward-user-box").remove();
    $(".p4course_target, .comment-box, .recommend-box, #csdn-toolbar, #tool-box,#dmp_ad_58, .more-toolbox, .article-info-box, .btn-readmore").remove();
    $("aside").remove();
    $(".tool-box").remove();
    $("main").css('display','content');
    $("main").css('float','left');
    $("#mainBox").css('width','90%');
    $(".main_father.clearfix.d-flex.justify-content-center").css("width","90%"); //The key to incomplete display is to modify the scale of the width here
    window.print();																  // Change it to 90% and you can basically display the full text
})();
main functions of this Code:
- Streamline the CSDN web page, leaving only the middle display area;
- Generate the main display area and set the page width occupied by the display area;
- Open the page print display dialog box;
in the TEASOFT command environment, enter "cdpdf" to generate the above code in the front cutting board of Windows. Just use CTRL+V in the console input area to enter the code. Use the Enter key to execute the above code.
3. Page Print dialog box
after the code is executed, the print preview dialog box can pop up. In the pop-up print preview dialog box:
- Select destination printer: save as PDF
- Set page and layout;
- In more settings, define the paper size, number of worksheet pages and margins;
- More importantly, remove "header and footer" and "background graphics".
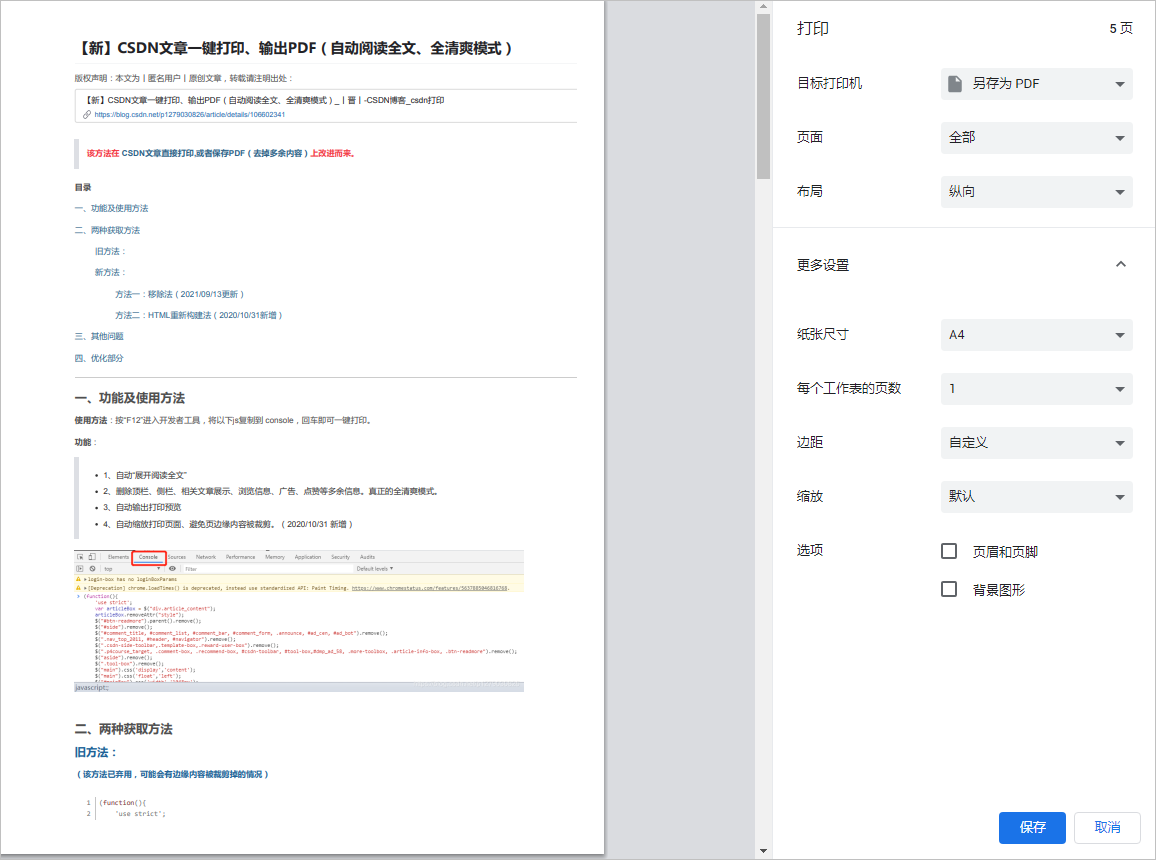
select Save to generate a clean and tidy PDF document.
4. Print example
1. Start printout
here's how to use Convert new CSDN articles to PDF and print (remove blank) The content of the PDF file printed out after the execution of the code.
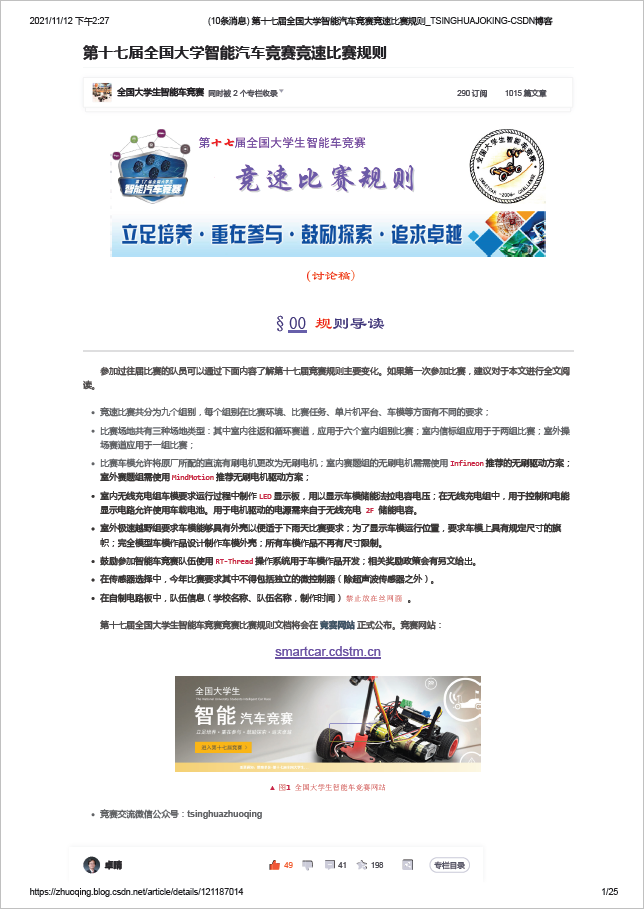
you can see that there are some unwanted contents in the output PDF page:
- The article contains the contents of the column, at the top of each page;
- Column directory status information, at the bottom of each page;
- Header and footer;
the page and footer information can be removed through the settings in the print preview. The other two contents are caused by the fact that the contents in the CSDN display page are not cleaned in the original code.
add a deletion to the pasted code to clean up the unnecessary parts of the printed page.
#blogColumnPayAdvert, #toolBarBox, #csdn-copyright-footer"
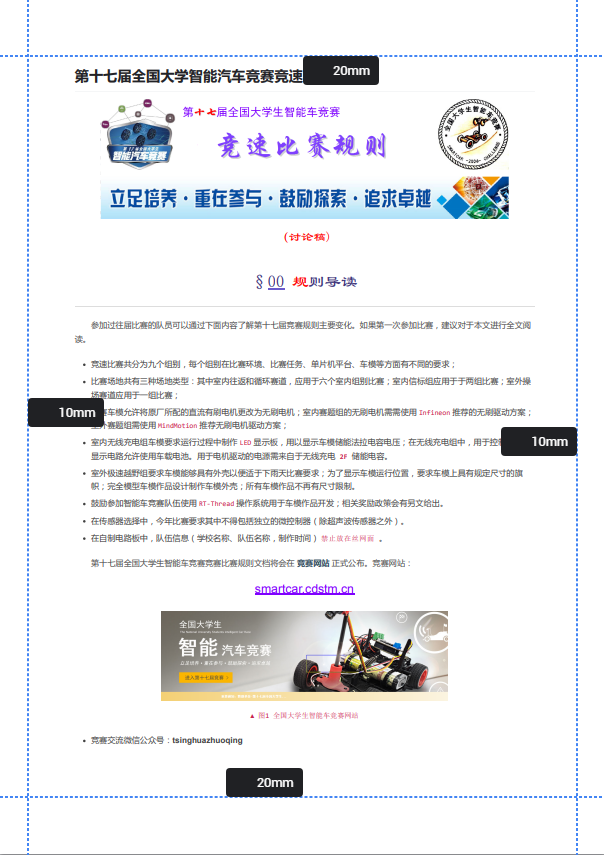
2. Latest printout
the following is the latest PDF generation page. You can see that the document page has been cleaned up to the greatest extent.

§ 02 how to organize pages?
in the CSDN display page, there are many display bars and toolbars unrelated to blog posts. Before printing with Chrome pages, you need to remove these information irrelevant to blog posts.

1, Remove page independent elements
1. Removal method
you can see that there are a large number of remove() commands to remove unnecessary elements in the page after pasting the first half of the code.
$("#btn-readmore").parent().remove();
$("#side").remove();
$("#comment_title, #comment_list, #comment_bar, #comment_form, .announce, #ad_cen, #ad_bot").remove();
$(".nav_top_2011, #header, #navigator, #blogColumnPayAdvert, #toolBarBox, #csdn-copyright-footer").remove();
$(".csdn-side-toolbar,.template-box,.reward-user-box").remove();
$(".p4course_target, .comment-box, .recommend-box, #csdn-toolbar, #tool-box,#dmp_ad_58, .more-toolbox, .article-info-box, .btn-readmore").remove();
$("aside").remove();
$(".tool-box").remove();
therefore, you can eliminate the relevant real elements by simply putting the id of the element to be removed into the above code.
2. How to locate the element ID?
how can I locate the id of a page element?
(1) Open developer tools
open the "developer Toolbar" according to the method given above. Switch to the corresponding "Element" page.
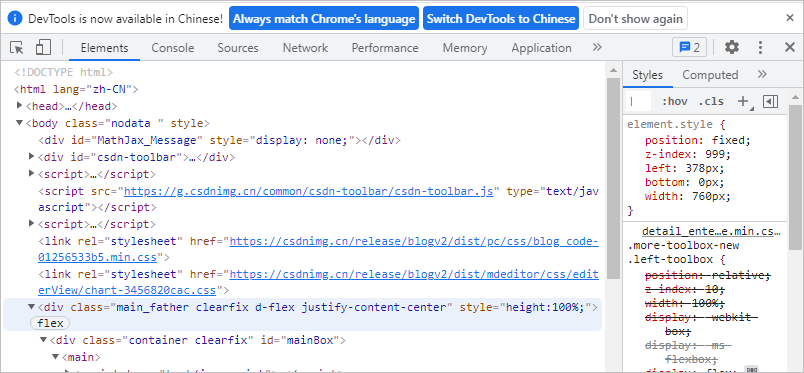
(2) Right click "check" command
on the page display Element, right-click the "check" command in the menu to synchronously display the corresponding code segment in the "Element" in the developer toolbar.
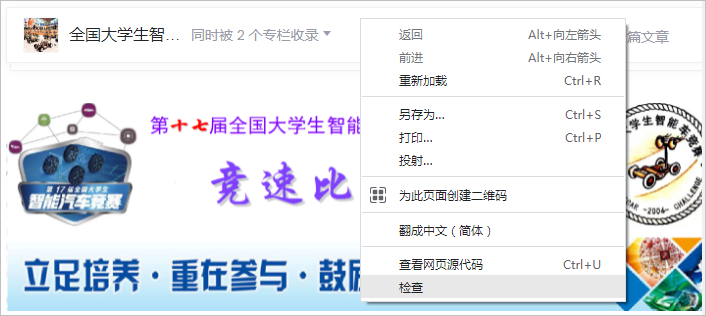
on the given code segment, you can find the corresponding ID string of the element code segment: id=toolBarBox.
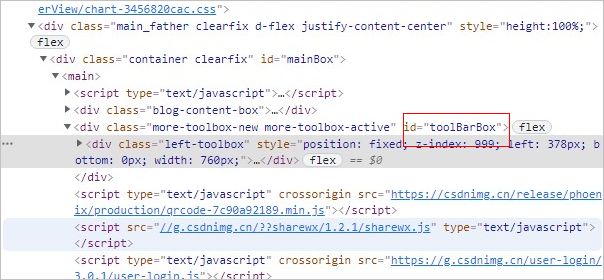
add #toolBarBox to the parameter in the remove() function of the pasted code above to remove the corresponding page element.
2, Modify page width
1. Modify width scale
in the previous paste code, modify the width proportion corresponding to "width" to adjust the display width of content in A4 page. The following code modifies the display width proportion to 90% and the content display proportion is appropriate.
(".main_father.clearfix.d-flex.justify-content-center").css("width","90%");
if the proportion of the width above is changed to 100%, the content on the right will exceed the boundary on the page.
2. Modify page height
set the print page margin through the print preview dialog box. It mainly modifies the height of the head and tail of the page, and can adjust the height of the printed content of each page.
※ content summary ※
according to the needs of generating documents, find some introductions on CSDN to generate PDF blog posts from MARKDOWN documents. Test the printing effect according to the method they introduced. Especially for the cleaning of some newly added display elements in CSDN, a cleaner and complete PDF document can be generated.
◎ CDPDF program
#The following is the program that automatically pastes the print script into the console command area of Chrome developer tools and executes it. It runs after using CTRL+SHIFT+I.
#!/usr/local/bin/python
# -*- coding: gbk -*-
#============================================================
# CDPDF.PY                     -- by Dr. ZhuoQing 2021-11-12
#
#   Usage:
#       Before using cdpdf, in Chrome, by CTRL+SHIFT+I to open
#       the developer tools windows of Chrome. Click "console"
#       to paste the following code into console. Press 'return'
#       to execute print dialog.
#
# Note:
#============================================================
from head import *
codestr = '''(function(){
    'use strict';
    var articleBox = $("div.article_content");
    articleBox.removeAttr("style");
    $("#btn-readmore").parent().remove();
    $("#side").remove();
    $("#comment_title, #comment_list, #comment_bar, #comment_form, .announce, #ad_cen, #ad_bot").remove();
    $(".nav_top_2011, #header, #navigator, #blogColumnPayAdvert, #toolBarBox, #csdn-copyright-footer").remove();
    $(".csdn-side-toolbar,.template-box,.reward-user-box").remove();
    $(".p4course_target, .comment-box, .recommend-box, #csdn-toolbar, #tool-box,#dmp_ad_58, .more-toolbox, .article-info-box, .btn-readmore").remove();
    $("aside").remove();
    $(".tool-box").remove();
    $("main").css('display','content');
    $("main").css('float','left');
    $("#mainBox").css('width','90%');
    $(".main_father.clearfix.d-flex.justify-content-center").css("width","90%"); //The key to incomplete display is to modify the scale of the width here
    window.print();																  // Change it to 90% and you can basically display the full text
})();'''
clipboard.copy(codestr)
printf('\a')
windtitle = tspgetwindowtitle()
printf(windtitle)
for s in windtitle:
    if s.find('CSDN Blog - Google Chrome') < 0: continue
    tspsendwindowkey(s, "v", control=1, noreturn=1)
    tspsendwindowkey(s, "\r")
    break
#------------------------------------------------------------
#        END OF FILE : CDPDF.PY
#============================================================
■ links to relevant literature:
- MDNICE allows you to focus only on content
- Racing rules of the 17th National University intelligent vehicle competition
- Convert new CSDN articles to PDF and print (remove blank)
- How to convert CSDN article content to PDF
- CSDN blog to PDF
● relevant chart links:
- Figure 1.3.1 opening the Chrome developer tool
- Figure 1.3.2 click Console and paste the code
- Figure 1.3.3 pop up print browse dialog box
- Figure 1.4.1 PDF sample of printout
- Figure 1.4.2 latest printout
- Figure 2.1 CSDN reading page
- Figure 2.1.1 open the developer tool and switch to the Element page
- Figure 2.1.2 right click on the display element and use the "check" command
- Figure 2.1.3 find the corresponding ID string
- Figure 2.2.1 setting print margins