Unification of cross-platform user experiences is on the rise: earlier iOS and Android had different experiences, but more recently they have become closer in terms of application design and interaction.From the bottom navigation of Android Nougat to the split screen feature, there are many similarities between the two platforms.For designers, we can design mainstream functionality into two platforms that are consistent (previously designed separately).This is a great opportunity for developers to improve their development skills.So we decided to develop a library of components for Android Bubble Selection - inspired by Apple Music Bubble Selection.

Design first
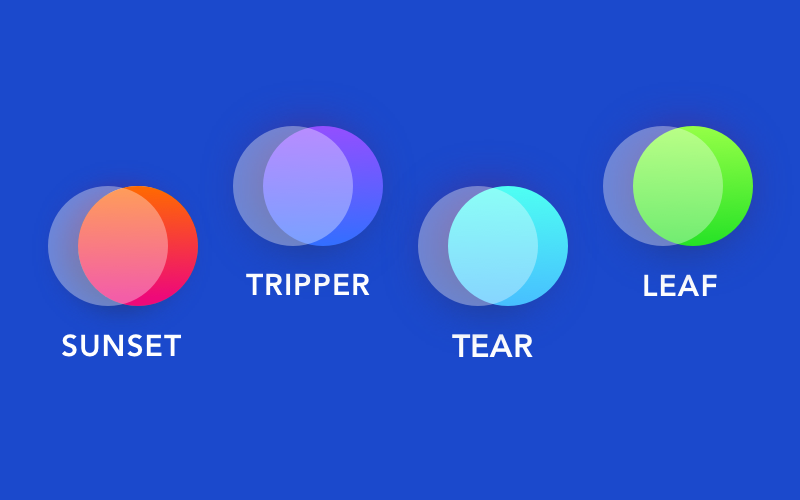
Our bubble selection animation is a good example, and it has the same appeal to different user groups.Bubbles summarize information in a convenient UI element that is easy to understand and visually consistent.It makes the interface simple enough for beginners and interesting for older drivers.
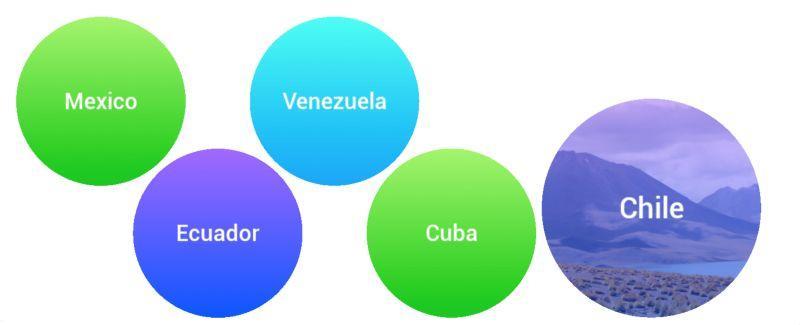
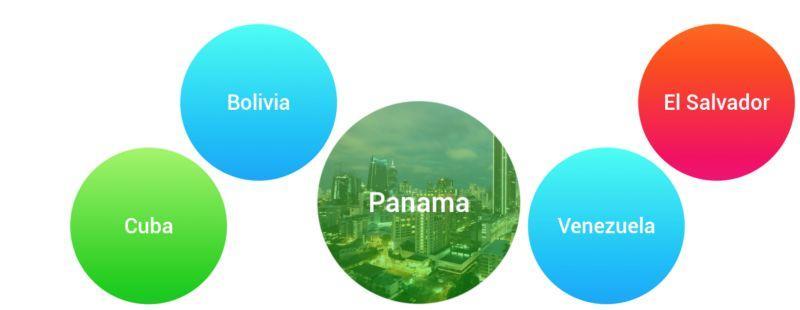
This animation type is very helpful for enriching the content of your application, mainly using the page when the user chooses from a range of options.For example, we use bubbles to select potential destination names in travel applications.Bubbles float freely, and when the user clicks on a bubble, the selected bubble becomes larger.This gives users deep feedback and enhances the intuitive experience of the operation.
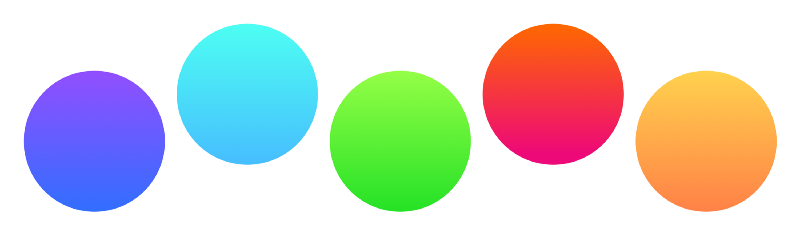
Components use a white theme with bright colors and pictures throughout.In addition, I decided to experiment with gradients to increase depth and volume.Gradients may be the main display feature that will attract the attention of new users.
Gradient of bubble selection
We allow developers to customize all UI elements, so our components are suitable for any application.
Take a look at the Developer Challenge
When I decided to implement this animation, the first question I faced was what tools to use to develop it.I knew that drawing animations so fast on Canvas was not efficient enough, so I decided to use OpenGL (Open Graphics Library).OpenGL is a cross-platform application development interface for 2D and 3D graphics drawing.Fortunately, Android supports a partial version of OpenGL.
I need to move circularly and naturally, just like bubbles in carbonated drinks.There are many physical engines available for Android, and I have specific needs that make choosing even more difficult.My requirement is that the engine be lightweight and easy to embed into the Android library.Most engines are developed for games, and they need to be engineered to fit them.It pays off, and I eventually found JBox2D (Java version of the C++ engine Box2D) because our animations don't need to support a large number of physical entities (such as 200+), so using a non-original Java engine is enough.
In addition, I will explain later in this article why I chose the Kotlin language for development and the benefits of doing so.You need to know more about the differences between Java and Kotlin to read my previous articles.
How do I create a shader?
First, we need to understand the underlying component triangle in OpenGL because it is the simplest shape similar to other shapes.So any graph you draw consists of one or more triangles.In animation, I use two associated triangles to represent an entity, so I draw a circle like a square.
Drawing a shape requires at least two shaders - the vertex shader and the segment shader.Their use can be distinguished by name.The vertex shader draws the vertices of each triangle, and the segment shader draws each pixel in the triangle.
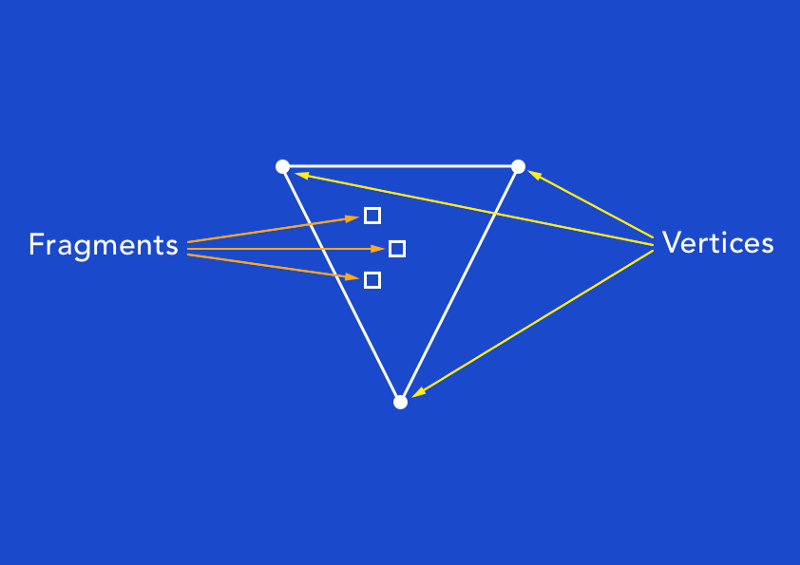
Segments and vertices of a triangle
The vertex shader controls the changes in the graphic (for example, size, position, rotation), and the segment shader controls the color of the shape.
// language=GLSL
val vertexShader = """
    uniform mat4 u_Matrix;
    attribute vec4 a_Position;
    attribute vec2 a_UV;
    varying vec2 v_UV;
    void main()
    {
        gl_Position = u_Matrix * a_Position;
        v_UV = a_UV;
    }
"""
Vertex Shader
// language=GLSL
val fragmentShader = """
    precision mediump float;
    uniform vec4 u_Background;
    uniform sampler2D u_Texture;
    varying vec2 v_UV;
    void main()
    {
        float distance = distance(vec2(0.5, 0.5), v_UV);
        gl_FragColor = mix(texture2D(u_Texture, v_UV), u_Background, smoothstep(0.49, 0.5, distance));
    }
"""
Fragment Shader
Shaders are written in GLSL (OpenGL Shading Language) and require runtime compilation.If your project uses Java, the easiest way is to write your shader in another file and read it using an input stream.As shown in the example code above, Kotlin can simply create a shader in a class.You can add any GLSL code in between.
There are many types of variables in GLSL:
-
The value of the uniform variable for vertices and fragments is the same
-
Each vertex has a different attribute variable
-
The varying variable is responsible for transferring data from the vertex shader to the fragment shader, and its values are inserted linearly by the fragment.
The u_Matrix variable contains a change matrix consisting of x and y at the initialization position of the circle. Obviously, its value is the same for all vertices of the graph. The type is uniform, but the positions of vertices are different, so the a_Position variable is of the attribute type.The a_UV variable serves two purposes:
-
Determines the distance between the current segment and the center of the square.Depending on this distance, I can adjust the color of the segment to create a circle.
-
Correctly place texture (photo and country name) at the center of the graphic.
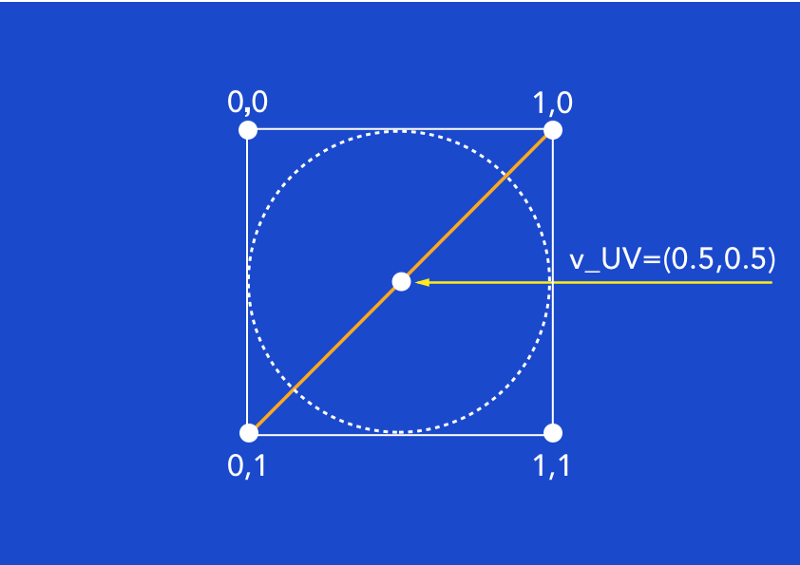
Center of circle
A_UV contains x and y, whose values vary from vertex to vertex and range from 0 to 1.I only included vertex shader a_UV and v_UV, so each segment can be inserted into v_UV.And the v_UV value for the center point of the fragment is [0.5, 0.5].I use the distance() method to calculate the distance between two points.
Draw a smooth circle using smoothstep
At first the segment shader looks different:
gl_FragColor = distance < 0.5 ? texture2D(u_Text, v_UV) : u_BgColor;
I did not use anti-aliasing to adjust the color of the segment based on the distance from the point to the center.Of course the result is not satisfactory - the edges of the circle are bumpy.
<figcaption style="margin: 5px 0px 0px; padding: 0px; max-width: 100%; box-sizing: border-box! Important; word-wrap: break-word! Important; text-align: center; color: RGB (136, 136); font-size: 14px;">serrated circle</figcaption>
The solution is smoothstep.It smoothly varies from 0 to 1 based on the distance from the starting point of the texture to the background transformation.So the transparency of texture is 1 at a distance of 0 to 0.49, and smoothly changes between 0, 0.49 and 0.5 when it is greater than or equal to 0.5, so that the edges of the circle are smooth.
<figcaption style="margin: 5px 0px 0px; padding: 0px; max-width: 100%; box-sizing: border-box! Important; word-wrap: break-word! Important; text-align: center; color: RGB (136, 136); font-size: 14px;">serrated circle</figcaption>
How do I use texture to display images and text in OpenGL?There are two states of a circle in an animation - Normal and Selected.The text of a circle in normal state contains both text and color, and the image in selected state.So I need to create two different textures for each circle.
I use Bitmap instances to create texture s and draw all elements.
fun bindTextures(textureIds: IntArray, index: Int) {
        texture = bindTexture(textureIds, index * 2, false)
        imageTexture = bindTexture(textureIds, index * 2 + 1, true)
    }

    private fun bindTexture(textureIds: IntArray, index: Int, withImage: Boolean): Int {
        glGenTextures(1, textureIds, index)
        createBitmap(withImage).toTexture(textureIds[index])
        return textureIds[index]
    }

    private fun createBitmap(withImage: Boolean): Bitmap {
        var bitmap = Bitmap.createBitmap(bitmapSize.toInt(), bitmapSize.toInt(), Bitmap.Config.ARGB_4444)
        val bitmapConfig: Bitmap.Config = bitmap.config ?: Bitmap.Config.ARGB_8888
        bitmap = bitmap.copy(bitmapConfig, true)

        val canvas = Canvas(bitmap)

        if (withImage) drawImage(canvas)
        drawBackground(canvas, withImage)
        drawText(canvas)

        return bitmap
    }

    private fun drawBackground(canvas: Canvas, withImage: Boolean) {
        ...
    }

    private fun drawText(canvas: Canvas) {
        ...
    }


    private fun drawImage(canvas: Canvas) {
        ...
    }
Then I assign the texture unit to the u_Text variable.I use the texture2() method to get the true color of the fragment, and texture2() receives two parameters: the position of the texture unit and the vertex of the fragment.
Use JBox2D to make bubbles move
It's very simple about the physical properties of animation.The primary object is the World instance, which is required for all entity creation.
class CircleBody(world: World, var position: Vec2, var radius: Float, var increasedRadius: Float) {

    val decreasedRadius: Float = radius
    val increasedDensity = 0.035f
    val decreasedDensity = 0.045f
    var isIncreasing = false
    var isDecreasing = false
    var physicalBody: Body
    var increased = false

    private val shape: CircleShape
        get() = CircleShape().apply {
            m_radius = radius + 0.01f
            m_p.set(Vec2(0f, 0f))
        }

    private val fixture: FixtureDef
        get() = FixtureDef().apply {
            this.shape = this@CircleBody.shape
            density = if (radius > decreasedRadius) decreasedDensity else increasedDensity
        }

    private val bodyDef: BodyDef
        get() = BodyDef().apply {
            type = BodyType.DYNAMIC
            this.position = this@CircleBody.position
        }

    init {
        physicalBody = world.createBody(bodyDef)
        physicalBody.createFixture(fixture)
    }

}
As you can see, creating an entity is simple: you need to specify its type (for example, dynamic, static, kinematic), location, radius, shape, density, and motion.
Every time you draw a picture, you need to call the World's step() method to move all the entities.You can then draw in the new location of the graph.
The problem I have is that the weight of the World can only be one direction, not one point.JBox2D does not support orbital gravity.So moving a circle to the center of the screen is impossible, so I can only do gravity on my own.
private val currentGravity: Float
        get() = if (touch) increasedGravity else gravity

private fun move(body: CircleBody) {
        body.physicalBody.apply {
            val direction = gravityCenter.sub(position)
            val distance = direction.length()
            val gravity = if (body.increased) 1.3f * currentGravity else currentGravity
            if (distance > step * 200) {
                applyForce(direction.mul(gravity / distance.sqr()), position)
            }
        }
}
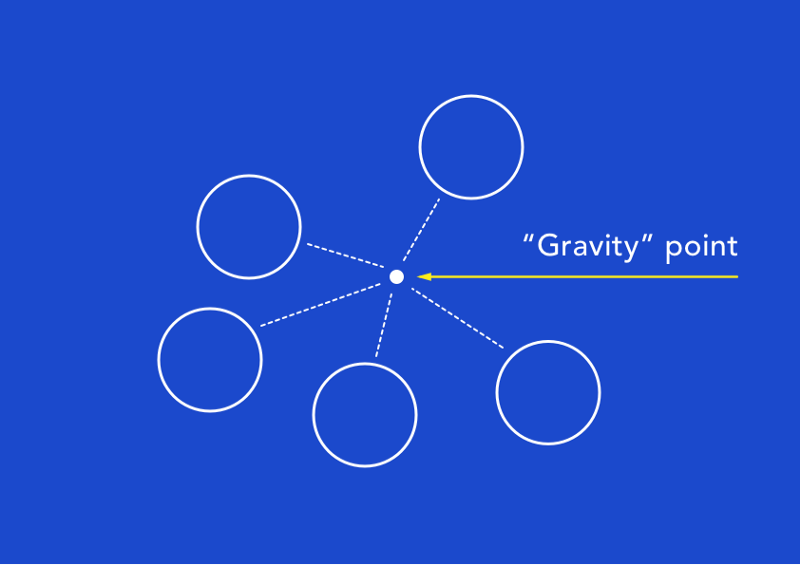
Gravitational Challenge
Every time a movement occurs, I calculate the magnitude of the force and use it for each entity, which looks like a circle is moving by gravitation.
Detect user touch events in GlSurfaceView
GLSurfaceView, like other Android view s, can respond to user clicks.
override fun onTouchEvent(event: MotionEvent): Boolean {
        when (event.action) {
            MotionEvent.ACTION_DOWN -> {
                startX = event.x
                startY = event.y
                previousX = event.x
                previousY = event.y
            }
            MotionEvent.ACTION_UP -> {
                if (isClick(event)) renderer.resize(event.x, event.y)
                renderer.release()
            }
            MotionEvent.ACTION_MOVE -> {
                if (isSwipe(event)) {
                    renderer.swipe(event.x, event.y)
                    previousX = event.x
                    previousY = event.y
                } else {
                    release()
                }
            }
            else -> release()
        }

        return true
}

private fun release() = postDelayed({ renderer.release() }, 1000)

private fun isClick(event: MotionEvent) = Math.abs(event.x - startX) < 20 && Math.abs(event.y - startY) < 20

private fun isSwipe(event: MotionEvent) = Math.abs(event.x - previousX) > 20 && Math.abs(event.y - previousY) > 20
GLSurfaceView intercepts all clicks and processes them with a renderer.
Renderer:
fun swipe(x: Float, y: Float) = Engine.swipe(x.convert(glView.width, scaleX),
            y.convert(glView.height, scaleY))

fun release() = Engine.release()

fun Float.convert(size: Int, scale: Float) = (2f * (this / size.toFloat()) - 1f) / scale
Engine:
fun swipe(x: Float, y: Float) {
        gravityCenter.set(x * 2, -y * 2)
        touch = true
}

fun release() {
        gravityCenter.setZero()
        touch = false
}
When the user clicks on the screen, I set the gravity center as the user click point, which looks like the user controls the movement of bubbles.When the user stops moving, I restore the bubbles to their original position.
Find bubbles by user clicking coordinates
When the user clicks on the circle, I get the screen click point from the onTouchEvent() method.But I also need to find the circle clicked on in the OpenGL coordinate system.The default center location coordinates for GLSurfaceView are [0, 0], and the x y values range from -1 to 1.So I need to consider the screen scale.
private fun getItem(position: Vec2) = position.let {
        val x = it.x.convert(glView.width, scaleX)
        val y = it.y.convert(glView.height, scaleY)
        circles.find { Math.sqrt(((x - it.x).sqr() + (y - it.y).sqr()).toDouble()) <= it.radius }
}
When I find the selected circle, I modify its radius and texture.
You can use this component at random!
Our components allow applications to be more focused, original and fun.Bubble Picker is available in the following ways:GitHub: https://github.com/igalata/Bubble-Picker
This is only the first version of the component, but we are sure to have subsequent iterations.We will support customizing the physical properties of bubbles and adding animated images through url s.In addition, we plan to add some new features (for example, removing bubbles). How to Become an Android Architect?(Architecture Video + Interview Document + Learning Notes)