[External chain picture transfer failed, source station may have anti-theft chain mechanism, it is recommended to save the picture and upload it directly (img-6ljXK6PO-1579487161655). (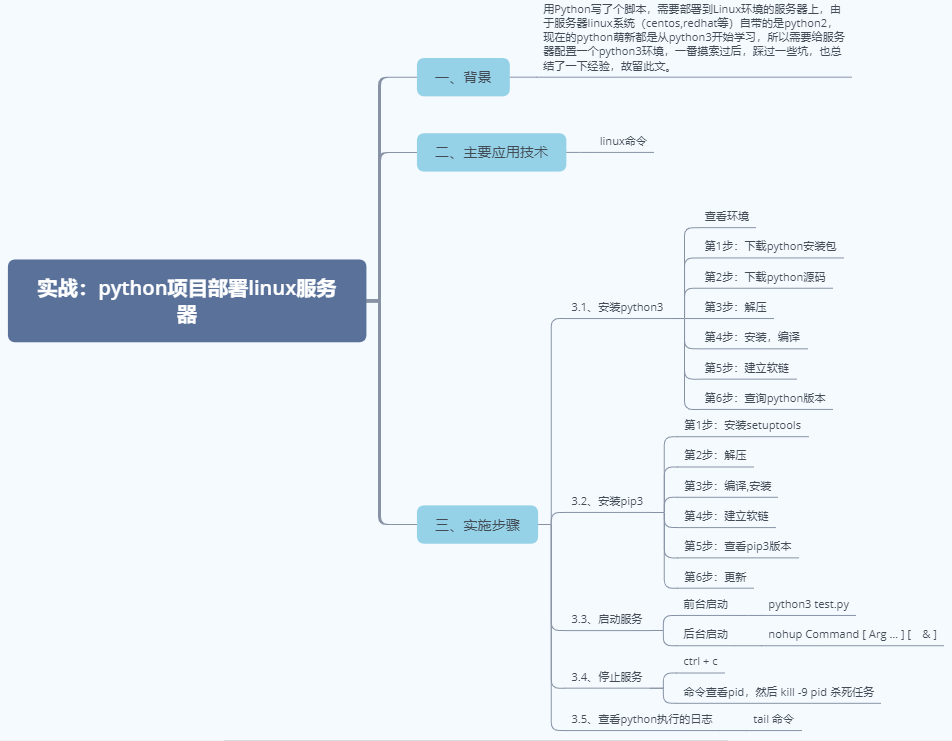 ])
])
1. Case Background
Write a script with Python and deploy it to a server in Linux environment. Since the server linux system (centos, redhats, etc.) comes with python2, Python is now learning from python3, so you need to configure a python3 environment for the server. After some exploration, you step through some pits and summarize your experience, so leave this article.
2. Main Applied Technologies
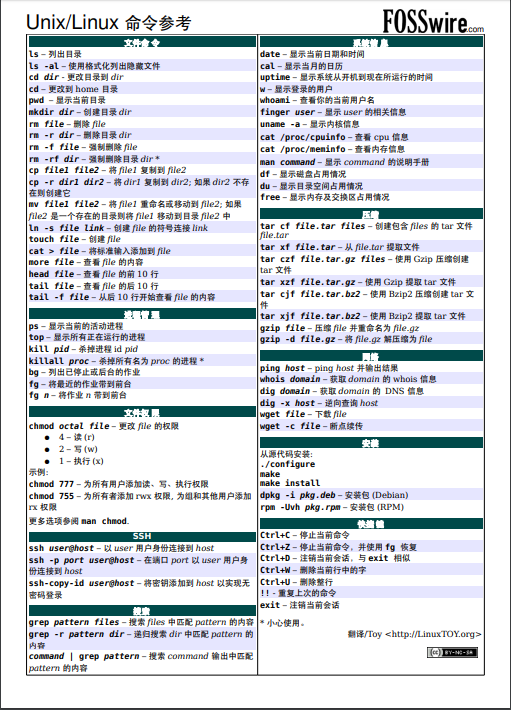
2.1, linux commands
**3. Implementation Steps**
3.1. Install python3
Before starting the installation, look at the machine's environment, mainly its environment and python version.
View Environment
Operating System:
[root@reportweb]#  cat /etc/redhat-release
CentOS release 6.5 (Final)
View the python version:
[root@reportweb]# python -V
Python 2.6.6


[root@reportweb]# python3 -V
-bash: python3: command not found
You can see that the operating system is CentOS 6.5, and python has only one python2 and no python 3.
Start the formal installation below:
Step 1: Download the python installation package to prepare the compilation environment:
[root@reportweb]# yum install zlib-devel bzip2-devel openssl-devel ncurses-devel sqlite-devel readline-devel tk-devel gcc make
Step 2: Download python source
[root@reportweb src]# wget https://www.python.org/ftp/python/3.6.6/Python-3.6.6.tgz
Step 3: Unzip
[root@reportweb src]# tar -zxvf Python-3.6.6.tgz
Step 4: Install, compile
[root@reportweb src]# cd Python-3.6.2
[root@reportweb Python-3.6.2] # mkdir /usr/local/python3.6
[root@reportweb Python-3.6.2] # ./configure --prefix=/usr/local/python3.6
[root@reportweb Python-3.6.2] # make
[root@reportweb Python-3.6.2] # make install
Step 5: Build a soft chain
[root@reportweb Python-3.6.2] # ln -s /usr/local/python3.6/bin/python3.6 /usr/bin/python3
Step 6: Query the python version
[root@reportweb]# python3 -V
Python 3.6.6

[root@reportweb]# python -V
Python 2.6.6
At this point, python3 has been installed.
3.2. Install pip3
Start the steps below to install pip3.
Step 1: Install setuptools
[root@reportweb src]# wget --no-check-certificate https://pypi.python.org/packages/source/s/setuptools/setuptools-19.6.tar.gz#md5=c607dd118eae682c44ed146367a17e26
Step 2: Unzip
[root@reportweb src]# tar -zxvf setuptools-19.6.tar.gz
Step 3: Compile, Install
[root@reportweb src] # cd setuptools-19.6/
[root@reportweb setuptools-19.6] # python3 setup.py build
[root@reportweb setuptools-19.6] # python3 setup.py install
Step 4: Build a soft chain
[root@reportweb setuptools-19.6] # ln -s /usr/local/python3.6/bin/pip3 /usr/bin/pip3
Step 5: View the pip3 version
[root@reportweb] # pip3 -V
pip 8.0.2 from /usr/local/python3.6/lib/python3.6/site-packages/pip-8.0.2-py3.6.egg (python 3.6)
Step 6: Update
[root@reportweb] # pip3 install --upgrade pip
Collecting pip
  Downloading https://files.pythonhosted.org/packages/00/b6/9cfa56b4081ad13874b0c6f96af8ce16cfbc1cb06bedf8e9164ce5551ec1/pip-19.3.1-py2.py3-none-any.whl (1.4MB)
    100% |████████████████████████████████| 1.4MB 172kB/s
Installing collected packages: pip
  Found existing installation: pip 8.0.2
    Uninstalling pip-8.0.2:
      Successfully uninstalled pip-8.0.2
Successfully installed pip-19.3.1
[root@reportweb]# pip3 -V
pip 19.3.1 from /usr/local/python3.6/lib/python3.6/site-packages/pip (python 3.6)
At this point, the pip3 installation is complete.
3.3. Start Services
Startup services are divided into foreground startup and background startup.
Foreground startup means that the application runs directly from the window and can print out the log information directly in the window. If the manual ctrl + C interrupts, the application stops.When using the foreground boot, if we exit the terminal, the service will stop.
Background startup is the execution of an application using commands such as nohup, which can still run in the background after the window closes or when other commands are executed.
Use the foreground to launch the python project:
[root@reportweb]# python3 test.py
2020-01-02 16:00:47 Read original log information:00:00:01.560 [http-nio-8605-exec-5] [DEBUG] Bound request context to thread: org.apache.catalina.connector.RequestFacade@2dc071e6 org.springframework.boot.web.filter.OrderedRequestContextFilter [RID:] [TID:] [MID:]
2020-01-02 16:00:47 Pre-format information: 00:00:01.560 [http-nio-8605-exec-5] [DEBUG] Bound request context to thread: org.apache.catalina.connector.RequestFacade@2dc071e6 org.springframework.boot.web.filter.OrderedRequestContextFilter [RID:] [TID:] [MID:]
^CTraceback (most recent call last):
  File "test.py", line 174, in <module>
    read_rawlog()
  File "test.py", line 79, in read_rawlog
    line_json = log_data_to_json(line_temp)
  File "test.py", line 120, in log_data_to_json
    logger = re.findall(logger_rule, line)
  File "/usr/python3/lib/python3.6/re.py", line 222, in findall
    return _compile(pattern, flags).findall(string)
KeyboardInterrupt
[root@reportweb data]#
The foreground will output normal log information until you press ctrl + c to interrupt it, and KeyboardInterrupt will be reported.
The following demonstrates background boot python files:
[root@reportweb data]# nohup python3 test.py &
A brief introduction to the nohup command
Purpose: Run commands without interruption.
Syntax: nohup Command [Arg...] [&]
Description: If you are running a process and you do not think it will end when you exit the account, you can use the nohup command.This command allows you to continue running the process after you exit the account/close the terminal.Nohup means no hang up.Nohup execution automatically generates a nohup.out record file by default.
3.4. Stop Services
The service started by the foreground, stopped directly by ctrl + c, or quit the terminal, the service will stop.
Background started services, view PIDs with commands, and kill-9 pid kills the task.
[root@reportweb]# ps -ef|grep python
root      9233  2598 95 16:22 pts/0    00:00:16 python3 test.py
root      9244  2598  0 16:22 pts/0    00:00:00 grep python
[root@reportweb]# kill -9 9233
[root@reportweb]# ps -ef|grep python
[root@reportweb]# ps -ef|grep python
root      9257  2598  0 16:23 pts/0    00:00:00 grep python
[1]+  Killed               nohup python3 test.py
3.5. View the log of python execution
View the first 10 commands:
[root@reportweb]# head -n 10 nohup.out

View the last 10 commands:
[root@reportweb]# tail -n 10 nohup.out

Display the contents of the file nohup.log from line 20 to the end of the file:
[root@reportweb]# tail +20 nohup.out

To track the growth of a file named nohup.log, type the following command:
[root@reportweb]# tail -f nohup.out
Tail-f filename displays the contents at the end of the filename file on the screen and refreshes constantly, so as long as the filename is updated, you can see the latest file contents.
Command format:
tail [parameter] [file]
Parameters:
-f Loop Read
-q does not display processing information
-v Displays detailed processing information
-c<number>number of bytes displayed
-n<number of lines>Show n lines at the end of the file
- pid=PID with -f to indicate the end of process ID after PID dies
-q, --quiet, --silent never outputs the first part of the given file name
-s, --sleep-interval=S in conjunction with-f, meaning to sleep for S seconds at each recurring interval

