1. Three installation methods of hive
Three installation methods of Hive are introduced on Hive official website, corresponding to different application scenarios. In the final analysis, the storage location of metadata is different.
- Embedded mode (metadata is saved in the embedded derby database, allowing one session link, and an error will be reported when trying multiple session links)
- Local mode (install mysql locally instead of derby to store metadata)
- Remote mode (remote installation of mysql instead of derby to store metadata)
From the user level, the first method only allows one user to operate hive, which is generally used for testing; the second and third methods allow multiple users to operate at the same time, also known as multi-user mode.
1.1 embedded mode
This mode connects to an in memory database Derby, which is generally used for Unit Test. When using Derby storage mode, running hive will generate a derby file and a Metastore? DB directory in the current directory. The disadvantage of this storage method is that only one hive client can use the database in the same directory at the same time. The operational database is not visible to other users. The architecture is as follows: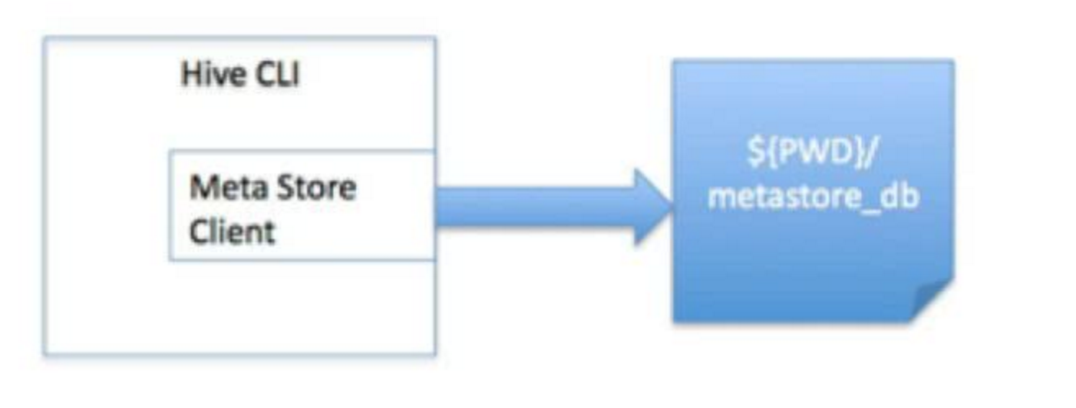
1.2 local mode
This storage mode requires running a mysql server locally. The architecture is as follows: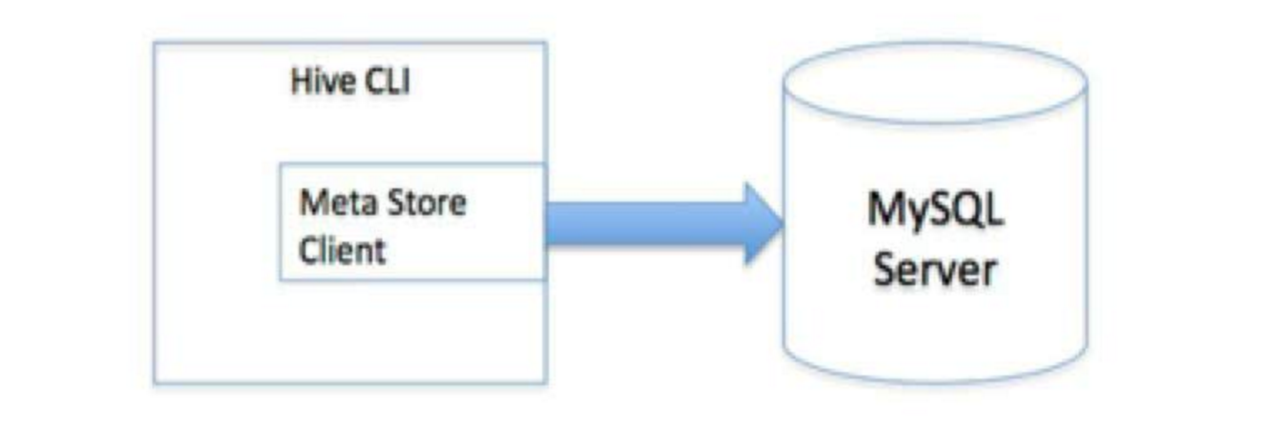
1.3 remote mode
The remote server mode enables non Java clients to access the metabase as well. Start MetaStoreServer on the hive server side, and the client uses Thrift protocol to access the Metadatabase through MetaStoreServer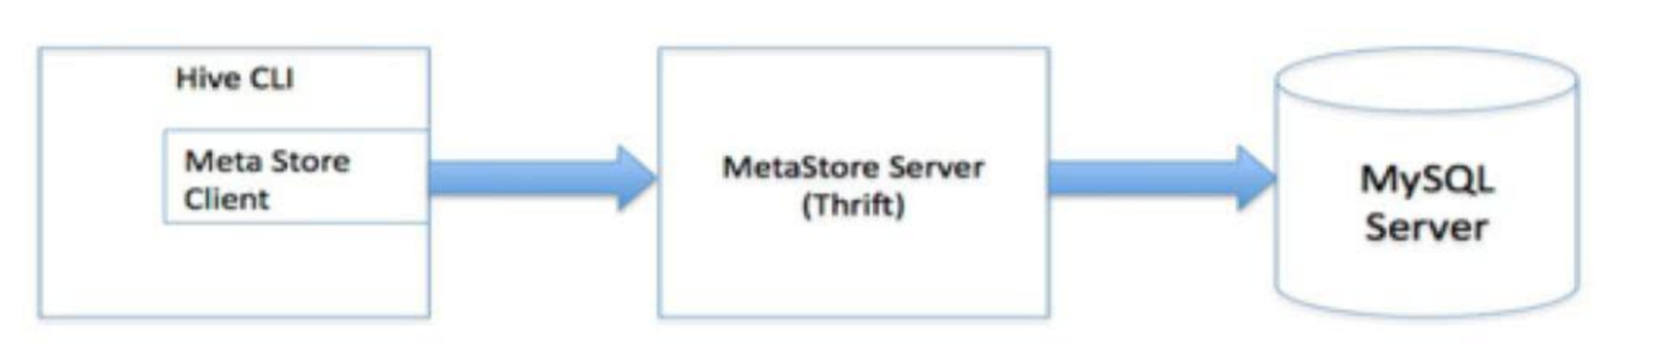
2.hive installation method
The third way is remote installation.
2.1 install mysql
Install mysql on Hadoop 02. After the installation, start to create the hive related database.
Check whether the service starts: service mysql status, and start MySQL: service mysql start. Then log in to MySQL using root.
##Landing mysql
[root@hadoop02 mysql]# mysql -h 127.0.0.1 -uroot -p111111
##Create hive database
mysql> create database hive;
##Create hive user and set password
mysql> create user 'hive'@'%' identified by '111111';
##To grant authorization
mysql> grant all privileges on hive.* to 'hive'@'%';
##Refresh authority
mysql> flush privileges;
2.2 download hive installation package
Download link: apache-hive-2.3.6-bin.tar.gz
2.3 upload the installation package and decompress it
Upload the installation package to / home/hdp/app/hive directory on Hadoop 01, and extract:
[hdp@hadoop01 hive]$ tar -zxvf apache-hive-2.3.6-bin.tar.gz
Add environment variables and add the following at the bottom of / etc/profile:
export HIVE_HOME=/home/hdp/app/hive/apache-hive-2.3.6-bin
export HIVE_CONF_DIR=${HIVE_HOME}/conf
export PATH=${HIVE_HOME}/bin:$PATH
2.4 configure hive
Enter / home/hdp/app/hive/apache-hive-2.3.6-bin/conf to start hive configuration
2.4.1 hive-site.xml
Copy the configuration template to generate a hive configuration file:
[hdp@hadoop01 conf]$ cp hive-default.xml.template hive-site.xml
The configuration contents are as follows:
<?xml version="1.0"?> <?xml-stylesheet type="text/xsl" href="configuration.xsl"?> <configuration> <property> <name>hive.default.fileformat</name> <value>TextFile</value> </property> <property> <name>hive.metastore.warehouse.dir</name> <value>hdfs:///hive/warehouse</value> </property> <property> <name>javax.jdo.option.ConnectionURL</name> <value>jdbc:mysql://192.168.136.102:3306/hive?createDatabaseIfNotExist=true&useSSL=false</value> </property> <property> <name>javax.jdo.option.ConnectionDriverName</name> <value>com.mysql.jdbc.Driver</value> </property> <property> <name>javax.jdo.option.ConnectionUserName</name> <value>hive</value> </property> <property> <name>javax.jdo.option.ConnectionPassword</name> <value>111111</value> </property> <property> <name>hive.metastore.local</name> <value>false</value> </property> <property> <name>hive.metastore.uris</name> <value>thrift://192.168.136.101:9083</value> </property> </configuration>
2.4.2 hive env.sh configuration
Copy the template file to generate hive-env.sh
[hdp@hadoop01 conf]$ cp hive-env.sh.template hive-env.sh
Edit hiv-env.sh and add at the end:
export HADOOP_HOME=/home/hdp/app/hadoop/hadoop-2.4.1
export HIVE_CONF_DIR=/home/hdp/app/hive/apache-hive-2.3.6-bin/conf
export HIVE_AUX_JARS_PATH=/home/hdp/app/hive/apache-hive-2.3.6-bin/lib
2.4.3 upload mysql driver
Upload MySQL driver mysql-connector-java-5.1.38.jar to / home/hdp/app/hive/apache-hive-2.3.6-bin/lib directory.
2.4.4 replace the jline.jar package
Copy the jline-2.12.jar package under / home/hdp/app/hive/apache-hive-2.3.6-bin/lib to hadoop? Home / share / hadoop / yarn / lib, and delete the original jline package of hadoop.
2.4.5 initialize hive metabase
[hdp@hadoop01 bin]$ cd /home/hdp/app/hive/apache-hive-2.3.6-bin/bin
[hdp@hadoop01 bin]$ schematool -initSchema -dbType mysql
3. start hive
3.1 start the hive server program
[hdp@hadoop01 bin]$ hive --service metastore
3.2 connect through hive client
[hdp@hadoop01 bin]$ hive
After connecting hive, start to operate hive

