1 Preface
- One MySQL host in the production environment has a single point of failure, so we want to make sure that MySQL is highly available, that is, two MySQLs
Server If one of the MySQL servers hangs up, the other can take over immediately. - MySQL's highly available solutions are generally as follows:
- keepalived+dual master
- MHA
- PXC
- MMM
- Heartbeat+DRBD, etc., keepalived+duplex, MHA and PXC are commonly used.
- This section focuses on keeping alived for high availability of MySQL databases.Keepalived+mysql dual master to implement MySQL-HA, we must ensure that the data of the two MySQL databases are exactly the same. The basic idea is that the two MySQL databases are mutually dominant and subordinate (dual-master). Configuring virtual IP through Keepalivedwill enable the application to switch to another MySQL database automatically after one of the MySQL databases is down and ensure high availability of the system.
2 Environment
- OS version: CentOS7
- MySQL version: mysql-5.7.28-el7-x86_64.tar.gz
- keepalived version: keepalived-2.0.20.tar.gz
- MySQL-master1: 192.168.200.88
- MySQL-master2: 192.168.200.89
- VIP: 192.168.200.200
- Client: 192.168.200.87
!!!Close the firewall, close selinux, time synchronization!!!
3 Binary Installation of MySQL
3.1 Installation Packages
# yum -y install libaio
3.2 Create Users and Groups
# groupadd mysql && useradd -r -g mysql -s /bin/false mysql
3.3 Preparer Files
# cd /usr/local/src/
# tar xf mysql-5.7.28-el7-x86_64.tar.gz -C /usr/local/
# cd /usr/local/
# ln -s mysql-5.7.28-el7-x86_64/ mysql
# chown -R mysql.mysql mysql
3.4 Preparing environment variables
# echo 'PATH=/usr/local/mysql/bin:$PATH' > /etc/profile.d/mysql.sh
# source /etc/profile.d/mysql.sh
3.5 Generating database files
# mysqld --initialize --user=mysql --datadir=/data/mysql
# mysqld --initialize --user=mysql --datadir=/data/mysql
···ellipsis···
2020-06-03T08:47:23.556966Z 1 [Note] A temporary password is generated for root@localhost: (1BfO&>qmvo,  #Note the generated temporary password, which you will need to use later
3.6 Preparing configuration files
# cp /etc/my.cnf{,.bak}
# vim /etc/my.cnf
[mysqld]
datadir=/data/mysql
socket=/data/mysql/mysql.sock
log-error=/data/mysql/mysql.log
pid-file=/data/mysql/mysql.pid

[client]
socket=/data/mysql/mysql.sock
3.7 Preparing service scripts and starting services
# cp /usr/local/mysql/support-files/mysql.server /etc/init.d/mysqld
# chkconfig --add mysqld
# service mysqld start
3.8 Modify initial secret
# mysqladmin -uroot -p'(1BfO&>qmvo,' password 123.com
 The initial password is the one that was just temporarily generated
3.9 Test Login
# mysql -uroot -p123.com
mysql: [Warning] Using a password on the command line interface can be insecure.
Welcome to the MySQL monitor.  Commands end with ; or \g.
Your MySQL connection id is 9
Server version: 5.7.28-log MySQL Community Server (GPL)

Copyright (c) 2000, 2019, Oracle and/or its affiliates. All rights reserved.

Oracle is a registered trademark of Oracle Corporation and/or its
affiliates. Other names may be trademarks of their respective
owners.

Type 'help;' or '\h' for help. Type '\c' to clear the current input statement.

mysql>
The same is true for another MySQL, and it's important to note that the temporarily generated password needs to be modified.
4 Configure 2 MySQL s for primary synchronization
-
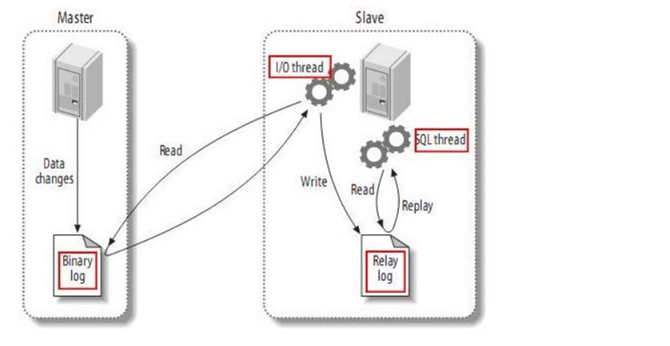
The first part of the process is master logging binary logs.The master logs these changes in the second log before each transaction updates the data.MySQL writes transactions to the binary log.When the event is written to the binary log, the master notifies the storage engine to commit the transaction.
-
The next step is for slave to copy master's binary log to its own relay log.First, slave starts a worker thread, the I/O thread.The I/O thread opens a normal connection on the master and begins the binlog dump process.Binlog dump process reads events from master's binary log, and if master has been synchronized, it sleeps and waits for master to generate new events.The I/O threads write these events to the relay log.
- SQL slave thread (SQL slave thread) handles the last step of the process.The SQL thread reads events from the relay log and replays them to update the slave's data to match that in the master.As long as the thread is consistent with the I/O thread, relay logs are usually in the OS cache, so the cost of relay logs is minimal.
Master master synchronization is the relationship between two machines and each other. Writes are synchronized on either machine.If the MySQL host opens the firewall, you need to close the firewall or create rules.
4.1 Modify MySQL configuration file
Both MySQL have to turn on bin log logging by adding the log-bin=MySQL-bin option to the MySQL configuration file [MySQLd] section. The server-ID s of both MySQL cannot be the same. By default, the serverID s of both MySQL are 1, and one needs to be modified to 2.
Configuration of replication in 4.1.1 master 1
log-bin = mysql-bin
binlog_format = mixed
server-id = 1
relay-log = relay-bin
relay-log-index = slave-relay-bin.index
auto-increment-increment = 2
auto-increment-offset = 1
Configuration of replication in 4.1.2 Master 2
log-bin = mysql-bin
binlog_format = mixed
server-id = 2
relay-log = relay-bin
relay-log-index = slave-relay-bin.index
auto-increment-increment = 2
auto-increment-offset = 2
Note: Only server-id and auto-increment-offset are different for master1 and master2.mysql has a self-growing field, and there are two related configurations to set self-growing when doing primary synchronization of the database: auto_increment_offset and auto_increment_increment.auto-increment-increment represents the increment of each increment from the growth field, and its default value is 1.Its value should be set to the total number of servers in the entire structure. In this case, two servers are used, so the value is set to 2.Auto-increment-offset is used to set the starting point (i.e., the initial value) for automatic growth in the database, because both energy servers set an auto-growth value of 2 at a time, so they must start from a different point in order to avoid primary key conflicts when data is synchronized between the two servers.
Note: You canMy.cnfAdd "binlog_to file"Do_Db=database name"configuration item (you can add more than one) to specify the database to synchronize
4.2 Set master 1 as master 2's master server
4.2.1 Create Authorized Account
mysql> GRANT REPLICATION SLAVE ON *.* TO 'rep'@'192.168.200.89' IDENTIFIED BY '123.com'
4.2.2 View master 1's current binlog status information
mysql> show master status;
+------------------+----------+--------------+------------------+-------------------+
| File             | Position | Binlog_Do_DB | Binlog_Ignore_DB | Executed_Gtid_Set |
+------------------+----------+--------------+------------------+-------------------+
| mysql-bin.000001 |      154 |              |                  |                   |
+------------------+----------+--------------+------------------+-------------------+
1 row in set (0.00 sec)
4.2.3 Make master 1 your own master server on Master 2 and turn on slave functionality
mysql> CHANGE MASTER TO
    -> MASTER_HOST='192.168.200.88',
    -> MASTER_USER='rep',
    -> MASTER_PASSWORD='123.com',
    -> MASTER_PORT=3306,
    -> MASTER_LOG_FILE='mysql-bin.000001',
    -> MASTER_LOG_POS=154;
Query OK, 0 rows affected, 2 warnings (0.00 sec)

mysql> start slave;
Query OK, 0 rows affected (0.00 sec)
4.2.4 View synchronization status
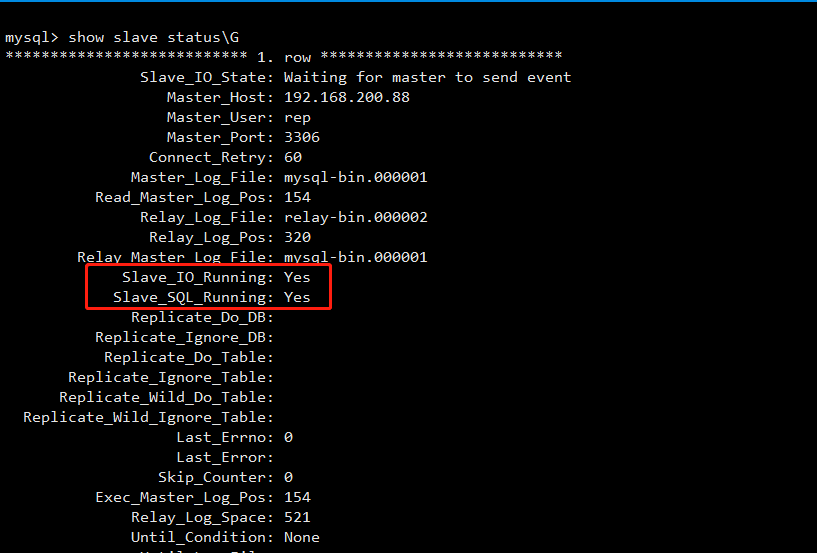
Slave_IO_Running and lave_SQL_The Running values must be Yes to indicate that the server can be properly connected from the server
4.3 Set Master 2 as master 1's master server
4.3.1 Create Authorized Account
mysql> GRANT REPLICATION SLAVE ON *.* TO 'rep'@'192.168.200.88' IDENTIFIED BY '123.com'
4.3.2 View master 2's current binlog status information
mysql> show master status;
+------------------+----------+--------------+------------------+-------------------+
| File             | Position | Binlog_Do_DB | Binlog_Ignore_DB | Executed_Gtid_Set |
+------------------+----------+--------------+------------------+-------------------+
| mysql-bin.000001 |      154 |              |                  |                   |
+------------------+----------+--------------+------------------+-------------------+
1 row in set (0.00 sec)
4.3.3 Make Master 2 your own master server on master 1 and turn on slave functionality
mysql> CHANGE MASTER TO
-> MASTER_HOST='192.168.200.89',
-> MASTER_USER='rep',
-> MASTER_PASSWORD='123.com',
-> MASTER_PORT=3306,
-> MASTER_LOG_FILE='mysql-bin.000001',
-> MASTER_LOG_POS=154;
Query OK, 0 rows affected, 2 warnings (0.00 sec)
mysql> start slave;
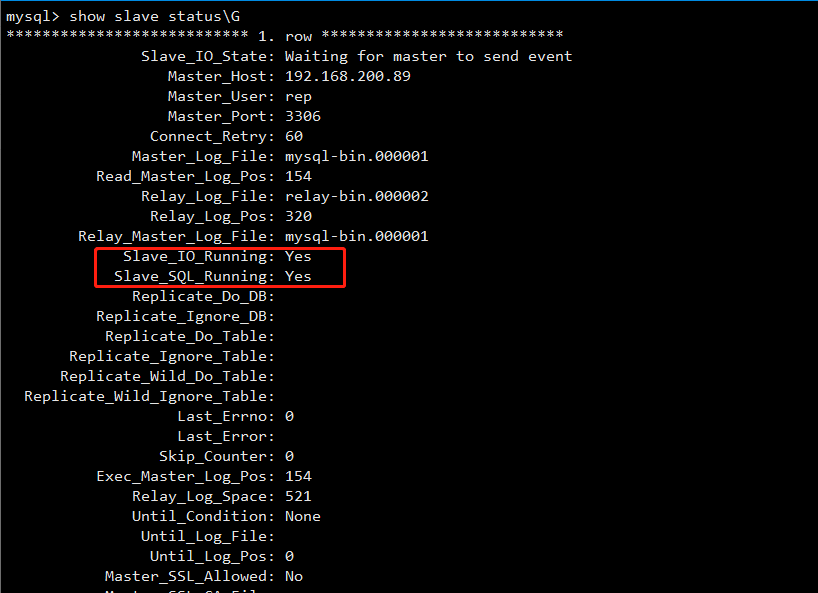
Query OK, 0 rows affected (0.00 sec)4.3.4 View synchronization status
4.4 Test Master Master Synchronization
Create databases to synchronize on master1, such as test_db, and in test_Create a test table in DB such as tab1 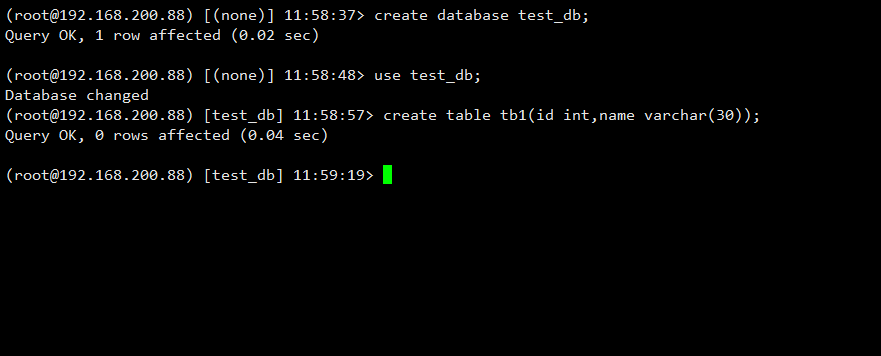
Check to see if master 2 host synchronizes data changes on master 1 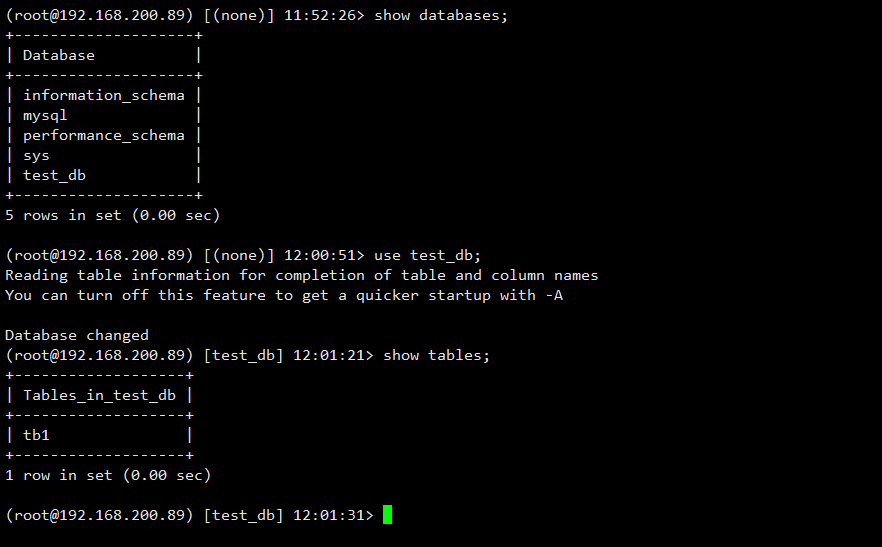
From the figure above, you can see that master 2 synchronizes master's data changes
Insert data into tab1 table on Master 2 host 
Check master 1 host to see if data changes on Master 2 are synchronized 
Update data on any MySQL will now be synchronized to another MySQL, and MySQL synchronization is complete.
Note: If the master MYSQL server already exists and is only built later from the MYSQL server, the master MYSQL server's database to be synchronized should be copied from the MYSQL server before configuring data synchronization (such as backing up the database on the master MYSQL before restoring it from the MYSQL server with backup)
5 Installation Configuration keepalived
Next we'll complete the high availability of keepalived.
- keepalived is a software solution that ensures high availability of clusters in cluster management. It functions like heartbeat and prevents single point failures keepalivedis based on VRRP protocol, which is called Virtual Router Redundancy Protocol (VRRP).
- Virtual Routing Redundancy Protocol, which can be considered as a highly available protocol for routers, consists of N routers that provide the same functionality into a router group, which has a master and multiple backups, a master with an external vip, and a master with multicast (the multicast address is 224.0.0.18), which is considered when the backup does not receive VRRP packets.Master is down, so you need to elect a backup to be master based on the priority of the VRRP.This ensures high availability of the router.
- Keepalived has three main modules, core, check and vrrp.The core module, which is the core of keepalived, is responsible for the startup, maintenance of the main process, and loading and parsing of the global configuration file.Check is responsible for health checks, including common checks (mode 1:tcp_check works on the fourth level.Mode 2: http_get, works in Layer 5, executes an HTTP request to the specified URL, encrypts the result with md5 and compares it with the specified md5 value to see if it matches or removes the mismatch from the server pool.Mode 3:ssl_get:and http_get is similar.Mode 4:misc_check: Use script to detect.Mode 5: smtp_check: SMTP used to detect mail services.)The VRRP module is to implement the VRRP protocol.
5.1 Install keepalived
The following actions are the same in master1 and master2
# tar xf keepalived-2.0.20.tar.gz
# cd keepalived-2.0.20/
# ./configure --prefix=/apps/keepalived
# make -j $(lscpu | awk 'NR==4{print $2}') && make install
5.2 Modify keepalived profile
keepalived has only one profileKeepalived.confWhich mainly includes the following configuration areas, global_defs, vrrp_instance and virtual_server.
- global_defs: Mainly configure the notification object and machine identification when a failure occurs.
- vrrp_instance: Used to define VIP regions and their associated properties for external service delivery.
- virtual_server: virtual server definition
On 5.2.1 master 1 hostKeepalived.confFile Modification
# mkdir /etc/keepalived
# cp /apps/keepalived/etc/keepalived/keepalived.conf /etc/keepalived/
# cat /etc/keepalived/keepalived.conf
! Configuration File for keepalived //! Indicates a comment

global_defs {
   router_id mysql-1 //Represents an identity that runs a keepalived server
}

vrrp_instance VI_1 {
    state BACKUP //Specify the role of keepalived, both configurations are BACKUP here, set as BACKUP will decide primary or secondary according to priority
    interface eth0 //Specify interfaces for HA monitoring network
    virtual_router_id 51 //Virtual Routing Identification, which is a number (values between 0 and 255, used to distinguish multiple
instance Of VRRP Multicast),Same vrrp Instances use unique identities,Ensure and master2 Same, this must be different for different clusters within the same network,Otherwise, a conflict occurs.
    priority 100 //To elect master, the value range is 1-255 (in this range)
//Otherwise, it will be recognized as the default value of 100, where 50 is set on Master 2
    advert_int 1 //The interval at which VRRP packages are issued, that is, how often a master election is held (which can be considered a health check)
//Check interval)
    authentication { //Authentication area, the authentication types are PASS and HA (IPSEC), PASS is recommended (password only recognizes the first 8 digits)
        auth_type PASS
        auth_pass 1111
    }
    virtual_ipaddress {  //vip area, specify vip address
        192.168.200.200
    }
}
virtual_server 192.168.200.200 3306 { //To set up a virtual server, you need to specify a virtual IP address and service port.
IP Separate ports with spaces
    delay_loop 2 //Set run time in seconds
    lb_algo rr  //Set the backend scheduling algorithm, where rr is the polling algorithm
    lb_kind DR //Set up the mechanism of LVS to achieve load balancing, there are three modes: NAT, TUN and DR.
    persistence_timeout 50 //Session hold time in seconds.This option is useful for dynamic web pages and provides a good solution for session sharing in clustered systems.With this session retention feature, requests from users are distributed to a service node until the session is held longer.
    protocol TCP //Specify the type of forwarding protocol, TCP and UDP
    real_server 192.168.200.88 3306 { //Configuring service node 1 requires specifying the real server's real IP address and
//Ports, IP separated by spaces
        weight 1  //Configure the weight of the service node. The size of the weight is expressed as a number. The larger the number, the higher the weight, and the setup weight
//Value size to distinguish between different performance servers
        notify_down /etc/keepalived/bin/mysql.sh //Script executed after realserver's mysql service down load is detected
        TCP_CHECK {
           connect_timeout 3  //Connection timeout
           nb_get_retry 3 //Number of reconnections
           delay_before_retry 3 //Reconnection Interval Time
           connect_port 3306 //Health Check Port
        }
    }
}
On 5.2.2 Master 2 hostKeepalived.confFile Modification
Master2 Host'sKeepalived.confFile configuration is basically the same as master 1, except router_id, priority,
Real_Three different servers, the other configurations are the same
# mkdir /etc/keepalived
# cp /apps/keepalived/etc/keepalived/keepalived.conf /etc/keepalived/
# cat /etc/keepalived/keepalived.conf
! Configuration File for keepalived

global_defs {
   router_id mysql-2
}

vrrp_instance VI_1 {
    state BACKUP
    interface eth0
    virtual_router_id 51
    priority 50
    advert_int 1
    authentication {
        auth_type PASS
        auth_pass 1111
    }
    virtual_ipaddress {
        192.168.200.200
    }
}
virtual_server 192.168.200.200 3306 {
    delay_loop 2
    lb_algo rr
    lb_kind DR
    persistence_timeout 50
    protocol TCP
    real_server 192.168.200.89 3306 {
        weight 1
        notify_down /etc/keepalived/bin/mysql.sh
        TCP_CHECK {
           connect_timeout 3
           nb_get_retry 3
           delay_before_retry 3
           connect_port 3306
        }
    }
}
5.2.3 Start keepalived on master1 and master2 and set startup
# systemctl enable --now keepalived
5.3 Add detection scripts on master1 and master2
The function is to automatically turn off the local keepalived when mysql stops working, thereby removing the faulty machine (since only the local realserver is added to keepalived on each machine) and manually start the keepalived service when mysqld starts up normally.
# mkdir /etc/keepalived/bin
# cat /etc/keepalived/bin/mysql.sh
#!/bin/bash
systemctl stop keepalived
(/sbin/ifdown eth0 && /sbin/ifup eth0)
# chmod +x /etc/keepalived/bin/mysql.sh
6 Tests
Execute ip addr show dev eth0 commands on master1 and master2 to see how master 1 and master2 control VIP (Cluster Virtual IP).
master1 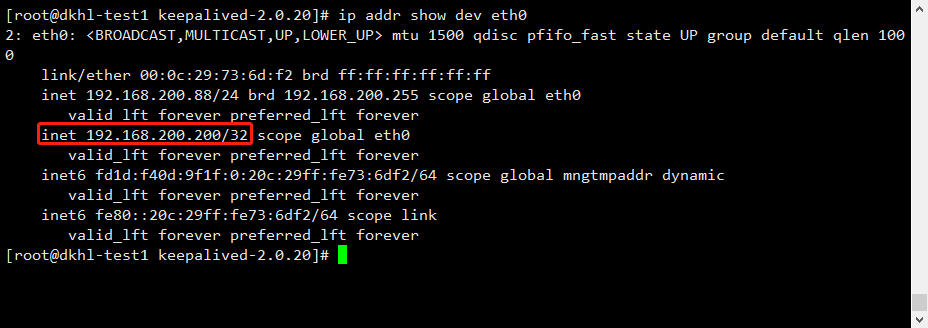
master2 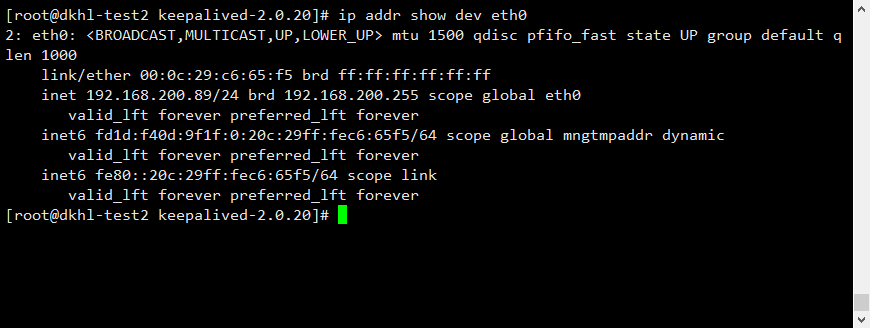
From the diagram above, you can see that master 1 is the primary server and master 2 is the standby server.
6.1 Stop the MySQL service to see if the keepalived health checker triggers the scripts we write
6.1.1 Stop mysql service of master 1 host

The log corresponding to 6.1.2 also has detailed output

6.1.3 Check for vip on Master 2

6.1.4 Related log information

This means that stopping the MySQL service on the primary service triggered the scripts we wrote to automatically fail over.
6.2 MySQL remote login test
6.2.1 Authorization on master 1 and master2
(root@192.168.200.88) [(none)] 03:26:45> GRANT ALL PRIVILEGES ON *.* TO 'root'@'%' IDENTIFIED BY '123.com';
(root@192.168.200.89) [(none)] 03:26:45> GRANT ALL PRIVILEGES ON *.* TO 'root'@'%' IDENTIFIED BY '123.com';
6.2.2 Testing login on client

The diagram above shows that when a VIP address is accessed on the client side, it is responded by the master 1 host because master 1 is currently the master server, stops the mysql service of master 1, and executes show variables like'server_on the client sideId'; 
The diagram above shows that query requests on the client side are responded by the master 2 host.Failure switch succeeded.
7 Summary:
Keepalived+mysql dual master Generally speaking, this architecture is the most effortless for small and medium-sized enterprises.After the master node fails, fast switching to the standby node takes advantage of the highly available keepalived mechanism.In this scenario, there are several things to note:
- 1) When using keepalived as a highly available scheme, it is better for both nodes to be set to BACKUP mode to avoid conflicts caused by unexpected preemption of each other (such as cleft brain) that results in writing the same data to both nodes;
- 2) Put auto_of two nodesIncrement_Increment (self-increasing step) and auto_increment_offset is set to a different value.The purpose is to avoid the unexpected downtime of master nodes, which may result in some binlog s not being copied to slaves in time for application, resulting in conflicts between the self-added value of slaves'newly written data and the original master, and thus making them staggered at first; of course, you can also avoid this if an appropriate fault-tolerant mechanism can resolve the conflict between the self-added ID of the master.
- 3) Do not poorly configure slave node servers, otherwise replication delays are more likely to occur.As a slave server of hot standby node, hardware configuration cannot be lower than master node;
- 4) If you are sensitive to latency issues, consider using a MariaDB branch version, or go online directly to the latest version of MySQL 5.7, where multithreaded replication can greatly reduce replication latency;