I. Introduction to MHA
Author brief introduction
Song xinjiafan:
MySQL/Linux expert
Sony in 2001
oracle started in 2001
Started using MySQL in 2004
September 2006 August 2010 MySQL Consultant
2010-2012 DeNA
2012 ~ now Facebook
Software introduction
MHA can realize automatic fault detection and failover in a short time, usually within 10-30 seconds; in the replication framework, MHA can solve the data consistency problem in the replication process well. Because there is no need to add additional servers in the existing replication, only one manager node is needed, and one manager can manage multiple sets of replication, so it can greatly save services The number of servers; in addition, simple installation, asexual energy consumption, and no need to modify the existing replication deployment are its advantages.
MHA also provides the function of online master database switching, which can safely switch the currently running master database to a new master database (by upgrading the slave database to the master database), which can be completed in about 0.5-2 seconds.
MHA consists of two parts: MHA Manager (management node) and MHA Node (data node). MHA manager can be deployed on a single machine to manage multiple Master Slave clusters, or on a single Slave. When the Master fails, it can automatically upgrade the Slave of the latest data to the new Master, and then point all other Slave to the new Master again. The entire failover process is completely transparent to the application.
II. Workflow
1) save the failed master binary log.
2) find the latest slave of binlog location point.
3) on the latest slave of binlog location point, use relay log to repair other slave.
4) restore the binary logs saved on the down master to the slave with the latest location point.
5) upgrade the slave containing the latest location binlog to master.
6) point other slaves back to the newly promoted master, and enable master-slave replication.
III. MHA architecture
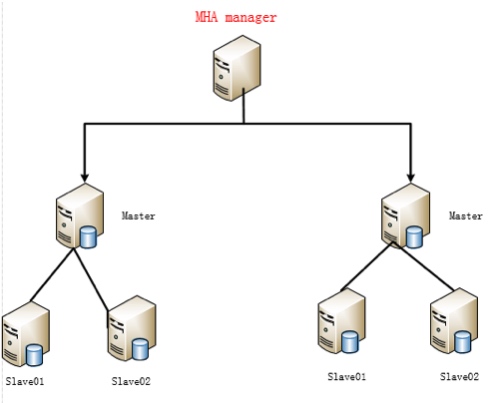 

- MHA manager can be installed on any server
- One MHA manager can manage multiple sets of mysql clusters (hundreds of sets)
- Try to avoid installing on the main database (to prevent breakpoints and network disconnection of the main database)
- c\s structure services
IV. introduction to MHA tools
MHA software consists of two parts, Manager toolkit and Node toolkit. The specific instructions are as follows:
The Manager toolkit mainly includes the following tools:
masterha_check_ssh              #Check the SSH key of MHA
masterha_check_repl             #Check master-slave replication
masterha_manger                 #Start MHA
masterha_check_status           #Detect the operation status of MHA
masterha_master_monitor         #Check whether the master is down
masterha_master_switch          #Manual failover
masterha_conf_host              #Add server information manually
masterha_secondary_check        #Establish TCP connection from remote server
masterha_stop                   #Stop MHA
The Node toolkit mainly includes the following tools:
cd /root/mha4mysql-node-0.56/bin
save_binary_logs                #Save binlog of the down master
apply_diff_relay_logs           #Identify differences in relay log
filter_mysqlbinlog              #Prevent rollback events
purge_relay_logs                #Clear relay log
MHA benefits summary
1)Masterfailover and slave promotion can be done very quickly
Automatic failover fast
2)Mastercrash does not result in data inconsistency
No data consistency problem in master database crash
3)Noneed to modify current MySQL settings (MHA works with regular MySQL)
There is no need to make major changes to the current mysql environment
4)Noneed to increase lots of servers
No additional servers need to be added (one manager alone can manage hundreds of replicas)
5)Noperformance penalty
Excellent performance, it can work in semi synchronous replication and asynchronous replication. When monitoring mysql status, you only need to send ping packets to the master every N seconds (default 3 seconds), so it has no impact on performance. You can understand that the performance of MHA is the same as that of simple master-slave replication framework.
ping baidu.com 10.0.0.50(icmp)
sql ping
select ping Detect heartbeat of main database
6)Works with any storage engine
As long as the storage engine and MHA supported by replication are available, they are not limited to innodb
MySQL environment preparation
1) environmental inspection
mysql-db01
#System version
[root@mysql-db01 ~]# cat /etc/redhat-release
CentOS release 6.7 (Final)
#Kernel version
[root@mysql-db01 ~]# uname -r
2.6.32-573.el6.x86_64
#IP address
[root@mysql-db01 ~]# hostname -I
10.0.0.51
mysql-db02
#System version
[root@mysql-db02 ~]# cat /etc/redhat-release
CentOS release 6.7 (Final)
#Kernel version
[root@mysql-db02 ~]# uname -r
2.6.32-573.el6.x86_64
#IP address
[root@mysql-db02 ~]# hostname -I
10.0.0.52
mysql-db03
#System version
[root@mysql-db03 ~]# cat /etc/redhat-release
CentOS release 6.7 (Final)
#Kernel version
[root@mysql-db03 ~]# uname -r
2.6.32-573.el6.x86_64
#IP address
[root@mysql-db03 ~]# hostname -I
10.0.0.53
Install MySQL
1) installation package preparation
#Create installation package storage directory
[root@mysql-db01 ~]# mkdir /home/oldboy/tools -p
#Entry directory
[root@mysql-db01 ~]# cd /home/oldboy/tools/
#Upload MySQL installation package (mysql-5.6.16-linux-glibc2.5-x86_. Tar. GZ)
[root@mysql-db01 tools]# rz -be
2) installation
#Create installation directory
[root@mysql-db01 tools]# mkdir /application
#Unzip mysql binary package
[root@mysql-db01 tools]# tar xf mysql-5.6.16-linux-glibc2.5-x86_64.tar.gz
#Mobile installation package
[root@mysql-db01 tools]# mv mysql-5.6.16-linux-glibc2.5-x86_64 /application/mysql-5.6.16
#Making soft links
[root@mysql-db01 tools]# ln -s /application/mysql-5.6.16/ /application/mysql
#Create mysql user
[root@mysql-db01 tools]# useradd mysql -s /sbin/nologin -M
#Enter mysql initialization directory
[root@mysql-db01 tools]# cd /application/mysql/scripts/
#Initialize mysql
[root@mysql-db01 scripts]# ./mysql_install_db \
--user=mysql \
--datadir=/application/mysql/data/ \
--basedir=/application/mysql/
#annotation
--user:   Appoint mysql user
--datadir: Appoint mysql Data storage directory
--basedir: Appoint mysql base Catalog
#Copy mysql configuration file
[root@mysql-db01 ~]# \cp /application/mysql/support-files/my-default.cnf /etc/my.cnf
#Copy mysql startup script
[root@mysql-db01 ~]# cp /application/mysql/support-files/mysql.server /etc/init.d/mysqld
#Modify the mysql default installation directory (otherwise, it cannot be started)
[root@mysql-db01 ~]# sed -i 's#/usr/local#/application#g' /etc/init.d/mysqld
[root@mysql-db01 ~]# sed -i 's#/usr/local#/application#g' /application/mysql/bin/mysqld_safe
#Configure mysql environment variables
[root@mysql-db01 ~]# echo 'export PATH="/application/mysql/bin:$PATH"' >> /etc/profile.d/mysql.sh
#Refresh environment variables
[root@mysql-db01 ~]# source /etc/profile
2.2.3 start-up
#Add power on self start
[root@mysql-db01 ~]# chkconfig mysqld on
#mysql start
[root@mysql-db01 ~]# /etc/init.d/mysqld start
Starting MySQL........... SUCCESS! #Startup success
2.2.4 Configure Ciphers
#Configure mysql password to oldby123
[root@mysql-db01 ~]# mysqladmin -uroot password oldboy123
V. master-slave replication based on GTID
GTID: a globally unique identifier, which is UUID + TID. TID is the transaction submission number, which submits a transaction + 1
342a3b8f-0d8e-11ea-8095-000c29c7dac3:1
342a3b8f-0d8e-11ea-8095-000c29c7dac3:2
342a3b8f-0d8e-11ea-8095-000c29c7dac3:23
Precondition
1) binlog should be enabled for both the master and slave databases
2) the server ID of the master database is different from that of the slave database
3) to have a master-slave replication user
GTID advantages:
(1) support multi-threaded replication: in fact, it is to open corresponding independent threads for each database, that is, each database has a separate (sql
thread).
(2) support to enable GTID. In the traditional way of configuring master-slave replication, you need to find binlog and POS points, and then change master to point to
In mysql5.6, you don't need to know binlog and POS points any more. You just need to know the IP / port / account password of the master. Because synchronous replication is automatic, MySQL is connected
Automatically find a point for synchronization through the internal mechanism GTID. (show master status)
(3) based on Row replication, only changed columns are saved, which greatly saves Disk Space/Network resources and Memory usage
(4) support to record the relevant information of Master and Slave in the Table, which is originally recorded in the file and in the Table, so as to enhance the usability
(5) support delayed replication
Disadvantages:
- mysqldump is troublesome to back up. Additional parameters are required, -- set gtid = on
- If an error is encountered only from replication, s starts and stops. Skip error, gtid cannot skip error
Main library operation
Modify profile
#Edit mysql configuration file
[root@mysql-db01 ~]# vim /etc/my.cnf
#Configure under mysqld label
[mysqld]
#Master database server ID is 1, slave database is not equal to 1
server_id =1
#Open binlog log
log_bin=mysql-bin
Create primary and secondary replication users
#Log in to the database
[root@mysql-db01 ~]# mysql -uroot -poldboy123
#Create rep user
mysql> grant replication slave on *.* to rep@'10.0.0.%' identified by 'oldboy123';
Slave operation
Modify profile
#Modify mysql-db02 configuration file
[root@mysql-db02 ~]# vim /etc/my.cnf
#Configure under mysqld label
[mysqld]
#Master database server ID is 1, slave database must be greater than 1
server_id =5
#Open binlog log
log_bin=mysql-bin
#Restart mysql
[root@mysql-db02 ~]# /etc/init.d/mysqld restart
#Modify mysql-db03 configuration file
[root@mysql-db03 ~]# vim /etc/my.cnf
#Configure under mysqld label
[mysqld]
#Master database server ID is 1, slave database must be greater than 1
server_id =10
#Open binlog log
log_bin=mysql-bin
#Restart mysql
[root@mysql-db03 ~]# /etc/init.d/mysqld restart
Note: in the past, if the master-slave replication is based on binlog logs, you must remember the master status information of the master database.
mysql> show master status;
+------------------+----------+
| File             | Position |
+------------------+----------+
| mysql-bin.000002 |      120 |
+------------------+----------+
Open GTID
#Check the status of GTID before opening it
mysql> show global variables like '%gtid%';
+--------------------------+-------+
| Variable_name            | Value |
+--------------------------+-------+
| enforce_gtid_consistency | OFF   |
| gtid_executed            |       |
| gtid_mode                | OFF   |
| gtid_owned               |       |
| gtid_purged              |       |
+--------------------------+-------+
#Edit mysql configuration file (both master and slave databases need to be modified)
[root@mysql-db01 ~]# vim /etc/my.cnf
#Add under the [mysqld] tab
[mysqld]
gtid_mode=ON
log_slave_updates #Keep binlog refreshed
enforce_gtid_consistency
#Restart database
[root@mysql-db01 ~]# /etc/init.d/mysqld restart
#Check GTID status
mysql> show global variables like '%gtid%';
+--------------------------+-------+
| Variable_name            | Value |
+--------------------------+-------+
| enforce_gtid_consistency | ON    | #Execute GTID consistency
| gtid_executed            |       |
| gtid_mode                | ON    | #Start GTID module
| gtid_owned               |       |
| gtid_purged              |       |
+--------------------------+-------+
When is log slave updates used
- Double main mode
- cascading replication
- GTID
Note: GTID needs to be enabled for both master and slave databases, or an error will be reported during master-slave replication:
[root@mysql-db02 ~]# mysql -uroot -poldboy123
mysql> change master to
-> master_host='10.0.0.51',
-> master_user='rep',
-> master_password='oldboy123',
-> master_auto_position=1;
ERROR 1777 (HY000): CHANGE MASTER TO MASTER_AUTO_POSITION = 1 can only be executed when @@GLOBAL.GTID_MODE = ON.
Configure master-slave replication
#Log in to the database
[root@mysql-db02 ~]# mysql -uroot -poldboy123
#Configure replication host information
mysql> change master to
#Main library IP
-> master_host='10.0.0.51',
#Master copy user
-> master_user='rep',
#Password of the master copy user
-> master_password='oldboy123',
#GTID location point
-> master_auto_position=1;
#Open slave
mysql> start slave;
#View slave status
mysql> show slave status\G
*************************** 1. row ***************************
               Slave_IO_State: Waiting for master to send event
                  Master_Host: 10.0.0.51
                  Master_User: rep
                  Master_Port: 3306
                Connect_Retry: 60
              Master_Log_File: mysql-bin.000003
          Read_Master_Log_Pos: 403
               Relay_Log_File: mysql-db02-relay-bin.000002
                Relay_Log_Pos: 613
        Relay_Master_Log_File: mysql-bin.000003
             Slave_IO_Running: Yes
            Slave_SQL_Running: Yes
              Replicate_Do_DB:
          Replicate_Ignore_DB:
           Replicate_Do_Table:
       Replicate_Ignore_Table:
      Replicate_Wild_Do_Table:
  Replicate_Wild_Ignore_Table:
                   Last_Errno: 0
                   Last_Error:
                 Skip_Counter: 0
          Exec_Master_Log_Pos: 403
              Relay_Log_Space: 822
              Until_Condition: None
Vi. deploy MHA (if the master and slave have been done well, try not to install management nodes on the master database)
Main library
1. Enable binlog
2. Enable server ID
3. Create master-slave replication user
Slave Library
1. Enable binlog
2. Enable server ID: the server ID between the slave database and the master database is different, and the slave databases are different
3.change master to
4. Ensure data consistency before making decisions
5. A master-slave replication user should also be created in the slave database
Prerequisite
#Temporarily close the relay log (master and slave)
set global relay_log_purge = 0;
# Temporarily open read only (from Library)
set global read_only=1;
# Permanently close and automatically delete the relay log (primary and secondary)
relay_log_purge = 0
1) environment preparation (all nodes)
# epel is required for node and manager installation
wget -O /etc/yum.repos.d/epel.repo http://mirrors.aliyun.com/repo/epel-7.repo
# Install node node (install several nodes if there are several databases)
[root@db01 ~]# yum localinstall -y mha4mysql-node-0.56-0.el6.noarch.rpm
# mha management user will be created on each database (master database will be copied from slave database)
mysql> grant all on *.* to mha@'%' identified by 'mha';
Command soft connect (all nodes)
#If the command soft connection is not created, an error will be reported when mha replication is detected
[root@mysql-db01 ~]# ln -s /application/mysql/bin/mysqlbinlog /usr/bin/mysqlbinlog
[root@mysql-db01 ~]# ln -s /application/mysql/bin/mysql /usr/bin/mysql
Deployment management node (MHA Manager: mysql-db03)
#Install manager package
[root@mysql-db03 tools]# rpm -ivh mha4mysql-manager-0.56-0.el6.noarch.rpm
Preparing...              ########################################### [100%]
1:mha4mysql-manager       ########################################### [100%]
Edit profile
#Create profile directory
[root@mysql-db03 ~]# mkdir -p /etc/mha
#Create log directory
[root@mysql-db03 ~]# mkdir -p /etc/mha/app1
#Edit mha profile
[root@mysql-db03 ~]# vim /etc/mha/app1.cnf
# Modify profile
[server default]
#MHA log name
manager_log=/etc/mha/manager.log
#MHA's working directory
manager_workdir=/etc/mha/app1
#Storage path of database binlog
master_binlog_dir=/application/mysql/data
#User name of the mha administrative user
user=mha
#mha manage user's password
password=mha
#Monitor heartbeat every 2 seconds (default is 3 seconds)
ping_interval=2
#Password of master-slave replication user
repl_password=123
#Primary and secondary replication users
repl_user=slave
#ssh Remote Connection user
ssh_user=root
[server1]
hostname=10.0.0.51
port=3306
[server2]
hostname=10.0.0.52
port=3306
ssh Password free authentication
MHA Monitoring start up
[server3]
hostname=10.0.0.53
port=3306
[server4]
hostname=10.0.0.54
port=3306
Profile details
[server default]
#Set up manager's working directory
manager_workdir=/var/log/masterha/app1
#Set up manager's log
manager_log=/var/log/masterha/app1/manager.log
#Set the location where the master saves the binlog so that the MHA can find the master's log. My data directory here is mysql
master_binlog_dir=/data/mysql
#Set the switch script for automatic failover
master_ip_failover_script= /usr/local/bin/master_ip_failover
#Set the switch script for manual switch
master_ip_online_change_script= /usr/local/bin/master_ip_online_change
#Set the password of the root user in mysql, which is the password of the monitoring user created in the previous section
password=123456
#Set monitoring user root
user=root
#Set the monitoring main database, send the time interval of ping packets, and automatically fail when there is no response for three times
ping_interval=1
#Set the save location of binlog when remote mysql is switched
remote_workdir=/tmp
#Set password for replication user
repl_password=123456
#Set the replication user name in the replication environment
repl_user=rep
#Set script for alarms sent after switching
report_script=/usr/local/send_report
#Once there is a problem between the monitoring of MHA and server02, MHA Manager will try to log in from server03 to server02
secondary_check_script= /usr/local/bin/masterha_secondary_check -s server03 -s server02 --user=root --master_host=server02 --master_ip=192.168.0.50 --master_port=3306
#Set the script to shut down the failed host after the failure (the main function of the script is to shut down the host in case of brain crack, which is not used here)
shutdown_script=""
#Set the login user name of ssh
ssh_user=root

[server1]
hostname=10.0.0.51
port=3306

[server2]
hostname=10.0.0.52
port=3306
#Set as candidate master. If this parameter is set, the slave database will be promoted to the master database after the master-slave switch occurs, even if the master database is not the latest slave in the cluster.
candidate_master=1
#By default, if a slave is 100m behind the master's relay logs, MHA will not select the slave as a new master, because the recovery of the slave will take a long time. By setting check ﹐ repl ﹐ delay = 0, MHA triggers the switch and ignores the replication delay when selecting a new master. This parameter is not applicable to the host with candidate ﹐ master = 1 Often useful, because this candidate must be a new master in the process of switching
check_repl_delay=0
Configure ssh trust (all nodes)
#Create key pair
[root@mysql-db01 ~]# ssh-keygen -t dsa -P '' -f ~/.ssh/id_dsa >/dev/null 2>&1
#Send public key, including yourself
[root@mysql-db01 ~]# ssh-copy-id -i /root/.ssh/id_dsa.pub root@10.0.0.51
[root@mysql-db01 ~]# ssh-copy-id -i /root/.ssh/id_dsa.pub root@10.0.0.52
[root@mysql-db01 ~]# ssh-copy-id -i /root/.ssh/id_dsa.pub root@10.0.0.53
Startup Test
#Test ssh
[root@mysql-db03 ~]# masterha_check_ssh --conf=/etc/mha/app1.cnf
#If you see the following words, the test is successful
Tue Mar  7 01:03:33 2017 - [info] All SSH connection tests passed successfully.
#Test replication
[root@mysql-db03 ~]# masterha_check_repl --conf=/etc/mha/app1.cnf
#If you see the following words, the test is successful
MySQL Replication Health is OK.
Start MHA
#start-up
[root@mysql-db03 ~]# nohup masterha_manager --conf=/etc/mha/app1.cnf --remove_dead_master_conf --ignore_last_failover < /dev/null > /var/log/mha/app1/manager.log 2>&1 &

#Test whether the startup is successful
[root@db04 scripts]# masterha_check_status --conf=/etc/mha/app1.cnf
app1 (pid:7916) is running(0:PING_OK), master:10.0.0.51
Switch master test
#Login database (db02)
[root@mysql-db02 ~]# mysql -uroot -poldboy123
#Check replication
mysql> show slave status\G
*************************** 1. row ***************************
               Slave_IO_State: Waiting for master to send event
                  Master_Host: 10.0.0.51
                  Master_User: rep
                  Master_Port: 3306
                Connect_Retry: 60
              Master_Log_File: mysql-bin.000006
          Read_Master_Log_Pos: 191
               Relay_Log_File: mysql-db02-relay-bin.000002
                Relay_Log_Pos: 361
        Relay_Master_Log_File: mysql-bin.000006
             Slave_IO_Running: Yes
            Slave_SQL_Running: Yes
#Login database (db03)
[root@mysql-db03 ~]# mysql -uroot -poldboy123
#Check replication
mysql> show slave status\G
*************************** 1. row ***************************
               Slave_IO_State: Waiting for master to send event
                  Master_Host: 10.0.0.51
                  Master_User: rep
                  Master_Port: 3306
                Connect_Retry: 60
              Master_Log_File: mysql-bin.000006
          Read_Master_Log_Pos: 191
               Relay_Log_File: mysql-db03-relay-bin.000002
                Relay_Log_Pos: 361
        Relay_Master_Log_File: mysql-bin.000006
             Slave_IO_Running: Yes
            Slave_SQL_Running: Yes

#Stop main library
[root@mysql-db01 ~]# /etc/init.d/mysqld stop
Shutting down MySQL..... SUCCESS!
#Login database (db02)
[root@mysql-db02 ~]# mysql -uroot -poldboy123
#View slave status
mysql> show slave status\G
#The slave of db02 is already empty
Empty set (0.00 sec)
#Login database (db03)
[root@mysql-db03 ~]# mysql -uroot -poldboy123
#View slave status
mysql> show slave status\G
*************************** 1. row ***************************
               Slave_IO_State: Waiting for master to send event
                  Master_Host: 10.0.0.52
                  Master_User: rep
                  Master_Port: 3306
                Connect_Retry: 60
              Master_Log_File: mysql-bin.000006
          Read_Master_Log_Pos: 191
               Relay_Log_File: mysql-db03-relay-bin.000002
                Relay_Log_Pos: 361
        Relay_Master_Log_File: mysql-bin.000006
             Slave_IO_Running: Yes
            Slave_SQL_Running: Yes
mha recovery (traditional)
#1. Restore the old master database
[root@db01 ~]# /etc/init.d/mysqld start
Starting MySQL SUCCESS!

#2. Find change master to in the mha log
[root@db04 ~]# grep -i 'change master to' /etc/mha/manager.log
Tue Nov 19 20:50:57 2019 - [info]  All other slaves should start replication from here. Statement should be: CHANGE MASTER TO MASTER_HOST='10.0.0.52', MASTER_PORT=3306, MASTER_AUTO_POSITION=1, MASTER_USER='slave', MASTER_PASSWORD='xxx';
Wed Nov 20 03:29:19 2019 - [info]  All other slaves should start replication from here. Statement should be: CHANGE MASTER TO MASTER_HOST='10.0.0.52', MASTER_PORT=3306, MASTER_LOG_FILE='mysql-bin.000005', MASTER_LOG_POS=120, MASTER_USER='slave', MASTER_PASSWORD='xxx';

#3. Execute the change master statement in the old master database
CHANGE MASTER TO MASTER_HOST='10.0.0.52', MASTER_PORT=3306, MASTER_LOG_FILE='mysql-bin.000005', MASTER_LOG_POS=120, MASTER_USER='slave', MASTER_PASSWORD='xxx';

#4. Repair the mha configuration file
[server1]
hostname=10.0.0.51
port=3306

#5. start mha
[root@db04 ~]# nohup masterha_manager --conf=/etc/mha/app1.cnf --remove_dead_master_conf --
ignore_last_failover < /dev/null > /etc/mha/manager.log 2>&1 &

[root@db04 ~]# masterha_check_status --conf=/etc/mha/app1.cnf
#MHA start command details
nohup masterha_manager
#Profile path
--conf=/etc/mha/app1.cnf
#Remove master library from configuration file
--remove_dead_master_conf
#Ignore last switch
--ignore_last_failover
< /dev/null > /etc/mha/manager.log 2>&1 &
#mha working mechanism: after a mha switch, a lock file will be generated in the working directory of mha
Note: after the switchover, start mha again
Script recovery
#Under each node service
[root@db03 ~]# vim abc.sh

#!/bin/bash
/etc/init.d/mysqld start
change=`ssh 10.0.0.54 "grep -i 'change master to' /etc/mha/manager.log"|awk -F : '{print $4}'|sed 's#xxx#123#g'`
mysql -e "$change;start slave;"
ssh 10.0.0.54 \cp /etc/mha/app1.cnf.ori /etc/mha/app1.cnf
MHA switching
If the data volume is the same, the smaller the server tag, the higher the priority
VII. Configure VIP drift
Two ways of VIP drift
1) manage the drift of virtual IP by keeping it alive
2) manage the drift of virtual IP through MHA script
MHA script mode
Modify profile
#Edit profile
[root@mysql-db03 ~]# vim /etc/mha/app1.cnf
#Add under the [server default] tab
[server default]
#Use MHA native script
master_ip_failover_script=/usr/local/bin/master_ip_failover
Edit script
#Modify the ssh port. The configuration files APP1.cnf and / etc / MHA / master? IP? Failover should be added


#Edit according to the script path in the configuration file
[root@mysql-db03 ~]# vim /etc/mha/master_ip_failover
#Modify the following lines
my $vip = '10.0.0.55/24';
my $key = '0';
my $ssh_start_vip = "/sbin/ifconfig eth0:$key $vip";
my $ssh_stop_vip = "/sbin/ifconfig eth0:$key down";
#Add execution permission, otherwise mha cannot start
[root@mysql-db03 ~]# chmod +x /etc/mha/master_ip_failover
#Grammatical problems
#Format problem
yum -y install dos2unix
[root@db04 mha]# dos2unix master_ip_failover
dos2unix: converting file master_ip_failover to Unix format ...
Bind VIP manually
#Binding vip
[root@mysql-db01 ~]# ifconfig eth0:0 10.0.0.55/24
#Drop off
ifconfig eth0:0 down
#View vip
[root@mysql-db01 ~]# ip a |grep eth0
2: eth0: <BROADCAST,MULTICAST,UP,LOWER_UP> mtu 1500 qdisc pfifo_fast state UP qlen 1000
   inet 10.0.0.51/24 brd 10.0.0.255 scope global eth0
   inet 10.0.0.55/24 brd 10.0.0.255 scope global secondary eth0:0
Test ip drift
#Login db02
[root@mysql-db02 ~]# mysql -uroot -poldboy123
#View slave information
mysql> show slave status\G
*************************** 1. row ***************************
               Slave_IO_State: Waiting for master to send event
                  Master_Host: 10.0.0.51
                  Master_User: rep
                  Master_Port: 3306
                Connect_Retry: 60
              Master_Log_File: mysql-bin.000007
          Read_Master_Log_Pos: 191
               Relay_Log_File: mysql-db02-relay-bin.000002
                Relay_Log_Pos: 361
        Relay_Master_Log_File: mysql-bin.000007
             Slave_IO_Running: Yes
            Slave_SQL_Running: Yes
#Stop main library
[root@mysql-db01 ~]# /etc/init.d/mysqld stop
Shutting down MySQL..... SUCCESS!
#Viewing slave database slave information on db03

mysql> show slave status\G
*************************** 1. row ***************************
               Slave_IO_State: Waiting for master to send event
                  Master_Host: 10.0.0.52
                  Master_User: rep
                  Master_Port: 3306
                Connect_Retry: 60
              Master_Log_File: mysql-bin.000006
          Read_Master_Log_Pos: 191
               Relay_Log_File: mysql-db03-relay-bin.000002
                Relay_Log_Pos: 361
        Relay_Master_Log_File: mysql-bin.000006
             Slave_IO_Running: Yes
            Slave_SQL_Running: Yes
#View vip information on db01
[root@mysql-db01 ~]# ip a |grep eth0
2: eth0: <BROADCAST,MULTICAST,UP,LOWER_UP> mtu 1500 qdisc pfifo_fast state UP qlen 1000
inet 10.0.0.51/24 brd 10.0.0.255 scope global eth0
#View vip information on db02
[root@mysql-db02 ~]# ip a |grep eth0
2: eth0: <BROADCAST,MULTICAST,UP,LOWER_UP> mtu 1500 qdisc pfifo_fast state UP qlen 1000
    inet 10.0.0.52/24 brd 10.0.0.255 scope global eth0
    inet 10.0.0.55/24 brd 10.0.0.255 scope global secondary eth0:0
Cerebral cleft
1. stop vip
 2. Redo from library to
Prevention:
Stop the database and check whether the mha configuration file is complete. No, complete. Start mha
vip drift of test moving point
I. CREATE TABLE statement
=============================================
//Student table: Student(Sno,Sname,Ssex,Sage,Sdept)
------(Student ID-Primary key, name, gender, age, Department)
=============================================

create table student(
Sno int(10) NOT NULL COMMENT 'Student ID',
Sname varchar(16) NOT NULL COMMENT 'Full name',
Ssex char(2) NOT NULL COMMENT 'Gender',
Sage tinyint(2)  NOT NULL default '0' COMMENT 'Student age',
Sdept varchar(16)  default NULL  COMMENT 'Department of students',
PRIMARY KEY  (Sno)
) ENGINE=InnoDB AUTO_INCREMENT=1 DEFAULT CHARSET=utf8;

//II. Batch insert data script
#!/bin/bash
MysqlLogin="mysql -uroot -p123"
i=1
while true
do
 ${MysqlLogin} -e "insert into test.student values ("$I",'zls"$i"','m','21','computer"$i"');"
 ((i++))
 sleep 2;
done
VIII. Configure binlog server
Modify mha profile
[root@mysql-db03 ~]# vim /etc/mha/app1.cnf
[binlog1]
no_master=1
hostname=10.0.0.54         #Main library
master_binlog_dir=/data/mysql/binlog/
Backup binlog
#Create backup binlog directory
[root@mysql-db03 ~]# mkdir -p /data/mysql/binlog/
#Enter this directory
[root@mysql-db03 ~]# cd /data/mysql/binlog/
#Backup binlog (enter the create key directory)
[root@mysql-db03 binlog]# mysqlbinlog  -R --host=10.0.0.51 --user=mha --password=mha --raw  --stop-never mysql-bin.000001 &
#Start mha
[root@mysql-db03 binlog]# nohup masterha_manager --conf=/etc/mha/app1.cnf --remove_dead_master_conf --ignore_last_failover < /dev/null > /etc/mha/manager.log 2>&1 &
Test binlog backup
#View binlog in binlog directory
[root@mysql-db03 binlog]# ll
total 44
-rw-r--r-- 1 root root 285 Mar  8 03:11 mysql-bin.000001
#Login main library
[root@mysql-db01 ~]# mysql -uroot -poldboy123
#Refresh binlog
mysql> flush logs;
#View the binlog directory again
[root@mysql-db03 binlog]# ll
total 48
-rw-r--r-- 1 root root 285 Mar  8 03:11 mysql-bin.000001
-rw-r--r-- 1 root root 143 Mar  8 04:00 mysql-bin.000002
IX. MySQL middleware Atlas
Atlas introduction
Atlas is a MySQL based data middle tier project developed and maintained by the infrastructure team of Web Platform Department of Qihoo 360 company. On the basis of MySQL proxy version 0.8.2, which is officially launched by mysql, it has modified a lot of bugs and added many functional features. On the basis of MySQL proxy version 0.8.2, which is officially launched by mysql, it has modified a lot of bugs and added many functional features.
Main functions of Atlas
- 1. Separation of reading and writing
- 2. Load balance of slave database
- 3.IP filtering
- 4. Automatic sorting
- 5.DBA can smooth up and down DB
- 6. Automatically remove the down DB
Advantages of Atlas over the official MySQL proxy
- 1. Rewrite all Lua codes in the main process with C, and Lua is only used for management interface
- 2. Rewrite the network model and thread model
- 3. Realize the real connection pool
- 4. Optimized the lock mechanism and improved the performance dozens of times
Install Atlas
Students are blessed. It's really easy to install atlas. There are two kinds of official Atlas:
1) Atlas (general): atlas-2.2.1.el6.x86_.rpm
2) Atlas (sub table): Atlas sharding_.0.1-el6.x86_.rpm
Here we just need to download the normal one.
#Install in the main library and enter the installation package directory
[root@mysql-db01 ~]# cd /home/oldboy/tools/
#Download Atlas
[root@mysql-db01 tools]#
wget httpss://github.com/Qihoo360/Atlas/releases/download/2.2.1/Atlas-2.2.1.el6.x86_64.rpm
#install
[root@mysql-db01 tools]# rpm -ivh Atlas-2.2.1.el6.x86_64.rpm
Preparing...               ########################################### [100%]
  1:Atlas                  ########################################### [100%]
Edit profile
#Go to Atlas tools catalog
[root@mysql-db01 ~]# cd /usr/local/mysql-proxy/bin/
#Generate password
[root@mysql-db01 bin]# ./encrypt oldboy123
#Modify Atlas profile
[root@mysql-db01 ~]# vim /usr/local/mysql-proxy/conf/test.cnf #(instance = test)

#The IP and port of the MySQL main database connected to the Atlas backend can be set in multiple ways, separated by commas
proxy-backend-addresses = 10.0.0.51:3306
#The IP and port of the MySQL slave database connected to the Atlas backend
proxy-read-only-backend-addresses = 10.0.0.52:3306,10.0.0.53:3306
#User name and its corresponding encrypted MySQL password
pwds = root:1N/CNLSgqXuTZ6zxvGQr9A==
#Switch for SQL log
sql-log = ON
#Working interface IP and port monitored by Atlas
proxy-address = 0.0.0.0:3307
#The default character set. After this item is set, the client no longer needs to execute the SET NAMES statement
charset = utf8
Start Atlas
[root@mysql-db01 ~]# /usr/local/mysql-proxy/bin/mysql-proxyd test start
OK: MySQL-Proxy of test is started
Atlas management interface operation
#Managing user login with atlas
[root@mysql-db01 ~]# mysql -uuser -ppwd -h127.0.0.1 -P2345
#View available command help
mysql> select * from help;
#View the library for back-end agents
mysql> SELECT * FROM backends;
+-------------+----------------+-------+------+
| backend_ndx | address        | state | type |
+-------------+----------------+-------+------+
|           1 | 10.0.0.51:3307 | up    | rw   |
|           2 | 10.0.0.53:3307 | up    | ro   |
|           3 | 10.0.0.52:3307 | up    | ro   |
+-------------+----------------+-------+------+
#Smooth mysql removal
mysql> REMOVE BACKEND 2;
Empty set (0.00 sec)
#Check if the removal is successful
mysql> SELECT * FROM backends;
+-------------+----------------+-------+------+
| backend_ndx | address        | state | type |
+-------------+----------------+-------+------+
|           1 | 10.0.0.51:3307 | up    | rw   |
|           2 | 10.0.0.52:3307 | up    | ro   |
+-------------+----------------+-------+------+
#Save to profile
mysql> SAVE CONFIG;
Empty set (0.06 sec)
mysql>  select * from help;
+----------------------------+---------------------------------------------------------+
| command                    | description                                             |
+----------------------------+---------------------------------------------------------+
| SELECT * FROM help         | shows this help                                         |
| SELECT * FROM backends     | View the server status of the backend                                      |
| SET OFFLINE $backend_id    | Smooth offline for example:set offline 2;                               |
| SET ONLINE $backend_id     | Smooth lines for example:set online 2;                             |
| ADD MASTER $backend        | Add back-end main library:add master 10.0.0.56:3306               |
| ADD SLAVE $backend         | Add backend from library:add slave 10.0.0.56:3306;                |
| REMOVE BACKEND $backend_id | Delete backend node: remove backend 1;                        |
| SELECT * FROM clients      | View clients allowed to connect IP                                       |
| ADD CLIENT $client         | Add client IP:add client 10.0.0.51;                  |
| REMOVE CLIENT $client      | Delete client IP:remove client 10.0.0.51               |
| SELECT * FROM pwds         | View users and passwords for back-end databases                                          |
| ADD PWD $pwd               | Add user,Automatic encryption:add pwd root:123               |
| ADD ENPWD $pwd             | Add user,Require password after manual encryption       |
| REMOVE PWD $pwd            | Delete useless users:remove pwd xxx;                         |
| SAVE CONFIG                | Save to profile                       |
| SELECT VERSION             | View version                            |
+----------------------------+---------------------------------------------------------+
Add: traditional approach
Main match:
[root@db01 scripts]# cat /etc/my.cnf
[mysqld]
log-bin=mysql-bin
server_id=1
#gtid_mode=on
#log-slave-updates
#enforce_gtid_consistency
#relay_log_purge = 0
skip_name_resolve
relay_log_purge = 0

//From match:
[root@db02 scripts]# cat /etc/my.cnf
[mysqld]
server_id=2
#gtid_mode=on
log-bin=mysql-bin
#log-slave-updates
#enforce_gtid_consistency
#relay_log_purge = 0
skip_name_resolve

#Management node: note that after blocking, the node will be lost, and it needs to be added
[root@db04 scripts]# vim /etc/mha/app1.cnf

[server default]
manager_log=/etc/mha/manager.log
manager_workdir=/etc/mha/app1
master_binlog_dir=/application/mysql/data
password=mha
ping_interval=2
repl_password=123
repl_user=slave
ssh_user=root
user=mha

[server2]
hostname=10.0.0.52
port=3306

[server3]
hostname=10.0.0.53
port=3306

[server4]
hostname=10.0.0.54
port=3306
vip drift, atlas
Node node automatic recovery from library script
[root@db02 ~]# cat abc.sh
#!/bin/bash
/etc/init.d/mysqld start
change=`ssh 10.0.0.54 "grep -i 'change master to' /etc/mha/manager.log"|awk -F : '{print $4}'|sed 's#xxx#123#g'`
mysql -e "$change;start slave;"
Management node calls script to realize non interaction and VIP drift
vim master_ip_failover
''''
my (
    $command,          $ssh_user,        $orig_master_host, $orig_master_ip,
    $orig_master_port, $new_master_host, $new_master_ip,    $new_master_port
);

my $vip = '10.0.0.55/24';
my $key = '0';
my $ssh_start_vip = "/sbin/ifconfig eth0:$key $vip";
my $ssh_stop_vip = "/sbin/ifconfig eth0:$key down";
'''


sub start_vip() {
    `ssh $ssh_user\@$new_master_host \" $ssh_start_vip \"`;

    `ssh $ssh_user\@$orig_master_host \" sh /root/abc.sh \"`;
}
sub stop_vip() {

     return 0  unless  ($ssh_user);
    `ssh $ssh_user\@$orig_master_host \" $ssh_stop_vip \"`;
}
'''
Implementation of atlas management database script
[root@db04 mha]# vim  /root/cre.sh

#!/bin/bash
while true;do
        succ=`sed -nr 's#^Master.*ted (.*)\.$#\1#gp' /etc/mha/manager.log`
        if [[ $succ == 'successfully' ]];then
                \cp /etc/mha/app1.cnf.ori /etc/mha/app1.cnf
                down_master=`sed -nr 's#^Master (.*)\(.*down\!#\1#gp' /etc/mha/manager.log`
                new_master=`sed -rn 's#^Master .*\((.*)\) completed.*#\1#gp' /etc/mha/manager.log`

                new_master_num=`mysql -uuser -ppwd -h127.0.0.1 -P2345 -e 'select * from backends;'|grep '$new_master' |awk '{print $1}'`


               mysql -uuser -ppwd -h127.0.0.1 -P2345 -e "remove backend ${new_master_num};save config;"

               mysql -uuser -ppwd -h127.0.0.1 -P2345 -e "add slave  ${down_master}:3306;save config;"

               nohup masterha_manager --conf=/etc/mha/app1.cnf --remove_dead_master_conf --ignore_last_failover < /dev/null > /etc/mha/manager.log 2>&1 &
        else
                echo "$(date +%F-%T) MHA No switch" > /etc/mha/app1.log
                sleep 2
        fi
done