I. lvs
1. Noun Interpretation
LVS is the abbreviation of Linux Virtual Server, which means Linux Virtual Server, is a virtual server cluster system.
2. Technical introduction of LVS
The following quotation is from Baidu Encyclopedia
[1] Technical Introduction
LVS cluster adopts IP load balancing technology and content-based request distribution technology. The scheduler has good throughput, transfers requests to different servers in a balanced way, and automatically shields the server from failures, thus making a group of servers into a high-performance and highly available virtual server. The structure of the whole server cluster is transparent to customers, and there is no need to modify the client and server programs. Therefore, the transparency, scalability, high availability and manageability of the system should be considered in the design.
[2] Cluster adopts three-tier structure
Generally speaking, LVS cluster adopts three-tier structure, its main components are:
A. load balancer, which is the front-end machine of the whole cluster to the outside, is responsible for sending customers'requests to a group of servers for execution, and customers think that the service comes from an IP address (we can call it virtual IP address).
B. server pool is a group of servers that actually execute customer requests. The services performed are WEB, MAIL, FTP and DNS.
C. Shared storage, which provides a shared storage area for the server pool.
3. Three IP Load Balancing Techniques
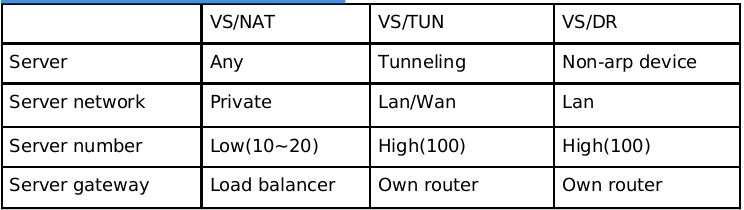
In the existing IP load balancing technology, there are mainly a group of servers through network Address Translation to form a high-performance, highly available virtual server, which we call VS/NAT technology (Virtual Server via Network Address Translation). On the basis of analyzing the shortcomings of VS/NAT and the asymmetry of network services, we put forward the methods of realizing virtual servers through IP tunnel, VS/TUN (Virtual Server via IP Tunneling), and VS/DR (Virtual Server via Direct Routing), which can greatly improve the scalability of the system. VS/NAT, VS/TUN and VS/DR are three IP load balancing technologies implemented in LVS cluster.
2. Keeping alived
1. role
It is mainly used for health checking of Real Server and the implementation of failover between LoadBalance host and BackUP host. If a web server goes down or fails to work, Keepalived will detect and remove the faulty server from the system. At the same time, other servers will be used to replace the work of the server. When the server works normally, Keepalived will automatically add the server to the server group. All of these tasks are automatically completed without manual intervention and need to be done manually. It's just the server that fixes the problem.
** III. Deployment of LVS (IP Load Balancing) +Keepalived**
Here we use VS/DR
Experimental environment: rhel6
server1: 172.25.70.1
server2: 172.25.70.2
server3: 172.25.70.3
server4: 172.25.70.4
server1 is a scheduling server (vs), server2 and server3 are rs (real back-end server), and server4 is a keepalived standby.
1. Using ipvsadm
Utilize the ipvsadm kernel functionality (no need to open, user level needs to control the service, call scripts to save) strategy
- Required software: ipvsadm-1.26-2.el6.x86_64 (configuration yum source) added as follows:
[HighAvailability]
name=HighAvailability
baseurl=http://172.25.70.250/rhel6.5/HighAvailability
gpgcheck=0


[ResilientStorage]
name=ResilientStorage
baseurl=http://172.25.70.250/rhel6.5/ResilientStorage
gpgcheck=0


[ScalableFileSystem]
name=ScalableFileSystem
baseurl=http://172.25.70.250/rhel6.5/ScalableFileSystem
gpgcheck=0


[LoadBalancer]
name=LoadBalancer
baseurl=http://172.25.70.250/rhel6.5/LoadBalancer
gpgcheck=0- install
[root@server1 ~]# yum install ipvsadm -y- Scheduling server (vs) is configured as follows (server1)
[root@server1 ~]# ip addr add 172.25.70.100/24 dev eth0   #Add a vip
[root@server1 ~]# ipvsadm -A -t 172.25.70.100:80 -s rr
[root@server1 ~]# ipvsadm -a -t 172.25.70.100:80 -r 172.25.70.2:80 -g
[root@server1 ~]# ipvsadm -a -t 172.25.70.100:80 -r 172.25.70.3:80 -g
Add a VIP (virtual ip of dispatch server) and bind two rs (real back-end server) IPS for vip, their listening ports are 80
- Make the following configuration on rs (server2 & server3)
We naturally need to add VIP to the real server, but we need to install the arptables_jf plug-in, and then do some strategies on the plug-in, so that the packets with VIP ip address are discarded when entering rs, and the packets of RS broadcast their own real ip when they go out instead of vip.
[root@server2 ~]# yum install arptables_jf -y

[root@server2 ~]# arptables -A IN -d 172.25.70.100 -j DROP
[root@server2 ~]# arptables -A OUT -s  172.25.70.100 -j mangle --mangle-ip-s 172.25.70.2
[root@server2 ~]# ip addr add 172.25.70.100/24 dev eth0
server3 Empathy- Edit such pages separately in the default publishing directory of apache in server2&serer3
[root@server2 ~]# vim /var/www/html/index.html
<h1>the page from server2</h1>

[root@server3 ~]# vim /var/www/html/index.html
<h1>the page from server3</h1>
- Testing, by visiting vip to see if the rotation can be achieved in the rs key
[root@foundation70 kiosk]# curl 172.25.70.100
<h1>the page from server3</h1>

[root@foundation70 kiosk]# curl 172.25.70.100
<h1>the page from server2</h1>
The test was successful, and we can see which server's mac address the vip access corresponds to
[root@foundation70 kiosk]# arp -an | grep 100
? (172.25.70.100) at 52:54:00:ff:a3:61 [ether] on br0
You have new mail in /var/spool/mail/kiosk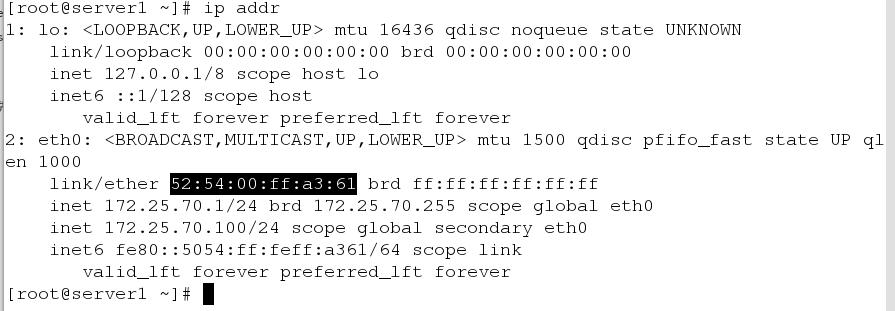
As you might expect, the mac address of vs corresponds. See the details. This blog (I don't think it's possible for anyone to write specific details ~~)
2. Installation and deployment of keepalived
- Install keepalived
Materials required: keepalived-1.3.6.tar.gz libnfnetlink-devel-1.0.0-1.el6.x86_64.rp
[root@server1 ~]# tar -zxf keepalived-1.3.6.tar.gz
[root@server1 ~]# yum install libnfnetlink-devel-1.0.0-1.el6.x86_64.rpm openssl-devel libnl-devel iptables-devel -y
[root@server1 ~]# cd keepalived-1.3.6
[root@server1 keepalived-1.3.6]# ./configure --prefix=/usr/local/keepalived --with-init=SYSV        #Compile check
[root@server1 keepalived-1.3.6]# make
[root@server1 keepalived-1.3.6]# make install- Do 4 soft connections to facilitate follow-up operations
[root@server1 keepalived-1.3.6]# ln -s /usr/local/keepalived/etc/keepalived/ /etc/
[root@server1 keepalived-1.3.6]# ln -s /usr/local/keepalived/etc/sysconfig/keepalived /etc/sysconfig/
[root@server1 keepalived-1.3.6]# ln -s /usr/local/keepalived/etc/rc.d/init.d/keepalived /etc/init.d/
[root@server1 keepalived-1.3.6]# ln -s /usr/local/keepalived/sbin/keepalived /sbin/
[root@server1 keepalived-1.3.6]# chmod +x /etc/init.d/keepalived #Add executable privileges to the startup script- Since our next modification of the keepalived configuration file will automatically add vip to us, we first delete the vip from the previous experiment.
[root@server1 keepalived-1.3.6]# ip addr del 172.25.70.100/24 dev eth0- Check the iptables policy of server1 and delete it if the following policy appears
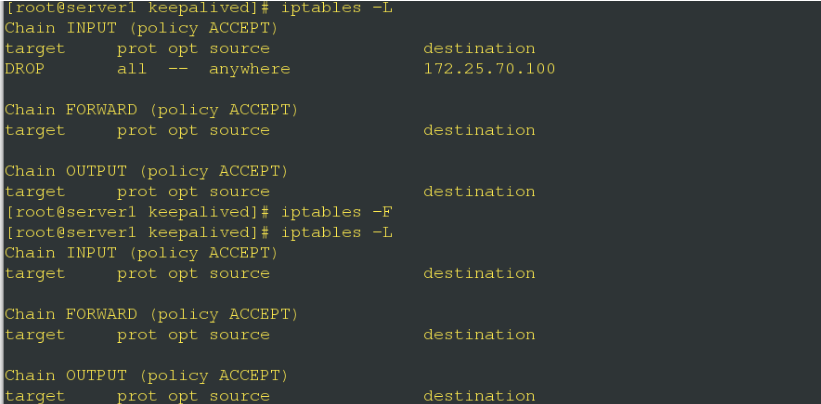
- Change the keepalived configuration file
[root@server1 keepalived]# vim /etc/keepalived/keepalived.conf! Configuration File for keepalived
global_defs {
notification_email {
2721671190@qq.com #email addresses that receive alerts can add multiple
}
notification_email_from keepalived@server1.example.com #Setting the mailing address
smtp_server 127.0.0.1 #Setting smtp server address
smtp_connect_timeout 30 #Setting the connection smtp server timeout
router_id LVS_DEVEL #Identity ID of load balancer for email alerts
}
vrrp_instance VI_1 {
state MASTER #The state of the server is master
interface eth0 #High Availability Monitoring Network Interface
virtual_router_id 51 #The virtual_router_id of the main and standby machines must be the same, with a value of 0-255.
priority 100 #Host priority, backup machine to 50, host priority must be greater than standby machine
advert_int 1 #Number of seconds between notifications between backups
authentication { #Verification in the case of primary and standby switching
auth_type PASS #There are two main types of validation, PASS and AH.
auth_pass 1111 #Set the authentication password. In a vrrp_instance, MASTER and BACKUP must use the same password to communicate normally.
}
virtual_ipaddress { #Setting virtual IP addresses, you can set multiple virtual IP addresses, one per line
172.25.70.100
}
}
virtual_server 172.25.70.100 80 { #Define virtual servers
delay_loop 6 #Query realserver status every 6 seconds
lb_algo rr #lvs scheduling algorithm, where round call is used
lb_kind DR #LVS is in DR mode
#persistence_timeout 50
protocol TCP #Specify the type of forwarding protocol, tcp and udp
real_server 172.25.70.2 80 { #realserve's state detection settings, in seconds
weight 1
TCP_CHECK {
connect_timeout 3 #10 seconds no response timeout
nb_get_retry 3 #retry count
delay_before_retry 3 #retry interval
}
}
real_server 172.25.70.3 80 { #realserve's state detection settings, in seconds
weight 1
TCP_CHECK {
connect_timeout 3 #10 seconds no response timeout
nb_get_retry 3 #retry count
delay_before_retry 3 #retry interval
}
}
}Note: persistence_timeout represents session retention time in seconds. This option is very useful for dynamic web pages and provides a good solution for session sharing in cluster systems. With this session retention function, user requests are distributed to a service node until the session retention time is exceeded. It should be noted that this session retention time is the maximum unresponsive timeout time, that is to say, when users operate dynamic pages, if they do not perform any operations within 50 seconds, then the next operations will be distributed to another node, but if they have been operating dynamic pages, they are not subject to the time limit of 50 seconds.
[root@server1 keepalived]# /etc/init.d/keepalived restart #Restart serviceWe say keepalived can automatically add vip, and has the function of security check, that is, the server of the back end hangs up and can be detected to test it.
Successful addition of vip 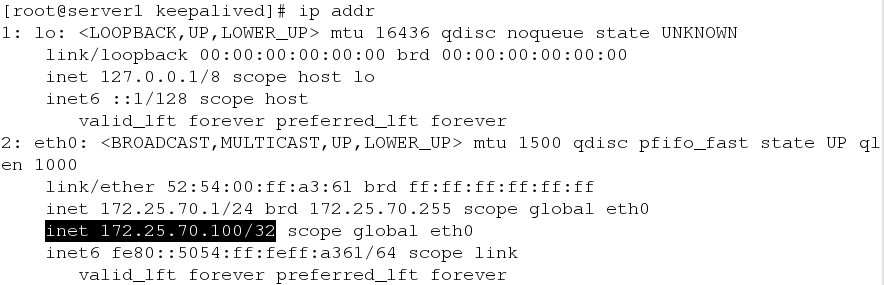
Automatic Safety Inspection
[root@server2 ~]# /etc/init.d/httpd stop  #down a back-end server
[root@server1 keepalived]# ipvsadm -Ln    #There is no server 2 ip in active rs
IP Virtual Server version 1.2.1 (size=4096)
Prot LocalAddress:Port Scheduler Flags
  -> RemoteAddress:Port           Forward Weight ActiveConn InActConn
TCP  172.25.70.100:80 rr
  -> 172.25.70.3:80               Route   1      0          0
In this way, we can only access the apache Web page information of server 3 on the test machine.
[root@foundation70 keepalived]# curl 172.25.70.100
<h1>the page from server3</h1>

[root@foundation70 keepalived]# curl 172.25.70.100
<h1>the page from server3</h1>
If there is no keepalived, a back-end server hangs up
[root@server1 keepalived]# /etc/init.d/keepalived  stop
[root@server2 ~]# /etc/init.d/httpd stop
[root@foundation70 keepalived]# curl 172.25.70.100   #The result is no access.
curl: (7) Failed connect to 172.25.70.100:80; No route to host
You have new mail in /var/spool/mail/kiosk
3. high availability
Let's assume that if we deploy a keepalived server (that is, the server 1 of this experiment is deactivated), then it's obvious that our back-end servers will not be accessible. To solve this problem, let's do the following experiment: keep alived in backup mode to achieve high availability.
- Install keepalived on server4 to directly copy keepalived on server1
[root@server1 local]# scp -r keepalived/ server4:/usr/local/- Make four soft connections for server4 and add execution privileges for startup scripts
[root@server4 ~]# ln -s /usr/local/keepalived/sbin/keepalived /sbin/
[root@server4 ~]# ln -s /usr/local/keepalived/etc/sysconfig/keepalived /etc/sysconfig/
[root@server4 ~]# ln -s /usr/local/keepalived/etc/rc.d/init.d/keepalived /etc/init.d/
[root@server4 ~]# ln -s /usr/local/keepalived/etc/keepalived/ /etc/
[root@server4 ~]# chmod +x /etc/init.d/keepalived - To change the configuration file, you only need to change state and priorit y
[root@server4 ~]# vim /etc/keepalived/keepalived.conf ! Configuration File for keepalived
global_defs {
notification_email {
2721671190@qq.com #email addresses that receive alerts can add multiple
}
notification_email_from keepalived@server1.example.com #Setting the mailing address
smtp_server 127.0.0.1 #Setting smtp server address
smtp_connect_timeout 30 #Setting the connection smtp server timeout
router_id LVS_DEVEL #Identity ID of load balancer for email alerts
}
vrrp_instance VI_1 {
state ABCKUP #The state of the server is master
interface eth0 #High Availability Monitoring Network Interface
virtual_router_id 51 #The virtual_router_id of the main and standby machines must be the same, with a value of 0-255.
priority 50 #Host priority, backup machine to 50, host priority must be greater than standby machine
advert_int 1 #Number of seconds between notifications between backups
authentication { #Verification in the case of primary and standby switching
auth_type PASS #There are two main types of validation, PASS and AH.
auth_pass 1111 #Set the authentication password. In a vrrp_instance, MASTER and BACKUP must use the same password to communicate normally.
}
virtual_ipaddress { #Setting virtual IP addresses, you can set multiple virtual IP addresses, one per line
172.25.70.100
}
}
virtual_server 172.25.70.100 80 { #Define virtual servers
delay_loop 6 #Query realserver status every 6 seconds
lb_algo rr #lvs scheduling algorithm, where round call is used
lb_kind DR #LVS is in DR mode
#persistence_timeout 50
protocol TCP #Specify the type of forwarding protocol, tcp and udp
real_server 172.25.70.2 80 { #realserve's state detection settings, in seconds
weight 1
TCP_CHECK {
connect_timeout 3 #10 seconds no response timeout
nb_get_retry 3 #retry count
delay_before_retry 3 #retry interval
}
}
real_server 172.25.70.3 80 { #realserve's state detection settings, in seconds
weight 1
TCP_CHECK {
connect_timeout 3 #10 seconds no response timeout
nb_get_retry 3 #retry count
delay_before_retry 3 #retry interval
}
}
}[root@server4 ~]# /etc/init.d/keepalived start
Starting keepalived: [ OK ]
- Install ipvsadm on servre4, the same as server1
[root@server4 ~]# yum install ipvsadm -y- test
[root@server4 ~]# ipvsadm -Ln     #Policy because configuration files are automatically added
IP Virtual Server version 1.2.1 (size=4096)
Prot LocalAddress:Port Scheduler Flags
  -> RemoteAddress:Port           Forward Weight ActiveConn InActConn
TCP  172.25.70.100:80 rr
  -> 172.25.70.2:80               Route   1      0          0
-> 172.25.70.3:80 Route 1 0 0 [root@server1 local]# /etc/init.d/keepalived stop #Hang up keepalived of server1[root@foundation70 keepalived]# curl 172.25.70.100 #Successful access to server2 &&server3, and in a round-robin mode
<h1>the page from server3</h1>
[root@foundation70 keepalived]# curl 172.25.70.100
<h1>the page from server2</h1>[root@foundation70 keepalived]# arp -an | grep 100 #View the mac address where the vip is located
? (172.25.70.100) at 52:54:00:5f:de:54 [ether] on br0
You have new mail in /var/spool/mail/kioskThe same mac address as server4. Prove the keepalived effect of server 4 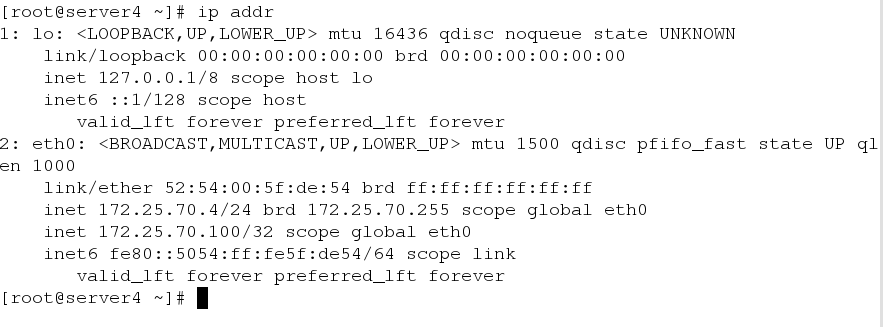
Open the keepalived service of master
[root@server1 local]# /etc/init.d/keepalived start
Starting keepalived:                                       [  OK  ]
Visit server 2 & & server 3 again and look at the mac address and find that the mac address has changed 
To verify whether it is the mac address of serevr1 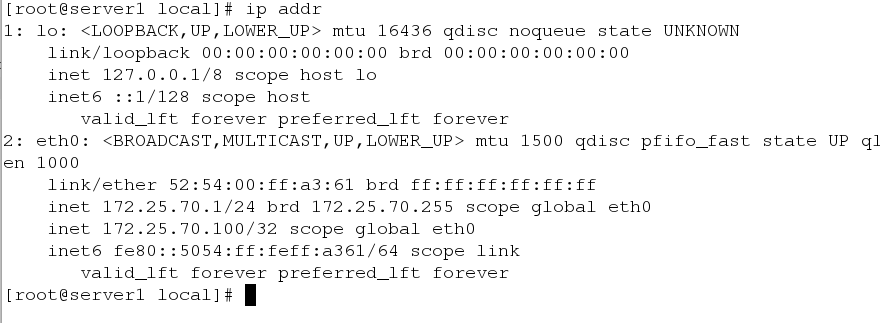
Prove the role of master-backup mode, when the master restores, because the weight is relatively large, so it is through the role of master to transfer data packets to the backend rs.