Because of the epidemic, Alibaba cloud has sent half a year's servers free of charge, and they can't be used for playing. Then I will first migrate my blog from github to Alibaba cloud, and then change it if there is a problem.
Previous conditions:
1. Server
2. hexo has been installed on the local computer, and GitHub has been uploaded earlier (in this case, your local computer already has a key)
The following parts are all operations on the server side!
The following parts are all operations on the server side!
The following parts are all operations on the server side!
1. Configure server security group rules
Because alicloud does not authorize access to port 80 by default, we need to configure it manually.
Open Alibaba cloud server management console - > click left security group - > click right configuration rule - > click add security group rule
Following chart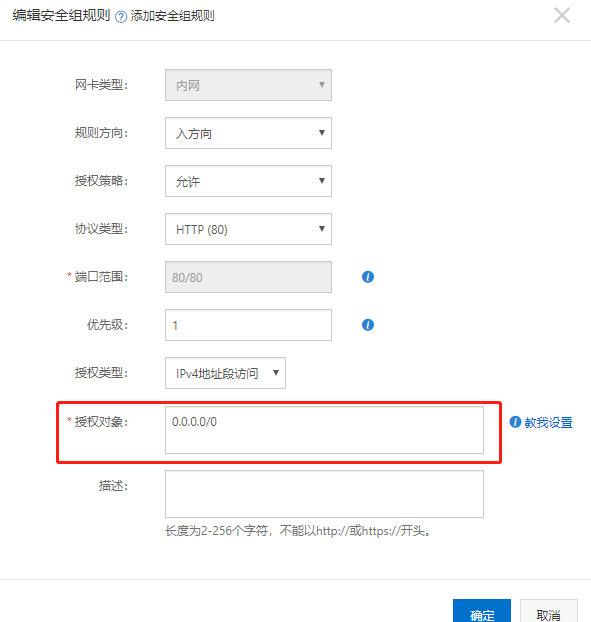
2. Configure agent nginx
Because we use nginx as a Web server, we need to install and deploy nginx, if not. The following is centos command, other Baidu.
The installation execution command is as follows
yum install -y nginx
 Start server:
systemctl start nginx
systemctl enable nginx
Now you can access our public IP and enter a default nginx interface. I went to centos introduction interface.
But we actually want this address to point to our blog instead of the default address of nginx, which requires us to configure the configuration file of nginx.
cd /etc/nginx
vim nginx.conf
Find the server and change it as follows
# Load modular configuration files from the /etc/nginx/conf.d directory.
    # See http://nginx.org/en/docs/ngx_core_module.html#include
    # for more information.
    include /etc/nginx/conf.d/*.conf;
    server {
        listen       80 default_server;
        listen       [::]:80 default_server;
        server_name  www.cloudcver.com;###Change to your domain name; no domain name change to server public IP
        root         /home/git/projects/blog;## Change to the address where the blog is stored on the server. Just follow me.

        # Load configuration files for the default server block.
        include /etc/nginx/default.d/*.conf;
3. Build git warehouse of server
3.1 install node
curl -sL https://rpm.nodesource.com/setup_10.x | bash -
yum install -y nodejs
3.2 install git
yum install git
3.3 creating git users
Add a git user first
adduser git
Modify user rights
chmod 740 /etc/sudoers
vi /etc/sudoers
Add the following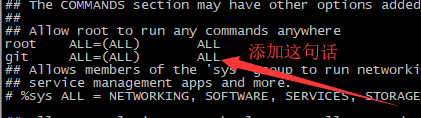
Change sudoers file permissions back to the original after saving and exiting
chmod 400 /etc/sudoers
Set the password of git user
sudo passwd git
3.4 create SSH key
Our local computer has generated a key, which can be copied directly to the server.
su git
mkdir ~/.ssh
vim ~/.ssh/authorized_keys
#Then copy and paste the contents of ~ /. ssh/id_rsa.pub from the computer.
chmod 600 ~/.ssh/authorzied_keys
chmod 700 ~/.ssh
3.5 create git warehouse
Operate under git user
mkdir -p projects/blog # Set up a project catalog
mkdir repos && cd repos
git init --bare blog.git # Create repository
cd blog.git/hooks
vim post-receive # Create a hook
Hook content:
#!/bin/sh
git --work-tree=/home/git/projects/blog --git-dir=/home/git/repos/blog.git checkout -f
Save file with permission
chmod +x post-receive # Add executable rights
exit # Return to root
chown -R git:git /home/git/repos/blog.git # Add permissions to git users
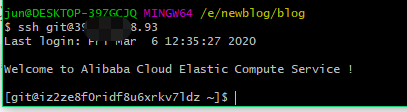
Test the following on the local computer. Sever? IP is your public IP
ssh git@server_ip
4 local computer upload
Add a deployed end to hexo
deploy:
  type: git
  repo:
    fuwuqi: git@server_ip:/home/git/repos/blog.git
    coding: git@e.coding.net:cloudcver/blogme.git
    github: git@github.com:Harryjun/Harryjun.github.io.git
  branch: master
5 online update down
reload on the server
nginx -s reload
It's much faster to open your own website.
www.cloudcver.com

