A basic concept
helm is similar to package manager under Linux system, such as yum/apt, which can deploy yaml files packaged before into kubernetes quickly and conveniently for management and maintenance.
- helm: A command-line client tool for creating/packaging/publishing kubernetes application charts that have been created and managed and remote Chart repositories.
- Tiller: The server of helm is deployed in kubernetes. Tiller accepts the request of helm and generates the kubernetes deployment file (called release) based on chart, which is then submitted to Kubernetes to create applications. Tiller also provides Release upgrade, deletion, rollback and a series of other functions.
- Chart: helm's package, in tar format, contains all image / dependency / resource definitions needed to run an application, and possibly service definitions in a kubernetes cluster
- Release: An instance of a Chart running in a cluster in kubernetes. On the same cluster, a Chart can be installed many times, and each installation generates a new release.
- Repository: A repository for publishing and storing Chart s
In short:
- What Helm does: Like the yum command in centos7, it manages software packages, except that helm manages various containers installed on k8s.
- tiller's role: Similar to centos7's software repository, it's simply like xxx.repo in the / etc/yum.repos.d directory.
Two-component architecture

Three working principles
3.1 Chart install
- helm parses chart structure information from a catalog or tar file
- helm passes the chart structure and value information to tiller through gRPC protocol
- tiller generates a release based on chart s and values
- tiller sends release to kubernetes via json to generate release
3.2 Chart update
- helm parses chart structure information from a specified directory or tar file
- helm passes the chart structure and value information to tiller through gRPC protocol
- tiller generates release and updates the history of release with the given name
- tiller sends release information to kubernetes to update release
3.3 Chart Rollback
- The release name that helm will roll over is passed to tiller
- tiller finds history by release name
- tiller gets the last release from history
- tiller sends the last release to kubernetes to replace the current release
3.4 Chart Processing Dependencies
When dealing with Chart, Tiller merges Chart and all Charts it depends on directly into a Release and passes it to Kubernetes. So Tiller is not responsible for managing the startup sequence between dependencies. Chart applications need to be able to handle dependencies on their own.
IV Installation Deployment
4.1 v2 version installation
4.1.1 Installation of helm
# On the helm client host, it is generally the master host
wget https://get.helm.sh/helm-v2.14.2-linux-amd64.tar.gz
tar xf helm-v2.14.2-linux-amd64.tar.gz
mv helm /usr/local/bin/
helm version
4.1.2 Initialization of tiller
-
Initialization of tiller automatically reads the ~/.kube directory, so you need to ensure that the config file exists and is authenticated successfully
- tiller configures rbac, builds rabc-config.yaml and applies it
# You can find rbac-config.yaml at: https://github.com/helm/helm/blob/master/docs/rbac.md

cat > rbac-config.yaml <<EOF
apiVersion: v1
kind: ServiceAccount
metadata:
  name: tiller
  namespace: kube-system
---
apiVersion: rbac.authorization.k8s.io/v1
kind: ClusterRoleBinding
metadata:
  name: tiller
roleRef:
  apiGroup: rbac.authorization.k8s.io
  kind: ClusterRole
  name: cluster-admin
subjects:
  - kind: ServiceAccount
    name: tiller
    namespace: kube-system
EOF

kubectl apply -f rbac-config.yaml- Making Mirrors
docker pull jessestuart/tiller:v2.14.2

yum install socat

# yum install socat

docker tag jessestuart/tiller:v2.14.2 gcr.io/kubernetes-helm/tiller:v2.14.2

helm init -i gcr.io/kubernetes-helm/tiller:v2.9.0

# Point of Attention
–client-only: That is, there is no server application installed, which is in the CI&CD It may be necessary, because usually you're already there. k8s Once the application is installed in the cluster, only initialization is needed. helm Client can do it.
–history-max: Maximum History, When You Use helm When installing the application, helm It'll be there. namespace Create a record of installation, as the number of updates increases, the record will be more and more;
–tiller-namespace: The default is kube-system,You can also set it to something else. namespace;
- Modify the mirror
# For gfw reasons, this mirror can be used at https://hub.docker.com/r/jessestuart/tiller/tags
kubectl edit deployment -n kube-system tiller-deploy

image: jessestuart/tiller:v2.14.0
- exception handling
Error: Looks like "https://kubernetes-charts.storage.googleapis.com" is not a valid chart repository or cannot be reached: Get https://kubernetes-charts.storage.googleapis.com/index.yaml: read tcp 10.2.8.44:49020->216.58.220.208:443: read: connection reset by peer

Solution: Replace source: helm repo add stable https://kubernetes.oss-cn-hangzhou.aliyuncs.com/charts

Then in helm init

Note: The tiller may run on the node node, download the tiller image to the node and modify the tag
- View Version
[root@master ~]# helm version
Client: &version.Version{SemVer:"v2.14.2", GitCommit:"a8b13cc5ab6a7dbef0a58f5061bcc7c0c61598e7", GitTreeState:"clean"}
Server: &version.Version{SemVer:"v2.14.2+unreleased", GitCommit:"d953c6875cfd4b351a1e8205081ea8aabad7e7d4", GitTreeState:"dirty"}
4.2 helm3 Installation Deployment
Because many mirror websites abroad are not accessible domestically, for example gcr.io It is suggested to use Aliyuan. https://developer.aliyun.com/hub.
AppHub is an all-public Helm Hub "China Station" hosted on the domestic public cloud. Its back end is developed by three engineers from the Aliyun Container Platform Team in 20% of the time.
An important responsibility of this site is to automatically synchronize all Helm official Hub hosted applications into the country; at the same time, automatically synchronize Charts files gcr.io All URLs with network access problems are replaced by stable domestic mirror URLs.
Now that helm3 is no longer dependent on tiller, the Release name can be reused between different ns.
4.2.1 Install helm
Helm3 does not need to install tiller, download to Helm binary file and decompress it directly to $PATH.
cd /opt && wget https://cloudnativeapphub.oss-cn-hangzhou.aliyuncs.com/helm-v3.0.0-alpha.1-linux-amd64.tar.gz
tar -xvf helm-v3.0.0-alpha.1-linux-amd64.tar.gz
mv linux-amd64 helm3
mv helm3/helm helm3/helm3
chown root.root helm3 -R
cat > /etc/profile.d/helm3.sh << EOF
export PATH=$PATH:/opt/helm3
EOF
source /etc/profile.d/helm3.sh

[root@master helm3]# helm3 version
version.BuildInfo{Version:"v3.0.0-alpha.1", GitCommit:"b9a54967f838723fe241172a6b94d18caf8bcdca", GitTreeState:"clean"}
4.2.2 Use helm3 to install applications
helm repo add apphub https://apphub.aliyuncs.com
helm search guestbook
helm install guestbook apphub/guestbook
Five uses
5.1 Basic Command
http://hub.kubeapps.com/

completion  # Generate automated completion scripts (bash or zsh) for the specified shell
create      # Create a new chart with a given name
delete      # Remove the release of the specified name from Kubernetes
dependency  # Managing dependencies of chart s
fetch       # Download chart s from the repository and (optionally) decompress them into local directories
get         # Download a named release
help        # List all help information
history     # Get release history
home        # Display the location of HELM_HOME
init        # Initialize Helm on client and server
inspect     # Check chart details
install     # Install chart Archives
lint        # Grammar checking for chart s
list        # releases list
package     # Pack the chart directory into a chart file
plugin      # Add lists or delete helm plug-ins
repo        # Add List Delete Updates and Index chart Repository
reset       # Unloading Tiller from Cluster
rollback    # Roll back the version to the previous version
search      # Search for keywords in the chart repository
serve       # Start the local http network server
status      # Display the status of the specified release
template    # Local rendering template
test        # Test a release
upgrade     # Upgrade a release
verify      # Verify that chart s on a given path are signed and valid
version     # Print client/server version information
dep         # Analyse Chart and download dependencies
- Specify value.yaml to deploy a chart
helm install --name els1 -f values.yaml stable/elasticsearch
- Upgrade a chart
helm upgrade --set mysqlRootPassword=passwd db-mysql stable/mysql

helm upgrade go2cloud-api-doc go2cloud-api-doc/
- Roll back a chart
helm rollback db-mysql 1
- Delete a release
helm delete --purge db-mysql
- Only render the template and output it, not install it.
helm install/upgrade xxx --dry-run --debug
5.2 Chart File Organization
myapp/                               # Chart directory
├── charts                           # The other charts that this charts relies on are always installed
├── Chart.yaml                       # Describe the relevant information about the Chart, including name, description information, version, etc.
├── templates                        # templates directory
│   ├── deployment.yaml              # Go template file for deployment controller
│   ├── _helpers.tpl                 # Files starting with will not be deployed on k8s and can be used to customize general information
│   ├── ingress.yaml                 # ingress template file
│   ├── NOTES.txt                    # Some information after Chart is deployed to the cluster, such as how to use and list default values
│   ├── service.yaml                 # The Go template file of service
│   └── tests
│       └── test-connection.yaml
└── values.yaml                      # Template value files, which are applied to the GO template at installation time to generate deployment files
5.3 Create your own Chart
- Create your own mychart
[root@master mychart]# helm create mychart
Creating mychart
[root@master mychart]# ls
mychart
[root@master mychart]# tree mychart/
mychart/
├── charts
├── Chart.yaml
├── templates
│   ├── deployment.yaml                     # Deployment of related resources
│   ├── _helpers.tpl                            # Template assistant
│   ├── ingress.yaml                            # ingress resources
│   ├── NOTES.txt                                   # chart's help text, run helm install to show to the user
│   ├── service.yaml                            # service endpoint
│   └── tests
│       └── test-connection.yaml
└── values.yaml

3 directories, 8 files
- Delete all files under template and create configmap
rm -rf mychart/templates/*
# Let's first create a mychart/templates/configmap.yaml:

apiVersion: v1
kind: ConfigMap
metadata:
  name: mychart-configmap
data:
  myvalue: "Hello World"
- Installation test
Because the created yaml file is in template, tiller reads the file and sends it to kubernetes.
[root@master mychart]# helm install ./mychart/
NAME:   enervated-dolphin
LAST DEPLOYED: Sun Jul 21 09:29:13 2019
NAMESPACE: default
STATUS: DEPLOYED

RESOURCES:
==> v1/ConfigMap
NAME               DATA  AGE
mychart-configmap  1     0s

[root@master mychart]# kubectl get cm mychart-configmap
NAME                DATA   AGE
mychart-configmap   1      2m6s
[root@master mychart]# kubectl describe cm mychart-configmap
Name:         mychart-configmap
Namespace:    default
Labels:       <none>
Annotations:  <none>

Data
====
myvalue:
----
this is my chart configmap
Events:  <none>

[root@master mychart]# helm get manifest enervated-dolphin

---
# Source: mychart/templates/configmap.yaml
apiVersion: v1
kind: ConfigMap
metadata:
  name: mychart-configmap
data:
  myvalue: "this is my chart configmap"
The helm get manifest command takes the release name (enervated-dolphin) and prints out all Kubernetes resources uploaded to the server. Each file begins as a YAML document, followed by an automatically generated comment line telling us about the YAML document generated by the template file.
From there, we can see that the YAML data is exactly what we designed in our configmap.yaml file.
Now we can delete our release: helm delete enervated-dolphin.
[root@master mychart]# helm delete enervated-dolphin
release "enervated-dolphin" deleted
5.4 Add template calls
Hard-coded name: Resource generation is often considered a bad practice. The name should be the only version. So we might want to generate a name field by inserting release names.
Tip: name: Due to the limitation of DNS system, this field is limited to 63 characters. Therefore, release names are limited to 53 characters. Kubernetes 1.3 and earlier were limited to 24 characters (14 character names).
Modify the previous configmap as follows
apiVersion: v1
kind: ConfigMap
metadata:
  name: {{.Release.Name}}-configmap
data:
  myvalue: "Hello World"
name: Now the value has changed to {Release. name} - configmap.
Template instructions are contained in {and}} blocks.
The template instruction {Release.Name} injects the release name into the template. The value passed to the template can be considered a namespace object, where dot (.) separates each namespace element.
The first small dot in front of Release indicates that we start with the namespace at the top of the range (we'll talk about scope a little). So we can understand. Release.Name: "Start with the top-level namespace, find the Release object, and then find the object named Name in it."
This Release object is one of Helm's built-in objects, and we'll go into it later. But for now, that's enough to show the release name Tiller assigned to us.
Now, when we install our resources, we will immediately see the results of using this template instruction:
[root@master mychart]# helm install ./mychart/
NAME:   famous-peahen
LAST DEPLOYED: Sun Jul 21 09:42:05 2019
NAMESPACE: default
STATUS: DEPLOYED

RESOURCES:
==> v1/ConfigMap
NAME                    DATA  AGE
famous-peahen-confgmap  1     0s

[root@master mychart]# helm get manifest famous-peahen

---
# Source: mychart/templates/configmap.yaml
apiVersion: v1
kind: ConfigMap
metadata:
  name: famous-peahen-confgmap
data:
  myvalue: "this is my chart configmap"
We looked at the basic template: the YAML file was embedded with template instructions and passed. In the next section, we'll look at templates in depth. But before moving on, there's a quick trick to building templates faster: when you want to test template rendering, but you don't actually install anything, you can use helm install -- debug -- dry-run. / mychart. This sends the chart to the Tiller server, which renders the template. Instead of installing chart, it returns the rendering template so that you can see the output:
5.5 Built-in Objects
Objects are passed from the template engine to the template. Your code can pass objects (we'll see examples when explaining with and range statements). There are even several ways to create new objects in templates, just like the tuple function we'll see later.
Objects can be simple, with only one value. Or they can include other objects or functions. For example, a Release object contains multiple objects (such as Release.Name) and a Files object has some functions.
In the previous section, we inserted the release name into the template using {Release.Name}. Release is one of the top-level objects that can be accessed in templates.
- Release: This object describes release itself. There are several objects in it:
- Release.Name: release name
- Release.Time: release time
- Release.Namespace: namespace for release (if the list is not covered)
- Release.Service: The name of the release service (always Tiller).
- Release.Revision: The revised version number of this release. It starts with 1 and adds one helm upgrade at a time.
- Release.IsUpgrade: If the current operation is upgrade or rollback, set it to true.
- Release.IsInstall: If the current operation is installation, set to true.
- Values: Pass in the value of the template from the values.yaml file and the user-supplied file. Values are empty by default.
- chart: The content of the Chart.yaml file. Any data Chart.yaml will be accessed here. For example, {chart.Name} - {chart.Version} will print out mychart-0.1.0. chart Guide Charts Guide Lists available fields
- Files: This provides access to all non-special files in charts. Although it cannot be used to access templates, it can be used to access other files in charts. See the Access Files section.
- Files.Get is a function that gets files by name (. Files.Get config.ini)
- Files.GetBytes is a function that takes the file content as an array of bytes rather than a string. This is useful for things like pictures.
- Capabilities: This provides information about the functionality supported by the Kubernetes cluster.
- Capabilities.APIVersions is a set of version information.
- Capabilities.APIVersions.Has $version indicates whether the version is enabled on the cluster (batch/v1).
- Capabilities. Kube Version provides a way to find the Kubernetes version. It has the following values: Major, Minor, GitVersion, GitCommit, GitTreeState, BuildDate, GoVersion, Compiler, and Platform.
- Capabilities.TillerVersion provides a way to find Tiller versions. It has the following values: SemVer, GitCommit, and GitTreeState.
- Template: Contains information about the current template being executed
- Name: Name space file path to the current template (such as mychart/templates/mytemplate.yaml)
- BasePath: The namespace path of the current chart template directory (for example, mychart/templates).
These values can be used for any top-level template. As we will see later, this does not mean that they will be available anywhere.
The built-in values always start with capital letters. This is in line with Go's naming convention. When you create your own name, you are free to use the conventions that suit your team. Some teams, such as the Kubernetes chart team, chose to use only lowercase initials to distinguish between local names and built-in names. In this guide, we follow this agreement.
5.6 values file
In the previous section, we looked at the built-in objects provided by Helm templates. One of the four built-in objects is Values. This object provides access to the value of the incoming chart. Its content comes from four sources:
- The values.yaml file in chart
- If this is a child chart, the values.yaml file from the parent chart
- The value file is passed into the file (helm install-f myvals.yaml. / mychart) by the - f flag of helm install or helm upgrade.
- By -- set (for example, helm install -- set foo = bar. / mychart)
The list above is arranged in a specific order: values.yaml by default, the parent chart can override the default level, and the chart values.yaml can be overridden by the user-provided values file, and the file can be overridden by the - set parameter.
Value files are pure YAML files. We edit mychart/values.yaml, and then we edit our ConfigMap template.
Delete the default values.yaml, and we only set one parameter:
# Edit values.yaml
domain: anchnet.com

# Reference in template
apiVersion: v1
kind: ConfigMap
metadata:
  name: {{.Release.Name}}-configmap
data:
  myvalue: "Hello World"
  domain: {{.Values.domain}}
Notice that we get the value of domain `in the last line {Values.domain}}.
[root@master mychart]# helm install --dry-run --debug ./mychart
'''
---
# Source: mychart/templates/configmap.yaml
apiVersion: v1
kind: ConfigMap
metadata:
  name: exciting-manta-confgmap
data:
  myvalue: "this is my chart configmap"
  domain: anchnet.com
- Manual Utilization -- set Specification
Because domain is set to anchnet.com in the default values.yaml file, this is the value displayed in the template. We can easily override our helm install command by adding a -- set flag:
helm install --dry-run --debug --set domain=51idc.com ./mychart
'''
---
# Source: mychart/templates/configmap.yaml
apiVersion: v1
kind: ConfigMap
metadata:
  name: foppish-mule-confgmap
data:
  myvalue: "this is my chart configmap"
  domain: 51idc.com
Because -- set has a higher priority than the default values.yaml file
- Delete the default key
If you need to delete a key from the default value, you can override the key's value as null, in which case Helm will delete the key from the override merge.
helm install stable/drupal --set image=my-registry/drupal:0.1.0 --set livenessProbe.exec.command=[cat,docroot/CHANGELOG.txt] --set livenessProbe.httpGet=null
5.7 Template Functions and Pipelines
- Template function
So far, we know how to put information into templates. But the information is put into the template without modification. Sometimes we want to convert these data to make them more useful to us.
Let's start with a best practice: when strings are injected into templates from. Values objects, we refer to them. We can do this by calling functions in quote template instructions:
apiVersion: v1
kind: ConfigMap
metadata:
  name: {{.Release.Name}}-configmap
data:
  myvalue: "Hello World"
  drink: {{quote .Values.favorite.drink}}
  food: {{quote .Values.favorite.food}}
Template functions follow the grammar function Name arg1 arg2.... In the code snippet above, quote. Values. favorite. drive calls the quote function and passes a parameter to it.
Helm has more than 60 available functions. Some of them are made up of Go Template Language Go template language Defined by itself. Most of the others are Sprig template Libraries Sprig template library Part of it. We will see a lot in the course of our illustration.
Although we consider Helm Template Language as unique to Helm, it is actually the Go Template Language, a combination of additional functions and various wrappers to expose certain objects to templates. Many resources on Go templates may be helpful in understanding templates.
- The Conduit
One of the powerful functions of template language is its pipeline concept. Using a UNIX concept, a pipeline is a tool that links together a series of template commands to compactly express a series of transformations. In other words, pipelines are an effective way to accomplish several things in sequence. Let's rewrite the above example with a pipe.
apiVersion: v1
kind: ConfigMap
metadata:
  name: {{.Release.Name}}-configmap
data:
  myvalue: "Hello World"
  drink: {{.Values.favorite.drink | quote}}
  food: {{.Values.favorite.food | quote}}
In this example, instead of calling quote ARGUMENT, we changed the order. We use a pipe (|) to send "parameters" to the function:.Values.favorite.drink | quote. Using pipes, we can link several functions together:
apiVersion: v1
kind: ConfigMap
metadata:
  name: {{.Release.Name}}-configmap
data:
  myvalue: "Hello World"
  drink: {{.Values.favorite.drink | quote}}
  food: {{.Values.favorite.food | upper | quote}}
Reversal order is a common practice in templates. You'll see. val | quote is more common than quote. val. Practice is the same.
When assessed, the template will produce the following results:
# Source: mychart/templates/configmap.yaml
apiVersion: v1
kind: ConfigMap
metadata:
  name: trendsetting-p-configmap
data:
  myvalue: "Hello World"
  drink: "coffee"
  food: "PIZZA"
Note that our original pizza has now been converted to "PIZZA".
When there are pipe parameters like this, the result of the first evaluation (. Values.favorite.drink) is sent as the last parameter of the function. We can modify the beverage example above to illustrate a function repeat COUNT STRING with two parameters:
apiVersion: v1
kind: ConfigMap
metadata:
  name: {{.Release.Name}}-configmap
data:
  myvalue: "Hello World"
  drink: {{.Values.favorite.drink | repeat 5 | quote}}
  food: {{.Values.favorite.food | upper | quote}}
The repeat function will return a given string and a given number of times, so we will get the output:
# Source: mychart/templates/configmap.yaml
apiVersion: v1
kind: ConfigMap
metadata:
  name: melting-porcup-configmap
data:
  myvalue: "Hello World"
  drink: "coffeecoffeecoffeecoffeecoffee"
  food: "PIZZA"
- Using default function
A commonly used function is default: default DEFAULT_VALUE GIVEN_VALUE. This function allows default values to be specified within the template in case the value is omitted. Let's use it to modify the beverage example above:
drink: {{.Values.favorite.drink | default "tea" | quote}}If we run as usual, we will get our coffee:
# Source: mychart/templates/configmap.yaml
apiVersion: v1
kind: ConfigMap
metadata:
  name: virtuous-mink-configmap
data:
  myvalue: "Hello World"
  drink: "coffee"
  food: "PIZZA"
Now, we will delete our favorite drink settings values.yaml from the following places:
favorite:
  #drink: coffee
  food: pizza
Now rerun helm install -- dry-run -- debug. / mychart to generate this YAML:
# Source: mychart/templates/configmap.yaml
apiVersion: v1
kind: ConfigMap
metadata:
  name: fair-worm-configmap
data:
  myvalue: "Hello World"
  drink: "tea"
  food: "PIZZA"
In actual chart s, all static defaults should exist in values.yaml and should not be repeated using the default command (otherwise they will be redundant). However, the default command is appropriate for the calculated value, because the calculated value cannot be declared in values.yaml. For example:
drink: {{.Values.favorite.drink | default (printf "%s-tea" (include "fullname" .)) }}In some places, an if condition may be more appropriate than this default. We'll see that in the next section.
Template functions and pipes are powerful ways to transform information and insert it into YAML. But sometimes you need to add more complex template logic than inserting strings. In the next section, we will look at the control structure provided by the template language.
- operator functions
For templates, operators (eq, ne, lt, gt, and, or, etc.) are implemented functions. In pipes, operators can be grouped in parentheses ((and)).
Place the operator in front of the declaration, followed by its parameters, just like using a function. To use multiple operators together, each function is separated by parentheses.
{{/* include the body of this if statement when the variable .Values.fooString xists and is set to "foo" */}}
{{if and .Values.fooString (eq .Values.fooString "foo") }}
    {{...}}
{{end}}

{{/* do not include the body of this if statement because unset variables evaluate o false and .Values.setVariable was negated with the not function. */}}
{{if or .Values.anUnsetVariable (not .Values.aSetVariable) }}
   {{...}}
{{end}}
Now we can turn from functions and pipes to flow control, condition, cycle and range modifiers.
5.8 Process Control
5.8.1 Process Control
The control structure (called "action" in template parlance) provides the template author with the ability to control the template generation process. Helm's template language provides the following control structures:
- if/else is used to create conditional blocks
- with specified range
- range, which provides a "for each" style loop
In addition, it provides some operations for declaring and using named template segments:
- define declares a new named template in the template
- Template imports a named template
- block declares a special fillable template area
In this section, we will talk about if, with, and range. Others are described in the Naming Templates section later in this guide.
5.8.2 if/else
The first control structure we want to see is used to conditionally contain text blocks in templates. This is the if/else block.
The basic structure of the condition is as follows:
{{if PIPELINE}}
  # Do something
{{else if OTHER PIPELINE}}
  # Do something else
{{else}}
  # Default case
{{end}}
Note that we are now talking about pipes rather than values. The reason is to make it clear that the control structure can execute the entire pipeline, not just evaluate a value.
If the value is as follows, the pipeline is evaluated as false.
- A Boolean Pseudo
- A Number Zero
- An empty string
- A nil (empty or null)
- An empty set (map, slice, tuple, dict, array)
In other cases, the condition value is true, and the pipeline is executed.
We add a simple condition to ConfigMap. If the beverage is set to coffee, we will add another setting:
apiVersion: v1
kind: ConfigMap
metadata:
  name: {{.Release.Name}}-configmap
data:
  myvalue: "Hello World"
  drink: {{.Values.favorite.drink | default "tea" | quote}}
  food: {{.Values.favorite.food | upper | quote}}
  {{if and .Values.favorite.drink (eq .Values.favorite.drink "coffee") }}mug: true{{ end }}
Note that. Values.favorite.drink must be defined, otherwise an error will be thrown when comparing it to "coffee". Since we commented out drink: coffee in the previous example, the output should not contain the mug: true flag. But if we add this line back to the values.yaml file, the output should be as follows:
# Source: mychart/templates/configmap.yaml
apiVersion: v1
kind: ConfigMap
metadata:
  name: eyewitness-elk-configmap
data:
  myvalue: "Hello World"
  drink: "coffee"
  food: "PIZZA"
  mug: true
5.8.3 Control Spaces
When looking at the conditions, we should quickly look at the space control mode in the template. Let's take a look at the previous example and format it into a more readable format:
apiVersion: v1
kind: ConfigMap
metadata:
  name: {{.Release.Name}}-configmap
data:
  myvalue: "Hello World"
  drink: {{.Values.favorite.drink | default "tea" | quote}}
  food: {{.Values.favorite.food | upper | quote}}
  {{if eq .Values.favorite.drink "coffee"}}
    mug: true
  {{end}}
At first, it looked good. But if we run it through a template engine, we get a wrong result:
$ helm install --dry-run --debug ./mychart
SERVER: "localhost:44134"
CHART PATH: /Users/mattbutcher/Code/Go/src/k8s.io/helm/_scratch/mychart
Error: YAML parse error on mychart/templates/configmap.yaml: error converting YAML to JSON: yaml: line 9: did not find expected key
What happened? Because of the space above, we generated incorrect YAML.
# Source: mychart/templates/configmap.yaml
apiVersion: v1
kind: ConfigMap
metadata:
  name: eyewitness-elk-configmap
data:
  myvalue: "Hello World"
  drink: "coffee"
  food: "PIZZA"
    mug: true
mug is indented incorrectly. Let's simply indent that line and run it again:
apiVersion: v1
kind: ConfigMap
metadata:
  name: {{.Release.Name}}-configmap
data:
  myvalue: "Hello World"
  drink: {{.Values.favorite.drink | default "tea" | quote}}
  food: {{.Values.favorite.food | upper | quote}}
  {{if eq .Values.favorite.drink "coffee"}}
  mug: true
  {{end}}
When we send this information, we get a valid YAML, but it still looks interesting:
# Source: mychart/templates/configmap.yaml
apiVersion: v1
kind: ConfigMap
metadata:
  name: telling-chimp-configmap
data:
  myvalue: "Hello World"
  drink: "coffee"
  food: "PIZZA"

  mug: true
Please note that we received some blank lines in YAML. Why? When the template engine runs, it will delete the blanks in {and}, but leave the remaining blanks as they are.
The indented spaces in YAML are strict, so managing them becomes very important. Fortunately, Helm templates have several tools to help us.
First, you can use special characters to modify the bracket syntax of the template declaration to tell the template engine to fill in the blanks. {{-(dashes and spaces added) means that the lattice should be moved left, while -}} means that the right space should be deleted. Be careful! Line breaks are also spaces!
Make sure there are spaces between - and other instructions. - 3 means "delete the left space and print 3", while - 3 means "print - 3".
With this grammar, we can modify our template to get rid of these new lines:
apiVersion: v1
kind: ConfigMap
metadata:
  name: {{.Release.Name}}-configmap
data:
  myvalue: "Hello World"
  drink: {{.Values.favorite.drink | default "tea" | quote}}
  food: {{.Values.favorite.food | upper | quote}}
  {{- if eq .Values.favorite.drink "coffee"}}
  mug: true
  {{- end}}
To clarify this point, let's adjust the above, replace the spaces with *, and delete each space according to this rule. A * at the end of the line indicates that the newline character will be removed
apiVersion: v1
kind: ConfigMap
metadata:
  name: {{.Release.Name}}-configmap
data:
  myvalue: "Hello World"
  drink: {{.Values.favorite.drink | default "tea" | quote}}
  food: {{.Values.favorite.food | upper | quote}}*
**{{- if eq .Values.favorite.drink "coffee"}}
  mug: true*
**{{- end}}
With this in mind, we can run our template through Helm and view the results:
# Source: mychart/templates/configmap.yaml
apiVersion: v1
kind: ConfigMap
metadata:
  name: clunky-cat-configmap
data:
  myvalue: "Hello World"
  drink: "coffee"
  food: "PIZZA"
  mug: true
Use the chomping modifier carefully. This can easily cause accidents:
  food: {{.Values.favorite.food | upper | quote}}
  {{- if eq .Values.favorite.drink "coffee" -}}
  mug: true
  {{- end -}}
This will result in food: "PIZZA"mug:true, because the line breaks for both sides are deleted.
For more information about space control in templates, see the official Go template documentation Official Go template documentation
Finally, sometimes it is easier to tell the template system how to indent, rather than trying to grasp the spacing of template instructions. Therefore, it may sometimes be found useful to use the indent function ({{indent 2 "mug:true"}).
5.8.4 Use with to modify scope
The next control structure to look at is with. It controls the scope of variables. Recall that. is a reference to the current scope. Therefore,.Values tells the template to find Values objects in the current scope.
Its grammar with is similar to a simple if statement:
{{with PIPELINE}}
  # restricted scope
{{end}}
The scope can be changed. with allows the current range (.) to be set to a specific object. For example, we've been using. Values.favorites. Let's rewrite our ConfigMap to change. Scope to point to. Values.favorites:
apiVersion: v1
kind: ConfigMap
metadata:
  name: {{.Release.Name}}-configmap
data:
  myvalue: "Hello World"
  {{- with .Values.favorite}}
  drink: {{.drink | default "tea" | quote}}
  food: {{.food | upper | quote}}
  {{- end}}
Note that we can now refer to. drink and. food without restricting them. This is because the with declaration sets. to point to. Values.favorite. After {end}, reset its previous range.
But please note! In the restricted range, other objects will not be accessible from the parent range at this time. For example, the following error will be reported:
  {{- with .Values.favorite}}
  drink: {{.drink | default "tea" | quote}}
  food: {{.food | upper | quote}}
  release: {{.Release.Name}}
  {{- end}}
It generates an error because Release.Name is not within. limits. But if we swap the last two lines, all will work as expected, because the scope is reset later.
  {{- with .Values.favorite}}
  drink: {{.drink | default "tea" | quote}}
  food: {{.food | upper | quote}}
  {{- end}}
  release: {{.Release.Name}}
Looking at range, let's look at the template variable, which provides a way to solve the scope problem mentioned above.
5.8.5 Cyclic range Action
Many programming languages support for loops, foreach loops, or similar functional mechanisms. In Helm's template language, the way to traverse collections is to use the range operator.
First, let's add a list of pizza ingredients to our values.yaml file:
favorite:
  drink: coffee
  food: pizza
pizzaToppings:
  - mushrooms
  - cheese
  - peppers
  - onions
Now we have a list (called slice in the template) pizza Toppings. We can modify our template and print this list into our ConfigMap:
apiVersion: v1
kind: ConfigMap
metadata:
  name: {{.Release.Name}}-configmap
data:
  myvalue: "Hello World"
  {{- with .Values.favorite}}
  drink: {{.drink | default "tea" | quote}}
  food: {{.food | upper | quote}}
  {{- end}}
  toppings: |-
    {{- range .Values.pizzaToppings}}
    - {{. | title | quote}}
    {{- end}}
Let's take a closer look at toppings:list. The range function traverses the pizza Toppings list. But now something interesting is happening. Just like the scope of withsets, so is the range operator. Each time it passes through the loop, the. is set to the top of the current pizza. That's the first time. Set mushrooms. The second iteration is set to cheese, and so on.
We can send the value of. directly to the pipeline, so when we do this {. | title | quote}, it sends. to Title (title case function), and then to quote. If we run this template, the output will be:
# Source: mychart/templates/configmap.yaml
apiVersion: v1
kind: ConfigMap
metadata:
  name: edgy-dragonfly-configmap
data:
  myvalue: "Hello World"
  drink: "coffee"
  food: "PIZZA"
  toppings: |-
    - "Mushrooms"
    - "Cheese"
    - "Peppers"
    - "Onions"
Now, in this case, we have encountered some difficult things. The toppings: | - line declares a multi-line string. So our toppings list is not actually a YAML list. This is a very large string. Why do we do this? Because data in ConfigMaps consists of key/value pairs, where keys and values are simple strings. To understand this situation, check it out Kubernetes ConfigMap document . But for us, this detail doesn't matter.
The | - tag in YAML represents a multi-line string. This can be a useful technique for embedding large chunks of data in lists, as shown here.
Sometimes it's useful to quickly create a list in a template and then traverse the list. Helm templates have a feature that makes this simple: tuple. In computer science, tuples are a set of list classes of fixed size, but with arbitrary data types. This roughly expresses how tuple is used.
  sizes: |-
    {{- range tuple "small" "medium" "large"}}
    - {{.}}
    {{- end}}
  sizes: |-
    - small
    - medium
    - large
In addition to list s and tuple s, range s can also be used to traverse collections with keys and values (such as map or dict). When we introduce template variables in the next section, we will see how to do this.
5.9 Variables
We have learned about functions, pipes, objects, and control structures, and we can find one of the more basic uses in many programming languages: variables. In templates, they are used less frequently. We'll see how to use them to simplify the code and make better use of with and range.
In the previous example, we saw that this code would fail:
  {{- with .Values.favorite}}
  drink: {{.drink | default "tea" | quote}}
  food: {{.food | upper | quote}}
  release: {{.Release.Name}}
  {{- end}}
Release.Name is not within the bounds of the with block. One way to solve the scope problem is to assign objects to variables that can be accessed without considering the current scope.
In Helm templates, variables are named references to another object. It follows this form, $name. Variables are assigned a special assignment operator: =. We can override the Release.Name above with variables.
apiVersion: v1
kind: ConfigMap
metadata:
  name: {{.Release.Name}}-configmap
data:
  myvalue: "Hello World"
  {{- $relname := .Release.Name -}}
  {{- with .Values.favorite}}
  drink: {{.drink | default "tea" | quote}}
  food: {{.food | upper | quote}}
  release: {{$relname}}
  {{- end}}
Note that before we start with the block, we assign $relname: =. Release. Name. Now inside the with block, $relname variable still points to the publication name.
This will lead to the following results:
# Source: mychart/templates/configmap.yaml
apiVersion: v1
kind: ConfigMap
metadata:
  name: viable-badger-configmap
data:
  myvalue: "Hello World"
  drink: "coffee"
  food: "PIZZA"
  release: viable-badger
Variables are particularly useful in range loops. They can be used for listlike objects to capture both indexes and values:
toppings: |-
    {{- range $index, $topping := .Values.pizzaToppings}}
      {{$index}}: {{ $topping }}
    {{- end}}
Note that range is first a variable, then an assignment operator, and then a list. This assigns an integer index (starting from zero) to $index and a value to $topping. Running it will produce:
  toppings: |-
      0: mushrooms
      1: cheese
      2: peppers
      3: onions
For data structures with both keys and values, we can use range to get both. For example, we can loop. Values.favorite like this:
apiVersion: v1
kind: ConfigMap
metadata:
  name: {{.Release.Name}}-configmap
data:
  myvalue: "Hello World"
  {{- range $key, $val := .Values.favorite}}
  {{$key}}: {{ $val | quote }}
  {{- end}}
Now in the first iteration, $key is drink, $val is coffee, the second, $key is food, $val is pizza. Running the above code generates the following:
# Source: mychart/templates/configmap.yaml
apiVersion: v1
kind: ConfigMap
metadata:
  name: eager-rabbit-configmap
data:
  myvalue: "Hello World"
  drink: "coffee"
  food: "pizza"
Variables are usually not "global". Their range is their block. Previously, we assigned $relname at the top of the template. This variable will work within the scope of the entire template. But in our final example, $key and $val only work within the scope of the {{range...} {end} block.
However, there is always a variable that is the global $variable - which always points to the root context. This is very useful when you need to loop within the scope of the release name of the chart.
Examples are given to illustrate:
{{- range .Values.tlsSecrets}}
apiVersion: v1
kind: Secret
metadata:
  name: {{.name}}
  labels:
    # Many helm templates would use `.` below, but that will not work,
    # however `$` will work here
    app.kubernetes.io/name: {{template "fullname" $}}
    # I cannot reference .Chart.Name, but I can do $.Chart.Name
    helm.sh/chart: "{{$.Chart.Name}}-{{ $.Chart.Version }}"
    app.kubernetes.io/instance: "{{$.Release.Name}}"
    app.kubernetes.io/managed-by: "{{$.Release.Service}}"
type: kubernetes.io/tls
data:
  tls.crt: {{.certificate}}
  tls.key: {{.key}}
---
{{- end}}
So far, we have only looked at one template declared in a file. But one of the powerful features of Helm Template Language is that it can declare multiple templates and use them together. We will discuss it in the next section.
5.10 Naming Template
It's time to start creating more than one template. In this section, we will see how to define named templates in a file and then use them elsewhere. Named templates (sometimes referred to as partial or sub-templates) are templates that are limited within a file and have a name. We have two ways to create it and several different ways to use it.
In the "Flow Control" section, we introduce three actions for declaring and managing templates: define, template, and block. In this section, we will introduce these three actions and introduce an include function, similar to template.
An important detail to note when naming templates is that the template name is global. If two templates with the same name are declared, the last template loaded is the working template. Because templates in subcharts are compiled with top-level templates, care should be taken to name templates with the names of specific charts.
The generic naming convention is to add a chart name for each defined template: {{define "mychart.labels"}. By prefixing specific chart names, we can avoid any conflicts that may arise from two different charts of the same name template.
5.10.1 partials and files
So far, we have used a file that contains a template. Helm's template language, however, allows the creation of specified embedded templates that can be accessed by name.
Before we start writing these templates, there are some file naming conventions worth mentioning:
- Most file templates / are considered to contain Kubernetes manifests
- NOTES.txt is an exception
- The file whose name begins with an underscore () is assumed to have no internal manifest. These files do not render Kubernetes object definitions, but are available everywhere in other chart templates for invocation.
These files are used to store partials and auxiliary programs. In fact, when we first created mychart, we saw a file called _helpers.tpl. This file is the default location for template partials.
5.10.2 Declare and use templates with define and template
Six Actual Warfare
6.1 Making charts
- go2cloud-api-doc made by slate will be charts made by helm to facilitate subsequent deployment
helm create go2cloud-api-doc

[root@master go2cloud-api-doc]# tree
.
├── charts
├── Chart.yaml
├── templates
│   ├── deployment.yaml
│   ├── _helpers.tpl
│   ├── NOTES.txt
│   ├── service.yaml
│   └── tests
│       └── test-connection.yaml
└── values.yaml

3 directories, 8 files

# Configure deployment
[root@master go2cloud_api_doc_charts]# egrep "^$|^#" -v go2cloud-api-doc/templates/deployment.yaml
apiVersion: apps/v1
kind: Deployment
metadata:
  name: {{ include "go2cloud-api-doc.fullname" . }}
  labels:
{{ include "go2cloud-api-doc.labels" . | indent 4 }}
spec:
  replicas: {{ .Values.replicaCount }}
  selector:
    matchLabels:
      app.kubernetes.io/name: {{ include "go2cloud-api-doc.name" . }}
      app.kubernetes.io/instance: {{ .Release.Name }}
  template:
    metadata:
      labels:
        app.kubernetes.io/name: {{ include "go2cloud-api-doc.name" . }}
        app.kubernetes.io/instance: {{ .Release.Name }}
    spec:
      imagePullSecrets:
        - name: {{ .Values.imagePullSecrets }}
      containers:
        - name: {{ .Chart.Name }}
          image: "{{ .Values.image.repository }}:{{ .Values.image.tag }}"
          imagePullPolicy: {{ .Values.image.pullPolicy }}
          ports:
            - name: http
              containerPort: {{ .Values.service.port }}
              protocol: TCP
          livenessProbe:
            {{- toYaml .Values.livenessProbe | nindent 12  }}
          readinessProbe:
            {{- toYaml .Values.readinessProbe | nindent 12  }}
          resources:
            {{- toYaml .Values.resources | nindent 12 }}
      {{- with .Values.nodeSelector }}
      nodeSelector:
        {{- toYaml . | nindent 8 }}
      {{- end }}
    {{- with .Values.affinity }}
      affinity:
        {{- toYaml . | nindent 8 }}
    {{- end }}
    {{- with .Values.tolerations }}
      tolerations:
        {{- toYaml . | nindent 8 }}
    {{- end }}

# Configuration service
[root@master go2cloud_api_doc_charts]# egrep "^$|^#" -v go2cloud-api-doc/templates/service.yaml
apiVersion: v1
kind: Service
metadata:
  name: {{ include "go2cloud-api-doc.fullname" . }}
  labels:
{{ include "go2cloud-api-doc.labels" . | indent 4 }}
spec:
  type: {{ .Values.service.type }}
  ports:
    - port: {{ .Values.service.port }}
      targetPort: {{ .Values.service.port }}
      protocol: TCP
      name: http
      nodePort: {{ .Values.service.nodePort }}
  selector:
    app.kubernetes.io/name: {{ include "go2cloud-api-doc.name" . }}
    app.kubernetes.io/instance: {{ .Release.Name }}

# Configure values
[root@master go2cloud_api_doc_charts]# egrep "^$|^#|^[[:space:]]+#" -v go2cloud-api-doc/values.yaml
replicaCount: 1
image:
  repository: 10.234.2.218/go2cloud/go2cloud-api-doc
  tag: latest
  pullPolicy: Always
imagePullSecrets: registry-secret
nameOverride: ""
fullnameOverride: ""
service:
  type: NodePort
  port: 4567
  nodePort: 30567
ingress:
  enabled: false
  annotations: {}
  hosts:
    - host: chart-example.local
      paths: []
  tls: []
resources:
  requests:
    cpu: 1000m
    memory: 1280Mi
  limits:
    cpu: 1000m
    memory: 1280Mi
livenessProbe:
  tcpSocket:
    port: 4567
  initialDelaySeconds: 10
  failureThreshold: 2
  timeoutSeconds: 10
readinessProbe:
  httpGet:
    path: /#introduction
    port: http
  initialDelaySeconds: 5
  failureThreshold: 2
  timeoutSeconds: 30
nodeSelector: {}
tolerations: []
affinity: {}

[root@master go2cloud_api_doc_charts]# egrep "^$|^#|^[[:space:]]+#" -v go2cloud-api-doc/Chart.yaml
apiVersion: v1
appVersion: "1.0"
description: A Helm chart for Kubernetes
name: go2cloud-api-doc
version: 0.1.0

# deploy
[root@master go2cloud_api_doc_charts]# helm install -n go2cloud-api-doc -f go2cloud-api-doc/values.yaml go2cloud-api-doc/
NAME:   go2cloud-api-doc
LAST DEPLOYED: Wed Jul 31 14:34:21 2019
NAMESPACE: default
STATUS: DEPLOYED

RESOURCES:
==> v1/Deployment
NAME              READY  UP-TO-DATE  AVAILABLE  AGE
go2cloud-api-doc  0/1    1           0          0s

==> v1/Pod(related)
NAME                               READY  STATUS             RESTARTS  AGE
go2cloud-api-doc-7cfb7bb795-clrz8  0/1    ContainerCreating  0         0s

==> v1/Service
NAME              TYPE      CLUSTER-IP     EXTERNAL-IP  PORT(S)         AGE
go2cloud-api-doc  NodePort  10.96.228.251  <none>       4567:30567/TCP  0s

NOTES:
1. Get the application URL by running these commands:
  export NODE_PORT=$(kubectl get --namespace default -o jsonpath="{.spec.ports[0].nodePort}" services go2cloud-api-doc)
  export NODE_IP=$(kubectl get nodes --namespace default -o jsonpath="{.items[0].status.addresses[0].address}")
  echo http://$NODE_IP:$NODE_PORT

[root@master go2cloud_api_doc_charts]# helm ls go2cloud-api-doc
NAME                    REVISION        UPDATED                         STATUS          CHART                   APP VERSION     NAMESPACE
go2cloud-api-doc        1               Wed Jul 31 14:34:21 2019        DEPLOYED        go2cloud-api-doc-0.1.0  1.0             default

[root@master go2cloud_api_doc_charts]# kubectl get deployment go2cloud-api-doc
NAME               READY   UP-TO-DATE   AVAILABLE   AGE
go2cloud-api-doc   0/1     1            0           10m

[root@master go2cloud_api_doc_charts]# kubectl get pods |grep go2cloud-api-doc
go2cloud-api-doc-7cfb7bb795-clrz8                         0/1     CrashLoopBackOff   7          10m

[root@master go2cloud_api_doc_charts]# kubectl get svc go2cloud-api-doc
NAME               TYPE       CLUSTER-IP      EXTERNAL-IP   PORT(S)          AGE
go2cloud-api-doc   NodePort   10.96.228.251   <none>        4567:30567/TCP   10m

# Pack
[root@master go2cloud_api_doc_charts]# helm package ./go2cloud-api-doc/
Successfully packaged chart and saved it to: /data/go2cloud_api_doc_charts/go2cloud-api-doc-0.1.0.tgz
[root@master go2cloud_api_doc_charts]# tree
.
├── go2cloud-api-doc
│   ├── charts
│   ├── Chart.yaml
│   ├── templates
│   │   ├── deployment.yaml
│   │   ├── _helpers.tpl
│   │   ├── NOTES.txt
│   │   ├── service.yaml
│   │   └── tests
│   │       └── test-connection.yaml
│   └── values.yaml
└── go2cloud-api-doc-0.1.0.tgz

4 directories, 8 files

# Upgraded copy number
helm upgrade go2cloud-api-doc --set replicaCount=2 go2cloud-api-doc/
6.2 Configure minior
Store the charts on minio and deploy minior in k8s
- Create a local chart directory
mkdir minio-chart
- Packing the modified chart file
helm package redis
- Copy the package to the created local chart directory
cp redis-8.0.5.tgz /root/minio-chart/
- Update index under / root/minio-chart / directory
helm repo index minio-chart/ --url http://10.234.2.204:31311/minio/common-helm-repo/
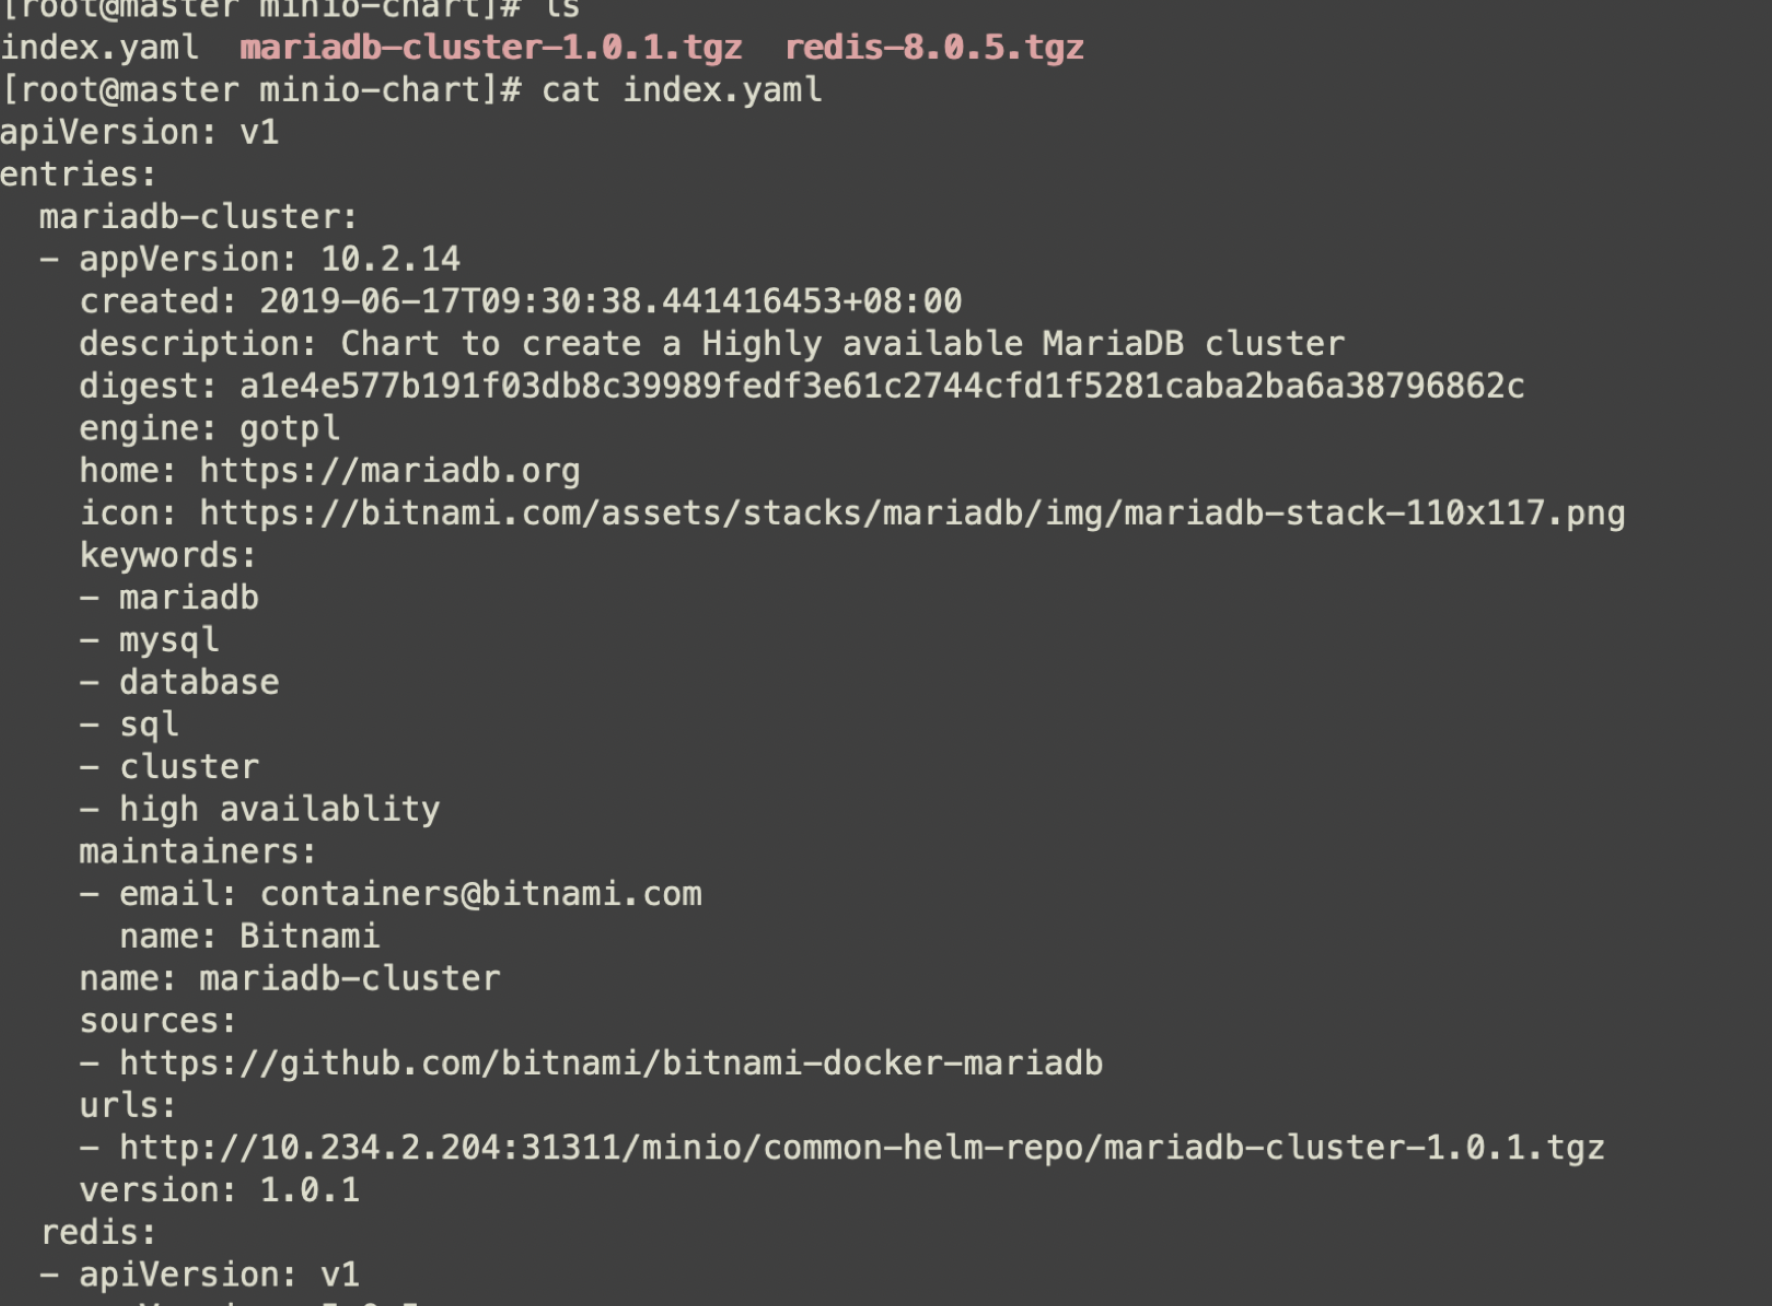
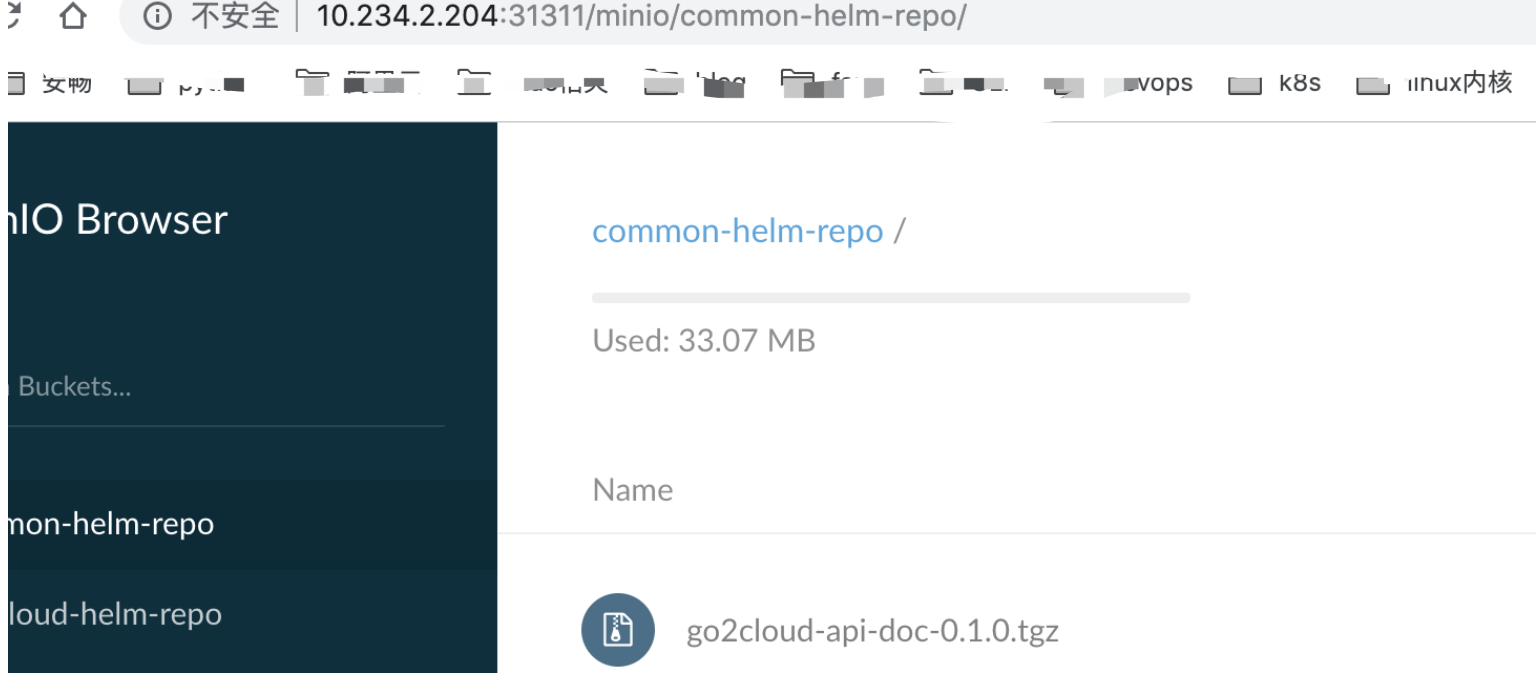
- Upload index.yaml and chart packages to minio
mc cp index.yaml minio/common-helm-repo/
mc cp redis-8.0.5.tgz minio/common-helm-repo/
- Upload the made charts to minio
helm repo add monocular https://helm.github.io/monocular
helm install -n monocular monocular/monocular

mc cp go2cloud-api-doc-0.1.0.tgz minio/common-helm-repo
You can view ak key information in ${HOME}/.mc/config.json.
- Verification

6.3 Upload to public helm warehouse
The charts package can be uploaded to the helm warehouse, can be placed in its own private warehouse, inflow: kubeapps/Monocular/minior, etc., can be installed with one key of the helm command.
Upload to public cloud public warehouses, such as Apphub, which is currently created by Ali in China. In today's cloud native ecosystem, many mature open source software has been made into Helm Charts, making it very convenient for users to download and use, such as Nginx, Apache, Elastic search, Redis and so on. However, before the release of App hub (Helm Charts China Station), the Open Cloud Native Application Center, it was always difficult for domestic users to download and use these Charts directly. Now, AppHub not only synchronizes all the applications in the official Helm Hub for domestic users in real time, but also automatically replaces all the inaccessible mirror URL s in these Charts (such as gcr.io, quay.io, etc.). Finally, it makes it possible for domestic developers to install "one-click" applications through helm install.
Specific submission of their charts can be referred to: https://github.com/cloudnativeapp/charts/pulls?spm=a2c6h.13155457.1383030.1.3347b579urlAo7
This is the slate chart I uploaded. Slate helps you create beautiful, intelligent, responsive API documentation.

Welcome to praise.