1, Construction of development environment
1.1 develop a suitable language for Hongmeng
- Java: suitable for mobile application development
- C/C + +: suitable for hardware development
- JavaScript: suitable for card development
- Cangjie (coming soon)
The differences in Java/JS card scenario capabilities are shown in the following table:
| scene | Java card | JS card | Supported versions |
|---|---|---|---|
| Real time refresh (similar to clock) | It is expensive for Java to use ComponentProvider for real-time refresh | JS can achieve end-to-side refresh, but customized components are required | HarmonyOS 2.0 and above |
| Development mode | The Java UI needs to process data and components at the same time at the card provider to generate a ComponentProvider remote rendering | The JS card is loaded and rendered by the user, and the provider only needs to deal with the separation of data, components and logic | HarmonyOS 2.0 and above |
| Component support | Text,Image,DirectionalLayout,PositionLayout,DependentLayout | div, list, list item, wiper, stack, image, text, span, progress, button (custom: chart, clock, calendar) | HarmonyOS 2.0 and above |
| Card internal dynamic effect | I won't support it | Temporarily closed | HarmonyOS 2.0 and above |
| Shadow blur | I won't support it | support | HarmonyOS 2.0 and above |
| Dynamic adaptive layout | I won't support it | support | HarmonyOS 2.0 and above |
| Custom card jump page | I won't support it | support | HarmonyOS 2.0 and above |
To sum up, JS cards support richer controls and capabilities than Java cards:
-
Java Card: it is suitable as a direct entrance without complex pages and events
-
JS card: suitable for cards with complex interfaces
1.2 preparations for java development
-
Register Huawei developer account: open Official website of Huawei developer Alliance , use your mobile phone number or email address to register your account and verify your real name
-
Download Development Tool: DevEco Studio, download link DevEco Studio distributed application development platform
- JDK: the development environment required by the Java language. The development tool will automatically download JDK8. At present, only JDK8 is supported
- Tool chain: some plug-in tools needed in development tools
- Toolchains: SDK tool chain, a necessary tool set for harmonic OS application development, including a collection of tools such as compilation, packaging, signature and database management. It is downloaded by default when downloading the SDK for the first time
- Viewer: Lite Wearable Previewer, which can dynamically preview the interface rendering effect of Lite Wearable applications during the development process. It does not download automatically by default, and you need to check the download manually
- Common settings of development tools:
- Automatically prompt to ignore case: in File - > Settings - > editor - > General - > code completion, uncheck Match case
- Auto import: File - > Settings - > editor - > General - > auto import, check Add unambiguous imports on the fly and Optimize imports on the fly
- Modify automatic prompt shortcut: File - > Settings - > keymap - > main Meun - > code - > code completion, change the Basic shortcut to Alt+/
- DevEco Studio project structure:
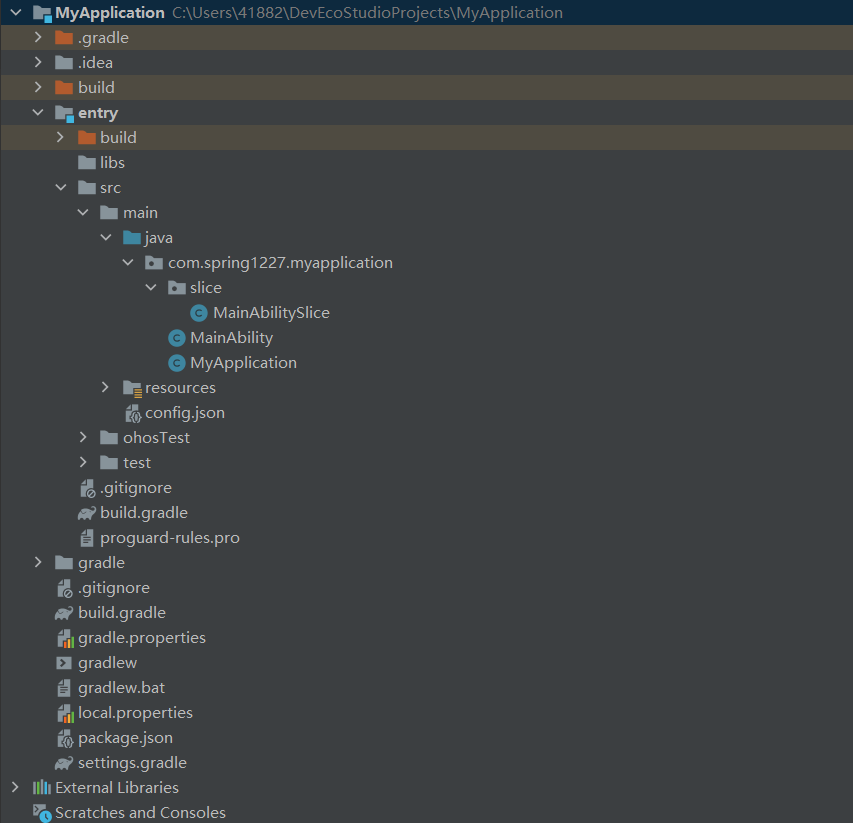
-
MyApplication: project name of the project
- . gradle: is the information of the project management tool gradle
- . idea: is the information of the development tool
- build: the program will be generated automatically after compiling and running
- entry: it is the main application module. In a project, there is one and only one, and all the code is written here (important)
- build: there is an R file in this folder, which records the corresponding id of each resource file. The contents are automatically generated. The R file is a compressed package containing the bytecode file of the ResourceTable class
- libs: the location where the third-party jar package is stored
- src: main code
- Main: it's the main code we write ourselves.
- java: there is all the code we wrote.
- resources: there are our resource files related to the interface.
- con "g.json: all configuration information related to the interface. Each interface needs to be configured in this.
- Main: it's the main code we write ourselves.
- ohosTest: Huawei's test tool.
- Test: Junit's test tool.
- Gradle: the configuration information of the project management tool gradle and the required jar package. In this, there is a configuration file of porperties. You can see the version number of gradle
- build.gradle: the configuration file of the third-party jar package. If you want to use the third-party jar package in future development, you need to configure it.
- gradlew: is the script file corresponding to the gradle command tool
- local.properties: local SDK configuration information
-
External Libraries: the third-party jar package to be imported in the project
2, Hongmeng introductory application
2.1 the first entry application - HelloWorld
2.1.1 how to run an application
-
Tools - > device manager, login account
-
Select P40 mobile phone and click the cyan triangle on the right to start
-
Click the green triangle above the compiler to start the project
2.1.2 inclusion relationship in page
-
MainAbility contains one or more MainAbilitySlice (sub interfaces), and MainAbilitySlice (sub interfaces) contains the content to be displayed
-
MainAbility is the first interface for project startup, but the content is not directly displayed in the interface. The sub interface is displayed in the interface, which is also called slice or fragment. Content display can be placed in the sub interface
2.1.3 configuration file config.json
All modules, interfaces and other information will be configured in this file.
After the Hongmeng application starts, first parse the con "g.json file.
The con fi g.json file is divided into three parts:
- app: the configuration of the whole project, including manufacturer information, version number, etc
- bundleName: package name
- vendor: it is the description of the application developer, that is, the name of the development company
- Version: includes: name (version number visible to the user), code (version number used by internal personnel of the company, not visible to the user)
- deviceCon "g": indicates the configuration information applied to the device. The application needs to obtain some permissions of the mobile phone and can be written in deviceCon "g". If you don't need any permissions, it's empty
- module: represents the configuration information of the whole code
- Package: package name
- Name: the name of the hap package
- Main ability: indicates the entry name of the HAP package
- deviceType: indicates which devices the project can run on
- distro: indicates the description of the HAP package
- deliveryWithInstall: can the current hap package support installation with applications
- moduleName: the name of the current HAP
- moduleType: indicates the type of the current HAP
- installationFree: indicates whether the application allows installation free
- Cap abilities: configuration information of each page in the code
2.1.4 procedure startup process
- Parsing config.json file
- Initialize entry MyApplication
- Get the full class name of the first interface to start MainAbility
- Run the code and start the first interface MainAbility
- Slice MainAbilitySlice in the run interface
- Load xml file Layout_ability_main, display content
2.2 the second entry application - page Jump
-
Design idea:
- Add a button in the first interface
- Write the second interface
- Add jump relationship
-
Interface layout: there are two ways to write layout in Hongmeng UI
- Declare UI layout in XML file: relatively simple and commonly used
- Create layout in code
Here, we layout the first page with XML and the second page with code
2.2.1 write the first page of XML file
Open src - > main - > resources - > base - > ability under layout_ Main.xml file to create a text and a button
<?xml version="1.0" encoding="utf-8"?>
<DirectionalLayout
    xmlns:ohos="http://schemas.huawei.com/res/ohos"
    ohos:height="match_parent"
    ohos:width="match_parent"
    ohos:alignment="center"
    ohos:orientation="vertical">

    <Text
        ohos:id="$+id:text_helloworld"
        ohos:height="match_content"
        ohos:width="match_content"
        ohos:background_element="$graphic:background_ability_main"
        ohos:layout_alignment="horizontal_center"
        ohos:text="$string:mainability_HelloWorld"
        ohos:text_size="40vp"
        />

    <Button
        ohos:id="$+id:but1"
        ohos:height="match_content"
        ohos:width="match_content"
        ohos:background_element="red"
        ohos:text_size="40fp"
        ohos:text="Point me"
        />

</DirectionalLayout>
2.2.2 Java code writing the second page
Create a new Ability - > empty page Ability (Java) in the package and name it SecondAbility. The SecondAbilitySlice file will be automatically generated in Slice. The file code is as follows:
package com.spring1227.myapplication;

import ohos.aafwk.ability.Ability;
import ohos.aafwk.content.Intent;
import ohos.agp.components.DirectionalLayout;
import ohos.agp.components.Text;
import ohos.agp.utils.Color;

public class SecondAbility extends Ability {
    @Override
    public void onStart(Intent intent) {
        super.onStart(intent);
//        super.setMainRoute(SecondAbilitySlice.class.getName()); xml files are prohibited

        //Create a layout object
        DirectionalLayout dl = new DirectionalLayout(this);
        //Create text object
        Text t = new Text(this);
        //Set content
        t.setText("Second page");
        //Set text size
        t.setTextSize(55);
        //Set text color
        t.setTextColor(Color.BLUE);
        //Adds a text object to the layout
        dl.addComponent(t);
        //Add layout to sub interface
        super.setUIContent(dl);
    }
}
2.2.3 write jump relation
Write jump relationships in MainAbility
import ohos.agp.components.Button;
import ohos.agp.components.Component;

public class MainAbilitySlice extends AbilitySlice implements Component.ClickedListener {
    Button btu;
    @Override
    public void onStart(Intent intent) {
        super.onStart(intent);
        super.setUIContent(ResourceTable.Layout_ability_main);

        //Button id found
        btu = (Button)findComponentById(ResourceTable.Id_but1);
        //Add a click event to the button. After clicking, execute the onClick method in this class
        btu.setClickedListener(this);
    }

    @Override
    public void onActive() {
        super.onActive();
    }

    @Override
    public void onForeground(Intent intent) {
        super.onForeground(intent);
    }

    @Override
    public void onClick(Component component) {
        //Code to execute after clicking
        //Jump to the second page
        if(component == btu){
            //Jump only after clicking this button
            //Where to jump (intention)
            Intent i = new Intent();
            //Contains the page information to jump to
            Operation operation = new Intent.OperationBuilder()
                    .withDeviceId("")//Which device do you want to jump to
                    .withBundleName("com.spring1227.myapplication")//Which application to jump to and write the package name in it
                    .withAbilityName("com.spring1227.myapplication.SecondAbility")//Page to jump to
            .build();//Package the information above
            //Set the packaged operation to the intent
            i.setOperation(operation);
            //Jump page
            startAbility(i);
        }
    }
}