Through blog posts: Nginx+Tomcat to achieve load balancing cluster instance, can follow!!!
LVS Load Balancing Cluster Explanation
We have been able to use Nginx and LVS as load balancing cluster. They have their own characteristics. Today, we know a popular cluster scheduling tool, Haproxy.
I. Overview of Haproxy
Haproxy is a popular cluster scheduling tool at present. There are many similar cluster scheduling tools, such as LVS and Nginx. Comparatively speaking, LVS has the best performance, but its construction is relatively complex; Nginx upstream module supports clustering function, but it has not strong health checking function for clustering nodes, and its performance is not as good as Haproxy.
2. Knowledge Points that Haproxy Must Know
1.HTTP request
The protocol used to access websites through URL s is the HTTP protocol. Such requests are generally referred to as HTTP requests.
HTTP requests are divided into GET mode and POST mode.
- GET mode: less content (generally not more than 8kB), unsafe, content directly attached to the URL;
- POST mode: multi-content and security;
When using a browser to access a certain URL, it will return the status code according to the requested URL. Usually the normal status code is: 2X, 3XX (such as 201, 301). If an exception occurs, it will return 4X, 5XX (such as 401, 501).
HTTP request return status code details, can refer to the blog: HTTP Request Return Status Code Details
2. Common Scheduling Algorithms for Load Balancing
There are three most commonly used scheduling algorithms for clustering using LVS, Haproxy and Nginx.
(1) RR (polling algorithm)
RR (Round Robin): RR algorithm is the simplest and easiest to understand, namely polling scheduling. This algorithm also has a weighted polling, which allocates access requests according to the weights of each node.
This algorithm is mainly used for node servers with similar performance and work.
(2) LC (Minimum Connection Number Algorithms)
LC (Least Connections): A minimum number of connections algorithm, which dynamically allocates front-end requests according to the number of connections at the back-end nodes. It ensures that new requests are allocated to clients with the least number of connections. Because the number of connections of each node is released dynamically in practice, it is difficult to have the same number of connections. Therefore, this algorithm wants to compare RR algorithm with a great improvement, and is the most used one at present.
(3) SH (Source-based access scheduling algorithm)
SH (Source Hashing): Source-based access scheduling algorithm, which is used in some scenarios where Session session is recorded on the server side. It can do cluster scheduling based on source IP, Cookie, etc. The advantage of this algorithm is to achieve Session retention, but some IP accesses will cause unbalanced load when they are very large, and some nodes will have a large amount of access, which will affect the use of business.
3. Common Web Cluster Scheduler
At present, the most common Web Cluster Scheduler is divided into software and hardware; software usually uses open source LVS, Haproxy, Nginx; hardware generally uses F5, but many people use some domestic products. Such as barracuda, green league, etc.
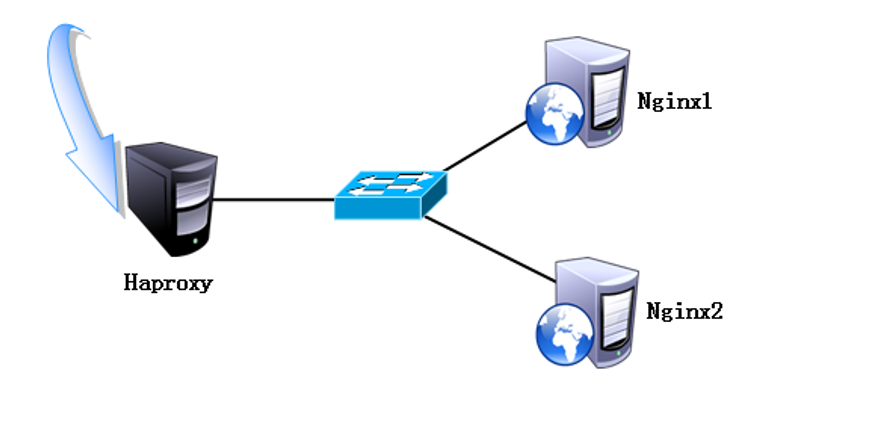
4.Haproxy Application Environment
As shown in the picture:
III. Installation of Haproxy
Haproxy's Installation Pack Disk Link: https://pan.baidu.com/s/10masYgp7VSWuZu8ebZ-pfQ
Extraction code: 2l44
1. Compile and install Haproxy
[root@localhost ~]# yum -y install pcre-devel bzip2-devel
//Install dependency packages to enable Haproxy services to support regular expressions and decompression
[root@localhost ~]# tar zxf haproxy-1.5.19.tar.gz -C /usr/src
[root@localhost ~]# cd /usr/src/haproxy-1.5.19/
[root@localhost haproxy-1.5.19]# MakeTARGET = Linux 26 // / Represents 64 systems
//Normal decompression can be done, but the software does not need to be configured.
[root@localhost haproxy-1.5.19]# make install
2.Haproxy service configuration
(1) Establish Haproxy configuration file
[root@localhost haproxy-1.5.19]# mkdir /etc/haproxy
[root@localhost haproxy-1.5.19]# cp /usr/src/haproxy-1.5.19/examples/haproxy.cfg /etc/haproxy/
//Copy haproxy.cfg file to configuration file directory
(2) Haproxy configuration details
Haproxy configuration files are usually divided into three parts:
- Global (global configuration);
- defaults (default configuration);
- listen (application component configuration)
Global (global configuration) usually has the following configuration parameters:
global
        log 127.0.0.1   local   #Configure log records. local0 is a log device and is stored in the system log by default.
        log 127.0.0.1   local1 notice  #Notce is a log level, usually 24 levels
        #log loghost    local0 info
        maxconn 4096             #maximum connection
        chroot /usr/share/haproxy         #The service has its own root directory, which is usually commented out
        uid 99         #User UID
        gid 99        #User GID
        daemon        #Daemon process model
defaults (default configuration) are generally inherited by application components. If there is no special declaration in the application components, default configuration parameter settings will be installed. Common parameters are:
defaults
        log     global               #Define logs as log definitions in global configuration
        mode    http                 #The mode is http
        option  httplog              #Logging in http log format
        option  dontlognull
        retries 3         #If the number of failures of the node server is checked and three successive failures are reached, the node is considered unavailable.
        redispatch             #Automatically terminate connections that have been processed for a long time by the current queue when the server load is high
        maxconn 2000                      #maximum connection
        contimeout      5000              #Connection timeout
        clitimeout      50000             #Client timeout
        srvtimeout      50000             #Server timeout
listen (Configuration Item) General configuration application module parameters:
listen  appli4-backup 0.0.0.0:10004           #Define an application called appli4-backup
                option  httpchk /index.html        #Check the server's index.html file
                option  persist     #Force requests to be sent to down loaded servers, and this option is generally disabled.
                balance roundrobin        #Load Balancing Scheduling Algorithms Use Polling Algorithms
            server  inst1 192.168.114.56:80 check inter 2000 fall 3     #Define online nodes
         server  inst2 192.168.114.56:81 check inter 2000 fall 3 backup #Define backup nodes
#Note: In the parameters above defining the backup node,
#"check inter 2000" denotes a heartbeat rate between haproxy servers and nodes.
#"fall 3" means that if the heartbeat rate is not detected three times in a row, the node is considered to be invalid.
#A "backup" after a node is configured means that the node is only a backup node, and only if the primary node fails will the node go up.
#Remove backup, which means that the primary node provides services together with other primary nodes.
(3) Parameter optimization of Haproxy
As shown in the picture:
The following configuration files can meet the normal requirements. If you read the meaning of the above configuration items in detail, you can add your own requirements.
global
        log 127.0.0.1   local0
        log 127.0.0.1   local1 notice
        #log loghost    local0 info
        maxconn 4096
        #chroot /usr/share/haproxy
        uid 99
        gid 99
        daemon
        #debug
        #quiet

defaults
        log     global
        mode    http
        option  httplog
        option  dontlognull
        retries 3
        #redispatch
        maxconn 2000
        contimeout      5000
        clitimeout      50000
        srvtimeout      50000

listen  appli1-rewrite 0.0.0.0:80
        option httpchk GET /index.html
        balance roundrobin
        server  app1_1 192.168.1.3:80 check inter 2000 rise 2 fall 5
        server  app1_2 192.168.1.4:80 check inter 2000 rise 2 fall 5
I will not explain what it means.
(4) Create self-startup scripts
[root@localhost ~]# cp /usr/src/haproxy-1.5.19/examples/haproxy.init /etc/init.d/haproxy
[root@localhost ~]# ln -s /usr/local/sbin/haproxy /usr/sbin/haproxy
[root@localhost ~]# chmod +x /etc/init.d/haproxy
[root@localhost ~]# chkconfig --add /etc/init.d/haproxy
[root@localhost ~]# /etc/init.d/haproxy start
Starting haproxy (via systemctl):                          [  Determine  ]
//It's all very basic commands, so I won't explain what they mean here.