In a real project, Mycat services also need to consider high availability. If the server Mycat is on is down, or if the Mycat service fails, it needs a standby machine to provide services and the Mycat cluster needs to be considered.
Highly available options:
We can use HAProxy+Keepalived with two Mycats to build Mycat clusters for high availability.HAProxy implements cluster high availability and load balancing for Mycat multi-nodes, while HAProxy's own high availability can be achieved through Keepalived.
Mycat and Master-Slave Reference MySQL Middleware Mycat Deployment
| host name | Running Services | IP |
|---|---|---|
| haproxy | HAProxy+Keepalived | 192.168.171.132 |
| haproxy2 | HAProxy+Keepalived | 192.168.171.136 |
| mycat1 | Mycat | 192.168.171.134 |
| mycat2 | Mycat | 192.168.171.140 |
| master1 | MySQL Master 1 | 192.168.171.135 |
| slave | MySQL from | 192.168.171.145 |
| master2 | MySQL Master 2 | 192.168.171.131 |
1. Install and configure HAProxy
[root@haproxy ~]# wget https://src.fedoraproject.org/repo/pkgs/haproxy/haproxy-1.8.23.tar.gz/sha512/bfd65179345285f6f4581a7dce42e638b89e12717d4cb9218afa085759161e04b6c78307d04265a6c97cd484b67949781639da5236edb89137585c625130be4f/haproxy-1.8.23.tar.gz
[root@haproxy ~]# tar zxf haproxy-1.8.23.tar.gz
[root@haproxy ~]# cd haproxy-1.8.23/
#View Kernel Version
[root@haproxy haproxy-1.8.23]# uname -r
3.10.0-514.el7.x86_64
#View Bit shu
[root@haproxy ~]# uname -m
x86_64
#Compile
[root@haproxy haproxy-1.8.23]# make TARGET=linux310 PREFIX=/usr/local/haproxy ARCH=x86_64
#Install after compilation is complete
[root@haproxy haproxy-1.8.23]# make install PREFIX=/usr/local/haproxy
[root@haproxy ~]# vim /usr/local/haproxy/haproxy.conf

global
        log 127.0.0.1 local0
        #log 127.0.0.1 local1 notice
        #log loghost local0 info
        maxconn 4096
        chroot /usr/local/haproxy
        pidfile /usr/local/haproxy/haproxy.pid
        uid 99
        gid 99
        daemon
        #debug
        #quiet
defaults
        log global
        mode tcp
        option abortonclose
        option redispatch
        retries 3
        maxconn 2000
        timeout connect 5000
        timeout client 50000
        timeout server 50000
listen proxy_status
        bind :48066
                mode tcp
                balance roundrobin                    # Polling access to mycat
                server mycat_1 192.168.171.134:8066 check inter 10s
                server mycat_2 192.168.171.140:8066 check inter 10s
frontend admin_stats
        bind :7777
                mode http
                stats enable
                option httplog
                maxconn 10
                stats refresh 30s
                stats uri /admin
                stats auth admin:123123
                stats hide-version
                stats admin if TRUE
[root@haproxy ~]# /usr/local/haproxy/sbin/haproxy -f /usr/local/haproxy/haproxy.conf            # start-up
[root@haproxy ~]# ss -anput | grep haproxy       # Check whether to start
udp    UNCONN     0      0         *:33498                 *:*                   users:(("haproxy",pid=4535,fd=4))
tcp    LISTEN     0      10        *:7777                  *:*                   users:(("haproxy",pid=4535,fd=5))
tcp    LISTEN     0      128       *:48066                 *:*                   users:(("haproxy",pid=4535,fd=3))
Browser AccessHttp://192.168.171.132/admin: 7777
Enter account password in pop-up box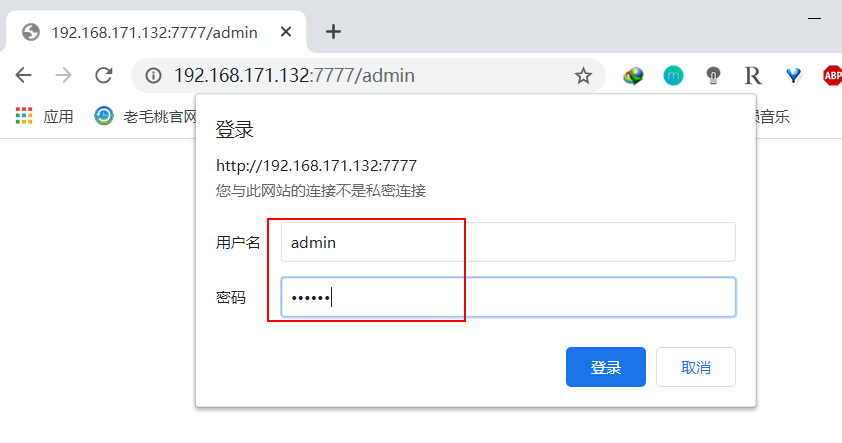
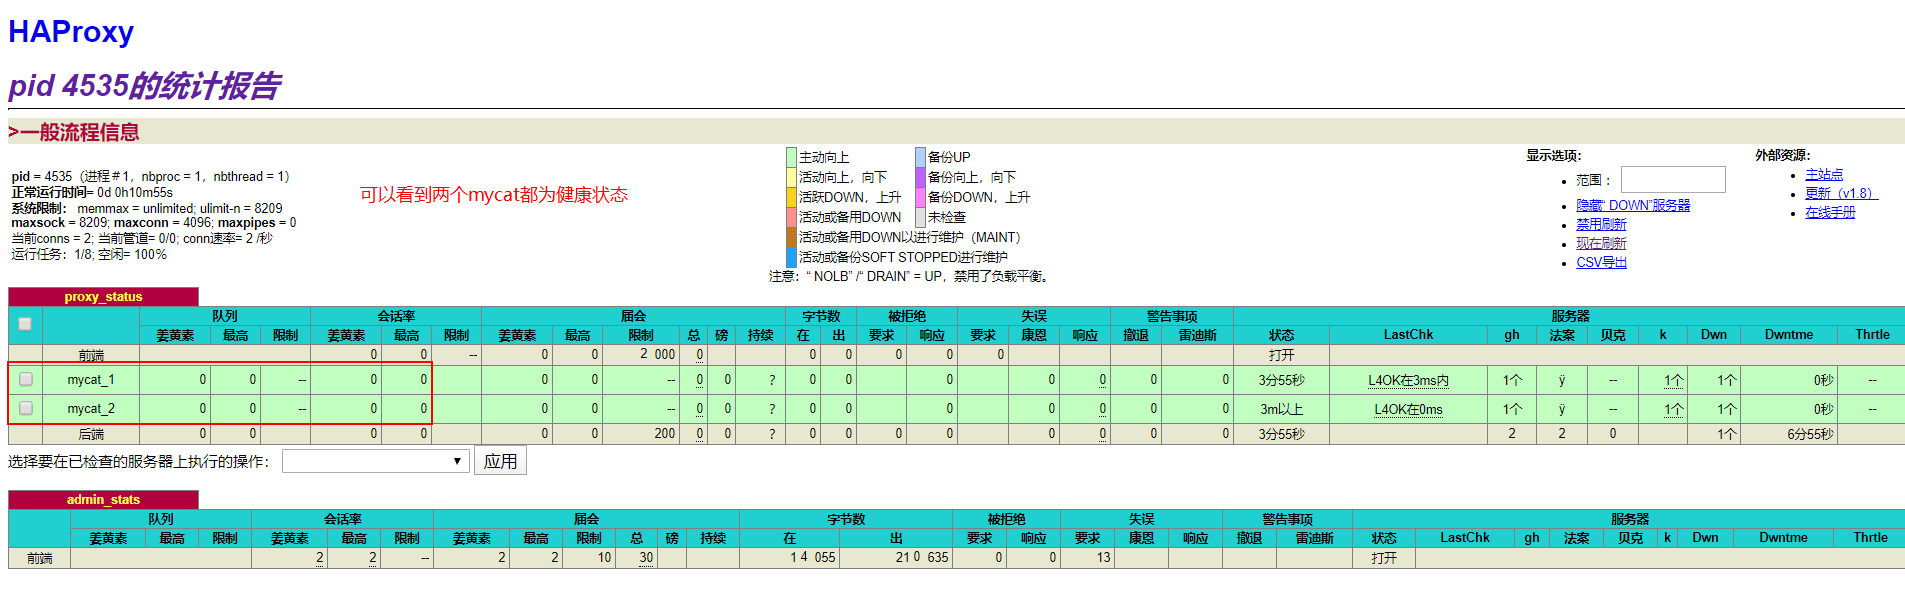
Verify load balancing, access Mycat through haproxy
[root@haproxy ~]# mysql -umycat -p123456 -h192.168.171.132 -P48066
Install and configure a haproxy server again (same as above)
#Pass previous configuration files to newly installed haproxy
[root@haproxy ~]# scp /usr/local/haproxy/haproxy.conf root@192.168.171.136:/usr/local/haproxy/
#Start haproxy2
[root@hahaproxy2 haproxy-1.8.23]# /usr/local/haproxy/sbin/haproxy -f /usr/local/haproxy/haproxy.conf
2. Configuring Keepalived
#Install Keepalived on both haproxy hosts
#Install Dependent Packages
[root@haproxy ~]# yum -y install  openssl-devel popt-devel kernel-devel
[root@haproxy ~]# tar zxf keepalived-2.0.20.tar.gz
[root@haproxy ~]# cd keepalived-2.0.20/
[root@haproxy keepalived-2.0.20]# ./configure --prefix=/ && make && make install
[root@haproxy ~]# vim /etc/keepalived/keepalived.conf
! Configuration File for keepalived

global_defs {
   router_id LVS_DEVEL
}

vrrp_instance VI_1 {
    state MASTER
    interface ens33
    virtual_router_id 51
    priority 100
    advert_int 1
    authentication {
        auth_type PASS
        auth_pass 1111
    }
    virtual_ipaddress {
        192.168.171.250                      # VIP Address
    }
}

virtual_server 192.168.171.250 48066 {
    delay_loop 6
    lb_algo rr
    lb_kind NAT
    persistence_timeout 50
    protocol TCP

    real_server 192.168.171.132 48066 {
        weight 1
        TCP_CHECK {
            connect_timeout 3
            retry 3
            delay_before_retry 3
        }
    }
    real_server 192.168.171.136 48066 {
        weight 1
        TCP_CHECK {
            connect_timeout 3
            retry 3
            delay_before_retry 3

        }
    }
}

[root@haproxy ~]# systemctl start keepalived      # Start Services
#Copy configuration file to haproxy2
[root@localhost ~]# scp /etc/keepalived/keepalived.conf root@192.168.171.136:/etc/keepalived/
#Modify Keepalived profile on haproxy
! Configuration File for keepalived

global_defs {
   router_id LVS_2                # Modify id
}

vrrp_instance VI_1 {
    state BACKUP             # modify state
    interface ens33
    virtual_router_id 51
    priority 50              # Priority modification
    advert_int 1
    authentication {
        auth_type PASS
        auth_pass 1111
    }
    virtual_ipaddress {
        192.168.171.250
    }
}
[root@haproxy2 ~]# systemctl start keepalived
Testing high availability, connecting VIP addresses to manage mycat
[root@haproxy ~]# mysql -umycat -p123456 -h192.168.171.250 -P48066
mysql> show databases;
+----------+
| DATABASE |
+----------+
| TESTDB   |
+----------+
1 row in set (0.00 sec)
Mycat Security Settings
1. Permission Configuration
1) user Tag Permission Control
At present, Mycat does not do too complex control for the connection control of the middleware. At present, it only does read and write permission control at the middleware logical library level.
#modifyServer.xmlConfiguration file user section
<user name="mycat" defaultAccount="true">
                <property name="password">123456</property>
                <property name="schemas">TESTDB</property>
                <property name="defaultSchema">TESTDB</property>
                                </user>
user name="user">
                <property name="password">user</property>
                <property name="schemas">TESTDB</property>
                <property name="readOnly">true</property>
                <property name="defaultSchema">TESTDB</property>
        </user>
2) privileges Label Rights Control
The privilege tag under the user tag allows fine-grained DML privilege control over logical libraries (schema s) and tables (tables).The check attribute under the privileges tag, such as turning on permission checking for true, does not turn on for false and defaults to false.
Since a user's schemas attribute in Mycat can configure multiple logical libraries (schemas), the schema nodes of privileges'subordinate nodes can also configure multiple, fine-grained DML privilege control over multiple libraries and tables
#modifyServer.xmlPrivileges section of
 <!-- Table Level DML Permission Settings -->
                <privileges check="false">
                        <schema name="TESTDB" dml="0110" >
                                <table name="tb01" dml="0000"></table>
                                <table name="tb02" dml="1111"></table>
                        </schema>
</privileges> 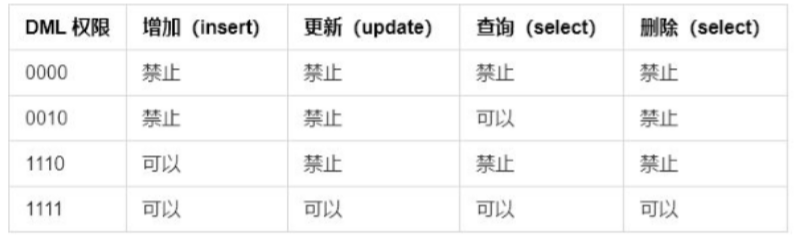
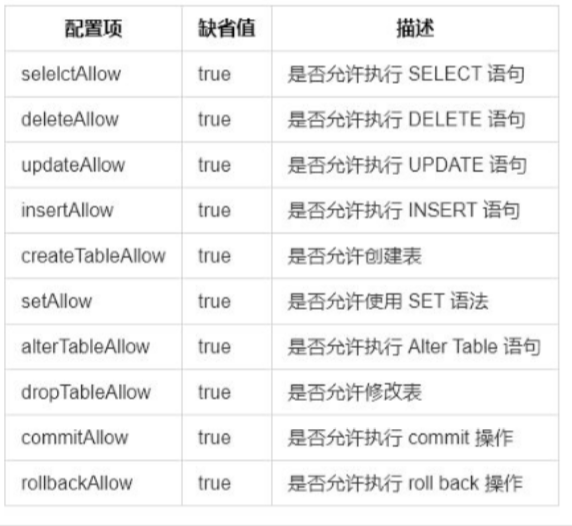
SQL Interception
The firewall tag defines the firewall; the whitehost tag under firewall defines the IP whitelist, and the blacklist defines the SQL blacklist.
1. Set up a whitelist
#Srserver.xmlconfiguration file
<firewall>
           <whitehost>
              <host host="192.168.171.250" user="root"/>
           </whitehost>
</firewall>
2. Blacklist
<firewall>
           <whitehost>
              <host host="192.168.171.250" user="root"/>
           </whitehost>
       <blacklist check="true">
                 <property name="deleteAllow">false</property>
       </blacklist>
        </firewall>
Blacklist SQL Intercept List that can be set