We've been asking vue about the principle of two-way data binding. Today, I'm just handwriting a two-way data binding and I'll get a better understanding of it.
Because the current vue technology is also constantly updated, now updated to 3.0, the internal method logic has also changed a lot, so as the development of us, in fact, we master the principles, can write a simple two-way data binding code, it is OK, after all, a deeper level of learning is better, if you really have enough time, you can pick up the source code.
We will write this article in sections. The code is not the source code, but you can achieve the same function by its principles.
Our goal today is to get rid of the watcher method of vue first.Enumerate the data data in the vue and redefine the attribute value by using the get and set in the Object.defineProperty method, that is, hijack and change the data in the vue to achieve the goal.
Before that, let's familiarize ourselves with the principles of our thinking today:
js we define the class class class, there are different methods in the class, first we will get all the data data data in vue, recursively traverse the data data, we add the Object.defineProperty method to each data, use get and set to make hijacking changes, to change the data source in the data.
Start:
Create two folders:
  One is vue.js (write Vue method);

  One is index.html (introduced for use by vue).
Below for the convenience of explanation, I will directly put in the code I have written, explanation is also in the code comments, very detailed, just look carefully.
  First, the index.html file:
  This file is a simple html structure, which imports the vue.js file we wrote, and then uses it directly in the same way as the Vue official website.
<!DOCTYPE html>
<html lang="en">

<head>
<meta charset="UTF-8">
<meta name="viewport" content="width=device-width, initial-scale=1.0">
<meta http-equiv="X-UA-Compatible" content="ie=edge">
<title>Document</title>
</head>

<body>

<!-- Introduce later writes vue.js file -->
<script src="./vue.js"></script>

<script>
  // Instantiate vue, writing in the same way as the Vue we normally introduced
  var vue = new Vue({

    // Define data, define two variables, a message, and a list object
    data: {
      message: 'Hello Vue!',
      list: {
        name: 'xiaoming'
      }
    }


  })

  // This time, this is not redirected, so first get the data of the data in the Vue with vue.$data (equivalent to this.), then make the assignment changes
  // We'll write that later, and we'll work on this.For now, we'll replace this with $data

  vue.$data.message = "Hello" // Change message to Hello
  vue.$data.list.name = "Xiao Ming" // Change name to Xiaoming

  console.log(vue.$data.message)  // Print it out, and if the data in the data changes successfully, we do that
  console.log(vue.$data.list.name)

</script>

</body>

</html>
Looking at the more important vue.js file, there are some JS knowledge points that you need to use in advance:

1. class concepts in JS
 2. constructor constructor
 3. Object.keys() enumeration method
 4. forEach() method
 5. Recursion
 6. The Object.defineProperty (obj, prop, desc) parameters are: the current object that needs to define the property, the name of the property that needs to be defined, and the descriptor (get and set)
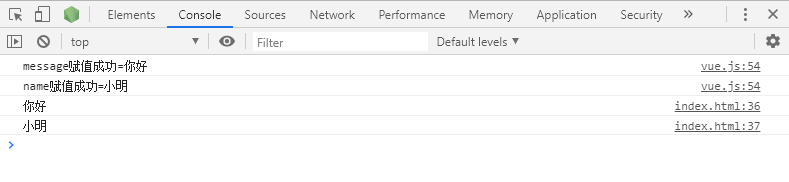
  // vue.js file

// Defines a vue class that can be used directly when introduced
class Vue {

  // The constructor, all in the new Vue () in html, is passed in.
  constructor(opa) {

 this.$opa = opa // Assign to $opa

 this.$data = opa.data // Assigning data in opa

 this.obsever(opa.data) // Once you get the data, pass in the obsever function to enumerate each data, then iterate through it
  }

  obsever(value) {

 // Determine if the incoming object is an object first, and if it is empty or non-object, do not go down.
 if (!value || typeof value !== 'object') {
   return
 }

 // Object.keys() enumeration method that returns the key value of each object, returns an array, and in this case returns: ['message','list']
 // forEach iterates through each key value, puts each data into the defineReactive() function, and processes it with Object.defineProperty
 Object.keys(value).forEach(key => {

   this.defineReactive(value, key, value[key]) // The first parameter is the value object, the second parameter is the enumerated key, and the third parameter is the value corresponding to the key

 })
  }

  defineReactive(value, key, val) {

 // If the incoming val ue is still an object object, the obsever() method needs to be re-executed recursively, as in this case, the html file has two parameters in the data: message and list
 // After traversing the data with forEach, we get a message key-value pair and a list object.Our goal is to get each key-value pair and change its value
 // If it is an object after traversal, it needs to be split again to get key-value pairs, so it needs to be traversed again recursively until all the key-value pairs are split.
 this.obsever(val) // Recursive operation

 // The third parameter of Object.defineProperty() is important in determining whether the data can be read, traversed, and so on.
 Object.defineProperty(value, key, {

   get() { // Read data
     return val
   },
   set(i) { // Make changes to the data

     // Returns if the incoming data val equals the modified i
     if (i === val) {
       return
     }

     // Value to be modified, assigned to old data, modified successfully
     val = i
     console.log(key + "Assignment succeeded" + '=' + val) // Successful modification, console printing
   }
 })
  }

}
Run index.html, open the console, run successfully
When idle, will continue to update the source knowledge, we learn together.If there are any errors, please indicate that they will be changed at the first time after verification.