Chapter 7: Exploring the glTF File Format
glTF is a standard format that can store both mesh and animation data. a file format that contains everything you need to display animated models. It's a standard format that most three-dimensional content creation applications can export to and allows you to load any arbitrary model.
glTF: Graphics Language Transmission Format is a file format similar to fbx format
Key points of this chapter:
- Understand what data is stored in the glTF file
- Use cgltf to read glTF files
- Learn to export glTF files from Blender
Notes before learning
Before looking at this one, you'd better familiarize yourself with glTF file format:
https://www.khronos.org/files/gltf20-reference-guide.pdf.
It will be used here cgltf (https://github.com/jkuhlmann/cgltf) )To parse glTF files, some files may be bad. At this time, you need to refer to the glTF reference viewer at https://gltfviewer.donmccurdy.com , it seems that you can test the quality of the document by dragging it in directly.
Introduction to glTF
glTF was designed and specified by the Khronos Group, for the efficient transfer of 3D content over networks.
glTF file is a file that stores 3D data. It is very efficient in network transmission. It is often used in AR, Internet transmission and other fields. However, it is not as widely used as Fbx file in games and Maya.
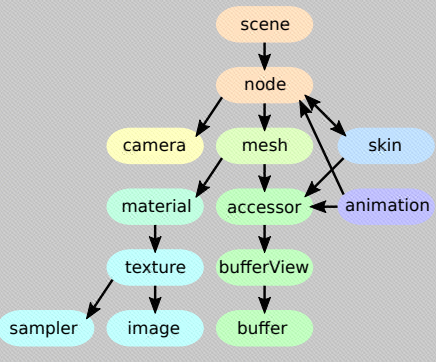
glTF can be represented by a JSON file, which can be roughly divided into the following contents:
- scenes and nodes: Basic structure of the scene
- cameras: View configurations for the scene
- meshes: Geometry of 3D objects
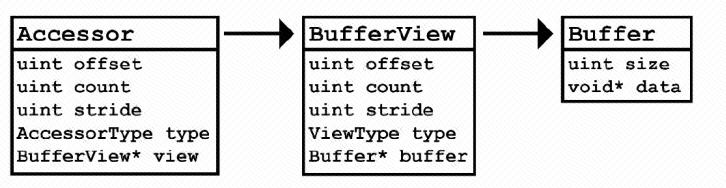
- buffers, bufferViews, accessors: Data references and data layout descriptions
- materials: Definitions of how objects should be rendered
- textures, images, samplers: Surface appearance of objects
- skins: Information for vertex skinning
- animations: Changes of properties over time
The relationship between each part is shown in the figure below:
File path to glTF index
The glTF file does not contain all the resources in it. You can store URIs to represent paths, as shown below:
// Note: comments are not supported in json files
"buffers": [
 {
 "uri": "buffer01.bin"	// It refers to the data in the bin file, which may be animation data, geometric data, etc
 "byteLength": 102040,
 }
],
"images": [
 {
 "uri": "image01.png"
 }
],
You can also use include path to write JSON files. base64 represents that the data is a base64 encoded string(The data URI defines the MIME type, and contains the data as a base64 encoded string):
// Buffer data:
"data:application/gltf-buffer;base64,AAABAAIAAgA..."
//Image data (PNG):
"data:image/png;base64,iVBORw0K..."
buffers, bufferViews, accessors
- buffers: contain the data that is used for the geometry of 3D models, animations, and skinning.
- bufferViews: describes what is in a buffer. It is equivalent to additional information about the buffer, such as which part of the buffer to take, and it can tell me whether the buffer is a vertex buffer or an index buffer
- accessors: define the exact type and layout of the data. buffer
This accessor references a buffer view and the buffer view references a buffer.
The buffer view describes what is in a buffer. If a buffer contains the information for glBufferData, then a buffer view contains some of the parameters to call glVertexAttribPointer
An accessor stores higher-level information, it describes the type of data you are dealing with
In OpenGL, you need to use glBufferData and glVertexAttribPointer to describe the Buffer. The Buffer here is equivalent to the content in glBufferData, and bufferView and accessors together form the content in glVertexAttribPointer (or the content in index buffer)
For example:
// Each of the buffers refers to a binary data file, using a URI.
"buffers": [
 {
 "byteLength": 35,
 "uri": "buffer01.bin"
 }
],

// bufferView corresponds to buffer one by one, which is a bit like vao of vbo. The application defines part of the data of buffer
"bufferViews": [
 {
 "buffer": 0,
 "byteOffset": 4,
 "byteLength": 28,
 "byteStride": 12,
 "target": 34963
 }
],

// The accessors define how the data of a bufferView is interpreted.
"accessors": [
 {
 "bufferView": 0,
 "byteOffset": 4,
 "type": "VEC2",
 "componentType": 5126,// For GL_FLOAT
 "count": 2, // Two float s
 // The range of all values is stored in the min and max property.
 "min" : [0.1, 0.2]
 "max" : [0.9, 0.8]
 }
]
Exploring how glTF files are stored
gltf files are generally represented by JOSN files or binary files. JOSN files are generally represented by. gltf suffix and binary files by. glb suffix
glTF files can be stored in three ways, as shown in the following figure. It is an option that can be set when exporting glTF files in Blender. It can be seen that glTF files can contain multiple files, which are divided into multiple chunk s. You can choose whether to put them together in a glTF file when exporting (it feels a little like fbx files)
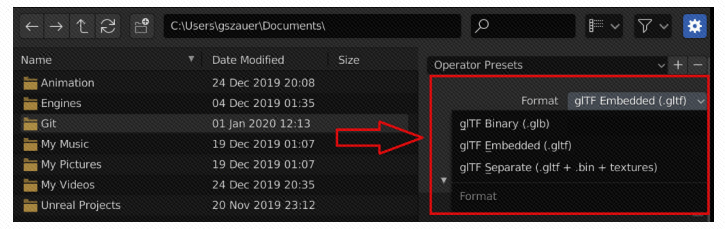
The glTF files provided in this book are the second file (glTF embedded format) in the figure, which is the text file of JOSN, but the glTF files of other two formats will be supported later.
glTF files store a scene, not a model
This is the same as fbx. In addition to models, glTF files can also store Cameras and PBR materials. Here are the contents for animation contained in glTF files - different types of mesh data:
- static mesh
- morph targets
- Skinned mesh (static mesh with weights of joints)
Exploring the glTF format
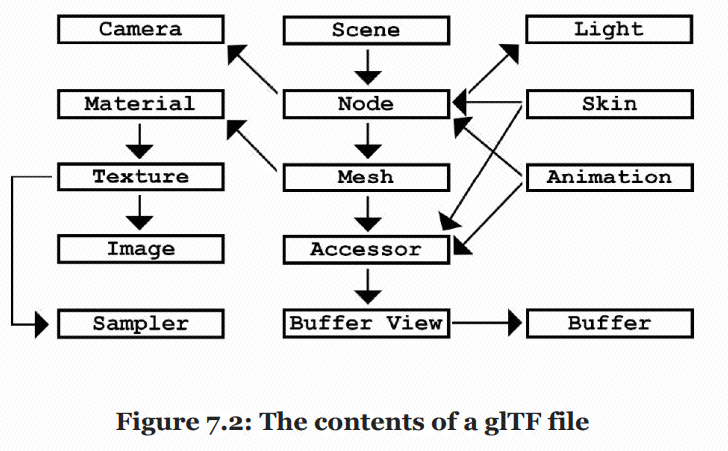
The root of a glTF file is the scene. A glTF file can contain one or more scenes. A scene contains one or more nodes. A node
can have a skin, a mesh, an animation, a camera, a light, or blend weights attached to it. Meshes, skins, and animations each store large chunks of information in buffers. To access a buffer, they contain an accessor that contains a buffer view, which in turn contains the buffer
The root of glTF file is scene. A glTF file can have one or more scenes. Each scene contains at least one node. A node can store references to mesh, camera, light, skin and other data. These data exist in buffers. They all have an accessor. This accessor contains a buffer view, and this buffer view contains the corresponding buffer(?)
You can see the following figure to help understand:
The parts you need for animation
The following figure is the relationship diagram of animation related parts in a simple version of glTF:
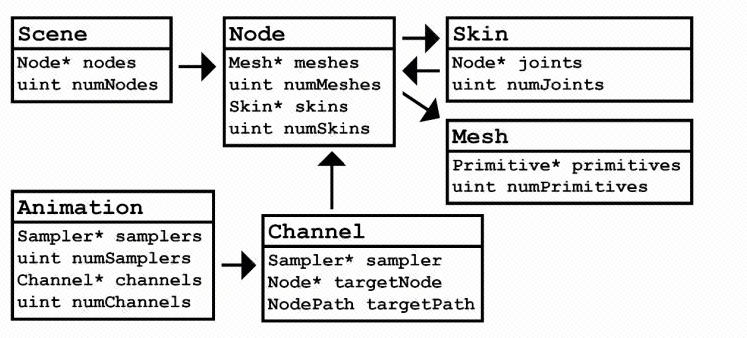
To implement skinned animations, you won't need lights, cameras, materials, textures, images, and samplers.
Read data
A glTF accessor is required to read Mesh, skin and animation objects. This accessor references a buffer view and the buffer view references a buffer are shown as follows:
The example code is as follows:
// Convert the Buffer data in the accessor into a float array
vector<float> GetPositions(const GLTFAccessor& accessor)
{
	// There is a special accessor used to separate buffer s. This should not be able to extract data
	assert(!accessor.isSparse);

	// Get references to bufferView and buffer
	const GLTFBufferView& bufferView = accessor.bufferView;
	const GLTFBuffer& buffer = bufferView.buffer;

	// GetNumComponents Would return 3 for a vec3, etc., should be the number of returned basic data types
	uint numComponents = GetNumComponents(accessor);

	vector<float> result;
	// accessor.count represents the number of elements, and numComponents represents the number of C + + primitive type objects in each element
	result.resize(accessor.count * numComponents);

	// Find where in the buffer the data actually starts
	uint offset = accessor.offset + bufferView.offset;

	// Dig the data in the buffer one by one
	for (uint i = 0; i < accessor.count; ++i)
	{
		// Gets a pointer to the address of the current element
		uint8* data = buffer.data + offset + accessor.stride * i;
		// Loop trough every component of current element
		float* target = result[i] * componentCount;// Is the code wrong?
		for (uint j = 0; j < numComponents; ++j)
		{
			// Omitting normalization
			// Omitting different storage types
			target[j] = data + componentCount * j;
		}
	}

	return result;
}
Add cgltf Library
If you read the glTF file from the beginning, you need to start with JSON parser. There is no need to write such a low-level one here, so cgltf is integrated. All the libraries here are implemented in the header file, so only github.com/jkuhlmann/cgltf/blob/master/cgltf.h Download the header file and add it to the project.
Then add a cgltf.c file to ensure that the header file is compiled, as follows:
#pragma warning(disable : 26451)
#define _CRT_SECURE_NO_WARNINGS
#define CGLTF_IMPLEMENTATION
#include "cgltf.h"
Create glTF Loader
Create the Loader function responsible for reading. Here, two global functions are created without creating classes. The header file is as follows:
// Two simple interfaces, one for reading and one for destroying the read cache
#ifndef _H_GLTFLOADER_
#define _H_GLTFLOADER_

#include "cgltf.h"

// Returns a cgltf_data object, which contains all the contents in glTf
cgltf_data* LoadGLTFFile(const char* path);
void FreeGLTFFile(cgltf_data* handle);

#endif
Then create the corresponding cpp file:
#include "GLTFLoader.h"
#include <iostream>

cgltf_data* LoadGLTFFile(const char* path)
{
	// Before loading, create a cgltf_ Objects of the options class
	cgltf_options options;
	memset(&options, 0, sizeof(cgltf_options));
	// Use the library file to read out both data and options
	cgltf_data* data = NULL;
	// cgltf_result is an enumeration
	cgltf_result result = cgltf_parse_file(&options, path, &data);

	// check
	if (result != cgltf_result_success)
	{
		std::cout << "Could not load input file: " << path << "\n";
		return 0;
	}

	// Read the data into the data according to the options and path. The options and path here pass in const
	result = cgltf_load_buffers(&options, data, path);
	if (result != cgltf_result_success)
	{
		cgltf_free(data);
		std::cout << "Could not load buffers for: " << path << "\n";
		return 0;
	}

	// check again
	result = cgltf_validate(data);
	if (result != cgltf_result::cgltf_result_success)
	{
		cgltf_free(data);
		std::cout << "Invalid gltf file: " << path << "\n";
		return 0;
	}
	return data;
}

void FreeGLTFFile(cgltf_data* data)
{
	if (data == 0)
		std::cout << "WARNING: Can't free null data\n";
	else
		cgltf_free(data);
}
Convert. fbx,. blend files to. glTF files
Since only glTF files can be read here, a method is introduced here to convert. fbx and. blend files into glTF files using Blender
Open Blender. If the file is a. blend file, open it directly. If it is a. DAE or. FBX file, you need to import it into Blender again. Open Blender, delete the default Cube in Blender, and select File - > import. After opening the file, select File - > export to export the glTF2.0 file. You can select multiple formats, as shown in the following figure:

Chapter 8: Creating Curves, Frames, and Tracks
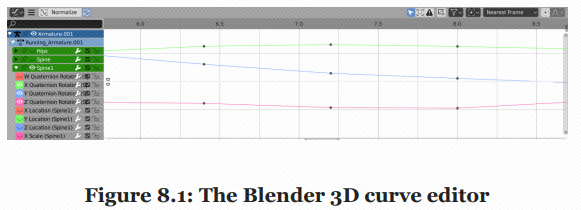
The old version of animation is to store the data of all characters' joints at the key frame, but this is a waste of memory. At this stage, animation is much more scientific. It uses Curve to save animation data, as shown in the following figure:
Key points of this chapter:
- Understand cubic B é zier splines and how they are valued
- Understand cubic Hermite splines and how they are valued
- Understand common interpolation methods
Understanding cubic Bézier splines
A B é zier spline has four points, two points are used for interpolation, and the two points are control points to help generate curves. As shown in the figure below, it is a cubic Bezier spline:
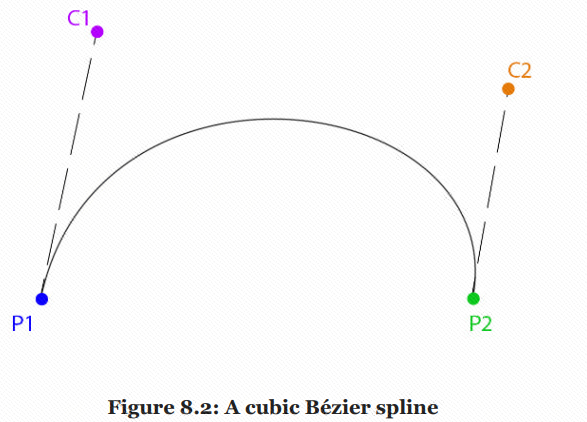
We can study how this curve is generated. To interpolate the value from P1 to P2, we can connect it according to the two control points C1 and C2:
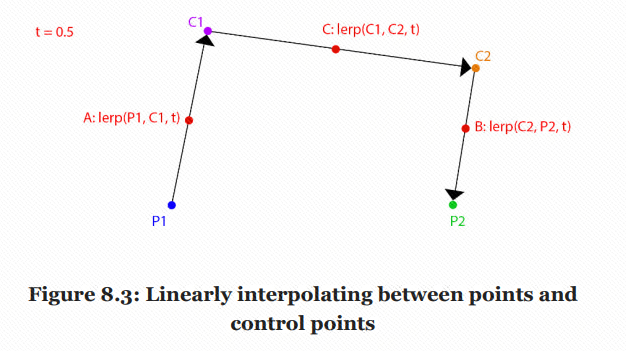
Among them, A, B and C are the midpoint of the three line segments. You can continue to take the midpoint in the same way to get:
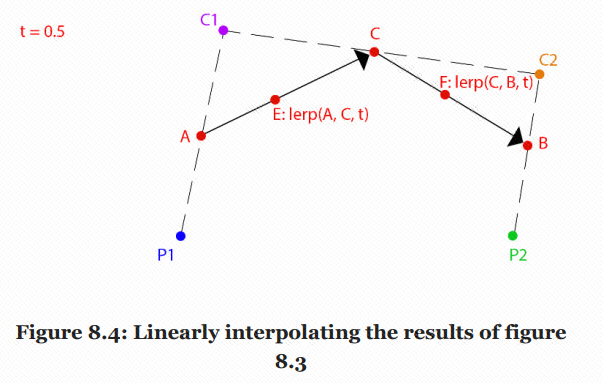
Do the same again, or take the midpoint of part 0.5, as shown in the figure below. The final R point is a point on Bezier spline:
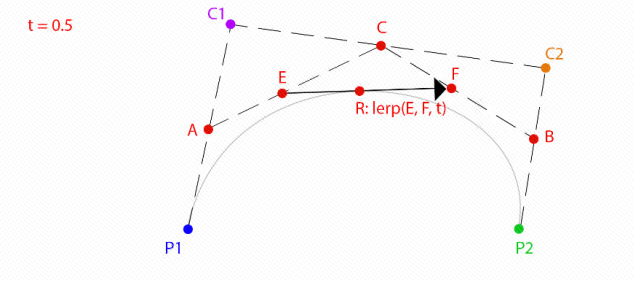
Note that this is only a point at the 0.5 part of the interpolation. Only after the points of each part are processed in this way can the final Bezier spline be obtained. In this process, four points are interpolated once to become three points, and three points are interpolated once to get two points,.
Relevant codes are as follows:
// Bezier curves have essentially only four points
template<typename T>
class Bezier
{
public:
	T P1; // Point 1
	T C1; // Control 1
	T P2; // Point 2
	T C2; // Control 2
};


// Equivalent to taking the point on the t part of Bessel Spline, t is in [0,1]
template<typename T>
inline T Interpolate(Bezier<T>&curve, float t)
{
	// lerp for the first time, four points get ABC
	T A = lerp(curve.P1, curve.C1, t);
	T B = lerp(curve.C2, curve.P2, t);
	T C = lerp(curve.C1, curve.C2, t);
	// lerp the second time, three points get ED
	T D = lerp(A, C, t);
	T E = lerp(C, B, t);
	// lerp the third time, two points get the final R
	T R = lerp(D, E, t);
	return R;
}
The following describes the method of drawing Bezier curve. In fact, the above function is used to obtain many points according to different proportions t, and then connect these points to approximate the Bezier curve. The code is as follows:
// Creates a Bezier curve based on four points
Bezier<vec3> curve;
curve.P1 = vec3(-5, 0, 0);
curve.P2 = vec3(5, 0, 0);
curve.C1 = vec3(-2, 1, 0);
curve.C2 = vec3(2, 1, 0);

// These are four colors
vec3 red = vec3(1, 0, 0);
vec3 green = vec3(0, 1, 0);
vec3 blue = vec3(0, 0, 1);
vec3 magenta = vec3(1, 0, 1);

// Draw four points representing the Bezier curve in four different colors
DrawPoint(curve.P1, red);
DrawPoint(curve.C1, green);
DrawPoint(curve.P2, red);
DrawPoint(curve.C2, green);

// Draw handles
DrawLine(curve.P1, curve.C1, blue);
DrawLine(curve.P2, curve.C2, blue);

// Draw the actual curve
// Resolution is 200 steps since last point is i + 1
for (int i = 0; i < 199; ++i)
{
	float t0 = (float)i / 199.0f;
	float t1 = (float)(i + 1) / 199.0f;
	vec3 thisPoint = Interpolate(curve, t0);
	vec3 nextPoint = Interpolate(curve, t1);
	DrawLine(thisPoint, nextPoint, magenta);
}
It can be seen from the above example that the final Bezier interpolation function can be completed through cubic linear interpolation. However, the above function also calls Lerp function, which is not an optimized code writing method. Here, the author mathematically optimizes it and obtains the new function as follows:
template<typename T>
inline T Interpolate(const Bezier<T>& curve, float t)
{
	return curve.P1 * ((1 - t) * (1 - t) * (1 - t)) +
		curve.C1 * (3.0f * ((1 - t) * (1 - t)) * t) +
		curve.C2 * (3.0f * (1 - t) * (t * t)) +
		curve.P2 *(t * t * t);
}
This is actually the decomposition form of Bezier interpolation, which turns it into the sum of four cubic functions of t, as shown in the following figure:
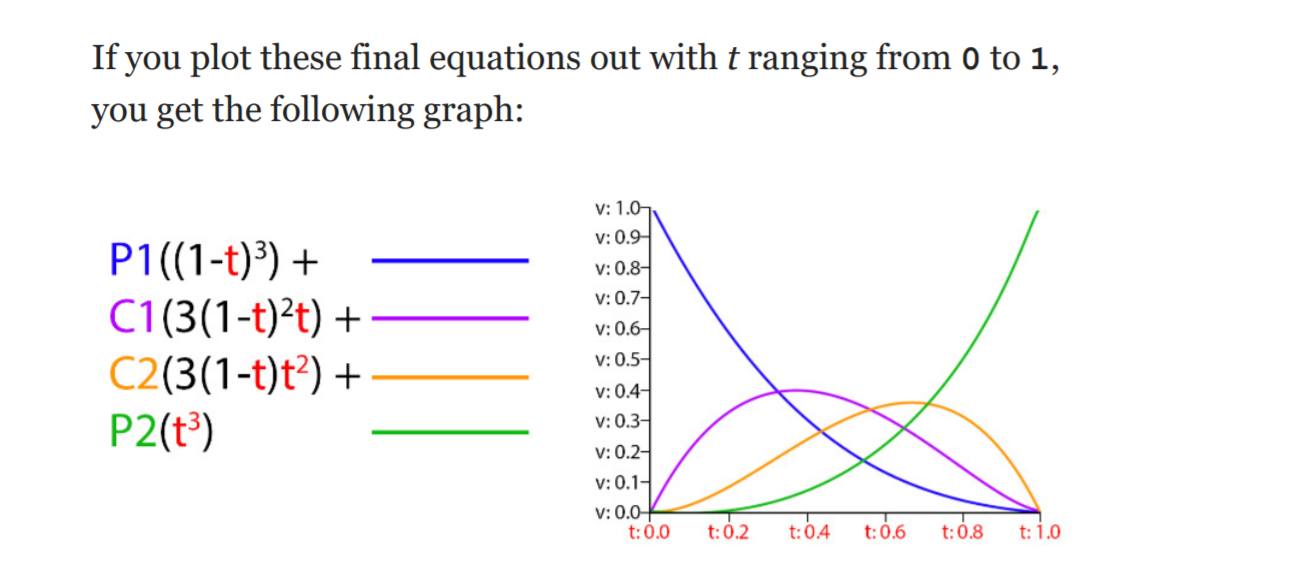
Since t here is a cubic function, the Bessel spline here belongs to cubic spline
Understanding cubic Hermite splines
The most common spline type used in animation for games is a cubic Hermite spline.
Unlike Bézier, a Hermite spline doesn't use points in space for its control; rather, it uses the
tangents of points along the spline. You still have four values, as with a Bézier spline, but they are interpreted differently. With the Hermite spline, you don't have two points and two control points; instead, you have two points and two slopes. The slopes are also referred to as tangents—throughout the rest of this chapter, the slope and tangent terms will be used interchangeably
The most commonly used spline type in the game animation industry is cubic Hermite spline. Bezier Spline can be represented by four points, two points and two control points, while Hermite spline can also be represented by four points, two points and two slopes. The concept of slopes here is the same as that of tangents. The specific Curve is long. In this way, you can see that there are two points, The expression of adding two tangents:

Its function is expressed as follows:

The corresponding code is:
template<typename T>
T Hermite(float t, T& p1, T& s1, T& p2, T& s2)
{
	return p1 * ((1.0f + 2.0f * t) * ((1.0f - t) * (1.0f - t)))
		+ s1 * (t * ((1.0f - t) * (1.0f - t)))
		+ p2 * ((t * t) * (3.0f - 2.0f * t))
		+ s2 * ((t * t) * (t - 1.0f));
}
The glTF file format supports the constant, linear, and cubic interpolation types. You just learned how to do cubic interpolation, but you still need to implement both constant and linear interpolation.
Hermite Spline and Bezier Spline
There are two ways to transform each other, but the relevant contents are not covered in this book. Some 3D modeling software, such as Maya, allows animators to use Hermite Splines to create animation, but other 3D modeling software, such as Blender 3D, uses Bezier Curves
The essence of animation is a pile of curves with Property over time. hermite Soline and Bezier Spline mentioned here are the two most common curves
Interpolation types
There are three types:
- Constant
- Linear
- Cubic: the Cubic Curve used in this book is Hermite Spline. I just introduced Bezier Spline, but I won't use it later.
The three types are shown in the following figure. Note that the Constant Curve here is not always a Constant Curve. It feels more and more advanced from left to right:

Creating the Frame struct
Here, we should consider the specific data of each frame of an animation. Assuming that the animation is only the application of a Property Curve, for Linear and Constant curves, the data of each frame is actually a value and the corresponding time.
For a Curve of Cubic type, its frame data is more complex. In addition to its own value and corresponding time, it also needs to store the tangent there. There are two tangents here, one is the incoming tangent and the other is the outgoing tangent. The former is used to evaluate the time point in front of the control point, and the latter is used to evaluate the time point behind the control point.
A Hermite curve is made by connecting Hermite splines, and an outgoing tangent. The incoming tangent is used if the control point is evaluated with the point that comes before it. The outgoing tangent is used if the control point is evaluated with the point that comes after it.
The Curve data of a Property is a collection of multiple key frame data. The data of each key frame includes time, incoming and outgoing tangent and the value of the corresponding Property. Specifically, there can be two representation methods:
- The first method, similar to Unity's animation processing method, is to subdivide all properties into curves corresponding to each scalar. For example, Position can be decomposed into curves of x, y and z variables
- The second method is to design specialized frame and curve types, such as scalar frame, vector frame and quaternion frame
The second method can write code better than the first method, but the first method saves memory because each property can be resolved into scalar curves (such as float curves). Animation Tracks are stored in the. glTF file in this way, while the second method, such as a Vector3, may only have x and y changes in the animation, But the second is to store it as a whole, so curve will also contain z data, which will consume more memory.
Next, you can implement the Frame class, which is a template class. The code is as follows:
#ifndef _H_FRAME_
#define _H_FRAME_

// I haven't seen much about the writing of this template before. The type must be filled in the < > of the previous template
// In this way, T type is specified as unsigned int, and a specific type of variable N is added here
// At this time, the value of unsigned int must be filled in < >
template<unsigned int N>
class Frame
{
public:
	float mValue[N];// This Property consists of several float s
	float mIn[N];
	float mOut[N];
	float mTime;
};

// Three kinds of specialized frames
typedef Frame<1> ScalarFrame;
typedef Frame<3> VectorFrame;
typedef Frame<4> QuaternionFrame;

#endif
Create Track class
A Track class is a collection of frames. Interpolating a track returns the data type of the track;
Track is essentially a collection of frames, that is, a set of frame data. A track must have at least two frame objects. Since track is a collection of frames, three specialized frames are defined here. Naturally, track needs to be defined as a template class and implemented in three specialized versions. The header file code is as follows:
#ifndef _H_TRACK_
#define _H_TRACK_

#include <vector>
#include "Frame.h"
#include "vec3.h"
#include "quat.h"
#include "Interpolation.h"

// Here, it is considered that all T types are composed of floats, and N is the number of floats
// For example, track < vec3, 3 >
template<typename T, int N>
class Track
{
protected:
	// In essence, a Track has only these two things: the collection of frames and the interpolation type
	std::vector<Frame<N>> mFrames;
	Interpolation mInterpolation;
protected:
	// protected below are some helper functions
	T SampleConstant(float time, bool looping);
	T SampleLinear(float time, bool looping);
	T SampleCubic(float time, bool looping);
	T Hermite(float time, const T& point1, const T& slope1,	const T& point2, const T& slope2);
	int FrameIndex(float time, bool looping);
	float AdjustTimeToFitTrack(float time, bool looping);
	T Cast(float* value);
public:
	Track();
	void Resize(unsigned int size);
	unsigned int Size();
	Interpolation GetInterpolation();
	void SetInterpolation(Interpolation interpolation);
	// Gets the time of the first frame
	float GetStartTime();
	// Gets the time of the last frame
	float GetEndTime();
	// Sample Curve
	T Sample(float time, bool looping);
	// Overload [], which is convenient to return the Frame data of Frame i
	Frame<N>& operator[](unsigned int index);
};

typedef Track<float, 1> ScalarTrack;
typedef Track<vec3, 3> VectorTrack;
typedef Track<quat, 4> QuaternionTrack;

#endif
The specific cpp code is as follows:
#include "Track.h"

template Track<float, 1>;
template Track<vec3, 3>;
template Track<quat, 4>;

// Some global inline functions of helper s are defined under namespace. These codes can actually be put into a separate header
namespace TrackHelpers
{
	// Linear interpolation of float
	inline float Interpolate(float a, float b, float t)
	{
		return a + (b - a) * t;
	}

	// Linear interpolation of VEC 3
	inline vec3 Interpolate(const vec3& a, const vec3& b, float t)
	{
		return lerp(a, b, t);
	}

	// Linear interpolation of quaternions
	inline quat Interpolate(const quat& a, const quat& b, float t)
	{
		// Although it is called mix function here, its essence is the linear interpolation operation of vec4
		quat result = mix(a, b, t);
		if (dot(a, b) < 0) // Neighborhood
			result = mix(a, -b, t);

		return normalized(result); //NLerp, not slerp
	}

	// For vec3,float and quaternion, only quaternion needs to be corrected to element quaternion
	// For the purpose of general interface, all Properry types should implement the AdjustHermiteResult function
	inline float AdjustHermiteResult(float f)
	{
		return f;
	}

	inline vec3 AdjustHermiteResult(const vec3& v)
	{
		return v;
	}

	// normalization
	inline quat AdjustHermiteResult(const quat& q)
	{
		return normalized(q);
	}

	// Only quaternion interpolation has the neighborhood problem
	inline void Neighborhood(const float& a, float& b) { }
	inline void Neighborhood(const vec3& a, vec3& b) { }
	inline void Neighborhood(const quat& a, quat& b)
	{
		if (dot(a, b) < 0)
			b = -b;
	}
}; // End Track Helpers namespace

// The default is ctor, and the default interpolation type is linear interpolation
template<typename T, int N>
Track<T, N>::Track()
{
	mInterpolation = Interpolation::Linear;
}


template<typename T, int N>
float Track<T, N>::GetStartTime()
{
	return mFrames[0].mTime;
}

template<typename T, int N>
float Track<T, N>::GetEndTime()
{
	return mFrames[mFrames.size() - 1].mTime;
}

// Sample is generated according to the interpolation type
template<typename T, int N>
T Track<T, N>::Sample(float time, bool looping)
{
	if (mInterpolation == Interpolation::Constant)
		return SampleConstant(time, looping);
	else if (mInterpolation == Interpolation::Linear)
		return SampleLinear(time, looping);

	return SampleCubic(time, looping);
}

// Returns the Frame object at Frame i
template<typename T, int N>
Frame<N>& Track<T, N>::operator[](unsigned int index)
{
	return mFrames[index];
}

// resize of vector
template<typename T, int N>
void Track<T, N>::Resize(unsigned int size)
{
	mFrames.resize(size);
}

template<typename T, int N>
unsigned int Track<T, N>::Size()
{
	return mFrames.size();
}

template<typename T, int N>
Interpolation Track<T, N>::GetInterpolation()
{
	return mInterpolation;
}

template<typename T, int N>
void Track<T, N>::SetInterpolation(Interpolation interpolation)
{
	mInterpolation = interpolation;
}

// This function will be called by the SampleCubic function
// Specifically, sample a Hermite Curve and return the property at the t scale
template<typename T, int N>
T Track<T, N>::Hermite(float t, const T& p1, const T& s1, const T& _p2, const T& s2)
{
	float tt = t * t;
	float ttt = tt * t;

	// In fact, only when T is quaternion, p2 needs to be processed by neighborhood
	T p2 = _p2;
	TrackHelpers::Neighborhood(p1, p2);

	// Each coefficient is a cubic function based on t
	float h1 = 2.0f * ttt - 3.0f * tt + 1.0f;
	float h2 = -2.0f * ttt + 3.0f * tt;
	float h3 = ttt - 2.0f * tt + t;
	float h4 = ttt - tt;

	// In fact, only when T is quaternion, the results need to be normalized
	T result = p1 * h1 + p2 * h2 + s1 * h3 + s2 * h4;
	return TrackHelpers::AdjustHermiteResult(result);
}

// Getting the corresponding number of frames according to time actually returns the key frame on the left
// Note that the frames here should be saved according to the key frame. For example, there are three elements in the frames, and the corresponding time may be
// 0, 4, 10, then when my input time is 5, the returned index is 1, which means starting from the second frame
// The return value of this function is guaranteed to be within the [0, size - 2] range
template<typename T, int N>
int Track<T, N>::FrameIndex(float time, bool looping)
{
	unsigned int size = (unsigned int)mFrames.size();
	if (size <= 1)
		return -1;

	if (looping)
	{
		float startTime = mFrames[0].mTime;
		float endTime = mFrames[size - 1].mTime;
		float duration = endTime - startTime;

		time = fmodf(time - startTime, endTime - startTime);
		if (time < 0.0f)
			time += endTime - startTime;

		time = time + startTime;
	}
	else
	{
		if (time <= mFrames[0].mTime)
			return 0;
		// Note that as long as the time is greater than the penultimate frame, the number of frames is returned
		// That is, the return value of this function is in the [0, size - 2] range
		if (time >= mFrames[size - 2].mTime)
			return (int)size - 2;
	}

	// After the lower boundary of time is determined
	// Traverse the time corresponding to all frames from back to front to find the upper boundary of time
	for (int i = (int)size - 1; i >= 0; --i)
	{
		if (time >= mFrames[i].mTime)
			return i;
	}

	// Invalid code, we should not reach here!
	return -1;
} // End of FrameIndex

// In fact, it is to ensure that the time is within the playback time interval corresponding to the animation. If loop is false, it means that Clamp is in this interval
// Just to facilitate the playback of the calculation time API
// If loop is true, the module of the interval is taken
template<typename T, int N>
float Track<T, N>::AdjustTimeToFitTrack(float time, bool looping)
{
	unsigned int size = (unsigned int)mFrames.size();
	if (size <= 1)
		return 0.0f;

	float startTime = mFrames[0].mTime;
	float endTime = mFrames[size - 1].mTime;
	float duration = endTime - startTime;
	if (duration <= 0.0f)
		return 0.0f;
	if (looping)
	{
		time = fmodf(time - startTime, endTime - startTime);
		if (time < 0.0f)
			time += endTime - startTime;

		time = time + startTime;
	}
	else
	{
		if (time <= mFrames[0].mTime)
			time = startTime;
		if (time >= mFrames[size - 1].mTime)
			time = endTime;
	}

	return time;
}

// For example, AdjustTimeToFitTrack:
//Track<float, 1> t;//  T is the track representing time
//float mAnimTime = 0.0f;
//void Update(float dt)
//{
// 	// dt: delta time of frame
//	mAnimTime = t.AdjustTimeToFitTrack(mAnimTime + dt);
//}


// Three Cast functions are used to convert the array to the type actually corresponding to T
// It is considered here that all data is essentially float*
// Then write template specialization and parse float * into different types of data
template<> float Track<float, 1>::Cast(float* value)
{
	return value[0];
}

template<> vec3 Track<vec3, 3>::Cast(float* value)
{
	return vec3(value[0], value[1], value[2]);
}

template<> quat Track<quat, 4>::Cast(float* value)
{
	quat r = quat(value[0], value[1], value[2], value[3]);
	return normalized(r);
}


template<typename T, int N>
T Track<T, N>::SampleConstant(float time, bool looping)
{
	// Get the number of frames corresponding to the time and round it
	int frame = FrameIndex(time, looping);
	if (frame < 0 || frame >= (int)mFrames.size())
		return T();

	// Constant curve does not need interpolation. There should be only frame data of key frames in mFrames
	return Cast(&mFrames[frame].mValue[0]);
	// Why transformation? Because mValue is an array of float * type, the operation here starts from the array address and Cast is of type T
}

template<typename T, int N>
T Track<T, N>::SampleLinear(float time, bool looping)
{
	// Find the id corresponding to the key frame on the left
	int thisFrame = FrameIndex(time, looping);
	if (thisFrame < 0 || thisFrame >= (int)(mFrames.size() - 1))
		return T();

	// id corresponding to the key frame on the right
	int nextFrame = thisFrame + 1;

	// In fact, this code should only work when looping is true
	float trackTime = AdjustTimeToFitTrack(time, looping);

	// Then there is linear interpolation
	float frameDelta = mFrames[nextFrame].mTime - mFrames[thisFrame].mTime;
	if (frameDelta <= 0.0f)
		return T();

	float t = (trackTime - mFrames[thisFrame].mTime) / frameDelta;

	// mValue is an array representing key frame data in mFrames. For example, when T is vec3, mValue is
	// An array of float[3]
	T start = Cast(&mFrames[thisFrame].mValue[0]);
	T end = Cast(&mFrames[nextFrame].mValue[0]);

	return TrackHelpers::Interpolate(start, end, t);
}

// Key function
template<typename T, int N>
T Track<T, N>::SampleCubic(float time, bool looping)
{
	// The previous steps are similar to those above
	// Get the id of the left and right keyframes
	int thisFrame = FrameIndex(time, looping);
	if (thisFrame < 0 || thisFrame >= (int)(mFrames.size() - 1))
		return T();

	int nextFrame = thisFrame + 1;

	float trackTime = AdjustTimeToFitTrack(time, looping);
	float frameDelta = mFrames[nextFrame].mTime - mFrames[thisFrame].mTime;
	if (frameDelta <= 0.0f)
		return T();

	// The algorithm of t is the same. t represents the proportion between two frames
	float t = (trackTime - mFrames[thisFrame].mTime) / frameDelta;

	// Get the point and slope of the left key frame. If the point is vec2, then the slope is also vec2, so the type is T
	T point1 = Cast(&mFrames[thisFrame].mValue[0]);
	T slope1;// = mFrames[thisFrame].mOut * frameDelta;
	// Note: the Out tangent of the left key frame is taken here, and the In tangent is not used. The Out and In here
	// As like as two peas of Delta T, it is exactly the same as T.
	// Moreover, the memcpy function is used here, not the Cast function, because for T of quaternion type
	// The Cast function will normalize, and here is the tangent, so normalization is not required
	memcpy(&slope1, mFrames[thisFrame].mOut, N * sizeof(float));
	slope1 = slope1 * frameDelta;

	T point2 = Cast(&mFrames[nextFrame].mValue[0]);
	T slope2;// = mFrames[nextFrame].mIn[0] * frameDelta;
	// Note: the In tangent of the right key frame is taken here, and the Out tangent is not used
	memcpy(&slope2, mFrames[nextFrame].mIn, N * sizeof(float));
	slope2 = slope2 * frameDelta;

	// According to the Curve composed of these four values, then enter the value of T of the Property returned by the t part
	return Hermite(t, point1, slope1, point2, slope2);
}
Thoughts on Track class
What exactly is the Track class? Does the Curve data corresponding to the Property seem to be not, because it seems to be used for time. For example, this Code:
// For example, AdjustTimeToFitTrack:
Track<float, 1> t;// t is the Track representing time
float mAnimTime = 0.0f;
void Update(float dt)
{
 	// dt: delta time of frame
	mAnimTime = t.AdjustTimeToFitTrack(mAnimTime + dt);
}
Essential code of Track:
// Objects of type T are represented by an array of N float s
template<typename T, int N>
class Track
{
protected:
	// In essence, a Track has only these two things: the collection of frames and the interpolation type
	std::vector<Frame<N>> mFrames;
	Interpolation mInterpolation;
	...
}

template<unsigned int N>
class Frame
{
public:
	float mValue[N];// This Property consists of several float s
	float mIn[N];
	float mOut[N];
	float mTime;
};
Analyze the characteristics of Track:
- The essential data of Track is an array, similar to the generic vector of C++ STL. Although they are all generic, the vector of STL stores the object of T, but the array vector of Track stores the object of Frame. Here, the Frame is a simple Class, representing key Frame data. Except that time is a float variable, everything else is represented by float *, and t here, It represents what kind of variable mValue in the Frame structure itself is (why the Frame here is not a template, and T has nothing to do with the Frame, but puts the definition of T in the Track, that is, a single Frame object cannot work without Track)
- Cast function is used to transform the float array into a T object. The float array here is actually a very small array, which can only correspond to a T object. For example, when T is vec3, the size of float * is 3
Therefore, the Track I understand is very similar to the Curve data in Unity. It is essentially a Curve whose Property changes over time.
Let's take a look at the previous code:
// The Track itself is the Curve of time
Track<float, 1> t;
float mAnimTime = 0.0f;
void Update(float dt)
{
 	// dt: delta time of frame
	mAnimTime = t.AdjustTimeToFitTrack(mAnimTime + dt);
}
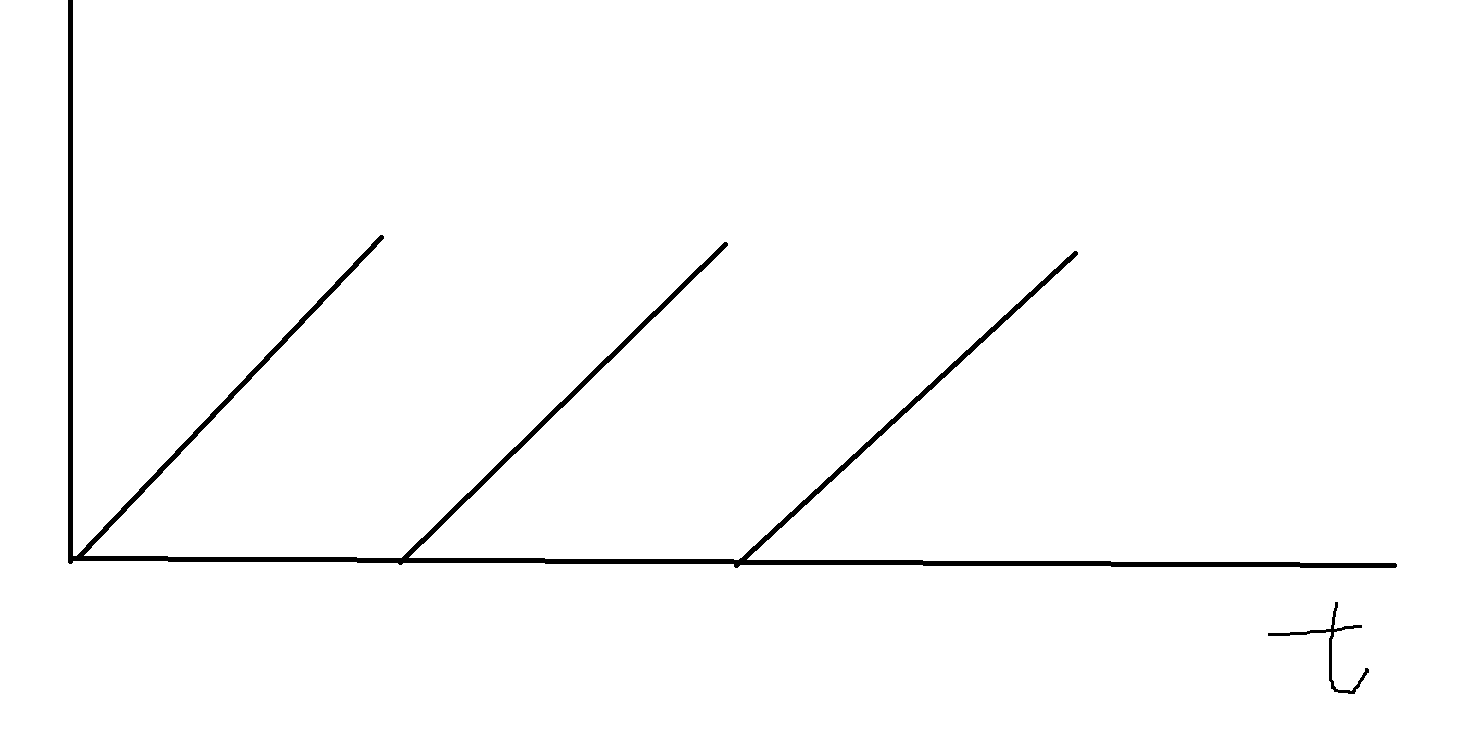
In fact, this Track is also a Curve. Its variable is time. The result is related to time and the cycle of the animation itself. Its Curve is shown in the following figure:
position track, quaternion track and scale track are combined into transform track
In fact, it is similar to the data in Animation in Unity. There are also curves of LocalPosition, LocalRotation and LocalScale. However, the Animation in this book seems to have no Animation data of Scale, so only the first two are combined.
There are two approaches:
- Create a Transform Track for each Model's Bone, which has the advantages of convenient query and large memory consumption. Even if there is no animation, the Bone will have a corresponding Track
- Only create transform tracks for the animated bones on the Model, and then record the corresponding Bone ID of each Track. When actually used, each Track will be traversed to find the corresponding Bone according to its ID
Obviously, method 2 is better. Select method 2 and create the header file of TransformTrack first:
#ifndef _H_TRANSFORMTRACK_
#define _H_TRANSFORMTRACK_

#include "Track.h"
#include "Transform.h"

class TransformTrack
{
protected:
	unsigned int mId;// Id corresponding to Bone
	// I didn't write track < vec3, float >, but I defined VectorTrack class and QuaternionTrack class myself
	VectorTrack mPosition;
	QuaternionTrack mRotation;
	VectorTrack mScale;
public:
	TransformTrack();
	unsigned int GetId();
	void SetId(unsigned int id);
	VectorTrack& GetPositionTrack();
	QuaternionTrack& GetRotationTrack();
	VectorTrack& GetScaleTrack();
	float GetStartTime();
	float GetEndTime();
	bool IsValid();
	Transform Sample(const Transform& ref, float time, bool looping);
};

#endif
The following is the implementation of these functions. They are basically the stitching of three tracks. There is nothing new:
#include "TransformTrack.h"

TransformTrack::TransformTrack()
{
	mId = 0;
}

unsigned int TransformTrack::GetId()
{
	return mId;
}

void TransformTrack::SetId(unsigned int id)
{
	mId = id;
}

VectorTrack& TransformTrack::GetPositionTrack()
{
	return mPosition;
}

QuaternionTrack& TransformTrack::GetRotationTrack()
{
	return mRotation;
}

VectorTrack& TransformTrack::GetScaleTrack()
{
	return mScale;
}

// Valid as long as any one of the three tracks has data
bool TransformTrack::IsValid()
{
	return mPosition.Size() > 1 || mRotation.Size() > 1 || mScale.Size() > 1;
}

// Select the earliest time point of various keyframes in the three tracks, and then take the smallest one
float TransformTrack::GetStartTime()
{
	float result = 0.0f;
	bool isSet = false;

	if (mPosition.Size() > 1)
	{
		result = mPosition.GetStartTime();
		isSet = true;
	}
	if (mRotation.Size() > 1)
	{
		float rotationStart = mRotation.GetStartTime();
		if (rotationStart < result || !isSet)
		{
			result = rotationStart;
			isSet = true;
		}
	}
	if (mScale.Size() > 1)
	{
		float scaleStart = mScale.GetStartTime();
		if (scaleStart < result || !isSet)
		{
			result = scaleStart;
			isSet = true;
		}
	}

	return result;
}

// Take the latest of the endtimes of the three tracks
float TransformTrack::GetEndTime()
{
	float result = 0.0f;
	bool isSet = false;

	if (mPosition.Size() > 1)
	{
		result = mPosition.GetEndTime();
		isSet = true;
	}
	if (mRotation.Size() > 1)
	{
		float rotationEnd = mRotation.GetEndTime();
		if (rotationEnd > result || !isSet)
		{
			result = rotationEnd;
			isSet = true;
		}
	}
	if (mScale.Size() > 1)
	{
		float scaleEnd = mScale.GetEndTime();
		if (scaleEnd > result || !isSet)
		{
			result = scaleEnd;
			isSet = true;
		}
	}

	return result;
}

// Sample s of each Track, if there is a Track
// Because not all animations have the same track corresponding to the Property, for example, some have only position without rotation and scale
// If you want to change to Sample animation B during Sample animation A, remember to reset the character's pose
Transform TransformTrack::Sample(const Transform& ref, float time, bool looping)
{
	// Record the result data every time the Sample plays the animation
	Transform result = ref; // Assign default values

	// Such a ref represents the Transform of the original character, so it doesn't matter even if the corresponding Track has no animation data
	if (mPosition.Size() > 1)
	{ // Only assign if animated
		result.position = mPosition.Sample(time, looping);
	}
	if (mRotation.Size() > 1)
	{ // Only assign if animated
		result.rotation = mRotation.Sample(time, looping);
	}
	if (mScale.Size() > 1)
	{ // Only assign if animated
		result.scale = mScale.Sample(time, looping);
	}

	return result;
}
Because not all animations contain the same tracks, it's important to reset the pose that you are sampling any time the
animation that you are sampling switches. This ensures that the reference transform is always correct. To reset the pose, assign it to be the same as the rest pose
Summary of this chapter
This chapter has learned the essence of animation. The essence of animation is a pile of tracks, or a pile of Curves of a Property. Track s are composed of multiple key frame data of a Property. The following AnimationClips are basically the collection of TransformTrack objects established in this chapter. Sample00 on Github brings the code of this lesson, and Sample01 draws some tracks, because previewing the Curves of these tracks is also very helpful for debugging.
appendix
Differences between fbx and glTF files
https://www.threekit.com/blog/gltf-vs-fbx-which-format-should-i-use
Difference between Spline, B-Spline and Bezier Curves
reference resources: https://www.geeksforgeeks.org/difference-between-spline-b-spline-and-bezier-curves/
I haven't finished it. I'll study it later
Spline
Spline Curve is a mathematical expression method used to represent complex curves and surfaces. What I understand is that this thing is similar to
A spline curve is a mathematical representation for which it is easy to build an interface that will allow a user to design and control the shape of complex curves and surfaces.
B-Spline
B-Spline is a basis function that contains a set of control points. The B-Spline curves are specified by Bernstein basis function that has limited flexibility.
Attention reader! Don't stop learning now. Get hold of all the important CS Theory concepts for SDE interviews with the CS Theory Course at a student-friendly price and become industry ready.
Bezier
These curves are specified with boundary conditions, with a characterizing matrix or with blending function. A Bezier curve section can be filled by any number of control points. The number of control points to be approximated and their relative position determine the degree of Bezier polynomial.