Previous articles Spring Cloud Building Registry and Service Registration This paper introduces the construction of the registry and the registration of services. This paper will introduce the process of load balancing for service consumers through Ribbon invoking services.
Contents of this article
I. Ribbon service invocation processII. Establishment of a RegistryIII. Service ProvidersIV. Service ConsumersV. Actual Operation of Service Call
I. Ribbon service invocation process
Ribbon is a client-side load balancer. It has several load balancing mechanisms. The default is polling. We can also customize rules to reduce server pressure by allocating network requests reasonably.
The overall process is to start the registry first. Service providers provide services and register with the registry. Consumers get services from the registry and execute them.
There are three roles to implement service invocation: service registry, service provider and service consumer.
II. Establishment of a Registry
First, create a new SpringBook project, named spring-cloud-eureka, and then write the code according to the following steps.
- pom.xml code
Add the dependency of eureka-server, code as follows:
    <dependencies>
        <dependency>
            <groupId>org.springframework.boot</groupId>
            <artifactId>spring-boot-starter</artifactId>
        </dependency>

        <dependency>
            <groupId>org.springframework.cloud</groupId>
            <artifactId>spring-cloud-starter-netflix-eureka-server</artifactId>
        </dependency>

        <dependency>
            <groupId>org.springframework.boot</groupId>
            <artifactId>spring-boot-starter-test</artifactId>
            <scope>test</scope>
        </dependency>
    </dependencies>

    <dependencyManagement>
        <dependencies>
            <dependency>
                <groupId>org.springframework.cloud</groupId>
                <artifactId>spring-cloud-dependencies</artifactId>
                <version>Finchley.RELEASE</version><!-- eureka Edition -->
                <type>pom</type>
                <scope>import</scope>
            </dependency>
        </dependencies>
    </dependencyManagement>
- Start class code
The startup class can be annotated @EnableEurekaServer with the following code:
@EnableEurekaServer
@SpringBootApplication
public class SpringCloudEurekaApplication {
    public static void main(String[] args) {
        SpringApplication.run(SpringCloudEurekaApplication.class, args);
    }
}
- configuration file
Using the configuration file of yml, application.yml is configured as follows:
server:
port: 9001 Service port
eureka:
  instance:
    hostname: localhost
  client:
Regis-with-eureka: false # Whether Eureka itself is registered as an application in the Eureka registry
fetch-registry: false # can be started when true, but an exception is reported: Cannot execute request on any known server
    serviceUrl:
      defaultZone: http://${eureka.instance.hostname}:${server.port}/eureka/
Configuration Item Description:
1. server.port=9001 denotes the port number of the service registry.

2. eureka.instance.hostname=localhost denotes the hostname that sets up the service registry

3. eureka.client.register-with-eureka=false, because the application we are creating is a service registry, not a normal application. By default, the application registers itself with the registry (and itself) and is set to false to deny this default behavior.

4. eureka.client.fetch-registry=false, which means not to retrieve other services, because the responsibility of the service registry itself is to maintain service instances, and it does not need to retrieve other services.
- Run screenshots
Open the browser and visit http://localhost:9001/. You can see the registry and start-up. The running screenshots are as follows:
Screen shot of registry operation
III. Service Providers
With the service registry, we can register a service provider with the service registry, create a new SpringBook project, name spring-cloud-user-service, provide user query service, and then write the code according to the following steps.
- pom.xml code
Add the dependency of eureka-client, code as follows:
<dependencies>
    <dependency>
        <groupId>org.springframework.boot</groupId>
        <artifactId>spring-boot-starter-web</artifactId>
    </dependency>

    <dependency>
        <groupId>org.springframework.boot</groupId>
        <artifactId>spring-boot-starter-test</artifactId>
        <scope>test</scope>
    </dependency>

    <dependency>
        <groupId>com.alibaba</groupId>
        <artifactId>fastjson</artifactId>
        <version>1.2.60</version>
    </dependency>

    <dependency>
        <groupId>org.springframework.cloud</groupId>
        <artifactId>spring-cloud-starter-netflix-eureka-client</artifactId>
    </dependency>

    <dependency>
        <groupId>org.projectlombok</groupId>
        <artifactId>lombok</artifactId>
        <optional>true</optional>
    </dependency>
</dependencies>

<dependencyManagement>
    <dependencies>
        <dependency>
            <groupId>org.springframework.cloud</groupId>
            <artifactId>spring-cloud-dependencies</artifactId>
            <version>Finchley.RELEASE</version><!-- eureka Edition -->
            <type>pom</type>
            <scope>import</scope>
        </dependency>
    </dependencies>
</dependencyManagement>
- Start class code
The startup class can be annotated @EnableEurekaClient with the following code:
@EnableEurekaClient
@SpringBootApplication
public class UserServiceDemoApplication {

    public static void main(String[] args) {
        SpringApplication.run(UserServiceDemoApplication.class, args);
    }
}
Add a User Controller that provides user services, code as follows:
/**
 * User service
 */
@Slf4j
@RestController
@RequestMapping("/provider")
public class UserController {

    static Map<Integer, User> userMap = new HashMap<>();

    static {
        //Analog database
        User user1 = new User(1, "Zhang San", "123456");
        userMap.put(1, user1);
        User user2 = new User(2, "Li Si", "123123");
        userMap.put(2, user2);
    }

    /**
     * Query by id
     */
    @RequestMapping("/getUser")
    public String getUser(Integer id) {
        log.info("call getUser Interface,id={}",id);
        User user = userMap.get(id);
        return JSON.toJSONString(user);
    }
- configuration file
Using the configuration file of yml, application.yml is configured as follows:
server:
  port: 8100 #Service port
eureka:
  client:
    serviceUrl:
      defaultZone: http://localhost:9001/eureka/
spring:
  application:
    name: user-service
IV. Service Consumers
First, create a new SpringBook project, named spring-cloud-consumer-ribbon, and then write the code according to the following steps.
- pom.xml code
Add the dependency of eureka-client, code as follows:
    <dependencies>
        <dependency>
            <groupId>org.springframework.boot</groupId>
            <artifactId>spring-boot-starter-web</artifactId>
        </dependency>

        <dependency>
            <groupId>org.springframework.cloud</groupId>
            <artifactId>spring-cloud-starter-netflix-eureka-client</artifactId>
        </dependency>

        <dependency>
            <groupId>org.projectlombok</groupId>
            <artifactId>lombok</artifactId>
            <optional>true</optional>
        </dependency>
        <dependency>
            <groupId>org.springframework.boot</groupId>
            <artifactId>spring-boot-starter-test</artifactId>
            <scope>test</scope>
        </dependency>
    </dependencies>

    <dependencyManagement>
        <dependencies>
            <dependency>
                <groupId>org.springframework.cloud</groupId>
                <artifactId>spring-cloud-dependencies</artifactId>
                <version>Finchley.RELEASE</version><!-- eureka Edition -->
                <type>pom</type>
                <scope>import</scope>
            </dependency>
        </dependencies>
    </dependencyManagement>
- Start class code
Adding the @LoadBalanced annotation when configuring RestTemplate represents starting Ribbon for load balancing.
The startup class adds the annotation @EnableEurekaClient and registers with the registry as follows:
@EnableEurekaClient
@SpringBootApplication
public class RibbonConsumerApplication {

    //When the @LoadBalanced annotation is added, it means starting Ribbon for load balancing.
    @LoadBalanced
    @Bean
    public RestTemplate restTemplate() {
        return new RestTemplate();
    }

    public static void main(String[] args) {
        SpringApplication.run(RibbonConsumerApplication.class, args);
    }

}
- Controller code
Add a Controller to invoke the service provider.
/**
 * Consumer Controller
 */
@Slf4j
@RestController
@RequestMapping("/consumer")
public class RibbonConsumerController {

    @Autowired
    private RestTemplate restTemplate;

    @Autowired
    private LoadBalancerClient loadBalancerClient;

    /**
     * Invoking user microservice
     */
    @GetMapping("getUser")
    public String getUser(Integer id) {
        String url = "http://user-service/provider/getUser?id=" + id;
        return restTemplate.getForObject(url, String.class);
    }
}
- configuration file
Using the configuration file of yml, application.yml is configured as follows:
server:
  port: 8082 #Service port
eureka:
  client:
    serviceUrl:
      defaultZone: http://localhost:9001/eureka/
spring:
  application:
    name: user-service-consumer-ribbon
V. Actual Operation of Service Call
- Start Service Center and Register Service
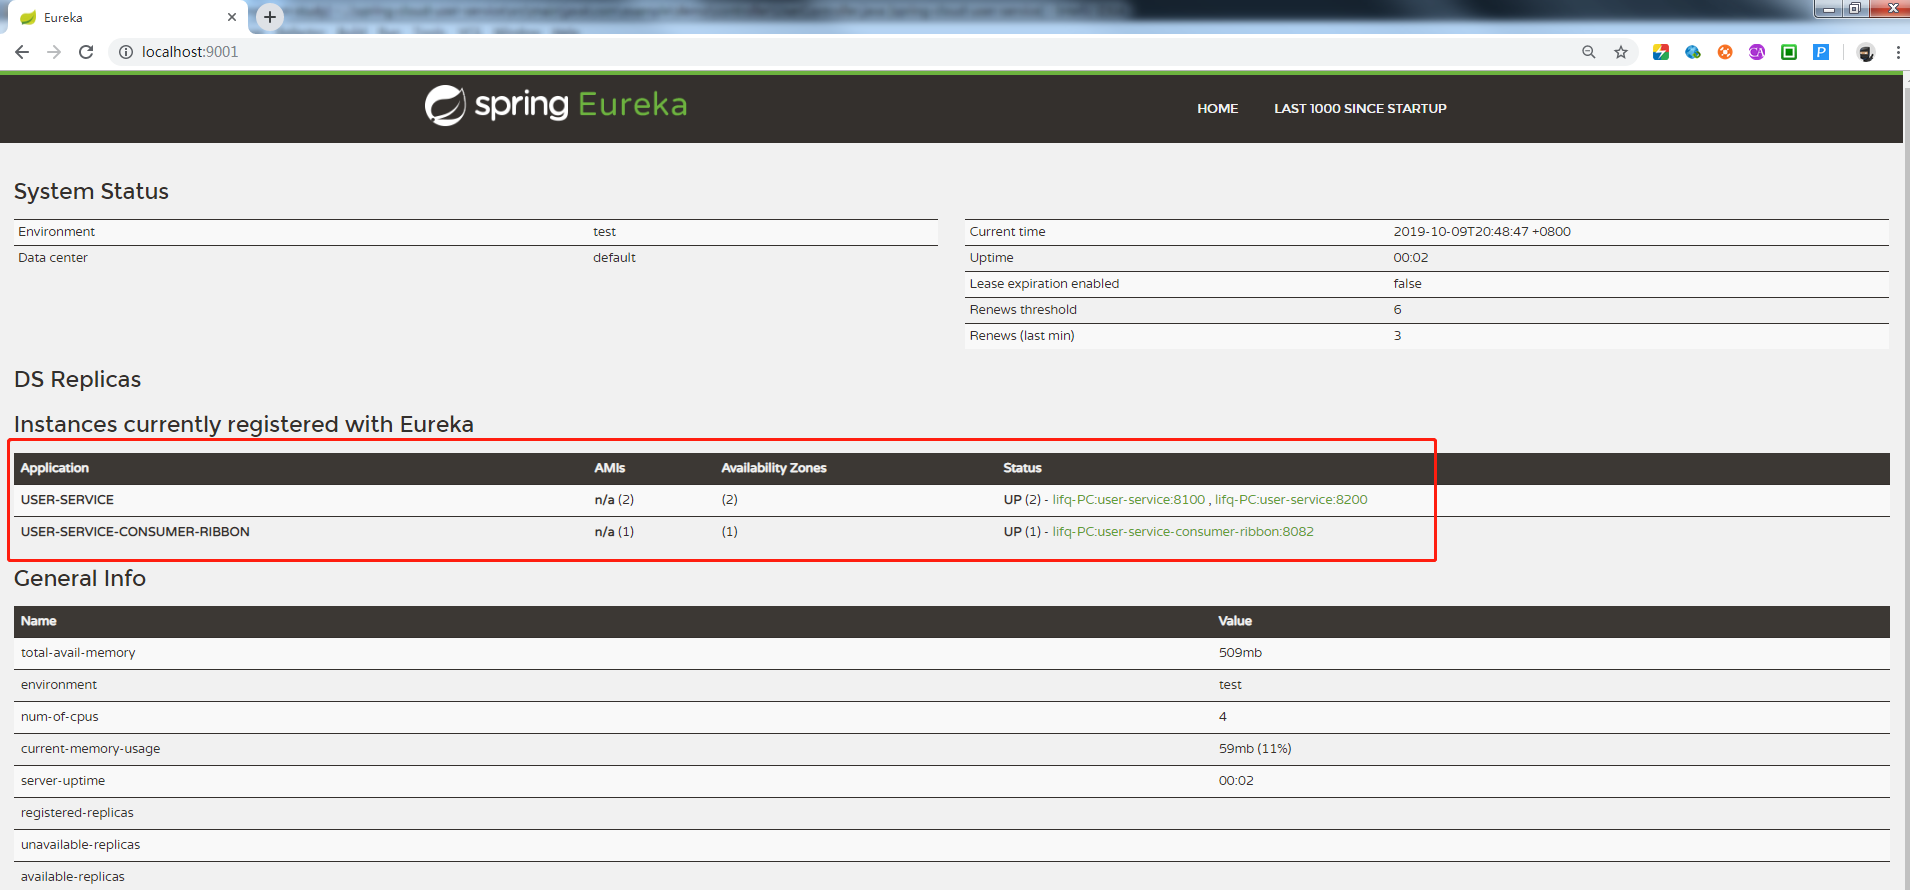
After coding, start spring-cloud-eureka, spring-cloud-user-service and spring-cloud-consumer-ribbon in sequence. Visit the registry http://localhost:9001/. The following figure shows that the registry and two services have been registered successfully.
 Screen shot of registry operation
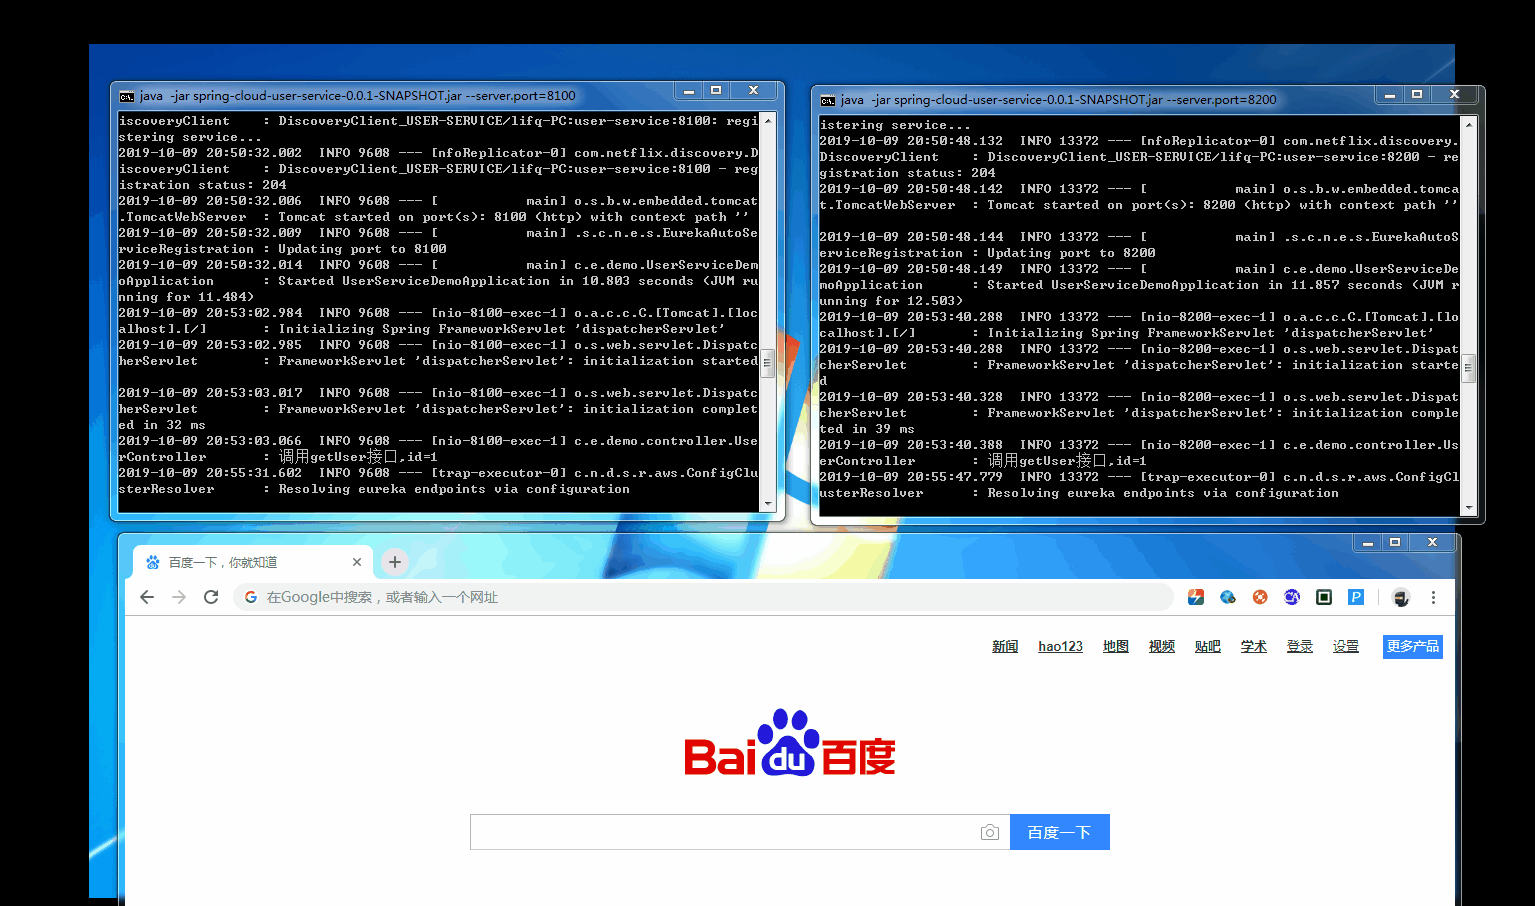
Note that in order to demonstrate load balancing, two services 8100 and 8200 are started when spring-cloud-user-service is started. The startup commands are as follows:
java -jar spring-cloud-user-service-0.0.1-SNAPSHOT.jar --server.port=8100

java -jar spring-cloud-user-service-0.0.1-SNAPSHOT.jar --server.port=8200
- Service invocation
Open the browser and visit http://localhost:8082/consumer/getUser?id=1 several times in a row. We can see that the user-service instance of each requester is different each time. Here is the embodiment of the client load balancing strategy. I made the call process into a gif picture. The effect is as follows:
Call gif pictures
Spring Cloud through Ribbon call service to achieve load balancing process has been fully realized, if you have any questions, please leave a message to communicate!
Full source address: https://github.com/suisui2019/springboot-study
Recommended reading
1. Spring Cloud Building Registry and Service Registration
2. Spring Cloud implements RestTemplate
3. Don't mess with the logs in Java code, that's the correct posture!
4. Encoding artifact Lombok, after learning to develop efficiency at least doubled!
5. Using Spring Boot+zxing, generating two-dimensional codes can be as simple as that.
Timely access to free Java-related information covers Java, Redis, MongoDB, MySQL, Zookeeper, Spring Cloud, Dubbo/Kafka, Hadoop, Hbase, Flink and other high-concurrent distributed, large data, machine learning technology.
Pay attention to the following public numbers for free:
 Java Reads Public Numbers