Hadoop learning Chapter 2 HDFS
- Chapter II HDFS
- HDFS overview
- HDFS definition
- Advantages and disadvantages of HDFS
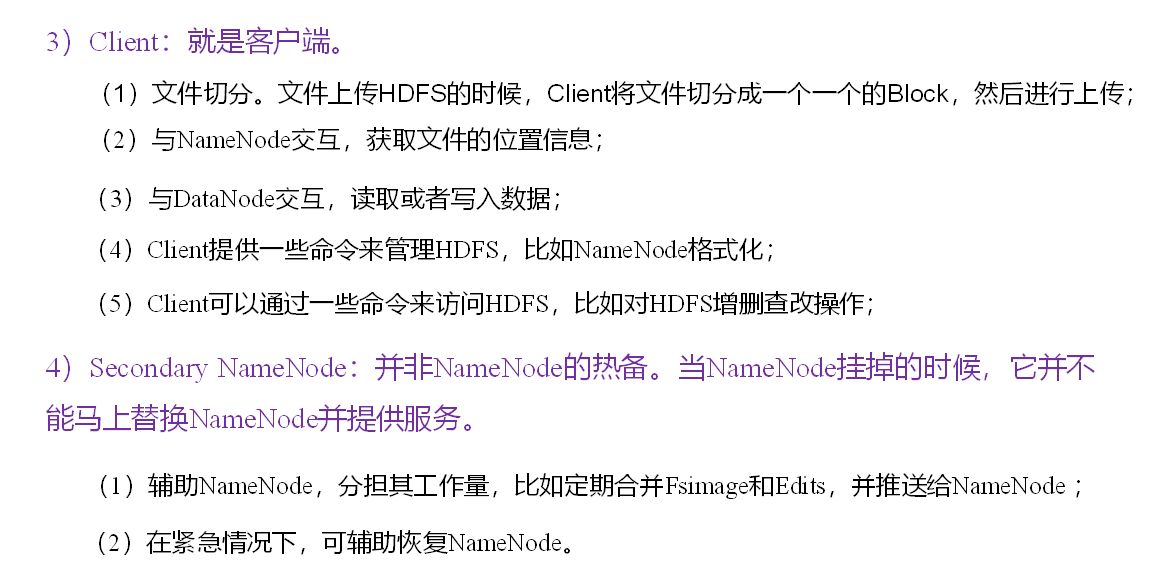
- HDFS architecture
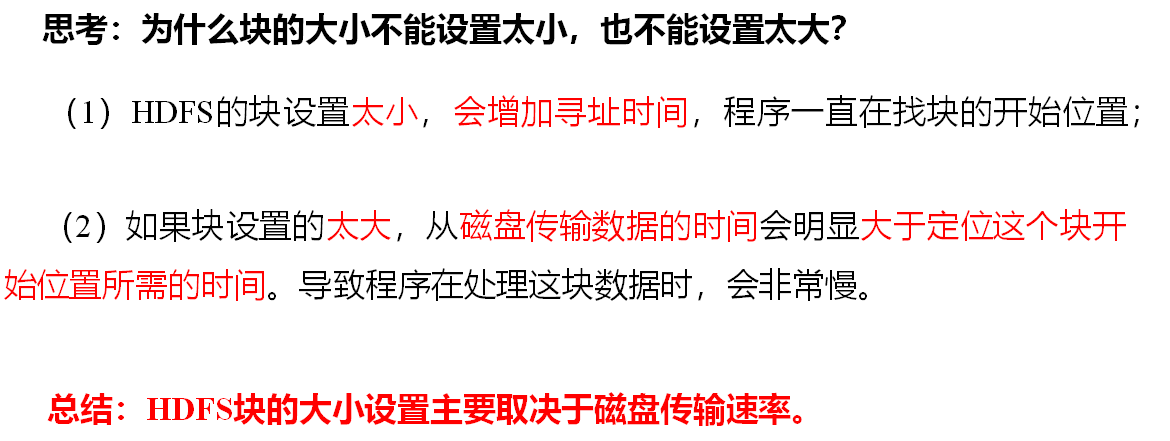
- HDFS file block size (interview focus)
- Common command practice
- HDFS client operation (development focus)
- HDFS client environment preparation
- HDFS file download
- HDFS folder delete
- HDFS filename change
- HDFS file details view
- HDFS file and folder judgment
- I/O stream operation of HDFS
- HDFS file download
- Locate file read
- Data flow of HDFS (interview focus)
- NameNode and SecondaryNameNode (key points of interview Development)
- NN and 2NN working mechanism
- Fsimage and Edits analysis
- CheckPoint time settings
- Cluster security mode
- NameNode multi directory configuration
- DataNode (key point of interview Development)
- DataNode working mechanism
- Data integrity
- Parameter setting of time limit for offline
- New data nodes in service
- Decommissioning old data nodes
- Datanode multi directory configuration
- New features of HDFS 2.X
Chapter II HDFS
HDFS overview
HDFS definition
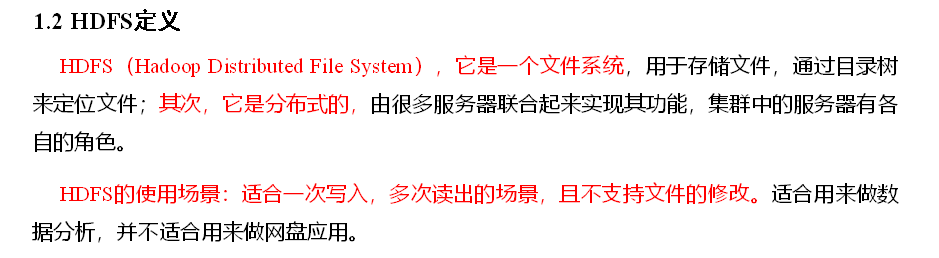
Advantages and disadvantages of HDFS
For small files, it is not suitable to store 15 bytes in the namenode, no matter how many gigabytes or gigabytes.
HDFS architecture
128 megabytes by default
HDFS file block size (interview focus)
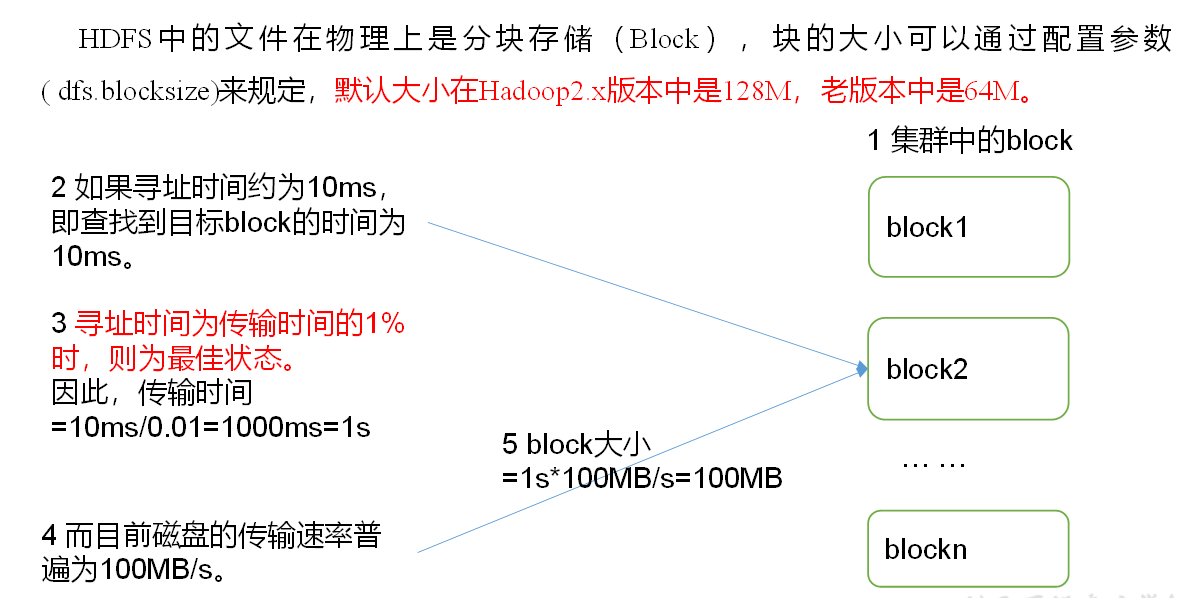
The size of the block is related to the transmission speed of the disk. The transmission speed of the mechanical hard disk is slower, generally 128M solid-state transmission is faster, block 256M.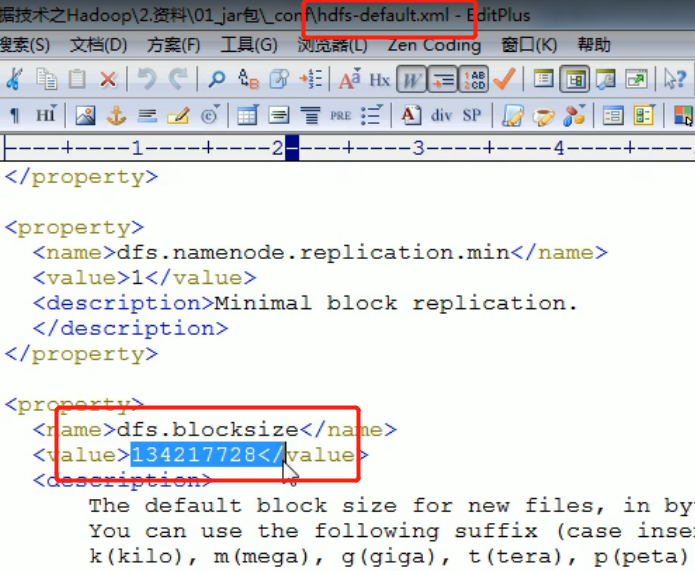
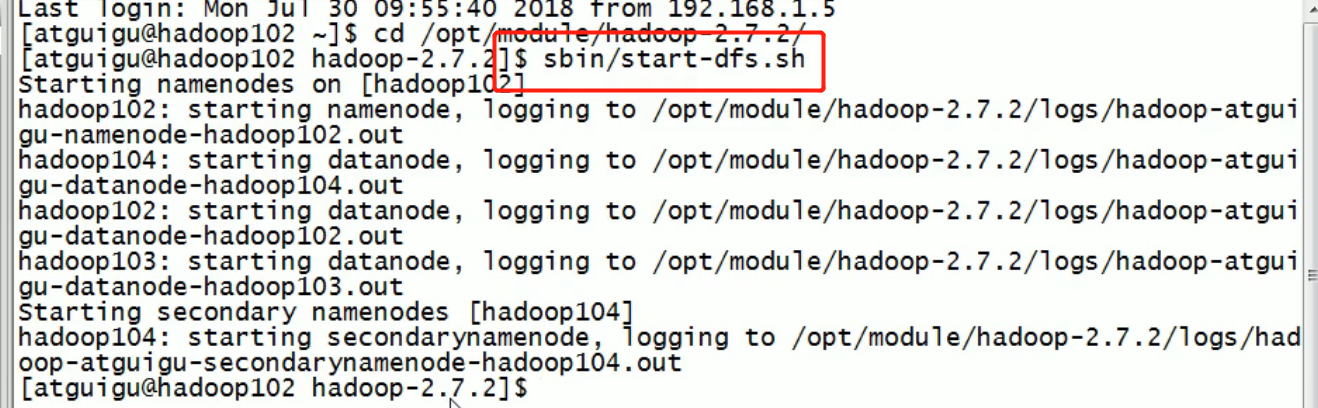

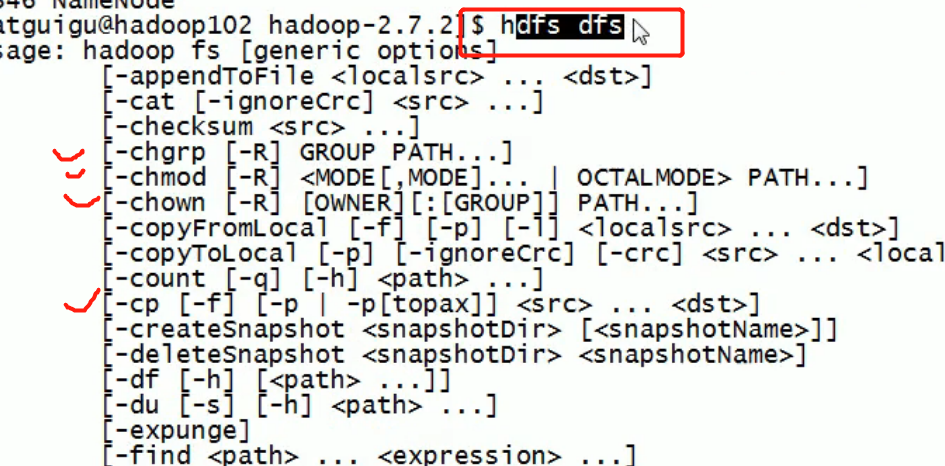
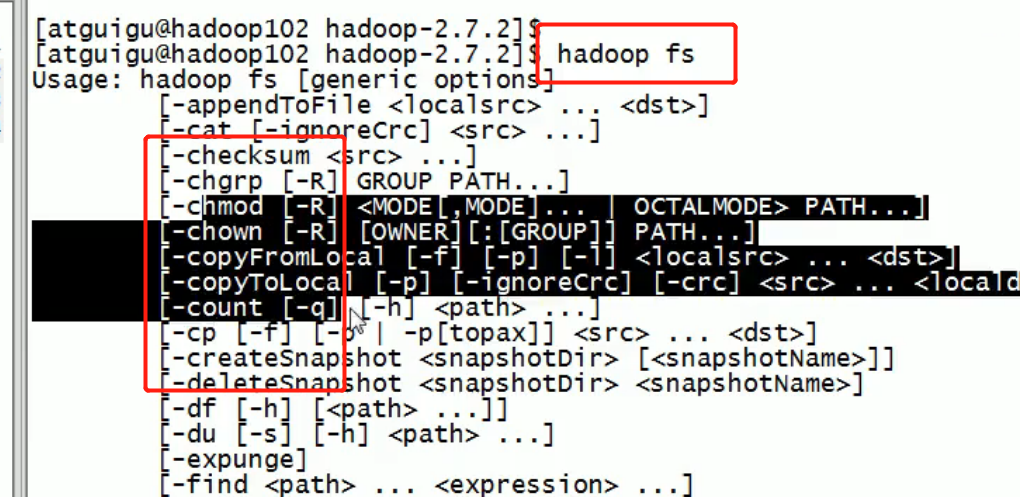
Common command practice
HDFS client operation (development focus)
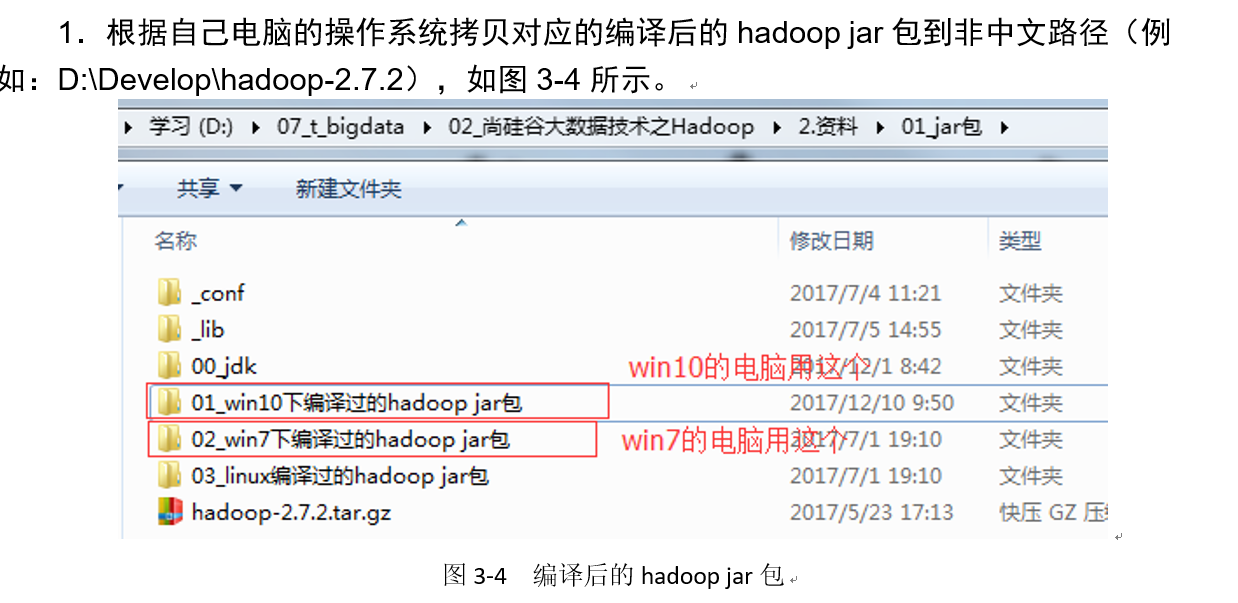
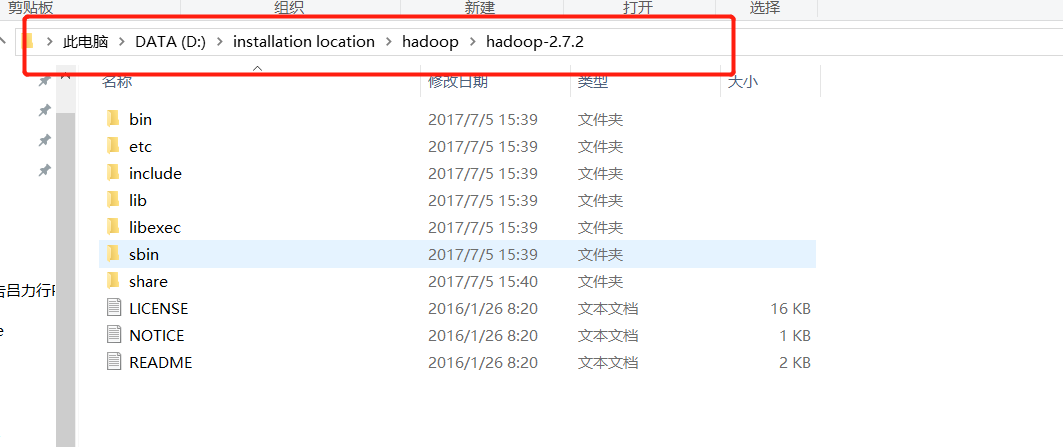
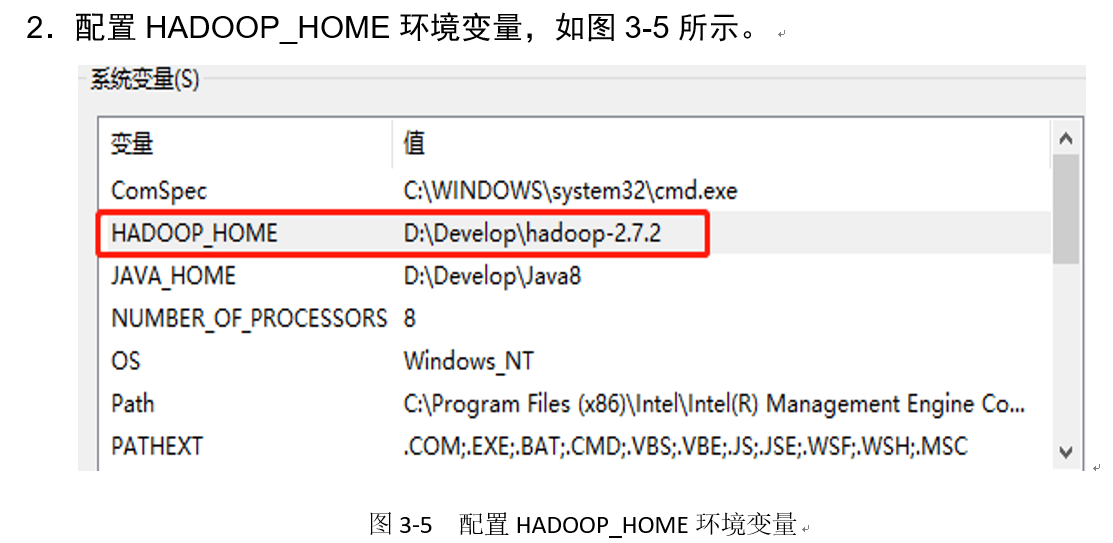
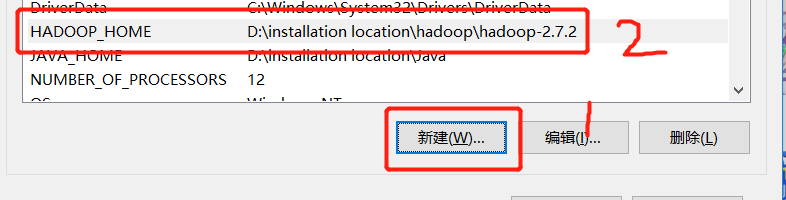
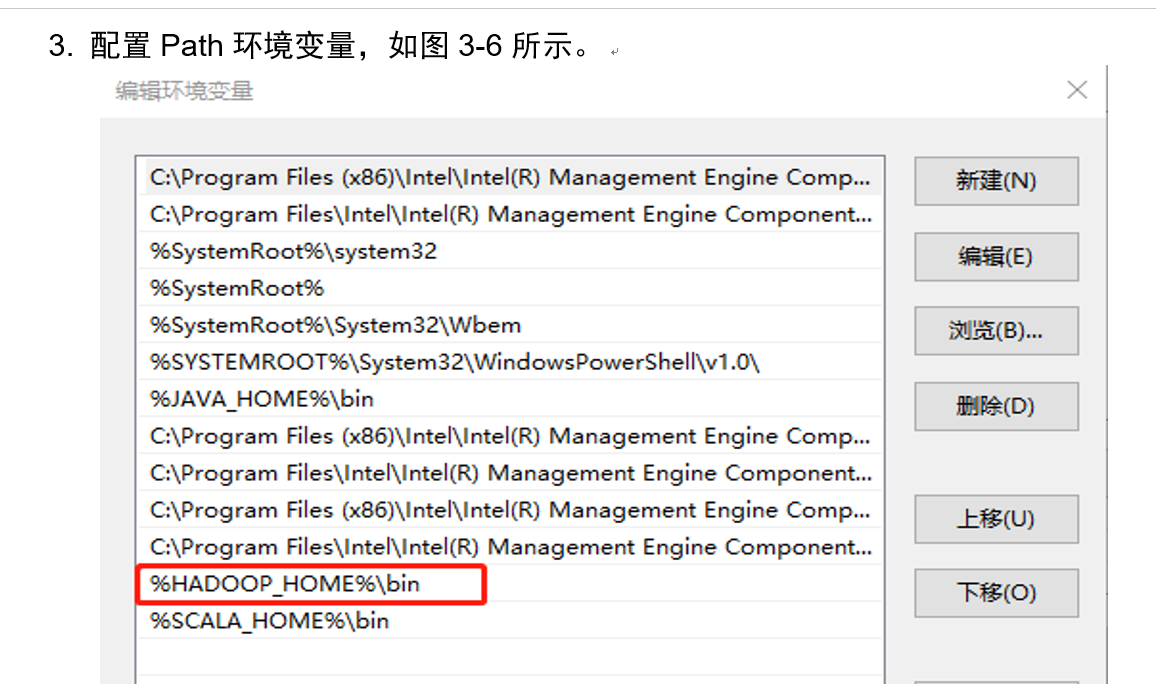
HDFS client environment preparation
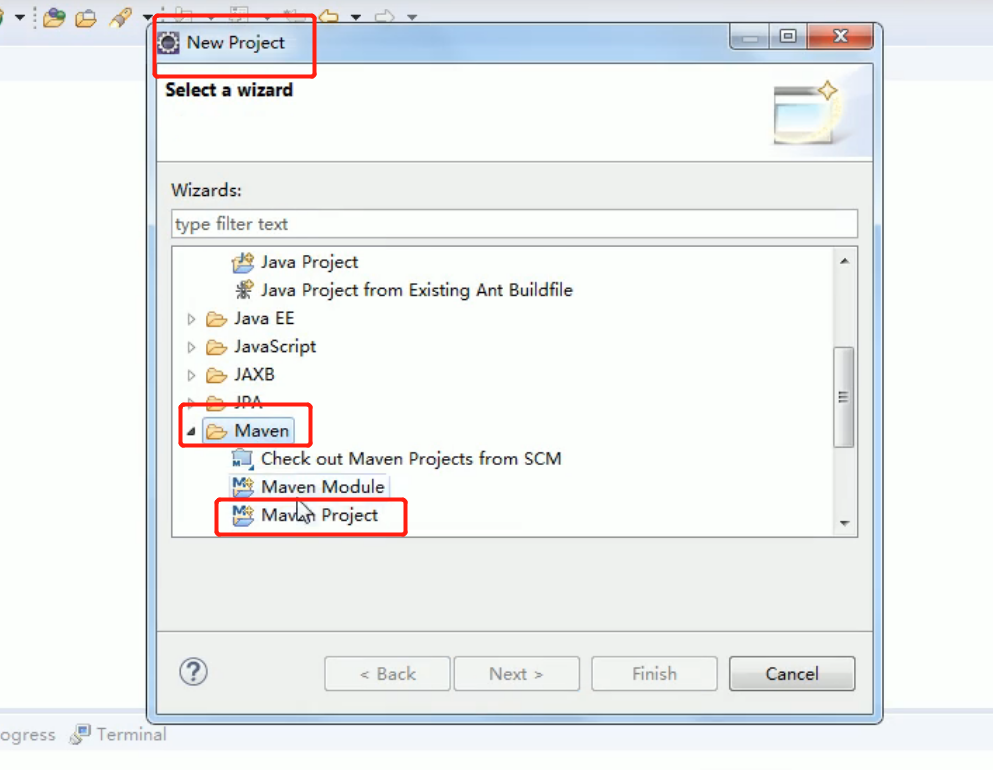
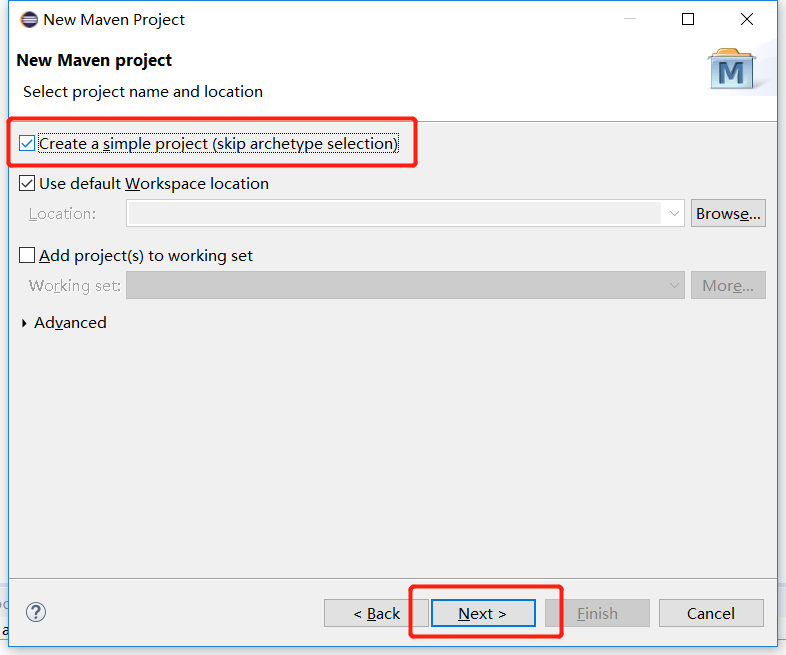
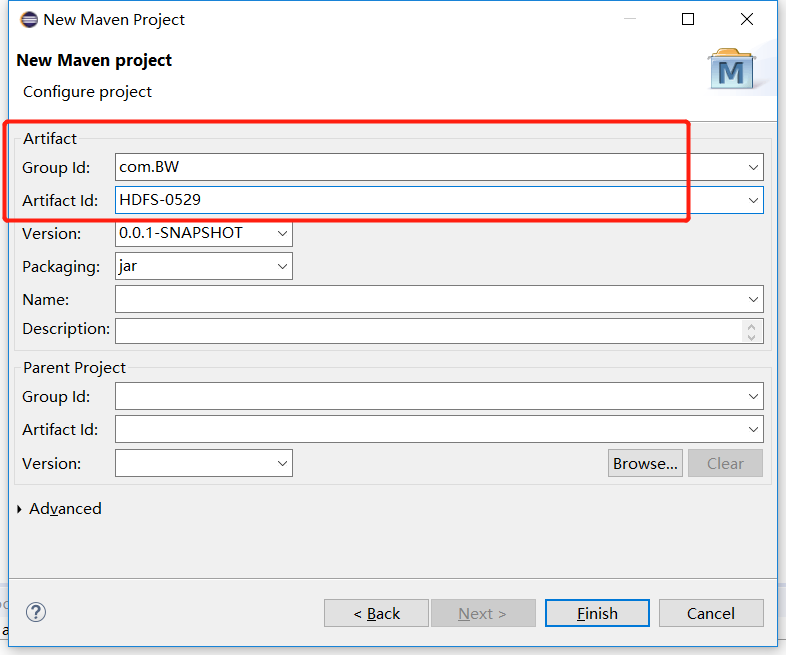
4. Create a Maven project HdfsClientDemo
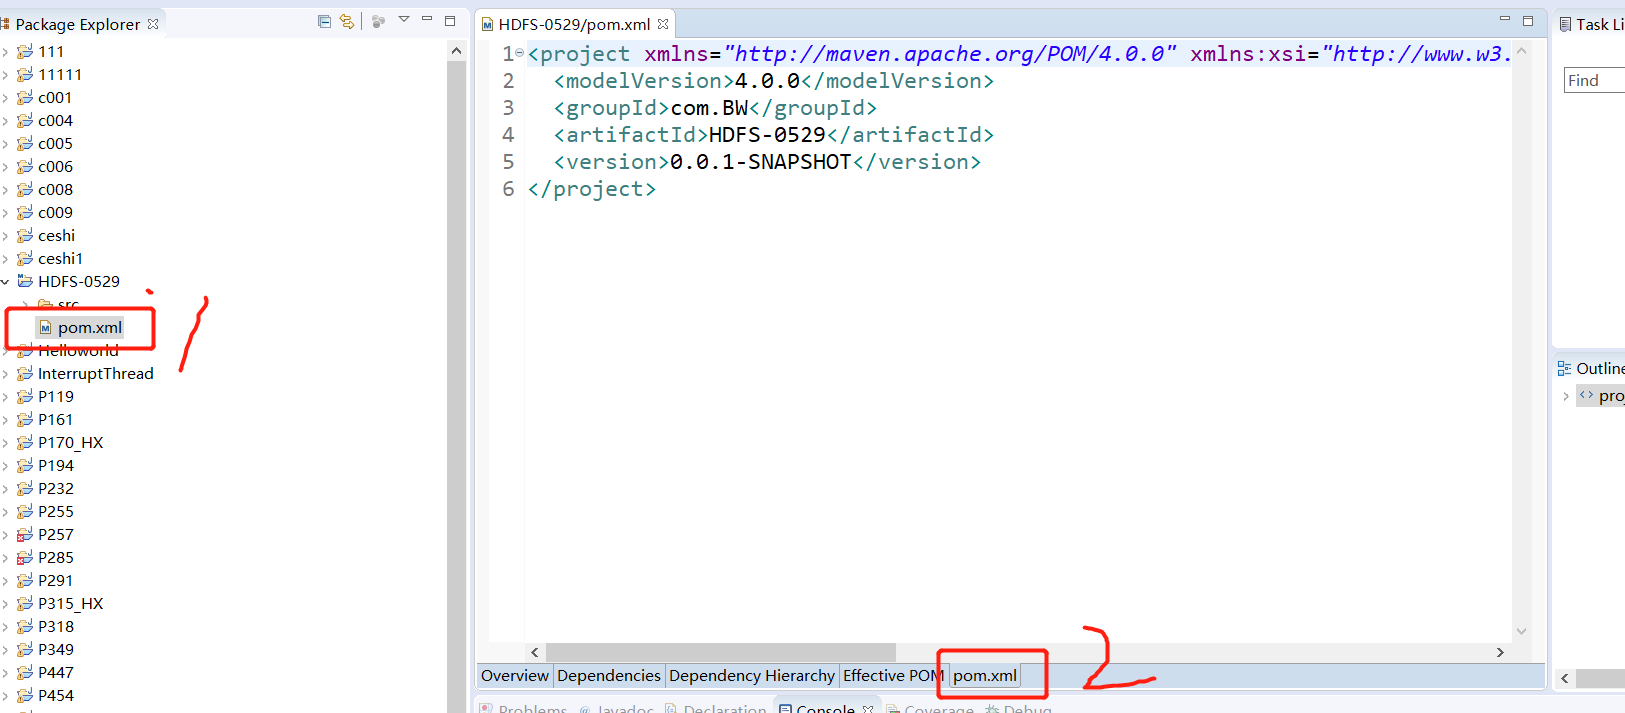
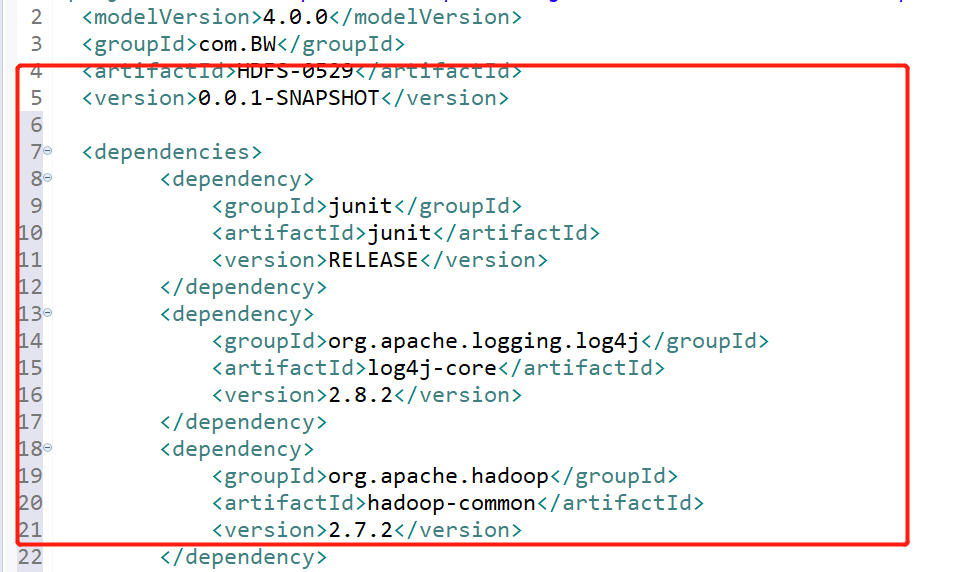
Import the corresponding dependent coordinates + log add
<dependencies>
		<dependency>
			<groupId>junit</groupId>
			<artifactId>junit</artifactId>
			<version>RELEASE</version>
		</dependency>
		<dependency>
			<groupId>org.apache.logging.log4j</groupId>
			<artifactId>log4j-core</artifactId>
			<version>2.8.2</version>
		</dependency>
		<dependency>
			<groupId>org.apache.hadoop</groupId>
			<artifactId>hadoop-common</artifactId>
			<version>2.7.2</version>
		</dependency>
		<dependency>
			<groupId>org.apache.hadoop</groupId>
			<artifactId>hadoop-client</artifactId>
			<version>2.7.2</version>
		</dependency>
		<dependency>
			<groupId>org.apache.hadoop</groupId>
			<artifactId>hadoop-hdfs</artifactId>
			<version>2.7.2</version>
		</dependency>
		<dependency>
			<groupId>jdk.tools</groupId>
			<artifactId>jdk.tools</artifactId>
			<version>1.8</version>
			<scope>system</scope>
			<systemPath>${JAVA_HOME}/lib/tools.jar</systemPath>
		</dependency>
</dependencies>
Then save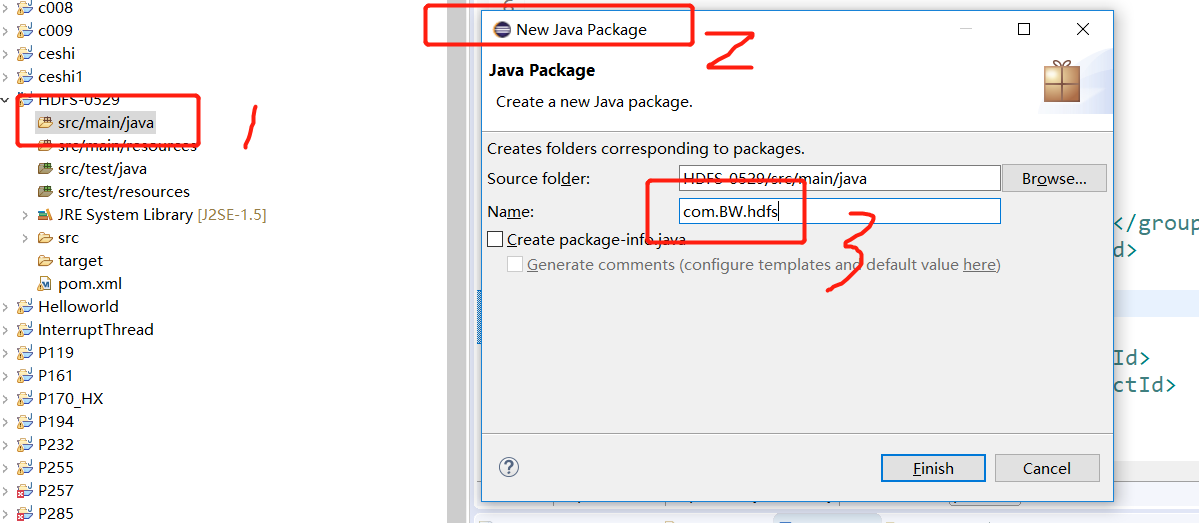
Create package: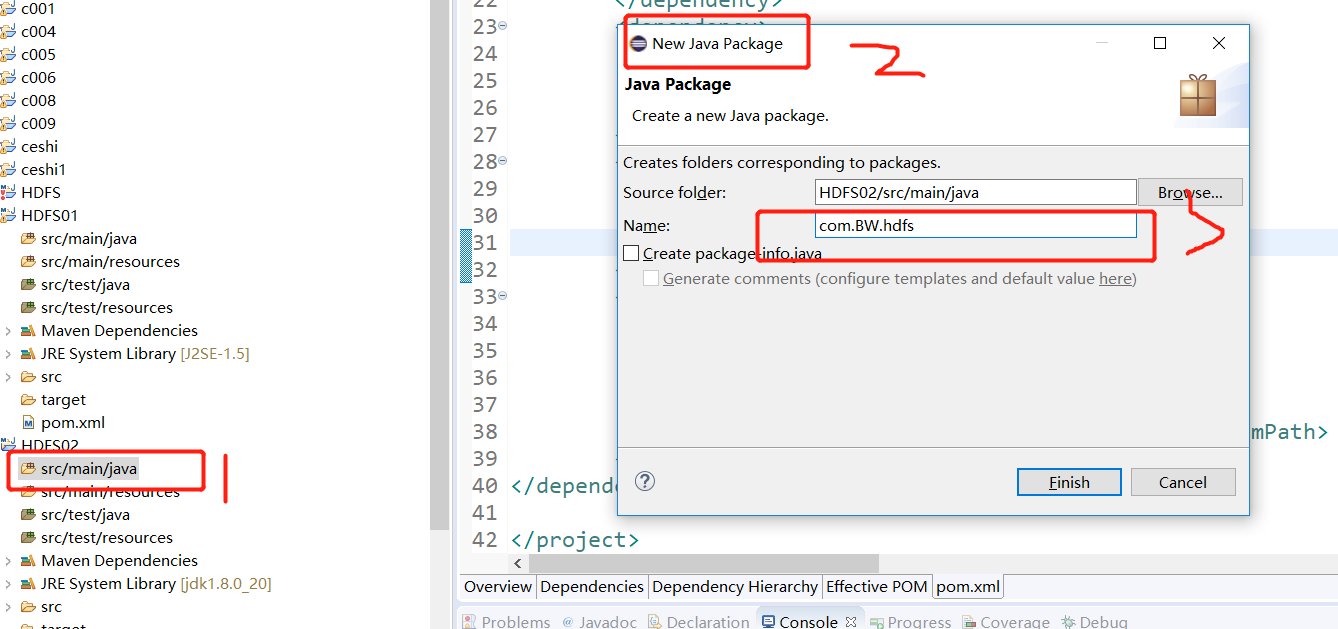
Then create a class: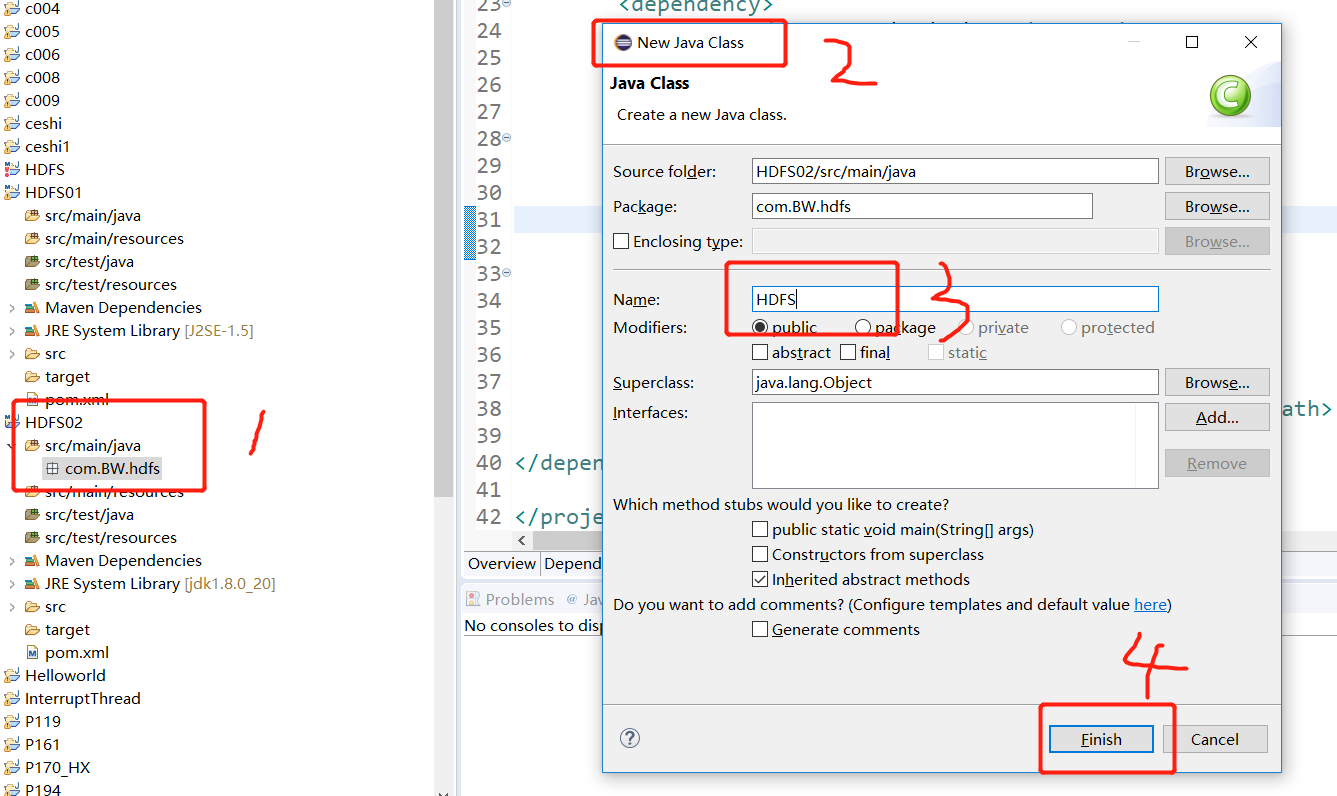
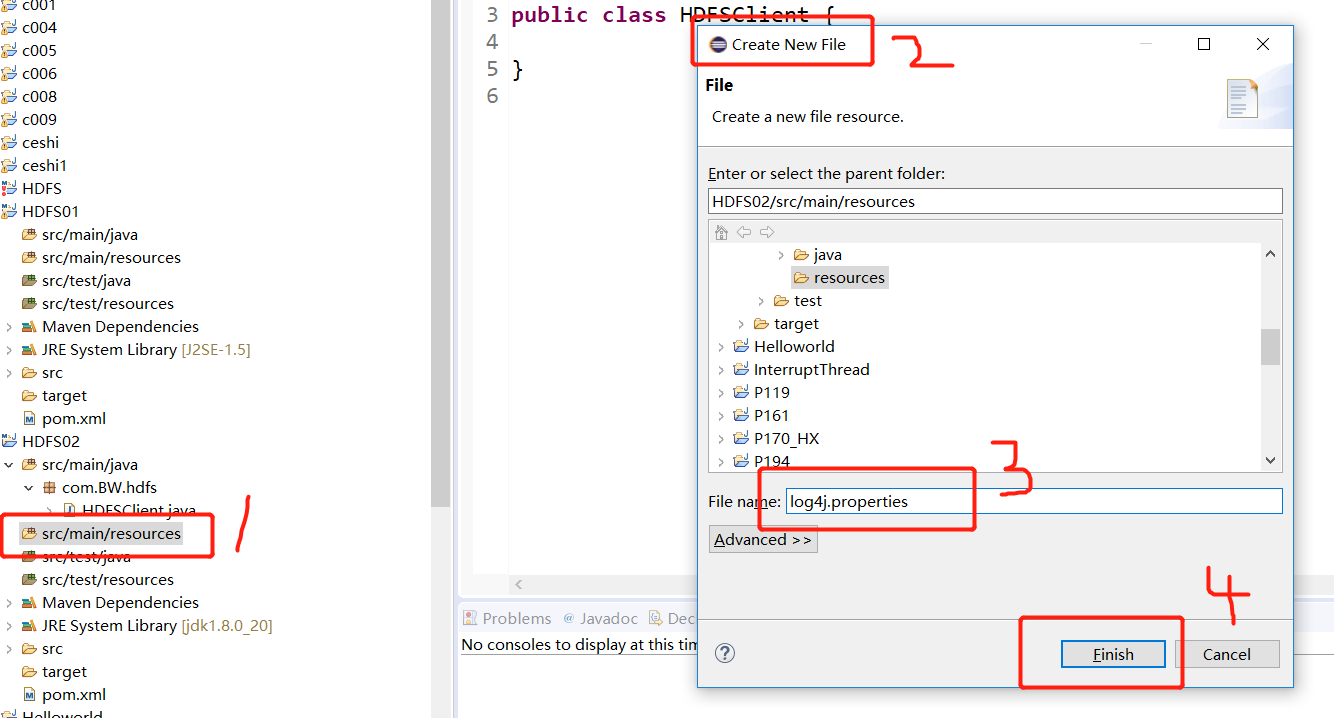
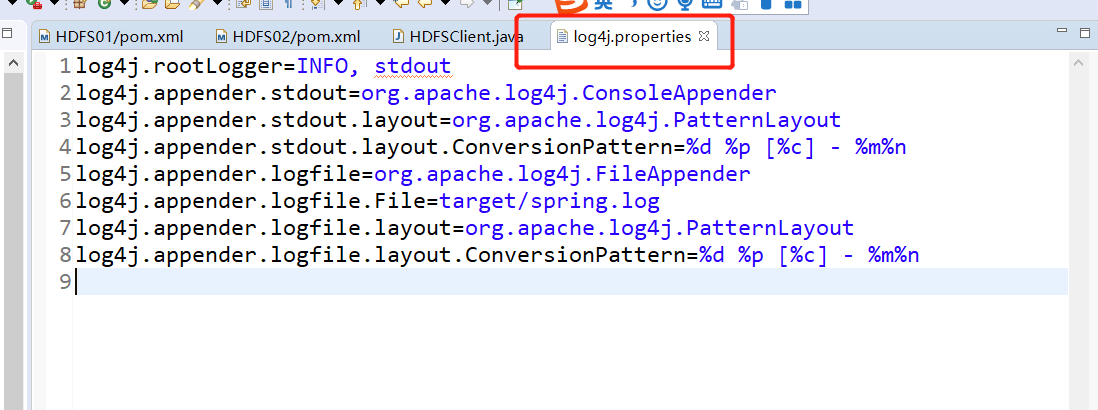
You need to create a new file named "log4j.properties" in the src/main/resources directory of the project, and fill in the file with:
log4j.rootLogger=INFO, stdout
log4j.appender.stdout=org.apache.log4j.ConsoleAppender
log4j.appender.stdout.layout=org.apache.log4j.PatternLayout
log4j.appender.stdout.layout.ConversionPattern=%d %p [%c] - %m%n
log4j.appender.logfile=org.apache.log4j.FileAppender
log4j.appender.logfile.File=target/spring.log
log4j.appender.logfile.layout=org.apache.log4j.PatternLayout
log4j.appender.logfile.layout.ConversionPattern=%d %p [%c] - %m%n
package com.BW.hdfs;


import java.io.IOException;
import java.net.URI;
import java.net.URISyntaxException;

import org.apache.hadoop.conf.Configuration;
import org.apache.hadoop.fs.FileSystem;
import org.apache.hadoop.fs.Path;


public class HDFSClient {
	public static void main(String[] args) throws IOException, InterruptedException, URISyntaxException {

		Configuration conf =new Configuration();
		//FileSystem fs =FileSystem.get(conf));
		FileSystem fs=FileSystem.get(new URI("hdfs://192.168.186.102:9000"), conf, "BW");
		fs.mkdirs(new Path("/0529/dashen/"));

		fs.close();
		System.out.print("over");


	}

}
success:!!!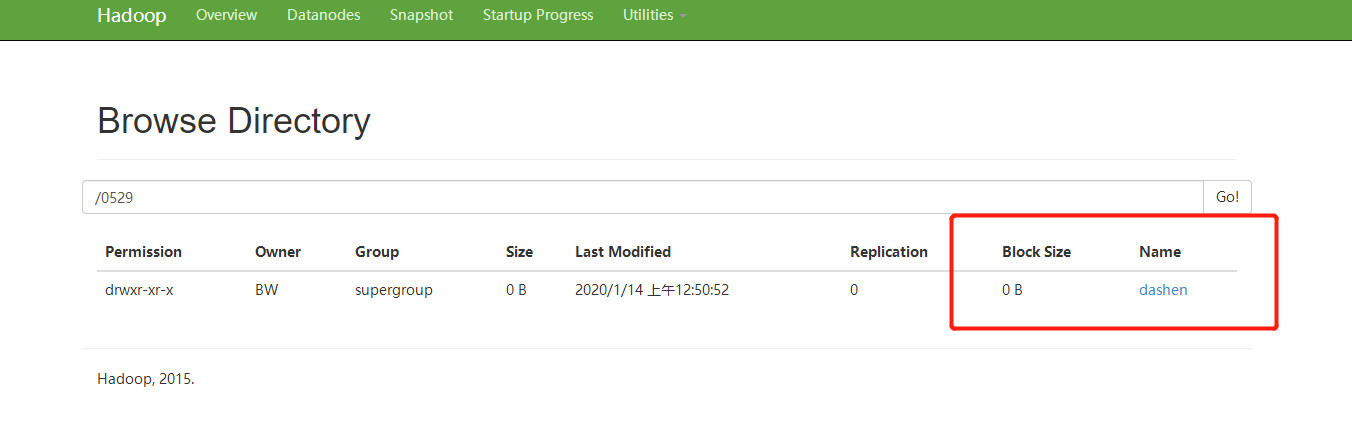
See the video tutorial for Maven related settings.
Then we need to modify jdk1.8 in eclipse
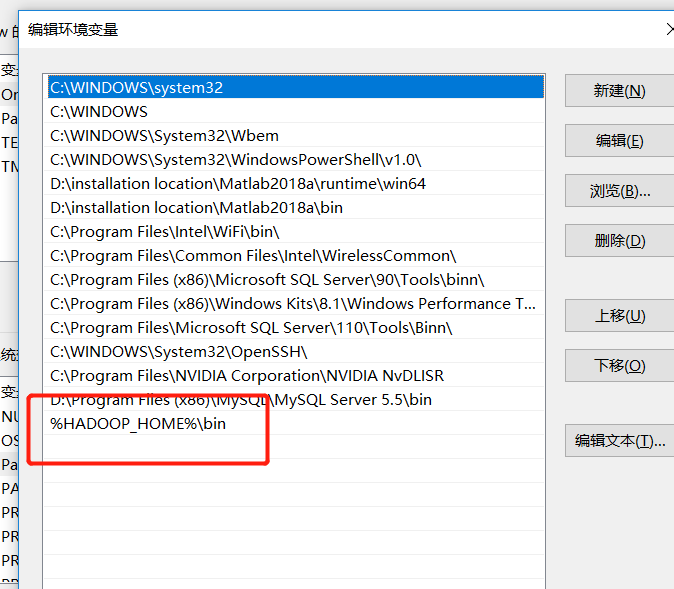
Finally, we need to check the environment variable of Java home.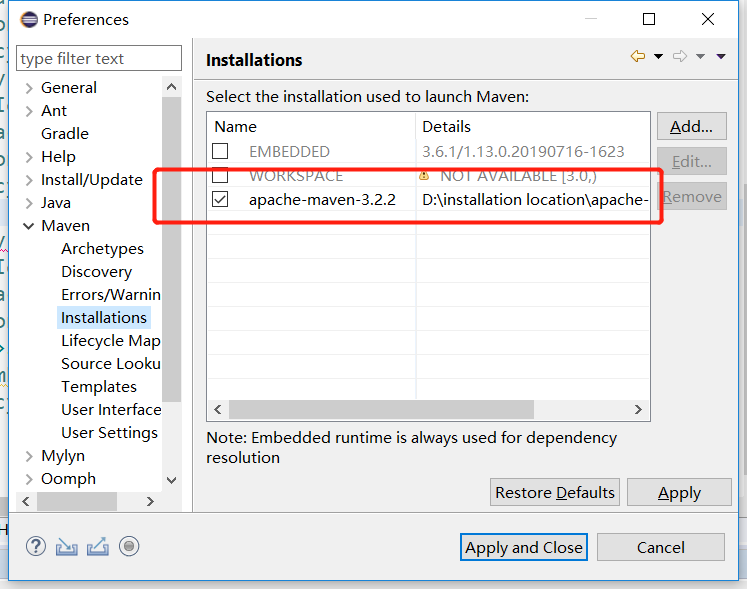
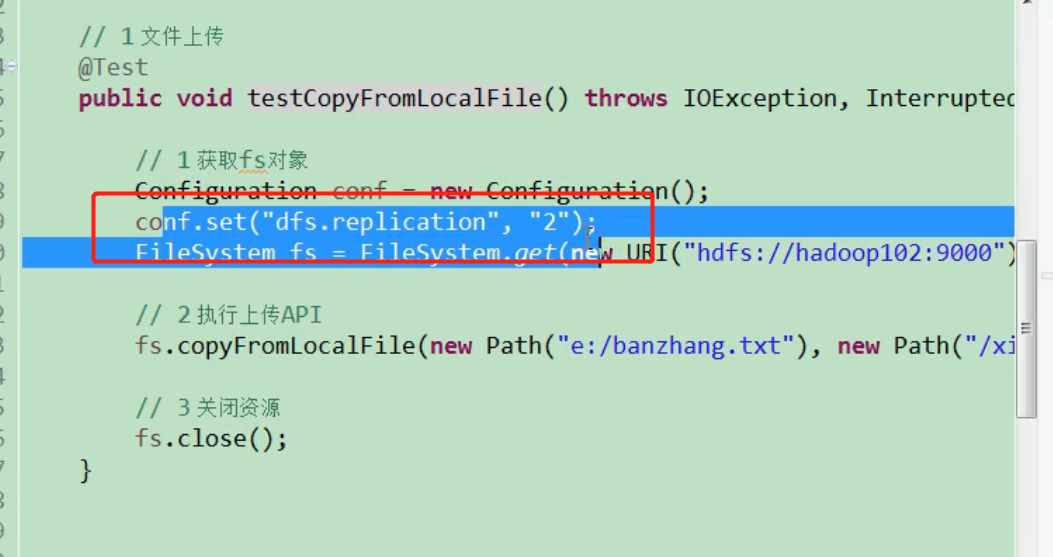


HDFS file download
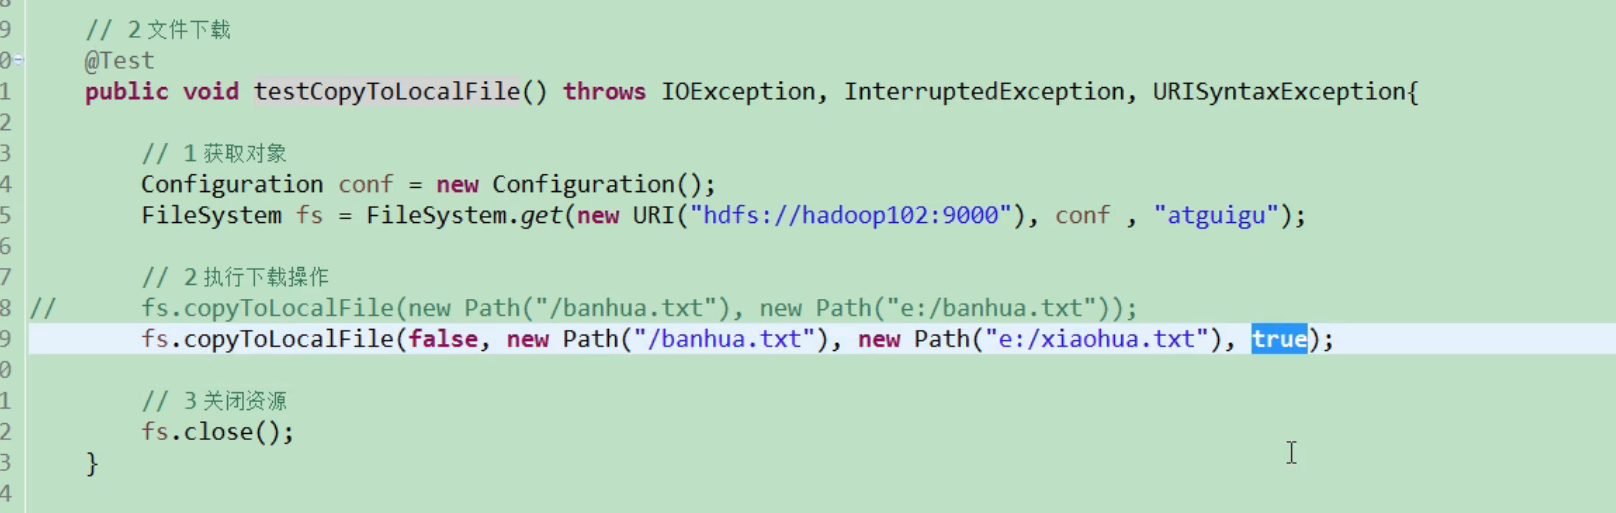
@Test
public void testCopyToLocalFile() throws IOException, InterruptedException, URISyntaxException{

		// 1 get file system
		Configuration configuration = new Configuration();
		FileSystem fs = FileSystem.get(new URI("hdfs://192.168.186.102:9000"), configuration, "atguigu");

		// 2 download
		// boolean delSrc refers to whether to delete the original file
		// Path src is the path of the file to download
		// Path dst is the path to download the file to
		// Whether to enable file verification for boolean useRawLocalFileSystem
		fs.copyToLocalFile(false, new Path("/banzhang.txt"), new Path("e:/banhua.txt"), true);

		// 3 close resources
		fs.close();
}
HDFS folder delete
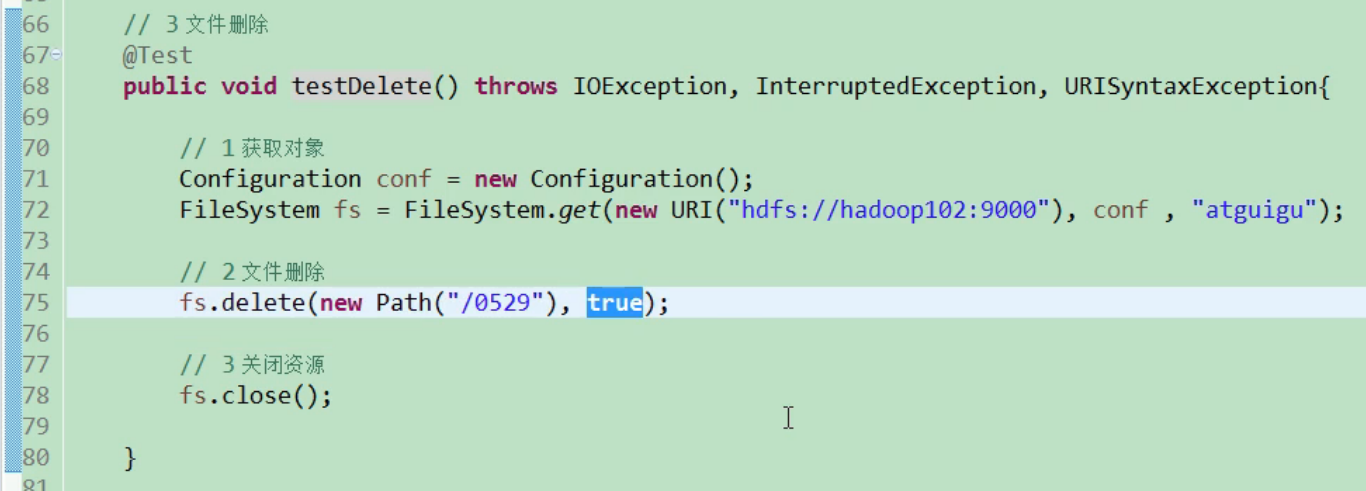
@Test
public void testDelete() throws IOException, InterruptedException, URISyntaxException{

	// 1 get file system
	Configuration configuration = new Configuration();
	FileSystem fs = FileSystem.get(new URI("hdfs://192.168.186.102:9000"), configuration, "atguigu");

	// 2 perform deletion
	fs.delete(new Path("/0508/"), true);

	// 3 close resources
	fs.close();
}
HDFS filename change
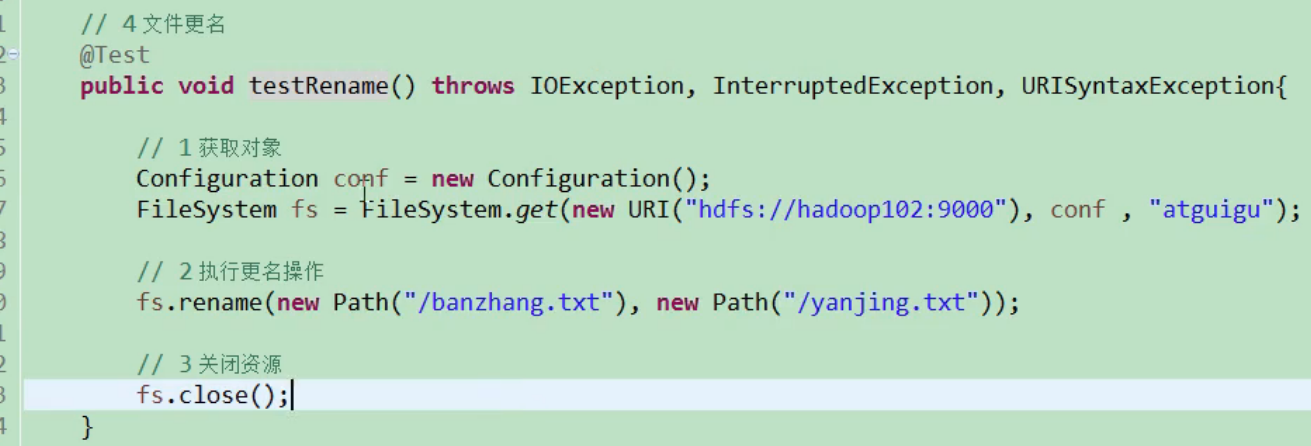
@Test
public void testRename() throws IOException, InterruptedException, URISyntaxException{

	// 1 get file system
	Configuration configuration = new Configuration();
	FileSystem fs = FileSystem.get(new URI("hdfs://hadoop102:9000"), configuration, "atguigu");

	// 2 modify the file name
	fs.rename(new Path("/banzhang.txt"), new Path("/banhua.txt"));

	// 3 close resources
	fs.close();
}
HDFS file details view
View file name, permission, length and block information
@Test
public void testListFiles() throws IOException, InterruptedException, URISyntaxException{

	// 1 get file system
	Configuration configuration = new Configuration();
	FileSystem fs = FileSystem.get(new URI("hdfs://hadoop102:9000"), configuration, "atguigu");

	// 2 get document details
	RemoteIterator<LocatedFileStatus> listFiles = fs.listFiles(new Path("/"), true);

	while(listFiles.hasNext()){
		LocatedFileStatus status = listFiles.next();

		// Output details
		// File name
		System.out.println(status.getPath().getName());
		// length
		System.out.println(status.getLen());
		// Jurisdiction
		System.out.println(status.getPermission());
		// Grouping
		System.out.println(status.getGroup());

		// Get stored block information
		BlockLocation[] blockLocations = status.getBlockLocations();

		for (BlockLocation blockLocation : blockLocations) {

			// Get host nodes for block storage
			String[] hosts = blockLocation.getHosts();

			for (String host : hosts) {
				System.out.println(host);
			}
		}

		System.out.println("-----------Squad leader's division line----------");
	}

// 3 close resources
fs.close();
}
HDFS file and folder judgment
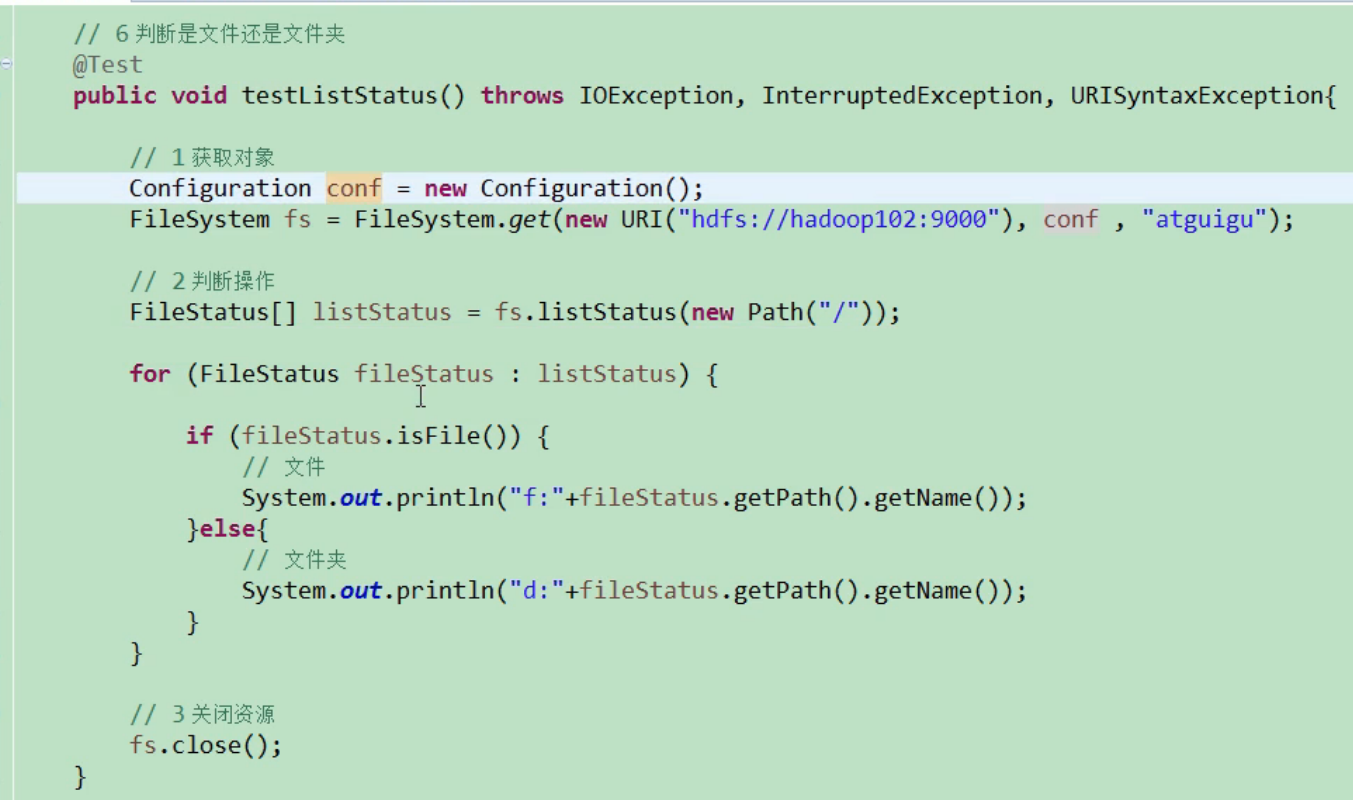
@Test
public void testListStatus() throws IOException, InterruptedException, URISyntaxException{

	// 1 get file configuration information
	Configuration configuration = new Configuration();
	FileSystem fs = FileSystem.get(new URI("hdfs://hadoop102:9000"), configuration, "atguigu");

	// 2 determine whether it is a file or a folder
	FileStatus[] listStatus = fs.listStatus(new Path("/"));

	for (FileStatus fileStatus : listStatus) {

		// If it's a file
		if (fileStatus.isFile()) {
				System.out.println("f:"+fileStatus.getPath().getName());
			}else {
				System.out.println("d:"+fileStatus.getPath().getName());
			}
		}

	// 3 close resources
	fs.close();
}
I/O stream operation of HDFS
There is an input stream and an output stream that reads files from outside, such as from a database. The output stream is written to HDFS.
fs tube is the output stream.
Requirement: upload the banhua.txt file on the local e disk to the HDFS root directory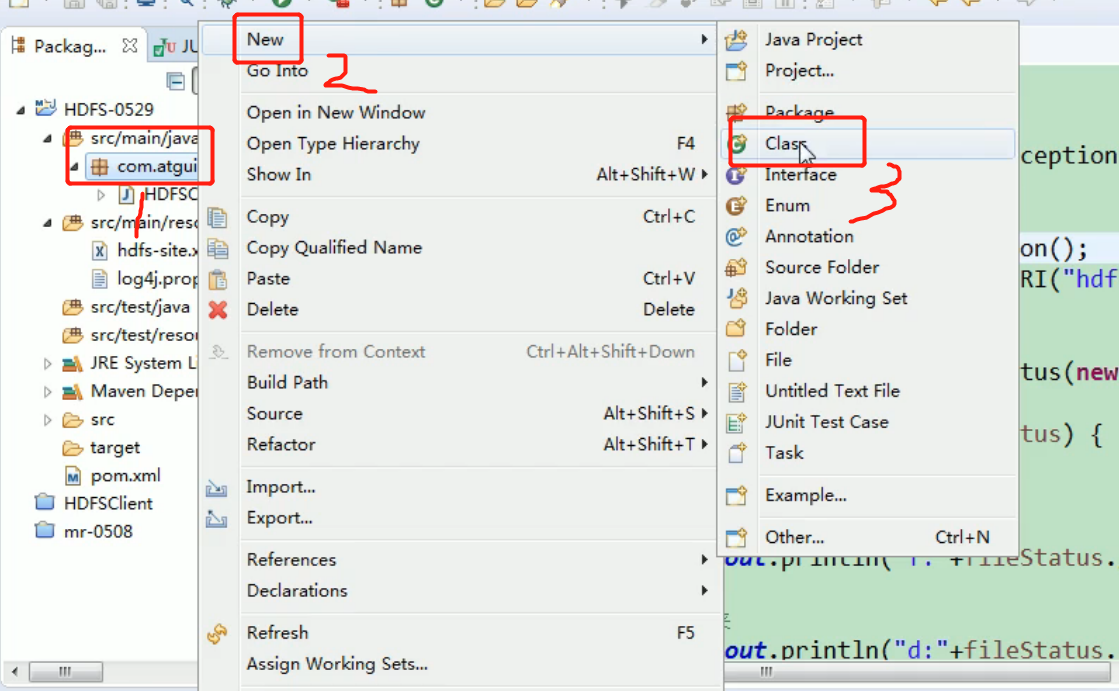
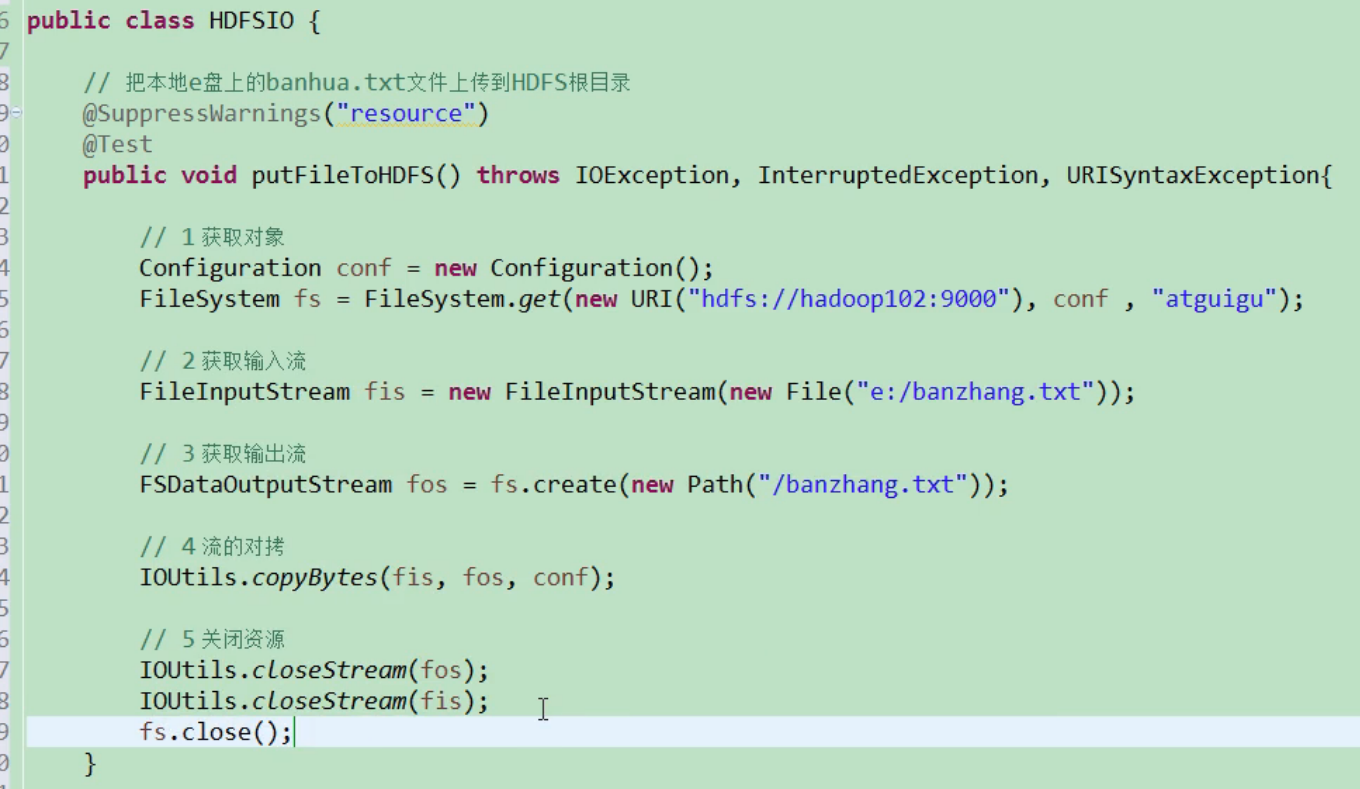
import java.io.File;
import java.io.FileInputStream;
import java.io.IOException;
import java.net.URI;
import java.net.URISyntaxException;
import org.apache.hadoop.conf.Configuration;
import org.apache.hadoop.fs.FSDataOutputStream;
import org.apache.hadoop.fs.FileSystem;
import org.apache.hadoop.fs.Path;
import org.apache.hadoop.io.IOUtils;
import org.junit.Test;

@Test
public void putFileToHDFS() throws IOException, InterruptedException, URISyntaxException {

	// 1 get file system
	Configuration configuration = new Configuration();
	FileSystem fs = FileSystem.get(new URI("hdfs://hadoop102:9000"), configuration, "atguigu");

	// 2 create input stream
	FileInputStream fis = new FileInputStream(new File("e:/banhua.txt"));

	// 3 get output stream
	FSDataOutputStream fos = fs.create(new Path("/banhua.txt"));

	// 4 streams to each other
	IOUtils.copyBytes(fis, fos, configuration);

	// 5 close resources
	IOUtils.closeStream(fos);
	IOUtils.closeStream(fis);
    fs.close();
}
HDFS file download
1. Requirement: Download banhua.txt file from HDFS to local e disk
//File download
@Test
public void getFileFromHDFS() throws IOException, InterruptedException, URISyntaxException{

	// 1 get file system
	Configuration configuration = new Configuration();
	FileSystem fs = FileSystem.get(new URI("hdfs://hadoop102:9000"), configuration, "atguigu");

	// 2 get input stream
	FSDataInputStream fis = fs.open(new Path("/banhua.txt"));

	// 3 get output stream
	FileOutputStream fos = new FileOutputStream(new File("e:/banhua.txt"));

	// The torture of stream
	IOUtils.copyBytes(fis, fos, configuration);

	// 5 close resources
	IOUtils.closeStream(fos);
	IOUtils.closeStream(fis);
	fs.close();
}
Locate file read
1. Requirements: read large files on HDFS in blocks, such as / hadoop-2.7.2.tar.gz in the root directory
(1) Download the first piece
@Test
public void readFileSeek1() throws IOException, InterruptedException, URISyntaxException{

	// 1 get file system
	Configuration configuration = new Configuration();
	FileSystem fs = FileSystem.get(new URI("hdfs://hadoop102:9000"), configuration, "atguigu");

	// 2 get input stream
	FSDataInputStream fis = fs.open(new Path("/hadoop-2.7.2.tar.gz"));

	// 3 create output stream
	FileOutputStream fos = new FileOutputStream(new File("e:/hadoop-2.7.2.tar.gz.part1"));

	// 4 copy of stream
	byte[] buf = new byte[1024];

	for(int i =0 ; i < 1024 * 128; i++){
		fis.read(buf);
		fos.write(buf);
	}

	// 5 close resources
	IOUtils.closeStream(fis);
	IOUtils.closeStream(fos);
fs.close();
}
(2) Download the second piece
@Test
public void readFileSeek2() throws IOException, InterruptedException, URISyntaxException{

	// 1 get file system
	Configuration configuration = new Configuration();
	FileSystem fs = FileSystem.get(new URI("hdfs://hadoop102:9000"), configuration, "atguigu");

	// 2 open input stream
	FSDataInputStream fis = fs.open(new Path("/hadoop-2.7.2.tar.gz"));

	// 3 positioning input data location
	fis.seek(1024*1024*128);

	// 4 create output stream
	FileOutputStream fos = new FileOutputStream(new File("e:/hadoop-2.7.2.tar.gz.part2"));

	// The torture of five streams
	IOUtils.copyBytes(fis, fos, configuration);

	// 6 close resources
	IOUtils.closeStream(fis);
	IOUtils.closeStream(fos);
}
(3) Merge files
In the Window command Window, enter the directory E: \, and execute the following command to merge the data
type hadoop-2.7.2.tar.gz.part2 >> hadoop-2.7.2.tar.gz.part1
After merging, rename hadoop-2.7.2.tar.gz.part1 to hadoop-2.7.2.tar.gz. Unzip found that the tar package is very complete.
Data flow of HDFS (interview focus)
HDFS write data flow
Profile write
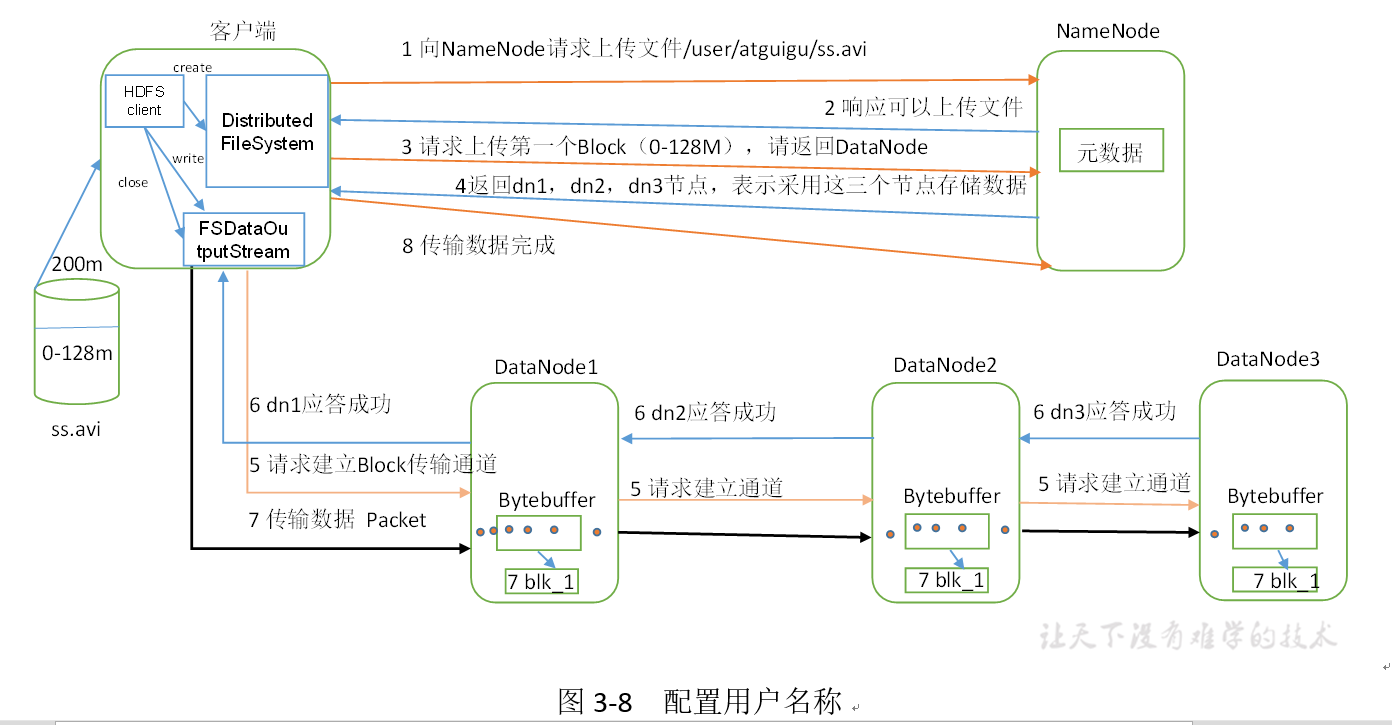
1) The client requests to upload files to NameNode through the distributed file system module. NameNode checks whether the target file already exists and whether the parent directory exists.
2) NameNode returns whether it can be uploaded.
3) Which DataNode servers does the client request the first Block to upload to.
4) NameNode returns three DataNode nodes, dn1, dn2 and dn3.
5) The client requests dn1 to upload data through FSDataOutputStream module. dn1 will continue to call dn2 after receiving the request, and then dn2 will call dn3 to complete the establishment of the communication pipeline.
6) dn1, dn2 and dn3 answer the client level by level.
7) The client starts to upload the first Block to dn1 (first read the data from the disk and put it into a local memory cache). In packets, dn1 will send a packet to dn2 and dn2 to dn3 when it receives a packet. Each packet sent by dn1 will be put into an answer queue to wait for an answer.
8) When a Block transmission is completed, the client requests NameNode to upload the server of the second Block again. (repeat steps 3-7)
How to determine which node to upload to? :
First: who is the closest to the node? It will be sent there first.
Second: according to the load.
7: In fact, it is IO stream operation. First, transfer the packet to memory, then serialize the packet to the local, then transfer it to the next node, then write it all, and return the reply one by one (all written), and then immediately clear the data in memory.
Network topology node distance calculation
In the process of HDFS writing data, NameNode will select the DataNode closest to the data to be uploaded to receive data. How to calculate the nearest distance?
Node distance: the total distance between two nodes to the nearest common ancestor.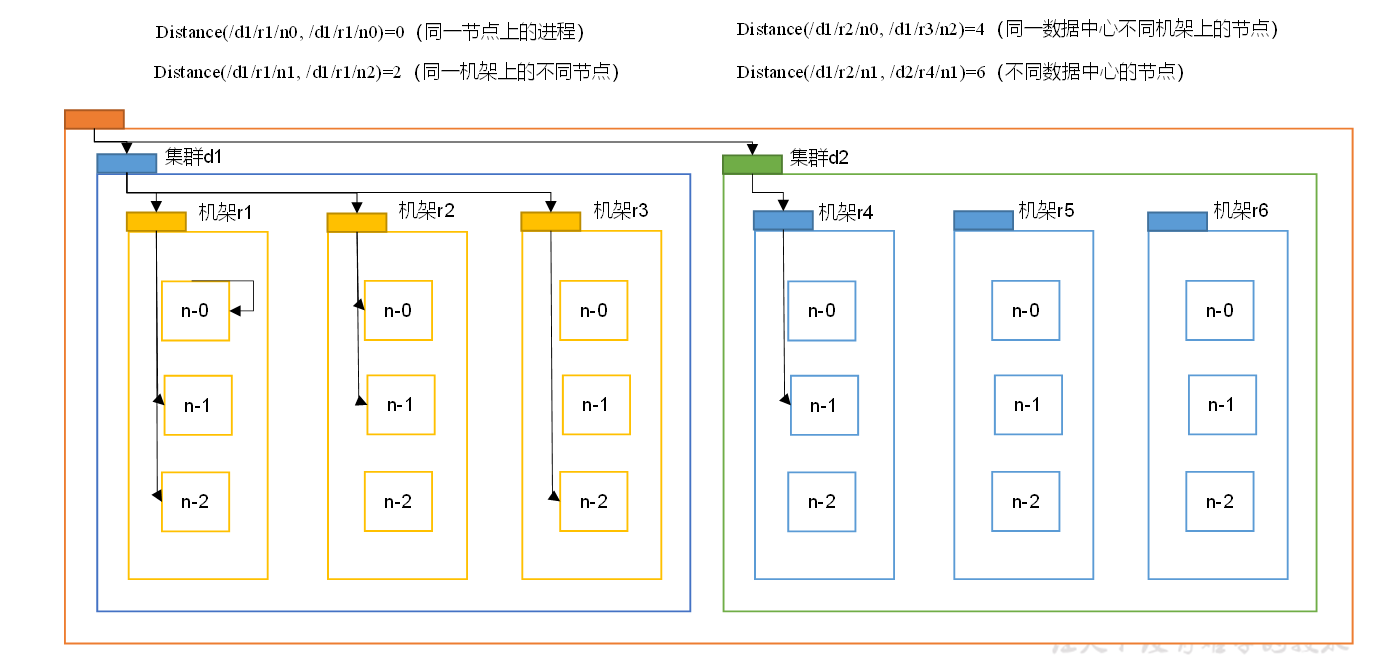
The color block can be regarded as the switch, the yellow one is the common ancestor of each rack, and the orange one is the common ancestor of the two clusters.
For example, suppose you have node n1 in rack r1 of data center d1. This node can be represented as / d1/r1/n1. With this marker, four distance descriptions are given here, as shown in Figure 3-9.
Let's calculate the distance between each two nodes, as shown in Figure 3-10.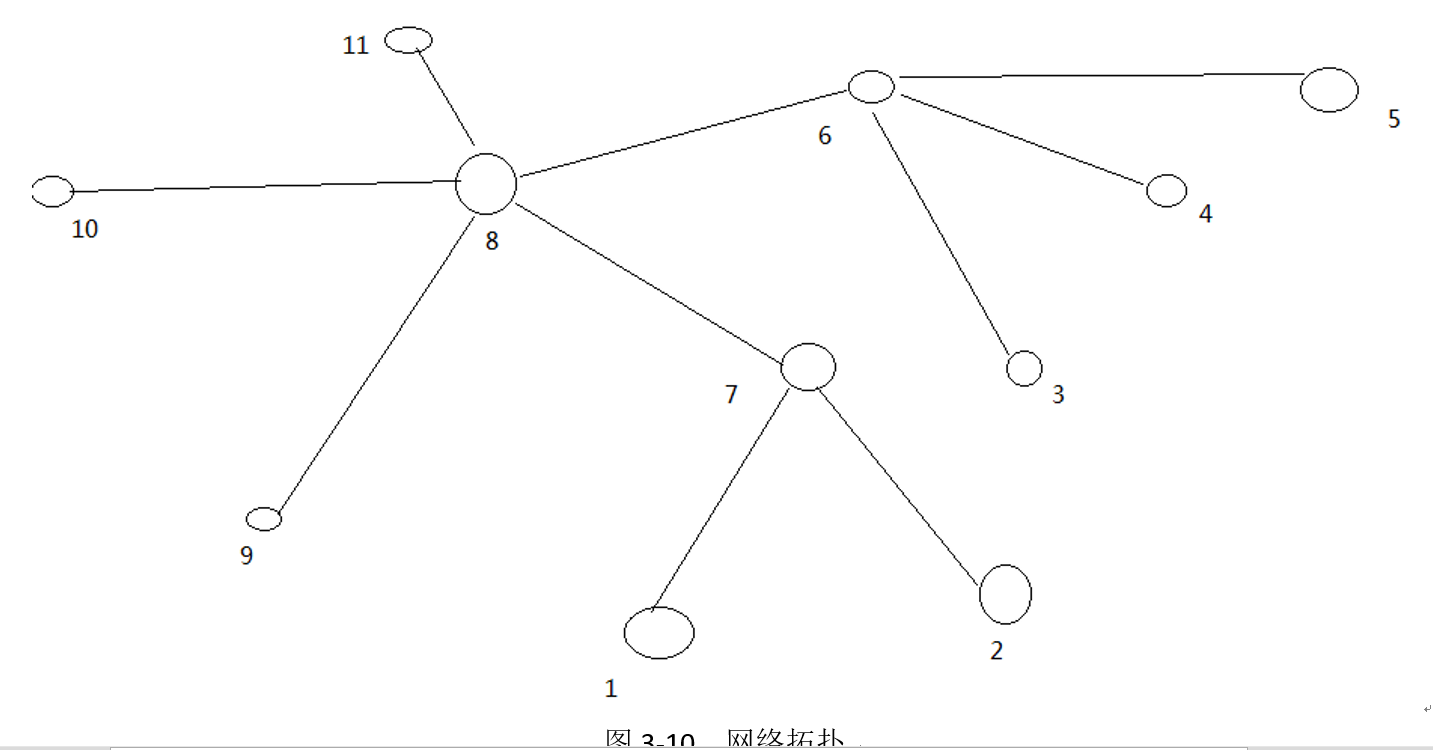
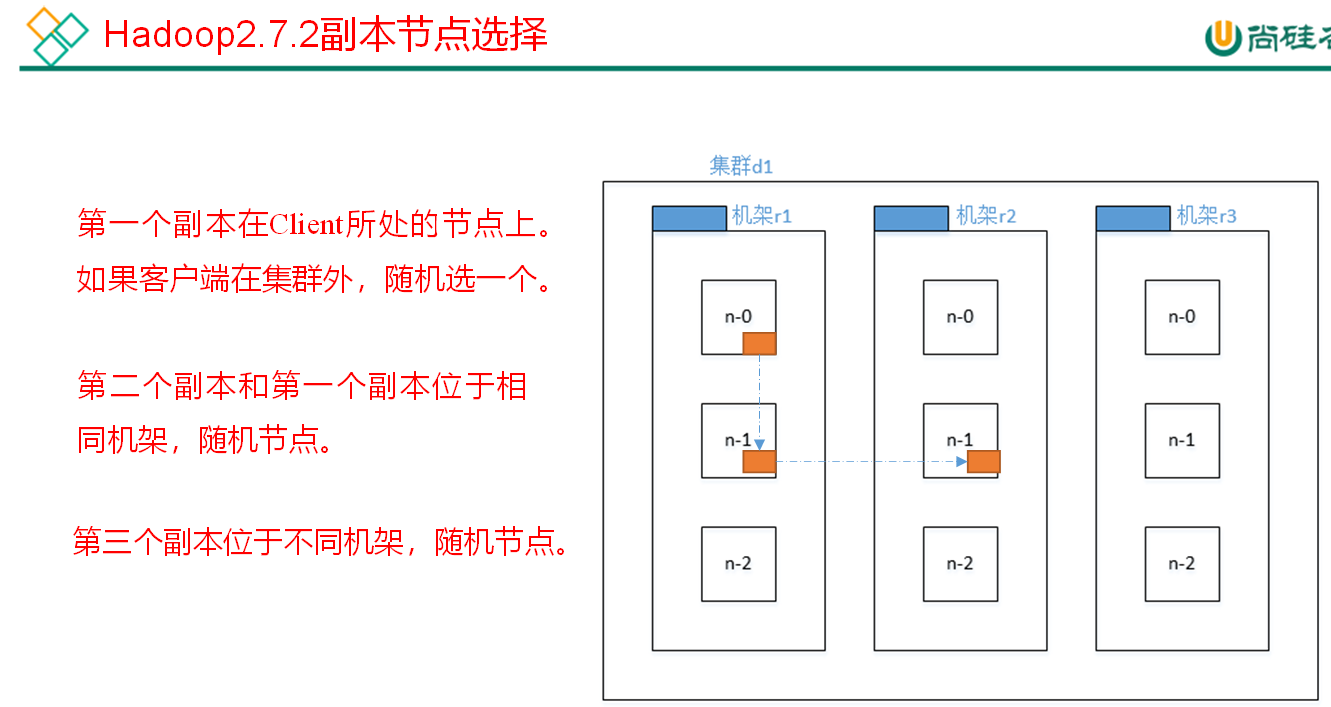
HDFS data reading process (interview focus)
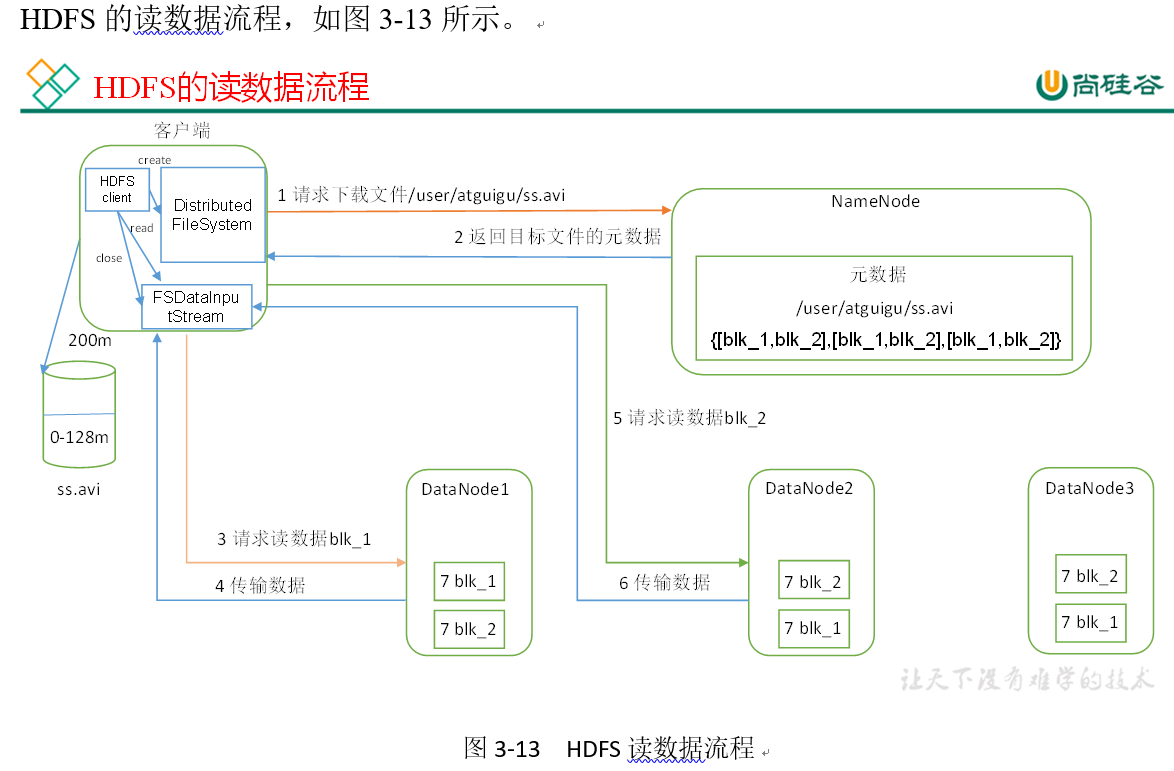
1) The client requests the NameNode to download the file through the distributed file system, and the NameNode finds the DataNode address where the file block is located by querying the metadata.
2) Select a DataNode (proximity principle, then random) server and request to read the data.
3) DataNode starts to transmit data to the client (read the data input stream from the disk, and verify it with Packet).
4) The client receives packets, caches them locally, and writes them to the target file.
NameNode and SecondaryNameNode (key points of interview Development)
NN and 2NN working mechanism
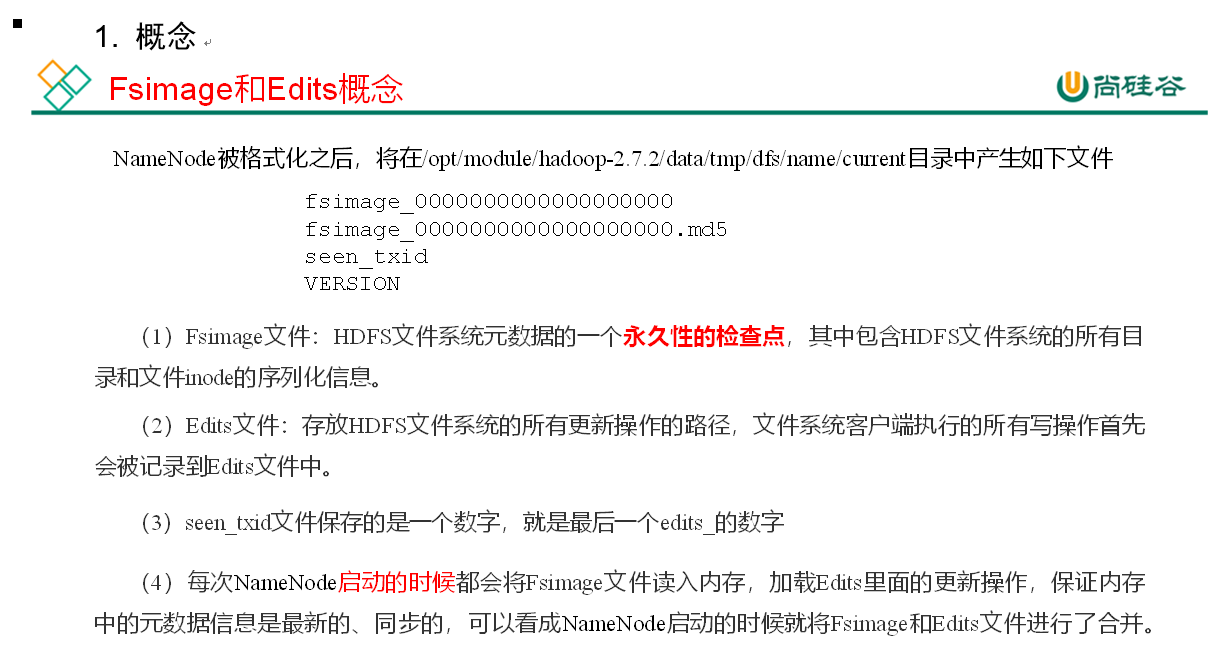
Thinking: where is the metadata stored in NameNode?
First of all, let's make a hypothesis that if it is stored in the disk of the NameNode node, because it often needs random access and response to customer requests, it must be inefficient. Therefore, metadata needs to be stored in memory. But if it only exists in memory, once the power is off and the metadata is lost, the whole cluster will not work. As a result, FsImage is generated to back up metadata in disk.
This will bring new problems. When the metadata in memory is updated, if the FsImage is updated at the same time, the efficiency will be too low. But if it is not updated, the consistency problem will occur. Once the NameNode node is powered off, the data will be lost. Therefore, the introduction of Edits files (only append operation, high efficiency). Whenever metadata is updated or added, the metadata in memory is modified and appended to the Edits. In this way, once the NameNode node is powered off, the metadata can be synthesized through the combination of FsImage and Edits.
However, if data is added to Edits for a long time, the file data will be too large, the efficiency will be reduced, and once the power is off, it will take too long to recover the metadata. Therefore, it is necessary to merge FsImage and Edits on a regular basis. If this operation is completed by the NameNode node, the efficiency will be too low. Therefore, a new node, SecondaryNamenode, is introduced for the merging of FsImage and Edits.
NN and 2NN work mechanism, as shown in Figure 3-14.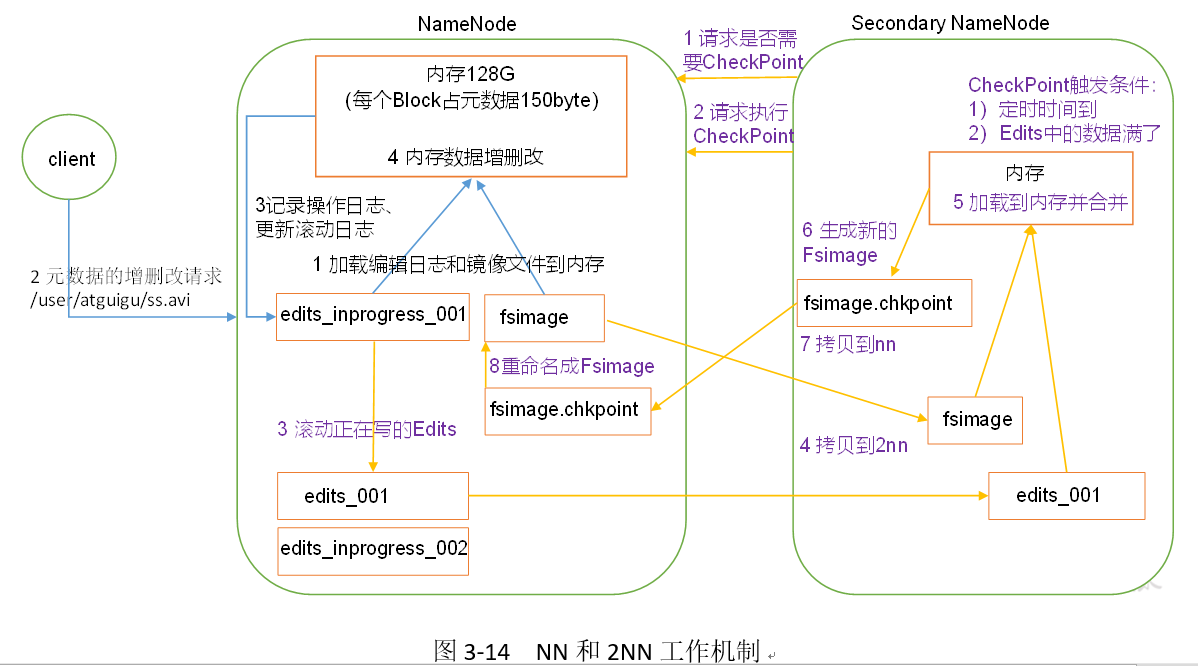
Note: the memory of namenode is 128G, and that of secondarynamenode is 128G, so it is generally not placed on one node. If it is placed on one node, the performance of 64G per minute will be reduced.
The content of the disk plus the content of the edit log is the content in memory.
1. The first stage: NameNode startup
(1) After the NameNode format is first started, the Fsimage and Edits files are created. If it is not started for the first time, directly load the editing log and the image file into memory.
(2) The client requests to add, delete and modify metadata.
(3) NameNode records the operation log and updates the rolling log.
(4) NameNode adds, deletes and modifies data in memory.
2. Second stage: Secondary NameNode work
(1) Secondary NameNode asks if NameNode needs CheckPoint. Directly bring back whether the NameNode checks the result.
(2) The Secondary NameNode requests a CheckPoint.
(3) NameNode to scroll through the Edits logs being written. An edit? Inprogress02 is generated, and the subsequent edit logs are written to edit? Inprogress02.
(4) Copy the edit log edit? 01 and the image file before scrolling to the Secondary NameNode.
(5) The Secondary NameNode loads the edit log and the mirror file into memory and merges them.
(6) Generate a new image file fsimage.chkpoint.
(7) Copy fsimage.chkpoint to NameNode.
(8) NameNode rename fsimage.chkpoint to fsimage. At this time, the file combined by fsimage and edit ⒈ inprogress02 is the latest amount of data in memory.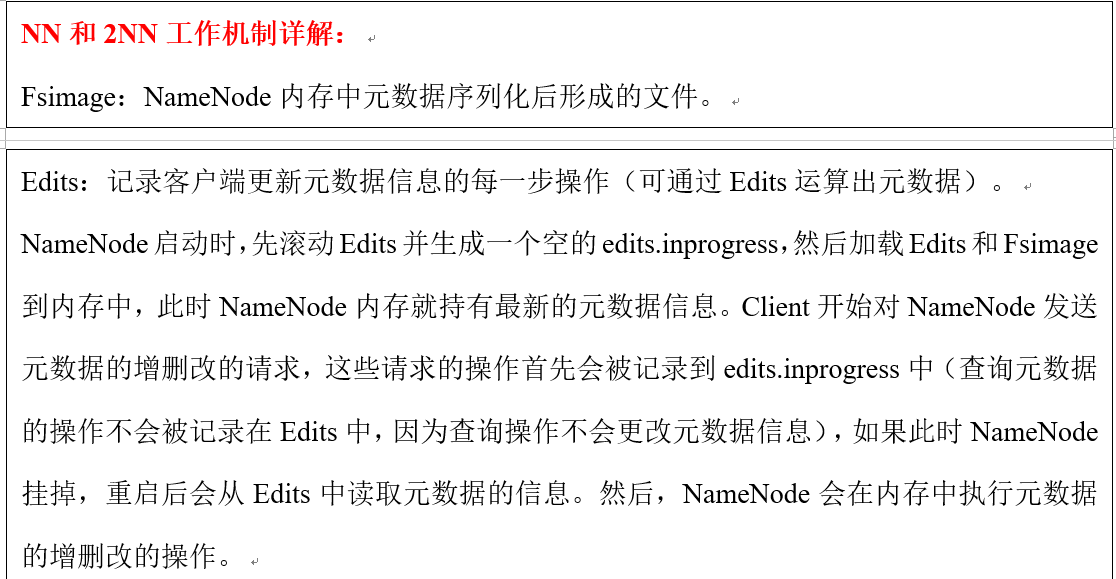

The metadata storage location in the namenode. In addition, there are secondary namenode:
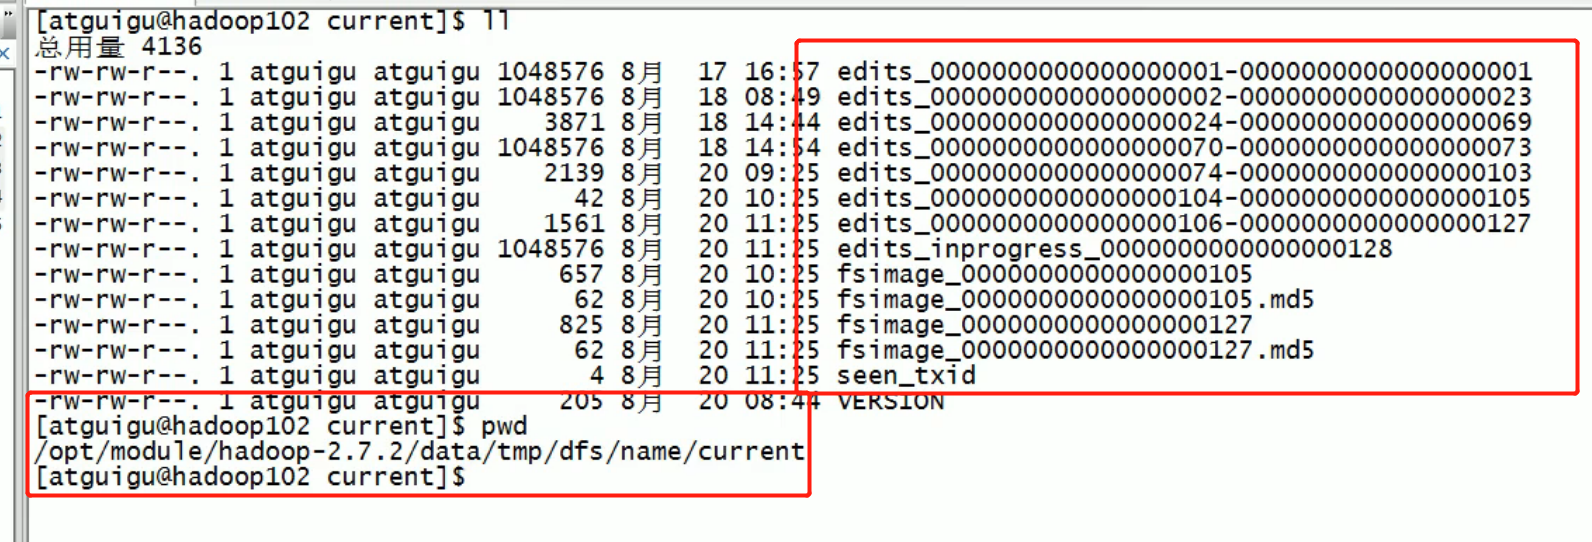
Fsimage and Edits analysis
2. oiv view the Fsimage file
(1) View oiv and oev commands
[atguigu@hadoop102 current]$ hdfs
oiv            apply the offline fsimage viewer to an fsimage
oev            apply the offline edits viewer to an edits file
(2) Basic grammar
hdfs oiv -p file type - i image file - o file output path after conversion
(3) Case practice
[atguigu@hadoop102 current]$ pwd
/opt/module/hadoop-2.7.2/data/tmp/dfs/name/current

[atguigu@hadoop102 current]$ hdfs oiv -p XML -i fsimage_0000000000000000025 -o /opt/module/hadoop-2.7.2/fsimage.xml

[atguigu@hadoop102 current]$ cat /opt/module/hadoop-2.7.2/fsimage.xml
Copy the contents of the displayed xml file to the xml file created in Eclipse and format it. Some of the results are as follows.
<inode>
	<id>16386</id>
	<type>DIRECTORY</type>
	<name>user</name>
	<mtime>1512722284477</mtime>
	<permission>atguigu:supergroup:rwxr-xr-x</permission>
	<nsquota>-1</nsquota>
	<dsquota>-1</dsquota>
</inode>
<inode>
	<id>16387</id>
	<type>DIRECTORY</type>
	<name>atguigu</name>
	<mtime>1512790549080</mtime>
	<permission>atguigu:supergroup:rwxr-xr-x</permission>
	<nsquota>-1</nsquota>
	<dsquota>-1</dsquota>
</inode>
<inode>
	<id>16389</id>
	<type>FILE</type>
	<name>wc.input</name>
	<replication>3</replication>
	<mtime>1512722322219</mtime>
	<atime>1512722321610</atime>
	<perferredBlockSize>134217728</perferredBlockSize>
	<permission>atguigu:supergroup:rw-r--r--</permission>
	<blocks>
		<block>
			<id>1073741825</id>
			<genstamp>1001</genstamp>
			<numBytes>59</numBytes>
		</block>
	</blocks>
</inode >
Thinking: you can see that there is no DataNode corresponding to the record block in Fsimage. Why?
After the cluster is started, DataNode is required to report the data block information and report again after a period of time.
oev view Edits file
(1) Basic grammar
HDFS oev-p file type-i edit log-o file output path after conversion
(2) Case practice
[atguigu@hadoop102 current]$ hdfs oev -p XML -i edits_0000000000000000012-0000000000000000013 -o /opt/module/hadoop-2.7.2/edits.xml

[atguigu@hadoop102 current]$ cat /opt/module/hadoop-2.7.2/edits.xml
Copy the contents of the displayed xml file to the xml file created in Eclipse and format it. The results are as follows.
<?xml version="1.0" encoding="UTF-8"?>
<EDITS>
	<EDITS_VERSION>-63</EDITS_VERSION>
	<RECORD>
		<OPCODE>OP_START_LOG_SEGMENT</OPCODE>
		<DATA>
			<TXID>129</TXID>
		</DATA>
	</RECORD>
	<RECORD>
		<OPCODE>OP_ADD</OPCODE>
		<DATA>
			<TXID>130</TXID>
			<LENGTH>0</LENGTH>
			<INODEID>16407</INODEID>
			<PATH>/hello7.txt</PATH>
			<REPLICATION>2</REPLICATION>
			<MTIME>1512943607866</MTIME>
			<ATIME>1512943607866</ATIME>
			<BLOCKSIZE>134217728</BLOCKSIZE>
			<CLIENT_NAME>DFSClient_NONMAPREDUCE_-1544295051_1</CLIENT_NAME>
			<CLIENT_MACHINE>192.168.1.5</CLIENT_MACHINE>
			<OVERWRITE>true</OVERWRITE>
			<PERMISSION_STATUS>
				<USERNAME>atguigu</USERNAME>
				<GROUPNAME>supergroup</GROUPNAME>
				<MODE>420</MODE>
			</PERMISSION_STATUS>
			<RPC_CLIENTID>908eafd4-9aec-4288-96f1-e8011d181561</RPC_CLIENTID>
			<RPC_CALLID>0</RPC_CALLID>
		</DATA>
	</RECORD>
	<RECORD>
		<OPCODE>OP_ALLOCATE_BLOCK_ID</OPCODE>
		<DATA>
			<TXID>131</TXID>
			<BLOCK_ID>1073741839</BLOCK_ID>
		</DATA>
	</RECORD>
	<RECORD>
		<OPCODE>OP_SET_GENSTAMP_V2</OPCODE>
		<DATA>
			<TXID>132</TXID>
			<GENSTAMPV2>1016</GENSTAMPV2>
		</DATA>
	</RECORD>
	<RECORD>
		<OPCODE>OP_ADD_BLOCK</OPCODE>
		<DATA>
			<TXID>133</TXID>
			<PATH>/hello7.txt</PATH>
			<BLOCK>
				<BLOCK_ID>1073741839</BLOCK_ID>
				<NUM_BYTES>0</NUM_BYTES>
				<GENSTAMP>1016</GENSTAMP>
			</BLOCK>
			<RPC_CLIENTID></RPC_CLIENTID>
			<RPC_CALLID>-2</RPC_CALLID>
		</DATA>
	</RECORD>
	<RECORD>
		<OPCODE>OP_CLOSE</OPCODE>
		<DATA>
			<TXID>134</TXID>
			<LENGTH>0</LENGTH>
			<INODEID>0</INODEID>
			<PATH>/hello7.txt</PATH>
			<REPLICATION>2</REPLICATION>
			<MTIME>1512943608761</MTIME>
			<ATIME>1512943607866</ATIME>
			<BLOCKSIZE>134217728</BLOCKSIZE>
			<CLIENT_NAME></CLIENT_NAME>
			<CLIENT_MACHINE></CLIENT_MACHINE>
			<OVERWRITE>false</OVERWRITE>
			<BLOCK>
				<BLOCK_ID>1073741839</BLOCK_ID>
				<NUM_BYTES>25</NUM_BYTES>
				<GENSTAMP>1016</GENSTAMP>
			</BLOCK>
			<PERMISSION_STATUS>
				<USERNAME>atguigu</USERNAME>
				<GROUPNAME>supergroup</GROUPNAME>
				<MODE>420</MODE>
			</PERMISSION_STATUS>
		</DATA>
	</RECORD>
</EDITS >
Thinking: how does NameNode determine which Edits to merge next time it starts? There is a seemtext? ID
CheckPoint time settings
(1) Usually, the SecondaryNameNode is executed every hour.
[hdfs-default.xml]
<property>
  <name>dfs.namenode.checkpoint.period</name>
  <value>3600</value>
</property>
(2) Check the number of operations once a minute. 3 when the number of operations reaches 1 million, the SecondaryNameNode executes once.
<property>
  <name>dfs.namenode.checkpoint.txns</name>
  <value>1000000</value>
<description>Operation times</description>
</property>

<property>
  <name>dfs.namenode.checkpoint.check.period</name>
  <value>60</value>
<description> 1Operation times per minute</description>
</property >
Cluster security mode
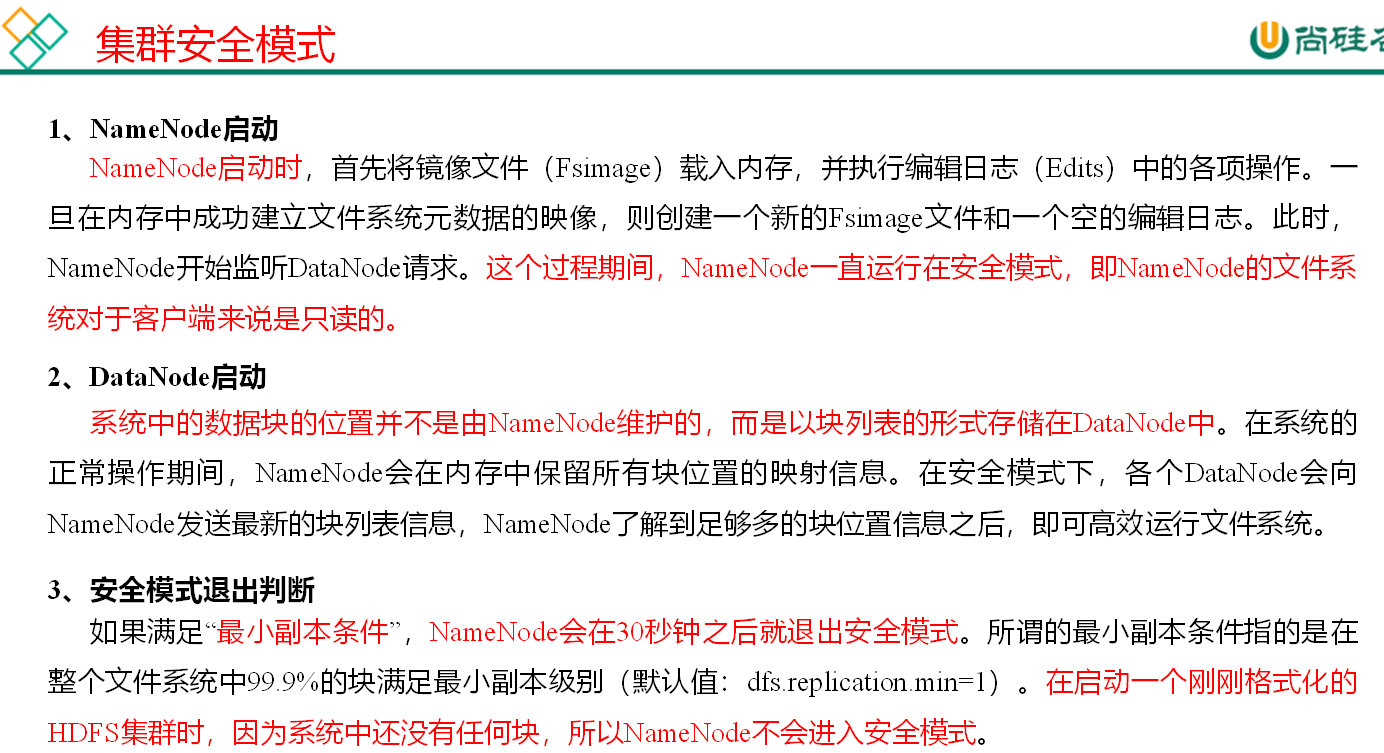
Security mode cannot write to HDFS.
NameNode multi directory configuration
- The local directory of NameNode can be configured into multiple directories, and the contents of each directory are the same, which increases reliability
- The specific configuration is as follows
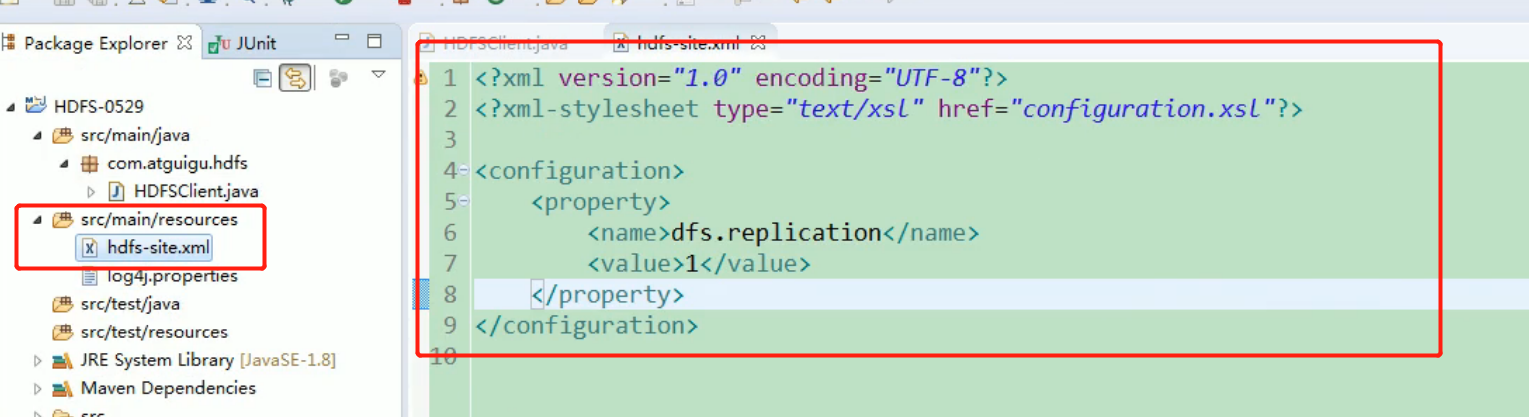
(1) Add the following content to the hdfs-site.xml file, and delete it before adding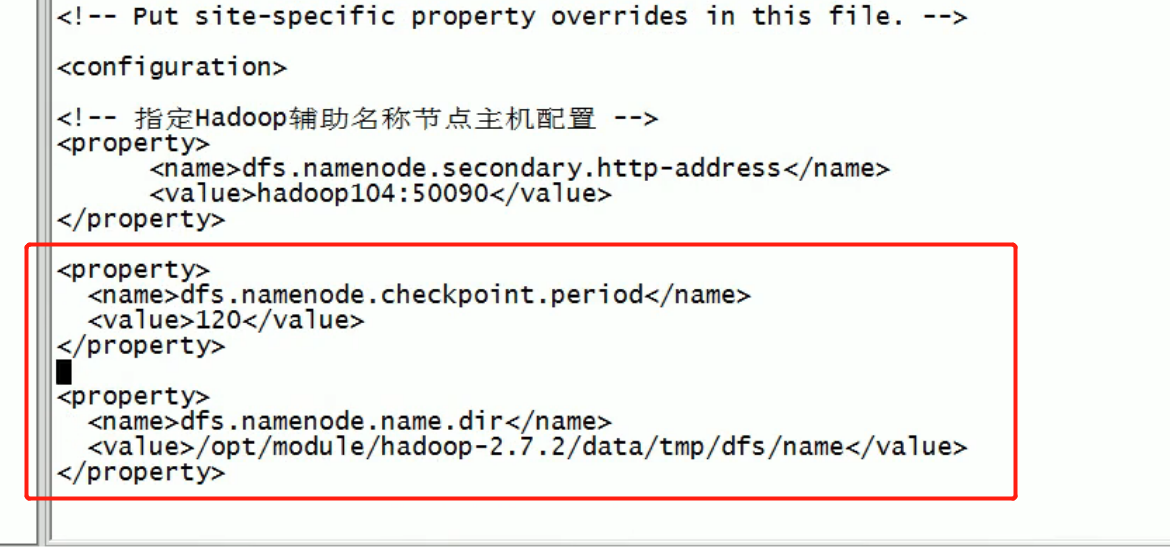
Then add:
<property>
    <name>dfs.namenode.name.dir</name>
<value>file:///${hadoop.tmp.dir}/dfs/name1,file:///${hadoop.tmp.dir}/dfs/name2</value>
</property>
Then distribute:
(2) Stop the cluster and delete all data in data and logs.
[atguigu@hadoop102 hadoop-2.7.2]$ rm -rf data/ logs/
[atguigu@hadoop103 hadoop-2.7.2]$ rm -rf data/ logs/
[atguigu@hadoop104 hadoop-2.7.2]$ rm -rf data/ logs/
(3) Format the cluster and start it.
[atguigu@hadoop102 hadoop-2.7.2]$ bin/hdfs namenode –format
[atguigu@hadoop102 hadoop-2.7.2]$ sbin/start-dfs.sh
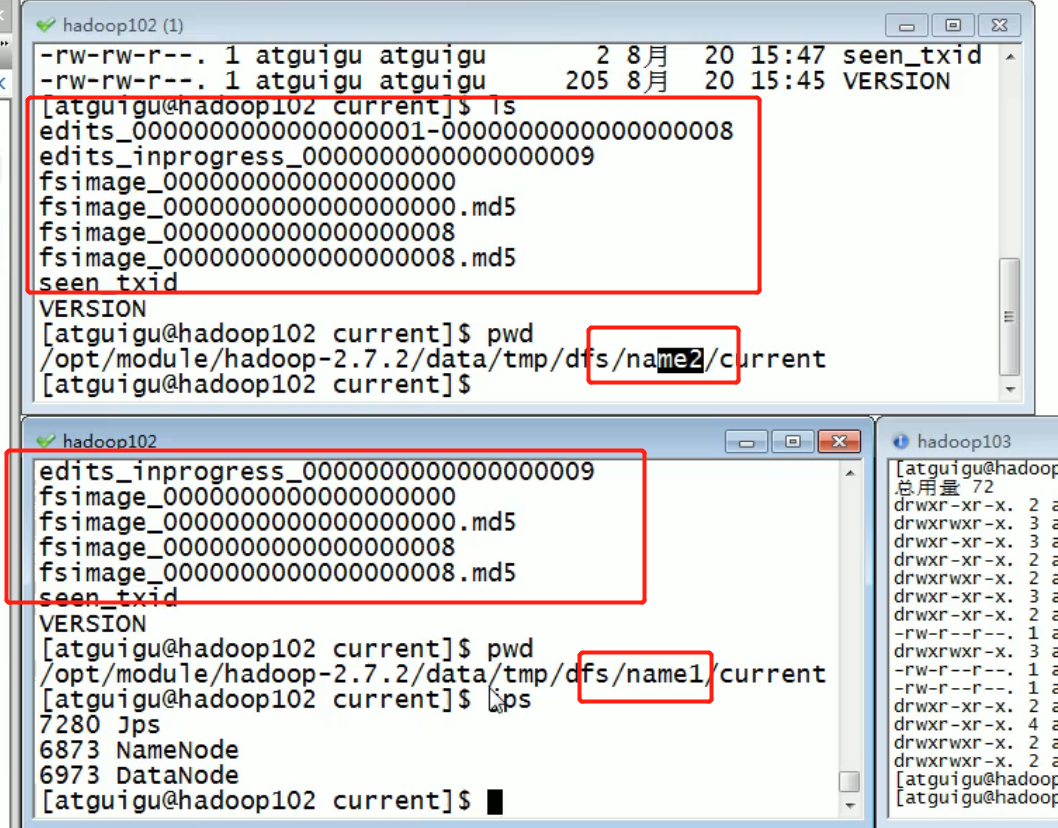
(4) View results
[atguigu@hadoop102 dfs]$ ll
//Total consumption 12
drwx------. 3 atguigu atguigu 4096 12month 11 08:03 data
drwxrwxr-x. 3 atguigu atguigu 4096 12month 11 08:03 name1
drwxrwxr-x. 3 atguigu atguigu 4096 12month 11 08:03 name2
DataNode (key point of interview Development)
DataNode working mechanism
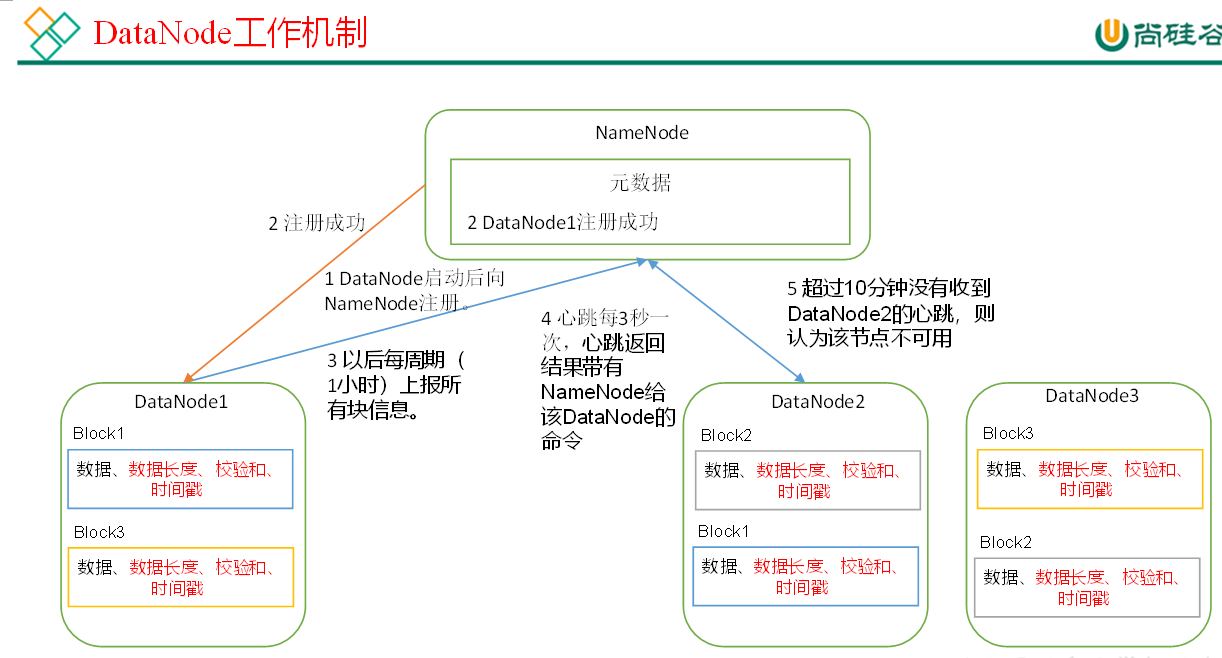
1) A data block is stored on the disk as a file on the DataNode, including two files, one is the data itself, the other is the metadata including the length of the data block, the check sum of the block data, and the time stamp.
2) After the DataNode is started, it registers with the NameNode. After passing the registration, it periodically (1 hour) reports all the block information to the NameNode.
3) The heartbeat is every 3 seconds. The heartbeat return result is provided with the command given by NameNode to the DataNode, such as copying block data to another machine, or deleting a data block. If the heartbeat of a DataNode is not received for more than 10 minutes, the node is considered unavailable.
4) Some machines can be added and exited safely when the cluster is running.
Data integrity
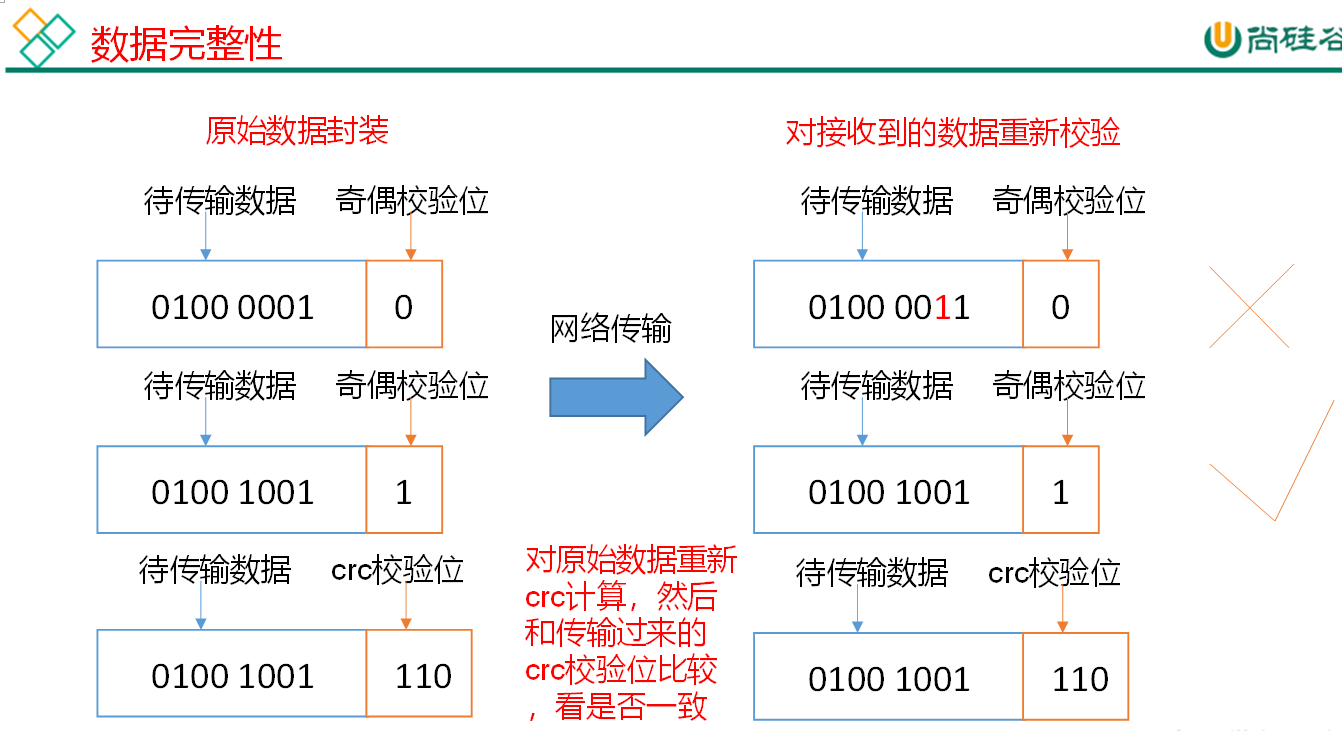
Thinking: if the data stored in the computer disk is the red light signal (1) and the green light signal (0) controlling the high-speed rail signal, but the disk storing the data is broken, and it always shows the green light, is it very dangerous? In the same way, the data on the DataNode node is damaged, but it is not found. Is it also dangerous? How to solve it?
The following is the method for DataNode node to ensure data integrity.
1) When the DataNode reads the Block, it calculates the CheckSum.
2) If the calculated CheckSum is different from the value when the Block was created, the Block is damaged.
3) The Client reads blocks on other datanodes.
4) DataNode periodically verifies CheckSum after its file is created, as shown in Figure 3-16.
Parameter setting of time limit for offline
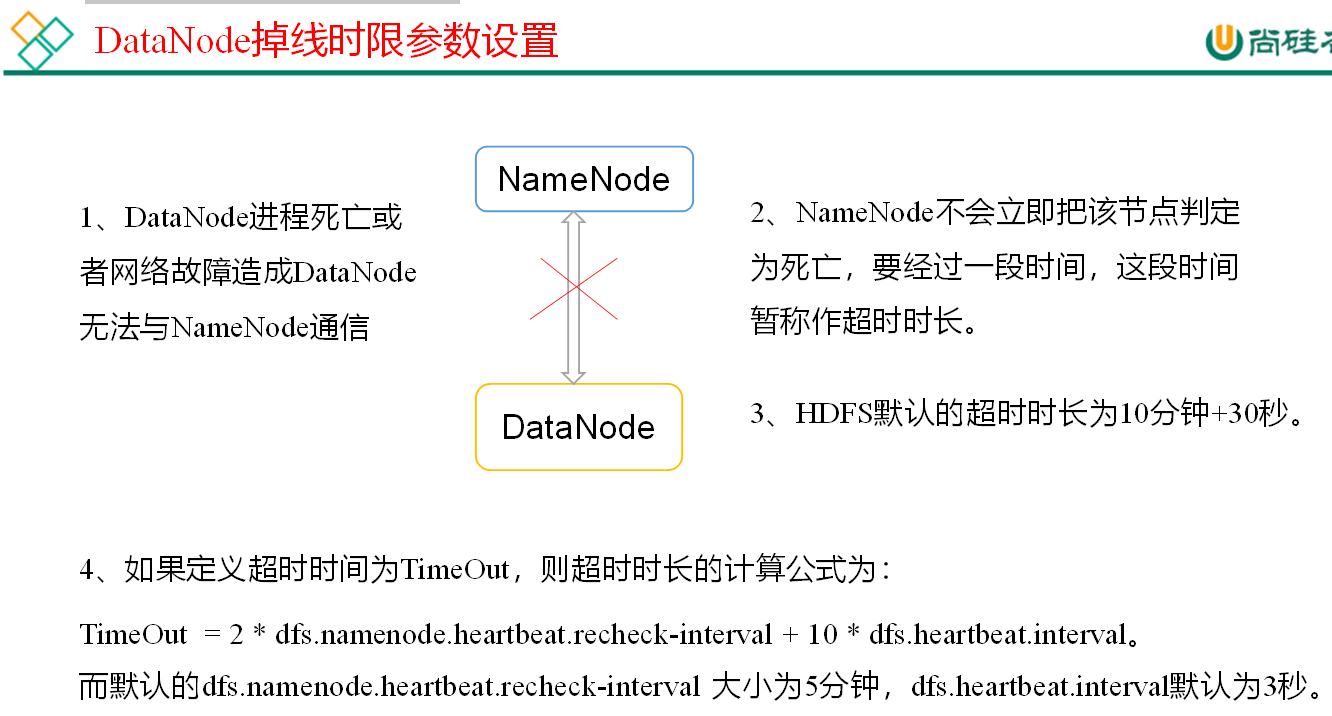
It should be noted that the unit of heartbeat.recheck.interval in the hdfs-site.xml configuration file is milliseconds, and the unit of dfs.heartbeat.interval is seconds. :
<property>
    <name>dfs.namenode.heartbeat.recheck-interval</name>
    <value>300000</value>
</property>
<property>
    <name>dfs.heartbeat.interval</name>
    <value>3</value>
</property>
New data nodes in service
- demand
With the growth of the company's business, the amount of data becomes larger and larger. The capacity of the original data nodes can no longer meet the needs of data storage. It is necessary to dynamically add new data nodes on the basis of the original cluster. - Environmental preparation
(1) Clone another Hadoop 105 host on Hadoop 104 host
(2) Modify IP address and host name
(3) Delete the files saved by the original HDFS file system (/ opt/module/hadoop-2.7.2/data and log)
(4) source profile
[atguigu@hadoop105 hadoop-2.7.2]$ source /etc/profile
- Specific steps of new service nodes
(1) Start the DataNode directly, and it can be associated to the cluster
[atguigu@hadoop105 hadoop-2.7.2]$ sbin/hadoop-daemon.sh start datanode
[atguigu@hadoop105 hadoop-2.7.2]$ sbin/yarn-daemon.sh start nodemanager
Several problems need to be noted:
- Suppose a 107 new node in service needs to configure the mapping of host name and IP address in / etc/hosts of 102.
- If you start directly next time: 107 still can't group up, you need to configure slaves plus 107. At the same time, you need to set ssh password free login for 107, and finally use xnyc to distribute the configuration file.
(2) Upload files on Hadoop 105
[atguigu@hadoop105 hadoop-2.7.2]$ hadoop fs -put /opt/module/hadoop-2.7.2/LICENSE.txt /
105 must have been uploaded to 105 client, and the node is the nearest.
(3) If the data is unbalanced, the command can be used to rebalance the cluster
[atguigu@hadoop102 sbin]$ ./start-balancer.sh
starting balancer, logging to /opt/module/hadoop-2.7.2/logs/hadoop-atguigu-balancer-hadoop102.out
Time Stamp  Iteration#  Bytes Already Moved  Bytes Left To Move  Bytes Being Moved
Danger: if namenode knows that the IP address is started according to the configuration, it can download the data.
Decommissioning old data nodes
Add white list
The way of adding nodes before is not safe. Use white list to solve the security problem:
All the host nodes added to the white list are allowed to access the NameNode. All the host nodes not in the white list will be exited.
The specific steps to configure the white list are as follows:
(1) Create dfs.hosts file in / opt/module/hadoop-2.7.2/etc/hadoop directory of NameNode
[atguigu@hadoop102 hadoop]$ pwd
/opt/module/hadoop-2.7.2/etc/hadoop
[atguigu@hadoop102 hadoop]$ touch dfs.hosts
[atguigu@hadoop102 hadoop]$ vi dfs.hosts
Add the following host name (do not add Hadoop 105)
hadoop102
hadoop103
hadoop104
(2) Add dfs.hosts attribute to hdfs-site.xml configuration file of NameNode
<property>
<name>dfs.hosts</name>
<value>/opt/module/hadoop-2.7.2/etc/hadoop/dfs.hosts</value>
</property>
(3) Profile distribution
[atguigu@hadoop102 hadoop]$ xsync hdfs-site.xml
Before refreshing, 105 was also: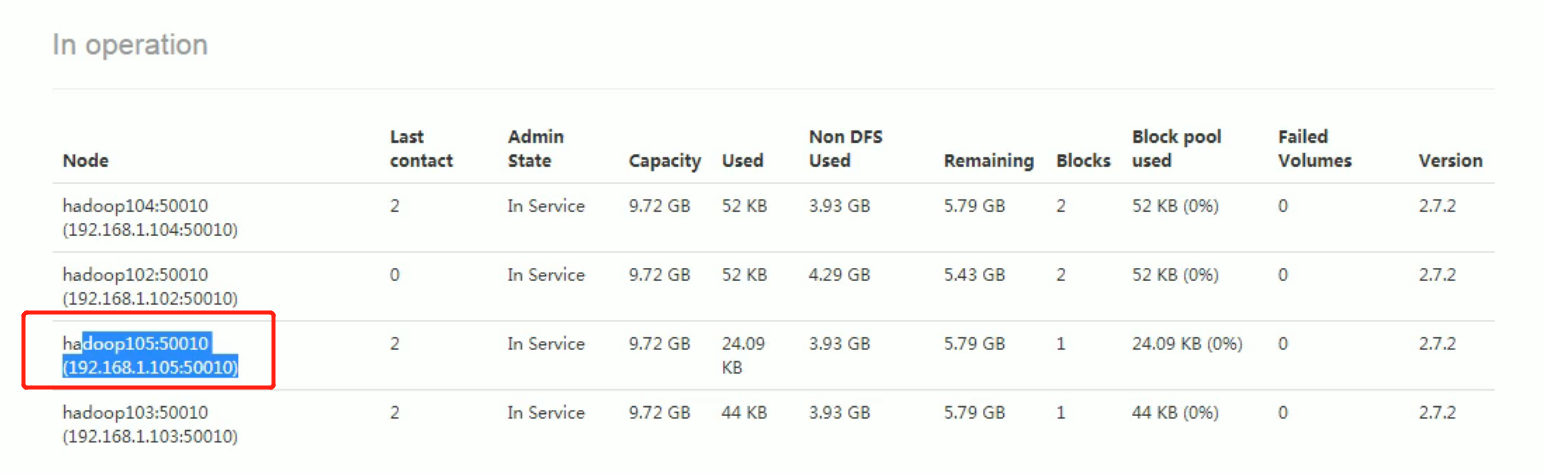
(4) Refresh NameNode
[atguigu@hadoop102 hadoop-2.7.2]$ hdfs dfsadmin -refreshNodes
Refresh nodes successful
105 instant offline. But there are other files uploaded with 105 before.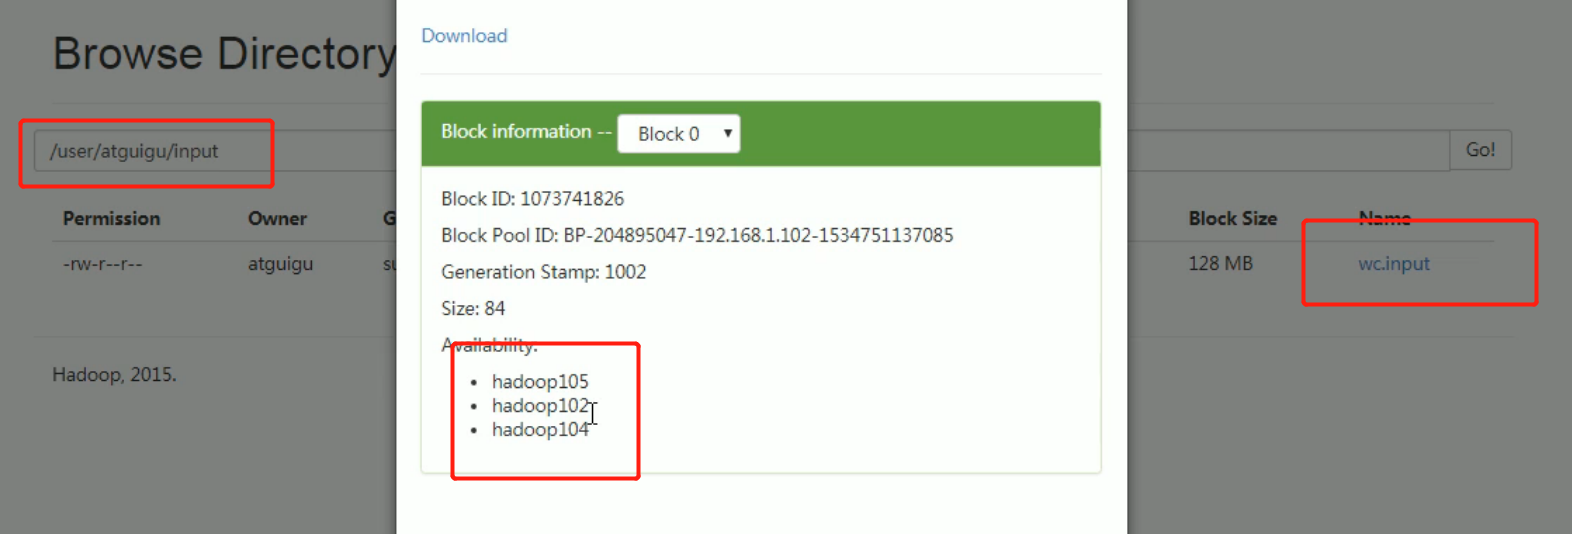
(5) Update ResourceManager node
[atguigu@hadoop102 hadoop-2.7.2]$ yarn rmadmin -refreshNodes
17/06/24 14:17:11 INFO client.RMProxy: Connecting to ResourceManager at hadoop103/192.168.1.103:8033
(6) View on web browser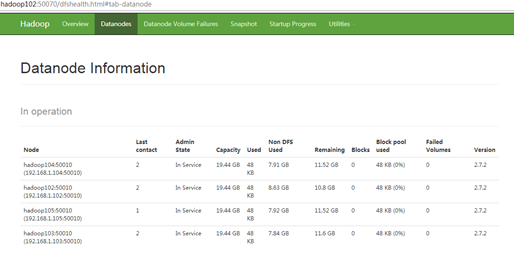
- If the data is unbalanced, the command can be used to rebalance the cluster
If a node is decommissioned, the data may need to be copied to another node, resulting in heavy load on some nodes, so the node needs to be rebalanced.
[atguigu@hadoop102 sbin]$ ./start-balancer.sh

starting balancer, logging to /opt/module/hadoop-2.7.2/logs/hadoop-atguigu-balancer-hadoop102.out
Time Stamp    Iteration#  Bytes Already Moved  Bytes Left To Move  Bytes Being Moved
Blacklist retirement
All hosts on the blacklist will be forced to exit.
First restore the site and restart 105:
Remove the dfs.hosts attribute in the hdfs-site.xml configuration file of NameNode
<property>
<name>dfs.hosts</name>
<value>/opt/module/hadoop-2.7.2/etc/hadoop/dfs.hosts</value>
</property>
Then distribute the profile
[atguigu@hadoop102 hadoop]$ xsync hdfs-site.xml
Then refresh:
Then start 105datanode:
Success: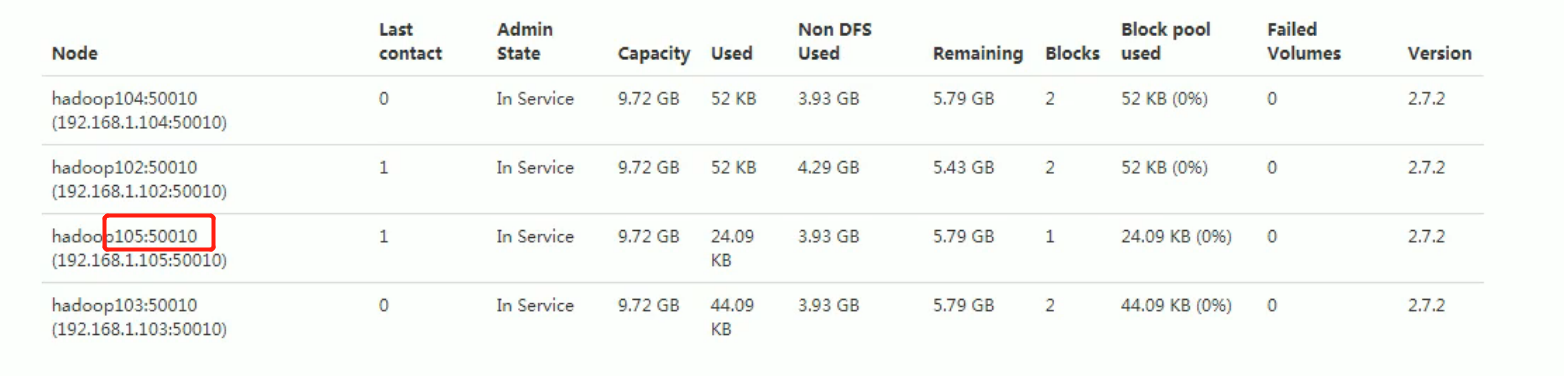
Start blacklist operation:
- Create dfs.hosts.exclude file in / opt/module/hadoop-2.7.2/etc/hadoop directory of NameNode
[atguigu@hadoop102 hadoop]$ pwd
/opt/module/hadoop-2.7.2/etc/hadoop
[atguigu@hadoop102 hadoop]$ touch dfs.hosts.exclude
[atguigu@hadoop102 hadoop]$ vi dfs.hosts.exclude
Add the following host name (node to retire)
hadoop105
- Add dfs.hosts.exclude attribute to hdfs-site.xml configuration file of NameNode
<property>
<name>dfs.hosts.exclude</name>
      <value>/opt/module/hadoop-2.7.2/etc/hadoop/dfs.hosts.exclude</value>
</property>
Then distribute: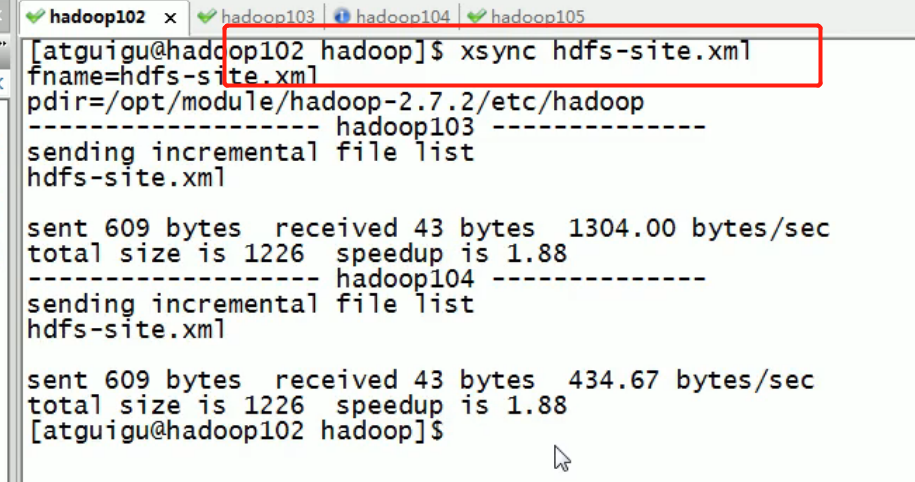
- Refresh NameNode, refresh ResourceManager
[atguigu@hadoop102 hadoop-2.7.2]$ hdfs dfsadmin -refreshNodes

Refresh nodes successful


[atguigu@hadoop102 hadoop-2.7.2]$ yarn rmadmin -refreshNodes

17/06/24 14:55:56 INFO client.RMProxy: Connecting to ResourceManager at hadoop103/192.168.1.103:8033
-
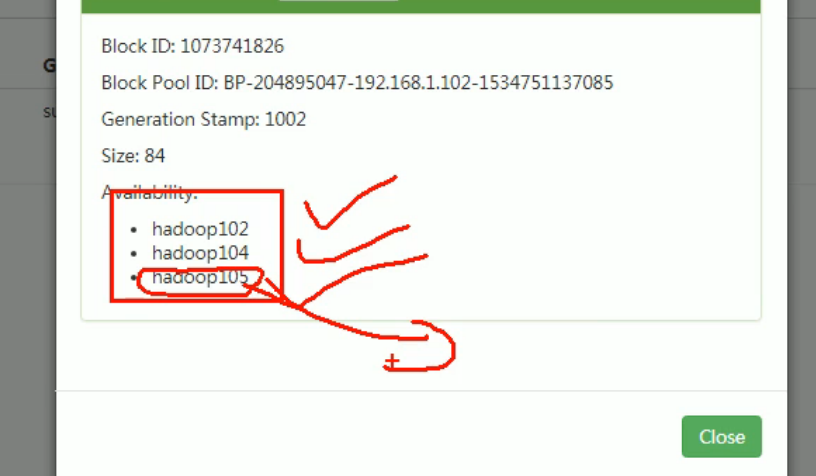
Check the Web browser. The status of the decommissioning node is decommissioning in progress, indicating that the data node is copying the block to other nodes, as shown in Figure 3-17
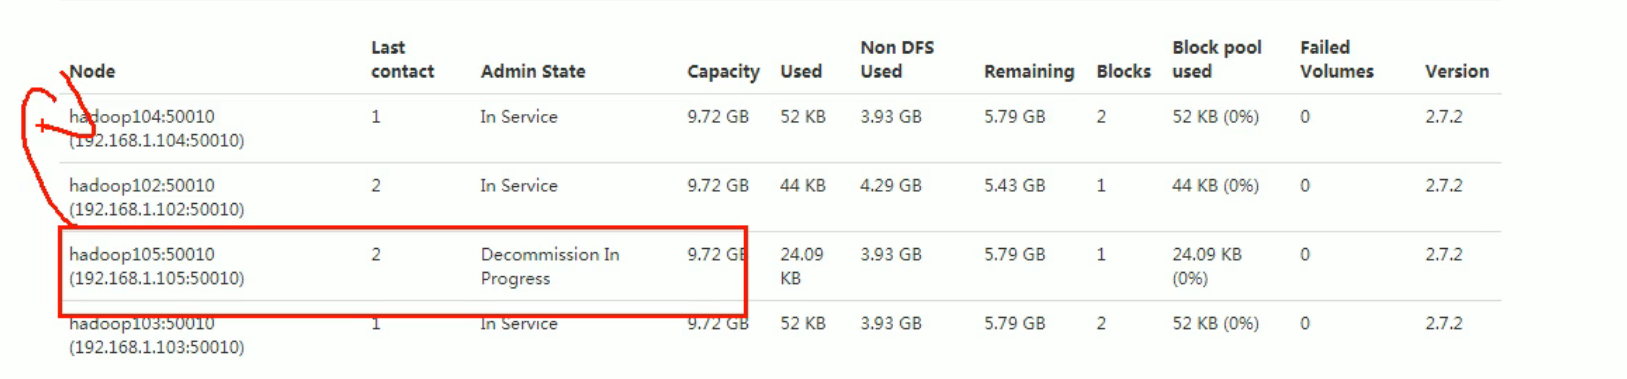
The data uploaded by 105 was transmitted to other nodes.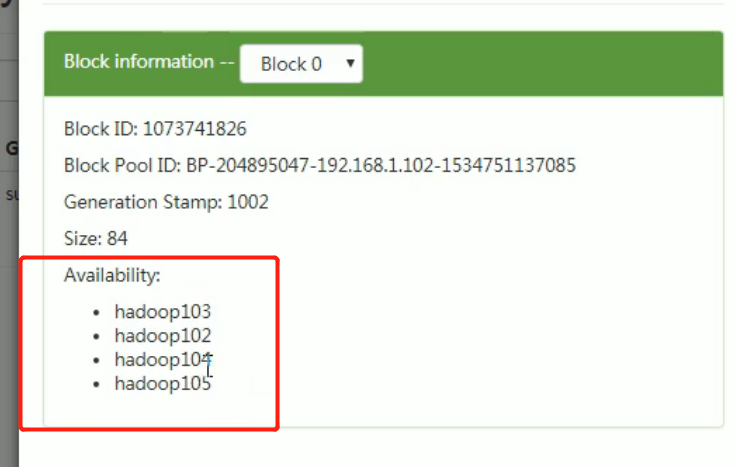
-
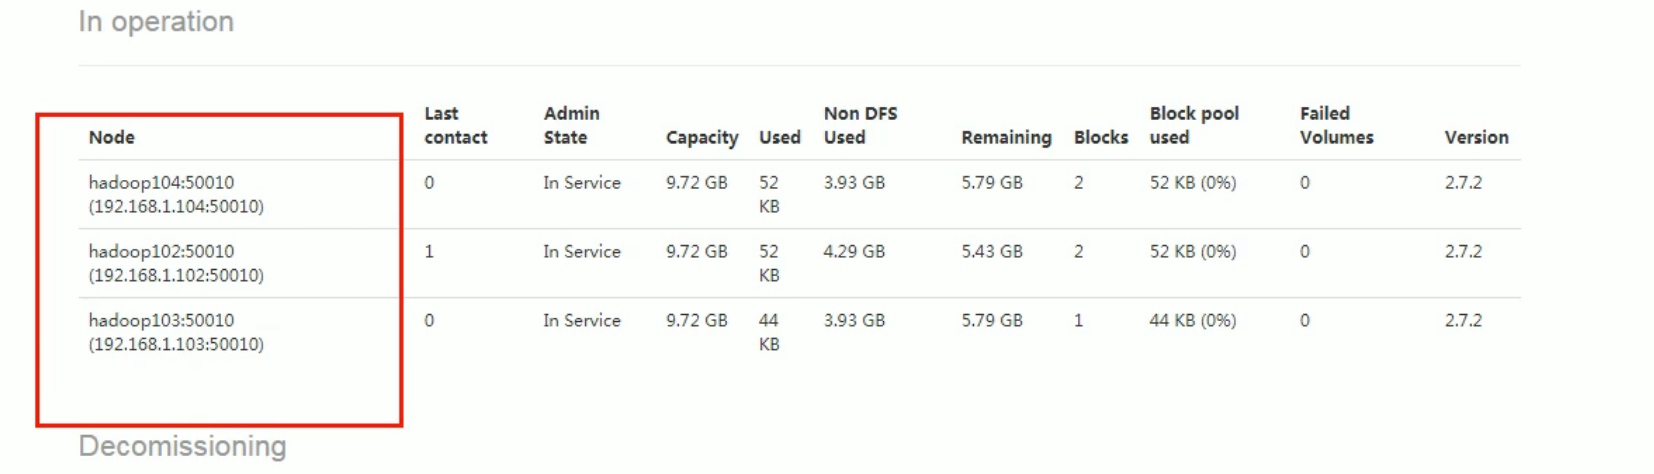
Wait for the decommissioned node state to be decommissioned (all blocks have been copied), and stop the node and node explorer. Note: if the number of replicas is 3 and the number of active nodes is less than or equal to 3, it cannot be retired successfully. You need to modify the number of replicas before retiring, as shown in Figure 3-18

Then manually exit the datanode and nodemanager of 105:
[atguigu@hadoop105 hadoop-2.7.2]$ sbin/hadoop-daemon.sh stop datanode

stopping datanode

[atguigu@hadoop105 hadoop-2.7.2]$ sbin/yarn-daemon.sh stop nodemanager

stopping nodemanager
- If the data is unbalanced, the command can be used to rebalance the cluster
[atguigu@hadoop102 hadoop-2.7.2]$ sbin/start-balancer.sh

starting balancer, logging to /opt/module/hadoop-2.7.2/logs/hadoop-atguigu-balancer-hadoop102.out
Time Stamp    Iteration#  Bytes Already Moved  Bytes Left To Move  Bytes Being Moved
Note: it is not allowed to have the same host name in the white list and the black list at the same time.
Datanode multi directory configuration
The data of multiple directory backup in namenode is exactly the same.
- DataNode can also be configured into multiple directories, each of which stores different data. That is, the data is not a copy
- The specific configuration is as follows

Remove the following: multi directory and blacklist settings for namenode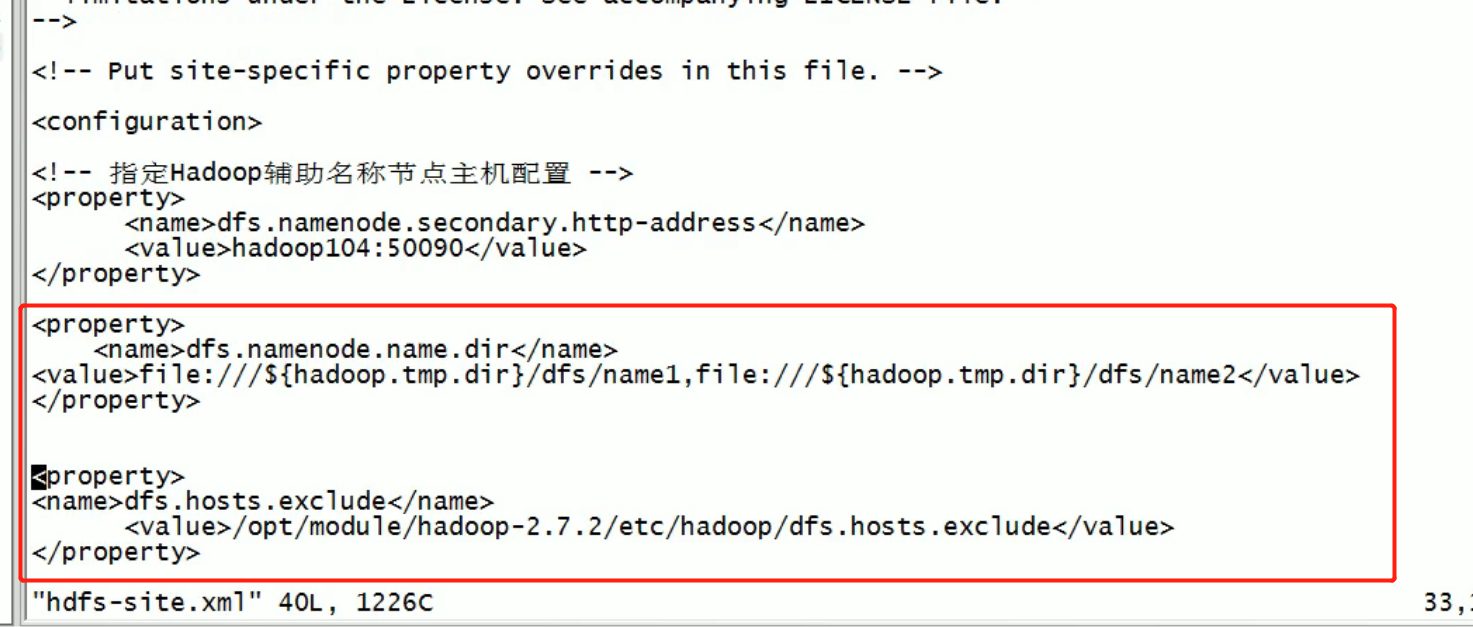
Then add the following
<property>
        <name>dfs.datanode.data.dir</name>
<value>file:///${hadoop.tmp.dir}/dfs/data1,file:///${hadoop.tmp.dir}/dfs/data2</value>
</property>
Then distribute the profile:
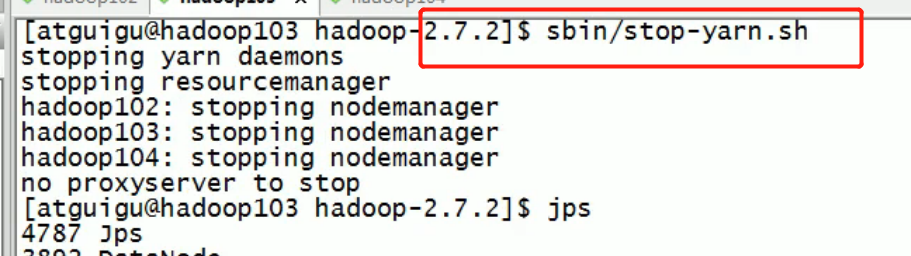
Exit all processes after configuration: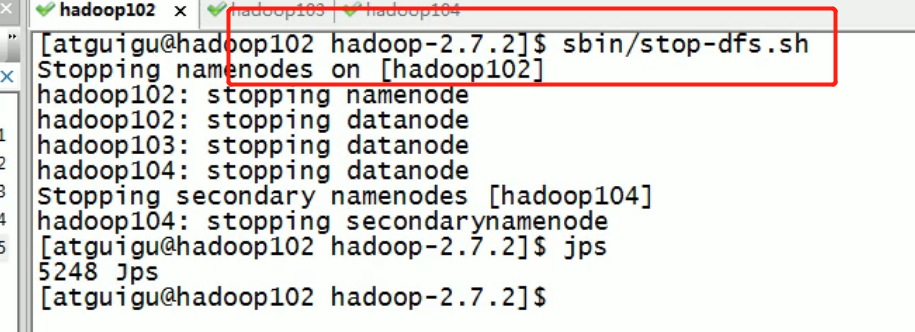
Data is then deleted on both 102 103 104: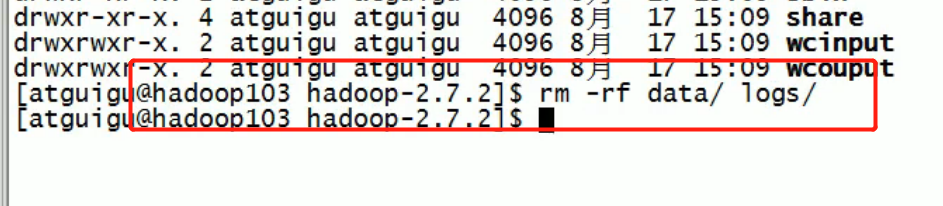
Then format the namenode:
Then restart: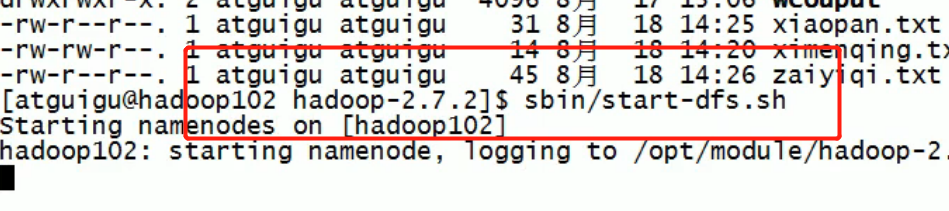
Multiple directories found: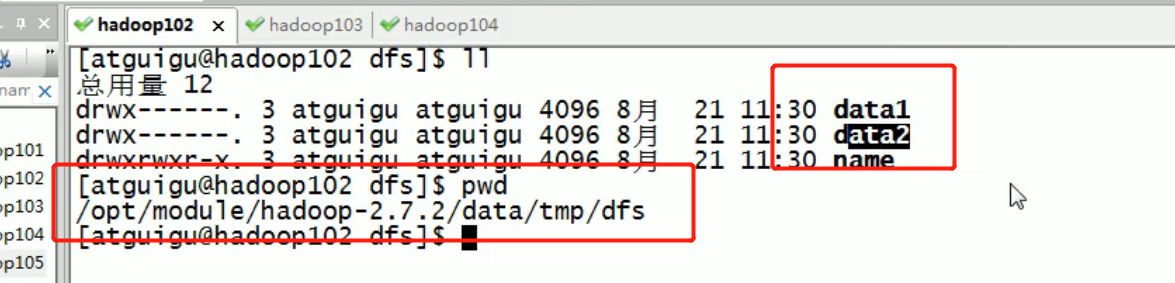
Then a data is passed in:
Found:
data2 has no data data1 has data: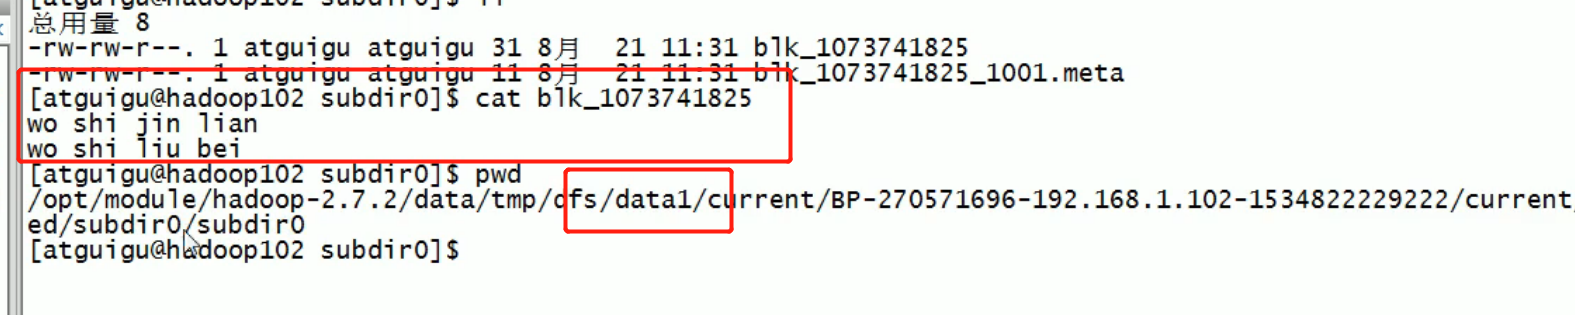

It is found that the data not stored through the directory is different, just multiple directories, but the data will not be backed up.
New features of HDFS 2.X
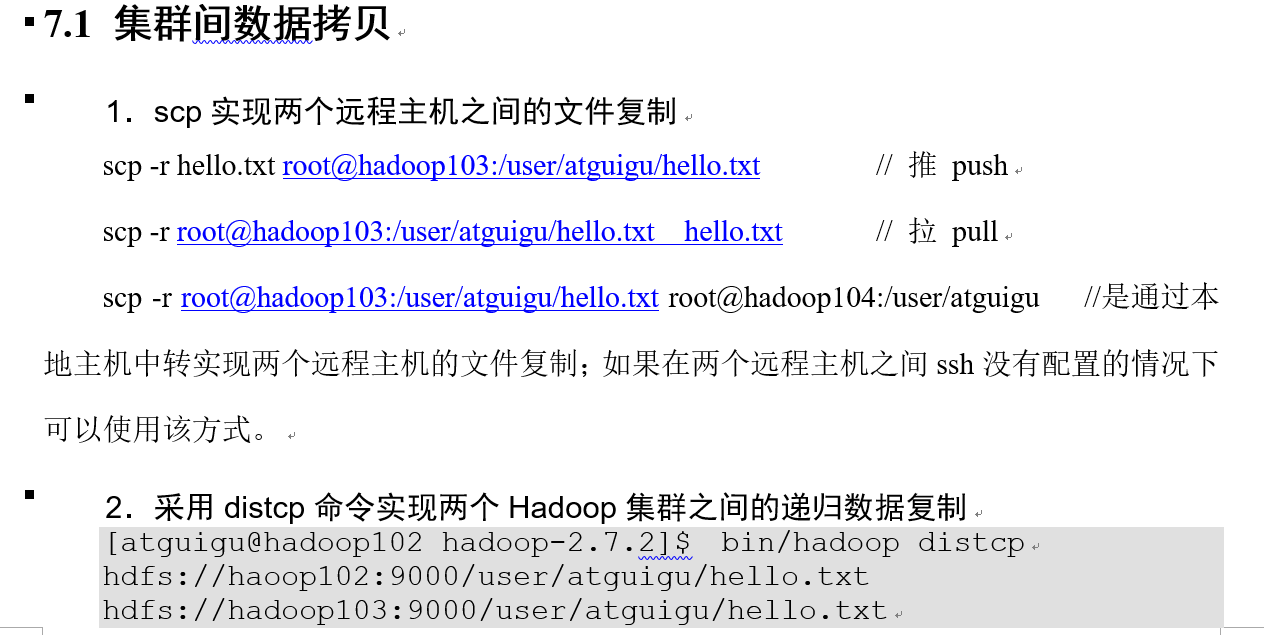
Data copy between clusters
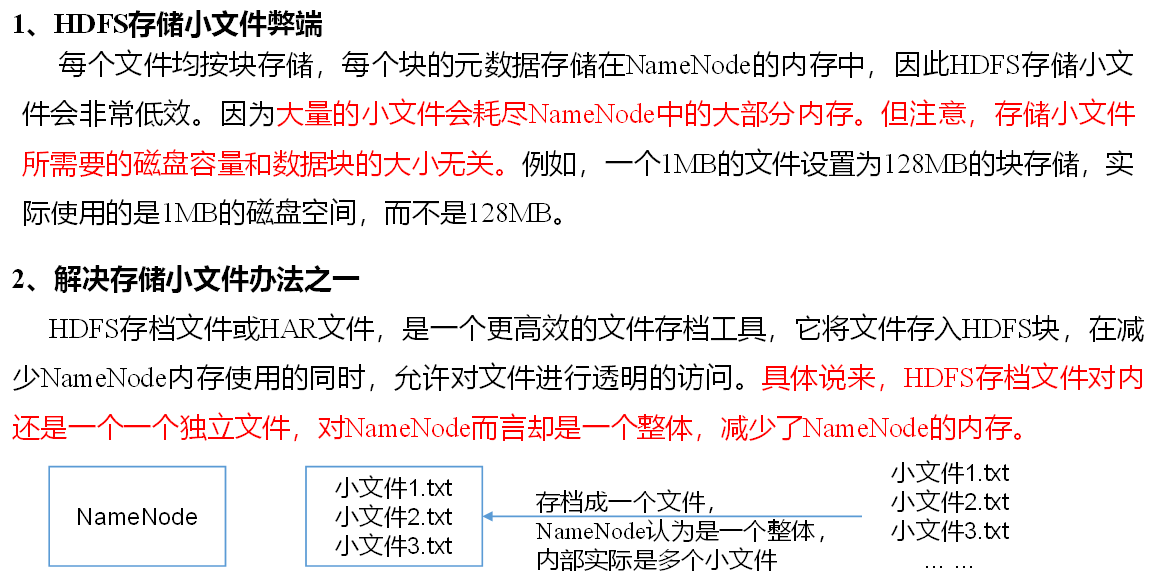
Small file archive
First, start all processes with dfs yarn
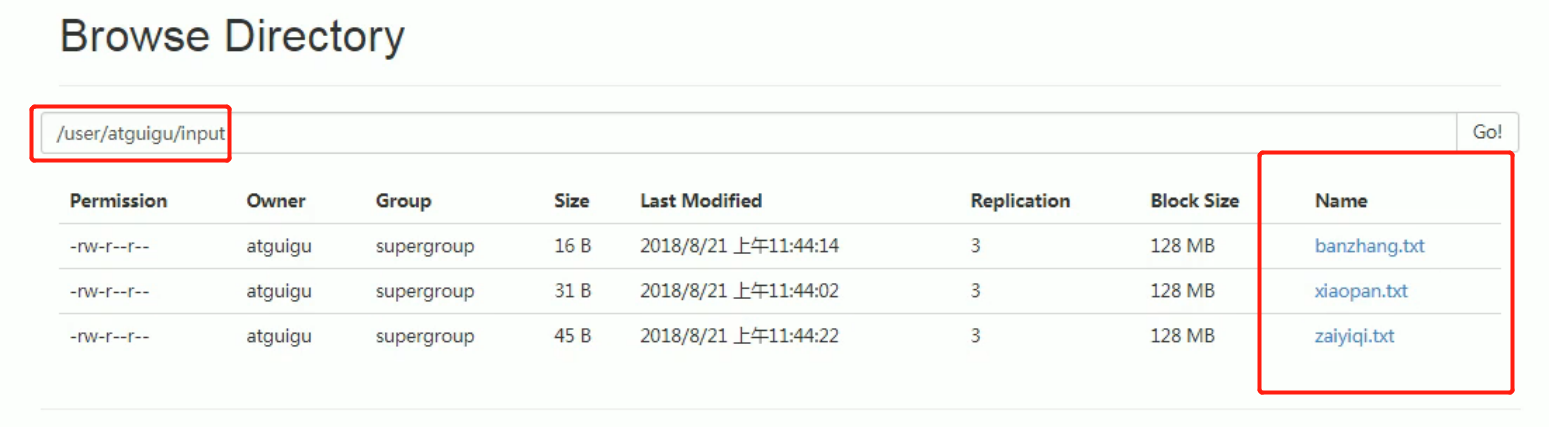
Archive all the files in the / user/atguigu/input directory into an archive file called input.har, and store the archived files in the / user/atguigu/output path.
Create three small files:
Then Archive: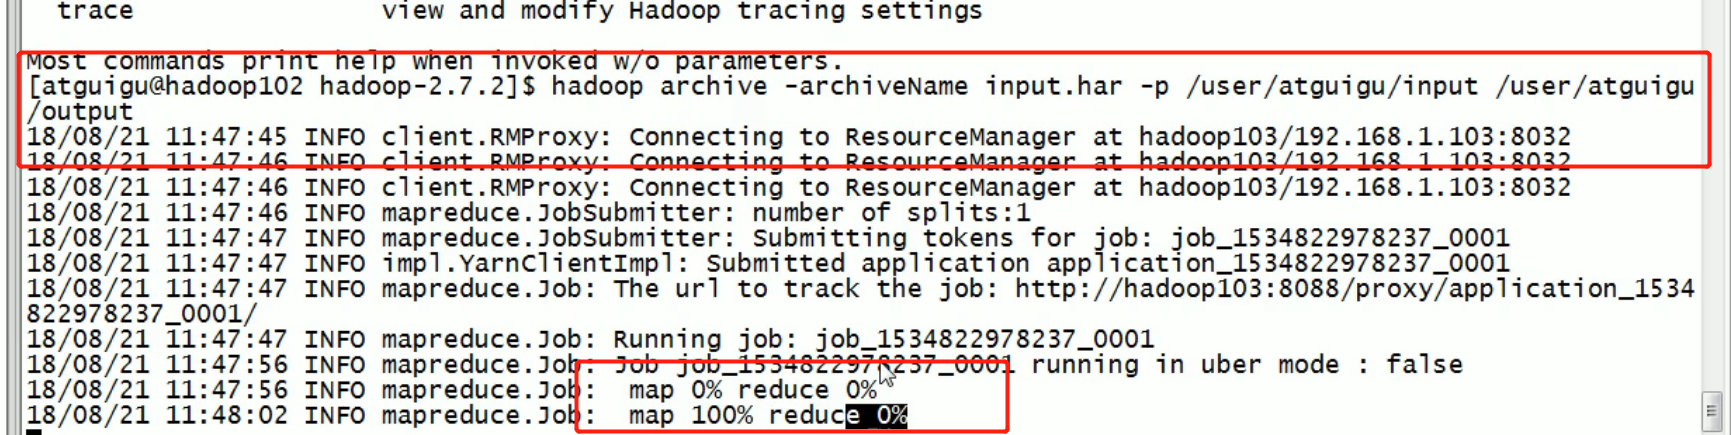

External is a whole, internal is a file, which reduces the memory pressure of namenode.
Har: / / is a kind of har protocol similar to hdfs://
So we need to use the har protocol to parse the har file.
recycle bin
Opening the recycle bin function can recover the original data of the deleted files without overtime, and prevent the deletion and backup by mistake.
2. Enable recycle bin
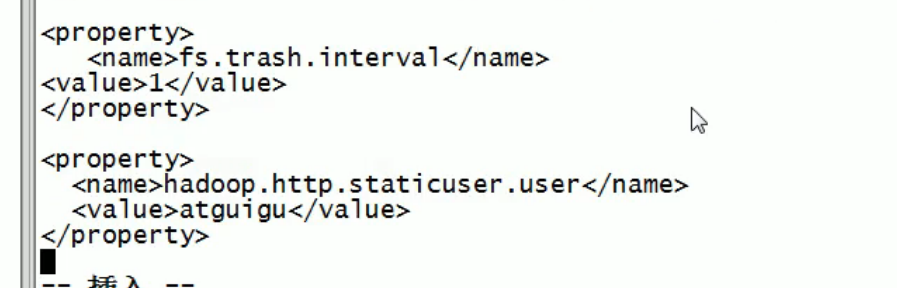
Modify the core-site.xml to configure the garbage collection time to 1 minute.
<property>
   <name>fs.trash.interval</name>
<value>1</value>
</property>
3. View recycle bin
Path of recycle bin in the cluster: user/atguigu/.Trash / .
4. Modify the name of the user accessing the garbage collection bin
Enter the garbage collection bin user name. The default value is dr.who, which is changed to atguigu user
[core-site.xml]
<property>
  <name>hadoop.http.staticuser.user</name>
  <value>atguigu</value>
</property>
- The files deleted through the program will not pass through the recycle bin. You need to call moveToTrash() to enter the recycle bin
Trash trash = New Trash(conf);
trash.moveToTrash(path); - Recover recycle bin data
[atguigu@hadoop102 hadoop-2.7.2]$ hadoop fs -mv
/user/atguigu/.Trash/Current/user/atguigu/input    /user/atguigu/input
- Empty Trash
[atguigu@hadoop102 hadoop-2.7.2]$ hadoop fs -expunge
Then distribute: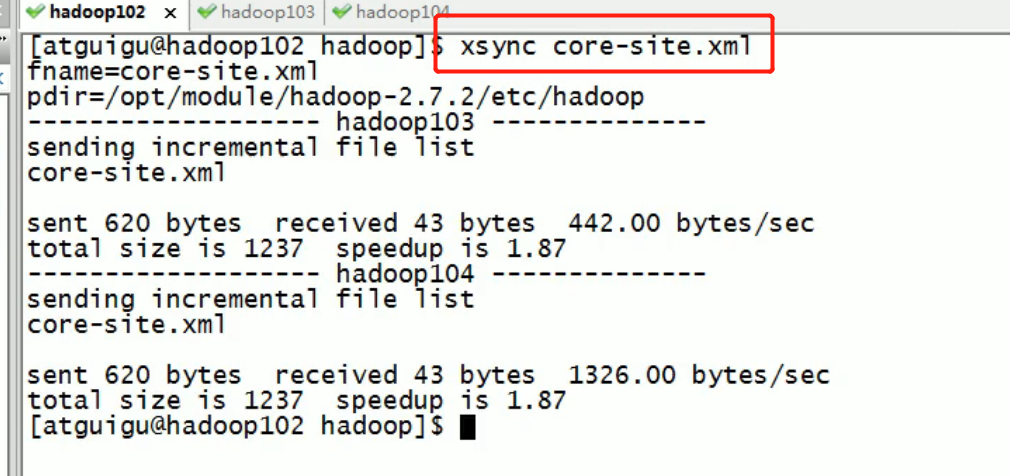
Then delete a file:

Then the time that this file lives in the recycle bin is 1 minute. If the time is over, the recycle bin will delete this file
Generate a package by timestamp

