* Hadoop Ecosphere-Ranger Data Security Management Framework
Author: Yin Zhengjie
Copyright Statement: Original work, decline to reprint!Otherwise, legal liability will be pursued.
Introduction to Ranger
Apache Ranger is a data security management framework designed to fully understand the Hadoop ecosystem.It provides a unified data authorization and management interface for many components in the Hadoop ecosystem.This enables system administrators to authorize data, manage data, and audit Hadoop's entire ecosystem with just one Ranger system.Refer to the official website for details: http://ranger.apache.org/index.html.
Ranger is structurally composed of three main components:

1>.User sync:
The Ranger system has its own internal users on which the assignment of login to permission policies from the portal system is based.Ranger is a security management framework that unifies the Hadoop ecosystem, so it faces many components of the Hadoop ecosystem.These components use Linux users on the server, so we need to map a copy of the Linux user data to become Ranger's internal user.User Synchronization Services are designed to do this, and Ranger synchronizes user data from a Linux server in real time through User Synchronization Services.
2>.Admin Portol:
The Administrator Portal is a Web UI console through which users can create and update permission policies.Plugins for each component (such as HDFS, HBase, etc.) periodically query these policies in a polling manner.The portal system also includes an auditing system, and the plug-in of the mooed component periodically sends the collected operational logs to the auditing system.
3>.Plugins:
Ranger implements and extends its capabilities through plug-in mechanisms that are essentially lightweight Java programs embedded in each cluster service.For example, Apache Hive's Angelr plug-in is embedded in HiveServer2.These plug-ins intercept requests and check permissions.These plug-ins also collect user action logs and send them to the auditing system that manages the portal.
2. Install Ranger
Now start installing the Ranger component, and we will still install it with Ambari.
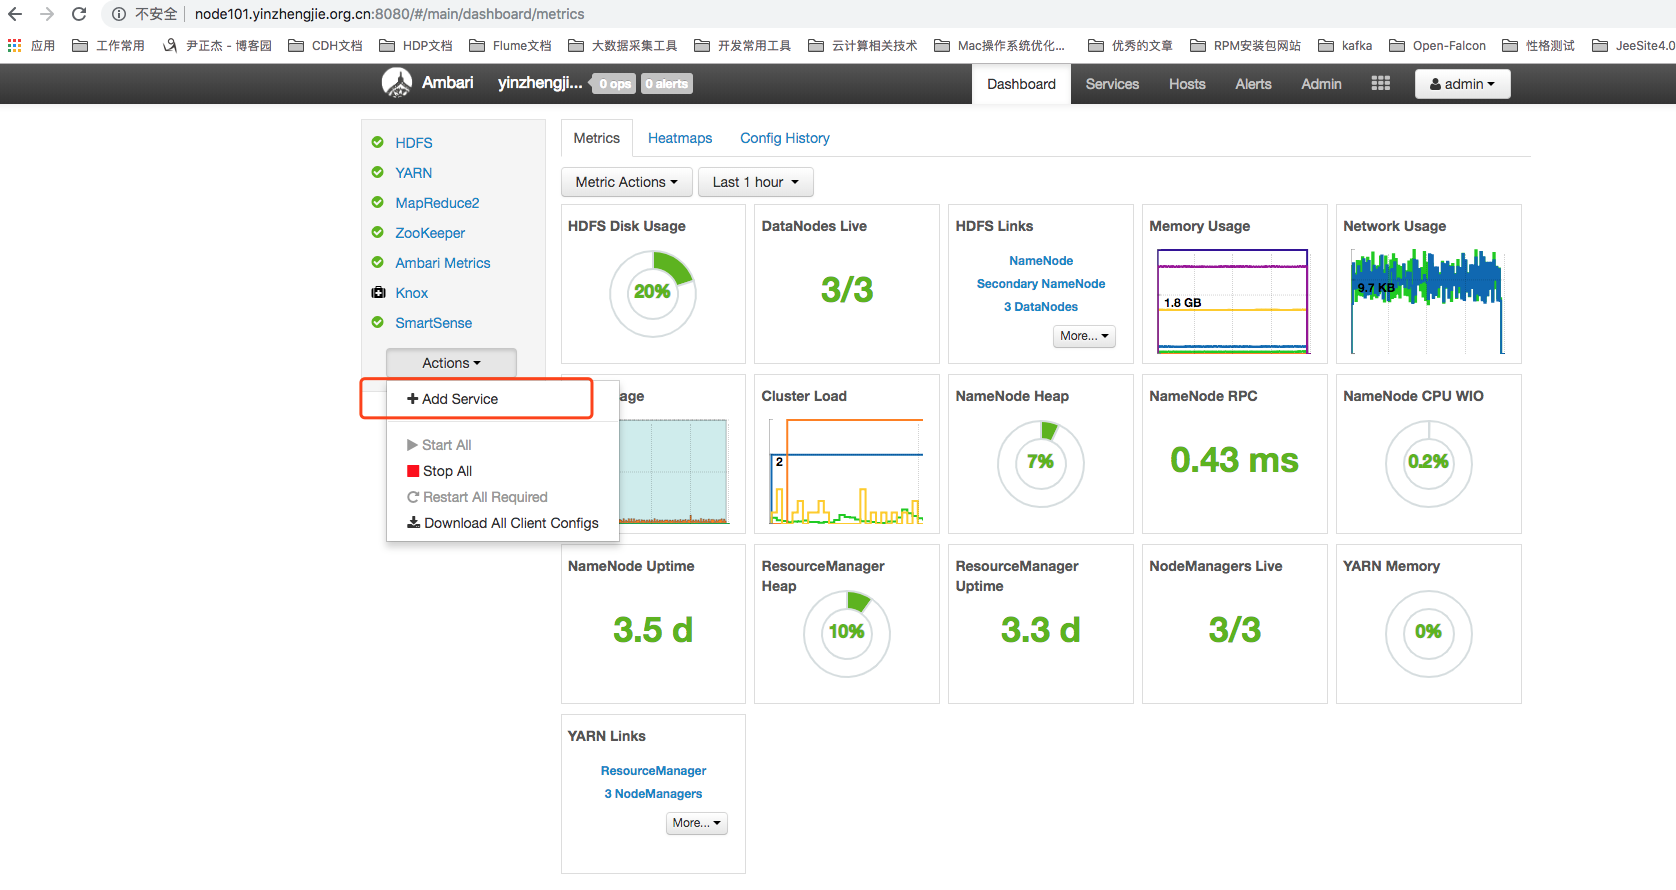
1>.Log in to Ambari and click the Actions button in the lower left corner of the home page to see the new service option as shown in the following image:
2>.Clicking New Service will bring you to the New Service Wizard page.Check out the services Ranger and Ranger KMS and click Next as shown in the following image: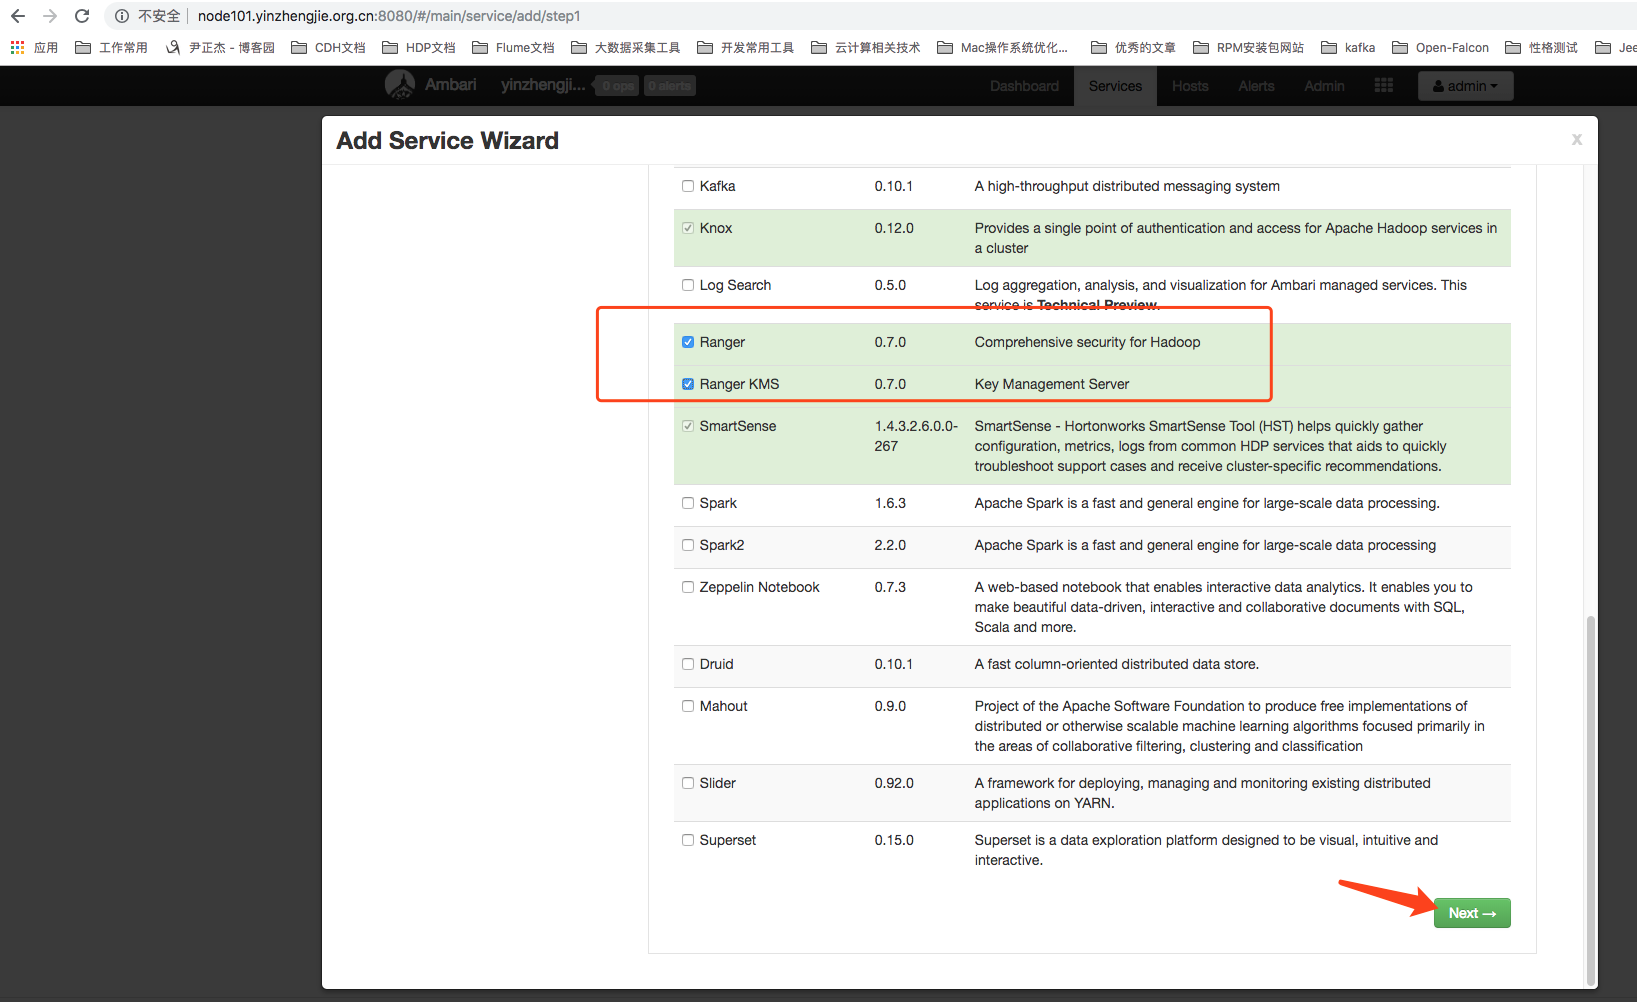
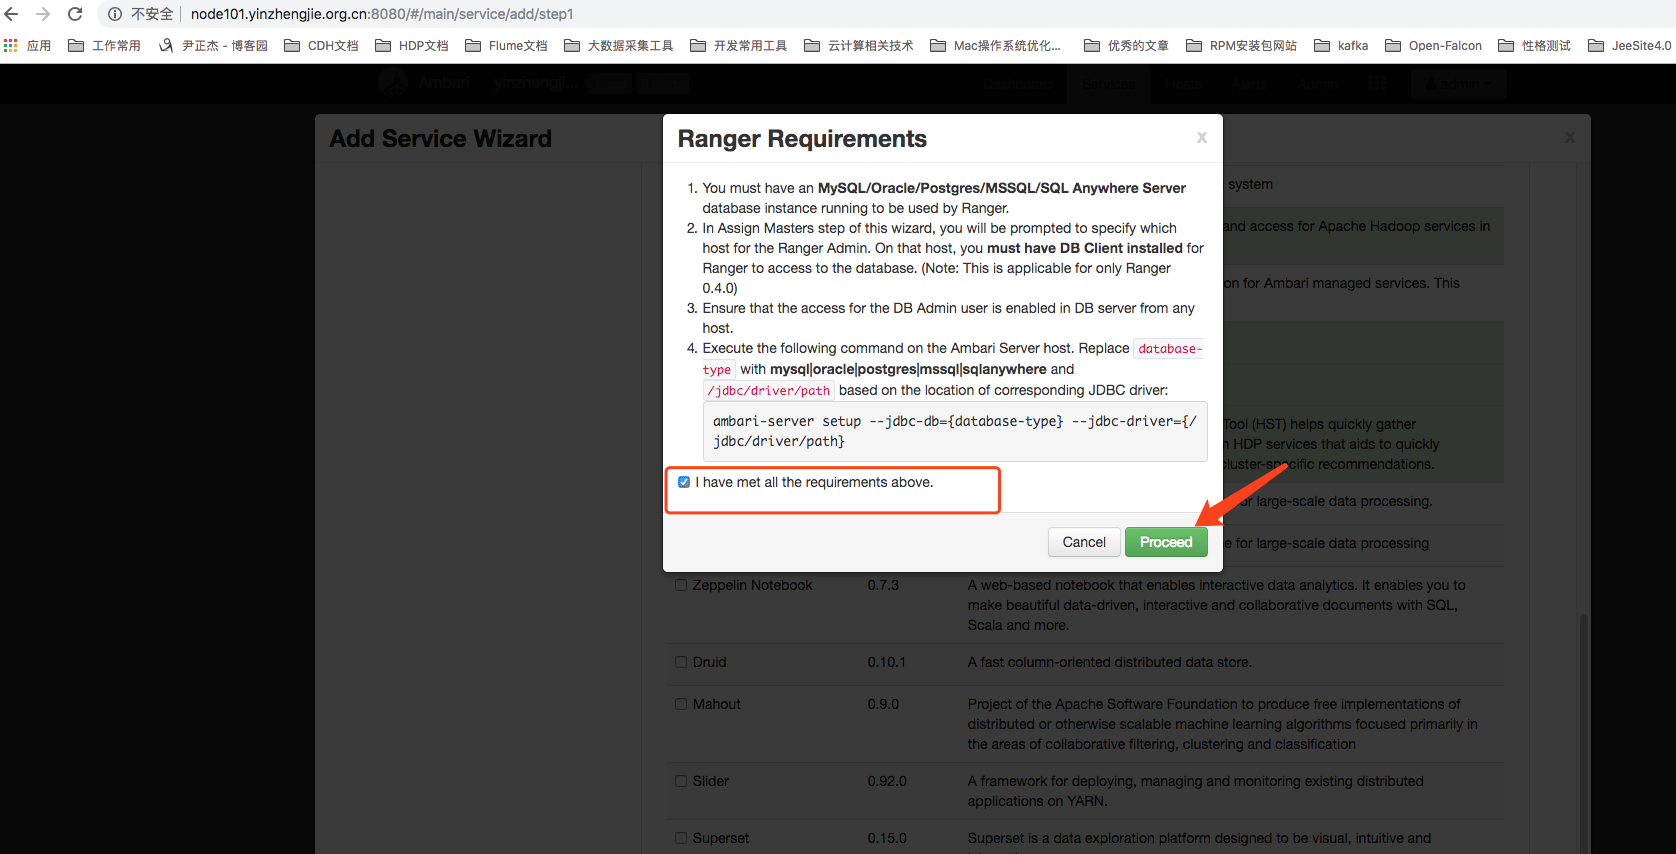
3>.Then we will see a prompt asking us to configure the JDBC driver information for Ambari-Server, as shown in the following figure.Since Ranger needs to use a relational database to store some metadata information, here we choose to use a MySQL database.Upload the MySQL driver jar package to the server where Ambari-Server resides and execute the following command.


[root@node101 ~]# ambari-server setup --jdbc-db=mysql --jdbc-driver=/usr/share/java/mysql-connector-java.jar
Using python  /usr/bin/python
Setup ambari-server
Copying /usr/share/java/mysql-connector-java.jar to /var/lib/ambari-server/resources
If you are updating existing jdbc driver jar for mysql with mysql-connector-java.jar. Please remove the old driver jar, from all hosts. Restarting services that need the driver, will automatically copy the new jar to the hosts.
JDBC driver was successfully initialized.
Ambari Server 'setup' completed successfully.
[root@node101 ~]#
4>. Install 3 services on the same machine
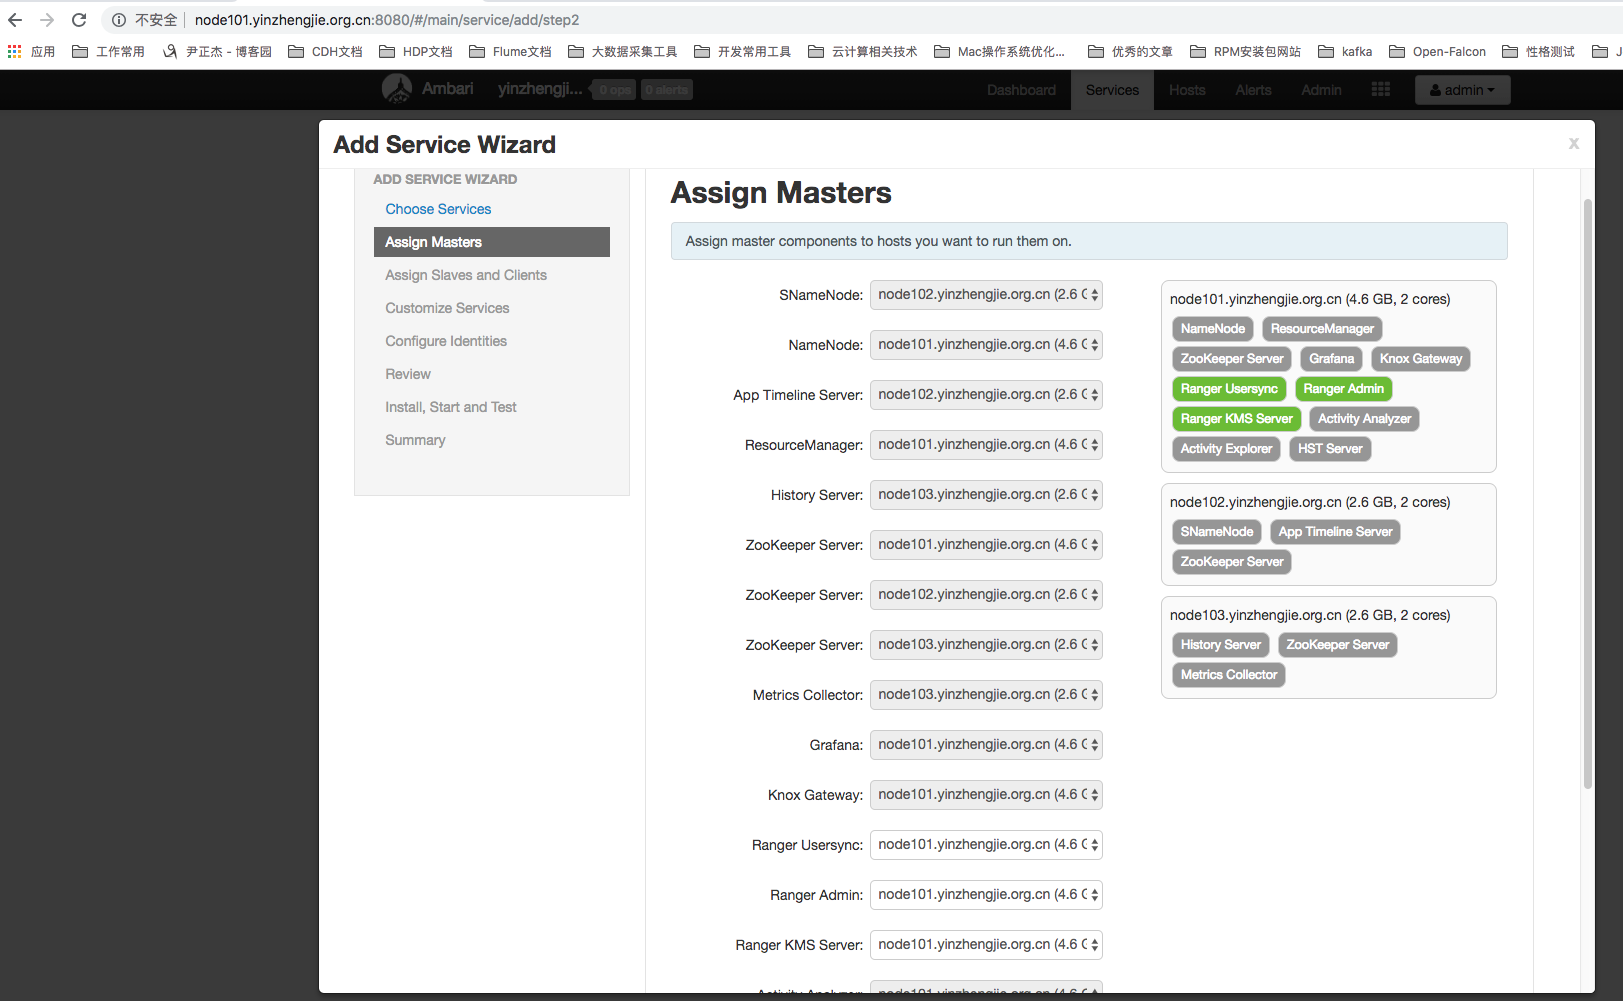
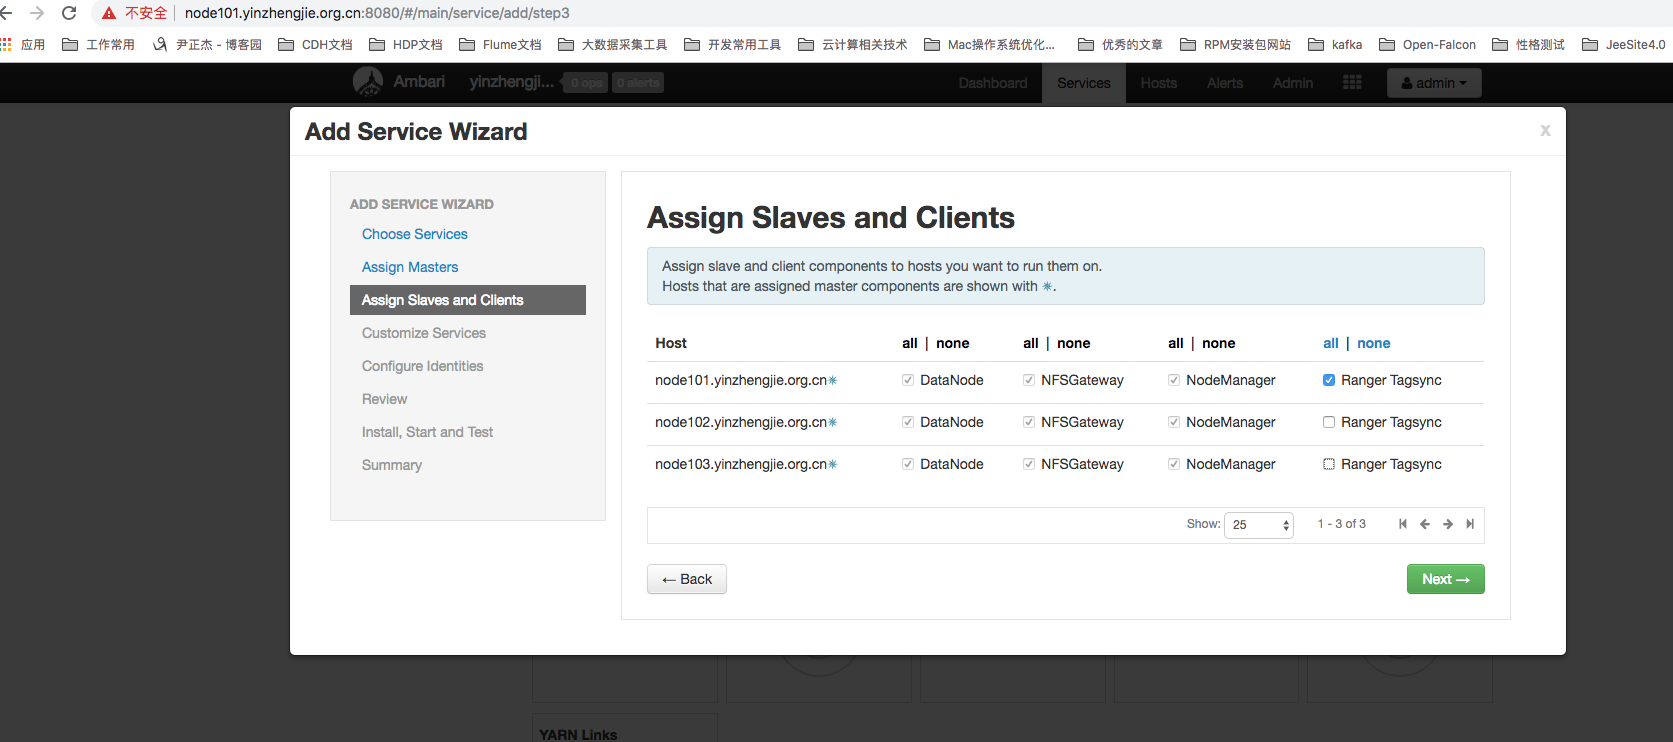
5>.Assign Tagsync, from client and client components.
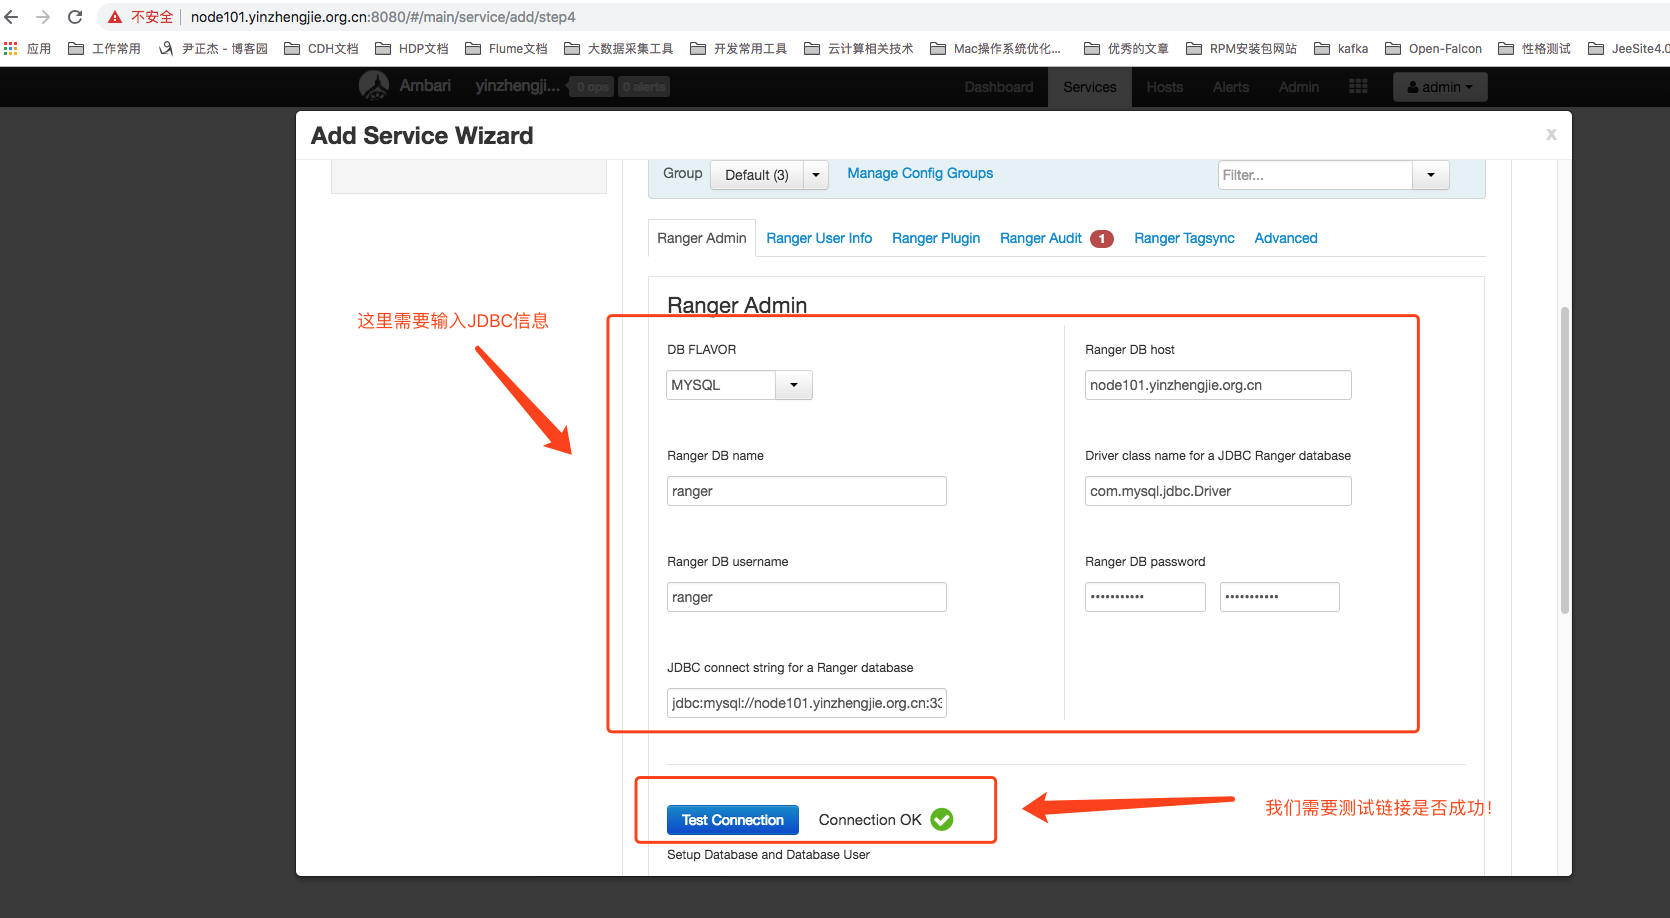
Configuration of 6>.Ranger Admin
[root@node101 ~]# mysql -uroot -pyinzhengjie
Warning: Using a password on the command line interface can be insecure.
Welcome to the MySQL monitor.  Commands end with ; or \g.
Your MySQL connection id is 71
Server version: 5.6.42 MySQL Community Server (GPL)

Copyright (c) 2000, 2018, Oracle and/or its affiliates. All rights reserved.

Oracle is a registered trademark of Oracle Corporation and/or its
affiliates. Other names may be trademarks of their respective
owners.

Type 'help;' or '\h' for help. Type '\c' to clear the current input statement.

mysql> show databases;
+--------------------+
| Database           |
+--------------------+
| information_schema |
| ambari             |
| mysql              |
| performance_schema |
+--------------------+
4 rows in set (0.00 sec)

mysql> CREATE DATABASE ranger;
Query OK, 1 row affected (0.00 sec)

mysql> GRANT ALL PRIVILEGES ON ranger.* TO 'ranger'@'node101.yinzhengjie.org.cn' IDENTIFIED BY 'yinzhengjie' WITH GRANT OPTION;
Query OK, 0 rows affected (0.01 sec)

mysql> FLUSH PRIVILEGES;
Query OK, 0 rows affected (0.00 sec)

mysql> select Host,User,Password from mysql.user where user='ranger';
+----------------------------+--------+-------------------------------------------+
| Host                       | User   | Password                                  |
+----------------------------+--------+-------------------------------------------+
| node101.yinzhengjie.org.cn | ranger | *BD0B1F48FDC55BD27555FC2F22FF29A68A25A1D7 |
+----------------------------+--------+-------------------------------------------+
1 row in set (0.00 sec)

mysql> quit
Bye
[root@node101 ~]#
[root@node101 ~]# mysql -h node101.yinzhengjie.org.cn -uranger -pyinzhengjie
Warning: Using a password on the command line interface can be insecure.
Welcome to the MySQL monitor.  Commands end with ; or \g.
Your MySQL connection id is 80
Server version: 5.6.42 MySQL Community Server (GPL)

Copyright (c) 2000, 2018, Oracle and/or its affiliates. All rights reserved.

Oracle is a registered trademark of Oracle Corporation and/or its
affiliates. Other names may be trademarks of their respective
owners.

Type 'help;' or '\h' for help. Type '\c' to clear the current input statement.

mysql> show databases;
+--------------------+
| Database           |
+--------------------+
| information_schema |
| ranger             |
+--------------------+
2 rows in set (0.00 sec)

mysql> quit
Bye
[root@node101 ~]#
7>.Ranger Configuration
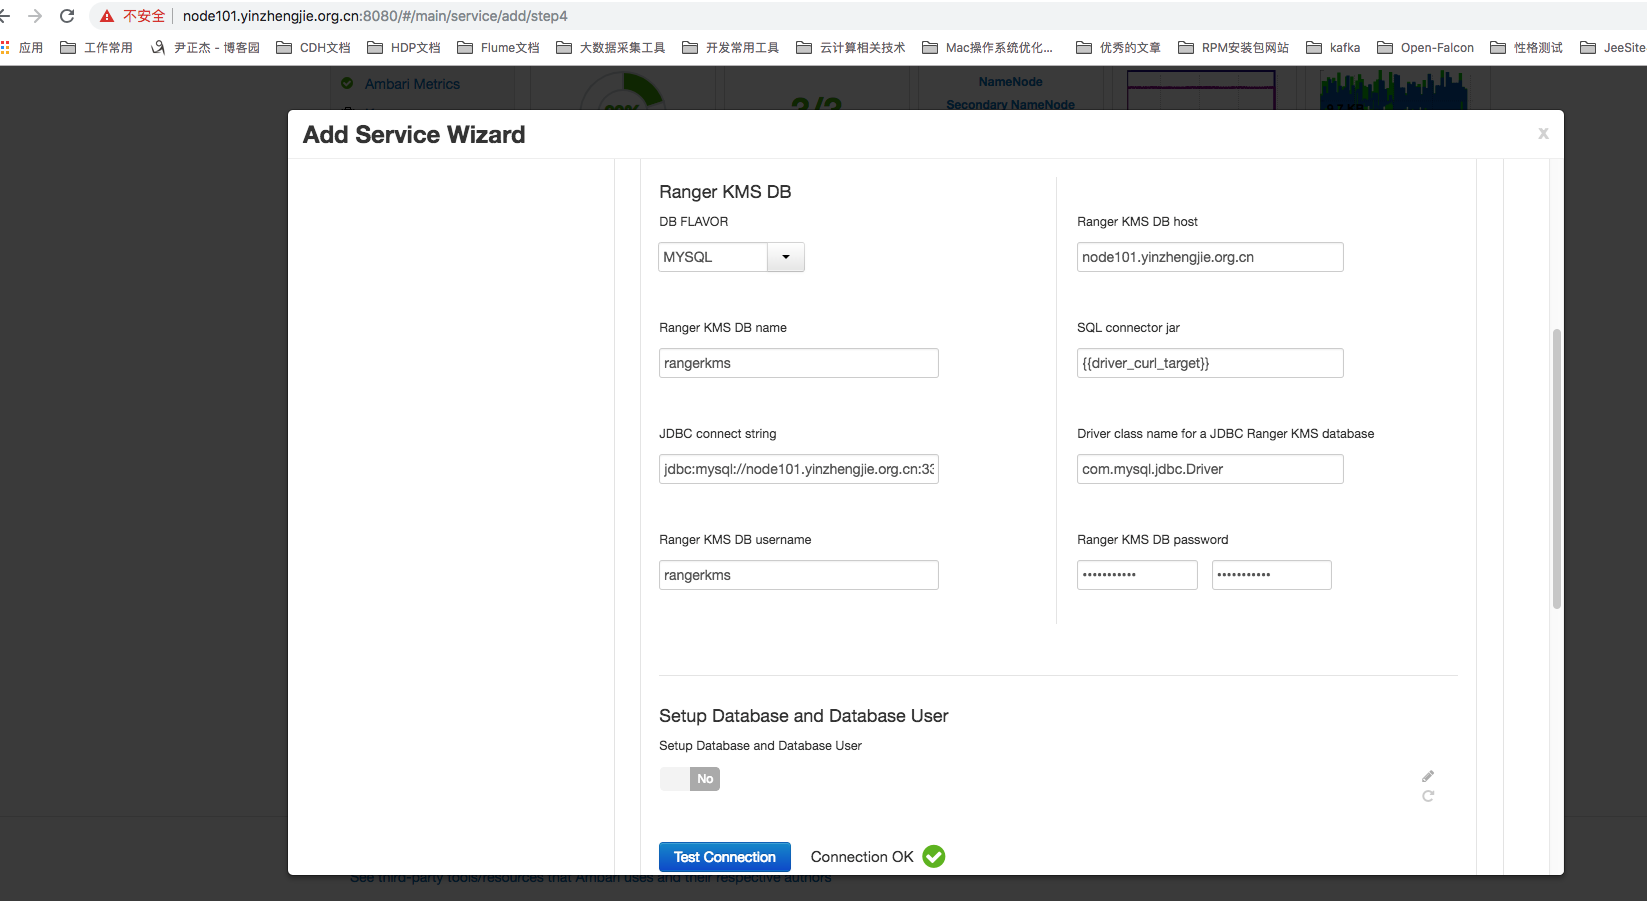
8>. Configure RangerKMS
[root@node101 ~]# mysql -uroot -pyinzhengjie
Warning: Using a password on the command line interface can be insecure.
Welcome to the MySQL monitor.  Commands end with ; or \g.
Your MySQL connection id is 84
Server version: 5.6.42 MySQL Community Server (GPL)

Copyright (c) 2000, 2018, Oracle and/or its affiliates. All rights reserved.

Oracle is a registered trademark of Oracle Corporation and/or its
affiliates. Other names may be trademarks of their respective
owners.

Type 'help;' or '\h' for help. Type '\c' to clear the current input statement.

mysql> CREATE DATABASE  rangerkms;
Query OK, 1 row affected (0.00 sec)

mysql> GRANT ALL PRIVILEGES ON rangerkms.* TO 'rangerkms'@'node101.yinzhengjie.org.cn' IDENTIFIED BY 'yinzhengjie' WITH GRANT OPTION;
Query OK, 0 rows affected (0.01 sec)

mysql> FLUSH PRIVILEGES;
Query OK, 0 rows affected (0.01 sec)

mysql> select Host,User,Password from mysql.user where user='rangerkms';
+----------------------------+-----------+-------------------------------------------+
| Host                       | User      | Password                                  |
+----------------------------+-----------+-------------------------------------------+
| node101.yinzhengjie.org.cn | rangerkms | *BD0B1F48FDC55BD27555FC2F22FF29A68A25A1D7 |
+----------------------------+-----------+-------------------------------------------+
1 row in set (0.00 sec)

mysql> quit
Bye
[root@node101 ~]#
[root@node101 ~]# mysql -h node101.yinzhengjie.org.cn -urangerkms -pyinzhengjie
Warning: Using a password on the command line interface can be insecure.
Welcome to the MySQL monitor.  Commands end with ; or \g.
Your MySQL connection id is 85
Server version: 5.6.42 MySQL Community Server (GPL)

Copyright (c) 2000, 2018, Oracle and/or its affiliates. All rights reserved.

Oracle is a registered trademark of Oracle Corporation and/or its
affiliates. Other names may be trademarks of their respective
owners.

Type 'help;' or '\h' for help. Type '\c' to clear the current input statement.

mysql> show databases;
+--------------------+
| Database           |
+--------------------+
| information_schema |
| rangerkms          |
+--------------------+
2 rows in set (0.00 sec)

mysql> quit
Bye
[root@node101 ~]#
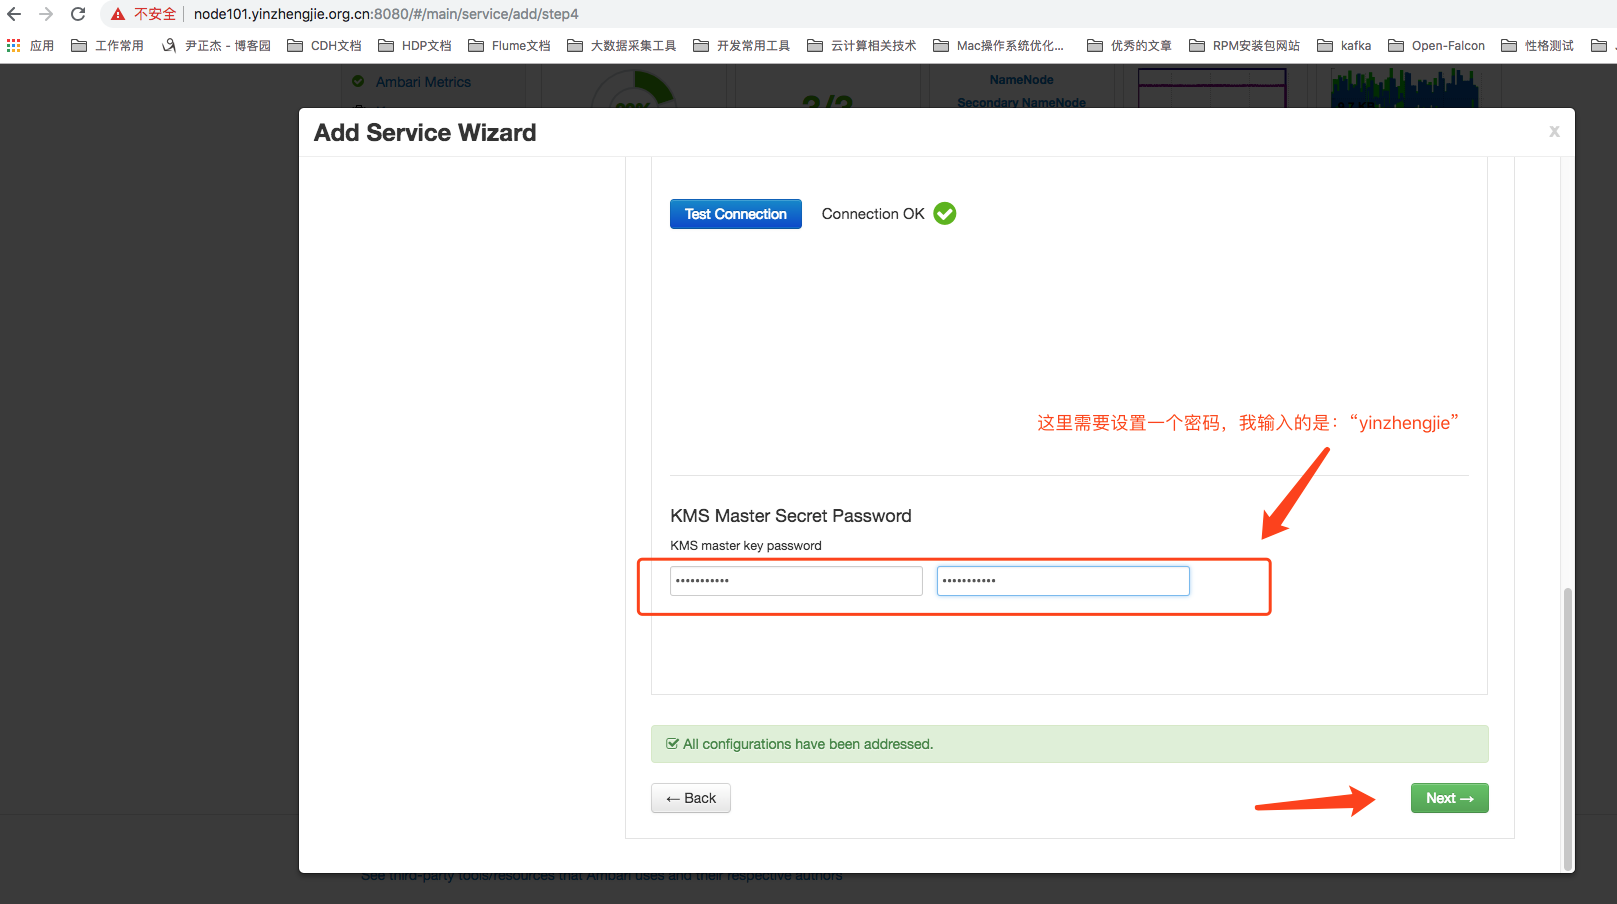
Then drop down and you need to enter a password, as shown in the image below, and click Next after entering:
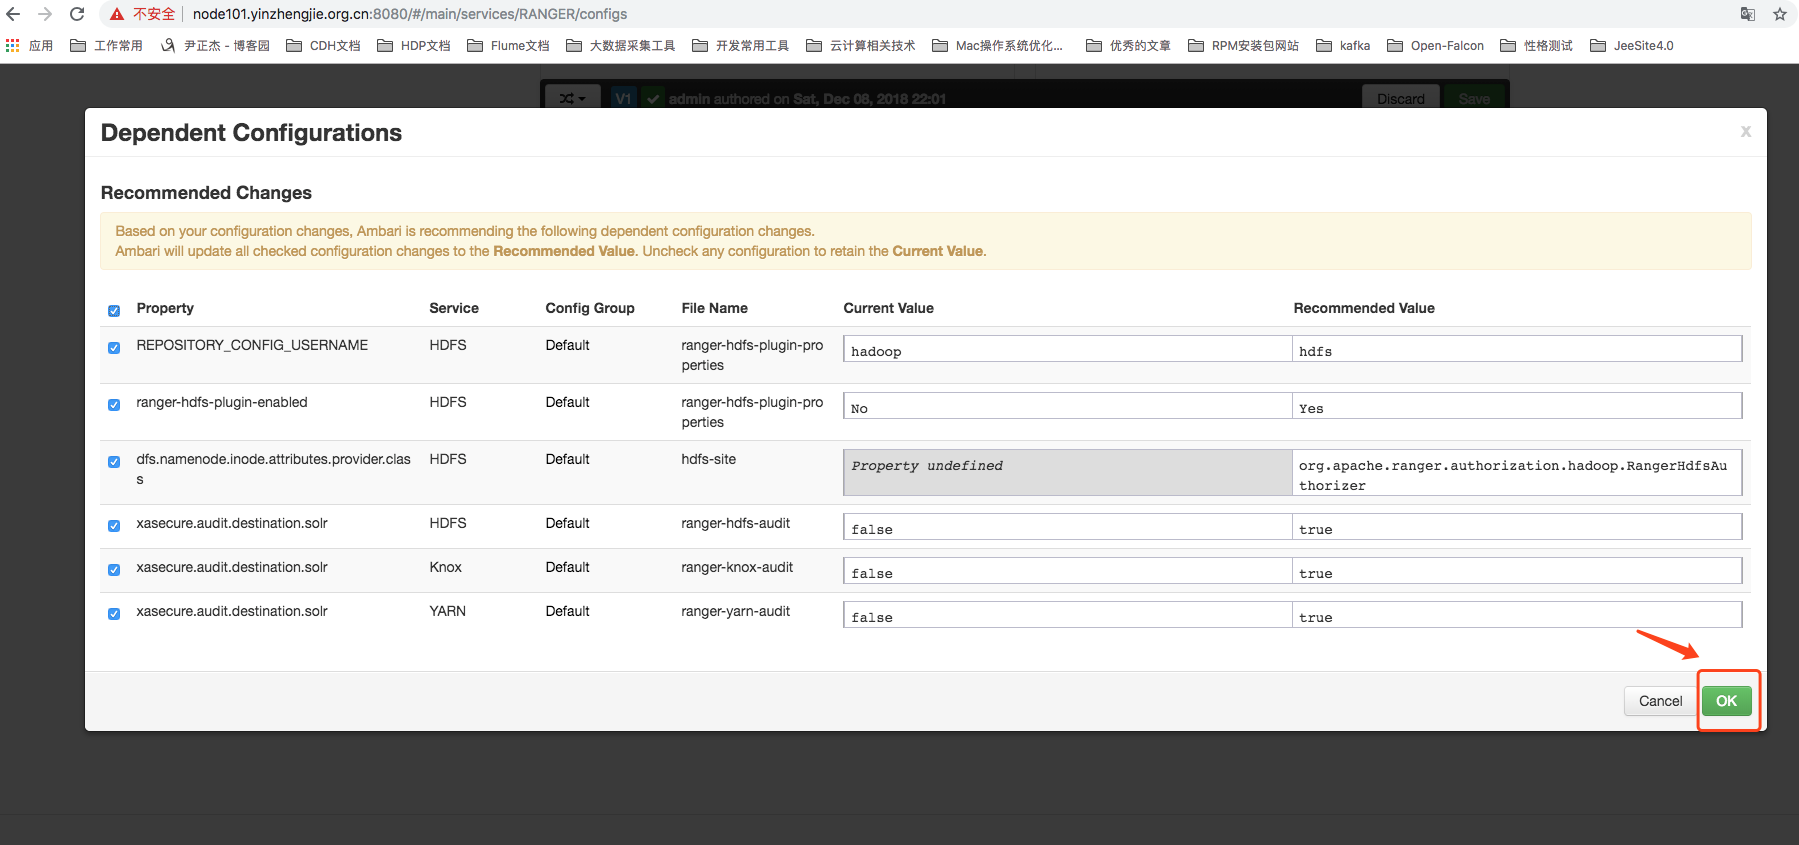
9>.Once configured, a Dependent Configurations dialog box will pop up, as shown in the following image, clicking OK will be sufficient to ~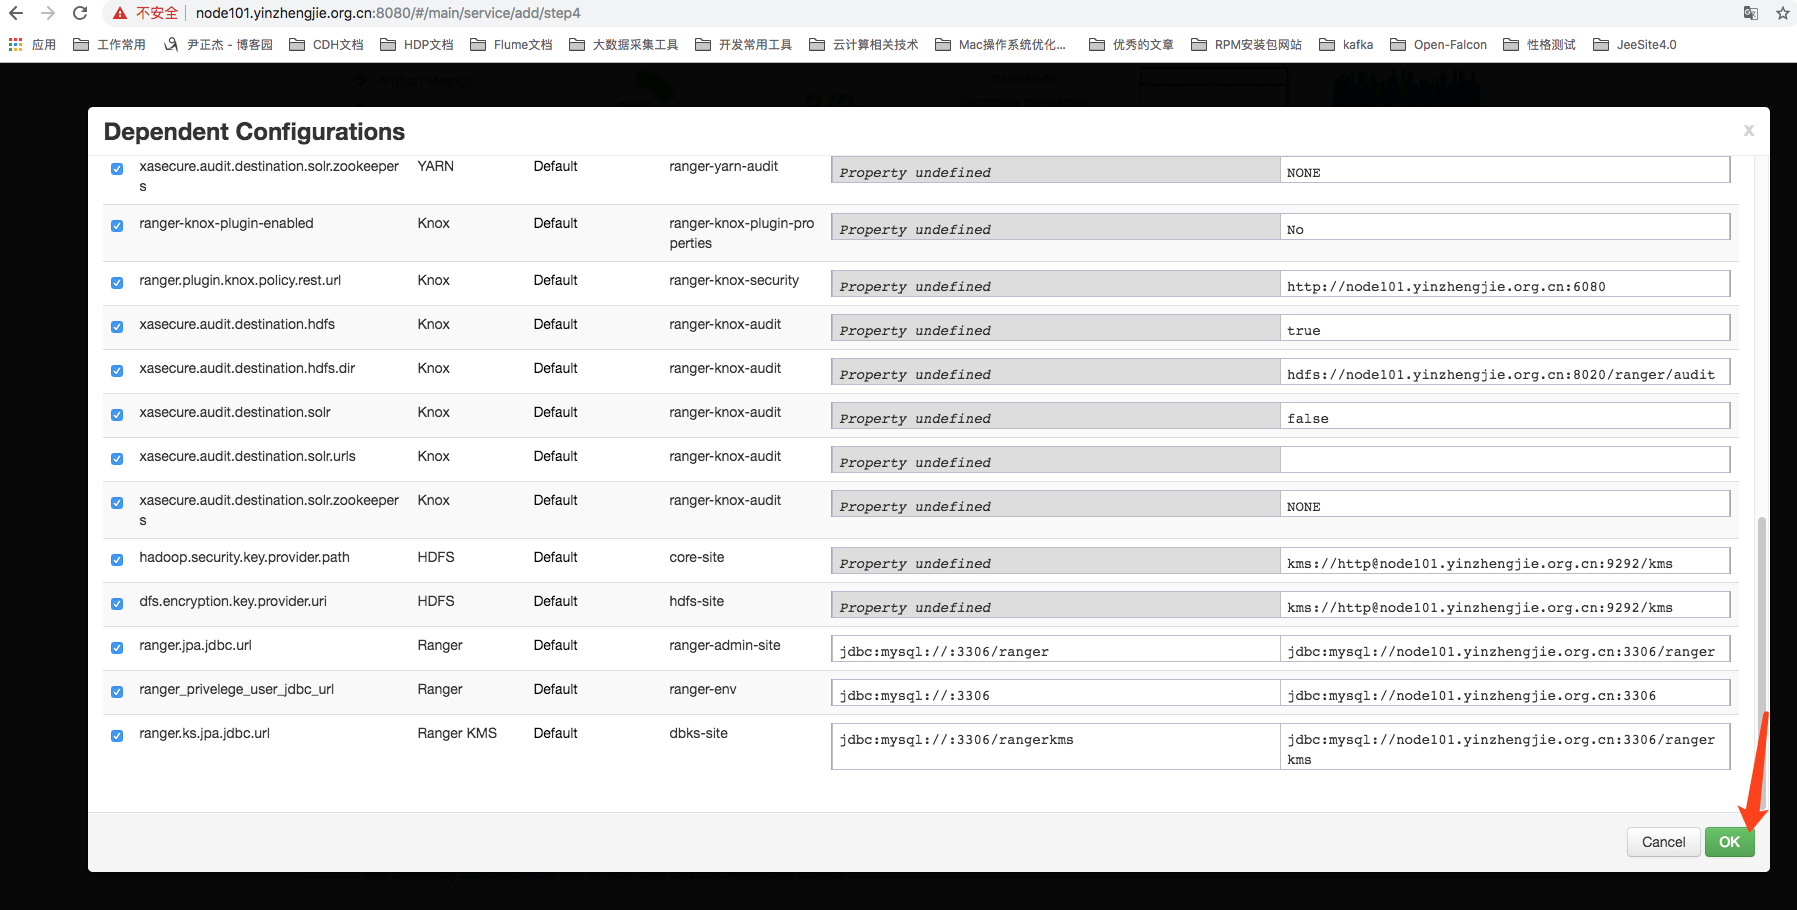
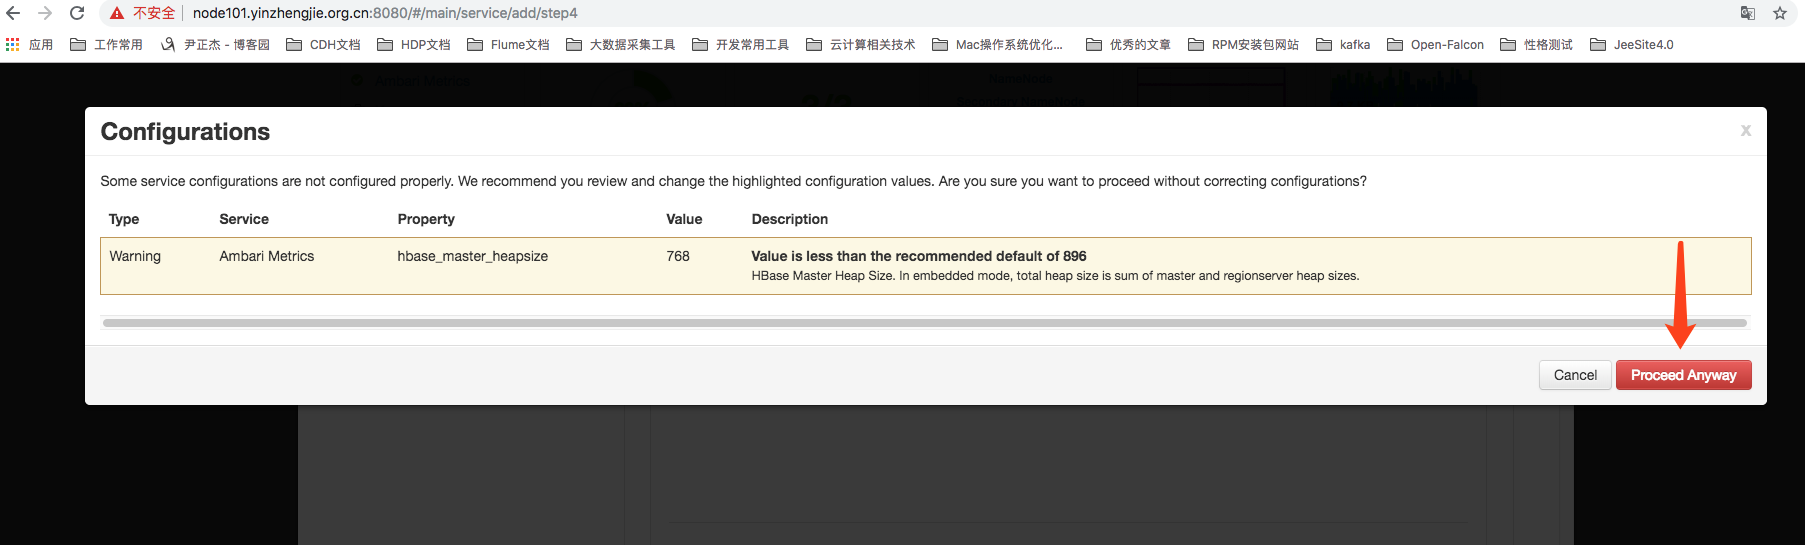
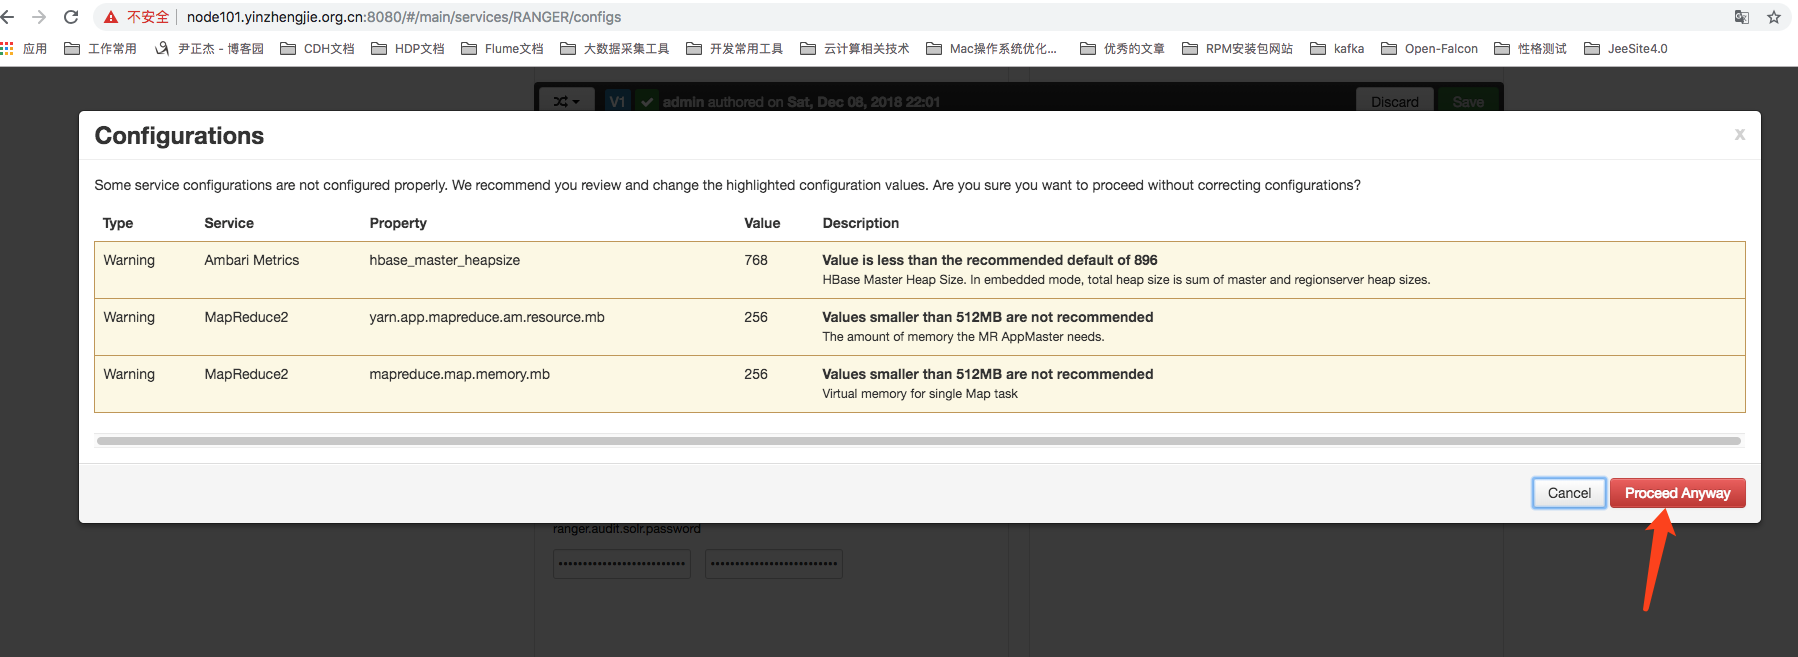
10>.Ignore warnings (my computer has limited memory and a small allocation for testing only)
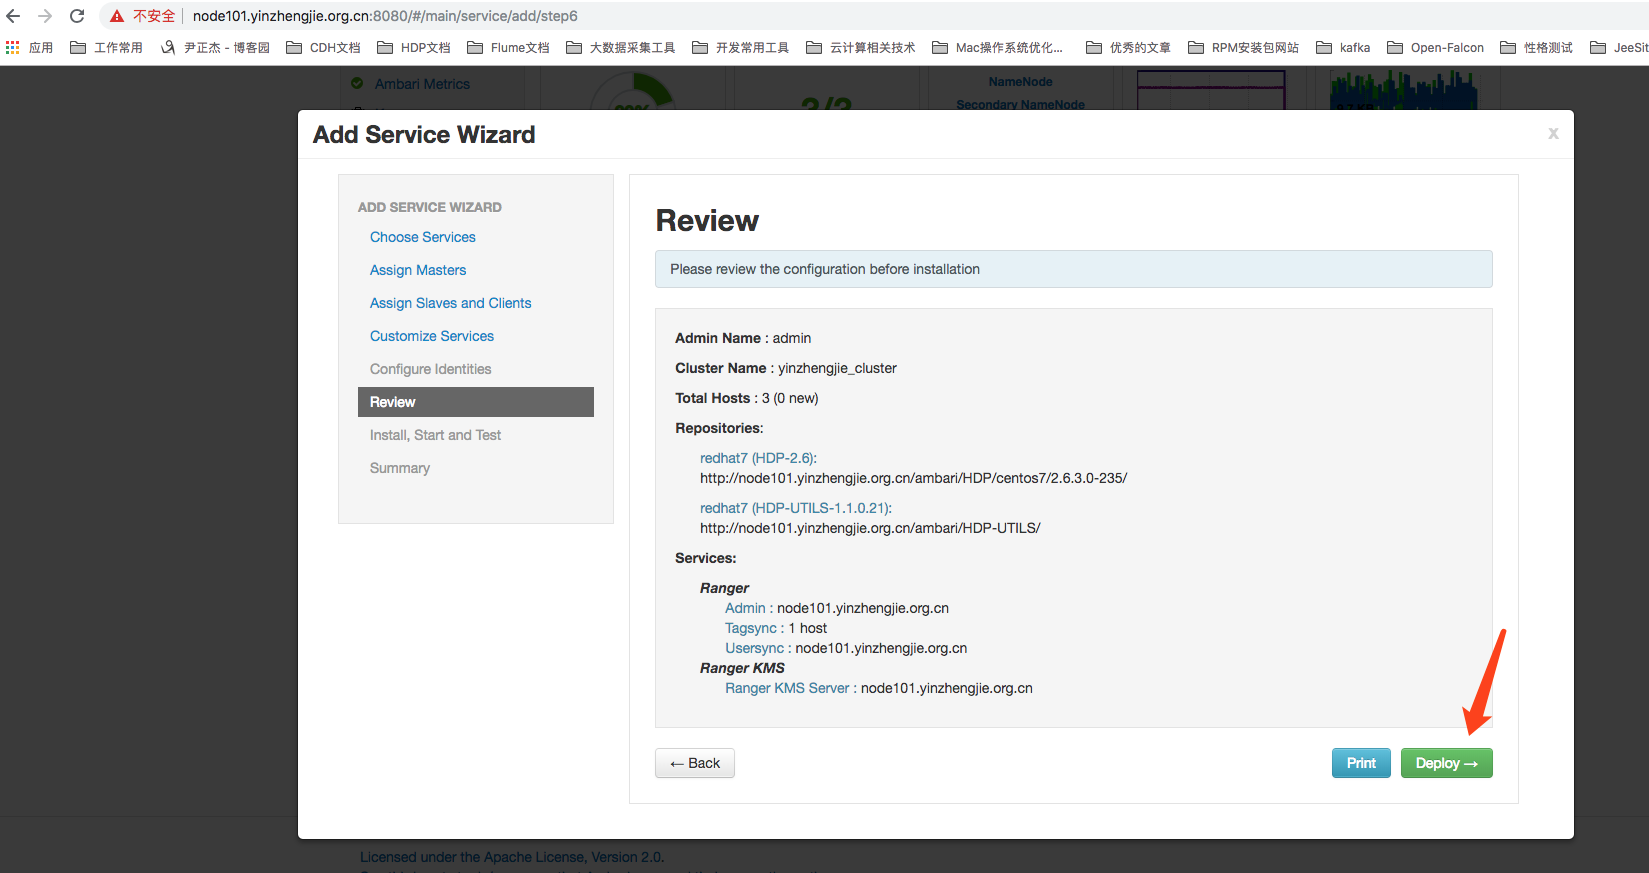
11>.After confirming that the configuration is correct, click the Depoly button
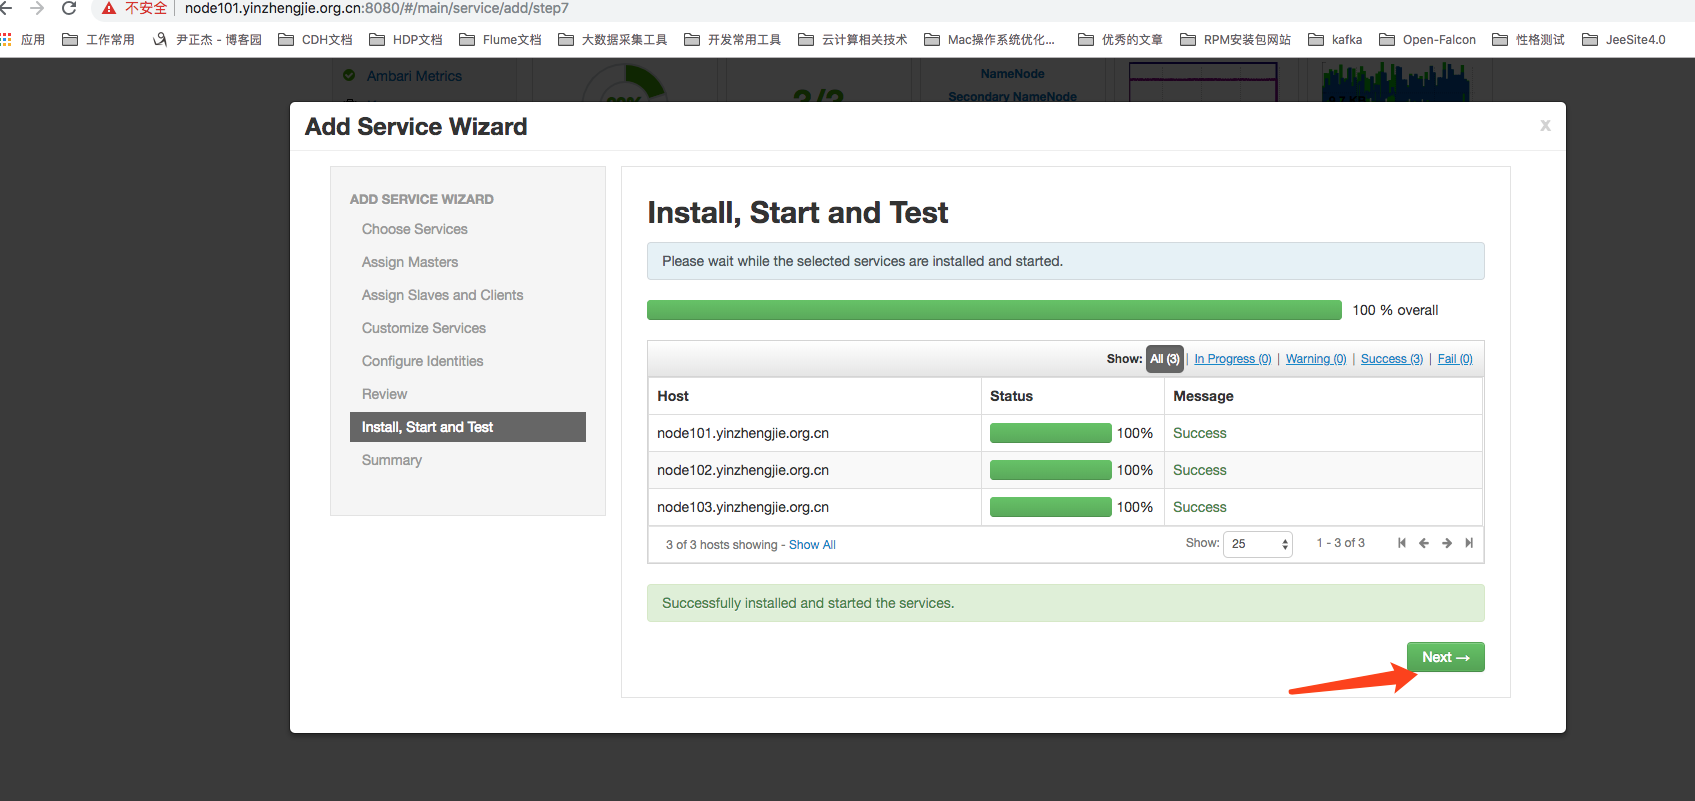
12>. Successful installation of services
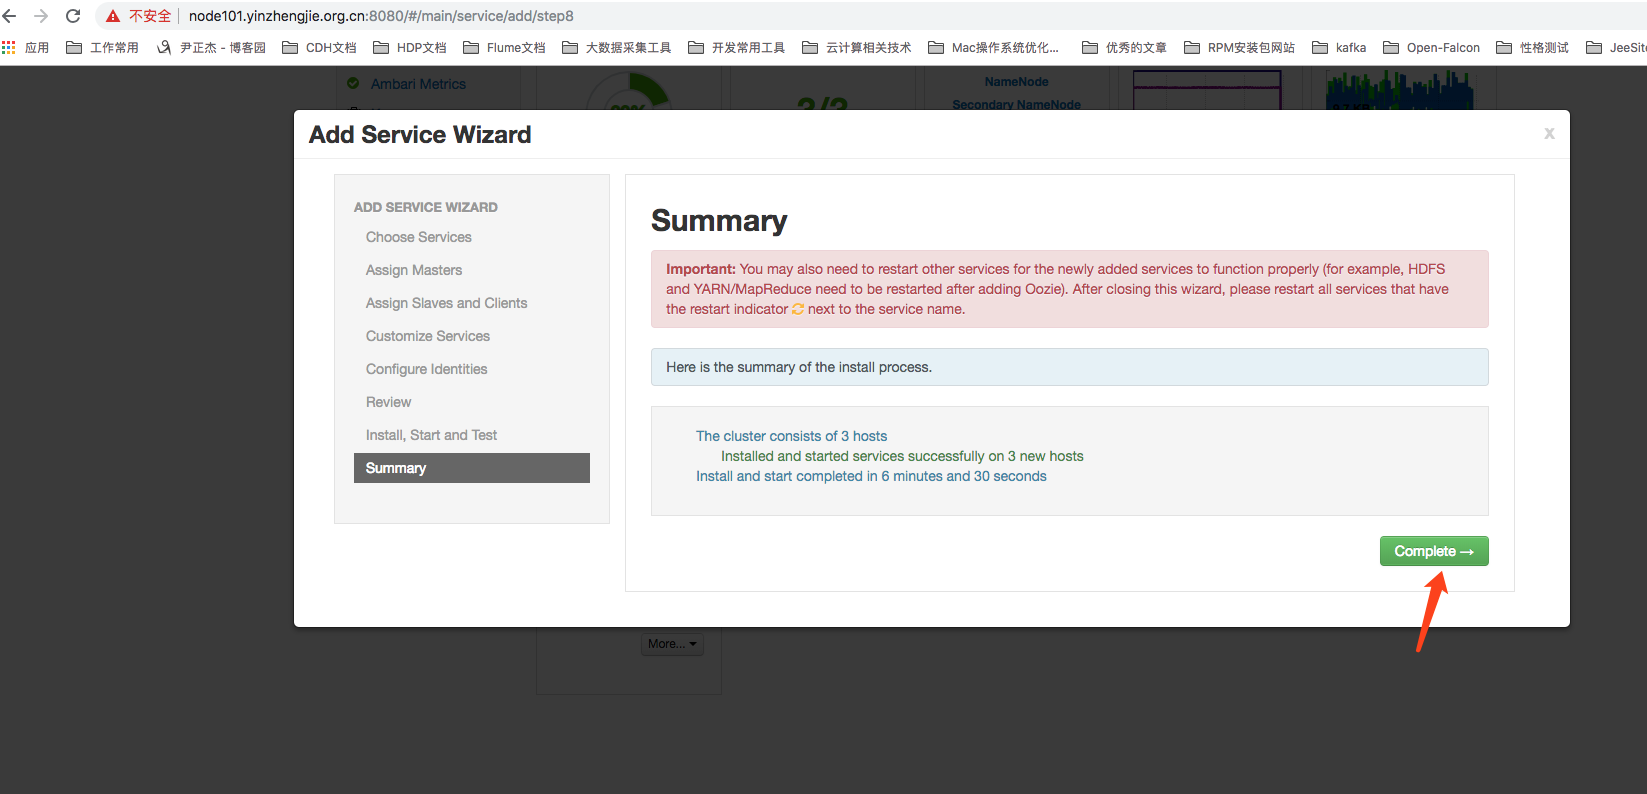
13>.Click Finish
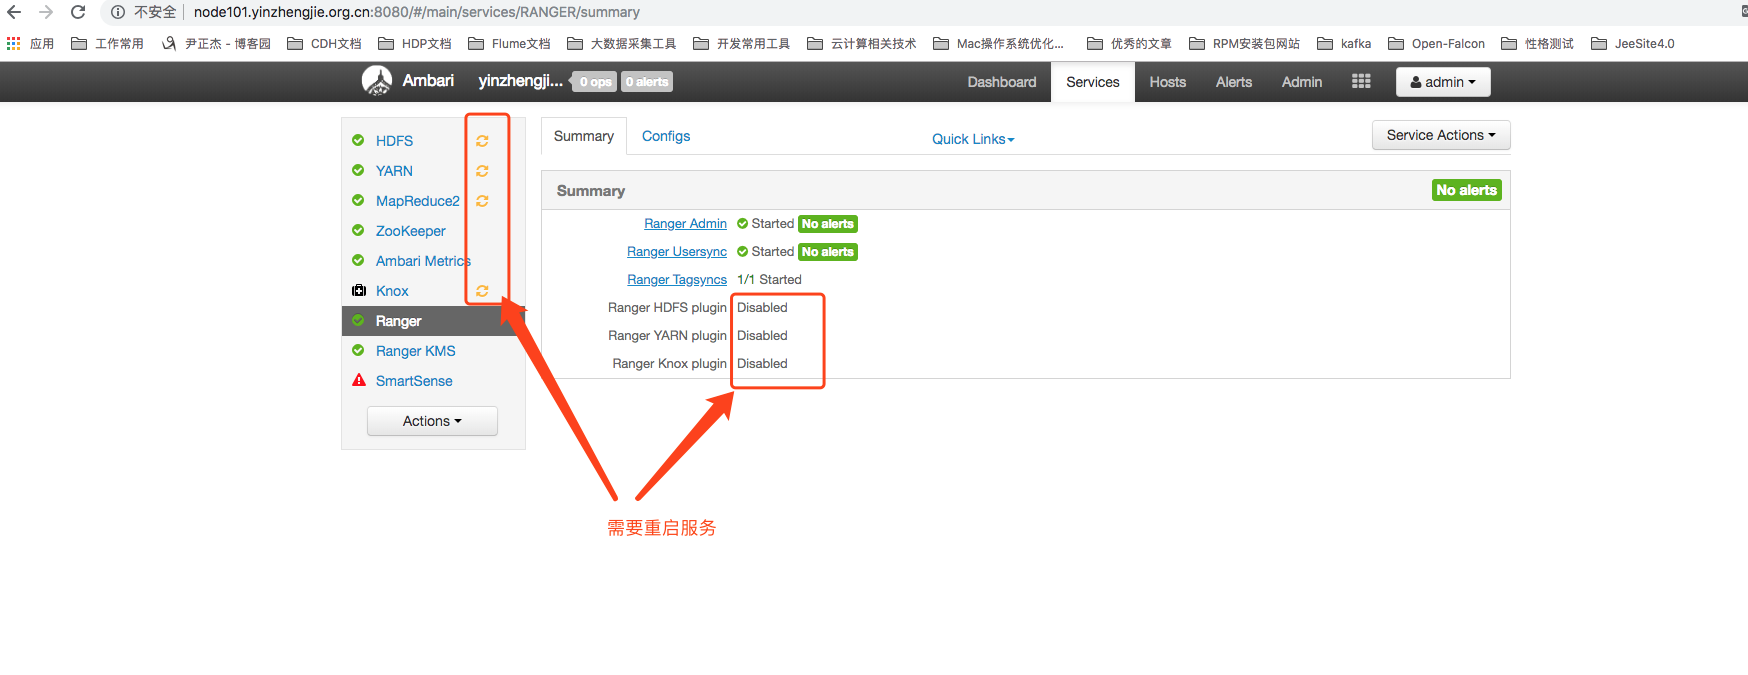
14>.Deployed services need to be restarted after installation
3. Configuring services
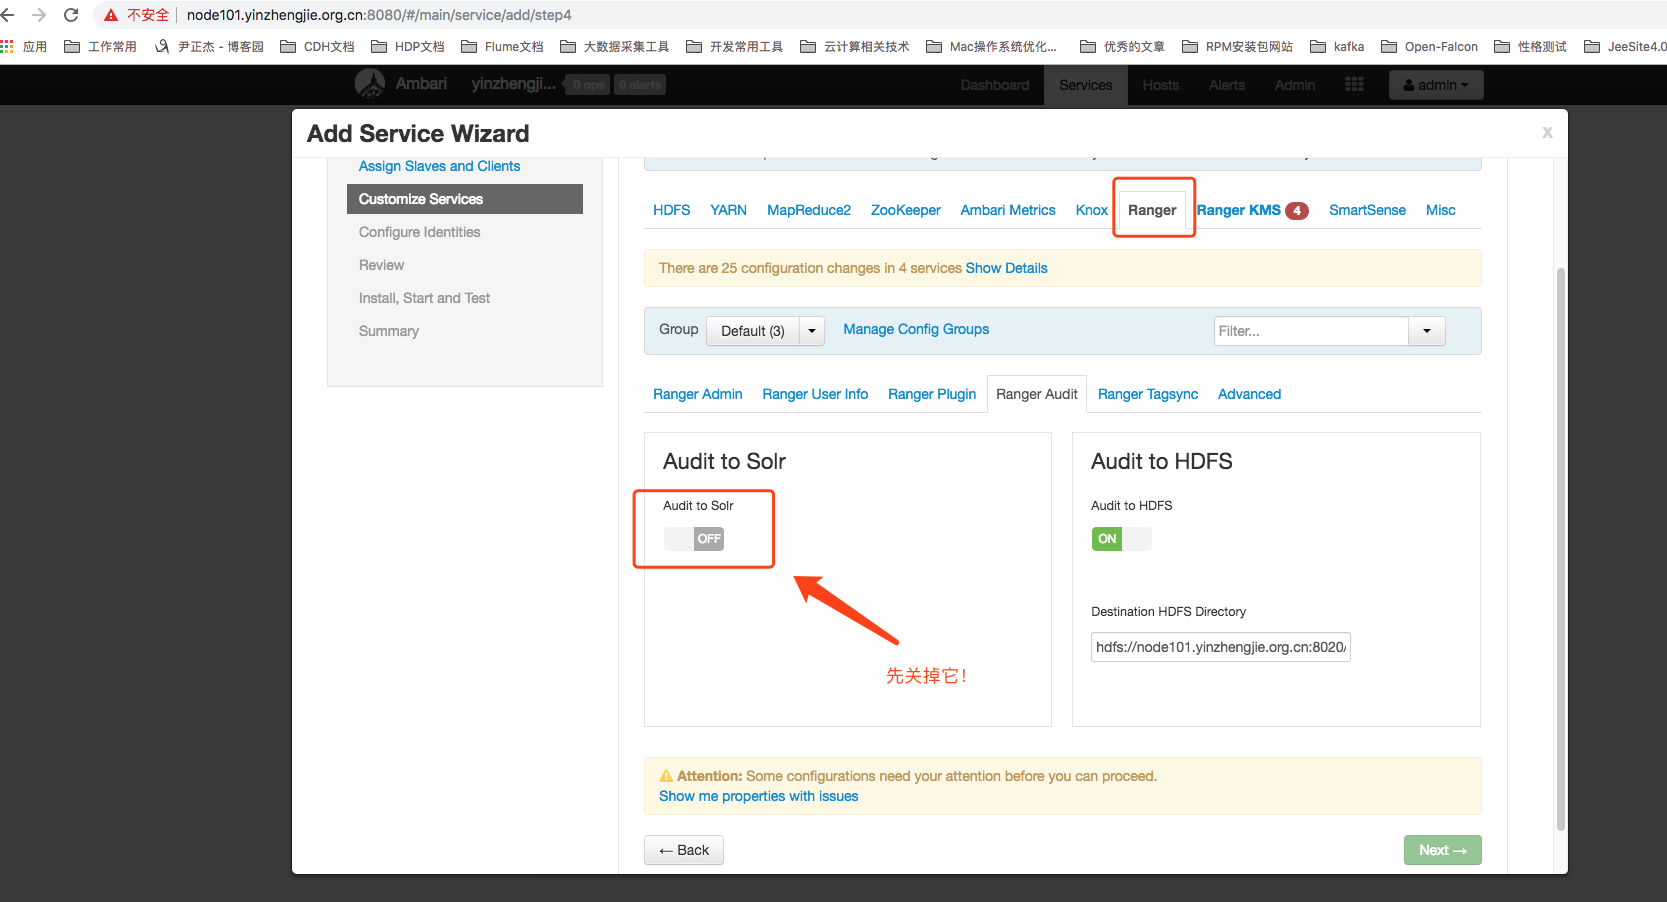
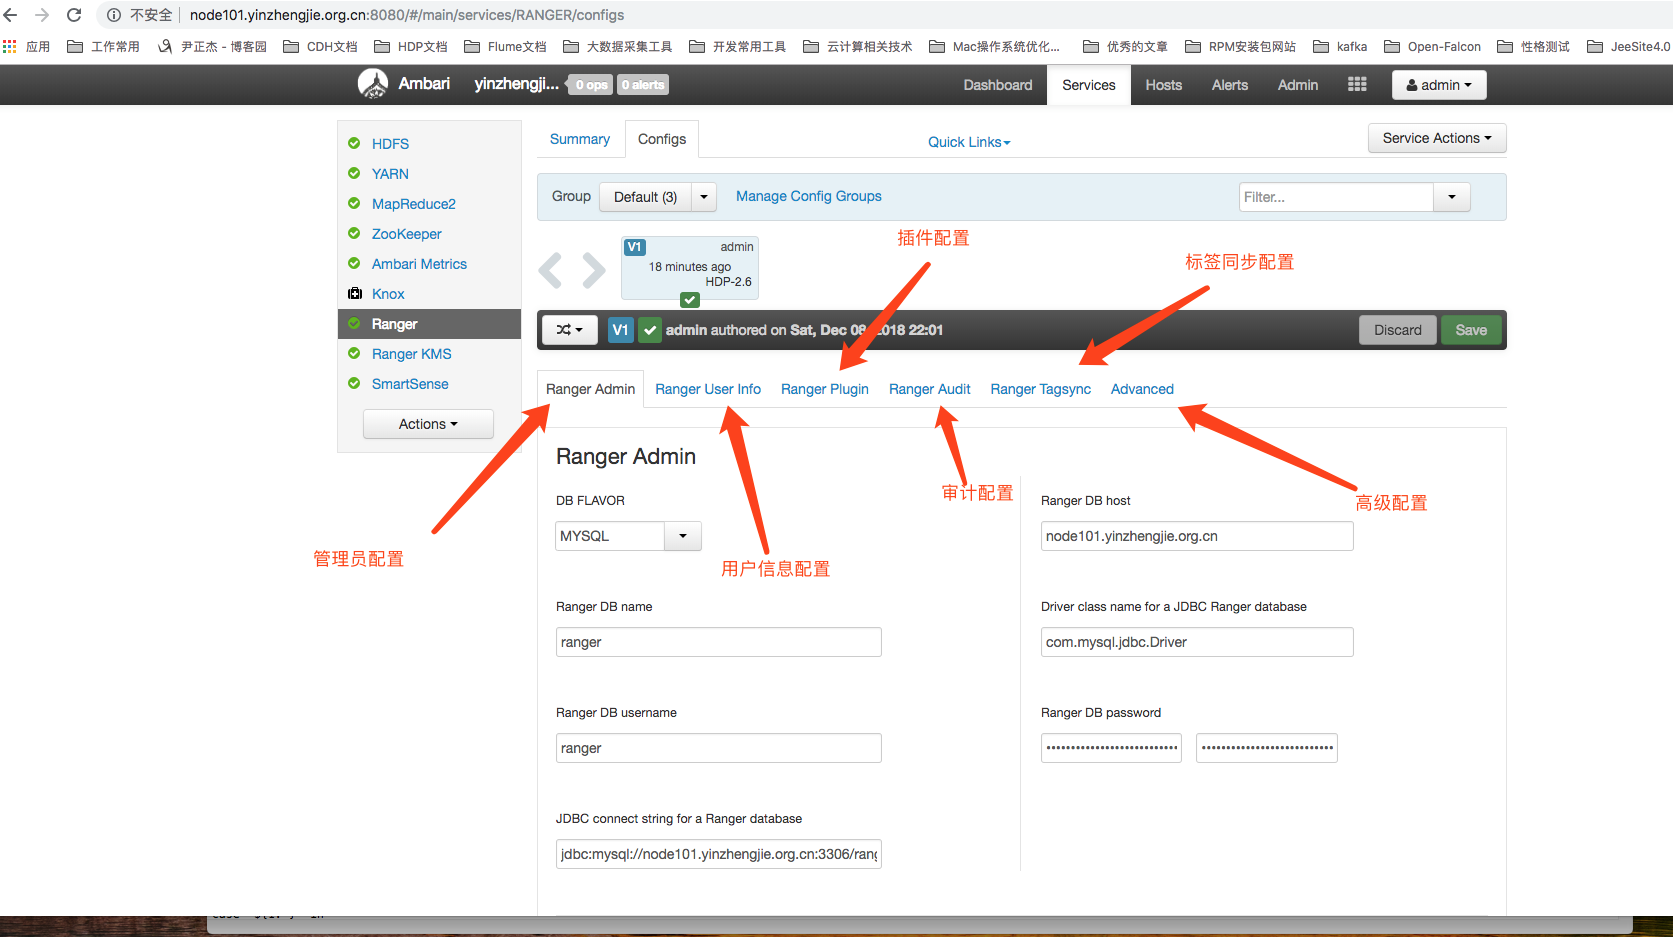
After installation, we need to configure Ranger to make it work properly by clicking the Configs button to get to the configuration interface.As shown in the figure below, Ranger to Configuration items are divided into six categories: Administrator Configuration, User Information Configuration, Plugin Configuration, Audit Configuration, Tag Synchronization Configuration, and Advanced Configuration.Here we focus on plug-in configuration and auditing configuration, other configurations can be left as default.
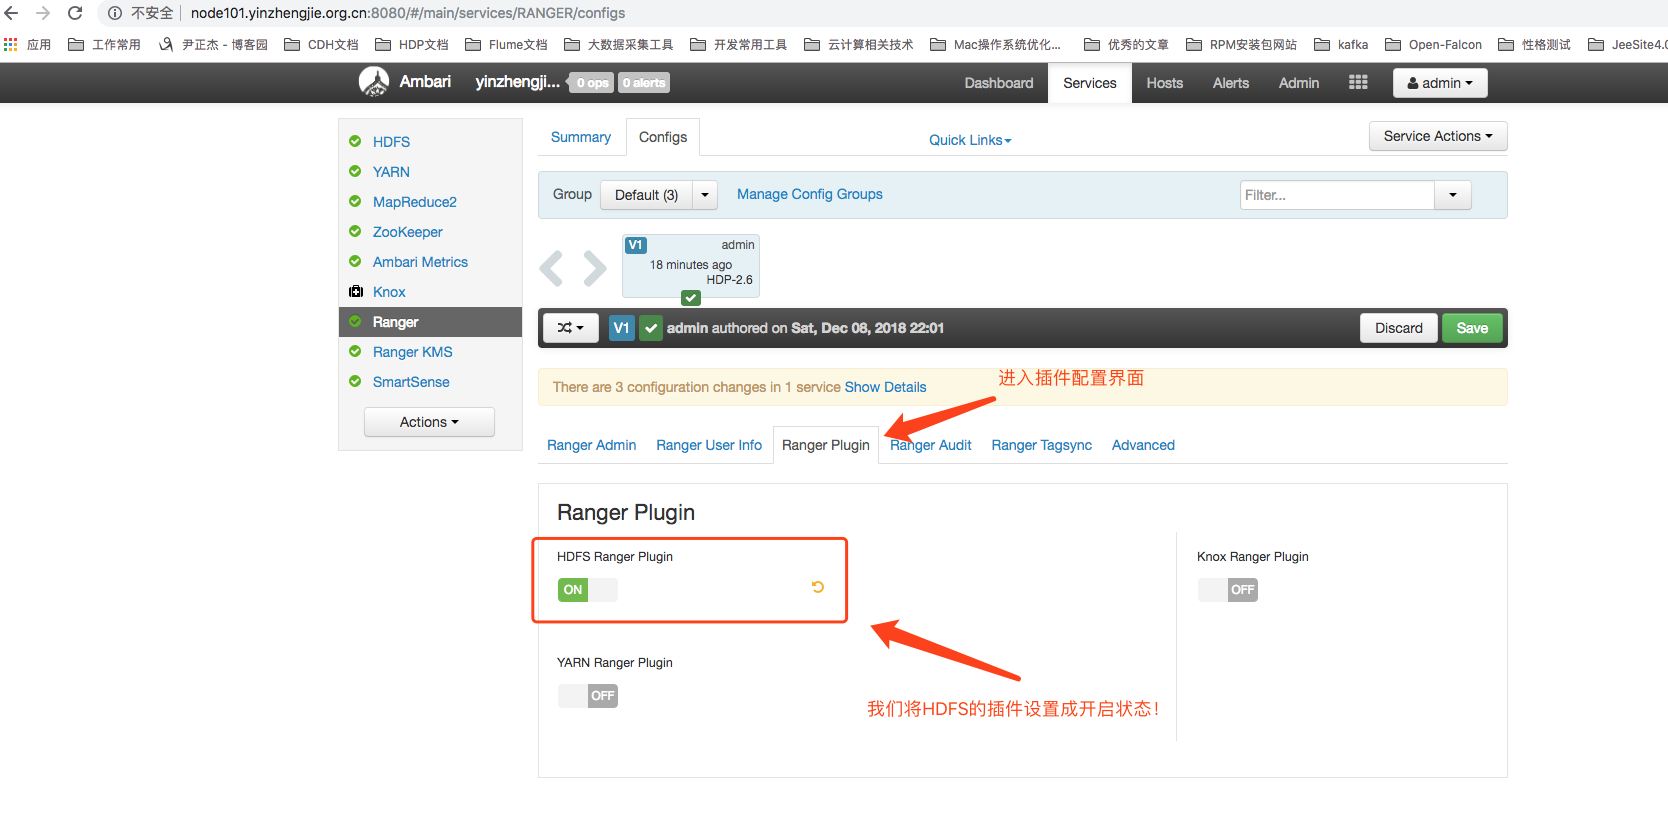
1>. Plugin Configuration for Ranger
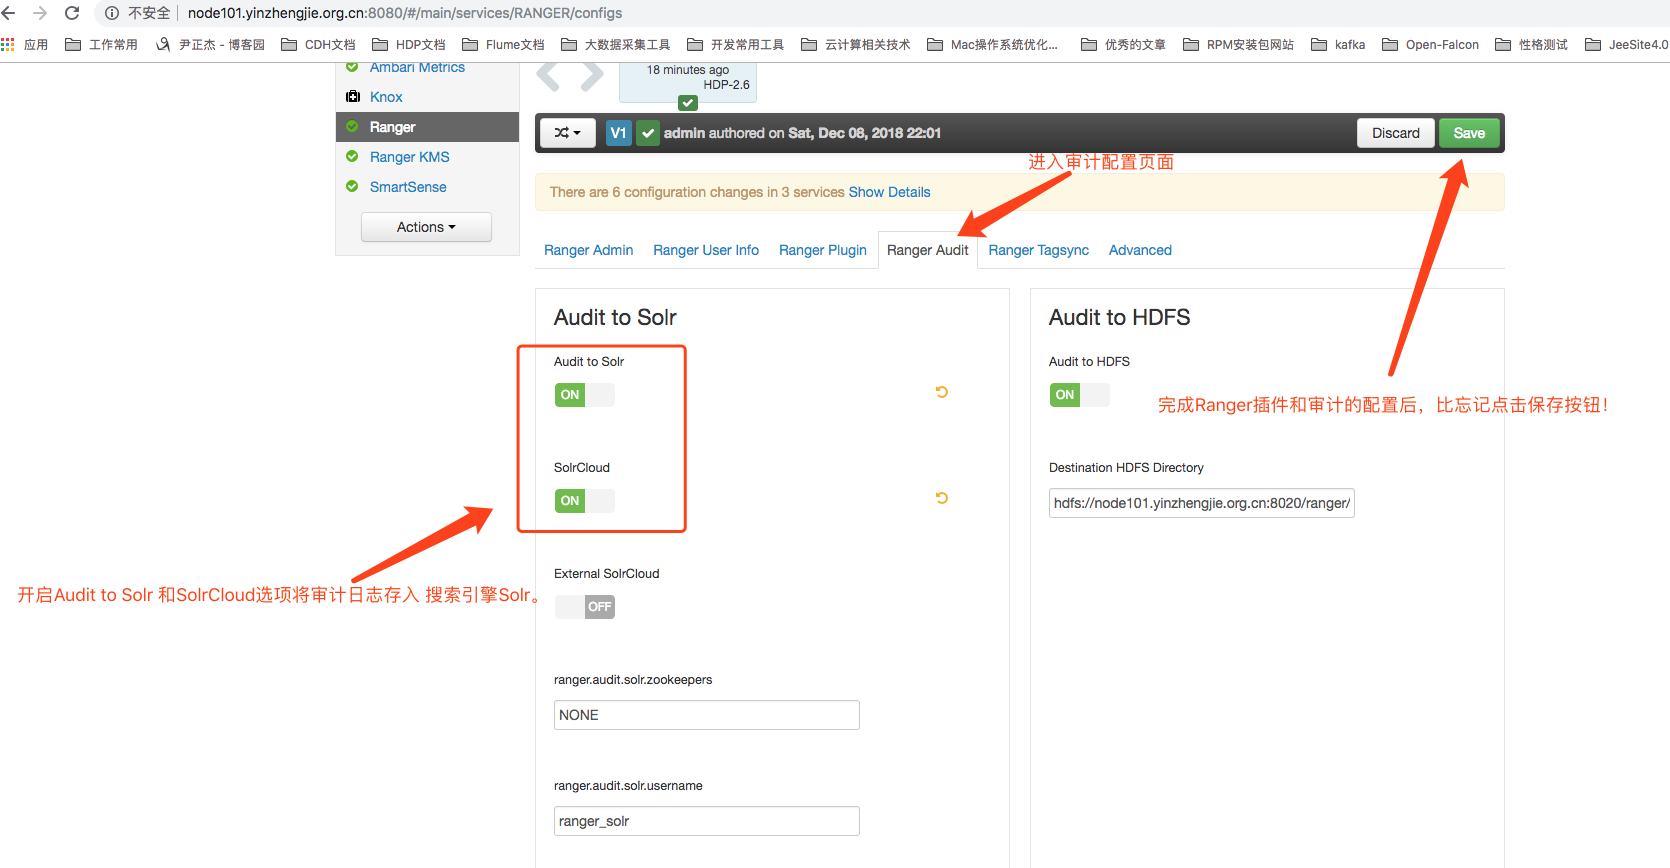
2>. Audit Configuration for Ranegr
3>. Save configuration information
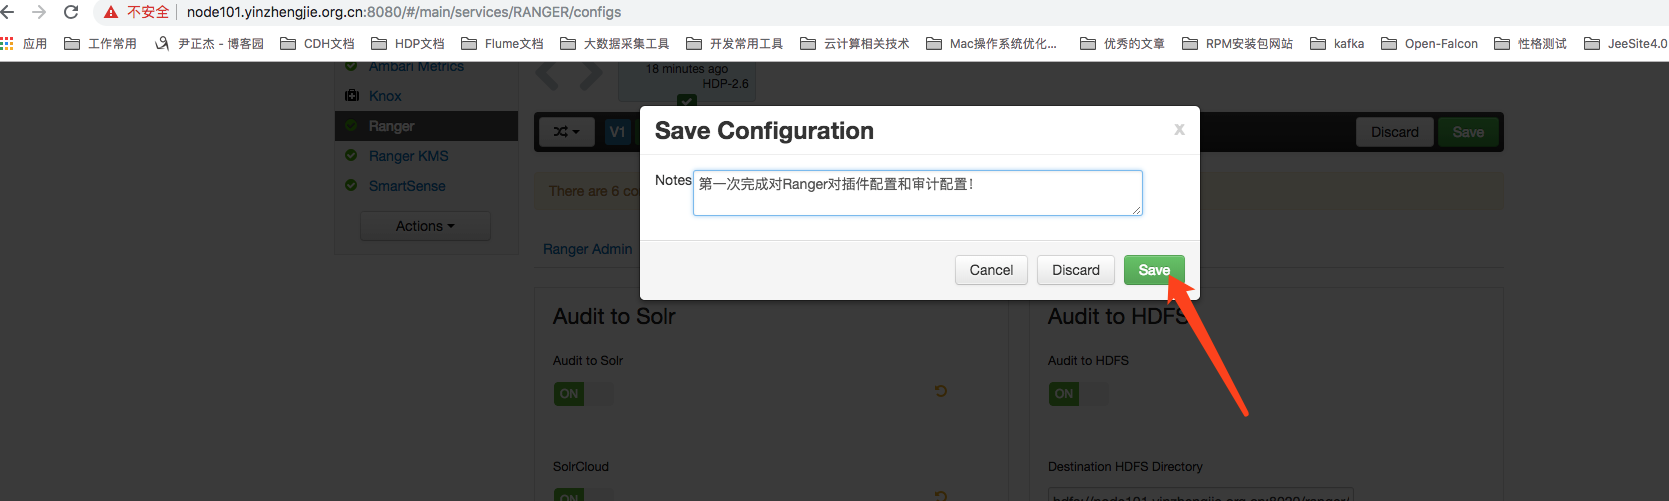
4>. Click Save
5>.Click Proceed Anyway
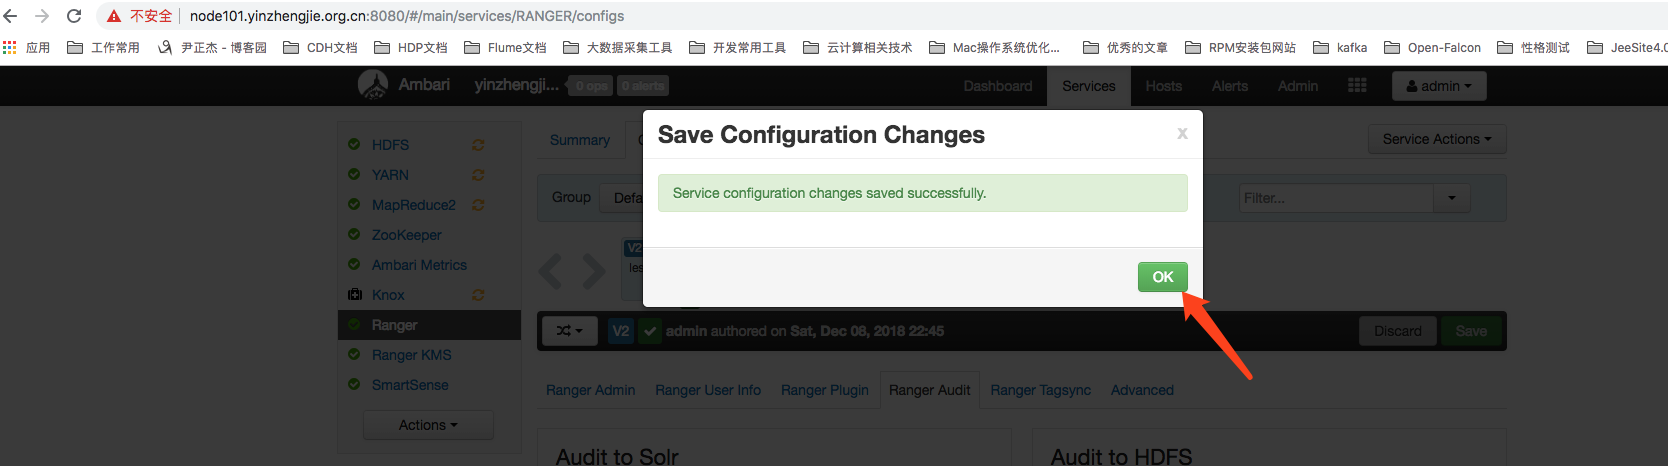
6>.Click ok
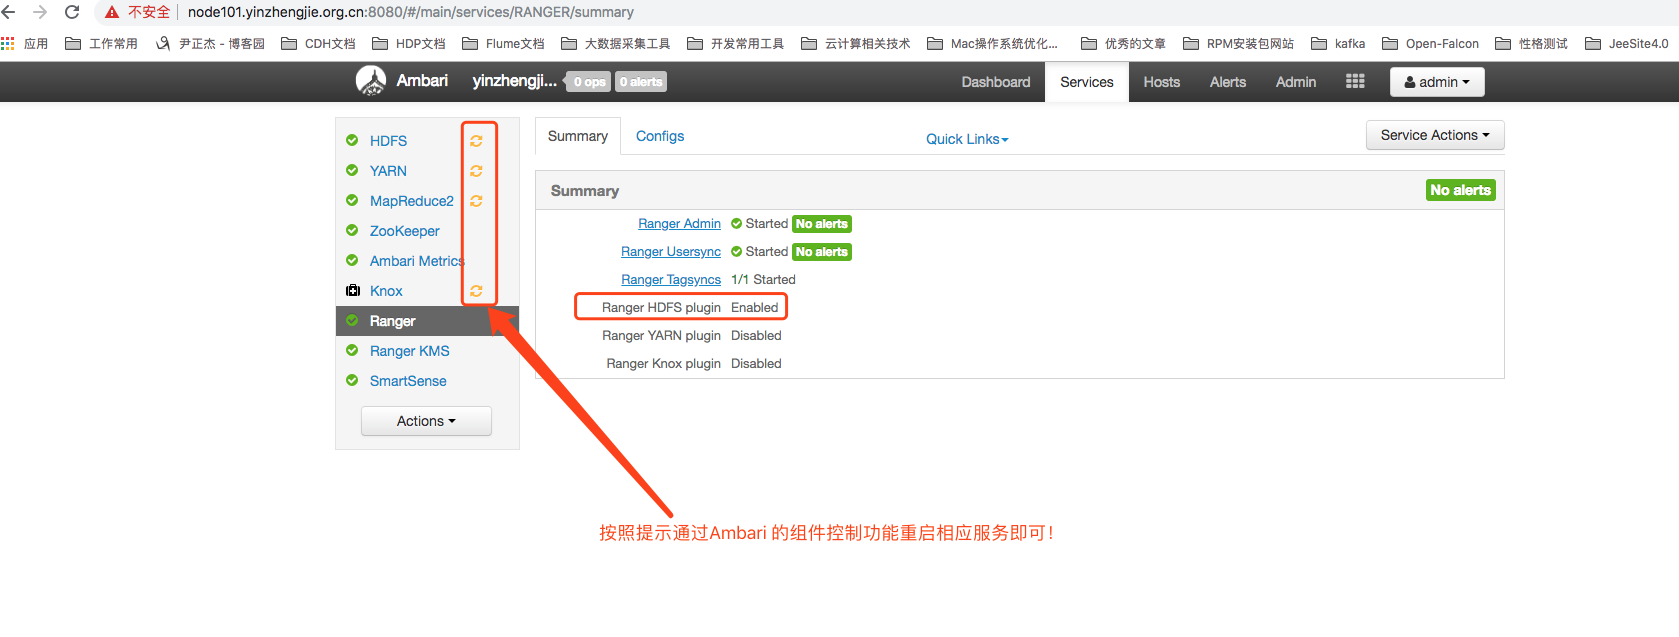
7>. As shown in the following figure, restart the corresponding service as prompted
8>.After restarting the appropriate service, we can go to Ranger's Web UI Management Console
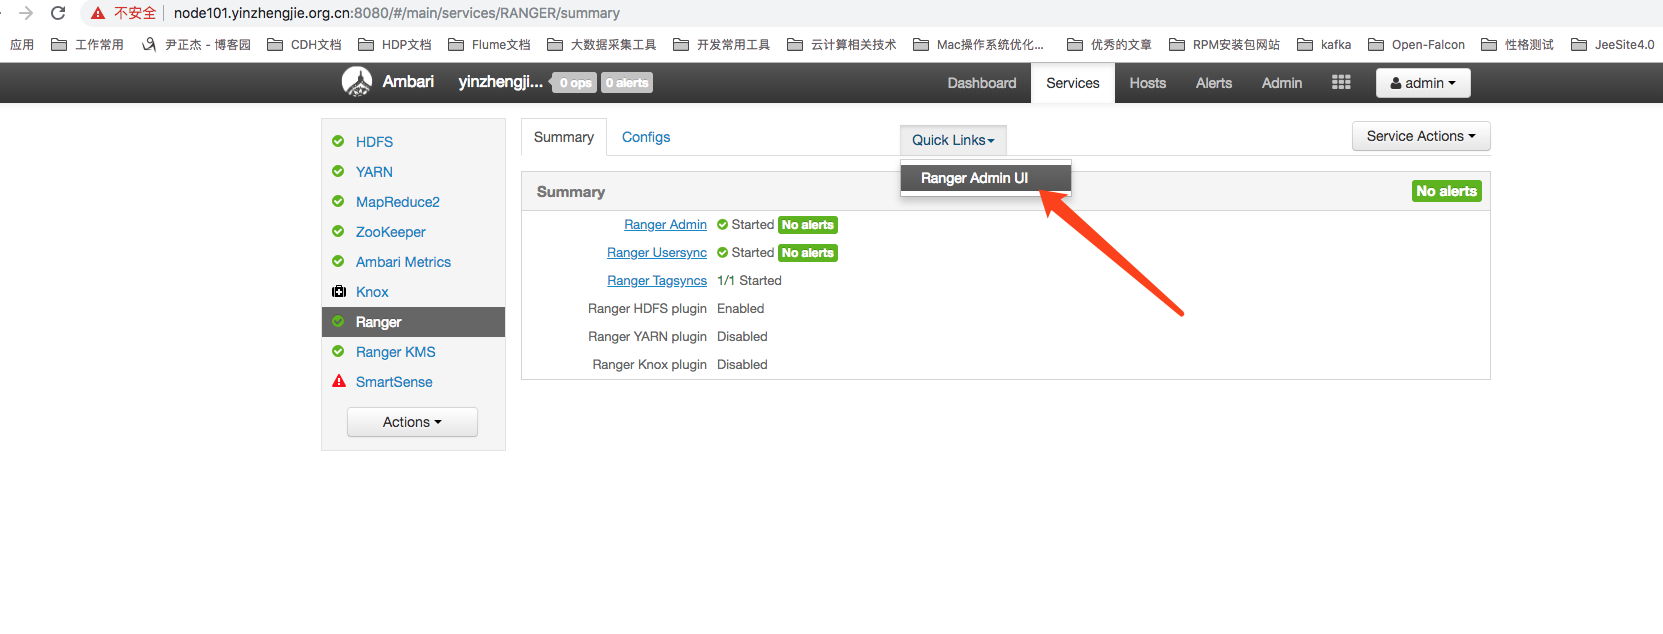
4. Introduction to Ranger Functions - View Ranger Users
1>.As shown in the image below, access Ranger's Management Console through Ambari's Quick Links feature and enter the default username and password for login (both the default username and password are "admin").(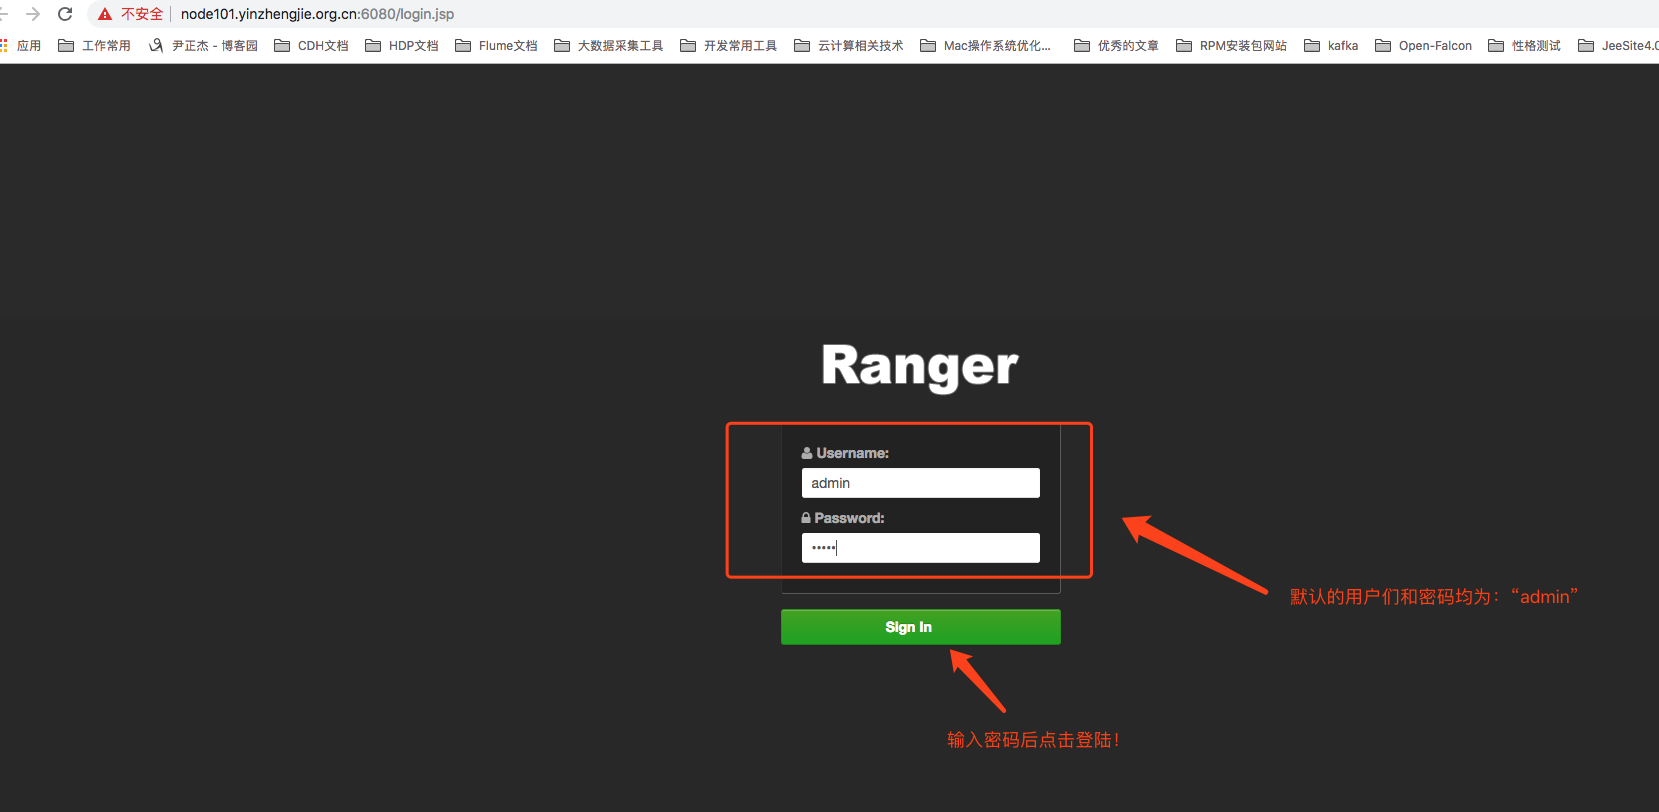
2>.Click the Settings Settings button to enter the Ranger user management interface
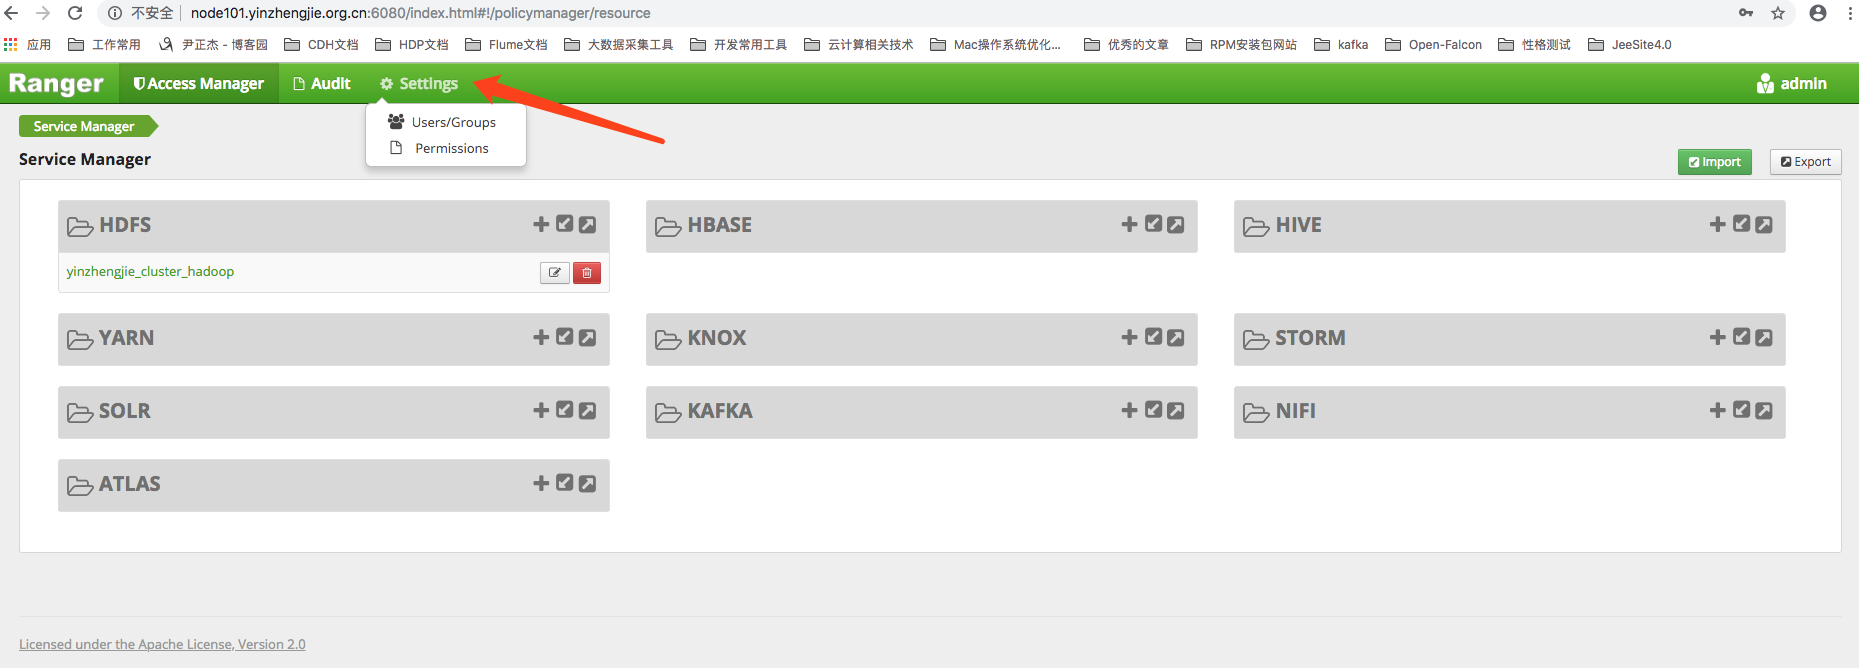
3>.As shown in the image below, you can see all Ranger users here after you click Setting.We found Ranger already has a pre-built set of users. Are they familiar?They are the same cluster component users within Ambari user management.Yes, these users are synchronized from Linux users in the Hadoop cluster.
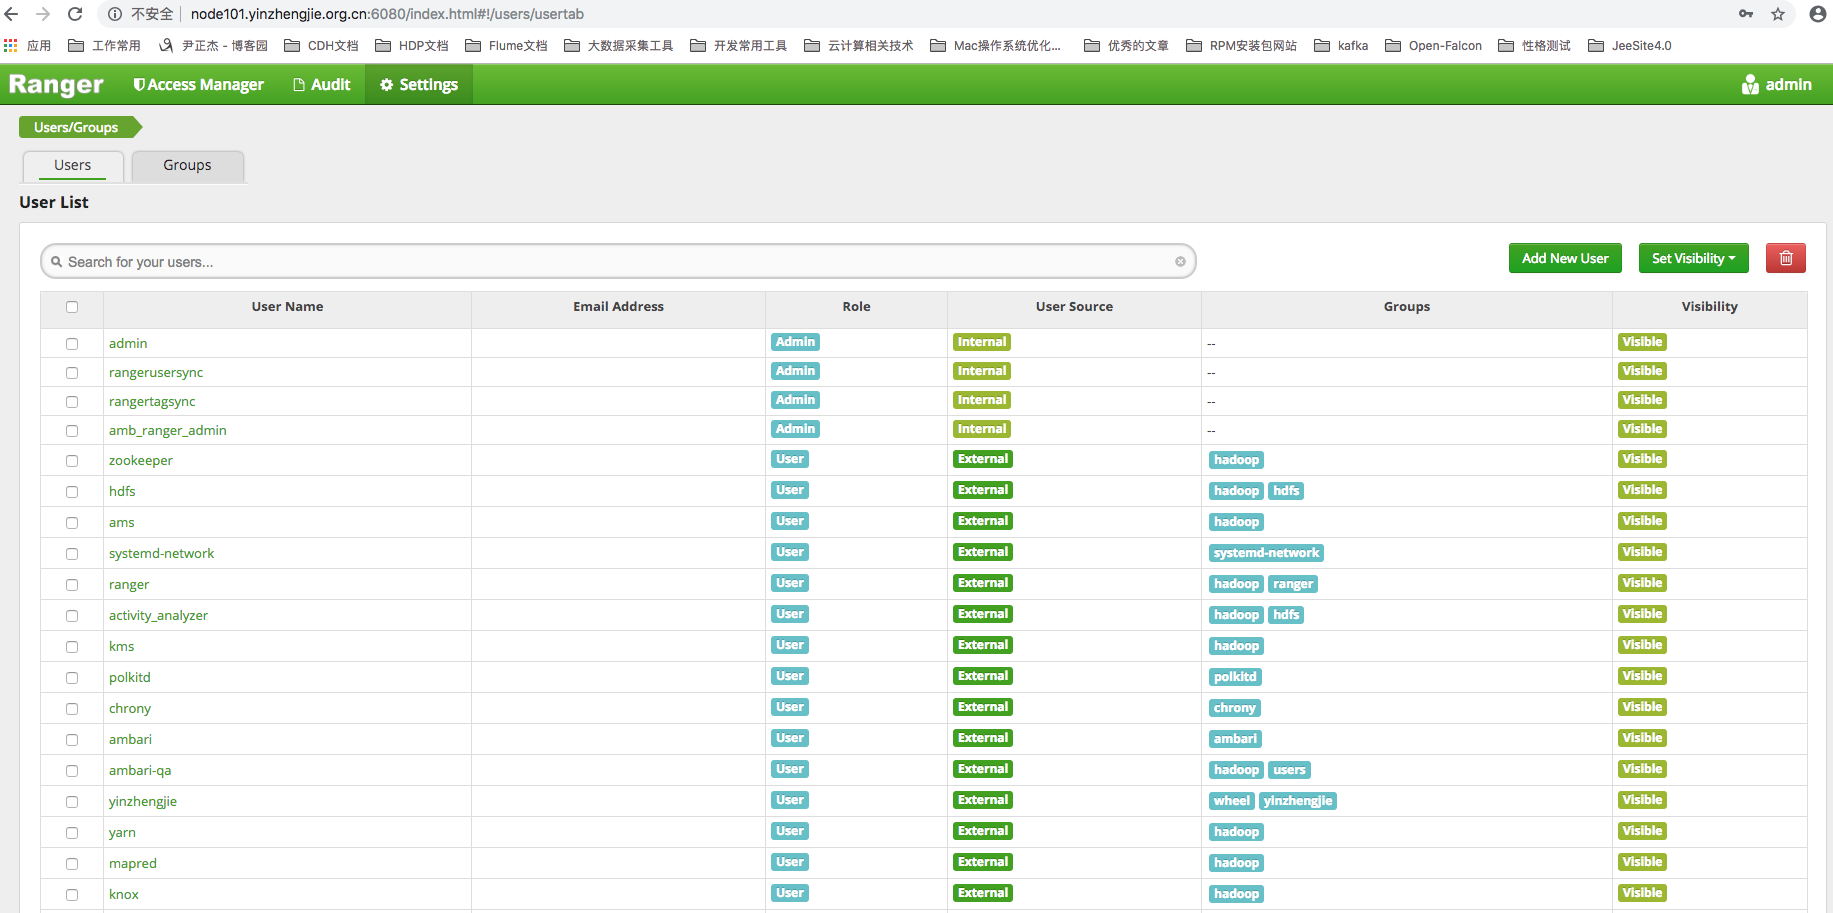
Ranger categorizes users into two sources, internal users and external extended users.

Internal users:
    Ranger's own unilaterally created user, mainly for internal system management related work, is not associated with external users.

External users:
    Users synchronized from cluster services through a synchronizer are a layer mapping of Ranger users and cluster service users, mainly for the allocation of rights policies.As shown in the figure above, admin users belong to internal users and all synchronized cluster service users belong to external extended users.
5. Introduction to Ranger Functions - Permission Policy
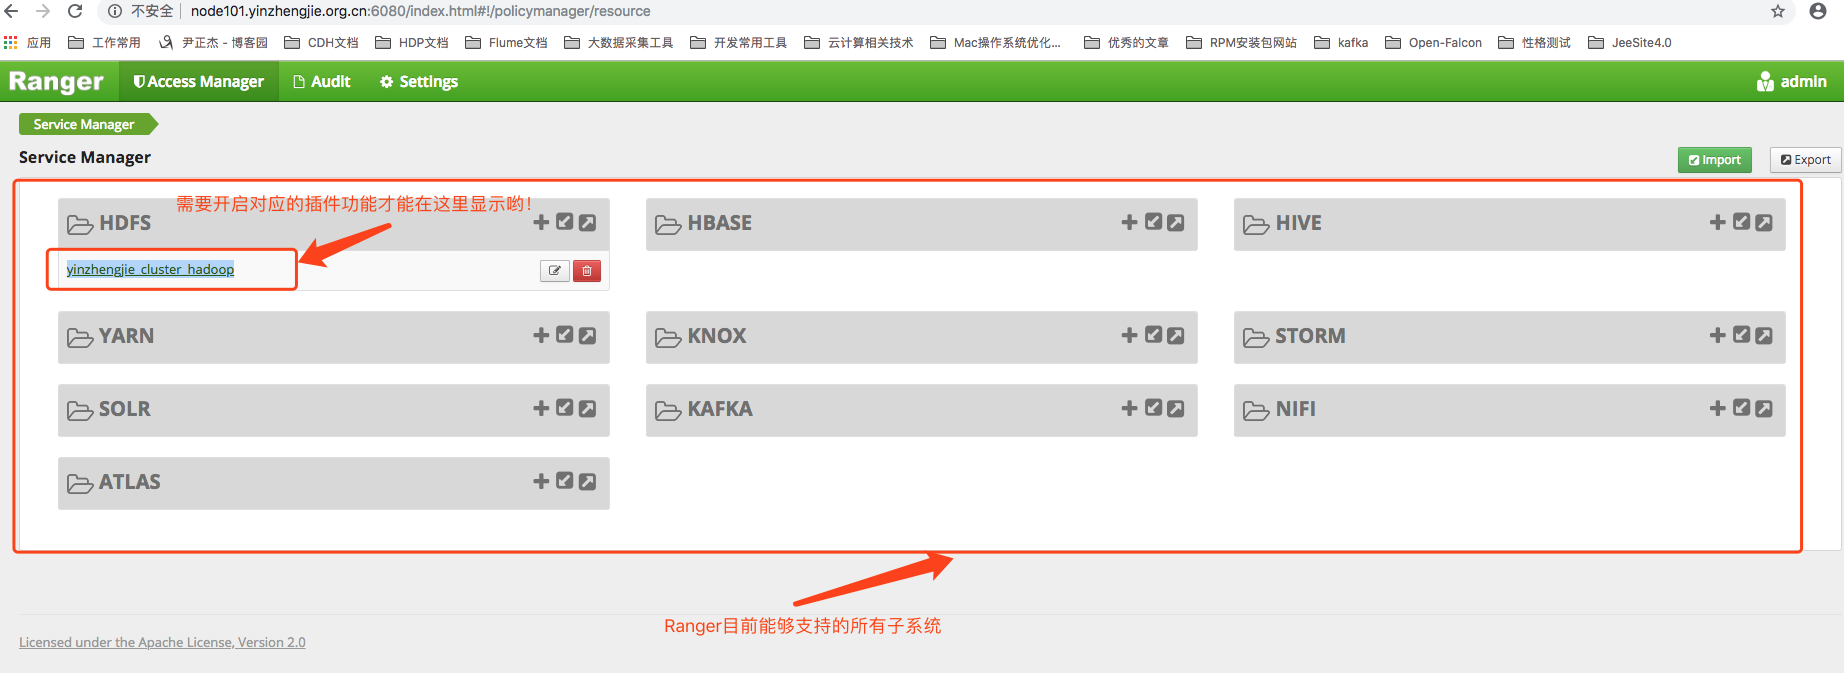
1>. Now let's start showing you how to authorize your data with Ranger.First click Access Manager to enter the Service Management page, as shown in the following image.

2>. As shown in the figure below, we will see a list of the raster layouts that Ranger currently supports.Because the HDFS plug-in was already enabled when Ranger was installed, we can see it under the HDFS components. yinzhengjie_cluster_hadoop "Service.It is Ranger's pre-built service item based on the open plug-in, named after the rule Ambari cluster name + component name.(
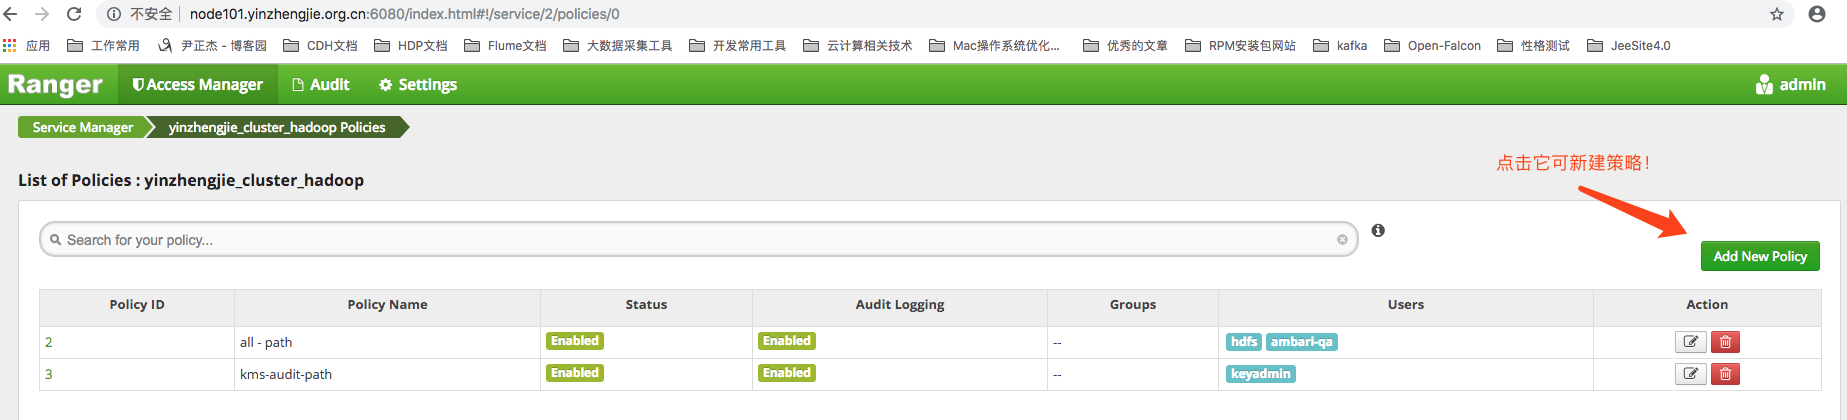
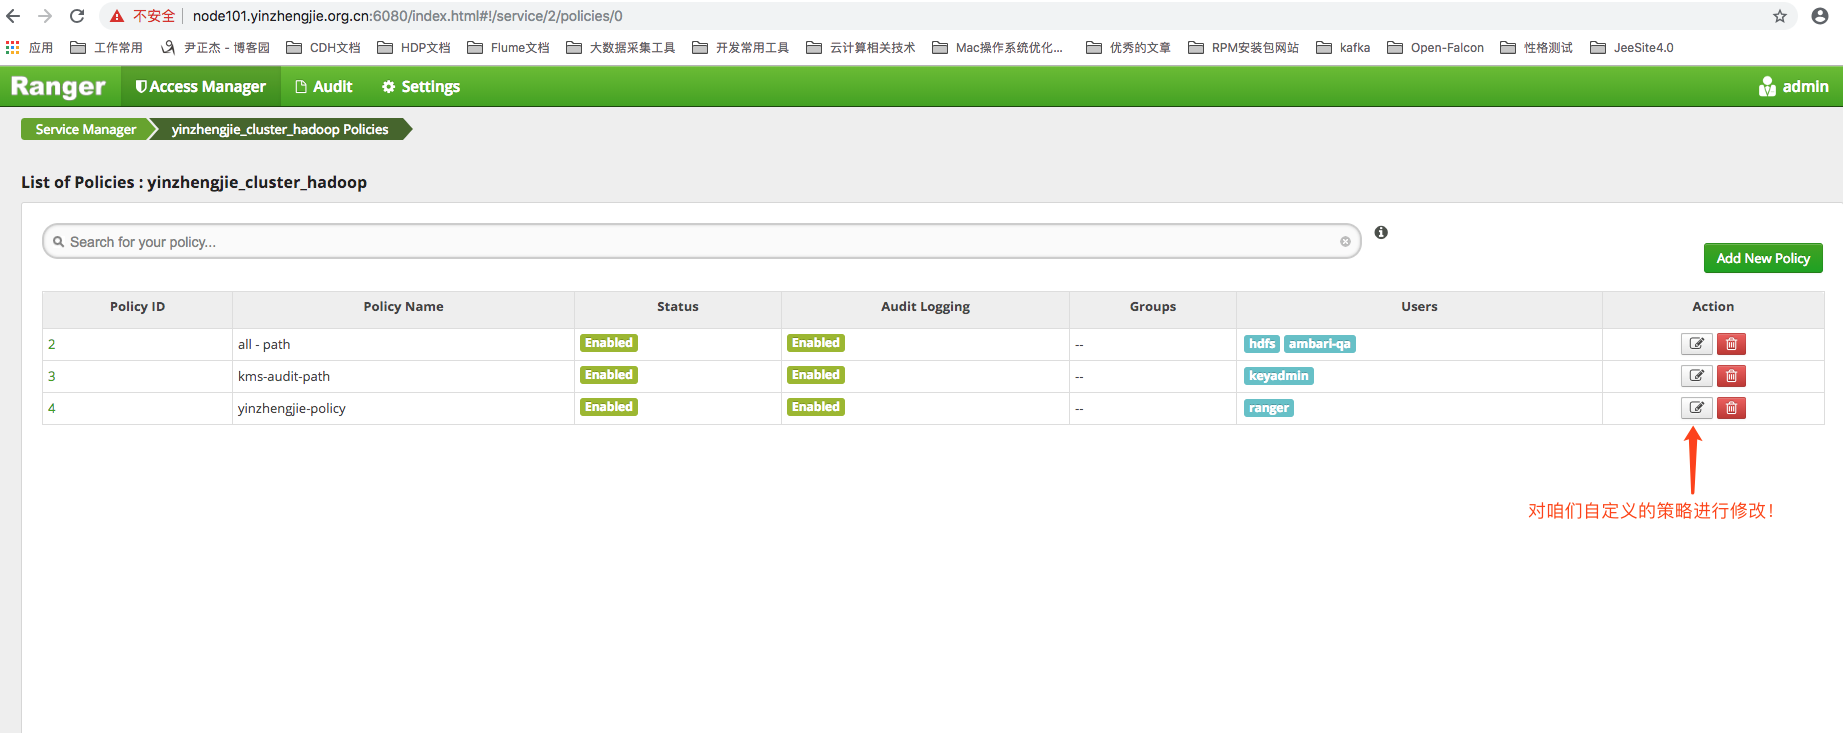
3>. Click on " yinzhengjie_cluster_hadoop "Enter the rights policy list page for HDFS.As shown in the image below, you can view, create a new one, modify the permission policy for root deletion of HDFS, and click Add New Pollicy to enter the new policy page:
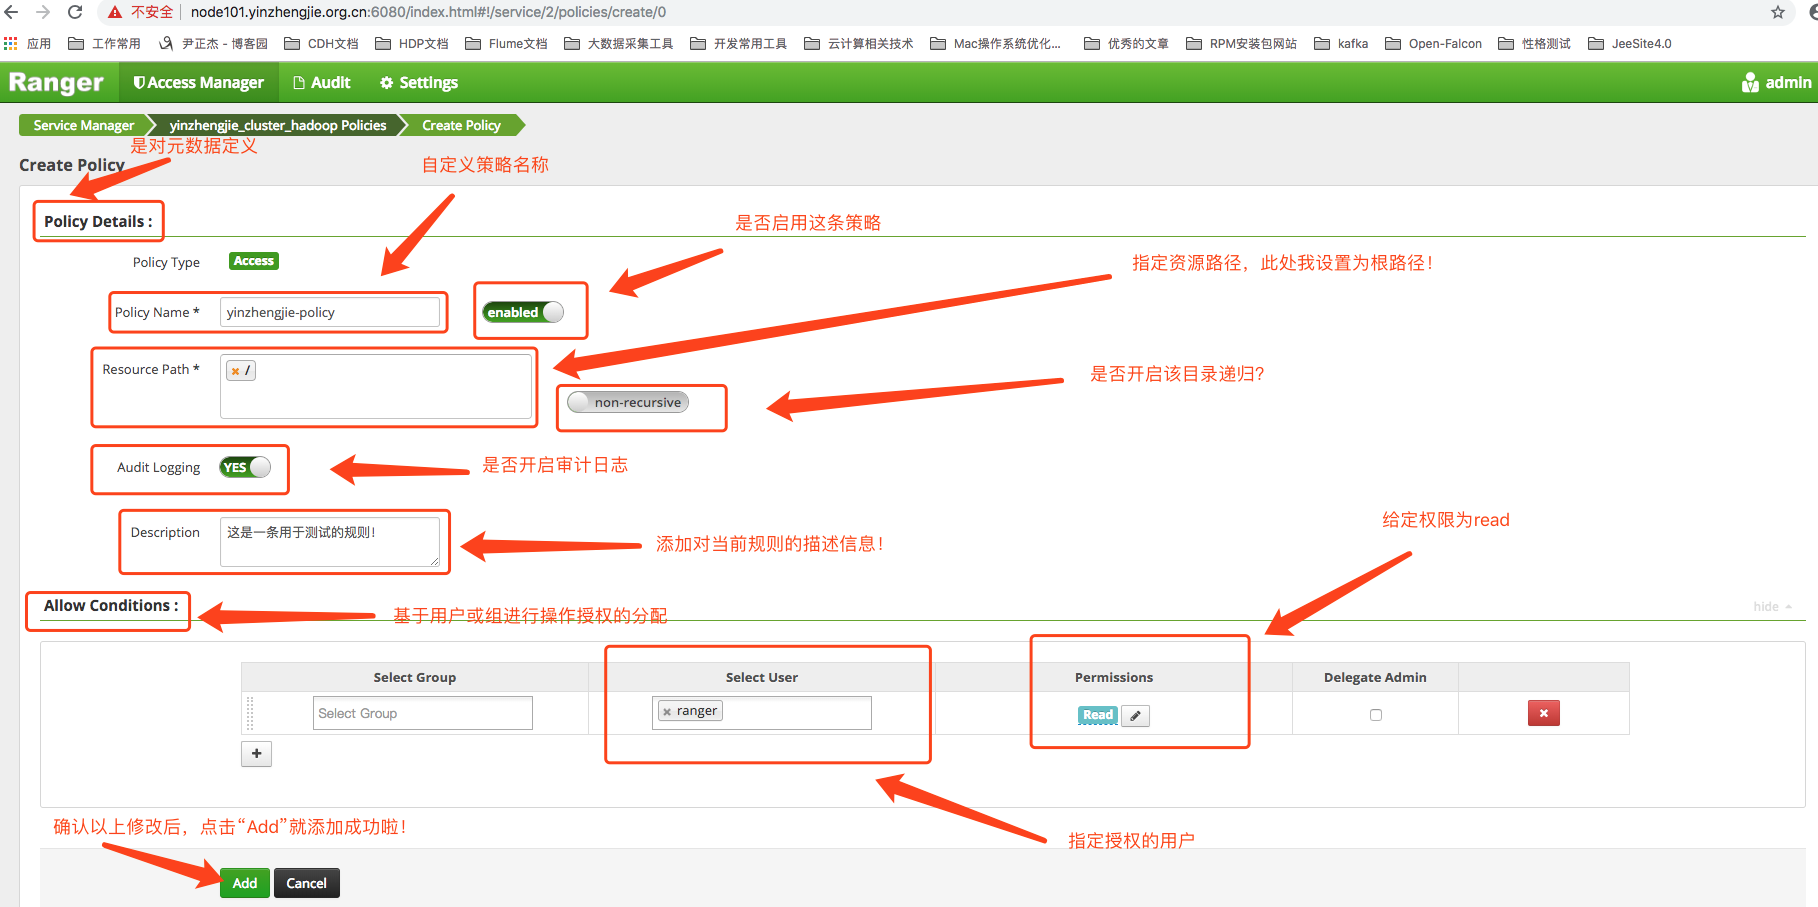
4>.Click on the "Add New Pollicy" button in the figure above to enter the interface of the figure below. The authorization policy page is divided into Pollicy Detail and Allow Conditions. Each parameter is labeled in the figure below:
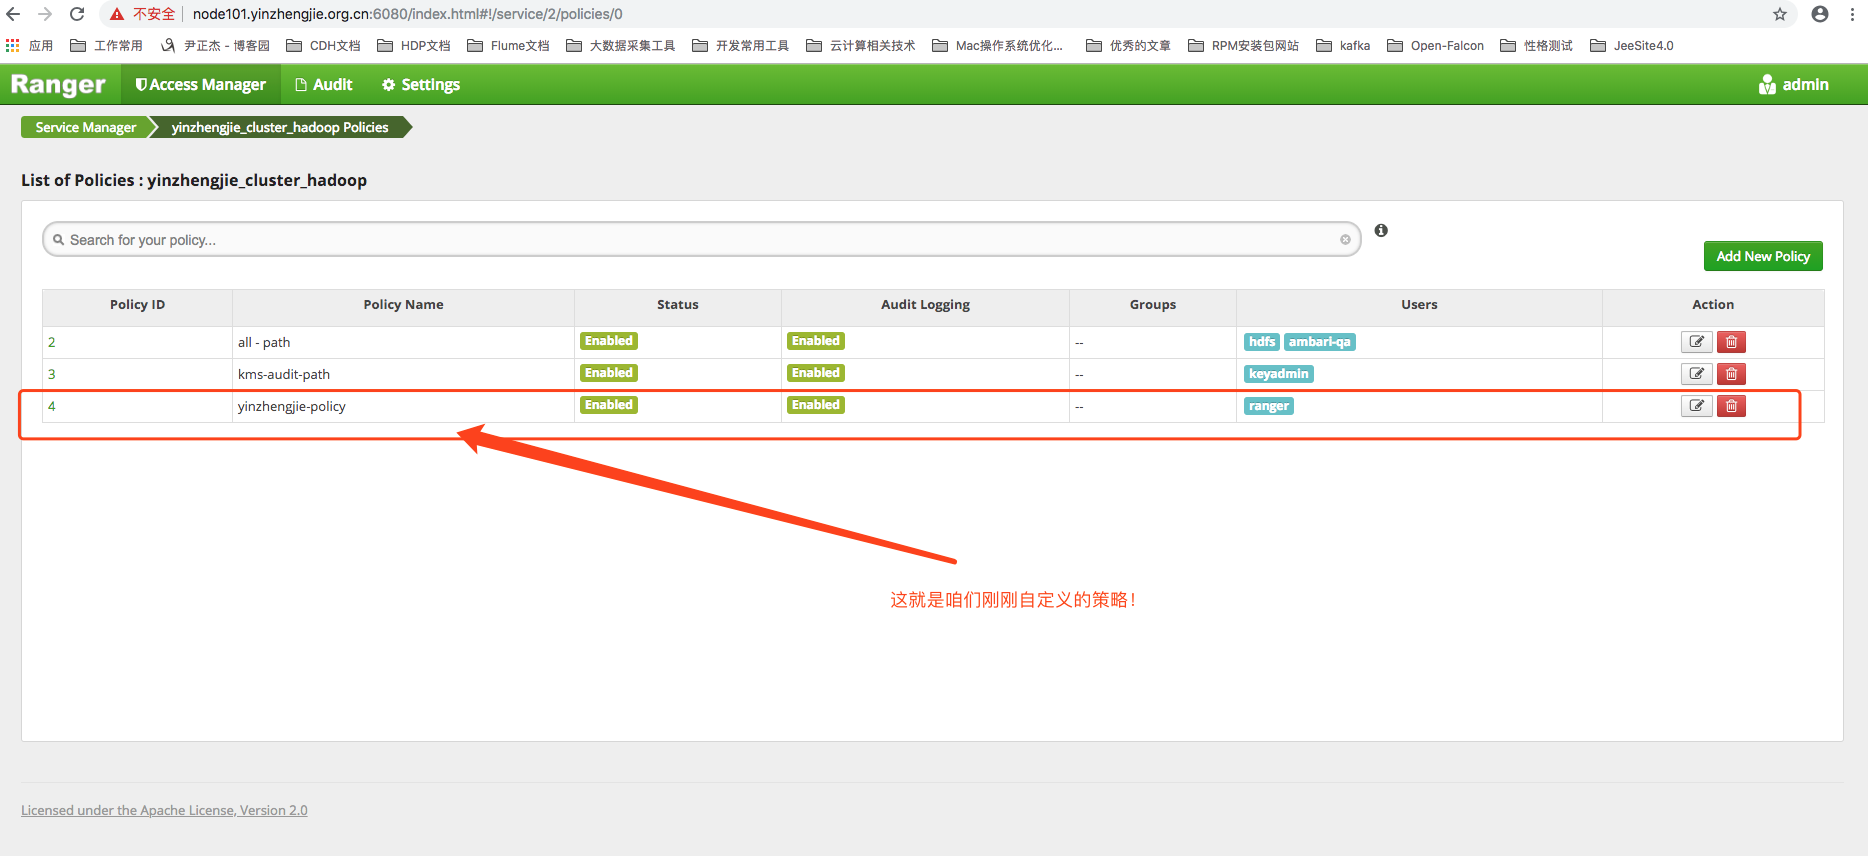
5>. As shown in the figure above, when you click Add, we will see the corresponding rules in the policy interface of HDFS, as shown in the following figure:
6>.Next we need to verify that the permission policy is in effect by first logging on to the cluster server through ssh and switching to the ranger user.The specific operations are as follows:
[root@node101 ~]# hostname
node101.yinzhengjie.org.cn
[root@node101 ~]#
[root@node101 ~]# id ranger
uid=1009(ranger) gid=1003(hadoop) groups=1003(hadoop),1006(ranger)
[root@node101 ~]#
[root@node101 ~]# su ranger
[ranger@node101 root]$
[ranger@node101 root]$ hdfs dfs -ls /
Found 9 items
drwxrwxrwx   - yarn   hadoop          0 2018-12-08 03:46 /app-logs
drwxr-xr-x   - yarn   hadoop          0 2018-12-08 03:46 /ats
drwxr-xr-x   - hdfs   hdfs            0 2018-12-08 03:46 /hdp
drwxr-xr-x   - mapred hdfs            0 2018-12-08 03:46 /mapred
drwxrwxrwx   - mapred hadoop          0 2018-12-08 03:46 /mr-history
drwxr-xr-x   - hdfs   hdfs            0 2018-12-08 22:07 /ranger
drwxrwxrwx   - hdfs   hdfs            0 2018-12-08 03:46 /tmp
drwxr-xr-x   - hdfs   hdfs            0 2018-12-07 16:12 /user
drwxrwxrwx   - hdfs   hdfs            0 2018-12-07 22:19 /yinzhengjie
[ranger@node101 root]$
[ranger@node101 root]$ hdfs dfs -mkdir /test
mkdir: Permission denied: user=ranger, access=WRITE, inode="/test":hdfs:hdfs:drwxr-xr-x          #See that?Say permission is denied!This is in line with our expectations, as we authorized only READ to his ranger user.Creating files is a write operation!
[ranger@node101 root]$
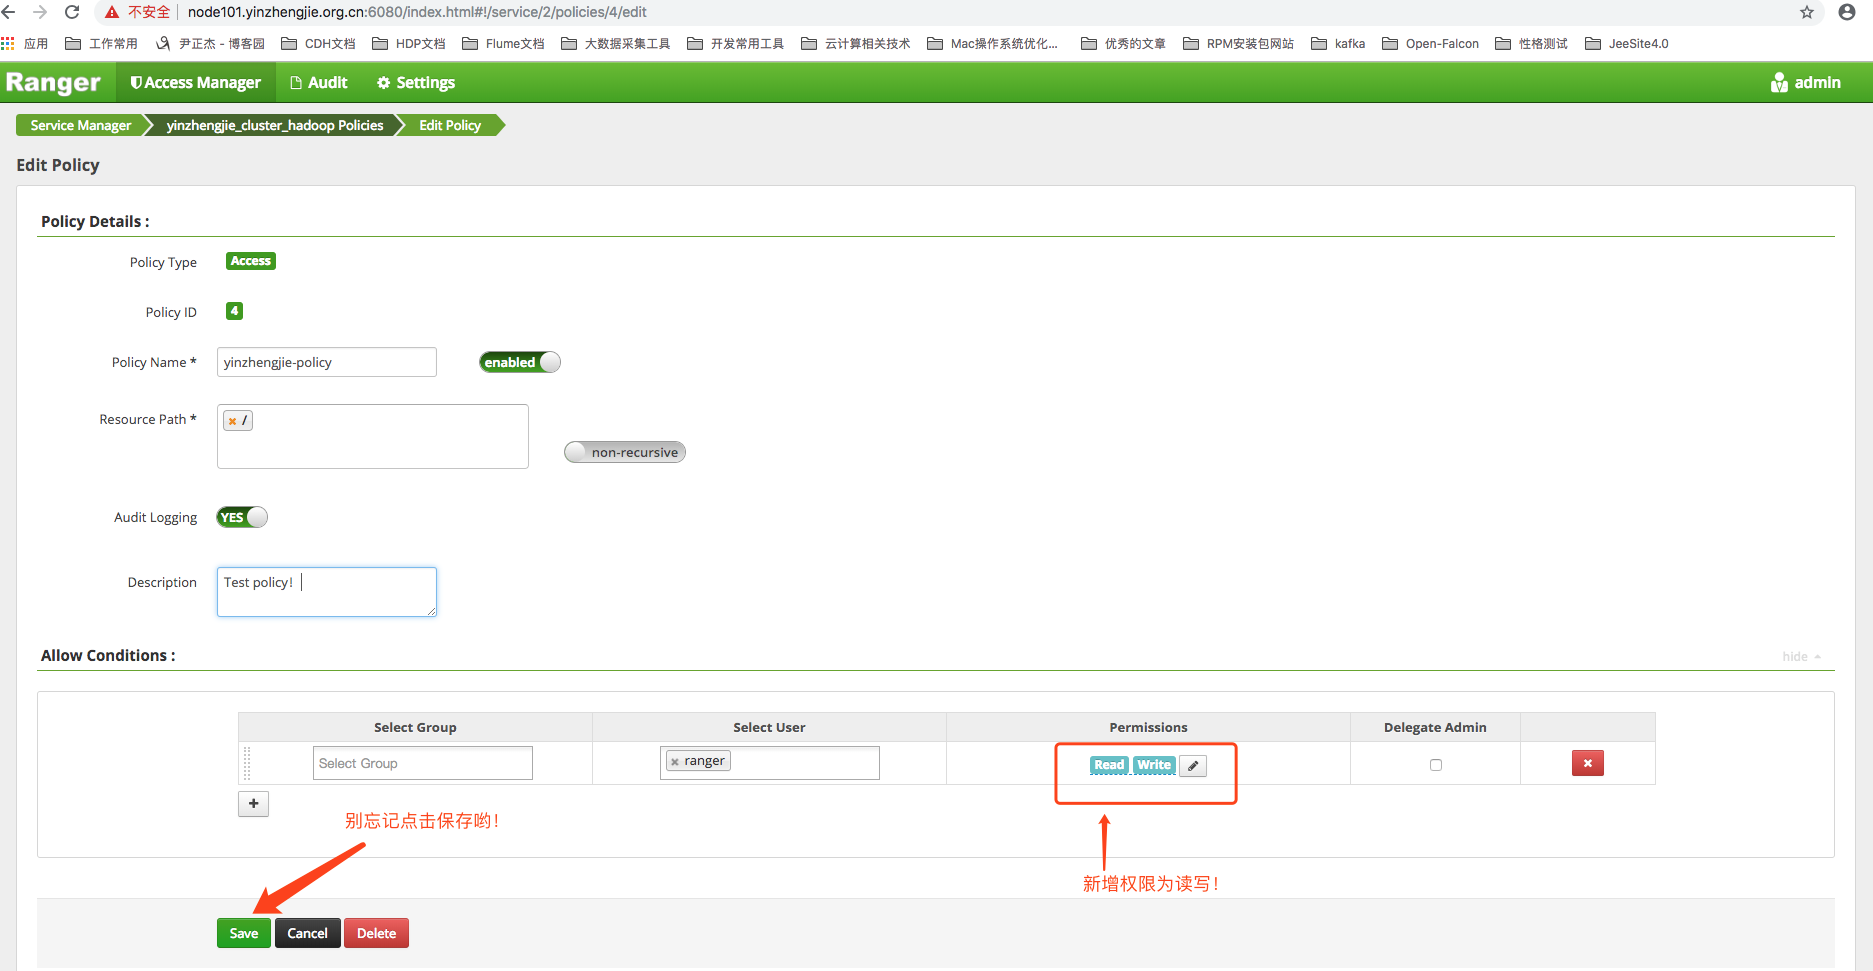
Next, we need to edit our previously customized strategy to modify ranger user permissions, as shown in the following image, by first clicking Edit:
8>.Modify ranger's strategy to read and write, as shown in the following image, don't forget to click Save!
9>.After the authorization modification succeeds, we continue to perform the same operation in the previous terminal (there is no need to exit the previous terminal, as long as the authorization modification takes effect immediately!), found that files can be successfully created and deleted as follows:
[ranger@node101 root]$ hostname
node101.yinzhengjie.org.cn
[ranger@node101 root]$
[ranger@node101 root]$ hdfs dfs -mkdir /test
[ranger@node101 root]$
[ranger@node101 root]$ hdfs dfs -ls /
Found 10 items
drwxrwxrwx   - yarn   hadoop          0 2018-12-08 03:46 /app-logs
drwxr-xr-x   - yarn   hadoop          0 2018-12-08 03:46 /ats
drwxr-xr-x   - hdfs   hdfs            0 2018-12-08 03:46 /hdp
drwxr-xr-x   - mapred hdfs            0 2018-12-08 03:46 /mapred
drwxrwxrwx   - mapred hadoop          0 2018-12-08 03:46 /mr-history
drwxr-xr-x   - hdfs   hdfs            0 2018-12-08 22:07 /ranger
drwxr-xr-x   - ranger hdfs            0 2018-12-09 00:53 /test
drwxrwxrwx   - hdfs   hdfs            0 2018-12-08 03:46 /tmp
drwxr-xr-x   - hdfs   hdfs            0 2018-12-07 16:12 /user
drwxrwxrwx   - hdfs   hdfs            0 2018-12-07 22:19 /yinzhengjie
[ranger@node101 root]$
[ranger@node101 root]$ hdfs dfs -rm  /test          #Note that when deleting directories here, we should never add the'-R'parameter, because when authorizing ranger users, the specified path is the root path and the Recursive button is not checked!
rm: `/test': Is a directory
[ranger@node101 root]$
[ranger@node101 root]$ hdfs dfs -ls /
Found 10 items
drwxrwxrwx   - yarn   hadoop          0 2018-12-08 03:46 /app-logs
drwxr-xr-x   - yarn   hadoop          0 2018-12-08 03:46 /ats
drwxr-xr-x   - hdfs   hdfs            0 2018-12-08 03:46 /hdp
drwxr-xr-x   - mapred hdfs            0 2018-12-08 03:46 /mapred
drwxrwxrwx   - mapred hadoop          0 2018-12-08 03:46 /mr-history
drwxr-xr-x   - hdfs   hdfs            0 2018-12-08 22:07 /ranger
drwxr-xr-x   - ranger hdfs            0 2018-12-09 00:53 /test
drwxrwxrwx   - hdfs   hdfs            0 2018-12-08 03:46 /tmp
drwxr-xr-x   - hdfs   hdfs            0 2018-12-07 16:12 /user
drwxrwxrwx   - hdfs   hdfs            0 2018-12-07 22:19 /yinzhengjie
[ranger@node101 root]$
6. Ranger Function Introduction - Audit Log
As an enterprise large data platform, its underlying services will be used by a large number of top-level applications (such as HDFS, HBase, etc.).Tracing operations back to the underlying components in the platform is also an essential feature, and Ranger can help implement audit log pairing.Ranger provides us with four types of audit log functionality: access log, administrator log, logon session log, plug-in log.
1>.Access log
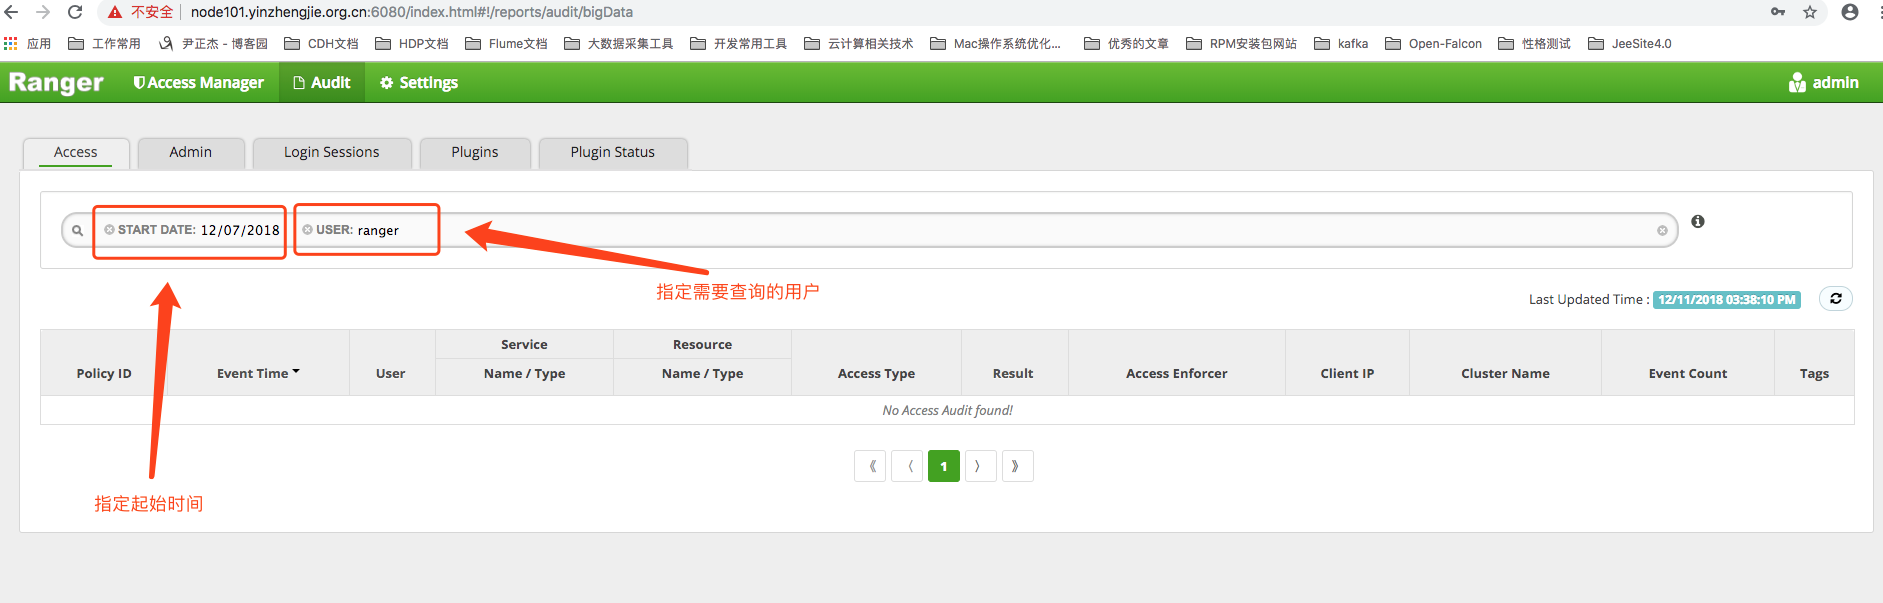
Access log pairs mainly record user access to resources.Remember the HDFS operations you just performed using ranger users?Now access the log page from the Audit Audit menu.
2>.Administrator Log
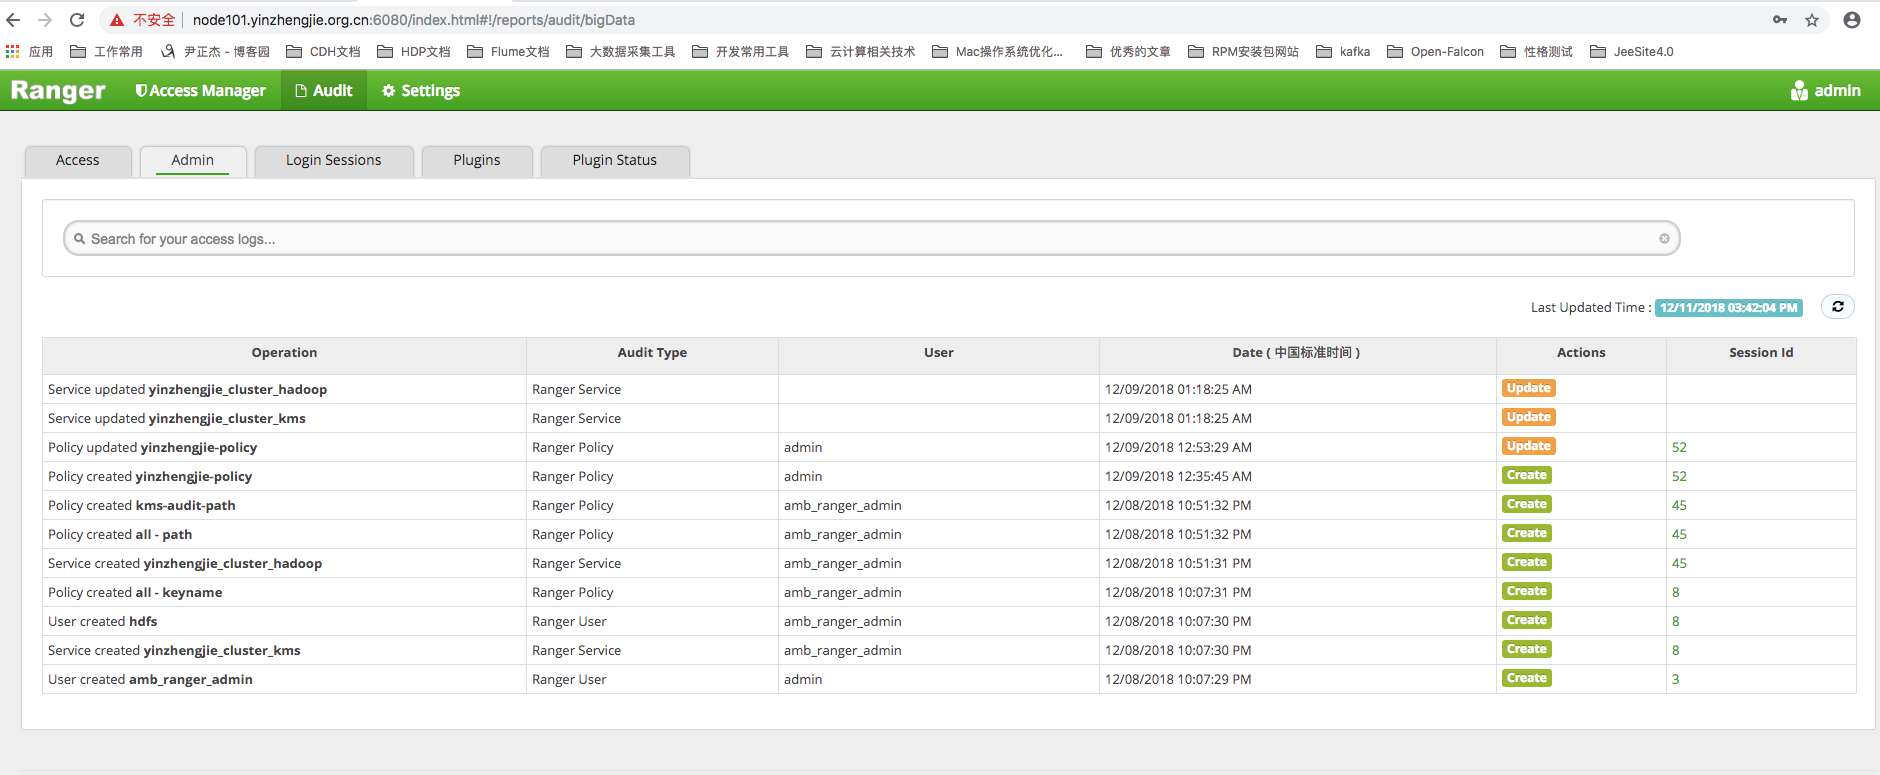
The Administrator Log mainly records the actions of the Administrator, such as creating new users, creating new or repairing permission policies, which are all logged by the Administrator Log.
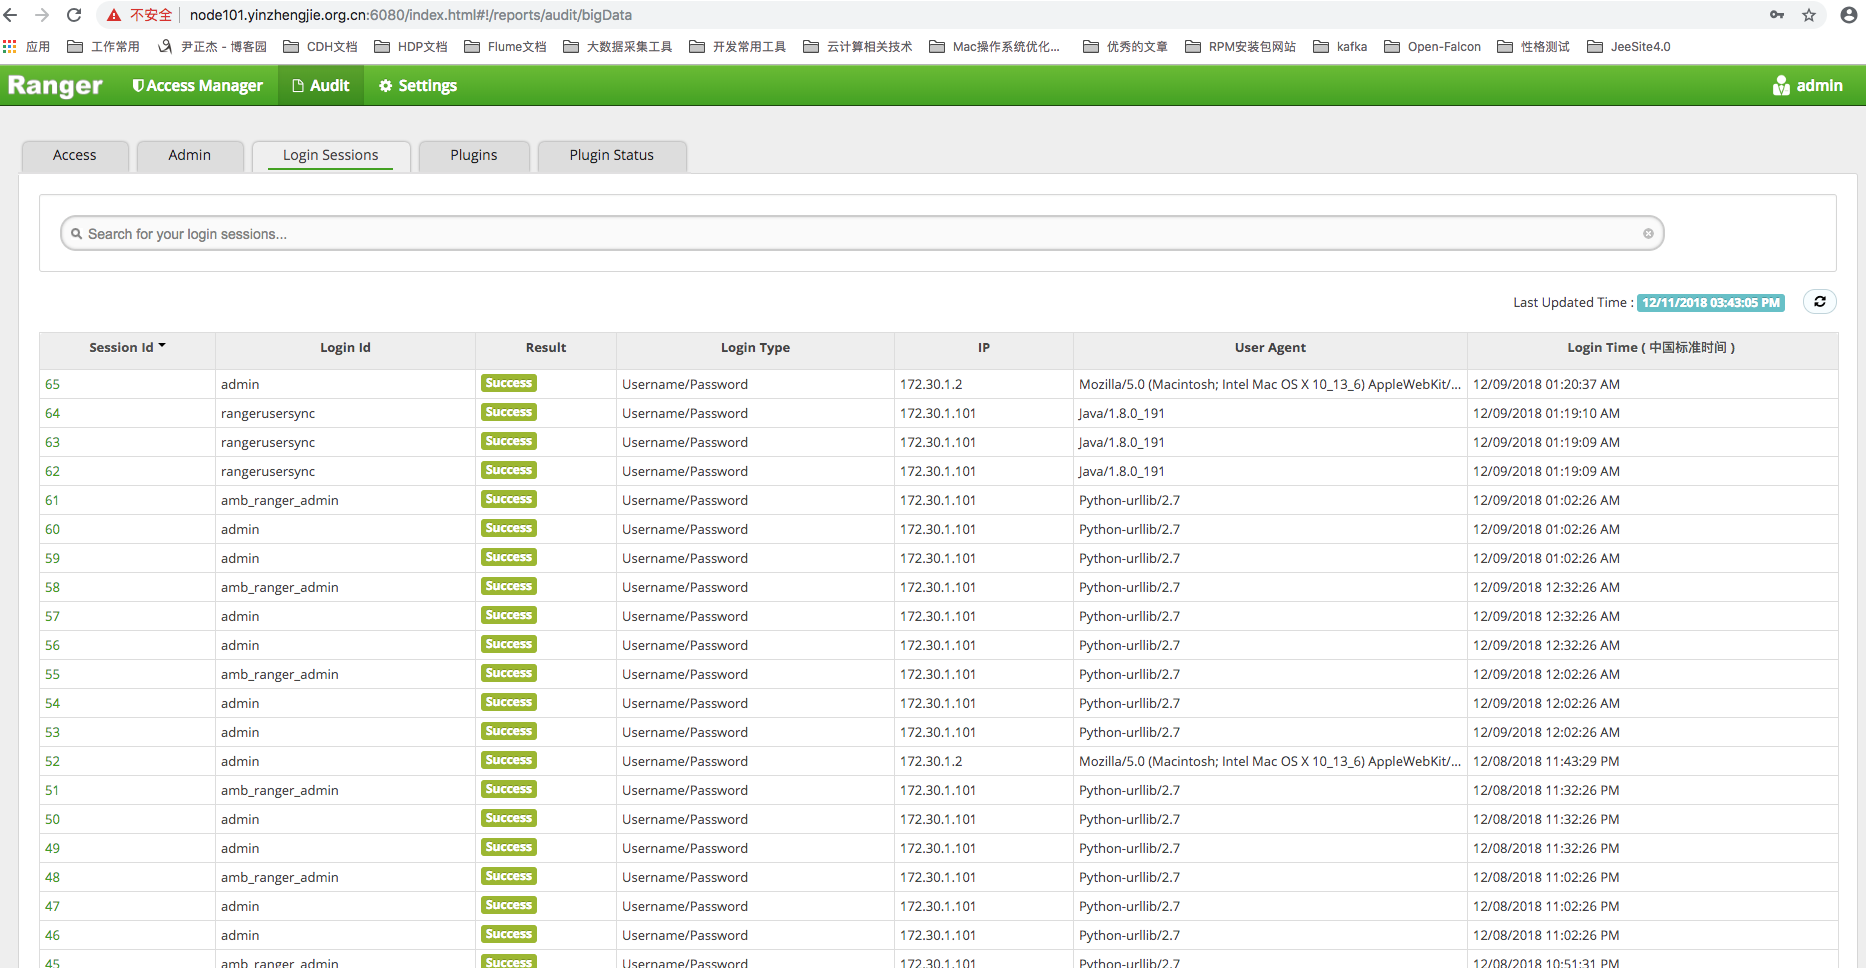
3>.Logon Session Log
The logon session log records the logon behavior of all users, including the logon person, logon mode, logon time, logon person's IP address, and so on.
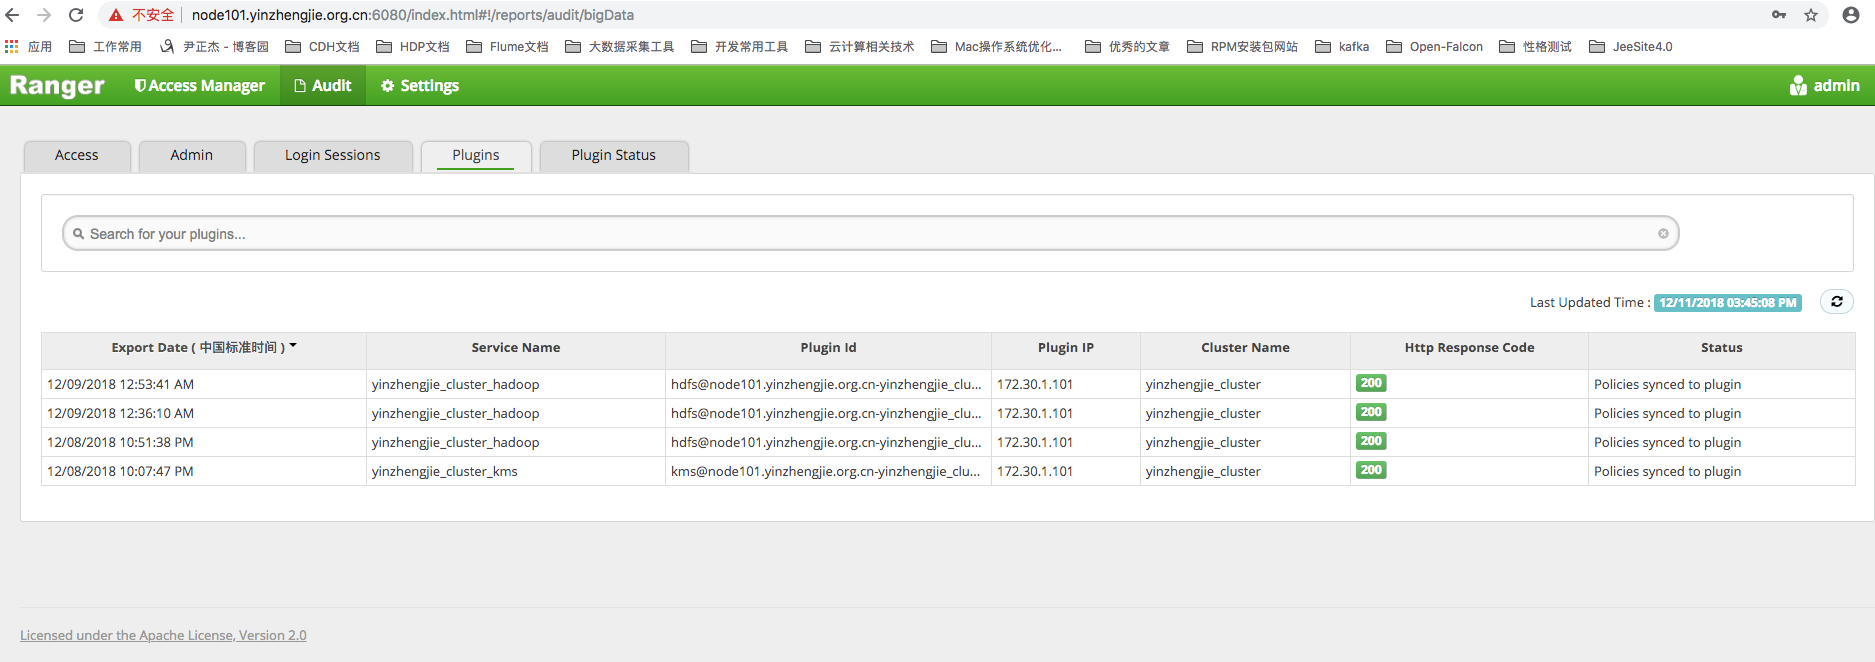
4>.Plugin Log
Ranger's plug-ins periodically obtain permission policies from the administrative portal, and the plug-in log records the tracks of these plug-in synchronization policies.What plug-ins update at what point in time and what strategies are clearly reflected in the log.