Learn small things quickly and remember them quickly. Learn big knowledge according to plan without delay
Recently, we have several needs for H5 games, one is character dressing, the other is red envelope rain. We all use pixijs
Originally, the main purpose was to write the specific implementation of the H5 game, but the foundation is to be able to use pixi and need to understand the basic api
Therefore, another article introduces pixi from the perspective of demand use, and records the pit stepped by using pixi to ensure that a thing can be completed with pixi
Contents of this article
1. Introduction to pixi
2. Brief description
3. api introduction
This paper is based on pixi v6.1.2
Introduction to pixi
pixijs is a
1. Fastest 2D rendering engine
2. It has rich and concise APIs, which can easily render graphics (scaling, rotation, etc.) and operate graphics (interaction of various events)
3. It is used to replace flash. It has better performance than flash and can achieve more details
4. Based on canvas, web GL is preferred
webgl
1. Web GL takes advantage of hardware acceleration and high-performance graphics rendering
2. It is integrated in canvas without any plug-ins and supports native
5. Use
1. h5 games
2. Complex interactive active pages
3. Data visualization
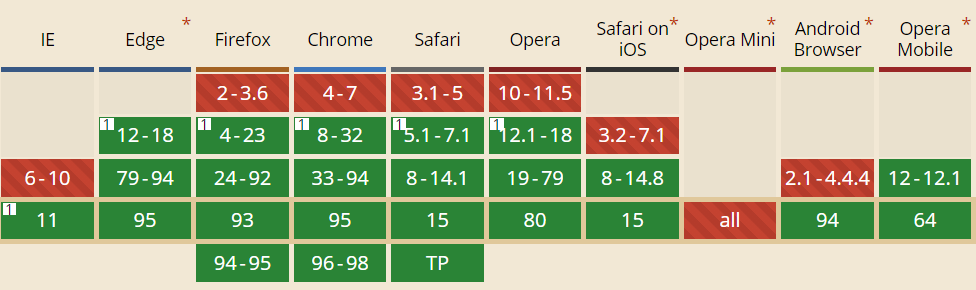
1. Compare competing products
In addition, there are several game rendering engines, such as three.js, cocos2d, createjs, playcanvas, etc
When selecting a framework, we usually need to consider the development convenience (whether it supports ts, whether the documents are complete, whether there are Chinese documents, degree of difficulty), performance (package size), ecology (whether there is team maintenance, and the maintenance and update frequency)
Let's look at the comparison
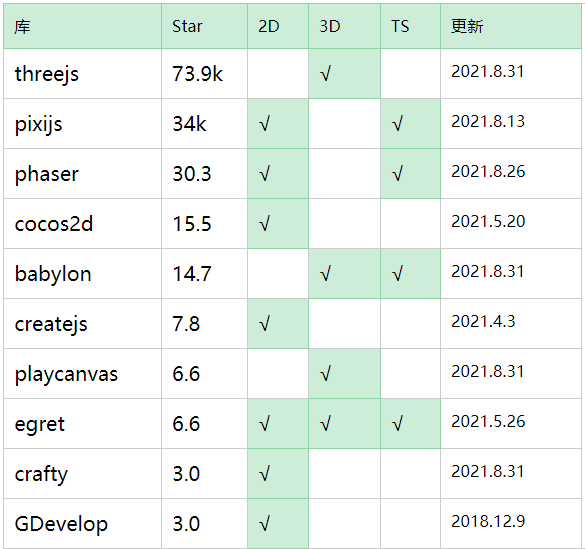
What we want to do is 2D games. In contrast, at the 2d rendering level, pixi has the best performance, supports ts, has low starting cost and good maintenance iteration. It is undoubtedly the best choice for 2D games
Brief description
Games are composed of various elements, characters, props, scenes, etc., so the most important thing to do a game is to create elements and control elements.
To create an element is to set the content, size, position, shape change and so on
Manipulating elements is to make elements change and move
Elements must be mounted when they are created, just like DOM, so there is a concept of container, which is equivalent to element combination.
Take a look at a simple implementation of pixi
Display a picture (close button) on the page, and that's about it

Take a brief look at the implementation of pixi
// Creating a container is also creating a canvas
let app = new PIXI.Application();
// Create element
const del = PIXI.Sprite.from('./img/del.png');
// Add element to container
app.stage.addChild(del);
// Mount to page
document.body.appendChild(app.view);
In fact, a simple process of a game is
1. Create container
2. Create element
3. Set element style (size, position, etc.)
4. Add element to container
5. Manipulation elements (animation, key movement, etc.)
It's just that the details of the specific implementation will be a little complicated. The general process is like this
api introduction
Now let's introduce the api of pixi in detail. I introduce it from the perspective of requirements. After reading it, I can make my own game
It is mainly divided into three parts
Container, resource, Sprite element
I won't introduce too much. I mainly introduce the content enough to complete a requirement
1
container
First, we need to create the root container of the whole application, and all the elements created later need to be added
let app = new PIXI.Application({
    width: 256, // default: 800 width
    height: 256, // default: 600 height
    antialias: true, // default: false anti aliasing to make the edges of fonts and graphics smoother
    transparent: false, // default: false transparency to make the canvas background transparent
    resolution: 1, // default: 1 resolution
});
document.body.appendChild(app.view);
Because it is an h5 application, it needs to be mounted on the page after creation, and it will automatically determine whether to use canvas or webgl for rendering
View official website
https://pixijs.huashengweilai.com/guide/start/3.stage.html#%E5%88%9B%E5%BB%BApixi%E5%BA%94%E7%94%A8%E5%92%8Cstage
If you want to change the size of the entire canvas later
app.renderer.resize(512, 512);
2
resources
Many resources must be used to make a game, such as pictures. The basic game is composed of pictures, so it is necessary to load the pictures in advance, which is equivalent to the initialization process of the game
There are four main problems
1. How to preload
2. How to load multiple at once
3. How to get cache
4. How do I know the loading progress
How to preload
A new loader instance needs to be created
const loader= new PIXI.Loader();
Or we can use the loader instance in the new app instance
app.loader
loader loads images, mainly the add method, with three parameters
1. Picture link
2. Cache key (for easier access to the image cache later)
3. Complete callback
Various parameter forms are supported
loader
.add('key', 'http://...', function ({})
.add('http://...', function () {})
.add('http://...')
.add({ name: 'key2',url: 'http://...'}, function () {})
.add({ name: 'key3',url:'http://...'onComplete: function () {}})
The above only adds resources. Only after the load method is called can the resources be loaded. When all resources are loaded, the incoming callback will be called
loader.load(()=>{
    // all resource loaded
})
Load multiple at once
If you pass in an array, you can load multiple arrays at one time
loader.add([
  { name: "sceen", url: "./img/materials/sceen/1.png" },
  { name: "accessories", url: "./img/materials/accessories/1.png" },
  { name: "props", url: "./img/materials/props/1.png" },
  { name: "trousers", url: "./img/materials/trousers/5.png" },
])
Loading progress
Generally, we will load all images at one time during application initialization. In this process, we will display a loading percentage in the page
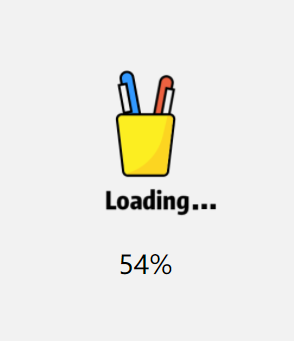
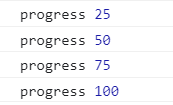
At this time, we need to monitor the progress of resource loading. The monitoring progress should be placed before the load method
loader.onProgress.add((loader) => {
  console.log("progress", loader.progress);
});
The number of pictures is used as the loading percentage. For example, 4 pictures are loaded above
Get picture cache
The resources loaded by each loader instance will exist in their own instances and will not affect each other
For example, the following is the list of resources loaded by the app's own loader and our new loader
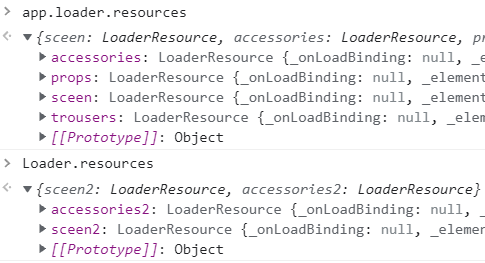
Where key is the alias set for each resource
We need to use this cached resource to create elements and click on one of the resources
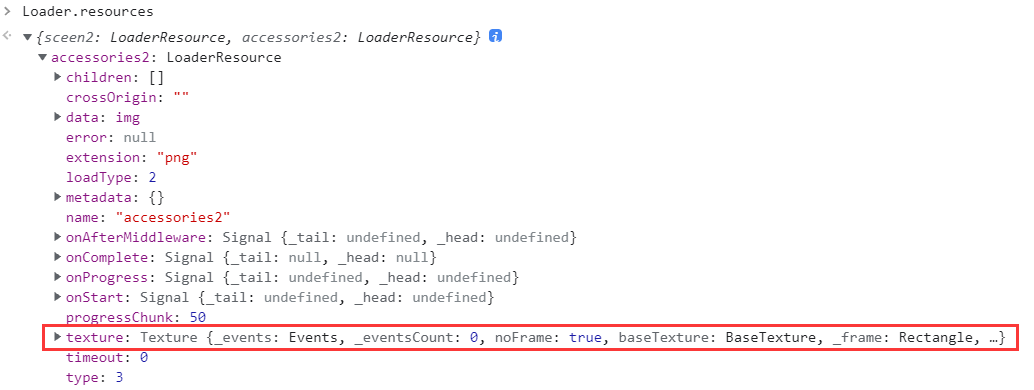
The texture attribute is mainly used to create elements (which will be described later)
There is also an error attribute. If the image is loaded incorrectly, it will have a value, otherwise it will be null
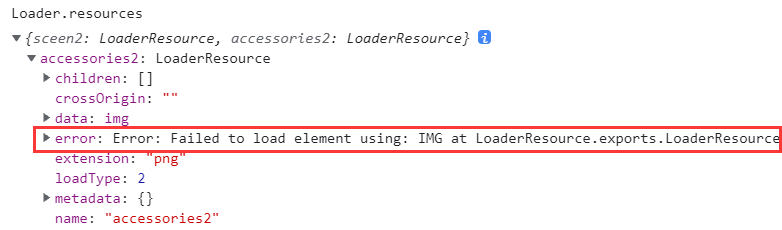
Therefore, error is usually used to judge whether the resource is loaded successfully
Although each loader only saves the resources loaded by itself, we can also see that all loader instances load resources at one time
PIXI.utilize.TextureCache
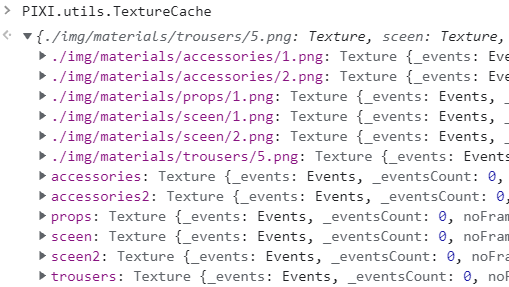
The alias key we set or the path of the picture can be directly obtained from the cache
There are also easier ways to get the cache
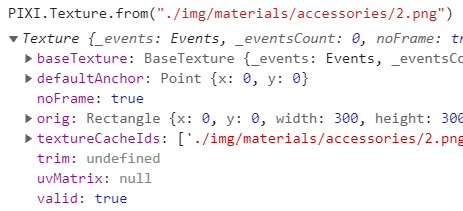
PIXI.Texture.from("./img/materials/accessories/2.png")
You can get the cache by directly passing in the picture path. After all, some pictures are requested back, and not all pictures will be taken at the beginning. Go through the loader process
Pictures may fail to load, so considering the fault tolerance of the application, we will encapsulate a method to obtain the cache of pictures
Get the image from the cache first. If the cached image does not exist or is loaded for use, rebuild the cache
function getTextureFromCache(
  app,
  name,
  url
) {
  const { loader } = app;
  const cacheResource = loader.resources[name];
  let texture = cacheResource?.texture;
  // The resource does not exist or an error occurs during preload, because the preload failed object still exists, and there is only an error object
  if (!texture || cacheResource?.error) {
    const newUrl = `${url}?retry=1`; // newUrl is because the same link loader will continue to use the failed one
    texture = PIXI.Texture.from(newUrl);
  }
  return texture;
}
3
Sprite element
After the container is created and the resources are loaded, it is necessary to create the elements in the game, which are generally called Sprite. In short, the characters, props, background and decoration in the game are called elements
The main part of the game is the spirit element, so the element involves a lot of content
The content is divided into five parts
1,CRUD
2. Element content
3. Display effect
4. Sprite element grouping
5. Events
1CRUD
establish
Two methods are supported
1. Only incoming cache resources are supported
const sceen = PIXI.utils.TextureCache.sceen
const sp1=new PIXI.Sprite(sceen)
2. Support incoming cache or picture link
Through the from method, you can quickly create an element through a picture link
const sceen = PIXI.utils.TextureCache.sceen
const sp2 = PIXI.Sprite.from(sceen)
const sp3 = PIXI.Sprite.from("./img/xxxx.png")
After the wizard is created, it needs to be added to the container before it is displayed
// app is the container created earlier
app.stage.addChild(sp1)
app.stage.addChild(sp2)

app.stage.addChild(sp1,sp2)
modify
It's ok for sprites to modify attributes directly. pixi will complete dynamic update, which is similar to Vue modifying attributes
For example, modify the picture and directly replace the cache resources
sprite.texture = Loader.resources.accessories2.texture
For example, modify the width and height
sprite.width = 10
sprite.height = 10
remove
To remove a specific element, you can remove multiple elements at the same time
app.stage.removeChild(sprite,sprite,sptite)
In addition, removeChildAt(index) removes the first few, and removeChildren(beginIdx, endIdx) removes the index range
However, these two methods have not been used when making requirements
lookup
Find child or descendant elements by element name
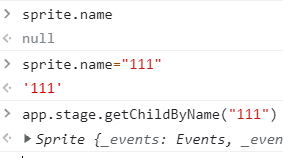
app.stage.getChildByName(sprite.name)
The created element has no name by default
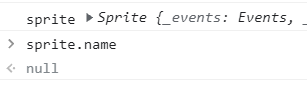
If you want to use this method, you need to manually give the element a name
Of course, you can also get the number of getChildAt(index)
Explicit and implicit
Sometimes you don't have to remove an element if you want to remove it. You can use explicit and implicit methods. After all, explicit and implicit is cheaper than removal and reconstruction
sprite.visible = true | false
2 element content
The content of element drawing is mainly divided into three categories: pictures, graphics and text
picture
Drawing pictures has been said. It's relatively simple
Through the creation of new Sprite() or Sprite.from(), the image data is loaded into texture cache through PIXI.Loader, or directly using image link
graphical
The api for drawing graphics is almost the same as that of Canvas, but Pixi can draw high-performance graphics through webgl. Post a few examples
// rectangle
let rectangle = new PIXI.Graphics();
rectangle.beginFill(0x66ccff);
rectangle.drawRect(0, 0, 64, 64);
rectangle.endFill();
rectangle.x = 170;
rectangle.y = 170;
app.stage.addChild(rectangle)

// circular
let circle = new PIXI.Graphics();
circle.beginFill(0x996687);
circle.drawCircle(0, 0, 32);
circle.endFill();
circle.x = 64;
circle.y = 130;
app.stage.addChild(circle)
See the official website for more demo s https://pixijs.io/guides/basics/graphics.html
written words
Text drawing is mainly custom style. Custom style in canvas is very troublesome. It's very simple here
let style = new PIXI.TextStyle({
  fontSize: 36,
  fill: 'white',
});
// Injection created style
let message = new PIXI.Text('Pixi written words', style);
app.stage.addChild(message)

If you want to modify the content and style later, you can directly modify the corresponding attributes
message.text="Modified"
message.style={ fontSize:100 }
More information:
https://pixijs.io/guides/basics/text.html
https://pixijs.huashengweilai.com/guide/start/14.graphic-primitive.html#%E6%98%BE%E7%A4%BA%E6%96%87%E5%AD%97
3 display effect
Since the drawing elements must have these basic drawing effects, control the size, position, rotation, scaling, origin, stacking and so on
All display effects can simply set properties
Width height size
sprite.width =10
sprite.height =10
position
Set xy two coordinates
sprite.x=10
sprite.y=10
Zoom, rotate
Scaling is scale. There are two ways to modify it
sprite.scale.x=1
sprite.scale.y=2
Or call a method
sprite.scale.set(1 /*x*/,1 /*y*/)
sprite.scale.set(1) // Only one parameter is passed to represent the same value of xy
Attention
1. scale is based on the original size of the picture
If the original size of the picture is 100 * 100, use this picture to create a wizard, and manually set the width and height to 64 * 64
If sprite.scale = 0.5 is set at this time, it is scaled based on the original size instead of 64
So the final rendering size is 50 * 50, not 32 * 32
2. Setting scale may not be valid
If the width, height and scale are directly set for the sprite element when the image is not loaded, then the scale is invalid at this time
For example, use Sprite.from("https: / / picture link") to create sprites
const sprite = PIXI.Sprite.from("./img/materials/blue.png");
sprite.height = 64;
sprite.width = 64;
sprite.scale.set(0.1); // Invalid scale
app.stage.addChild(sprite);
The width and height of the best displayed sprite element is 64 * 64, which will not be reduced to 0.1 times
The best way is to put the picture into the cache and set the properties after the picture is loaded, or ensure that the scale is set after the picture is loaded
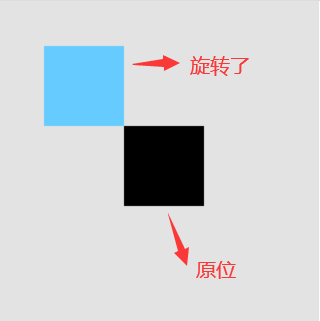
Rotation is to modify the rotation attribute
sprite.rotation = 0.5
The unit of value is radian. The radian of a circle is 2 π, and the radian of 1 is about 57.3 °. Therefore, if you turn half a circle, it should be set to π, which is Math.PI in js
sprite.rotation = Math.PI;
As shown in the figure
basic point
Element rendering and rotation change have a base point, just like the css attribute background origin.
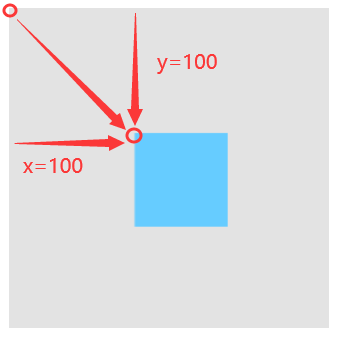
The default base point is the upper left corner of the element. Base point x = 0 and base point y = 0. The rendered x, y and rotation are based on this base point
For example, if xy is set to 100, the upper left corner of the element will be 100 to the right and 100 to the down. That's how it is rendered
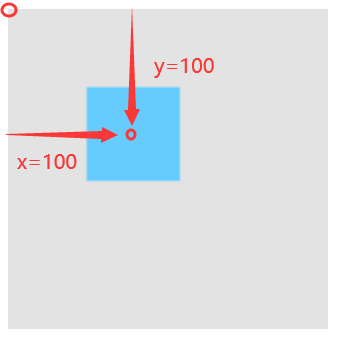
The size of the drawing is 100 * 100. The default base point is x=0 and y = 0. If the base point is set in the middle of the drawing
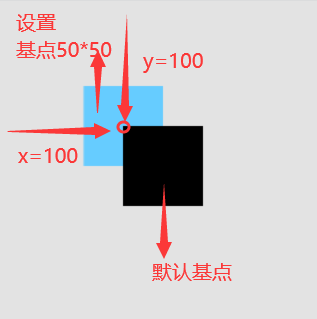
Then it should be set to base point x = 50, base point y = 50, and the effect is
For comparison, if the base point is set, it will move to the upper left as a whole
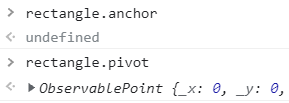
PIXI doesn't officially have the concept of base point, but I call it for unification. It is divided into origin and anchor point
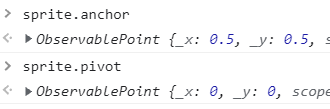
The origin attribute is sprite.pivot, and the anchor attribute is sprite.anchor. Both of them contain x and y coordinates
These two attributes are used to set the base point. The difference is that the value units set are different
sprite.pivot sets the pixel and sprite.anchor sets the percentage
For example, if the size of the element is 100 * 100, we should set the base point as the center point of the element
The two attributes are written as
sprite.anchor.x = 0.5; // Percentage 50%
sprite.anchor.y = 0.5; // Percentage 50%

sprite.pivot.x = 50; // Pixel 50px
sprite.pivot.y = 50; // Pixel 50px
It can also be abbreviated as
sprite.anchor.set(0.5, 0.5)
sprite.anchor.set(0.5) // A single value means that x is the same as y

sprite.pivot.set(50, 50)
sprite.pivot.set(50) // A single value means that x is the same as y
The attribute that is usually set more often is pivot, because anchor can not be set for any element
For example, the pivot and anchor attributes can be set for the element created by Sprite
However, the containers and graphs created have only the pivot attribute
4 sprite element grouping
The game will create many elements. We can't add one into the root container
In this way, the relationship between elements is very chaotic, which is not conducive to management
Therefore, the elements will be grouped, that is, a new container will be created to store a class of element sprites
For example, a character usually needs to create multiple elements, such as head, body, legs, hands, clothing, weapons and so on
Therefore, a character container will be created and all its elements will be added, so that I can control all its elements at one time by controlling the whole task container
For example, when a character moves, all elements need to be moved. It only controls the movement of the character container, not every element
Very simple, the code is as follows
const personContainer = new PIXI.Container();
const sprite = PIXI.Sprite.from("./img/head.png");
personContainer.addChild(sprite); // Add to container
const sprite2 = PIXI.Sprite.from("./img/body.png");
personContainer.addChild(sprite2);// Add to container
app.stage.addChild(personContainer);// Add the created container to the root container
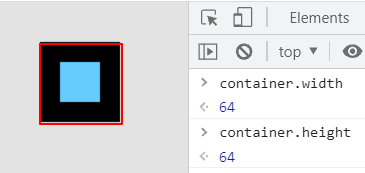
Container size
The default size of the container is the minimum rectangular area (where it is boxed in red) with all child elements
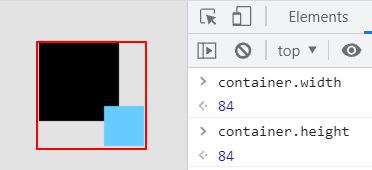
Container location
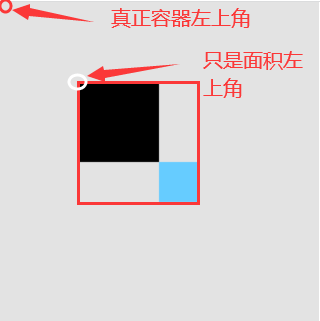
The default starting position of the container is x =0 and y = 0, but the above container does not start at the (0,0) position (container X and y are not modified)
Because the part framed in red above can only be called size, but actually the whole container contains
Minimum rectangular area including child elements + coordinate offset of child elements
For example, if the coordinates of the black element are set to x = 64 and y = 64, the container needs to calculate the coordinate offset 64 * 64 of the black sub element
So the outermost red box is the whole container
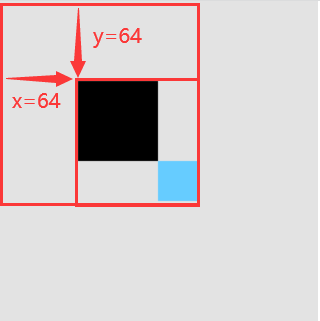
So the upper left corner of the container is still (0,0), not the upper left corner of the area
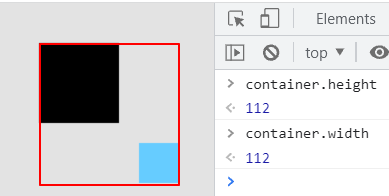
Sub element coordinates
After the element is added to the container, the coordinates set by the element are relative to the upper left corner of the container
For example, if the size and position of the child elements remain unchanged and the container start coordinate xy is modified, this is the result
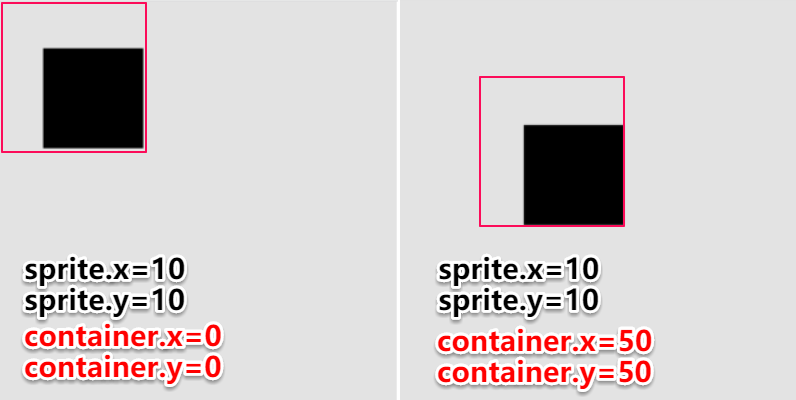
Here, the coordinates of child elements are fixed relative to the upper left corner of the container, and modifying the base point of the container will not affect
Container scaling
When the container is scaled, the child element will also be scaled, but the width and height of the child element is still the width and height before scaling
Like the following
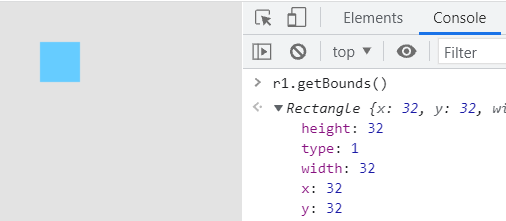
let r1 = new Graphics();
r1.beginFill(0x66ccff);
r1.drawRect(0, 0, 64, 64);
r1.endFill();
r1.x = 64
r1.y = 64

const container = new PIXI.Container();
container.addChild(r1);
container.scale.set(0.5, 0.5);
The blue box should be 32 * 32 after shrinking with the container, but the actual data obtained is still 64 * 64

If you want to get the actual size, you need to use the getBounds method
Therefore, the element data obtained by getboundaries is subject to the actual rendering, while the width height data obtained directly from the element is to retain the original setting
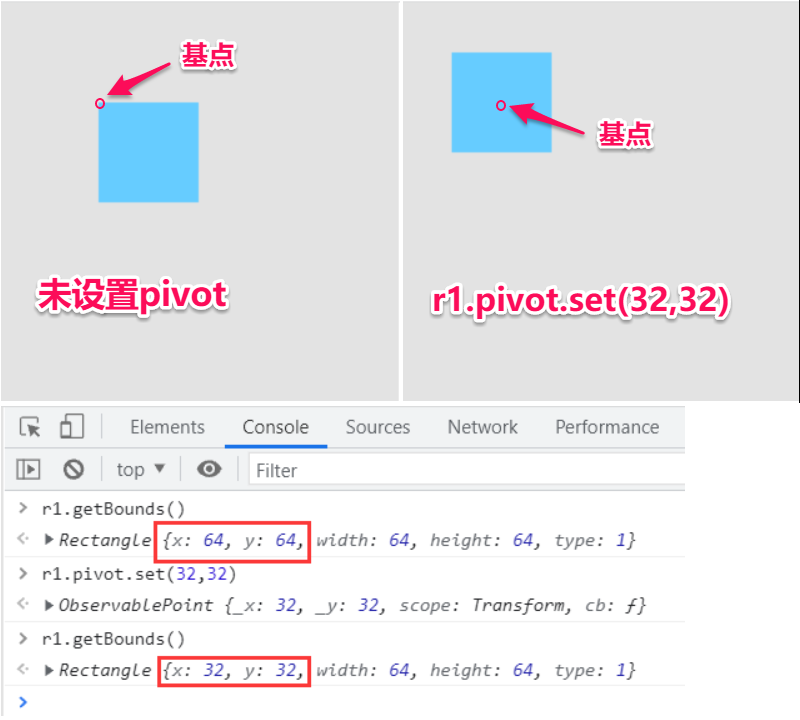
The coordinates obtained by getBounds are calculated based on the upper left corner of the element, not the base point of the element
As shown in the following figure, after setting the base point of element r1 as the center, the element runs to the upper left, so the closer the upper left corner is (0,0)
Therefore, the coordinates obtained by getboundaries change from (64,64) to (32,32)
To sum up
1. The element gets its own x and y, which are fixed, and the element width and height are only affected by its own scale
2. If getboundaries obtains x, y, width and height, the rendering result shall prevail
5 events
Adding events to canvas is very troublesome, but PIXI has done this well. We can use it as simple as dom listening for events
I haven't found any pits yet
How to add events
It mainly sets interactive to true for the element, and then listens for events
let r1 = new PIXI.Graphics();
r1.beginFill(0x66ccff);
r1.drawRect(0, 0, 64, 64);
r1.endFill();
r1.x = 64;
r1.y = 64;

app.stage.addChild(r1);

r1.interactive = true;
r1.on("pointerdown", (e) => {
  console.log("e", e);
});
What happened
mouse class (mousedown, mousemove)
touch class (touchmove, touchstart)
Self event (add child element, remove child element...)
See more
https://pixijs.download/dev/docs/PIXI.Container.html#added