Graphics of the Development of Dahua Camera java
Following the last project of Hai Kang, this month began the two development of Dahua webcam.
1. First of all, the emo downloaded from the official website, which is only written in C, let me understand how to read a java development, this aspect is a little worse than Haikang;
2. In the case of problems, when consulting their technology, every reply is a few numbers, and I have to guess for half a day, but finally the problem has been solved (there are a small part, they can not solve it).
3. Every time I ask a question, I will reply to an attachment, which is the Demo of the question. Since there is a Demo of java, why not put it on the official website directly, but also ask one to one at a time, which is quite speechless.
Well, back to the point. After we get the camera installed, we configure the IP address according to the tools of the official website, then download the Demo of the official website (although it is C, but it is useful to develop documents and programming instructions). If you want to download the code of the screenshot section, you can download it yourself. http://download.csdn.net/download/u012492535/10128871 It also has preview function, intelligent transportation function and download video function.
Since it is the development of webcam, the process is almost the same, which is carried out according to the process: 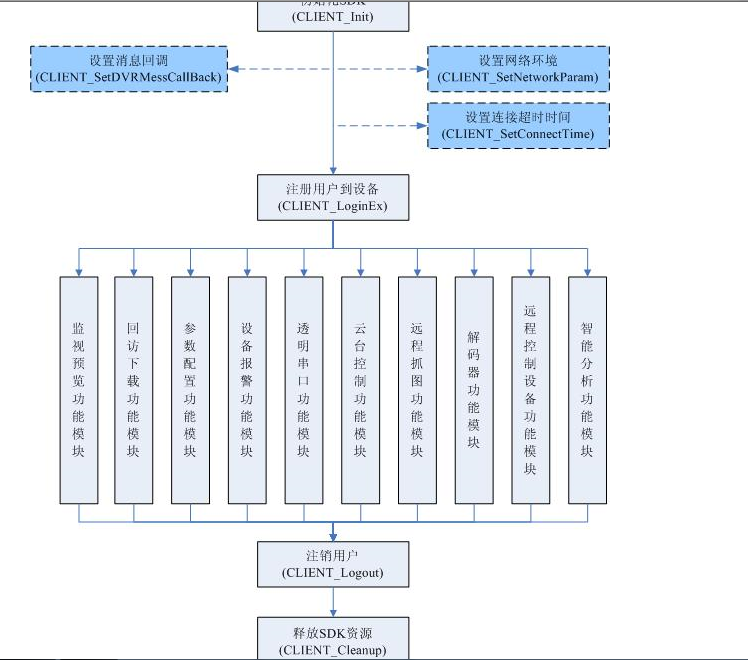
1. The first step is to initialize the device. Dahua's device functions need callback classes, so initialization is also available:
Code
        // Initialize SDK
        boolean binit = NetSdk.CLIENT_Init(m_DisConnectCB, new NativeLong(0));
        if (binit) {
            System.out.println("Successful initialization");
        }
Where m_DisConnectCB is a callback function
public class FDisConnectCB implements NetSDKLib.fDisConnect {
    public void invoke(NativeLong lLoginID, String pchDVRIP, int nDVRPort,
            NativeLong dwUser) {
        System.out.printf("Broken line callback:\n", pchDVRIP, nDVRPort, lLoginID.longValue(),
                dwUser.longValue());
    }
}
2. Among them, the optional operation items, if necessary, you can add it yourself. Here you can write the login directly.
m_hLoginHandle = NetSdk
                .CLIENT_LoginEx(ipAddress, (short) port, userName, password,
                        nSpecCap, pCapParam, m_stDeviceInfo, nError);
                        if (m_hLoginHandle.longValue() != 0) {
            System.out.printf("Login Success!\n");
            } else {
            System.out.printf("Login Fail.Last Error\n",
                    NetSdk.CLIENT_GetLastError());
        }
3. Setting up the callback function of the snapshot
//Setting callback function
        NetSdk.CLIENT_SetSnapRevCallBack(snapPicRet, new NativeLong(0));
Entry to callback functions
//Graph callback function
public class SnapPicRet implements NetSDKLib.fSnapRev{
    Pointer pBuffer;
    int revLen;

    public void invoke( NativeLong lLoginID, Pointer pBuf, int RevLen, int EncodeType, NativeLong CmdSerial, NativeLong dwUser) {
    }
}
4. After setting up the callback function, the request snapshot is executed. The parameters of SNAP_PARAMS are in the uploaded Demo.
NetSdk.CLIENT_SnapPictureEx(m_hLoginHandle, SNAP_PARAMS,
                    reserved
5. Next, the key point is how to save the captured image to the local location and name in the callback function.
if(pBuf != null && RevLen > 0) {
                        File path = new File("./Capture/");
                        if (!path.exists()) {
                            path.mkdir();
                        }

                        String strFileName = "./Capture/" + INetSDK.getDate() + ".jpg";

                        //Save pictures to local files
                        INetSDK.savePicture(pBuf, RevLen, strFileName);
                        System.out.println("strFileName = " + strFileName);
    try
        {
            DataOutputStream out = new DataOutputStream(new BufferedOutputStream(new FileOutputStream(sDstFile)));
            out.write(pBuf.getByteArray(0, dwBufSize), 0, dwBufSize);
            out.close();
        } catch (Exception e){
            e.printStackTrace();
        }
6. Results of running the program 
These are some of my experiences in making the screenshot function of the Huahua webcam. The complete code is not attached. If you don't understand, you can leave a message and see it, you will reply.