Use version 5.6.2
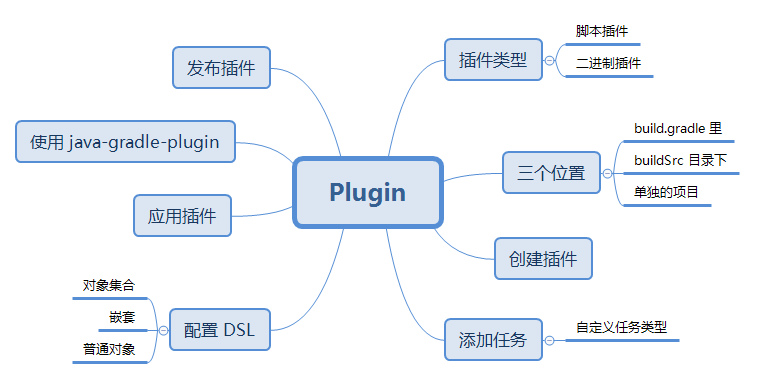
Plug-ins are used to encapsulate the build logic and some common configurations. Encapsulate reusable build logic and default conventions into plug-ins for use by other projects.
You can use your favorite language to develop plug-ins, but in the end it's compiled into bytecode to run in the JVM.
Gradle has two plug-ins, script plug-in and binary plug-in.
For the introduction of plug-ins, please refer to another article of mine. Gradle plug in
The custom plug-ins mentioned here are binary plug-ins. Binary plug-ins can be packaged and released for sharing.
Plug ins can be defined in three places
- In script
- Under buildSrc
- In a separate project
The purpose of plug-ins in three places is different.
Plug in in script
Other projects cannot be used. They can only be used in this script.
Under buildSrc
In the buildSrc directory of the project, all (sub) projects in the project can be used.
In a separate project
You can create a project for your plug-in. This project can package and publish JAR for any other project.
Create a plug-in
Static languages are recommended, such as Java, Kotlin, and IntelliJ IDEA is recommended for development tools.
A plug-in is a class that implements Plugin.
When a plug-in is applied to a project, Gradle instantiates the plug-in and calls the Plugin.apply() method, passing in the project instance as a parameter. The plug-in can make various configurations for this project.
CustomPLugin.java
// Define a plug-in
class CustomPLugin implements Plugin<Project>{

    @Override
    void apply(Project target) {
        // do something
    }
}
As mentioned above, plug-ins can be created in three places. Now let's implement them one by one.
Create a plug-in in the script
It can be defined anywhere in the build.gradle script.
build.gradle
// Define a plug-in
class CustomPLugin implements Plugin<Project>{

    @Override
    void apply(Project target) {
      //Add a task
     target.task('hello', group: 'util') {
         doLast {
             logger.quiet("Hello Plugin.")
         }
     }
    }
}

//Apply directly in the script
apply plugin:CustomPLugin
In the gradle window, you can see the added tasks after the application plug-in.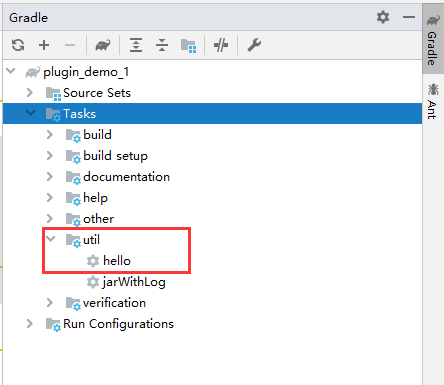
Double click the task or command line input to execute the hello task
gradle hello
Create a project in the buildSrc directory of the project
Groovy is used here.
Creating projects in this directory will be automatically recognized by Gradle.
The structure is as follows
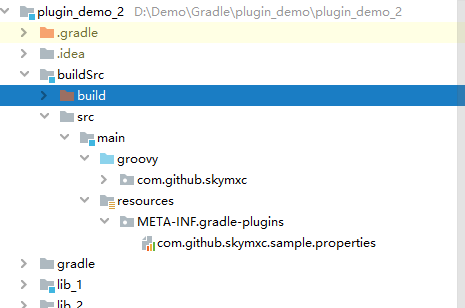
- Create directory buildSrc under the project root directory
- Under buildSrc, create a new directory according to java project or groovy project (depending on your language)
$projectDir/buildSrc/src/main/groovy
- Create your package in groovy (maybe not recognized as a project yet, create a directory), such as com.github.skymxc
- Create a plug-in in the package, that is, create a class that implements Plugin.
Here is a simple demonstration:
Add an operation for jar task in plug-in: generate record file
JarLogPlugin.groovy
/**
 * Output build record to specified file
 */
class JarLogPlugin implements Plugin<Project> {
    @Override
    void apply(Project target) {
        //Add an extension configuration to receive parameters
        target.extensions.create("log", LogExtension)

        //Add a task
        target.task(type: Jar,group:'util','jarWithLog',{
            doLast {
                //Use configuration
                def file = target.log.outputPath;
                if (file==null){
                    file = new File(target.projectDir,"/log/jarlog.txt").getPath()
                }
                println "The storage directory is ${file}"
                def content = "${getArchiveFileName().get()}---${getNow()}\n"
                writeFile(file,content)
            }
        })

        //Add an operation for the jar task.
        target.tasks.jar.doLast {
            println "current time is ${getNow()},Hit one. jar-> ${version}"
            //Save to specified file record
            def file = new File(target.projectDir,"/log/jarlog.txt");
            def content = "${version}---${getNow()}\n"
            writeFile(file.getAbsolutePath(),content)
        }
    }

    def String getNow(){
        def dateFormat = new SimpleDateFormat("YYYY-MM-dd HH:mm:ss.SSS");
        return dateFormat.format(Calendar.getInstance().getTime());
    }

    def void writeFile(String path,String content){
        def file = new File(path);
        if (!file.exists()){
            if (!file.getParentFile().exists()){
                file.getParentFile().mkdirs();
            }
            file.createNewFile();
        }
        FileWriter writer = new FileWriter(file.getAbsolutePath(),true);
        BufferedWriter bufferedWriter = new BufferedWriter(writer);
        bufferedWriter.write(content);
        bufferedWriter.close();
    }
}
Configure DSL
An extension is used to receive parameters. Ordinary objects can, for example
LogExtension.groovy
class LogExtension {
    String outputPath;
}
The extension is used here to configure the DSL for the plug-in.
//Added a LogExtension type property name for the project: log
project.extensions.create("log", LogExtension)
The plug-in can use DSL to receive parameters, which can be accessed directly through the Project instance in the plug-in or task.
def file = project.log.outputPath;
After the plug-in is created, it can be used in the project.
Now you can apply the plug-in using the class name.
build.gradle
import com.github.skymxc.JarLogPlugin

apply plugin: JarLogPlugin
After the plug-in application is successful, you can use DSL to configure parameters for the plug-in.
Profile address:
build.gradle
log {
    outputPath rootProject.projectDir.getPath()+"\\record\\jar.txt"
}
Create ID for plug-in
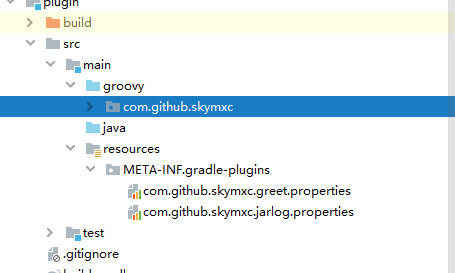
- Create the resources folder in the main directory
- Create the META-INF folder in the resources directory
- Create the gradle plugins folder in the META-INF directory
- Create the properties file in the gradle plugins directory. The name is your plug-in ID.
- In the id.properties file, point to your implementation class through implementation class.
for example
src / main / resources / META-INF / gradle-plugins / com.github.skymxc.sample.properties
implementation-class= com.github.skymxc.JarLogPlugin
Then you can use the plug-in ID
plugins {
    id 'com.github.skymxc.sample'
}
Specification of plug-in id:
- It can contain any alphanumeric characters "." and "-".
- Must contain at least one '.'.
- The reverse domain name in lowercase is generally used. (similar to package name)
- Cannot end with '.'.
- Cannot contain consecutive '.'.
For the syntax of Groovy, please refer to Groovy syntax.
Create plug-ins in separate projects
This time it's still in Groovy.
The plug-in project here is actually a Groovy project. Of course, if you use the Java language, it is a java project.
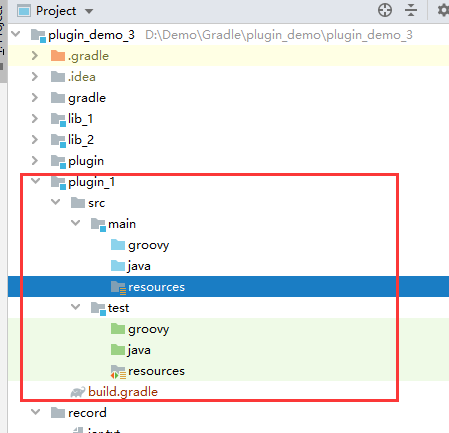
Create a project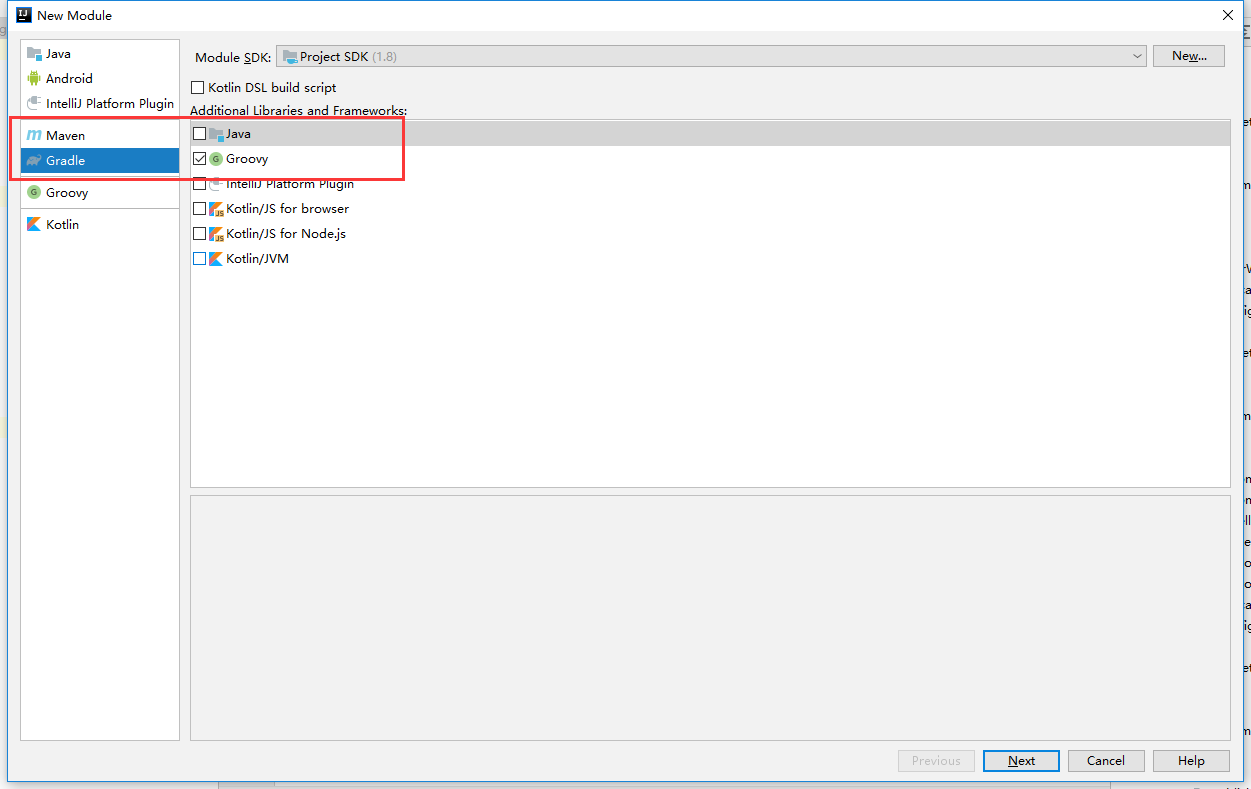
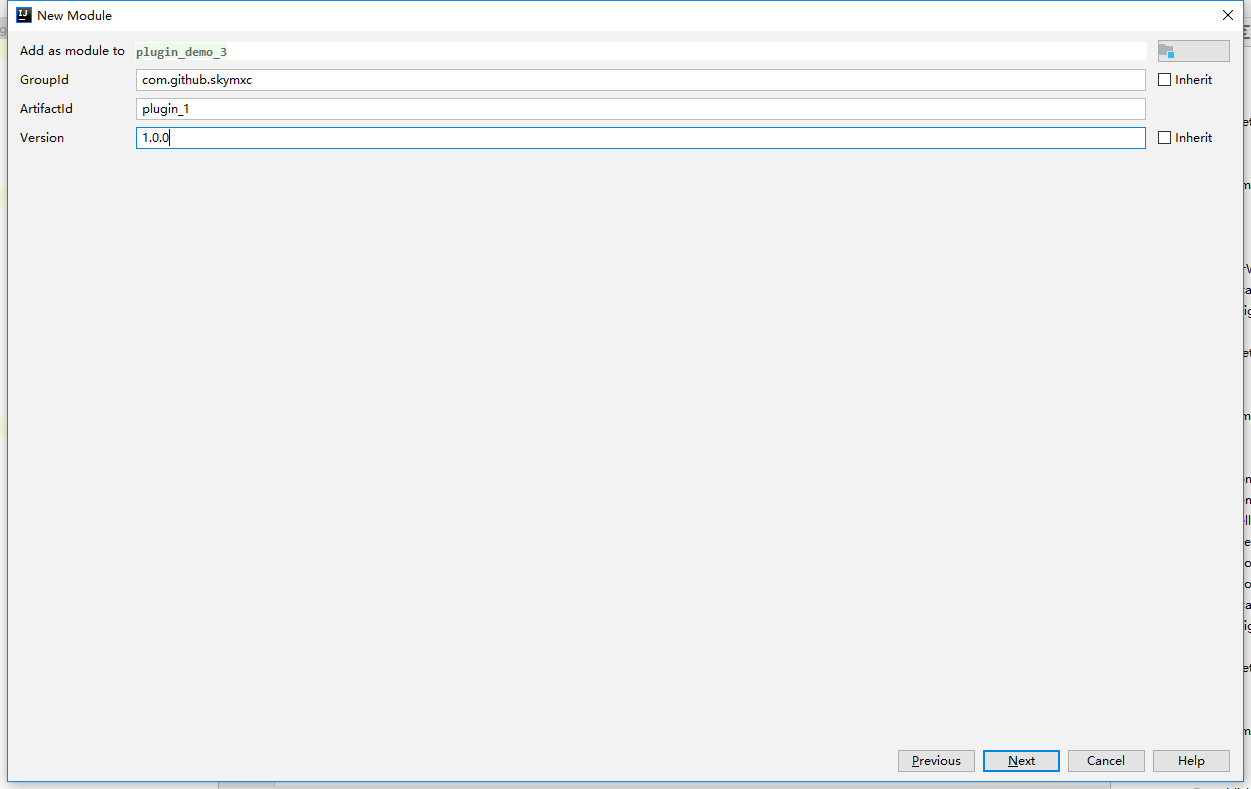
This is how the project was created, the standard Groovy project directory.
Change build.gradle script, configure project
- Application of maven publih plug-in
- Add Gradle and Groovy dependencies
- Configure upload task
That's how it ended up
plugins {
    id 'groovy'
    id 'maven-publish'
}

group 'com.github.skymxc'
version '1.0.0'

sourceCompatibility = 1.8

repositories {
    mavenCentral()
}

//Using groovy and gradle dependencies
dependencies {
    compile gradleApi()
    compile localGroovy()
}
publishing {
    repositories {
        maven {
            name 'local'
            url 'file://E:/libs/localMaven'
        }
    }
    publications {
        maven(MavenPublication) {
            groupId = 'com.github.skymxc'
            artifactId = 'plugin'
            version = '1.0.0'
            from components.java
        }
    }

}
Create two plug-ins:
One is the one created above, so there is no need to paste it again.
Another plug-in, green, configures a task and simply outputs a sentence.
class Greet implements Plugin<Project> {
    @Override
    void apply(Project target) {
        target.extensions.create("hello", Hello)
        target.task("hello") {
            doLast {
                println "message -> ${target.hello.message}"
            }
        }
    }
}
Hello.groovy
class Hello {
    String message
}
The configuration of plug-in ID is the same as above.
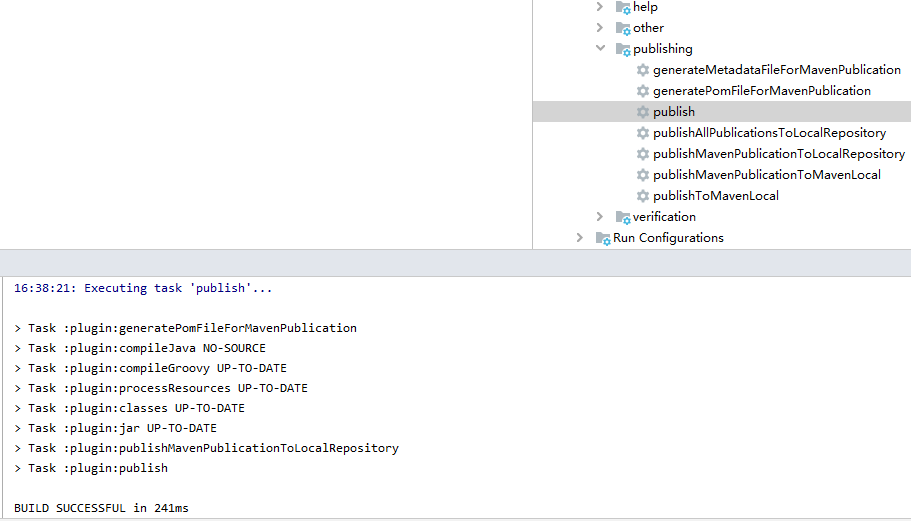
Execute the publish task of Maven publish to publish the plug-in to the specified warehouse.
Warehouse after successful publishing
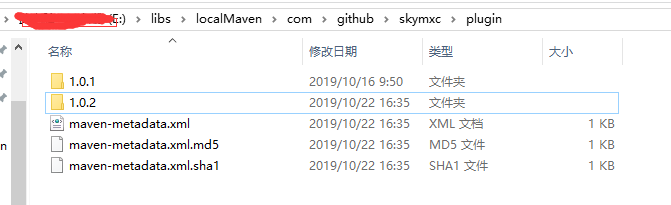
The plug-in has been created and released. Here is the plug-in.
Here is a brief introduction to the use of plug-ins. You can view the previous introduction in detail: Gradle plug in
- In the build.gradle configuration warehouse of the root project, add dependencies
buildscript {
    repositories {
        maven {
            url 'file://E:/libs/localMaven'
        }
    }
    dependencies {
        classpath 'com.github.skymxc:plugin:1.0.2'
    }
}- Application plug-in
I used plug-ins in two Java projects:
- One is how to use id
- One is to use the class name.
How to use the class name
······
apply plugin:'com.github.skymxc.greet'
hello{
message 'Used com.github.skymxc.greet Plug-in unit'
}
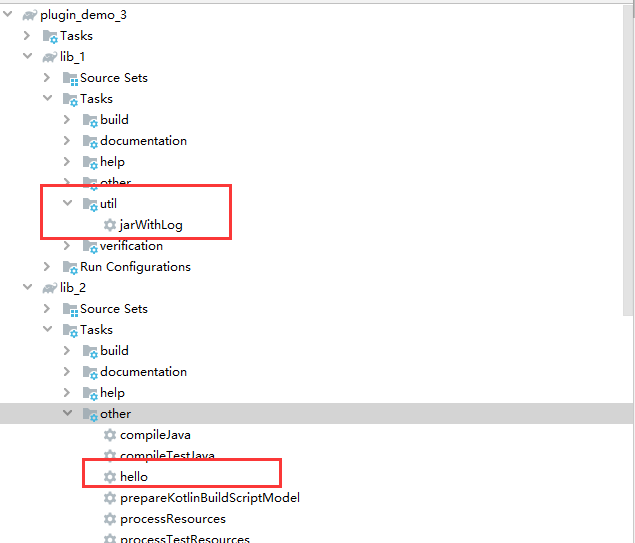
······How to use id in lib_1/ build.gradle
plugins {
    id 'java'
    id 'com.github.skymxc.jarlog'
}

······

logConfigure {
    outputPath rootProject.projectDir.getPath()+"\\record\\jar.txt"
}
In the gradle view after the plug-in is applied, you can see the added tasks.
Using java gradle plugin to develop plug-ins
Create a project as above, but this time it's a java project, and then apply the plug-in.
java gradle plugin can reduce duplicate code. It automatically applies java plug-ins and adds gradle api() dependency.
plugins {
    id 'java-gradle-plugin'
}
Using the gradlePlugin {} configuration block, you can configure every plug-in you develop without manually creating the corresponding attribute file.
gradlePlugin {
    plugins {
        greetPlugin {
            id = 'com.github.skymxc.greet'
            implementationClass = 'com.github.skymxc.GreetPlugin'
        }

        jarWithLogPlugin {
            id = 'com.github.skymxc.jar-log'
            implementationClass = 'com.github.skymxc.JarWithLogPlugin'
        }
    }
}
The plug-in will automatically generate the corresponding META-INF directory in the jar file.
With Maven publish, you can create corresponding publishing tasks for each plug-in.
The corresponding "plug in tag artifact" will also be published for each plug-in.
Parts marked by plug-ins
For the plug-in marking workpieces, insert the following:
Each maven artifact is identified by three parts
- groupId
- artifactId
- version
Usually we add the following dependency:
implementation 'groupId:artifactId:version'
And our plug-ins are applied by id. how to find the corresponding artifacts by id? There is "plug-in tag artifacts".
When applying plug-ins, the ID will be mapped as follows: plugin.id: plugin.id.gradle.plugin:plugin.version
Namely:
- plugin.id
- plugin.id.gradle.plugin
- plugin.version
For example, the corresponding artifacts of com.github.skymxc.green plug-in are:
com.github.skymxc.greet:com.github.skymxc.greet.gradle.plugin:1.0.0
Part code:
plugins {
    id 'java-gradle-plugin'
    id 'maven-publish'
}

group 'com.github.skymxc'
version '1.0.0'


gradlePlugin {
    plugins {
        greetPlugin {
            id = 'com.github.skymxc.greet'
            implementationClass = 'com.github.skymxc.GreetPlugin'
        }

        jarWithLogPlugin {
            id = 'com.github.skymxc.jar-log'
            implementationClass = 'com.github.skymxc.JarWithLogPlugin'
        }
    }
}

publishing {
    repositories {
        maven {
            name 'local'
            url 'file://E:/libs/localMaven'
        }
    }
}
Maven publish tasks
Briefly introduce the publishing task of Maven publish
-
generatePomFileFor${PubName}Publication
Create a POM file for a publication named PubName, populating it with known metadata, such as project name, project version, and dependencies. The default location for POM files is build / publications / $PubName / pom-default.xml.
-
publish${PubName}PublicationTo${RepoName}Repository
Publish PubName to a warehouse named RepoName.
If the warehouse definition does not have an explicit name, RepoName defaults to Maven. -
publish${PubName}PublicationToMavenLocal
Copy PubName publication and POM files and other metadata published locally to local Maven cache
(typically $user_home /. M2 / repository). -
publish
Depends on: all publish${PubName}PublicationTo${RepoName}Repository tasks
Publish all defined publications to the aggregate task of all defined warehouses. Tasks copied to the local Maven cache are not included. -
publishToMavenLocal
Depends on: all publish${PubName}PublicationToMavenLocal tasks
Copy all defined publications (including their metadata (POM files, etc.) to the local Maven cache.
This figure lists the corresponding tasks generated for each plug-in.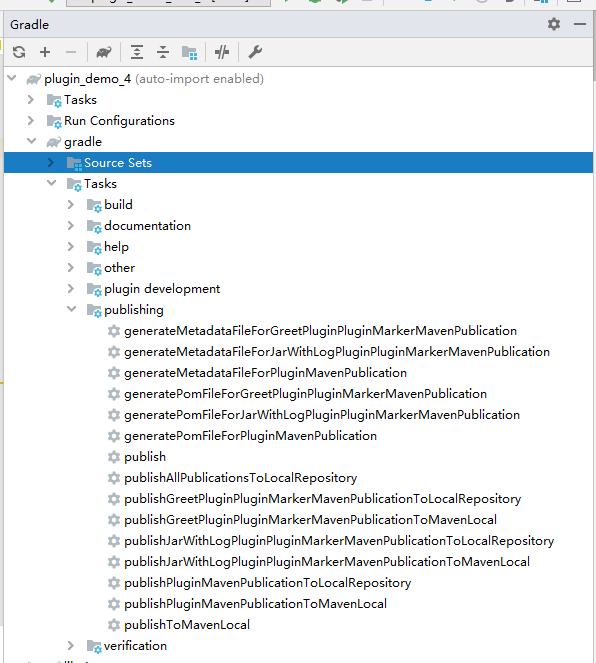
After publish ing, you can view it in the corresponding warehouse.


Use after plug-in release
- Configure the warehouse, this time in settings.gradle
pluginManagement {
    repositories {
        maven {
            url 'file://E:/libs/localMaven'
        }
    }
}- Use plug-ins
plugins {
    id 'java'
    id 'com.github.skymxc.greet' version '1.0.13'
    id 'com.github.skymxc.jar-log' version '1.0.0'
}
After applying the plug-in, you can see the corresponding tasks in the window of Gradle.
You can then configure the DSL as needed.
Configure DSL for plug-ins
The interaction with the plug-in is through the DSL configuration block.
How to configure DSL for plug-ins? The answer is that any ordinary class can.
Through the Gradle API, you can add a common class as an extension of Project, which is the property of Project.
For example, the tasks in plug-ins need two parameters: file address and file name, which need to be solved by DSL configuration.
JarLogExtension.java is a common class, which has two properties, namely name and path.
package com.github.skymxc.extension;

public class JarLogExtension {
    private String name;
    private String path;

    //Omit setter/getter
}
Add this class as an extension of the project in the plug-in.
public class JarWithLogPlugin implements Plugin<Project> {

    @Override
    public void apply(Project target) {
        //Add extension
        target.getExtensions().add("jarLog", JarLogExtension.class);
        //Create tasks
        target.getTasks().create("jarWithLog", JarWithLogTask.class);
    }
}
After applying the plug-in, you can use the DSL configuration in the script.
build.gradle
······

/**
 * DSL configured for jarWithLog
 */
jarLog {
    path getBuildDir().path+"/libs"
    name "record.txt"
}

······
The next step is to obtain the DSL configuration parameters in the plug-in or task.
You can get this extension object by name or type.
public class JarWithLogTask extends Jar {

    @TaskAction
    private void writeLog() throws IOException {
      //Get configuration
        JarLogExtension extension = getProject().getExtensions().getByType(JarLogExtension.class);

        File file = new File(extension.getPath(),extension.getName());
        String s = file.getAbsolutePath();
        String content = getNow()+" --- "+getArchiveFileName().get();
        System.out.println("path --> "+s);
        writeFile(s,content);
    }
}
Nested DSL
In our daily use, nested DSL is very common, so how to implement it?
hello {
    message 'Use pluginManagement Management plug-in'
    user {
        name 'mxc'
        age 18
    }
}
Now let me realize the following:
The first step is to create nested objects inside. It is important to configure corresponding methods for DSL.
UserData.java
package com.github.skymxc.extension;

/**
 * For the practice of nested DSL
 */
public class UserData {
    private String name;
    private int age;
    public String getName() {
        return name;
    }

    /**
     * Note that this method does not have a set
     * @param name
     */
    public void name(String name) {
        this.name = name;
    }

    public int getAge() {
        return age;
    }

    public void age(int age) {
        this.age = age;
    }

}
Then there is the class corresponding to the outer DSL. Because there are DSLs nested, closures are used.
package com.github.skymxc.extension;

import org.gradle.api.Action;

/**
 * Extension created for HelloTask to receive configuration parameters
 */
public class HelloExtension {

    private String message;
    private final UserData user = new UserData();


    /**
     * Note that this method does not have a set
     * @param action
     */
    public void user(Action<? super UserData> action) {
        action.execute(user);
    }

    // Omit other getters / setters
}
Finally, the extension added to the project, as before
public class GreetPlugin implements Plugin<Project> {
    @Override
    public void apply(Project target) {
        target.getExtensions().create("hello", HelloExtension.class);
        target.getTasks().create("hello", HelloTask.class);
    }
}
The same is true of acquisition in tasks
HelloExtension hello = getProject().getExtensions().getByType(HelloExtension.class);
UserData user = hello.getUser();
Aggregate object
Look at another DSL configuration. This kind of set nesting is often seen. Let's implement it briefly.
fruits {
    apple {
        color 'Red'
    }

    grape {
        color 'Purplish red'
    }

    banana {
        color 'yellow'
    }

    orange {
        color 'Shellfish yellow'
    }

}
This configuration is implemented with NamedDomainObjectContainer, which receives a class, which must have a constructor containing the name parameter.
Fruit.java
/**
 * There must be a name attribute and a constructor for the name parameter
 */
public class Fruit {

    private String name;
    private String color;

    public Fruit(String name) {
        this.name = name;
    }

    public void color(String color){
        setColor(color);
    }

    //Omit setter/getter
}
Configure a Factory
FruitFactory.java
import org.gradle.api.NamedDomainObjectFactory;
import org.gradle.internal.reflect.Instantiator;

public class FruitFactory implements NamedDomainObjectFactory<Fruit> {

    private Instantiator instantiator;

    public FruitFactory(Instantiator instantiator) {
        this.instantiator = instantiator;
    }

    @Override
    public Fruit create(String name) {
        return instantiator.newInstance(Fruit.class, name);
    }
}
The next step is to create the NamedDomainObjectContainer object and add it to the Project.
GreetPlugin.java
public class GreetPlugin implements Plugin<Project> {
    @Override
    public void apply(Project target) {

        Instantiator instantiator = ((DefaultGradle)target.getGradle()).getServices().get(Instantiator.class);

        NamedDomainObjectContainer<Fruit> fruits = target.container(Fruit.class,new FruitFactory(instantiator));

        target.getExtensions().add("fruits",fruits);

        target.getTasks().create("printlnFruits", ShowFruitTask.class);
    }
}
Now you can use the above DSL configuration in the script by using this plug-in.
Finally, DSL configuration is received.
public class ShowFruitTask extends DefaultTask {

    @TaskAction
    public void show(){
        NamedDomainObjectContainer<Fruit> fruits = (NamedDomainObjectContainer<Fruit>) getProject().getExtensions().getByName("fruits");

        fruits.forEach(fruit -> {
            String format = String.format("name: %s , color: %s", fruit.getName(), fruit.getColor());
            getLogger().quiet("fruit : {}",format);
        });
    }
}
This is all about the introduction of custom plug-ins. More detailed documents can be viewed. Gradle user manual
The source code of this article has been put on github: GradlePractice
data
- Custom plug-in https://docs.gradle.org/current/userguide/custom'plugins.html
- Develop auxiliary plug-ins https://docs.gradle.org/current/userguide/java.gradle.plugin.html
- Use the plug-in https://docs.gradle.org/current/userguide/plugins.html
- Publish https://docs.gradle.org/current/userguide/publishing'overview.html
- Maven publishing plug-in https://docs.gradle.org/current/userguide/publishing_maven.html
- Gradle tutorial https://gradle.org/guides/?q=Plugin%20Development
- Gradle DSL https://blog.csdn.net/zlcjssds/article/details/79229209
End