After learning Groovy's core grammar, I'll move on to Gradle.
Gradle is a system building tool whose DSL is based on Groovy. Most of its functionality is achieved through plug-ins. If built-in plug-ins do not meet your needs, you can customize your own plug-ins.
Gradle Getting Started and Exploring Life Cycles
We can Reference Documents Get started with Gradle.
Here, how Gradle downloads, how to install, let alone, you can learn by yourself in Baidu.
Once the installation is complete, you can verify the gradle version with the following command
// Window os
gradlew -v

// Linux os
./gradle -v
Now write the first Gradle script
// build.gradle
task hello {
    doLast {
       println "Hello World!"
    }
}

// Execute the hello task defined in the build.gradle script
// The -q parameter controls the log level of gradle output and which logs are visible
> gradlew -q hello
// Console Output Information
Hello World!
Buil.gradle is Gradle's default build script file.Define a task (Task), whose name is hello, and add an Action to the task hello, which is actually a closure of the Groovy language implementation.doLast is the code that Task calls back to execute after it has executed.
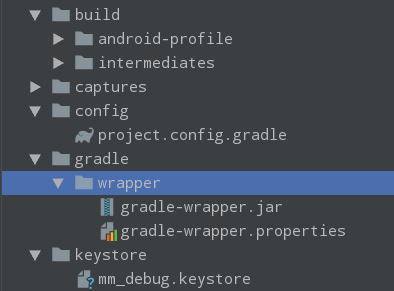
Gradle Wrapper
Wrapper, in fact, is a layer of packaging for Gradle in order to unify the build version of Gradle in the development and avoid the inconsistency of versions.
When using Wrapper to start Gradle, Wrapper checks to see if Gradle is associated with being downloaded, does not download and run the build from the configured address, and does not need to configure the Gradle environment.
Generate Wrapper
We can execute Gradle's built-in task to automatically generate Wrapper
> gradlew wrapper

// The following Wrapper configuration, gradlew, gradlew.bat file will be generated
// Gradlew and gradlew.bat are executable script files under Linux and Windows, respectively, the same as Gradle's original life command usage
When executing the gradlew wrapper command, you can also specify parameters such as Gradle version, Gradle download address, and so on.
// Specify Gradle version, not the version currently installed by default
> gradlew wrapper --gradle-version 4.1
This parameter affects the value of distribution Url in the gradle-wrapper.properties configuration, the rule of which is: distribution Url=https\://services.gradle.org/distributions/gradle-${gradle-version}-all.zip
Customize Wrapper Task
Customize Wrapper Task in build.gradle build file
task wrapper(type: Wrapper) {
    gradleVersion = '5.1'
}

> gradlew wrapper
Once the task is executed, a version 5.1 Wrapper is generated, and you do not need to specify the Gradle version manually.
Gradle Log
log level
Gradle log level adds QUIET and LIFECYCLE levels.The Gradle log level is as follows:
ERROR error message
QUIET Important Messages
WARNING Warning Message
LIFECYCLE Progress Message
INFO Information Message
DEBUG Debug Message
// -q or--quite outputs log information at and above the QUIET level
> gradlew -q tasks

// -i or--info outputs log information at and above the INFO level
> gradlew -i tasks

// Output LIFECYCLE level and higher without options
// -d or -debug outputs the DEBUG level and higher, which outputs all logs
Output Gradle Error Stack Information
By default, the output of stack information is turned off and can be opened by adding parameters from the command line, Gradle will output error stack information if the build fails
// -s is recommended because-S outputs too much stack information
> gradlew -s tasks

// -s or--stacktrace outputs critical stack information
// -S or--full-stacktrace outputs all stack information
Add Log Output to Script
Typically, we use the print series method to output logs at the QUIET level
println 'Output log information'
You can also use the built-in logger to output different levels of log information:
logger.quiet('quiet Journal')
logger.lifecycle("lifecycle Journal")
The internal implementation is to call the getLogger() method of the Project s to get an instance of the Logger object.
Gradle command line
View Help Document Command
In general, to view the help documentation, just add -h or--help after the command, and some are-?
> gradlew -?
> gradlew -h
> gradlew --help
View all executable Tasks
After executing the following command, all executable task s are listed
> gradlew tasks
Force Refresh Dependencies
To solve the problem caused by the cache, download the dependency again without going out of the cache by following the command
> gradlew --refresh-dependencies assemble
Multitask invocation
Multiple tasks can be performed by commands that are separated by spaces in order, such as the following commands: clean for file cleanup and package for commands
> gradlew clean assembleArmDebug
Gradle Life Cycle Exploration
https://docs.gradle.org/3.3/u...
Gradle building is usually a three-step process
Initialization phase
Gradle supports the compilation of single and multiple projects.During the initialization phase, Gradle determines which projects need to be compiled and creates a Project object for each project.
At this stage, Gradle creates a Settings object and executes a settings.gradle script on it to establish hierarchical relationships between projects.
Configuration phase
At this stage, Gradle executes the corresponding build.gradle script on each Projectobject to configure the Projects.
Execution phase
During the execution phase, Gradle determines which Tasks created during the configuration phase need to be executed, then executes each of the selected Tasks.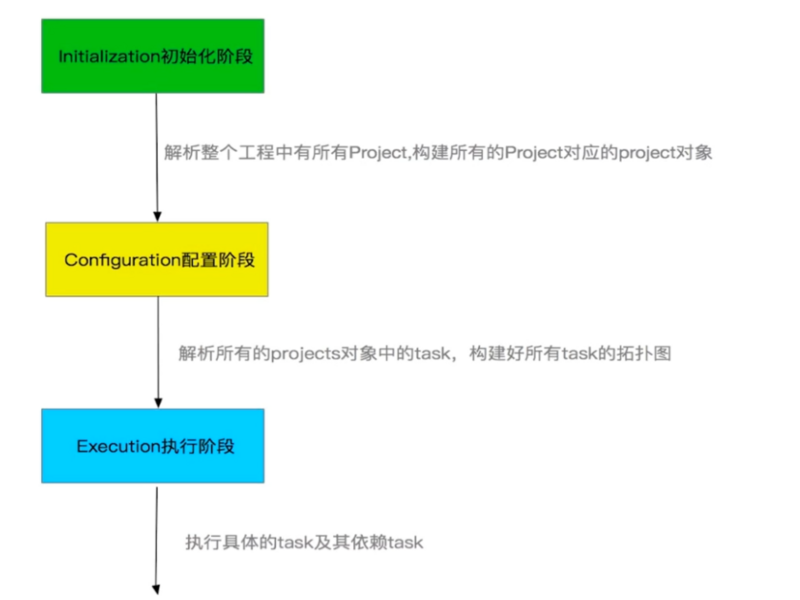
Stages can be monitored in Gradle:
In the settings.gradle file
println "Initialization phase begins..."
Add listen callback to build.gradle file
this.afterEvaluate {
    println "Listening callbacks after the configuration phase is complete"
}

this.gradle.buildFinished {
    println "gradle Listening Callback After Execution"
}
Gradle Building Script Foundation Exploration
settings file
In Gradle, the settings file is primarily used for initialization and configuration of the project tree. The default name is settings.gradle, which is stored in the project root directory.
A root Project is equivalent to a Project in Android Studio, and a root Project can have multiple subprojects, that is, multiple modules.
A subproject can only be identified by Gradle if it is configured in the settings.gradle file, that is, included when it is built.
include ':app', ':basiclib'
build file
Each Project will have a Build file, which is the Project build entry.You can configure versions, plug-ins, dependent libraries, etc.
Root Project s also have a Build file in which all Child Projects can be obtained, so we can configure Hild Projects uniformly, such as plug-ins, depending on the Maven repository, and so on, without having to configure each Projects.If you configure all Child Projects repositories as jcenter, you can configure them as follows:
subprojects {
    repositories {
       println "subprojects>> name: ${project.getName()}"
       jcenter()
    }
}
In addition to subprojects, allprojects are also provided, which is the configuration for all Project s.
Projects ,Tasks
A Project can consist of multiple Tasks.Task is an atomic operation, such as typing a jar package, copying a file, last jar to the Maven Central Warehouse, and so on.
Create a task
task customTask {
    doFirst {
        println "custom task>>> doFirst"
    }

    doLast {
        println "custom task>>> doLast"
    }
}

// Execute task, -s output error stack information
> gradlew -s customTask
Task is actually a function of the Project object, customTask is the name of the task.Prototype: Task task(String name, Closure configureClosure), Groovy syntax, the last parameter is the closure, can be placed outside the brackets, and method brackets can be omitted.
Tasks can also be created through TaskContainer, where a TaskContainer is already defined by the Project Object object
tasks.create("customTask") {
    doFirst {
        println "TaskContainer custom task>>> doFirst"
    }

    doLast {
        println "TaskContainer custom task>>> doLast"
    }
}

// Execute task, -s output error stack information
> gradlew -s customTask
Task Dependency
There can be dependencies between tasks, that is, a task cannot be executed until it has been executed.Dependent tasks can be specified through dependsOn.
task customTask1 {
    doLast {
        println "customTask1 running."
    }
}

// Execution of customTask2 will depend on customTask1
task customTask2(dependsOn: customTask1) {
    doLast {
        println "customTask2 running."
    }
}

> gradlew  customTask2

// Output print information, customTask1 will take precedence over customTask2
customTask1 running.
customTask2 running.
A task can also depend on multiple tasks at the same time, dependsOn is a method of the Task class that can accept multiple dependent tasks as parameters
task customTask1 {
    doLast {
        println "customTask1 running."
    }
}

task customTask2 {
    doLast {
        println "customTask2 running."
    }
}

task customTask3 {
    // Execution of customTask3, dependent on customTask1, customTask12
    // Multiple tasks, separated by commas, executed first in the previous tasks, such as the customTask1 task
    dependsOn customTask1, customTask2
    doLast {
        println "customTask3 running."
    }
}

// Execute customTask3 task
> gradlew customTask3

// Output print information,
:customTask1
customTask1 running.

:customTask2
customTask2 running.

:customTask3
customTask3 running.
Operating tasks by task name
Task's API can be used to access its methods, properties, or reconfigure the task through its name (the task type is Task).
task customTask1 {
    println "customTask1 running."
}

customTask1.doFirst {
    println "customTask1 doFirst running."
}

customTask1.doLast {
    println "has customTask1 property ${project.hasProperty('customTask1')}"
    println "customTask1 doLast running."
}

// Execute Tasks
> gradlew customTask1

// Output Print Information
customTask1 running.
customTask1 doFirst running.
has customTask1 property true
customTask1 doLast running.
From the script above, you can call the doFirst and doLast methods to do something before and after the task is executed.The principle of working with a task name is that when a project creates the task, it also registers the task name used by the task pair as a property of the project, of type Task.project.hasProperty(String propertyName) allows you to check for this property.
Custom Properties
Both Project s and Tasks can add additional custom attributes by applying the corresponding ext attribute to which they belong.If you customize multiple attributes, use a code block.Custom properties can be accessed across projects and across Tasks.
// Custom has a Project property
ext.myName = 'kerwin'

// Customize multiple attributes through code blocks
ext {
    myAge = 12
    myPhone = 13564954189
}

task customTask {
    doLast {
        println "myName: ${myName}"
        println "myAge: ${myAge}"
        println "myPhone: ${myPhone}"
    }
}
// Execute Tasks
> gradlew customTask
// Output Results
myName: kerwin
myAge: 12
myPhone: 13564954189