Process introduction
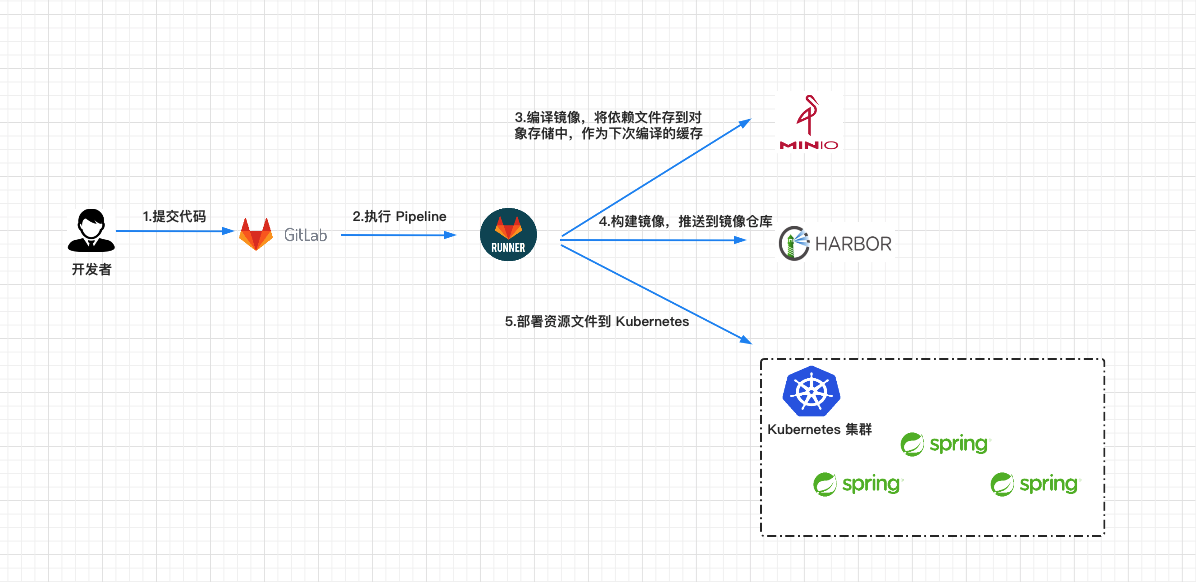
CI/CD is a method to frequently deliver applications to customers by introducing automation in the application development phase. The core concepts of CI/CD are continuous integration, continuous delivery and continuous deployment. In this article, I will introduce the practice of automated build and release based on GitLab CI/CD. As shown in the figure below, the whole process will be divided into several parts:
- 1. First, after the developer completes the development of the project locally, push the code to the Gitlab warehouse.
- 2. When the code is submitted to the gitlab warehouse, the Pipeline will be triggered, and the Gitlab Runner will run the tasks of each stage in the Pipeline according to the. gitlab-ci.yml configuration file. I have defined three phases: compile, build and deploy.
- 3. In the compile phase, Gitlab Runner compiles the project into jar packages, uses MinIO as cache, compresses and uploads the dependencies required by the project to MinIO, and can directly download the dependency files from MinIO during the next compilation.
- 4. In the build phase, Gitlab Runner uses the jar package compiled in the compile phase to build the Docker image and push the image to the image warehouse.
- 5. In the deploy phase, Gitlab Runner uses the built Docker image to deploy applications in the Kubernetes cluster.
Gitlab CI/CD
Introduction to GitLab
GitLab[1] is an open source application developed by Ruby on Rails, which implements a self managed Git project warehouse, and can access public or private projects through the Web interface. It has similar functions to GitHub, which can browse the source code and manage defects and comments. It can manage the team's access to the warehouse. It is very easy to browse the submitted versions and provides a file history library.
Introduction to GitLab CI/CD
Gitlab CI/CD[2] is a tool built into GitLab for software development through a continuous approach.
- Continuous Integration
Suppose an application whose code is stored in GitLab's Git repository. Developers push code changes many times a day. For each push to the repository, you can create a set of scripts to automatically build and test your application, reducing the chance of introducing errors into the application. This approach is called continuous integration. For each change submitted to the application (or even the development branch), it will automatically build and test continuously to ensure that the introduced change passes all the tests, guidelines and code compliance standards you have established for the application. - Continuous Delivery
Continuous delivery is a further operation beyond continuous integration. Not only will the application be built and tested at each code change pushed to the code base, but it can also be deployed continuously as an additional step, although the deployment is triggered manually. This method ensures that the code is checked automatically, but manual intervention is required to manually trigger the change from the policy. - Continuous Deployment
It is similar to continuous delivery, but the difference is that you do not need to deploy it manually, but set it to automatic deployment. Deploy your application without human intervention at all.
Introduction to GitLab Runner
GitLab Runner [3] is used to execute a series of jobs triggered by Gitlab CI/CD and send the results back to gitlab. GitLab Runner can be run in Docker container or deployed to Kubernetes cluster.
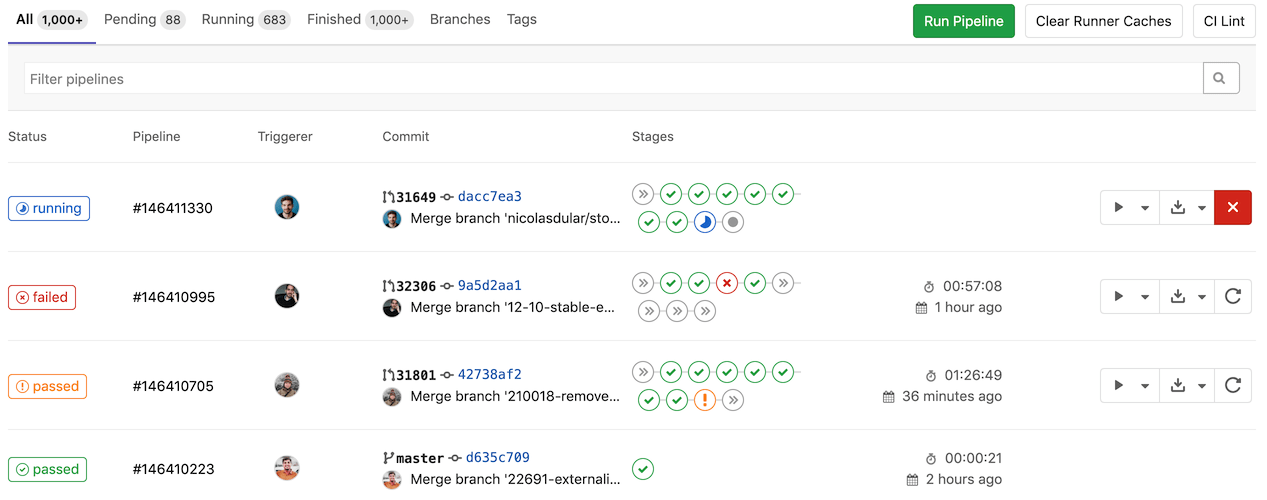
Pipeline
Pipeline [4], called pipeline in Chinese, is a phased construction task. For example, the processes of installing dependencies, running tests, packaging, deploying development servers, and deploying production servers are collectively called pipeline.
Stage
Stage [5] refers to the construction stage, which can be understood as the processes of "installation dependency" and "running test" mentioned above. We can define multiple stages in a Pipeline.
Job
Job [6] represents a built job (or task), and represents a specific task executed in a Stage. We can define multiple Jobs in Stages.
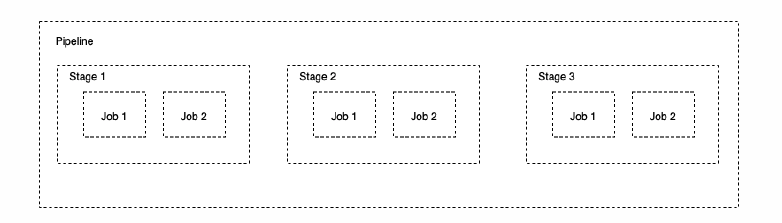
The relationship between Pipeline, Stage and Job can be represented by the following figure.
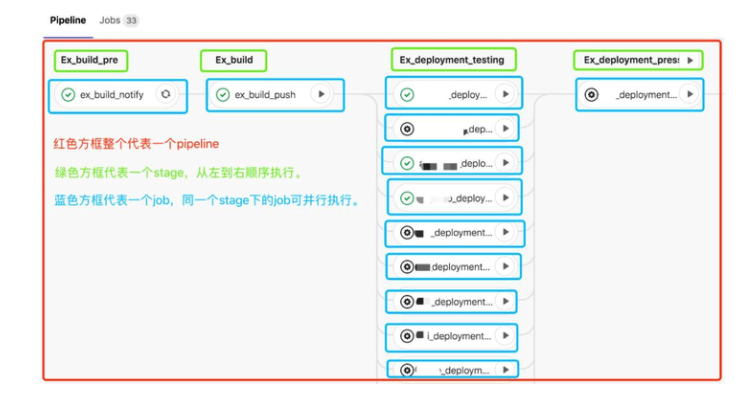
Take an actual Pipeline in Gitlab as an example to explain the meaning of Pipeline, Stage and Job. See the following figure for details.
Introduction to MinIO
MinIO is a distributed, high-performance object storage service designed for large private cloud environments. MinIO is compatible with Amazon S3 object storage interface and is very suitable for storing large amounts of unstructured data, such as pictures, videos, log files, images, etc.
This article will use MinIo as the cache used when compiling the Springboot project. When compiling the project for the first time, the dependency will be pulled from Maven's official website, and then the dependency will be compressed and uploaded to MinIo. The saved dependency file can be directly used when compiling the project next time.
Environment construction
prerequisite
- Deploy a set of Kubernetes clusters.
- Install the Helm tool. For Helm installation, please refer to https://helm.sh/zh/docs/intro/install/
MinIO deployment
Helm is a software package management tool in Kubernetes ecosystem, which is convenient for us to quickly deploy applications. We chose to use helm to deploy MinIO in the Kubernetes cluster.
Add Helm warehouse.
helm repo add minio https://helm.min.io/
Install Helm using the following command. Set the user name to admin and the password to admin123456, and deploy in the minio namespace.
helm install minio \
--set accessKey=admin,secretKey=admin123456 \
--namespace minio --create-namespace \
minio/minio

#Return results
minio/minio
NAME: minio
LAST DEPLOYED: Wed Aug 18 13:23:45 2021
NAMESPACE: minio
STATUS: deployed
REVISION: 1
TEST SUITE: None
NOTES:
Minio can be accessed via port 9000 on the following DNS name from within your cluster:
minio.minio.svc.cluster.local

To access Minio from localhost, run the below commands:

  1. export POD_NAME=$(kubectl get pods --namespace minio -l "release=minio" -o jsonpath="{.items[0].metadata.name}")

  2. kubectl port-forward $POD_NAME 9000 --namespace minio

Read more about port forwarding here: http://kubernetes.io/docs/user-guide/kubectl/kubectl_port-forward/

You can now access Minio server on http://localhost:9000. Follow the below steps to connect to Minio server with mc client:

  1. Download the Minio mc client - https://docs.minio.io/docs/minio-client-quickstart-guide

  2. Get the ACCESS_KEY=$(kubectl get secret minio -o jsonpath="{.data.accesskey}" | base64 --decode) and the SECRET_KEY=$(kubectl get secret minio -o jsonpath="{.data.secretkey}" | base64 --decode)

  3. mc alias set minio-local http://localhost:9000 "$ACCESS_KEY" "$SECRET_KEY" --api s3v4

  4. mc ls minio-local

Alternately, you can use your browser or the Minio SDK to access the server - https://docs.minio.io/categories/17
In order to access the Web interface of MinIO on the local computer, use the following command to turn on port forwarding. You can also choose to expose the MinIO service outside the cluster through NodePort or other methods.
export POD_NAME=$(kubectl get pods --namespace minio -l "release=minio" -o jsonpath="{.items[0].metadata.name}")
kubectl port-forward $POD_NAME 9000 --namespace minio
Browser input http://localhost:9000 Access the Minio interface. User name: admin, password: admin123456, which was set when we used helm install to follow Minio.

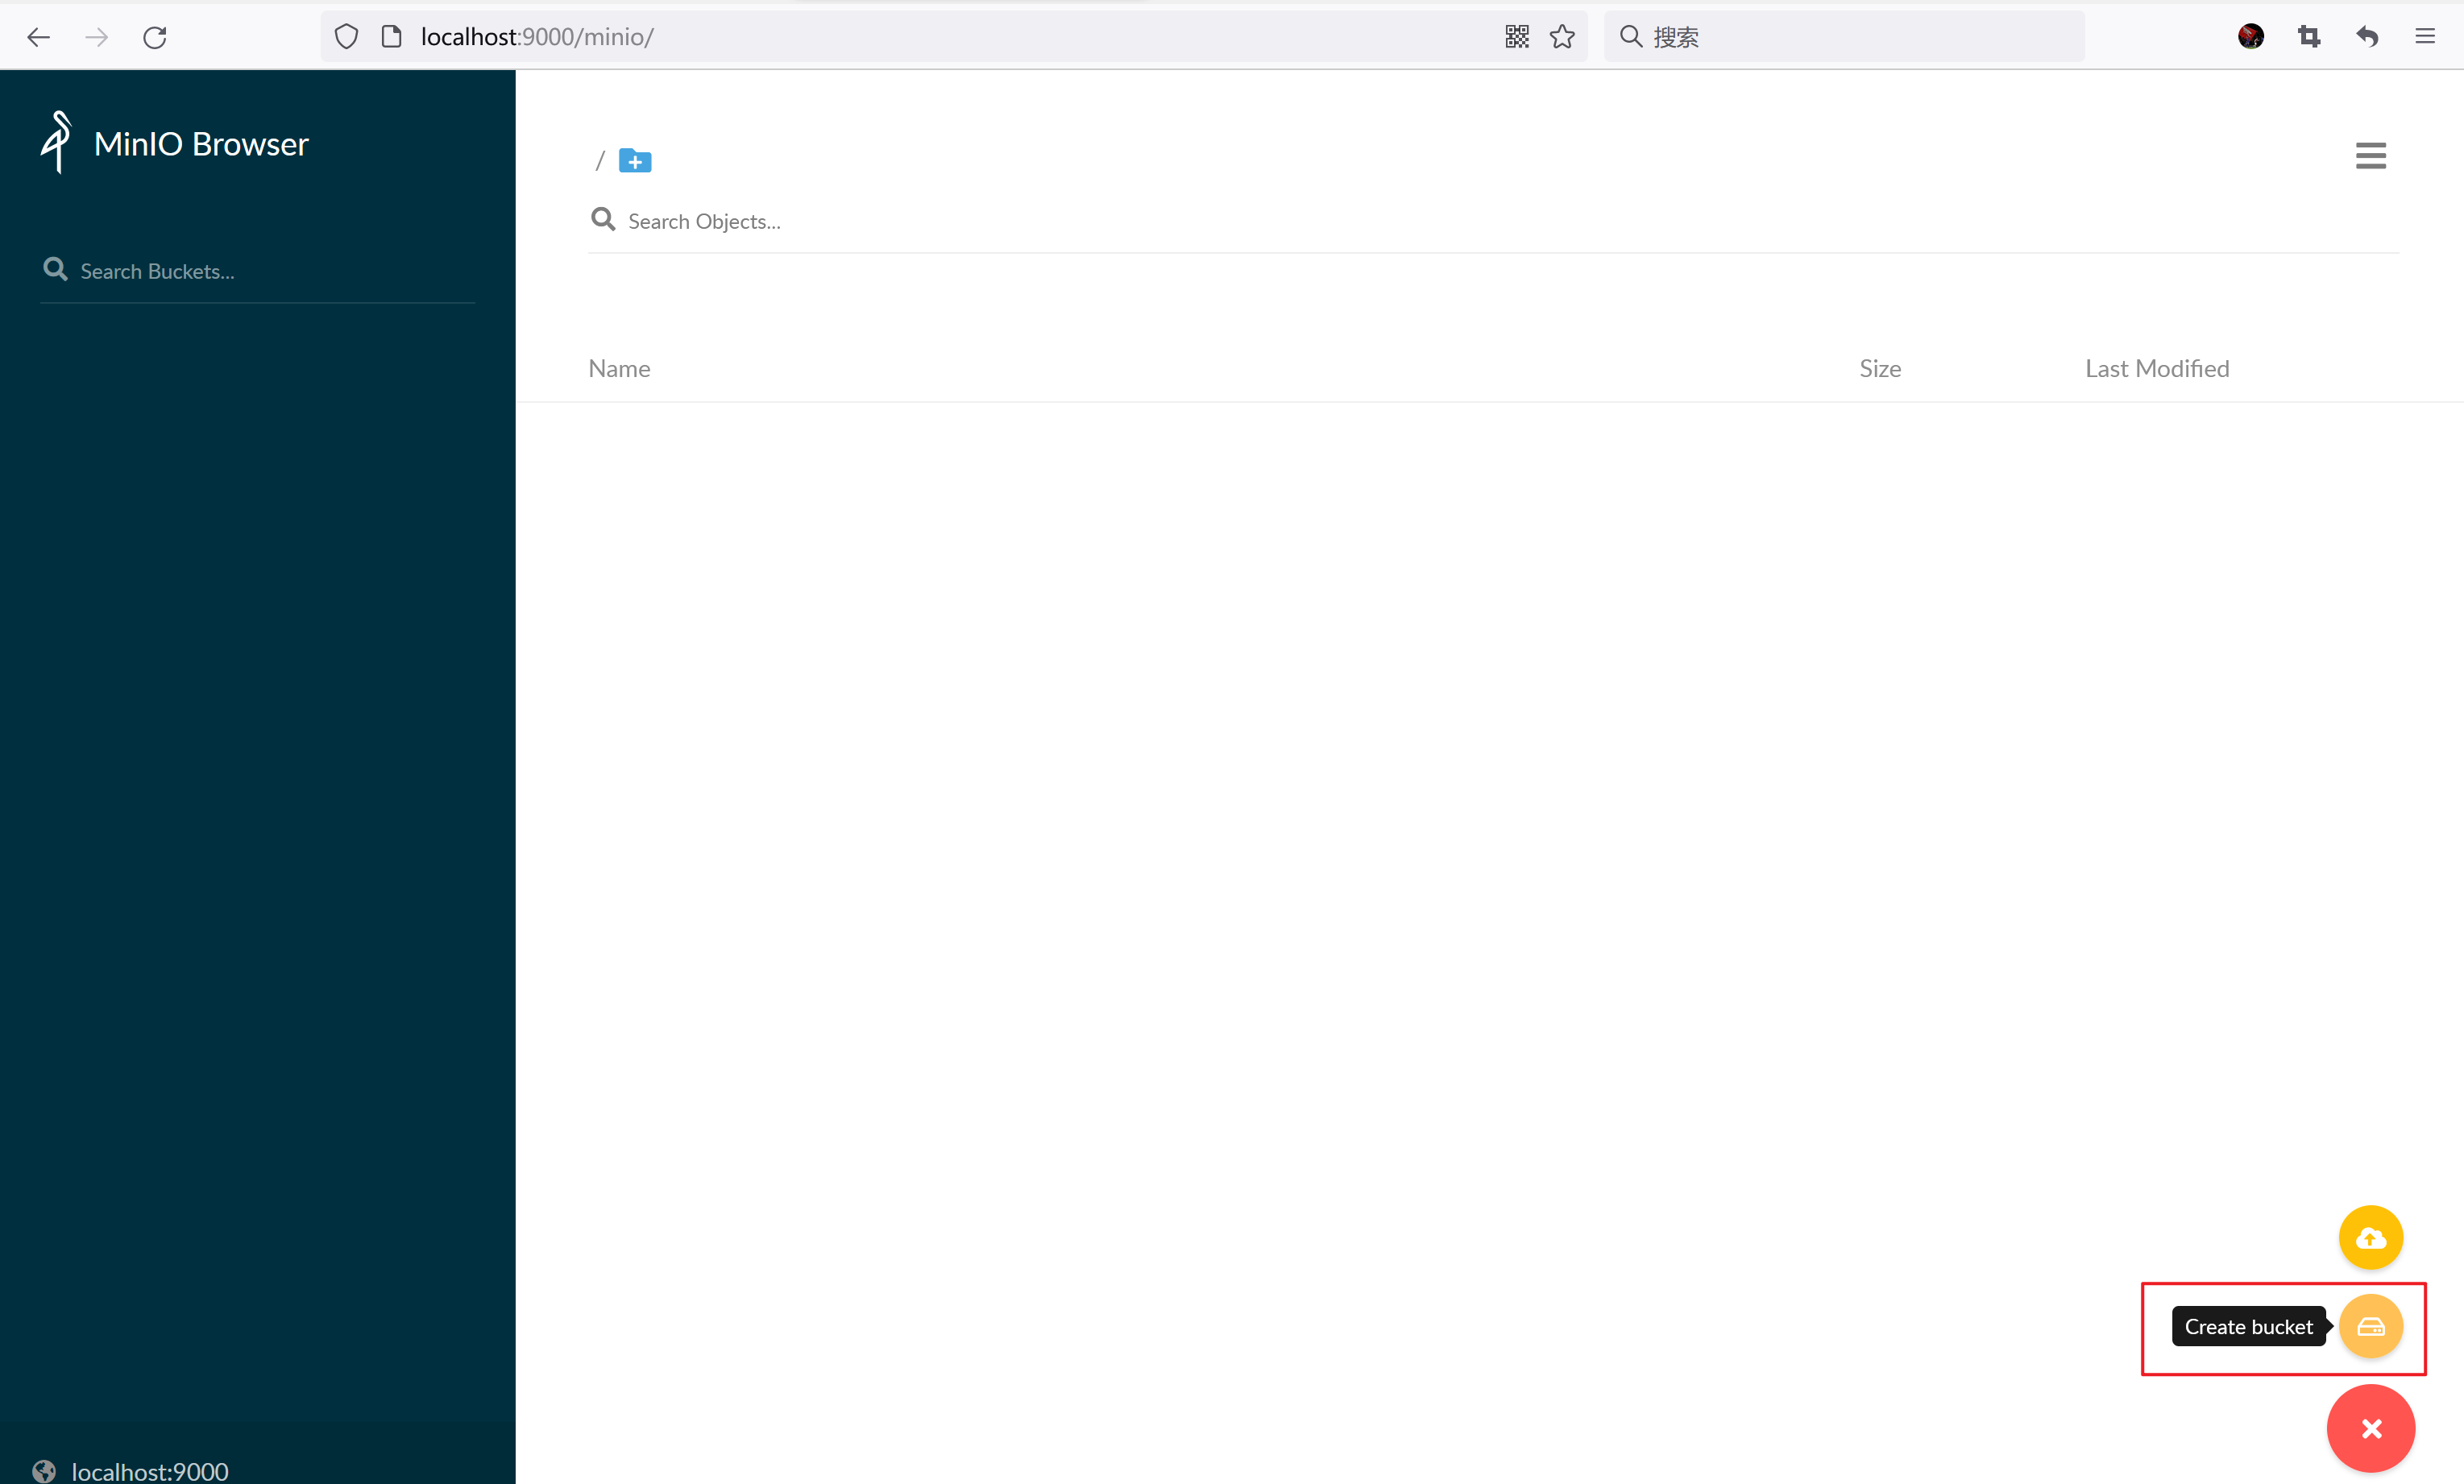
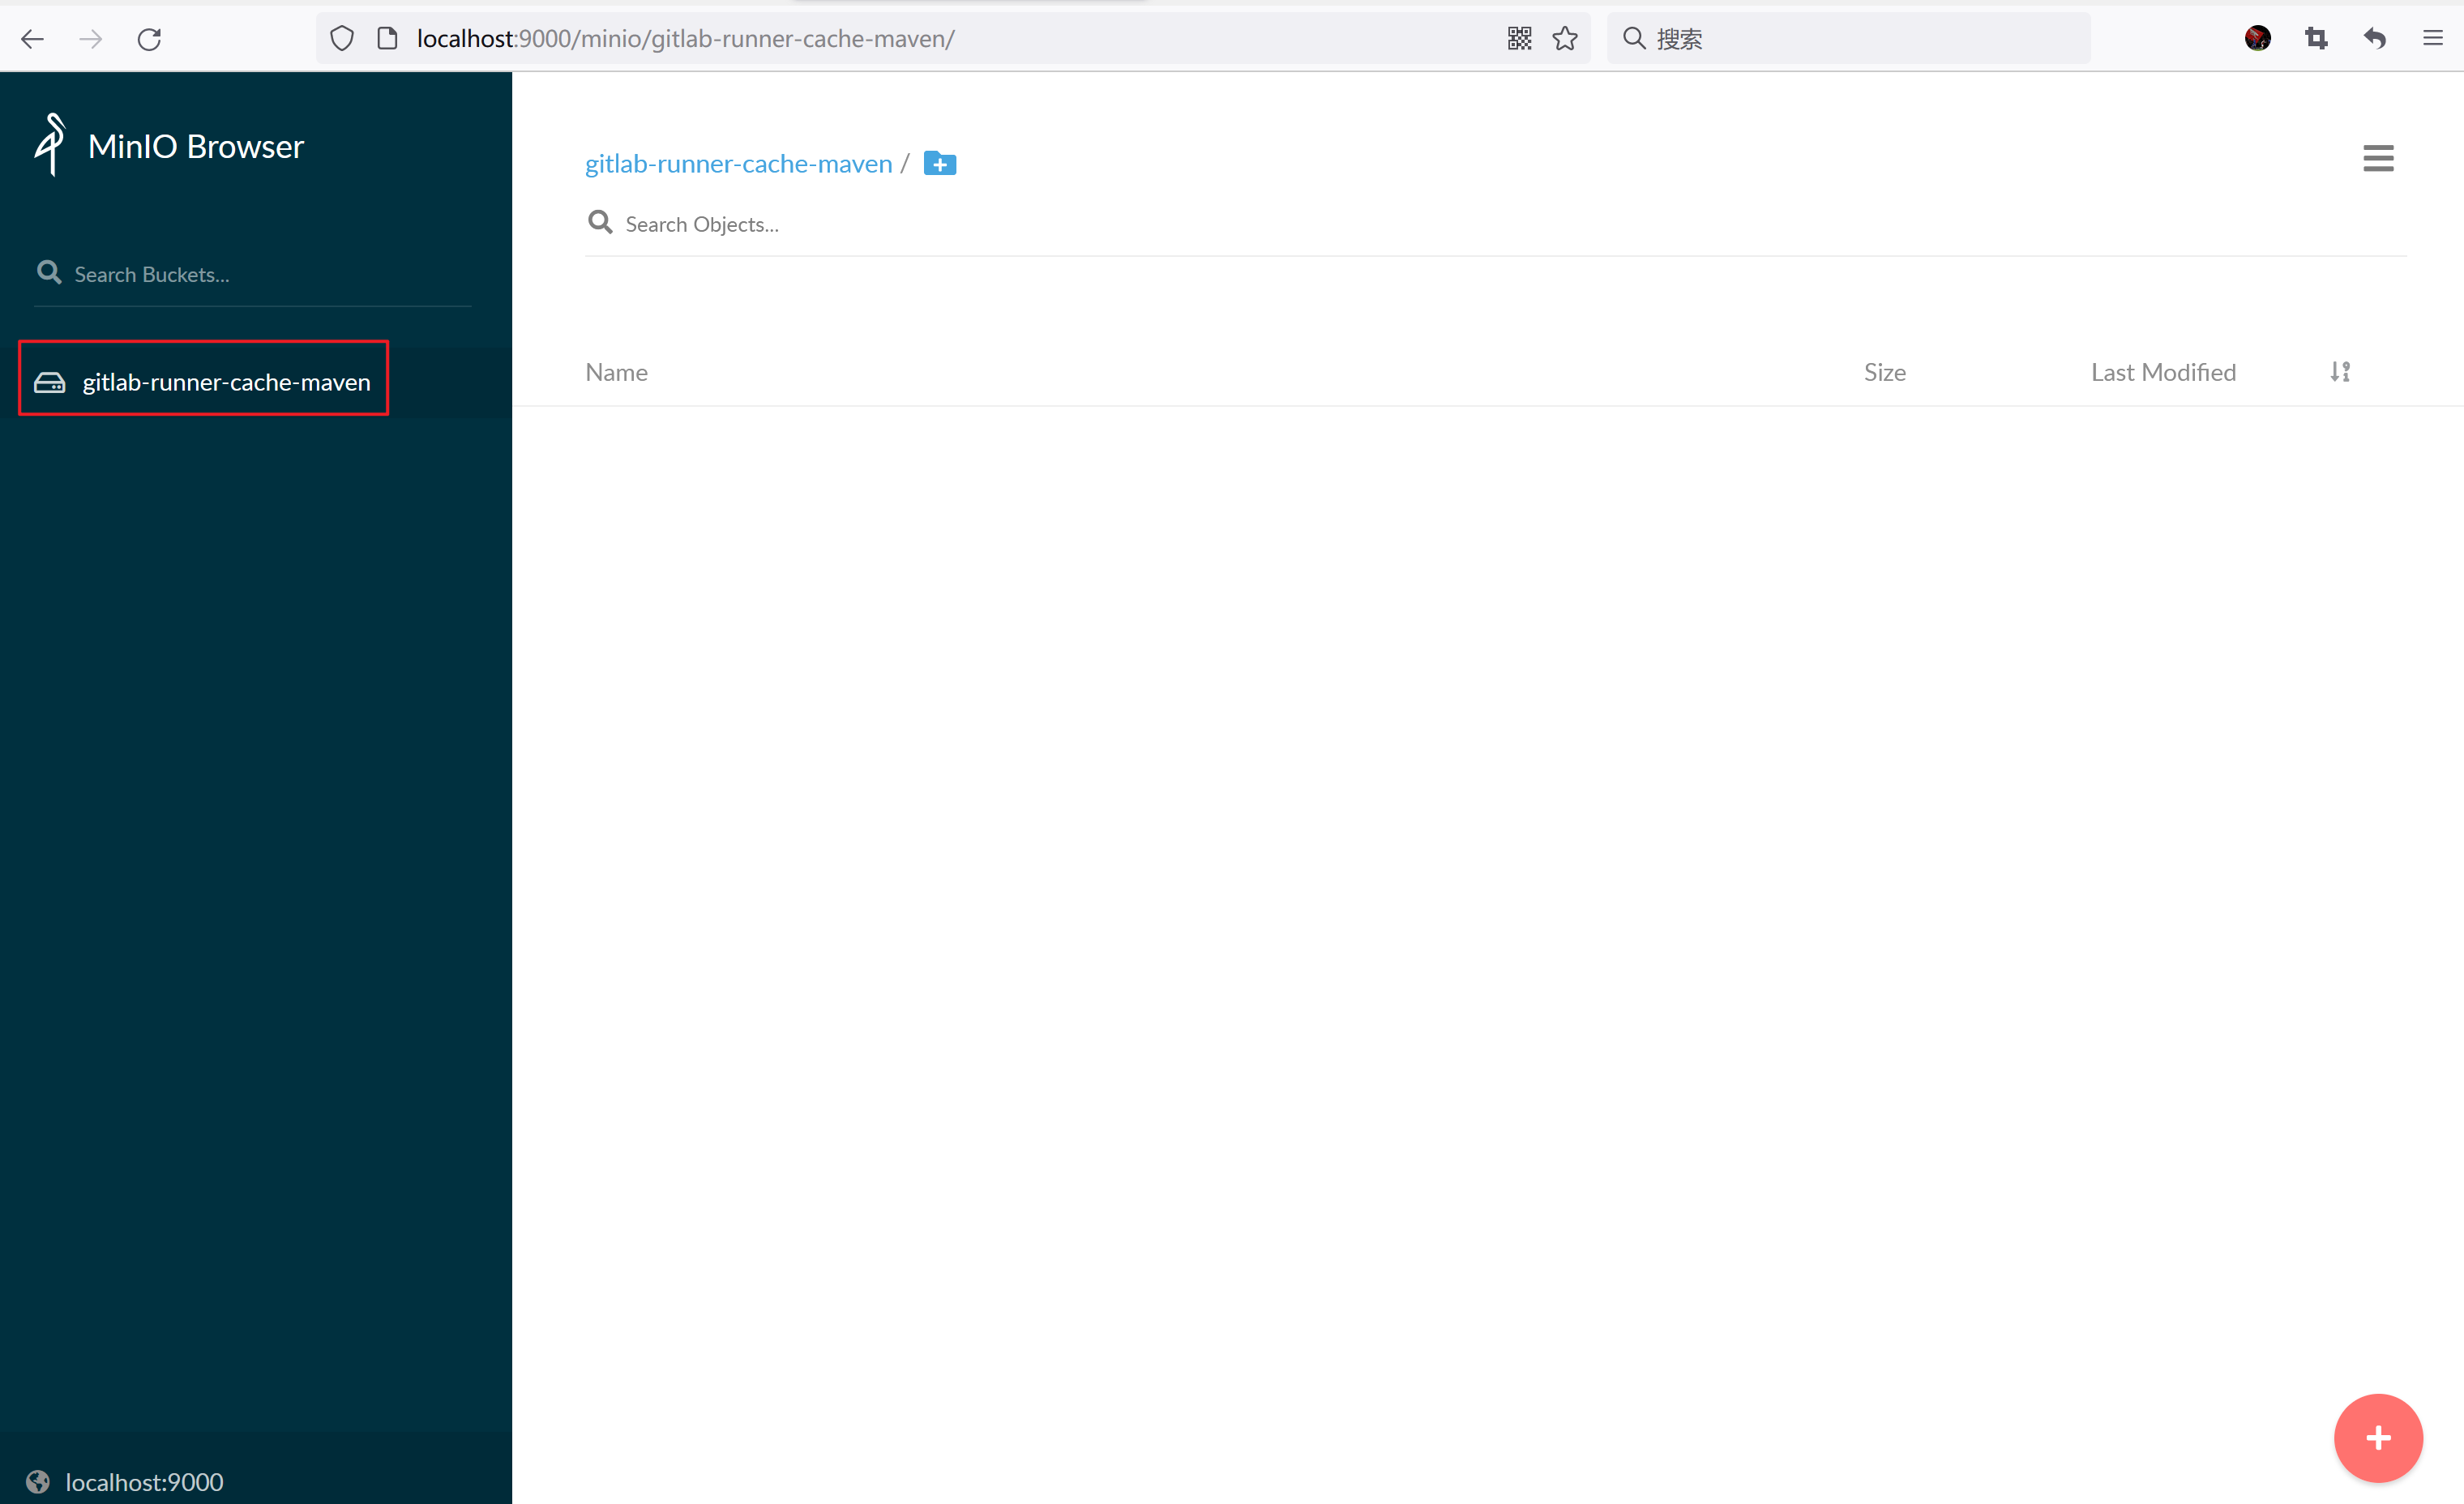
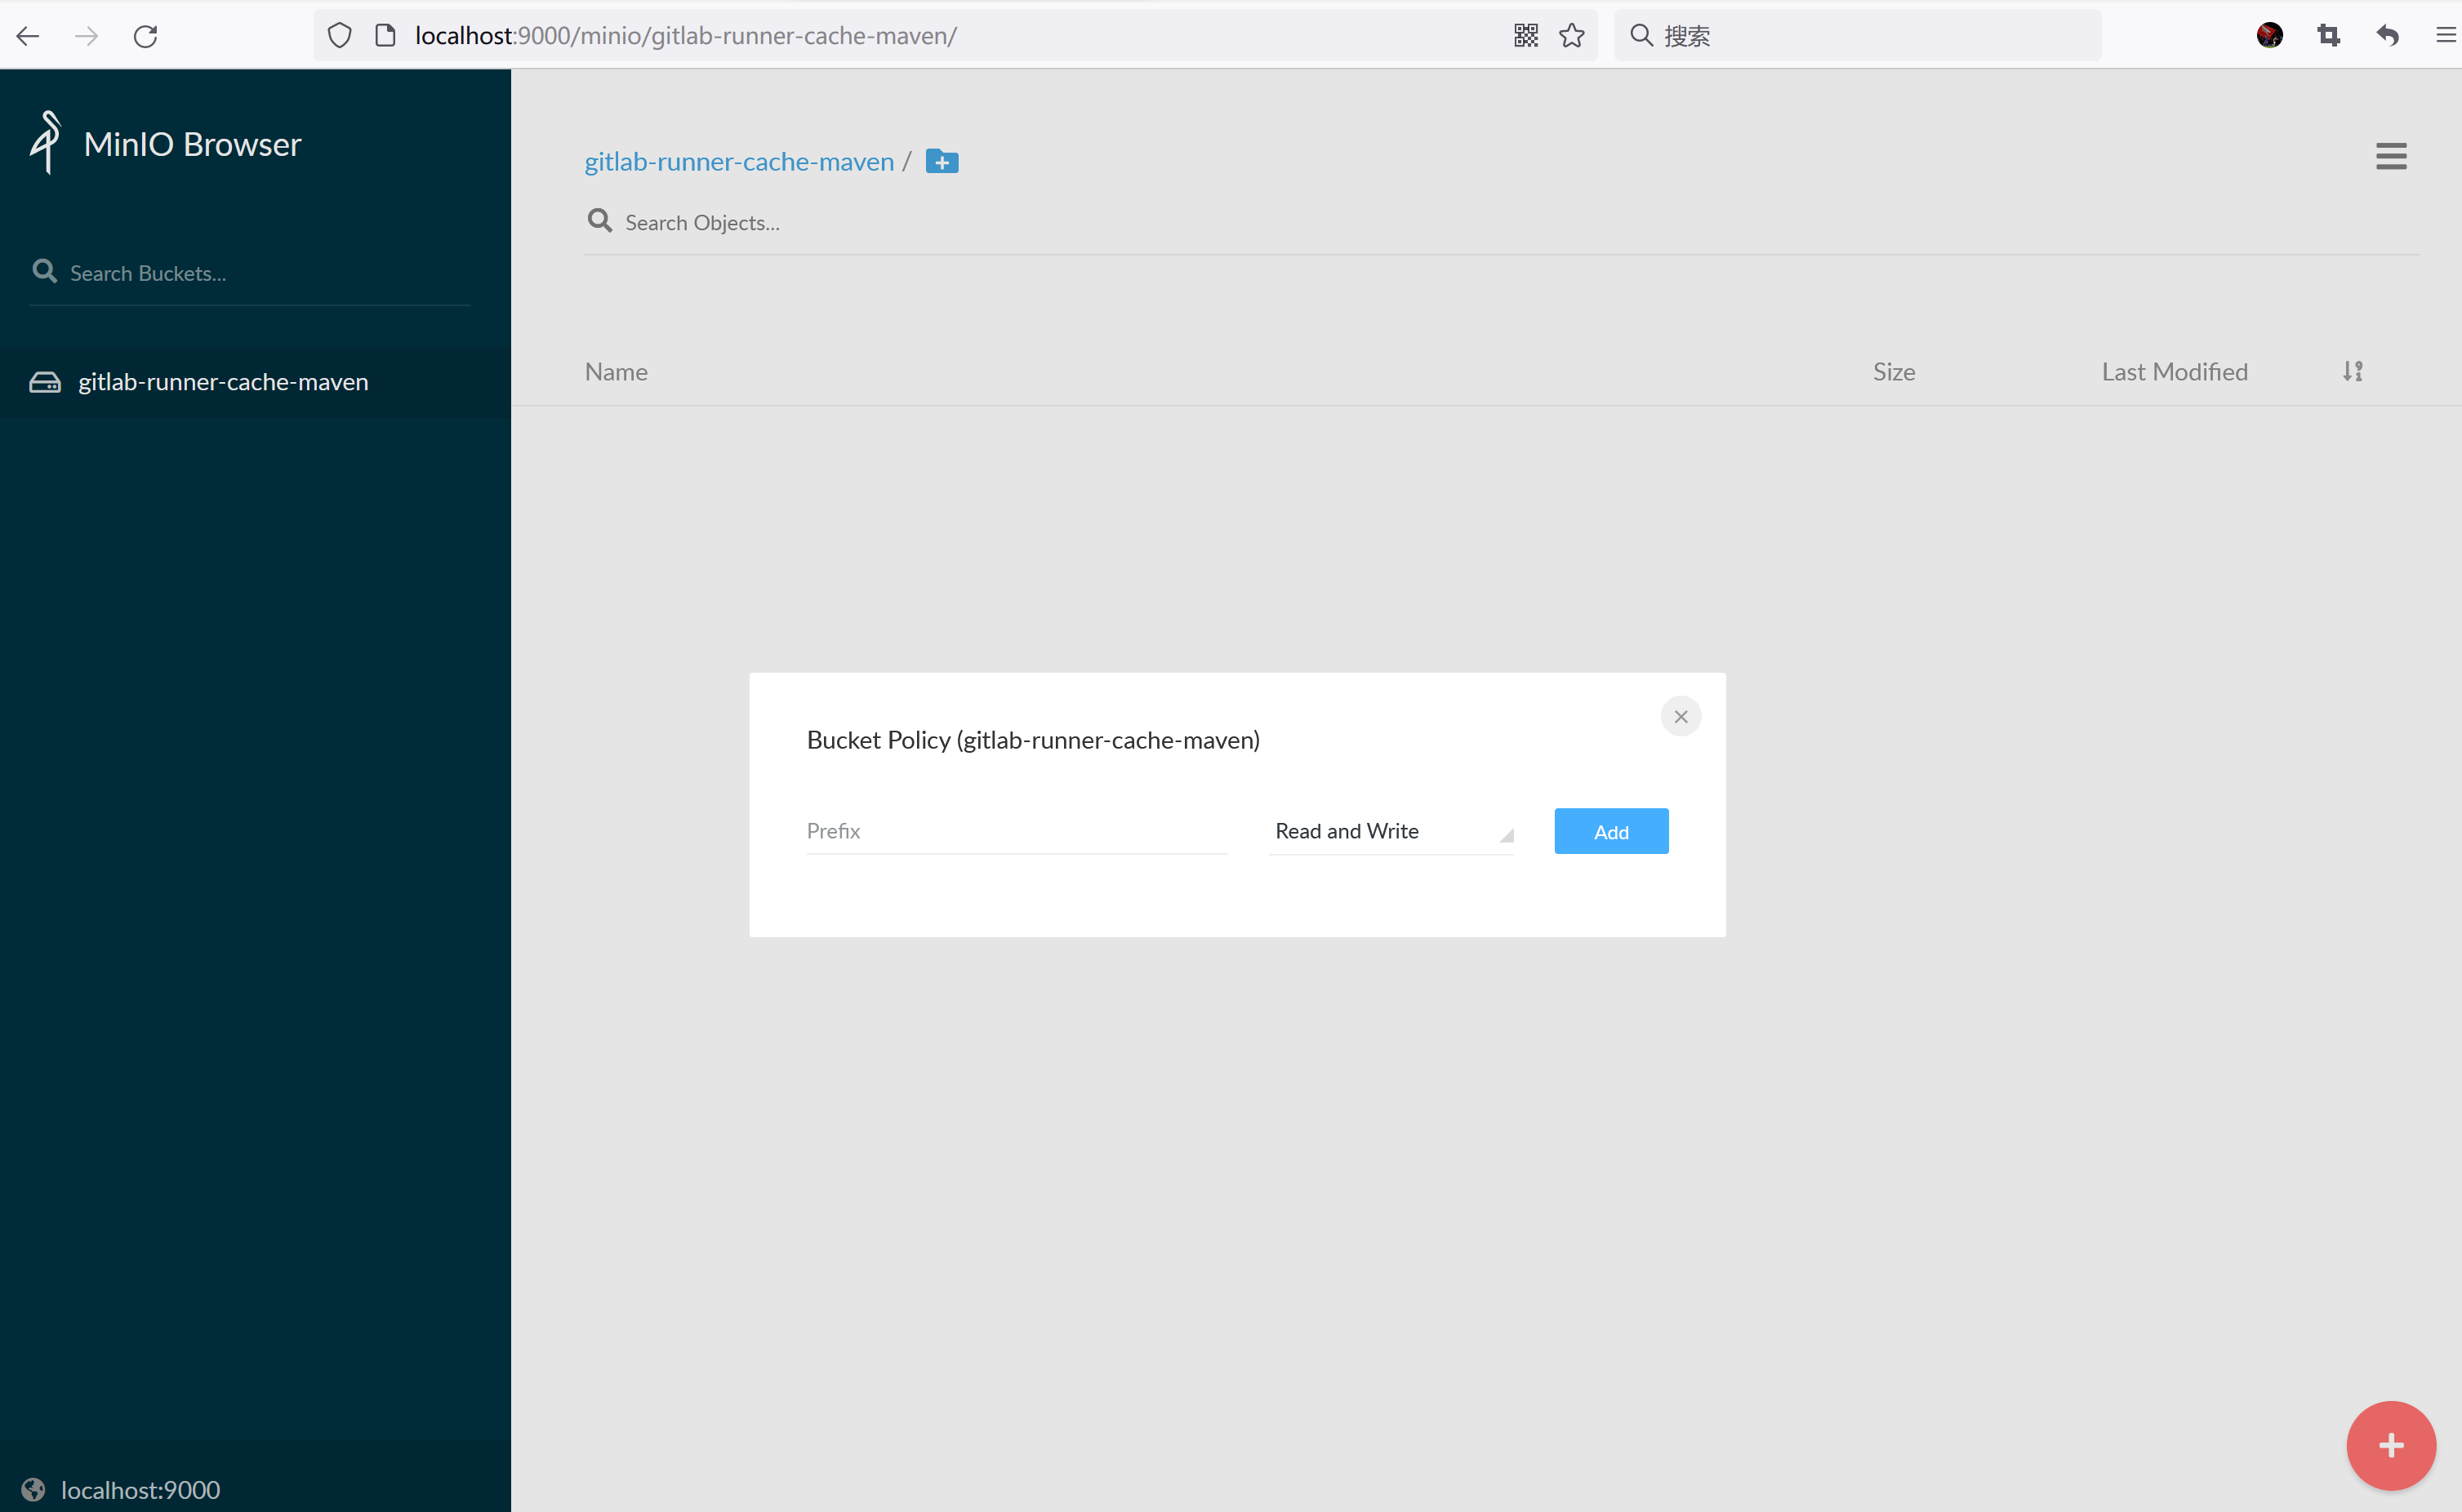
Create a Bucket named gitlab runner cache Maven to store the dependent files of the compiled project.
Gitlab Runner deployment
Create a Secret to save the user name and password of MinIO, and then the Gitlab Runner container will use this user name and password to log in to MinIO.
kubectl create secret -n acp generic s3access \
--from-literal=accesskey=admin \
--from-literal=secretkey=admin123456
Add the Gilab Helm repository and download the Gitlab Runner Helm resource file.
helm repo add gitlab https://charts.gitlab.io
helm pull gitlab/gitlab-runner --untar
Edit the values.yaml file in the gitlab runner directory. The following configurations need to be modified.
- gitlabUrl: set the IP address of Gitlab.
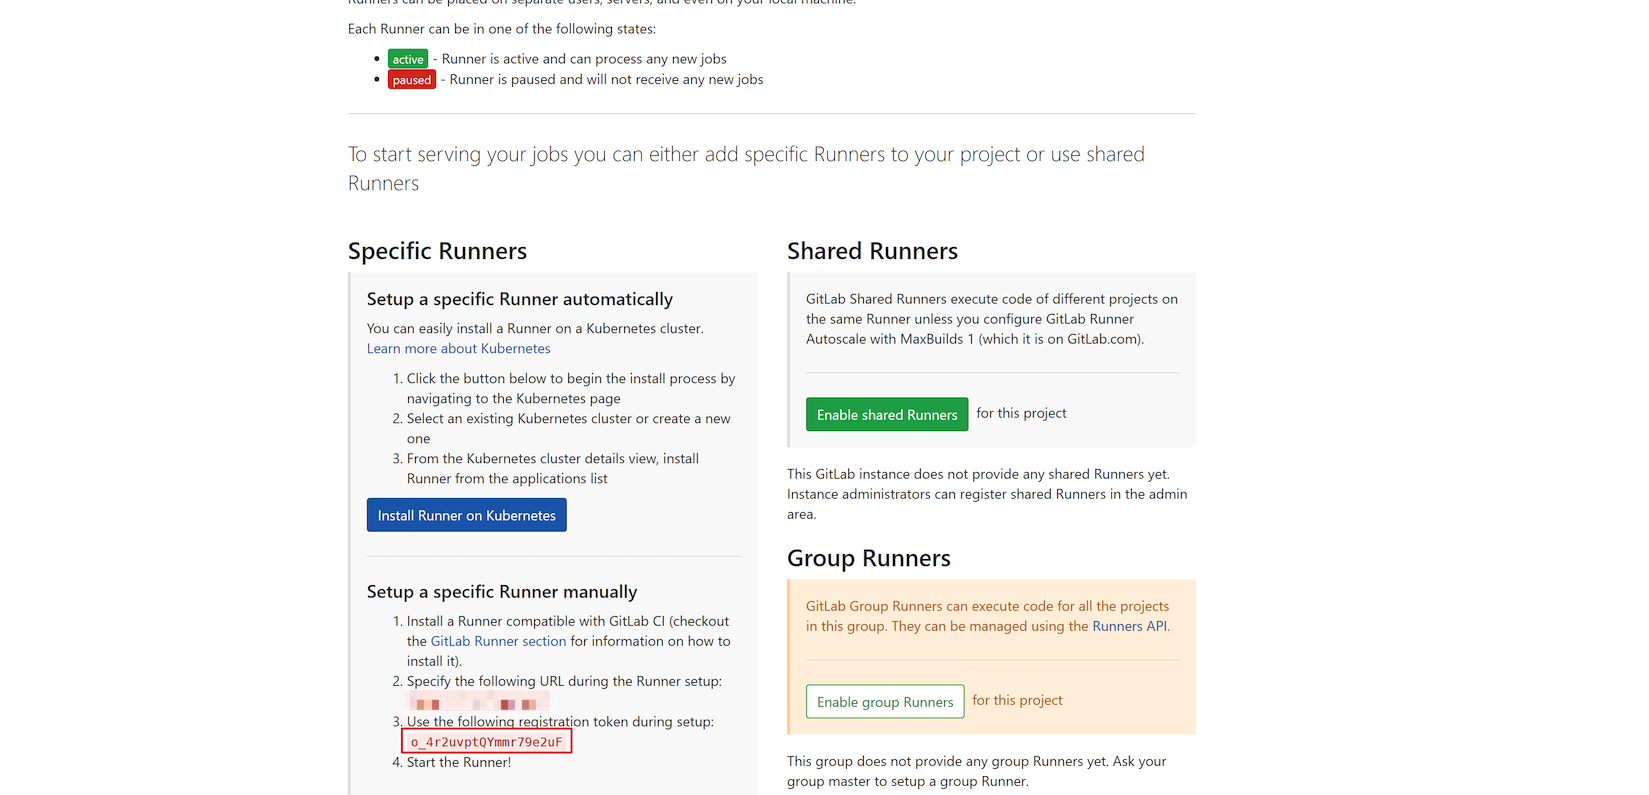
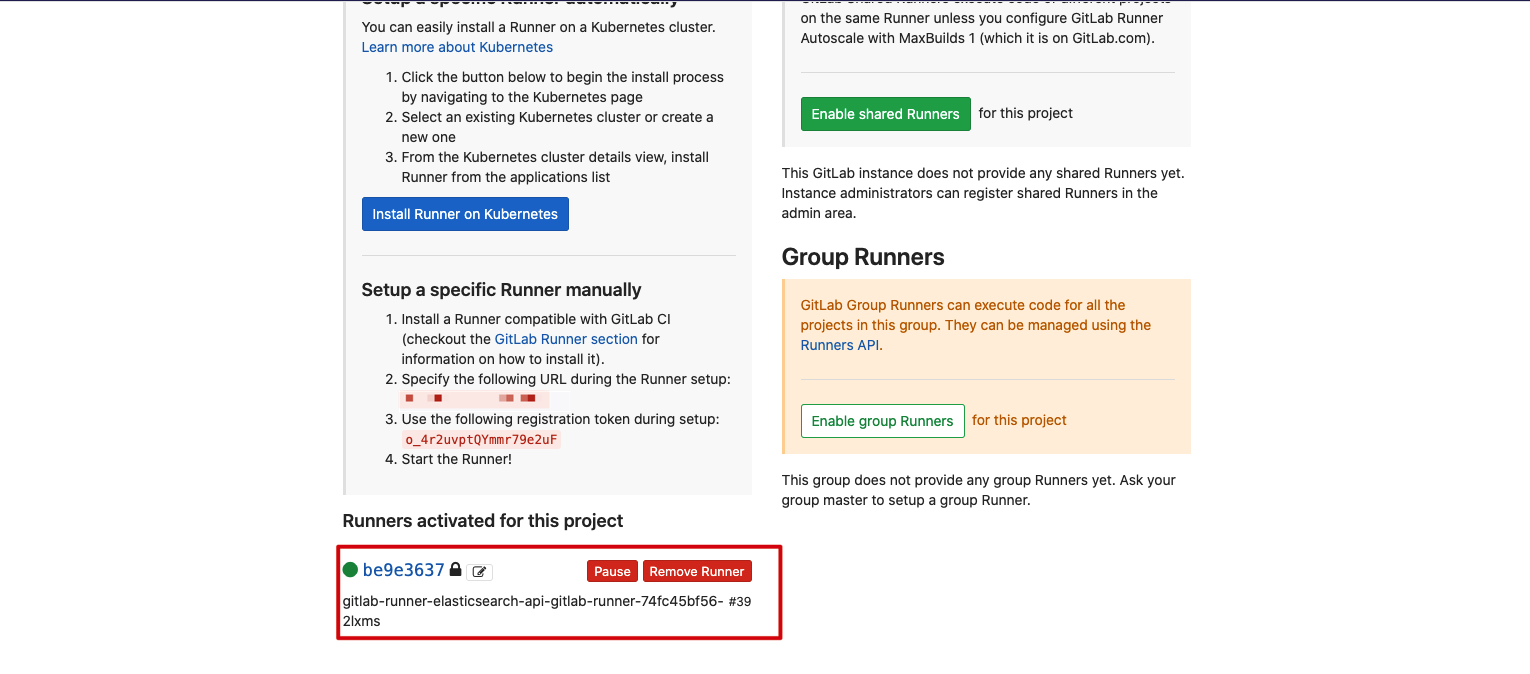
- runnerRegistrationToken: sets the token registered by gitlab runner. Go to project - > Settings - > CI / CD - > runners settings to view the registration token required to register gitlab runner.
- Cache: set the cache.
# gitlab IP address
gitlabUrl: http://gitlab ip address/

# Register the token of gitlab runner
runnerRegistrationToken: "o_4r2uvptQYmmr79e2uF"

runners:
# Set cache
  cache:
    ## General settings
    cacheType: s3
    cachePath: "gitlab-runner-elasticsearch-api" # Cache path. gitlab runner will automatically create the directory under the bucket
    cacheShared: true

    ## S3 settings
    s3ServerAddress: minio.minio.svc.cluster.local:9000 # Address accessed by kubernetes cluster clusterip service
    s3BucketName: gitlab-runner-cache-maven # bucket name
    s3BucketLocation:
    s3CacheInsecure: true # http login
    secretName: s3access # secert created with Minio username and password
After the configuration is complete, install Gitlab Runner using the following command.
helm install -n acp gitlab-runner-elasticsearch-api gitlab-runner
If everything goes well, you can see Gitlab Runner successfully registered on Gitlab.
View the Pod of Gitlab Runner created in Kubernetes cluster
❯ kubectl get pod -n acp | grep runner
gitlab-runner-elasticsearch-api-gitlab-runner-88f7b64fc-rdfch   1/1     Running     0          113s
Configure the. gitlab-ci.yml file
Gitlab CI/CD defines each Stage of the Pipeline and several jobs in each Stage through the. gitlab-ci.yml configuration file. For example, in the following configuration file, we define three stages:
- 1.compile: use the openjdk image to compile the project.
- 2.build: use the jar package compiled in the compile phase to build the Docker image and upload it to the image warehouse.
- 3.deploy: deploy the application using the built Docker image in the Kubernetes cluster.
stages:
  - compile
  - build
  - deploy

variables:
  KUBECONFIG: /tmp/config
  CI_REGISTRY: Your mirror warehouse IP
  CI_REGISTRY_IMAGE: Your mirror warehouse project path

# maven dependent cache
cache:
  paths:
    - cache

# Compile project
compile:
  stage: compile
  image: openjdk:8-jdk-alpine
  # The task will be triggered only when you hit tag
  only:
    - tags
  # Compile the project, skip the unit test, and specify the local dependency directory
  script:
    - ./mvnw package -Dmaven.test.skip=true -Dmaven.repo.local=cache
  # Pass the compiled jar package to the next stage for kaniko to build the docker image
  artifacts:
    paths:
      - target

# Build mirror
build:
  image: gcr.io/kaniko-project/executor:debug # You may need to manually download in advance
  stage: build
  only:
    - tags
  script:
   # Using kaniko to build a docker image
    - mkdir -p /kaniko/.docker
    - echo "{\"auths\":{\"$CI_REGISTRY\":{\"username\":\"$REGISTRY_USER\",\"password\":\"$REGISTRY_PASS\"}}}" > /kaniko/.docker/config.json
    - /kaniko/executor --context $CI_PROJECT_DIR --dockerfile $CI_PROJECT_DIR/Dockerfile --destination $CI_REGISTRY_IMAGE:$CI_COMMIT_TAG

#Deploy to kubernetes environment
deploy:
  image: bitnami/kubectl:1.19
  stage: deploy
  only:
    - tags
  script:
    # Set the kubeconfig file of the kubectl container so that the kubectl container has the permission to deploy applications in Kubernetes
    - echo $kube_config | base64 -id > $KUBECONFIG
    - sed -i "s/CI_COMMIT_TAG/$CI_COMMIT_TAG/g" manifests/deployment.yaml
    - cat manifests/*.yaml
    - kubectl apply -f manifests/
matters needing attention:
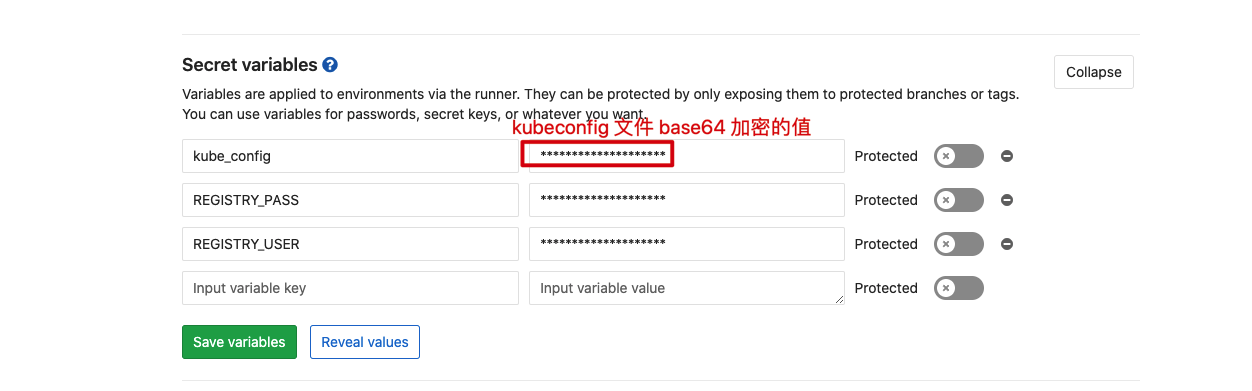
- For security, we set the user name and password of the image warehouse and the kubeconfig file of the Kubernetes cluster in Gitlab's Secret variables. Enter project - > Settings - > CI / CD - > Secret variables. Note that the value of kubeconfig file is encrypted with base64, and the user name and password of the image warehouse can be set normally.
- You need to create a cache directory under the project root path to temporarily store dependencies downloaded from Minio. This directory name can be customized and should be consistent with the cache path set in the. gitlab-ci.yml file. In the compile phase, specify the - Dmaven.repo.local=cache parameter and use cache as the dependency repository, so that the dependencies extracted from Minio can be used.
- In the build phase, use the jar package compiled in the compile phase to build the Docker image. The Dockerfile content is as follows.
FROM openjdk:8-jdk-alpine
# Set working directory
WORKDIR /app

# Language, time zone settings
ENV TZ=Asia/Shanghai
ENV LANG=en_US.UTF-8
ENV LANGUAGE=en_US:en
ENV iC_ALL=en_US.UTF-8

EXPOSE 8080
# Copy the jar package compiled in the compile phase
COPY target/*.jar elasticsearch-api.jar
CMD ["java","-jar","elasticsearch-api.jar"]
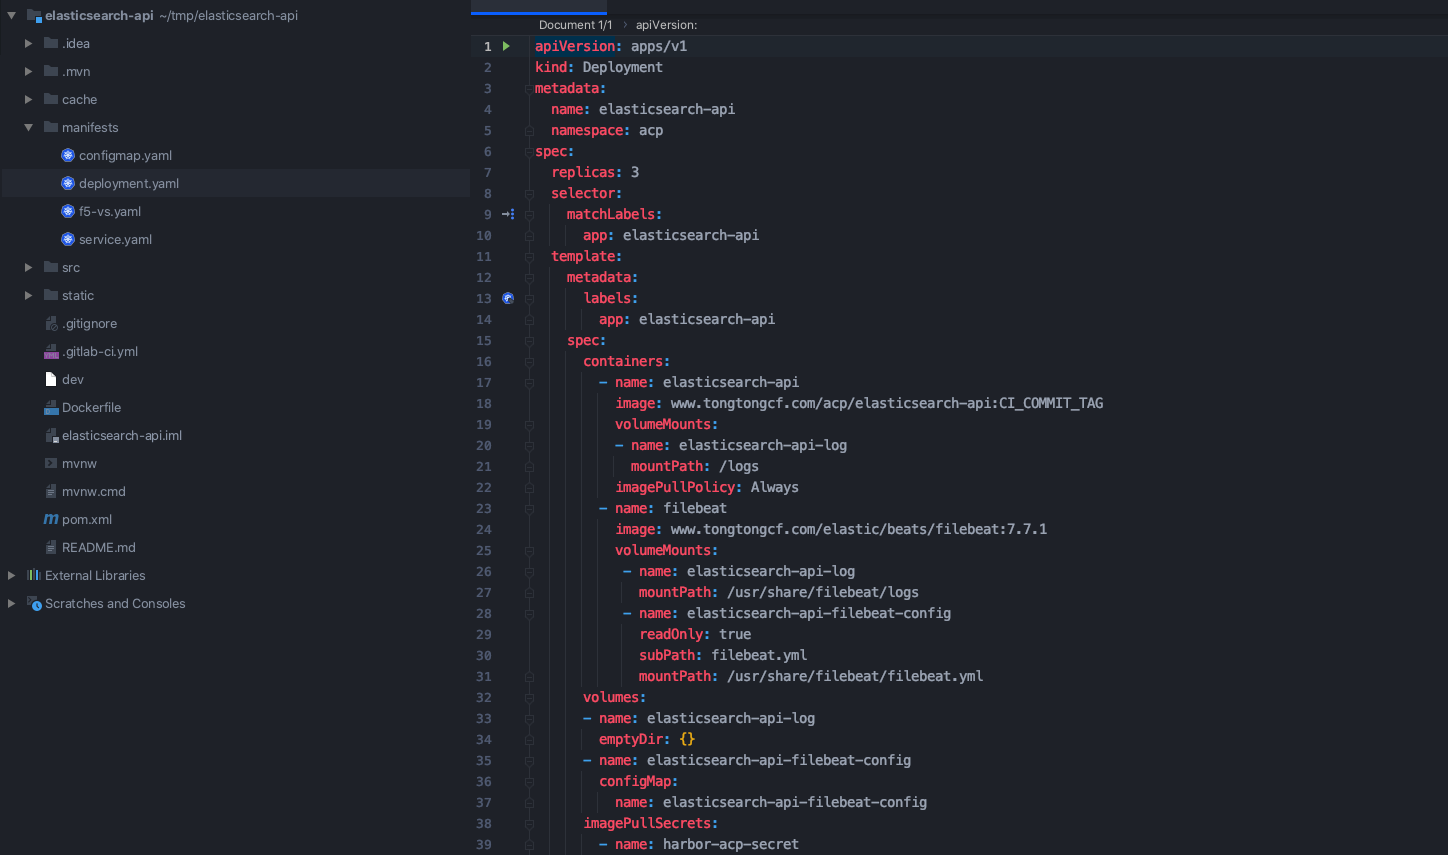
- In the deploy phase, the resource files used to deploy in the Kubernetes environment are written in the manifest directory according to your own project.
Process validation
After completing the development of the project, push the code to the Gitlab warehouse.
git add .
git commit -m "First trigger task"
git push
Pipline will not be triggered at this time, because we set it in the. gitlab-ci.yml configuration file that pipline will be triggered only after the tag is hit. Push tag triggers Pipeline.
git tag 3.0.4
git push origin 3.0.4
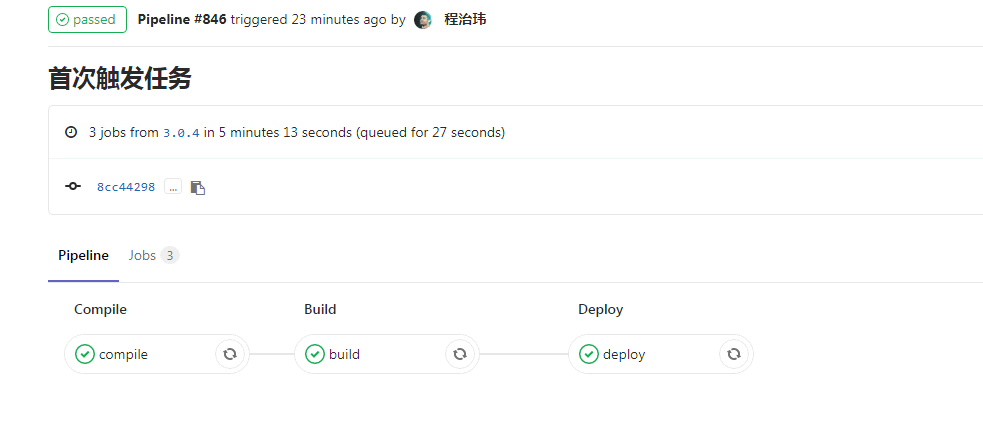
Wait for Pipeline execution to complete.

Click the Pipeline number to view the details. You can see that there are three stages in it.
For the first time, Pipeline will be slow in the compile stage, because the dependencies need to be downloaded from the public network when compiling the project. After the compilation is completed, the dependencies in the cache directory will be compressed and packaged and uploaded to Minio. They can be used directly after the next compilation to avoid repeated downloading from the public network, which will speed up a lot.
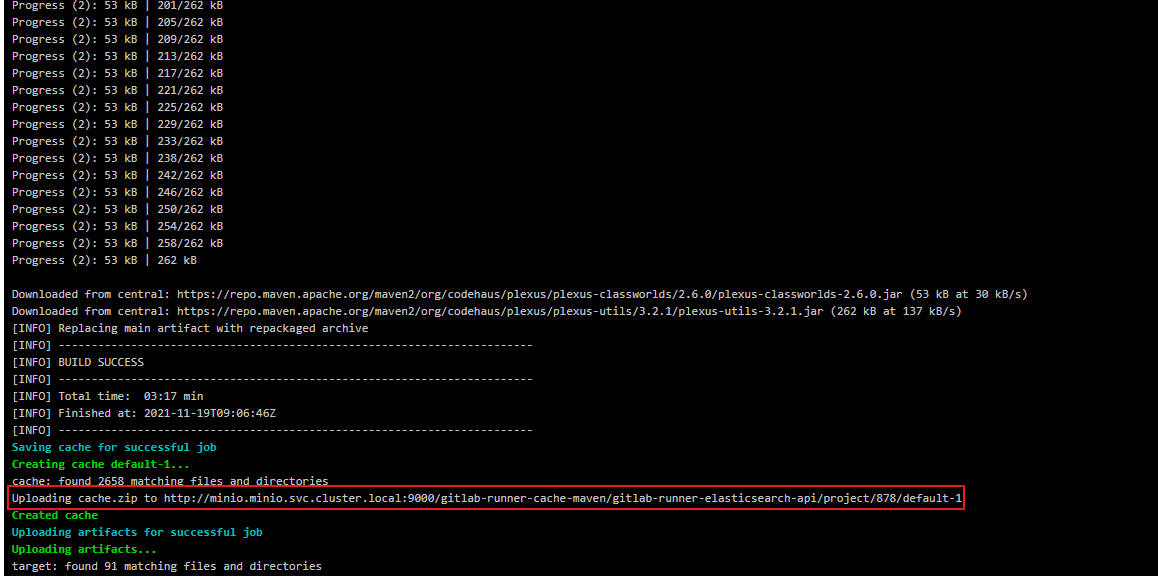
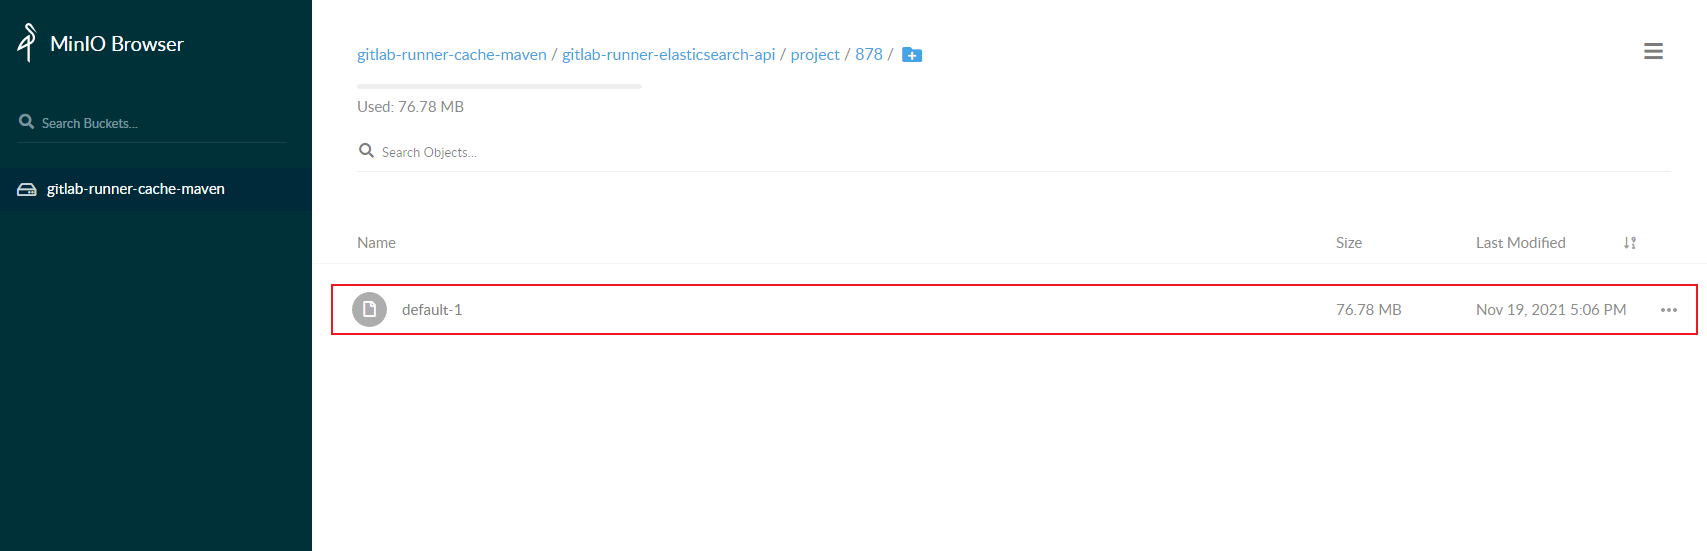
You can see the dependent compressed files uploaded by Gitlab Runner on MinIO.
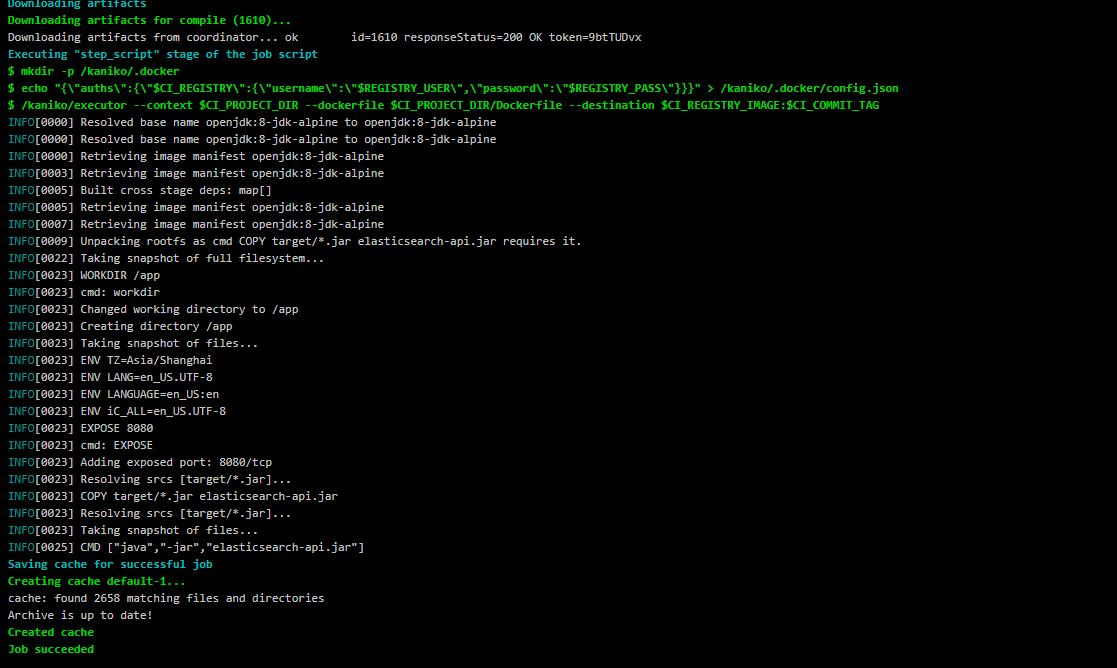
The build phase will obtain the compiled jar package and build the Docker image from the target directory set by the artifact in the compile phase.
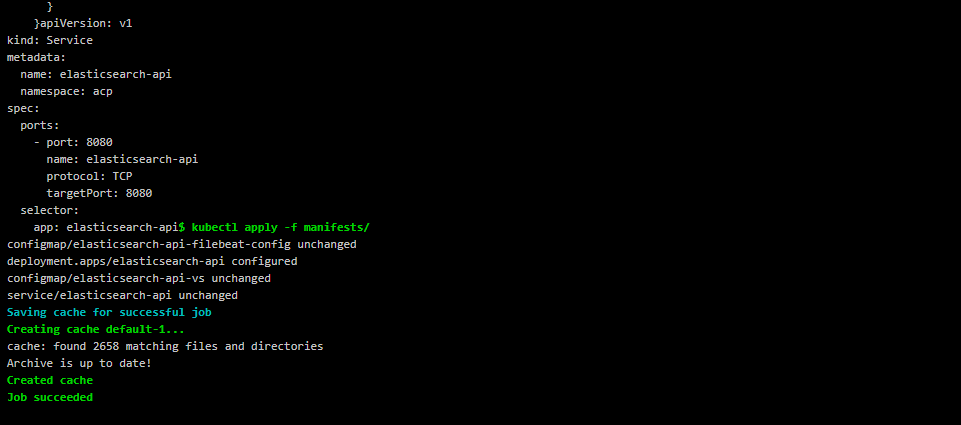
The deploy phase deploys the image to the Kubernetes environment.
This completes the complete Gitlab CI/CD process:
- You can see the built image in the image warehouse.

- You can see the deployed applications in Kubernetes.
❯ kubectl get pod -n acp | grep elasticsearch
elasticsearch-api-7d9656cf5d-5sngv                               2/2     Running     0          30s
elasticsearch-api-7d9656cf5d-9zgzt                               2/2     Running     0          30s
elasticsearch-api-7d9656cf5d-tthx5                               2/2     Running     0          30s
Now we have modified the code, and now push a new tag to trigger the Pipeline again.
git add .
git commit -m "Second trigger task"
git push

git tag 3.0.5
git push origin 3.0.5

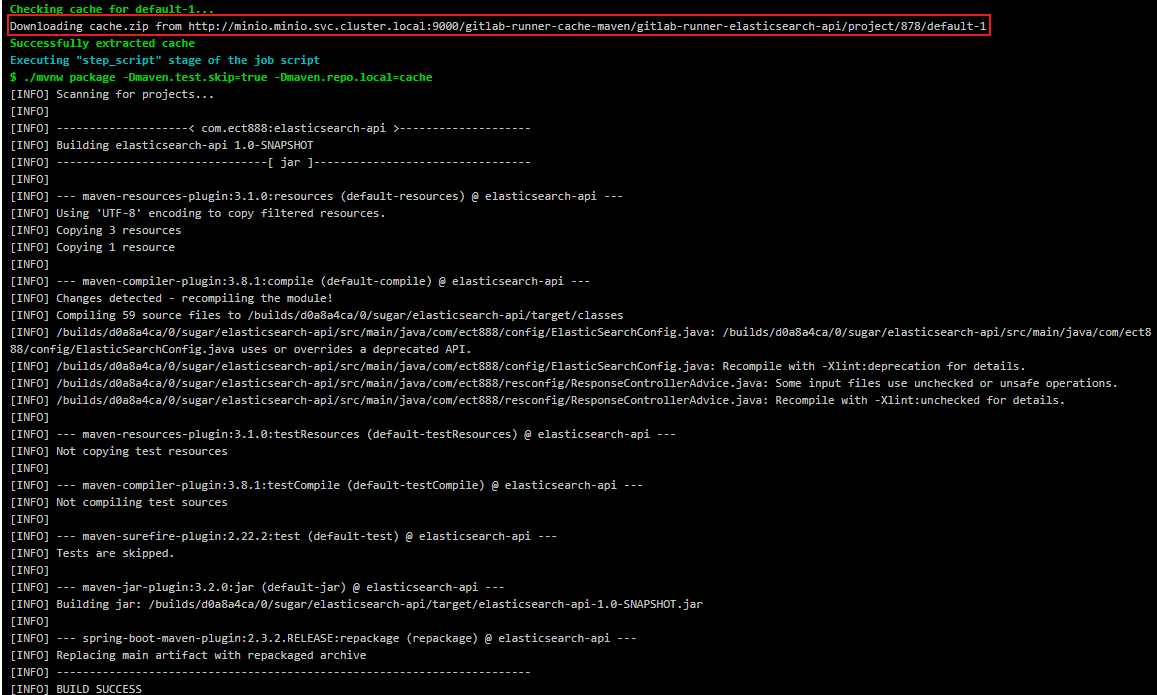
You can see that in the compile phase, you did not download the dependency from the public network, but directly downloaded the dependent compressed package from Minio. The whole Pipeline process is also shortened from 5 minutes to 1 minute.
reference material
- [1]Gitlab
- [2]Gitlab CI/CD
- [3]GitLab Runner
- [4]Pipelines
- [5]Stages
- [6]Jobs
- Use kaniko to build Docker images
- Introduction to common container image construction tools and schemes
- How to use Docker in Docker
- Deep understanding of container – container runtime
- Container Runtime (I): Introduction
- Container Runtime (II): low level Container Runtime
- Container Runtimes (III): advanced container runtime
- Container runtimes (IV): kubernetes container runtimes & CRI
- Configure to use distributed caching
- What is the feeling of CI/CD with GitLab? It's too strong!!
- Introduction and use of GitLab CI/CD
- GitLab CI/CD official website
- DevOps gitlab cicd practice
- GitLab CI/CD practice
- What is CI/CD? How to understand continuous integration, continuous delivery and continuous deployment