Git Foundation
Read this chapter and you can start using Git.This chapter introduces the basic and most common Git commands, which will be used most of the time.After reading this chapter, you can initialize a new code repository, make some appropriate configurations, start or stop tracking certain files, temporarily save or submit some updates.We'll also show you how to let Git ignore certain files or files whose names fit a specific pattern; how to quickly and easily undo minor errors made; how to browse the update history of a project to see the differences between one and two updates; and how to pull or push data down from a remote warehouse.
2.1 Git repository for project acquisition
There are two ways to get a Git project repository.The first is to create a new Git repository by importing all the files in an existing directory.The second is to clone a new mirror warehouse from an existing Git warehouse.
Initialize a new repository in the working directory
To start Git management on an existing project, simply go to the directory where the project is located and execute:
$ git init
After initialization, a directory named.git appears in the current directory where all the data and resources required by git are stored.At present, however, all the files and directories inside have been initialized just according to the existing structure framework, but we have not yet started tracking any of the files in the management project.(In Chapter 9 we'll go into more detail about what files are in the.git directory you just created and what they all do.)
If there are several files in the current directory that you want to include in version control, you need to tell Git to start tracking them with the git add command and submit:
$ git add *.c
$ git add README
$ git commit -m 'initial project version'
We'll explain each command one by one later.Now, however, you have a Git repository that actually maintains several files.
Cloning from an existing repository
If you want to contribute to an open source project, you can first copy the project's Git repository, which requires the git clone command.If you are familiar with other VCS such as Subversion, you may have noticed that clone is used here instead of checkout.This is a very important difference, as Git collects all the data for the project history (every version of each file) and the data on the server is cloned and available locally as well.In fact, even if the server's disk fails, any cloned client can rebuild the warehouse on the server back to the state it was when it was cloned (although some server-side hook settings may be lost, all versions of the data are still there, see Chapter IV for details).
The command format for cloning a repository is git clone [url].For example, to clone the Git code repository Grit in Ruby, you can use the following command:
$ git clone git://github.com/schacon/grit.git
This creates a directory named "grit" in the current directory, which contains a.git directory to hold all downloaded version records and then pull out a copy of the latest version of the file.If you enter this new grit directory, you will see that all the files in the project are already inside and ready for further development and use.If you want to define your own project directory name to be created when cloning, you can specify a new name at the end of the command above:
$ git clone git://github.com/schacon/grit.git mygrit
The only difference is that the new directory is now mygrit, and everything else is the same as above.
Git supports many data transfer protocols.The previous example used the git://protocol, but you can also use the SSH transport protocol represented by http(s)://or user@server:/path.git.In chapter 4, we will detail how all these protocols are configured and used on the server side, as well as the pros and cons of each approach.
2.2 Record each update to warehouse
Now we have a Git repository of the real project in hand and take out the working copies of all the files from that repository.Next, make some modifications to these files and submit this update to the warehouse after completing the objectives of a phase.
Keep in mind that all files under the working directory are either tracked or not tracked.Tracked files are files that have been incorporated into version control management and have their records in the last snapshot. After a period of work, their status may not be updated, modified, or put into the staging area.All other files are untracked.They have neither the snapshot from the last update nor the current staging area.When a repository is first cloned, all files in the working directory belong to tracked files and the status is unmodified.
After editing some files, Git marks them as modified.Gradually, we put these modified files in the staging area until we submit all these staging files for the last time, and repeat them like this.So the cycle of file state changes with Git is shown in Figure 2-1.
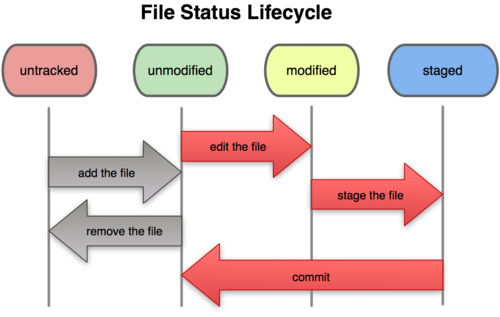
Figure 2-1. Period of file state change
Check current file status
To determine which files are in what state, you can use the git status command.If you execute this command immediately after cloning the repository, you will see output like this:
$ git status
# On branch master
nothing to commit (working directory clean)
This means that your current work directory is fairly clean.In other words, there are currently no files being tracked, nor have any files been changed since the last submission.In addition, the information above indicates that there are no new files in the current directory that are not being tracked, otherwise Git will be listed here.Finally, the command shows that the current branch is master, which is the default branch name and is actually modifiable and not considered for now.In the next chapter, we will discuss branches and references in more detail.
Now let's edit a new file README with vim, save it and run git status after exit to see it appear in the list of untracked files:
$ vim README
$ git status
# On branch master
# Untracked files:
#   (use "git add


     ..." to include in what will be committed)
#
#	README
nothing added to commit but untracked files present (use "git add" to track)
Just below the line "Untracked files".Git won't automatically include it in the tracking unless you explicitly tell it "I need to track this file," so you don't have to worry about putting temporary files and anything else into versioning.But now in our example, we really want to track and manage the README file.
Track new files
Use the command git add to start tracking a new file.So to track README files, run:
$ git add README
Run the git status command at this point and you will see that the README file has been tracked and is in a temporary state:
$ git status
# On branch master
# Changes to be committed:
#   (use "git reset HEAD


     ..." to unstage)
#
#	new file:   README
#
As long as it is below the line "Changes to be committed", it means that it is in a temporary state.If submitted at this time, the current version of the file will remain in the history.You may recall running the GIT add command after we used git init to start tracking files in the current directory.You can specify the file or directory path to be tracked after git add.If it's a directory, it means you want to track all the files in that directory recursively.(Note: The subtext of GIT add is to put a snapshot of the target file in the staging area, which is the add file into the stage area, while the files that have not been tracked are marked for tracking.This makes it easier to understand what the subsequent add operation actually means.)
Temporarily save modified files
Now let's modify the file benchmarks.rb that we've tracked before and run the status command again to see a status report like this:
$ git status
# On branch master
# Changes to be committed:
#   (use "git reset HEAD


     ..." to unstage)
#
#	new file:   README
#
# Changed but not updated:
#   (use "git add


      ..." to update what will be committed)
#
#	modified:   benchmarks.rb
#
The file benchmarks.rb appears below the line "Changed but not updated" to indicate that the contents of the tracked file have changed, but have not yet been placed in the staging area.To temporarily save this update, you need to run the GIT add command (this is a multifunctional command that has different effects depending on the state of the target file: you can use it to start tracking new files, you can put tracked files in the staging area, you can also use it to mark conflicting files as resolved when merging, and so on).Now let's run git add to put benchmarks.rb in the staging area and see the output of git status:
$ git add benchmarks.rb
$ git status
# On branch master
# Changes to be committed:
#   (use "git reset HEAD


     ..." to unstage)
#
#	new file:   README
#	modified:   benchmarks.rb
#
Now that both files have been temporarily saved, they will be recorded in the warehouse at the next submission.Suppose at this point you want to add a note to benchmarks.rb, re-edit the archive, and be ready to submit.But slowly, run git status to see:
$ vim benchmarks.rb
$ git status
# On branch master
# Changes to be committed:
#   (use "git reset HEAD


     ..." to unstage)
#
#	new file:   README
#	modified:   benchmarks.rb
#
# Changed but not updated:
#   (use "git add


      ..." to update what will be committed)
#
#	modified:   benchmarks.rb
#
What's going on?The benchmarks.rb file appears twice!How is it possible that one calculation has not been temporarily saved and one calculation has been temporarily saved?Well, Git actually only temporarily saves the version you ran when you ran the GIT add command. If you submit now, you submit the version before you added the comment, not the one in your current working directory.Therefore, files that have been revised since git add was run need to be re-run git add to reschedule the latest version:
$ git add benchmarks.rb
$ git status
# On branch master
# Changes to be committed:
#   (use "git reset HEAD


     ..." to unstage)
#
#	new file:   README
#	modified:   benchmarks.rb
#
Ignore some files
Normally, there will always be files that don't need to be managed by Git and that don't always appear in the untracked file list.Usually these are automatically generated files, such as log files, or temporary files created during compilation.We can create a file named.gitignore that lists file patterns to ignore.Let's take a real example:
$ cat .gitignore
*.[oa]
*~
The first line tells Git to ignore all files ending in.o or.A.Often these object files and archive files occur during compilation, so we don't need to track their versions.The second line tells Git to ignore all files that end with a tilde (~), and many text editing software, such as Emacs, save copies with this file name.In addition, you may need to ignore log, tmp, or pid directories, autogenerated documents, and so on.Get into the habit of setting up.gitignore files at the beginning to avoid missubmitting such useless files in the future.
The format specification for the file.gitignore is as follows:
- All empty lines or lines beginning with the comment symbol # are ignored by Git.
- You can use standard glob pattern matching.*The matching pattern ends with a backslash (/) indicating that the directory is to be ignored.*To ignore files or directories outside of the specified mode, you can reverse the pattern by adding an exclamation mark (!).
The so-called glob pattern refers to the simplified regular expression used by the shell.An asterisk (*) matches zero or more arbitrary characters; [a B c] matches any character listed in square brackets (this example matches either a, b, or c); a question mark (?) matches only one arbitrary character; if two characters are separated by a dash in square brackets, all within these two character ranges can be matched (For example, [0-9] means to match all numbers from 0 to 9.
Let's look at another example of a.gitignore file:
# This is a comment - will be ignored by Git
*.a       # Ignore all files at the end of.a
!lib.a    # Except lib.a
/TODO     # Ignore only TODO files in the project root directory, not subdir/TODO
build/    # Ignore all files in build/directory
doc/*.txt # doc/notes.txt will be ignored but not doc/server/arch.txt
View temporary and non-temporary updates
The git status display is actually simpler, simply listing the modified files, and if you want to see where the changes were made, you can use the GIT diff command.We'll cover git diff in more detail later, but now it can answer two of our questions: What updates are currently being made that haven't been temporarily saved yet?What updates have been temporarily saved and ready for next submission?The git diff displays the specific added and deleted rows in the format of the file patch.
If you modify the README file again and save temporarily, then edit the benchmarks.rb file and save temporarily, run the status command, you will see:
$ git status
# On branch master
# Changes to be committed:
#   (use "git reset HEAD


     ..." to unstage)
#
#	new file:   README
#
# Changed but not updated:
#   (use "git add


      ..." to update what will be committed)
#
#	modified:   benchmarks.rb
#
To see which parts of a file have been updated that have not yet been temporarily saved, type git diff directly without parameters:
$ git diff
diff --git a/benchmarks.rb b/benchmarks.rb
index 3cb747f..da65585 100644
--- a/benchmarks.rb
+++ b/benchmarks.rb
@@ -36,6 +36,10 @@ def main
           @commit.parents[0].parents[0].parents[0]
         end

+        run_code(x, 'commits 1') do
+          git.commits.size
+        end
+
         run_code(x, 'commits 2') do
           log = git.commits('master', 15)
           log.size
This command compares the differences between the current file in the working directory and the snapshot of the staging area, that is, changes that have not been temporarily saved after modification.
To see the difference between a temporary file and a snapshot taken at the time of last submission, you can use the git diff --cached command.(Git 1.6.1 and later also allow git diff --stage, which works the same but is better remembered.)To see the actual effect:
$ git diff --cached
diff --git a/README b/README
new file mode 100644
index 0000000..03902a1
--- /dev/null
+++ b/README2
@@ -0,0 +1,5 @@
+grit
+ by Tom Preston-Werner, Chris Wanstrath
+ http://github.com/mojombo/grit
+
+Grit is a Ruby library for extracting information from a Git repository
Note that git diff alone shows changes that have not yet been temporarily saved, not differences between this work and the last submission.That's why sometimes you temporarily save all the updated files and run git diff without anything.
As mentioned before, save benchmarks.rb and edit it. Run git status to see the two versions before and after the temporary save:
$ git add benchmarks.rb
$ echo '# test line' >> benchmarks.rb
$ git status
# On branch master
#
# Changes to be committed:
#
#	modified:   benchmarks.rb
#
# Changed but not updated:
#
#	modified:   benchmarks.rb
#
Now run git diff to see the changes before and after temporary storage:
$ git diff
diff --git a/benchmarks.rb b/benchmarks.rb
index e445e28..86b2f7c 100644
--- a/benchmarks.rb
+++ b/benchmarks.rb
@@ -127,3 +127,4 @@ end
 main()

 ##pp Grit::GitRuby.cache_client.stats
+# test line
Then use git diff--cached to see the changes that have been temporarily stored:
$ git diff --cached
diff --git a/benchmarks.rb b/benchmarks.rb
index 3cb747f..e445e28 100644
--- a/benchmarks.rb
+++ b/benchmarks.rb
@@ -36,6 +36,10 @@ def main
          @commit.parents[0].parents[0].parents[0]
        end

+        run_code(x, 'commits 1') do
+          git.commits.size
+        end
+
        run_code(x, 'commits 2') do
          log = git.commits('master', 15)
          log.size
Submit Updates
The staging area is now ready for submission.Before doing so, be sure to make sure there are any other modified or newly created files that have not been git add ed. Otherwise, changes that have not yet been temporarily recorded will not be submitted.So before each submission, use git status to see if it's temporarily saved, and then run the submission command git commit:
$ git commit
This will launch a text editor to enter instructions for this submission.(The shell's environment variable, $EDITOR, is enabled by default, typically vim or emacs.You can also use the git config --global core.editor command to configure your favorite editing software as described in Chapter 1.)
The editor will display text information similar to the following (this example uses Vim's on-screen display):
# Please enter the commit message for your changes. Lines starting
# with '#' will be ignored, and an empty message aborts the commit.
# On branch master
# Changes to be committed:
#   (use "git reset HEAD


     ..." to unstage)
#
#       new file:   README
#       modified:   benchmarks.rb
~
~
~
".git/COMMIT_EDITMSG" 10L, 283C
You can see that the default submission message contains the output of the last run of git status, placed in the comment line, with an empty line at the beginning for you to enter the submission instructions.You can remove these comment lines, but it doesn't matter how long you keep them and how much it will help you to recall what's in this update.(If you don't think that's enough, you can use the -v option to include in the comment every line that modifies the difference.)When you exit the editor, Git drops the comment line and submits the description and this update to the repository.
You can also submit updates in one line of command by using the -m parameter followed by the submission instructions:
$ git commit -m "Story 182: Fix benchmarks for speed"
[master]: created 463dc4f: "Fix benchmarks for speed"
 2 files changed, 3 insertions(+), 0 deletions(-)
 create mode 100644 README
Okay, now you've created your first submission!You can see that after submission, it will tell you which branch (master) is currently submitting, what is the complete SHA-1 checksum submitted (463dc4f), and how many documents have been revised, how many lines have been added and deleted in this submission.
Keep in mind that snapshots placed in the staging area are recorded at the time of submission, and that any changes that have not yet been staging remain modified and can be incorporated into version management at the next submission.Each time you run a submit, you take a snapshot of your project, which you can return to later, or compare.
Skip using staging area
Although using staging areas allows you to prepare the details for submission, it can sometimes be a little cumbersome.Git provides a way to skip using staging areas. Git automatically saves all tracked files and submits them together by adding the -a option to git commit at the time of submission, skipping the git add step:
$ git status
# On branch master
#
# Changed but not updated:
#
#	modified:   benchmarks.rb
#
$ git commit -a -m 'added new benchmarks'
[master 83e38c7] added new benchmarks
 1 files changed, 5 insertions(+), 0 deletions(-)
Did you see?The git add file benchmarks.rb is no longer needed before submission.
remove file
To remove a file from Git, you must remove it from the list of tracked files (specifically, from the staging area) and submit it.You can use the git rm command to do this, along with deleting the specified file from the working directory, so that it does not appear in the list of untracked files in the future.
If you simply delete the file manually from the working directory, you will see it in the Changed but not updated section (i.e. _Untemporary_List) when running git status:
$ rm grit.gemspec
$ git status
# On branch master
#
# Changed but not updated:
#   (use "git add/rm


     ..." to update what will be committed)
#
#       deleted:    grit.gemspec
#
Then run git rm to record the removal:
$ git rm grit.gemspec
rm 'grit.gemspec'
$ git status
# On branch master
#
# Changes to be committed:
#   (use "git reset HEAD


     ..." to unstage)
#
#       deleted:    grit.gemspec
#
At the time of final submission, the file will no longer be included in version management.If you have previously modified a file and placed it in a staging area, you must use the force deletion option - f (i.e. the first letter of force) to prevent you from losing the modified content after deleting the file by mistake.
Another scenario is that we want to delete files from the Git repository (that is, remove them from the staging area), but still want to keep them in the current working directory.In other words, just delete from the tracking list.For example, after some large log files or a stack of.A compiled files have been accidentally incorporated into the repository, remove the trace but do not delete the files so that they can be added later to the.gitignore file with the --cached option:
$ git rm --cached readme.txt
The name of the file or directory can be listed later, or the glob mode can be used.For example:
$ git rm log/\*.log
Notice the backslash before the asterisk * because Git has its own file pattern extension matching method, so we don't need a shell to help expand it.The example above already specifies a directory, so the effect is the same, but the example below matches recursively, so backslashes must be added.This command deletes all files with a.Log extension under the log/directory.Similar examples:
$ git rm \*~
All ~end files in the current directory and its subdirectories are deleted recursively.
move file
Unlike other VCS systems, Git does not track file movements.If you rename a file in Git, the metadata stored in the repository does not reflect that this is a rename operation.But Git is smart enough to deduce exactly what happened, and we'll talk later about how it did that.
In that case, you'll be confused when you see Git's mv command.To rename a file in Git, do this:
$ git mv file_from file_to
It will work as expected.In fact, even if you look at the status information at this point, you will see a clear explanation of the rename operation:
$ git mv README.txt README
$ git status
# On branch master
# Your branch is ahead of 'origin/master' by 1 commit.
#
# Changes to be committed:
#   (use "git reset HEAD


     ..." to unstage)
#
#       renamed:    README.txt -> README
#
In fact, running git mv is equivalent to running the following three commands:
$ mv README.txt README
$ git rm README.txt
$ git add README
If you do this separately, Git realizes it's a rename, so it's the same in any way.Of course, it's much lighter to use git mv directly, but sometimes batch renames with other tools, remember to delete the old file name and add a new one before submitting.
2.3 View submission history
After several updates have been submitted or an item has been cloned, you can use the git log command to review the submission history.
The next example runs the following command to get the source code of the simplegit project that I dedicated to demonstrating:
git clone git://github.com/schacon/simplegit-progit.git
Then run the git log in this project and you should see the following output:
$ git log
commit ca82a6dff817ec66f44342007202690a93763949
Author: Scott Chacon


    <schacon@gee-mail.com>


Date:   Mon Mar 17 21:52:11 2008 -0700

    changed the version number

commit 085bb3bcb608e1e8451d4b2432f8ecbe6306e7e7
Author: Scott Chacon


     <schacon@gee-mail.com>


Date:   Sat Mar 15 16:40:33 2008 -0700

    removed unnecessary test code

commit a11bef06a3f659402fe7563abf99ad00de2209e6
Author: Scott Chacon


      <schacon@gee-mail.com>


Date:   Sat Mar 15 10:31:28 2008 -0700

    first commit
By default, git log lists all updates by submission time, with the most recent updates at the top.See, every update has a SHA-1 checksum, author's name and e-mail address, submission time, and a paragraph indented to show the submission instructions.
The git log has many options to help you search for submissions of interest, so let's move on to some of the most common ones.
We use the -p option to expand to show the differences between each submission and -2 to show only the last two updates:
$ git log -p -2
commit ca82a6dff817ec66f44342007202690a93763949
Author: Scott Chacon


    <schacon@gee-mail.com>


Date:   Mon Mar 17 21:52:11 2008 -0700

    changed the version number

diff --git a/Rakefile b/Rakefile
index a874b73..8f94139 100644
--- a/Rakefile
+++ b/Rakefile
@@ -5,7 +5,7 @@ require 'rake/gempackagetask'
 spec = Gem::Specification.new do |s|
-    s.version   =   "0.1.0"
+    s.version   =   "0.1.1"
     s.author    =   "Scott Chacon"

commit 085bb3bcb608e1e8451d4b2432f8ecbe6306e7e7
Author: Scott Chacon


     <schacon@gee-mail.com>


Date:   Sat Mar 15 16:40:33 2008 -0700

    removed unnecessary test code

diff --git a/lib/simplegit.rb b/lib/simplegit.rb
index a0a60ae..47c6340 100644
--- a/lib/simplegit.rb
+++ b/lib/simplegit.rb
@@ -18,8 +18,3 @@ class SimpleGit
     end

 end
-
-if $0 == __FILE__
-  git = SimpleGit.new
-  puts git.show
-end
\ No newline at end of file
This option is available for code review or for a quick tour of changes made to updates submitted by other collaborators.In addition, there are many summary options available, such as--stat, which shows only a brief change row count:
$ git log --stat
commit ca82a6dff817ec66f44342007202690a93763949
Author: Scott Chacon


    <schacon@gee-mail.com>


Date:   Mon Mar 17 21:52:11 2008 -0700

    changed the version number

 Rakefile |    2 +-
 1 files changed, 1 insertions(+), 1 deletions(-)

commit 085bb3bcb608e1e8451d4b2432f8ecbe6306e7e7
Author: Scott Chacon


     <schacon@gee-mail.com>


Date:   Sat Mar 15 16:40:33 2008 -0700

    removed unnecessary test code

 lib/simplegit.rb |    5 -----
 1 files changed, 0 insertions(+), 5 deletions(-)

commit a11bef06a3f659402fe7563abf99ad00de2209e6
Author: Scott Chacon


      <schacon@gee-mail.com>


Date:   Sat Mar 15 10:31:28 2008 -0700

    first commit

 README           |    6 ++++++
 Rakefile         |   23 +++++++++++++++++++++++
 lib/simplegit.rb |   25 +++++++++++++++++++++++++
 3 files changed, 54 insertions(+), 0 deletions(-)
Each submission lists the modified files, as well as the number of rows added and removed, and at the end lists all the subtotals added or removed.There is also a common--pretty option that allows you to specify that submission history be displayed in a completely different format from the default.For example, using oneline to display each submission on a single line can be useful when the number of submissions is large.In addition, short, full and fuller can be used. The information displayed is more or less different. Please try it out by yourself to see how it works.
$ git log --pretty=oneline
ca82a6dff817ec66f44342007202690a93763949 changed the version number
085bb3bcb608e1e8451d4b2432f8ecbe6306e7e7 removed unnecessary test code
a11bef06a3f659402fe7563abf99ad00de2209e6 first commit
But the most interesting thing is format, which allows you to customize the format of the records you want to display so that the output can be easily extracted and analyzed by later programming, like this:
$ git log --pretty=format:"%h - %an, %ar : %s"
ca82a6d - Scott Chacon, 11 months ago : changed the version number
085bb3b - Scott Chacon, 11 months ago : removed unnecessary test code
a11bef0 - Scott Chacon, 11 months ago : first commit
Table 2-1 lists common format placeholder notation and what it represents.
Options Description
 %H Full hash string for commit object
 %h Short hash string for submit object
 Full hash string for%T tree object
 Short hash string for%t tree object
 %P Full hash string for parent
 %p Short hash string of parent object
 %an author's Name
 %ae Author's E-mail Address
 %ad Author Revision Date (can be formatted with -date=option)
%ar Author Revision Date, shown as how long ago
 %cn Name of Submitter
 %ce Submitter's E-mail Address
 %cd Submission Date
 %cr Submission Date, shown as how long ago
 %s Submit Notes
You must be wondering what the difference between _author_and _committer_is: the author refers to the person who actually made the changes, and the submitter refers to the person who finally submitted the work to the repository.So when you issue a patch for a project and a core member incorporates your patch into the project, you are the author and that core member is the submitter.We will elaborate on the subtle differences between the two in Chapter Five.
Using the oneline or format with the--graph option, you can see a few more simple graphics represented by ASCII strings at the beginning, graphically showing where each submission is branched and how it differentiates and derives.As you can see from the Grit project repository we mentioned earlier:
$ git log --pretty=format:"%h %s" --graph
* 2d3acf9 ignore errors from SIGCHLD on trap
*  5e3ee11 Merge branch 'master' of git://github.com/dustin/grit
|\
| * 420eac9 Added a method for getting the current branch.
* | 30e367c timeout code and tests
* | 5a09431 add timeout protection to grit
* | e1193f8 support for heads with slashes in them
|/
* d6016bc require time for xmlschema
*  11d191e Merge branch 'defunkt' into local
These are just a few of the options supported by the git log command.Table 2-2 also lists some other commonly used options and their definitions.
Option Description
 -p Displays the differences between each update in patch format.
--stat Displays file modification statistics for each update.
--shortstat only shows--stat last row modification add remove statistics.
--name-only displays the list of modified files only after submitting information.
--name-status shows a list of new, modified, and deleted files.
--abbrev-commit only shows the first few characters of SHA-1, not all 40.
--relative-date uses a shorter relative time display (for example,'2 weeks ago').
--graph shows the merge history of branches represented by ASCII graphics.
--pretty uses other formats to display historical submissions.Available options include oneline, short, full, fuller, and format (followed by the specified format).
Limit output length
In addition to the options for customizing the output format, git log has many very practical options for limiting the length of output, that is, only outputting partial submission information.As we've seen before, -2 only shows the last two submissions. In fact, this is the -* option, where n can be any natural number, meaning only the last two submissions are shown.In practice, however, we don't use this option very much. Git automatically calls less when it outputs all submissions. To see earlier updates, just flip to the next page.
There are also time-bound options, such as--since and--until.The following command lists all submissions made in the last two weeks:
$ git log --since=2.weeks
You can give a variety of time formats, such as a specific day ("2008-01-15"), or how long ago ("2 years 1 day 3 minutes ago").
You can also give several search criteria and list the submissions that match.Display the submission by the specified author with the --author option, and search for keywords in the submission instructions with the --grep option.(Note that if you want to get a submission that meets both options'search criteria, you must use the --all-match option.)
If you only care about the historical submission of certain files or directories, you can specify their paths at the end of the git log option.Because it is the option that is placed last, separate the previous option from the trailing qualified path name with two dashes (--).
Table 2-3 also lists other commonly used similar options.
Option Description
 -(n) Show only the most recent n submissions
 --since, --after only shows submissions after a specified time.
--until, --before only shows submissions before the specified time.
--author displays only submissions related to the specified author.
--committer displays only submissions related to the specified submitter.
For a practical example, if you want to see a test script submitted by Junio Hamano (a file in the project's t/directory) during October 2008 in the Git repository, you can use the following query command:
$ git log --pretty="%h - %s" --author=gitster --since="2008-10-01" \
   --before="2008-11-01" --no-merges -- t/
5610e3b - Fix testcase failure when extended attribute
acd3b9e - Enhance hold_lock_file_for_{update,append}()
f563754 - demonstrate breakage of detached checkout wi
d1a43f2 - reset --hard/read-tree --reset -u: remove un
51a94af - Fix "checkout --track -b newbranch" on detac
b0ad11e - pull: allow "git pull origin $something:$cur
More than 20,000 submissions were made for Git projects, but when we gave the search options, only six of them met the criteria.
Use graphical tools to review submission history
Sometimes it's easier for graphical tools to show changes to historical submissions, such as the gitk released with Git.Written in Tcl/Tk, it is essentially equivalent to a visual version of the GIT log command, and any options git log can use can also be used on gitk.After entering the gitk command in the project working directory, the interface shown in Figure 2-2 will be launched.
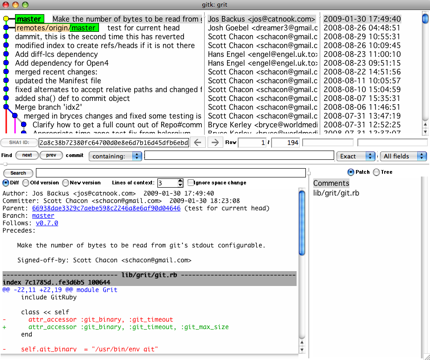
Figure 2-2. GUI for gitk
The upper window shows the branch ancestor maps submitted over time, and the lower window shows the specific differences for the current point-selected submissions.
2.4 Undo operation
At any time, you may need to undo something you just did.Next, we will introduce some basic undo commands.Note that some operations may not always be undone, so be careful that if you make a mistake, you may lose some of your work.
Modify Last Submission
Sometimes when we finish submitting, we find that we missed a few files and didn't add them, or that the submission was written incorrectly.To undo the submission you just made, you can resubmit with the --amend option:
$ git commit --amend
This command will commit using the current staging area snapshot.Running this command directly after the submission has just been completed without making any changes is equivalent to having the opportunity to edit the submission instructions again, but the snapshot of the file to be submitted is the same as before.
When you start the text editor, you will see the instructions from the last submission, edit it, confirm that it is OK, save and exit, and overwrite the submission you just missed with the new submission instructions.
If you forgot to temporarily save some changes when you just submitted, you can supplement the temporary operation before running--amend Submit:
$ git commit -m 'initial commit'
$ git add forgotten_file
$ git commit --amend
The three commands above ultimately result in only one submission, and the second submission corrects the first submission.
Cancel files that have been temporarily saved
The next two sections show how to cancel files in the staging area and files that have been modified in the working directory.Don't worry, checking the status of the file prompts you how to undo it, so you don't need to memorize it.For example, here are two modified files that we want to submit separately but accidentally add all to the staging area with git add.How do I undo one of these temporary files?In fact, git status's command output already tells us what to do:
$ git add .
$ git status
# On branch master
# Changes to be committed:
#   (use "git reset HEAD


     ..." to unstage)
#
#       modified:   README.txt
#       modified:   benchmarks.rb
#
Just below "Changes to be committed", there is a hint in parentheses that you can cancel the staging using git reset HEAD.....Okay, let's try to cancel the temporary benchmarks.rb file:
$ git reset HEAD benchmarks.rb
benchmarks.rb: locally modified
$ git status
# On branch master
# Changes to be committed:
#   (use "git reset HEAD


     ..." to unstage)
#
#       modified:   README.txt
#
# Changed but not updated:
#   (use "git add


      ..." to update what will be committed)
#   (use "git checkout --


       ..." to discard changes in working directory)
#
#       modified:   benchmarks.rb
#
This command looks odd. Just leave it alone and use it.The benchmarks.rb file is now back to the state it was previously modified and not temporary.
Cancel modifications to files
If you feel that the modification you just made to benchmarks.rb is completely unnecessary, how can you cancel the modification and go back to the previous state (that is, to the previous version of the modification)?git status also hints at specific undo methods, followed by the example above, where the untapped area now looks like this:
# Changed but not updated:
#   (use "git add


     ..." to update what will be committed)
#   (use "git checkout --


      ..." to discard changes in working directory)
#
#       modified:   benchmarks.rb
#
In the second bracket, we see the command to discard file modifications (at least as prompted in Git 1.6.1 and later, and if you're still using the older version, we strongly recommend that you upgrade to get the best user experience), so let's try:
$ git checkout -- benchmarks.rb
$ git status
# On branch master
# Changes to be committed:
#   (use "git reset HEAD


     ..." to unstage)
#
#       modified:   README.txt
#
You can see that the file has been restored to its original version.You may have realized that this command is dangerous and that all modifications to the file are gone because we just copied the previous version of the file and rewritten it.So before using this command, make sure you really don't need to keep the changes you just made.If you just want to roll back the version and keep the changes you just made so that you can continue working in the future, it would be better to use the stashing and branching described in the following chapter.
Keep in mind that any submission to Git can be restored.Even submissions from deleted branches, or submissions rewritten with--amend, can be recovered (see Chapter 9 for data recovery).So the data you may lose is limited to uncommitted data, which for Git looks like it never existed.
2.5 Use of remote warehouses
To participate in the collaboration of any Git project, you must understand how to manage the remote warehouse.A remote warehouse is a project warehouse hosted on a network, and there may be many, some of which are readable and others writable.When developing a project in collaboration with others, these remote warehouses need to be managed to push or pull data and share their progress.Manage the work of remote warehouses, including adding remote libraries, removing obsolete remote libraries, managing various remote library branches, defining whether they are tracked, and so on.In this section, we will discuss the management and use of remote libraries in detail.
View the current remote library
To see which remote repositories are currently configured, you can use the GIT remove command, which lists the short name of each remote repository.After cloning a project, you will see at least one remote repository named origin, which Git uses by default to identify the original repository you cloned:
$ git clone git://github.com/schacon/ticgit.git
Initialized empty Git repository in /private/tmp/ticgit/.git/
remote: Counting objects: 595, done.
remote: Compressing objects: 100% (269/269), done.
remote: Total 595 (delta 255), reused 589 (delta 253)
Receiving objects: 100% (595/595), 73.31 KiB | 1 KiB/s, done.
Resolving deltas: 100% (255/255), done.
$ cd ticgit
$ git remote
origin
You can also add the -v option (note: this is short for--verbose, take the first letter) to display the corresponding clone address:
$ git remote -v
origin	git://github.com/schacon/ticgit.git
If there are multiple remote warehouses, this command will be listed in its entirety.For example, in my Grit project, you can see:
$ cd grit
$ git remote -v
bakkdoor  git://github.com/bakkdoor/grit.git
cho45     git://github.com/cho45/grit.git
defunkt   git://github.com/defunkt/grit.git
koke      git://github.com/koke/grit.git
origin    git@github.com:mojombo/grit.git
This makes it very easy for me to pull these users from their repositories and submit them locally.Note that only the origin address listed above uses SSH URL links, so only this repository can push data up (we'll explain why in chapter 4).
Add Remote Warehouse
To add a new remote repository, you can specify a simple name for future references and run git remote add [shortname] [url]:
$ git remote
origin
$ git remote add pb git://github.com/paulboone/ticgit.git
$ git remote -v
origin	git://github.com/schacon/ticgit.git
pb	git://github.com/paulboone/ticgit.git
Now you can use the string PB to refer to the corresponding warehouse address.For example, to grab all the information that Paul has but the local repository does not, run git fetch pb:
$ git fetch pb
remote: Counting objects: 58, done.
remote: Compressing objects: 100% (41/41), done.
remote: Total 44 (delta 24), reused 1 (delta 0)
Unpacking objects: 100% (44/44), done.
From git://github.com/paulboone/ticgit
 * [new branch]      master     -> pb/master
 * [new branch]      ticgit     -> pb/ticgit
Now that Paul's main branch (master) is fully accessible locally, the corresponding name is pb/master, you can merge it into one of your branches or switch to it to see what interesting updates are.
Grab data from a remote warehouse
As you've seen before, you can use the following commands to fetch data from a remote warehouse to a local location:
$ git fetch [remote-name]
This command will go to the remote warehouse and pull all data that is not available in your local warehouse.Once running is complete, you can access all branches in the remote warehouse locally, merge one of them locally, or just take out a branch and explore it.(We will discuss the concept and operation of branching in detail in chapter 3.)
If a warehouse is cloned, this command automatically attributes the remote warehouse to the origin name.Therefore, git fetch origin will capture all updates that others have uploaded to this remote repository since your last clone (or updates submitted by others since your last fetch).It is important to remember that the fetch command only pulls remote data into the local repository and does not automatically merge into the current branch of work. Only when you are really ready can you merge manually.
If you have a branch set up to track the branches of a remote warehouse (see the next section and chapter 3), you can use the GIT pull command to automatically grab the data and merge the remote branches into the current branch in the local warehouse.We often do this in our daily work, fast and good.In fact, by default, the git clone command essentially automatically creates a local master branch to track the master branch in a remote warehouse (assuming that the remote warehouse does have a master branch).So in general, we run git pull to capture data from the remote repository of the original clone and merge it into the current branch in the working directory.
Push data to remote warehouse
As the project progresses, to share current results with others, data from local warehouses can be pushed to remote warehouses.The command to do this is simple: git push [remote-name] [branch-name].If you want to push the local master branch to the origin server (again, cloning automatically uses the default master and origin names), you can run the following command:
$ git push origin master
This command will only complete the task as scheduled if the cloned server has write access or no other person is pushing data at the same time.If someone else has already pushed several updates before you push the data, your push will be rejected.You must capture their updates locally and incorporate them into your project before you can push them again.See Chapter 3 for more information on pushing data to remote warehouses.
View remote warehouse information
We can view the details of a remote warehouse by command git remote show [remote-name], for example, to see the cloned origin warehouse, we can run:
$ git remote show origin
* remote origin
  URL: git://github.com/schacon/ticgit.git
  Remote branch merged with 'git pull' while on branch master
    master
  Tracked remote branches
    master
    ticgit
In addition to the corresponding clone address, it provides a lot of additional information.It kindly tells you that if you are in the master branch, you can use the git pull command to grab data and merge it locally.All remote branches in the tracked state are also listed.
The example above is very simple, and as you go deeper with Git, git remote show may give you information like this:
$ git remote show origin
* remote origin
  URL: git@github.com:defunkt/github.git
  Remote branch merged with 'git pull' while on branch issues
    issues
  Remote branch merged with 'git pull' while on branch master
    master
  New remote branches (next fetch will store in remotes/origin)
    caching
  Stale tracking branches (use 'git remote prune')
    libwalker
    walker2
  Tracked remote branches
    acl
    apiv2
    dashboard2
    issues
    master
    postgres
  Local branch pushed with 'git push'
    master:master
It tells us what the branch of the default push is when running git push.It also shows which remote branches have not been synchronized locally (Note: caching branch in line 6), which remote branches have been synchronized locally have been deleted on the remote server (Note: the two branches below Stale tracking branches), and which branches will be merged automatically when git pull is run (Note: issues and master branches listed in the first four lines)).
Delete and rename remote warehouse
In the new Git, you can use the git remote rename command to modify the short local name of a remote warehouse, for example, to change pb to paul, which can be done:
$ git remote rename pb paul
$ git remote
origin
paul
Note that renaming a remote warehouse also changes the name of the corresponding branch, and the original pb/master branch is now paul/master.
If you encounter a remote warehouse server migration, or if the original clone image is no longer used, or if a participant no longer contributes code, you need to remove the corresponding remote warehouse and run the git remote rm command:
$ git remote rm paul
$ git remote
origin
2.6 Labeling
Like most VCS, Git can also label a version at a point in time.People often do this when publishing a software version, such as v1.0, etc.In this section, we will learn how to list all the available tags, how to create new tags, and the differences between different types of tags.
List existing labels
The command to list existing tags is simple, just run git tag:
$ git tag
v0.1
v1.3
The labels displayed are arranged alphabetically, so the order of the labels does not indicate the importance.
We can list qualified tags with a specific search pattern.With over 240 tags in Git's own project repository, if you are only interested in the 1.4.2 series, you can run the following command:
$ git tag -l 'v1.4.2.*'
v1.4.2.1
v1.4.2.2
v1.4.2.3
v1.4.2.4
new label
Git uses two types of tags: lightweight and annotated.A lightweight tag is like an unchanged branch; it is actually a reference to a specific submission object.A tag with a note is actually an independent object stored in a warehouse. It has its own checks and information, contains the name of the tag, e-mail address and date, and tag description. The tag itself allows signing or verification using the GNU Privacy Guard (GPG).In general, we recommend using tags with notes in order to keep relevant information; of course, if you only want to temporarily add tags, or if you don't need to add additional information, you can use lightweight tags as well.
Labels with Notes
It is easy to create a label with a type of annotation by specifying the label name with -a:
$ git tag -a v1.4 -m 'my version 1.4'
$ git tag
v0.1
v1.3
v1.4
The -m option specifies the label description that Git will save together in the label object.If this option is not given, Git will launch text editing software for you to enter label descriptions.
You can use the git show command to view the version information for the corresponding label, along with the submission object displayed when labeling.
$ git show v1.4
tag v1.4
Tagger: Scott Chacon


    <schacon@gee-mail.com>


Date:   Mon Feb 9 14:45:11 2009 -0800

my version 1.4
commit 15027957951b64cf874c3557a0f3547bd83b3ff6
Merge: 4a447f7... a6b4c97...
Author: Scott Chacon


     <schacon@gee-mail.com>


Date:   Sun Feb 8 19:02:46 2009 -0800

    Merge branch 'experiment'
We can see that on the submission object information, the submitter and submission time of this tag are listed, along with the corresponding tag description.
Sign label
If you have your own private key, you can also use GPG to sign the label by changing the previous -a to -s:
$ git tag -s v1.5 -m 'my signed 1.5 tag'
You need a passphrase to unlock the secret key for
user: "Scott Chacon


    <schacon@gee-mail.com>


     "
1024-bit DSA key, ID F721C45A, created 2009-02-09
Now running git show again will see the corresponding GPG signature attached to it:
$ git show v1.5
tag v1.5
Tagger: Scott Chacon


    <schacon@gee-mail.com>


Date:   Mon Feb 9 15:22:20 2009 -0800

my signed 1.5 tag
-----BEGIN PGP SIGNATURE-----
Version: GnuPG v1.4.8 (Darwin)

iEYEABECAAYFAkmQurIACgkQON3DxfchxFr5cACeIMN+ZxLKggJQf0QYiQBwgySN
Ki0An2JeAVUCAiJ7Ox6ZEtK+NvZAj82/
=WryJ
-----END PGP SIGNATURE-----
commit 15027957951b64cf874c3557a0f3547bd83b3ff6
Merge: 4a447f7... a6b4c97...
Author: Scott Chacon


     <schacon@gee-mail.com>


Date:   Sun Feb 8 19:02:46 2009 -0800

    Merge branch 'experiment'
We'll learn how to verify the signed label later.
Lightweight Label
A lightweight tag is essentially a file that holds checks and information about the corresponding submitted object.To create such a label, either a -a, -s or -m option is not needed, just give the label name:
$ git tag v1.4-lw
$ git tag
v0.1
v1.3
v1.4
v1.4-lw
v1.5
Now run git show to see this tag information, only the corresponding summary of the submission objects:
$ git show v1.4-lw
commit 15027957951b64cf874c3557a0f3547bd83b3ff6
Merge: 4a447f7... a6b4c97...
Author: Scott Chacon


    <schacon@gee-mail.com>


Date:   Sun Feb 8 19:02:46 2009 -0800

    Merge branch 'experiment'
Validation Label
Signed labels can be validated using git tag-v [tag-name].This command calls GPG to verify the signature, so you need to have the signer's public key stored in the keyring to verify:
$ git tag -v v1.4.2.1
object 883653babd8ee7ea23e6a5c392bb739348b1eb61
type commit
tag v1.4.2.1
tagger Junio C Hamano


    <junkio@cox.net>


      1158138501 -0700

GIT 1.4.2.1

Minor fixes since 1.4.2, including git-mv and git-http with alternates.
gpg: Signature made Wed Sep 13 02:08:25 2006 PDT using DSA key ID F3119B9A
gpg: Good signature from "Junio C Hamano


     <junkio@cox.net>


      "
gpg:                 aka "[jpeg image of size 1513]"
Primary key fingerprint: 3565 2A26 2040 E066 C9A7  4A7D C0C6 D9A4 F311 9B9A
If there is no signer's public key, an error like the following will be reported:
gpg: Signature made Wed Sep 13 02:08:25 2006 PDT using DSA key ID F3119B9A
gpg: Can't check signature: public key not found
error: could not verify the tag 'v1.4.2.1'
Post-annotation label
You can even tag an earlier submission later.For example, in the submission history shown below:
$ git log --pretty=oneline
15027957951b64cf874c3557a0f3547bd83b3ff6 Merge branch 'experiment'
a6b4c97498bd301d84096da251c98a07c7723e65 beginning write support
0d52aaab4479697da7686c15f77a3d64d9165190 one more thing
6d52a271eda8725415634dd79daabbc4d9b6008e Merge branch 'experiment'
0b7434d86859cc7b8c3d5e1dddfed66ff742fcbc added a commit function
4682c3261057305bdd616e23b64b0857d832627b added a todo file
166ae0c4d3f420721acbb115cc33848dfcc2121a started write support
9fceb02d0ae598e95dc970b74767f19372d61af8 updated rakefile
964f16d36dfccde844893cac5b347e7b3d44abbc commit the todo
8a5cbc430f1a9c3d00faaeffd07798508422908a updated readme
We forgot to put version number v1.2 on this project after submitting the updated rakefile. That's OK, we can do it now.Just keep up with the checksum (or the first few characters) of the corresponding submission object when labeling:
$ git tag -a v1.2 9fceb02
You can see that we've added tags:
$ git tag
v0.1
v1.2
v1.3
v1.4
v1.4-lw
v1.5

$ git show v1.2
tag v1.2
Tagger: Scott Chacon


    <schacon@gee-mail.com>


Date:   Mon Feb 9 15:32:16 2009 -0800

version 1.2
commit 9fceb02d0ae598e95dc970b74767f19372d61af8
Author: Magnus Chacon


     <mchacon@gee-mail.com>


Date:   Sun Apr 27 20:43:35 2008 -0700

    updated rakefile
...
Sharing Tags
By default, git push does not transfer labels to remote servers; only explicit commands can share labels to remote repositories.Its command format is like a push branch, just run git push origin [tagname]:
$ git push origin v1.5
Counting objects: 50, done.
Compressing objects: 100% (38/38), done.
Writing objects: 100% (44/44), 4.56 KiB, done.
Total 44 (delta 18), reused 8 (delta 1)
To git@github.com:schacon/simplegit.git
* [new tag]         v1.5 -> v1.5
If you want to push all the locally added tags at once, you can use the --tags option:
$ git push origin --tags
Counting objects: 50, done.
Compressing objects: 100% (38/38), done.
Writing objects: 100% (44/44), 4.56 KiB, done.
Total 44 (delta 18), reused 8 (delta 1)
To git@github.com:schacon/simplegit.git
 * [new tag]         v0.1 -> v0.1
 * [new tag]         v1.2 -> v1.2
 * [new tag]         v1.4 -> v1.4
 * [new tag]         v1.4-lw -> v1.4-lw
 * [new tag]         v1.5 -> v1.5
These tags are also now visible when others clone the shared repository or pull data synchronization.
2.7 Tips and tricks
Before concluding this chapter, I would also like to share some tips and tricks that Git uses.Many developers who use Git may not have used these techniques at all, and we don't mean you have to use them after reading this book, but at least you should know them.To be honest, with these tips, we can make our work easier, easier and more efficient.
Autocomplete
If you're using a Bash shell, try Git's AutoComplete script.Download Git's source code, enter the contrib/completion directory, and you'll see a git-completion.bash file.Copy this file to your own user home directory (Note: Follow the example below and rename it with a dot: cp git-completion.bash ~/.git-completion.bash) and add the following line to your.bashrc file:
source ~/.git-completion.bash
You can also set the default use of this script for all users on the system.Copy this script to the / opt/local/etc/bash_completion.d directory on Mac and to the / etc/bash_completion.d/directory on Linux.Scripts in both directories are automatically loaded when Bash starts.
If msysGit is installed on Windows, the default Git Bash is already equipped with this autocomplete script and can be used directly.
When you type a Git command, you can hit the Tab twice and you'll see a list of all the available command suggestions that match:
$ git co


       commit config
In this example, type git co and press the Tab key twice in succession, and you will see two related suggestions (commands) commit and config.Entering m* will automatically complete the git commit command.
Command options can also be automated in this way, which is more practical.For example, if you forget the name of an option while running git log, you can enter the first few letters and tap the Tab key to see what matches:
$ git log --s


      --shortstat  --since=  --src-prefix=  --stat   --summary
That's a good technique to save you a lot of time entering and consulting documents.
Git Command Alias
Git doesn't infer which command you're going to type in a few characters, but if you want to be lazy and tap fewer characters, you can alias the command with git config.Take a look at the following examples:
$ git config --global alias.co checkout
$ git config --global alias.br branch
$ git config --global alias.ci commit
$ git config --global alias.st status
Now, if you want to enter git commit, just type git ci.As Git goes deeper, there will be many commands that are often used. In this case, you might want to create an individual name to increase efficiency.
Using this technology, you can also create new commands, such as canceling temporary files when the input is cumbersome, you can set up your own:
$ git config --global alias.unstage 'reset HEAD --'
In this way, the following two commands are identical:
$ git unstage fileA
$ git reset HEAD fileA
Obviously, the way aliases are used looks clearer.In addition, we often set the last command:
$ git config --global alias.last 'log -1 HEAD'
Then it's much easier to look at the last submission:
$ git last
commit 66938dae3329c7aebe598c2246a8e6af90d04646
Author: Josh Goebel


    <dreamer3@example.com>


Date:   Tue Aug 26 19:48:51 2008 +0800

    test for current head

    Signed-off-by: Scott Chacon


     <schacon@example.com>
You can see that Git actually simply replaces the alias you set in the command.Sometimes, however, we want to run an external command instead of Git's accessory. That's good. Just add! Before the command.If you've written your own scripts that handle Git repository information, you can wrap them in this technology.As a demonstration, we can set gitk to start with git visual:
$ git config --global alias.visual "!gitk"
2.8 Summary
So far, you've learned the most basic Git operations: creating and cloning repositories, making updates, staging and submitting updates, and viewing all historical updates.Next, we'll learn Git's killer feature: Branch Model.
Reprinted at: https://www.cnblogs.com/licheng/archive/2013/05/04/3059864.html