Git notes
1. What problems does git solve in existing projects
- 1. The security is too low
- 2. Project error reporting for no reason
- 3. Project version confusion
- 4. It is difficult to carry out collaborative development
2.Git concept
- Git is a distributed version control and * * * * collaborative development tool
3. Classification of version control tools
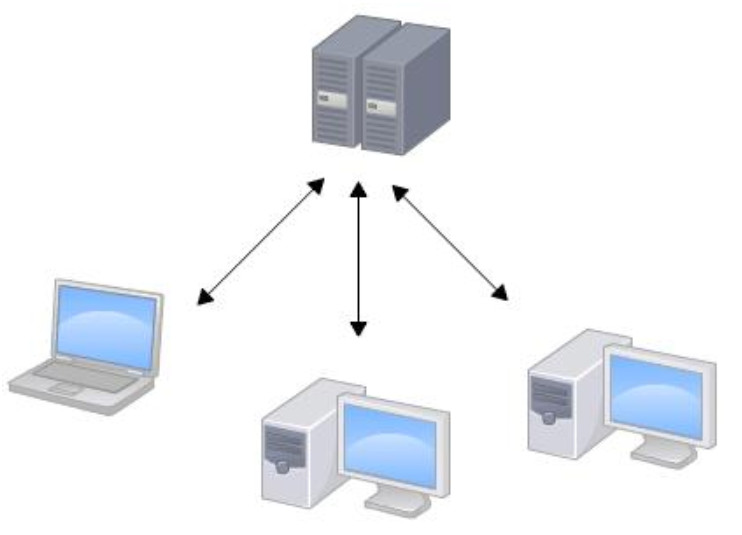
3.1. Centralized version control tool cvs svn
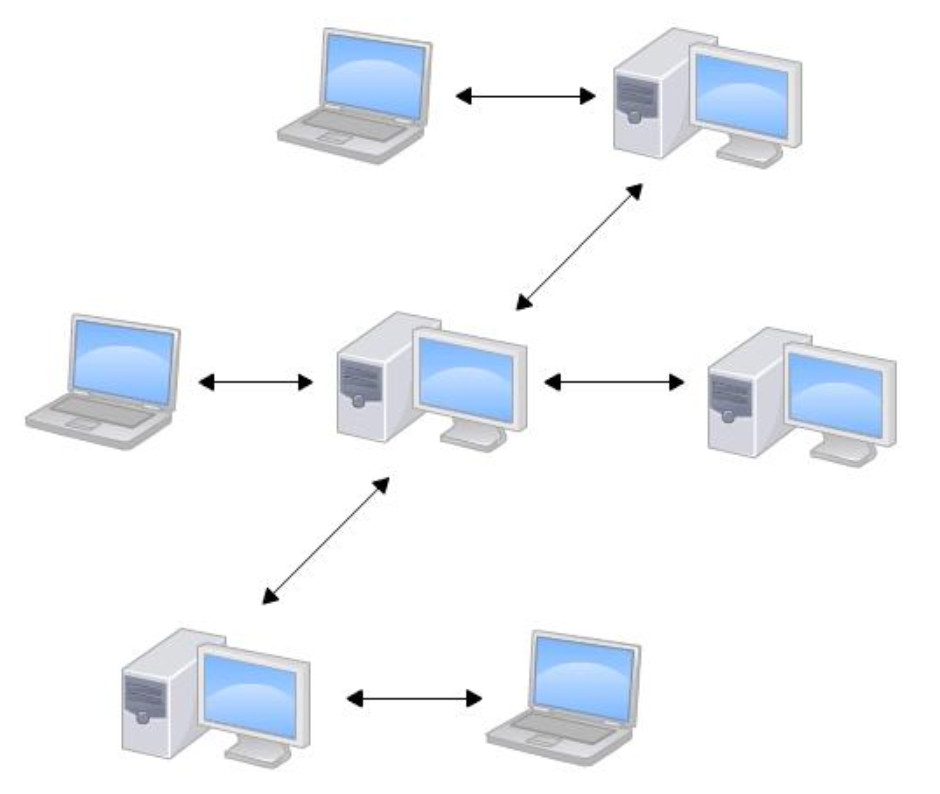
3.2. Distributed version control Git
4. Download and install
4.1. Download
Official website download address: https://git-scm.com/downloads
You can use Git on Windows directly from Git's official website Download installer , and then install it according to the default option.
4.2. Installation
Fool installation, the next step along the way
After installation, find "Git" - > "Git Bash" in the start menu and pop up something similar to the command line window, which indicates that Git installation is successful!
After the installation is completed, the last step of setting is required. Enter on the command line:
$ git config --global user.name "zhongyk"
$ git config --global user.email "zhongyk@163.com"
Because Git is a distributed version control system, each machine must report its home: your name and Email address. You may worry, what if someone deliberately pretends to be someone else? There is no need to worry about this. First, we believe that everyone is a kind and ignorant people. Second, there are ways to find out if there are really fake people.
Note: the -- global parameter of git config command uses this parameter, which means that all Git warehouses on your machine will use this configuration. Of course, you can also specify different user names and Email addresses for a warehouse.
5.Git use
5.1. Create version Library (local library)
What is a version library? The version library is also known as the warehouse and the English name is repository. You can simply understand it as a directory. All files in this directory can be managed by GIT. Git can track the modification and deletion of each file, so that the history can be tracked at any time or "restored" at some time in the future.
Therefore, creating a version library is very simple. First, select an appropriate place and create an empty directory:
$ mkdir 192-Repository #Create an empty directory
The second step is to turn this directory into a warehouse that Git can manage through the git init command:
$ git init

In an instant, GIT has built the warehouse and told you that it is an empty Git repository. Careful readers can find that there is an additional. Git directory in the current directory. Git tracks and manages the version library. Don't manually modify the files in this directory, otherwise the GIT warehouse will be damaged if it is changed.
If you don't see the. git directory, it's because the directory is hidden by default. You can see it with the ls -ah command.
5.2. Create a file
$ touch aaa.txt
It takes only two steps to put a file in Git warehouse, compared with three steps to put an elephant in the refrigerator.
5.3. Add modification to staging area
First, use the command git add to tell Git to add the file to the warehouse (staging area):
$ git add <file> #file filename aaa.txt

Execute the above command without any display, which is right. The philosophy of Unix is "no news is good news", indicating that the addition is successful.
5.4. Submit the modification of the staging area to the version Library
Step 2: use the command git commit to tell Git to submit the file to the warehouse:
$ git commit -m "Submit description information" #-m is equivalent to the description submitted by message

Briefly explain the git commit command, - m followed by the description of this submission. You can enter any content. Of course, it is better to be meaningful, so that you can easily find the change record from the historical record.
If you don't want to enter -m "xxx", will you? There are ways to do this, but it is strongly not recommended, because input instructions are important to yourself and others. If you really don't want to enter the description of children's shoes, please Google by yourself. I won't tell you this parameter.
After the git commit command is successfully executed, it will tell you that 1 file changed: 1 file has been changed (the aaa.txt file we added);
5.5. Viewing status
$ git status
- Red: the workspace has been modified and has not been added to the staging area
- Green: the modification of the workspace has been added to the staging area and has not been submitted to the version library
- nothing to commit, working tree clean: the workspace is consistent with the version library
5.6.Git zoning principle
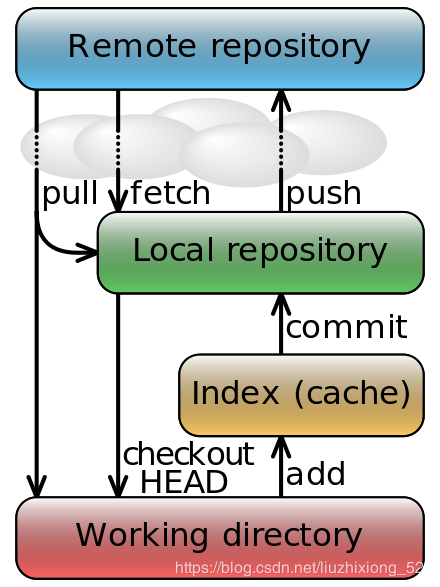
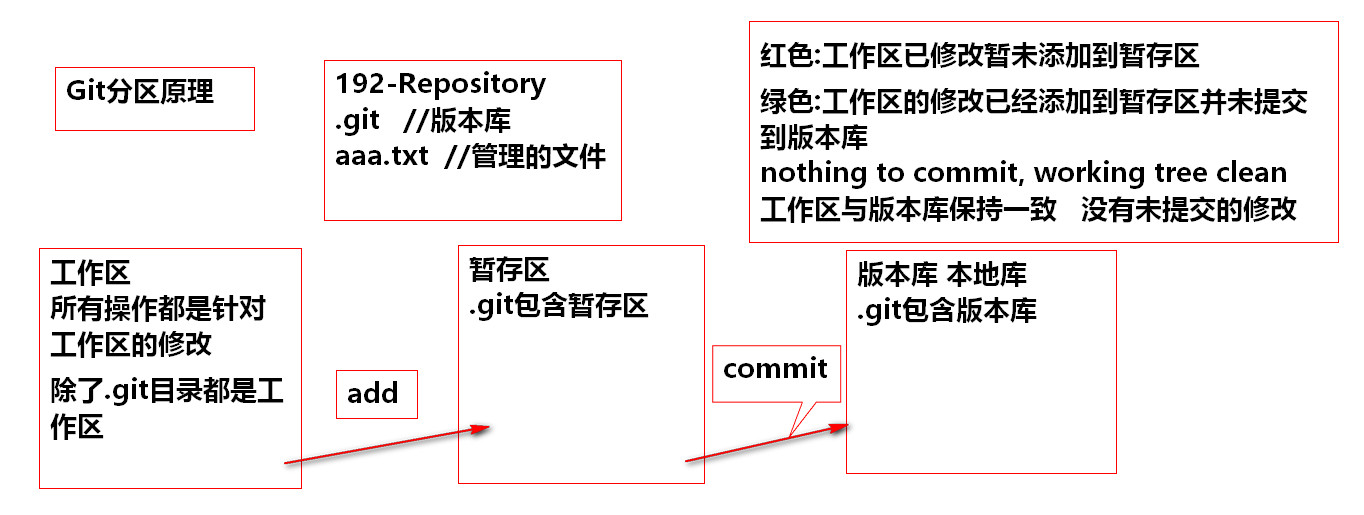
The workspace has a hidden directory. Git, which is not the workspace, but the Git version library.
5.7. View submitted version
Of course, in actual work, how can we remember what has been changed in a file with thousands of lines every time? Otherwise, what should the version control system do. There must be a command in the version control system that can tell us the history. In Git, we use the git log command to view:
$ git log
$ git log --pretty=onelie
Like this, you constantly modify files, and then constantly submit modifications to the version library. It's like when playing RPG Games, you will automatically save the game status every time you pass a level. If a level hasn't passed, you can also choose to read the status of the previous level. Sometimes, you will save the disk manually before playing Boss, so that if you fail to play Boss, you can start from the nearest place. Git is the same. Whenever you think the file has been modified to a certain extent, you can "save a snapshot". This snapshot is called commit in GIT. Once you mess up the file or delete the file by mistake, you can recover from the latest commit and continue to work instead of losing all the work results of several months.
5.8. Version fallback
First of all, Git must know which version the current version is. In Git, HEAD is used to represent the current version, that is, the latest submission 1094adb... (note that my submission ID is certainly different from yours). The previous version is HEAD ^, and the previous version is HEAD ^. Of course, it is easier to write 100 ^ in the last 100 versions, so it is written as HEAD~100.
Now, if we want to return the current version to the previous version, we can use the git reset command:
5.8.1. Fallback to previous version
$ git reset --hard HEAD^   #Fallback to previous version

$ git reset --hard HEAD^(1~100)  #Will revert to the previous n versions

5.8.2. Fallback to the specified version
$ git reset --hard d273 #d273 specifies the version number of the submitted version: commitId
The latest version of append GPL can no longer be seen! For example, you came to the 19th century by time shuttle from the 21st century. You can't go back if you want to go back. What should you do?
In fact, there are some methods. As long as the command line window above has not been closed, you can look up and find that the commit id of the append GPL is 1094adb... So you can specify to go back to a future version:
Now, you go back to a certain version, turn off the computer, and regret the next morning. What if you want to restore to a new version? What if the new version of commit id cannot be found?
In git, there is always regret medicine to take. When you use $git reset --hard HEAD ^ to go back to the add distributed version, if you want to restore to the append GPL, you must find the commit id of the append GPL. Git provides a command git reflog to record every command:
5.8.3. View history command
$ git reflog
5.9. Revocation of modification
5.9.1. Undo the modification of the workspace
$ git restore <file>  #< File >: file name used after version 2.24.0
$ git checkout -- <file>
5.9.2. Cancel modification of temporary storage area
#Step 1: undo the modification of the staging area to the workspace
$ git restore --staged <file> #< File >: file name used after version 2.24.0

$ git reset HEAD <file>

#Step 2: undo the modification of the workspace
$ git restore <file>
5.10. Deleting files
In Git, deleting is also a modification operation
Delete files can be deleted directly
$ rm <fiel> #Delete file
5.10.1. Confirm deletion
#Step 1: confirm deletion
$ git add/rm <file>   #Equivalent to submitting modification | confirm deletion

#Step 2: submit
$ git commit -m "Submission instructions"
5.10.2. Deletion by mistake
$ git restore <file> #Undo changes to the workspace
6.Github
6.1. Registration
6.2. Login
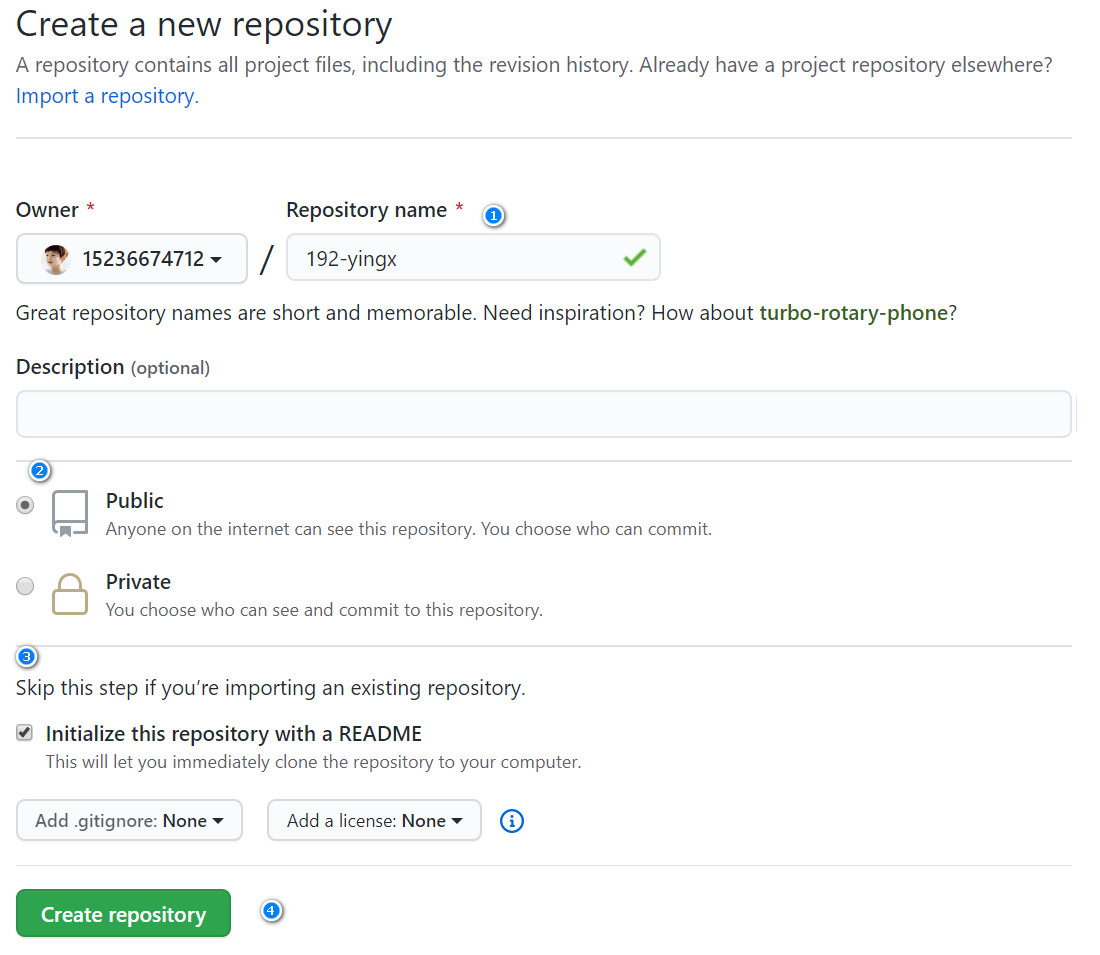
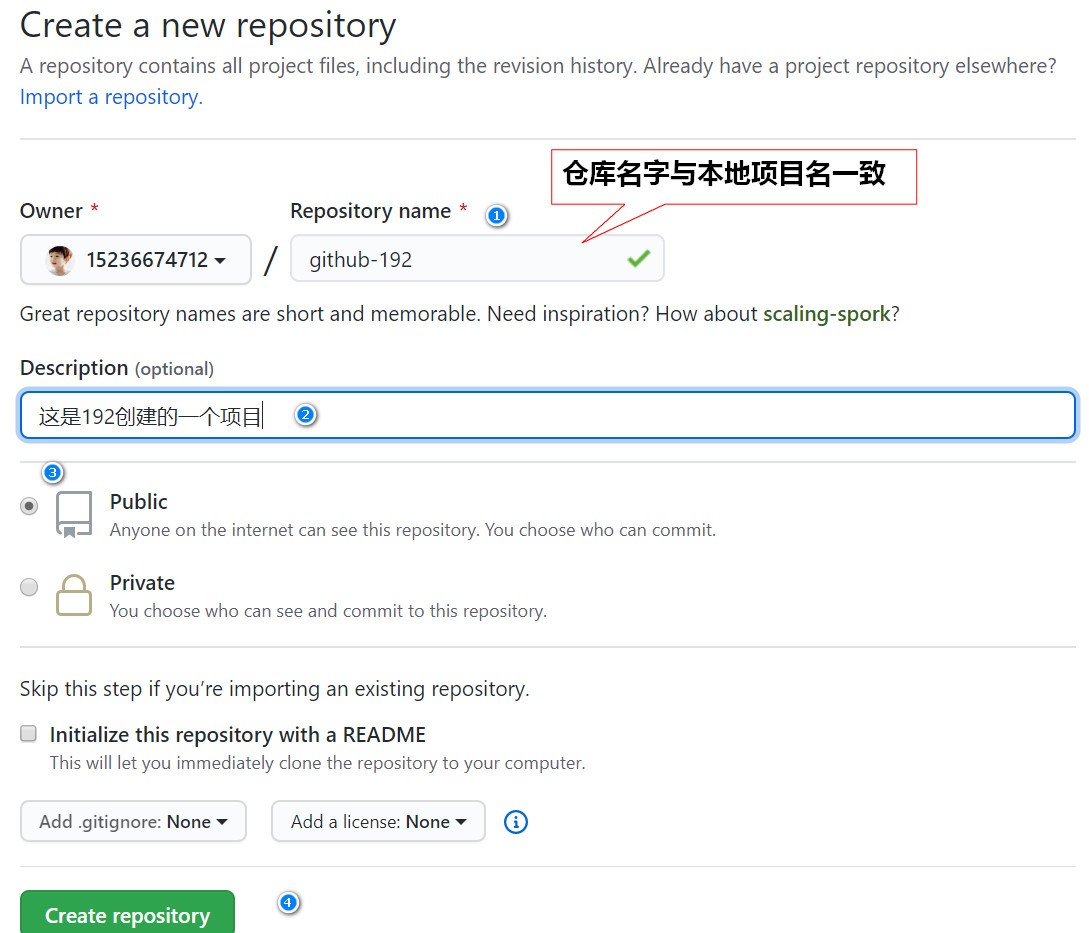
6.3. Create warehouse
Warehouse Name: globally unique
6.4. Pull the remote warehouse to the local
$ git clone git@github.com:15236674712/2001-yingx.git
Cloning failed
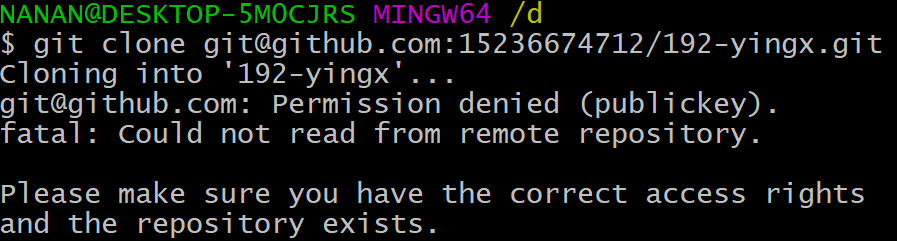
- It is possible that the warehouse does not exist
- No permission
Clone as "192 yingx"
git@github.com : permission denied (public key).
Fatal: cannot read from remote repository.
Ensure that you have the correct access rights and that the repository exists.
6.5. Generate public and private keys
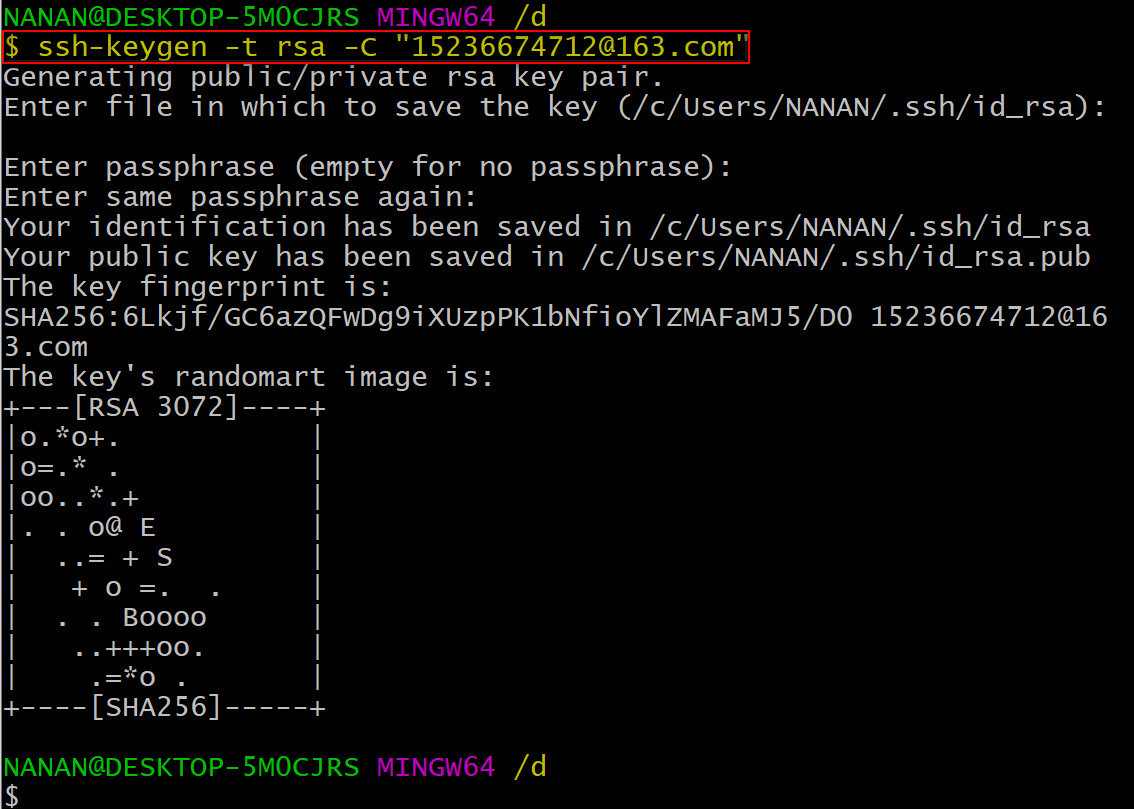
Step 1: create SSH Key. In the user's home directory, check whether there is an. ssh directory. If so, check whether there is an ID in this directory_ RSA and ID_ If you already have the rsa.pub files, you can skip to the next step. If not, open Shell (open Git Bash under Windows) and create SSH Key:
$ ssh-keygen -t rsa -C "15236674712@163.com"
#If the. ssh directory does not exist on the computer, execute the following command
$ ssh-keygen
You need to change your email address to your own email address, then enter all the way, and use the default value. Since this Key is not used for military purposes, there is no need to set a password.
If everything goes well, you can find the. ssh directory with ID in the user's home directory_ RSA and id_rsa.pub two files, which are the secret key pair of SSH Key, id_rsa is the private key and cannot be disclosed. id_rsa.pub is a public key that can be confidently told to anyone.
View public and private keys
C:\Users\NANAN\.ssh
1. Public key
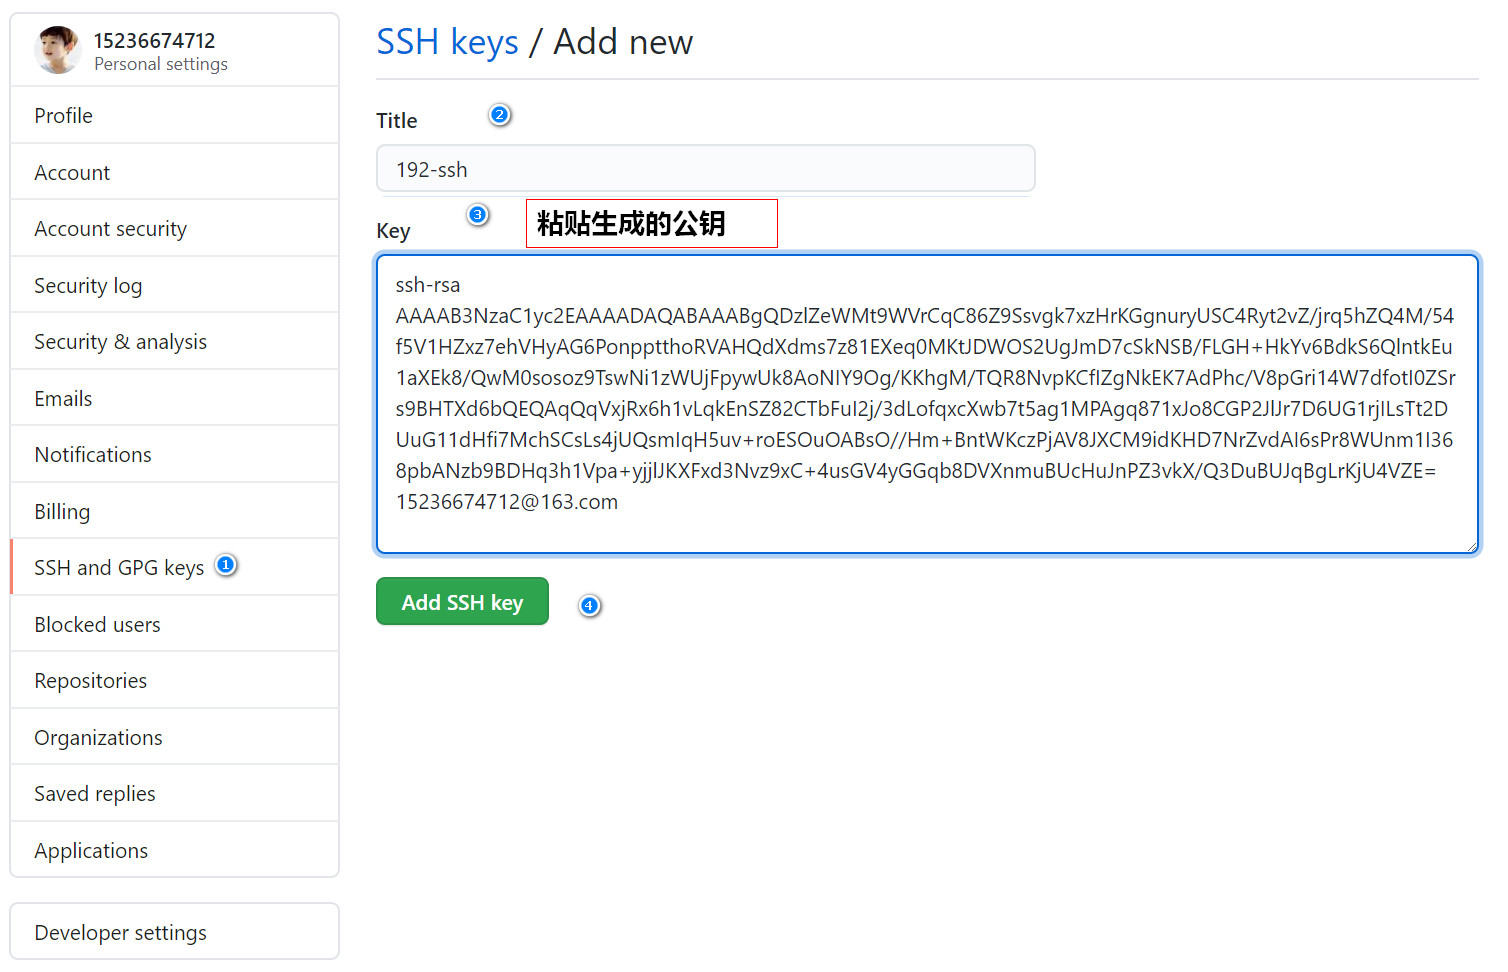
ssh-rsa AAAAB3NzaC1yc2EAAAADAQABAAABgQDzlZeWMt9WVrCqC86Z9Ssvgk7xzHrKGgnuryUSC4Ryt2vZ/jrq5hZQ4M/54f5V1HZxz7ehVHyAG6PonpptthoRVAHQdXdms7z81EXeq0MKtJDWOS2UgJmD7cSkNSB/FLGH+HkYv6BdkS6QlntkEu1aXEk8/QwM0sosoz9TswNi1zWUjFpywUk8AoNIY9Og/KKhgM/TQR8NvpKCfIZgNkEK7AdPhc/V8pGri14W7dfotI0ZSrs9BHTXd6bQEQAqQqVxjRx6h1vLqkEnSZ82CTbFuI2j/3dLofqxcXwb7t5ag1MPAgq871xJo8CGP2JlJr7D6UG1rjILsTt2DUuG11dHfi7MchSCsLs4jUQsmIqH5uv+roESOuOABsO//Hm+BntWKczPjAV8JXCM9idKHD7NrZvdAI6sPr8WUnm1I368pbANzb9BDHq3h1Vpa+yjjlJKXFxd3Nvz9xC+4usGV4yGGqb8DVXnmuBUcHuJnPZ3vkX/Q3DuBUJqBgLrKjU4VZE= 15236674712@163.com
2. Private key
-----BEGIN OPENSSH PRIVATE KEY-----
b3BlbnNzaC1rZXktdjEAAAAABG5vbmUAAAAEbm9uZQAAAAAAAAABAAABlwAAAAdzc2gtcn
NhAAAAAwEAAQAAAYEA85WXljLfVlawqgvOmfUrL4JO8cx6yhoJ7q8lEguEcrdr2f466uYW
UODP+eH+VdR2cc+3oVR8gBuj6J6abbYaEVQB0HV3ZrO8/NRF3qtDCrSQ1jktlICZg+3EpD
UgfxSxh/h5GL+gXZEukJZ7ZBLtWlxJPP0MDNLKLKM/U7MDYtc1lIxacsFJPAKDSGPToPyi
oYDP00EfDb6SgnyGYDZBCuwHT4XP1fKRq4teFu3X6LSNGUq7PQR013em0BEAKkKlcY0ceo
dby6pBJ0mfNgk2xbiNo/93S6H6sXF8G+7eWoNTDwIKvO9cSaPAhj9iZSa+w+lBta4yC7E7
dg1LhtdXR34uzHIUgrC7OI1ELJiKh+br/q6BEjrjgAbDv/x5vgZ7VinMz4wFfCVwjPYnSh
w+za2b3QCOrD6/FlJ5tSN+vKWwDc2/QQx6t4dVaWvso45SSlxcXdzb8/cQvuLrBleMhhqm
/A1V55rgVHB7iZz2d75F/0Nw7gVCagYC6yo1OFWRAAAFiEcBkYpHAZGKAAAAB3NzaC1yc2
EAAAGBAPOVl5Yy31ZWsKoLzpn1Ky+CTvHMesoaCe6vJRILhHK3a9n+OurmFlDgz/nh/lXU
dnHPt6FUfIAbo+iemm22GhFUAdB1d2azvPzURd6rQwq0kNY5LZSAmYPtxKQ1IH8UsYf4eR
i/oF2RLpCWe2QS7VpcSTz9DAzSyiyjP1OzA2LXNZSMWnLBSTwCg0hj06D8oqGAz9NBHw2+
koJ8hmA2QQrsB0+Fz9XykauLXhbt1+i0jRlKuz0EdNd3ptARACpCpXGNHHqHW8uqQSdJnz
YJNsW4jaP/d0uh+rFxfBvu3lqDUw8CCrzvXEmjwIY/YmUmvsPpQbWuMguxO3YNS4bXV0d+
LsxyFIKwuziNRCyYiofm6/6ugRI644AGw7/8eb4Ge1YpzM+MBXwlcIz2J0ocPs2tm90Ajq
w+vxZSebUjfrylsA3Nv0EMereHVWlr7KOOUkpcXF3c2/P3EL7i6wZXjIYapvwNVeea4FRw
e4mc9ne+Rf9DcO4FQmoGAusqNThVkQAAAAMBAAEAAAGANiJn1wylUAXiK1iGaPbwyxU1wE
1GeMYCsRYhsfn3TJtxD7iNlYjfKshb0FgmcyLN1Atq7yLcrIf4DIm7HmjbMECwSojgqWWG
udXfVVZQhv+MNN/uPlO6SnS8QBZCi5uovOQ+3X4xALp0U9PtxlbigzOBX1mJpQvvvK3nNA
3T0dKsaMAsldZZFUolrR/qd5vN9QCwr22InkBdRTyxjI5iNDAyi7zcbNsE/s/xcD0Zv/Do
bteJ90yXPw+rdhBhLgMzXKLuSvcUWdBDY2OieFGwB7WJYZrI2gRyS/kpj8AWZiClAQdzpm
Juz2+uzGGPJ+wNvH1o2X0FZsl27prnLVBkgKjSTUC0kdlujZMmwXUb+hjylecfUjOKcWKM
yC4pe7X15voRbGTNflEGGaWpu/rxhy74IKQq7eP6PWLk48uHDBPLVk1+NTDGmb2ZCX31fE
YTKOEMrXt1xe7ei9DysLuk0MKxkCs+Bz8ORWVzzPFdJpeUVWr+HWzPptMraTZGm4+xAAAA
wHV+7l9YemnJxONQbnA2W0omcdRz42uQTzMXnlvPN98AX4dKXrLf2wBDQl5670fggndfIy
loBDhM0AhtusiI88HGtrz1U5qZtBdVfdDjnHcLy1KT+FwYYebVHNr6qGsC+F30+tpg6VNe
+pvbCjCTQ4P0cAc9+p65/fuUbSs+SC8d/JcSDsLDNE28/ngrGhewIxTkcy7LdM1DYk4yme
sG0o8Kq55qBrrBQxHRN5JWHwweCTCq6uU7VZqJMi//jcnw/wAAAMEA+uN0iWd3CtrwwABp
UA2I33bQeA7FaUqXtqUGVeMguVPnzjWaKA5VyNdzM0GkxRNeJa9l2V1RMl6cm8zvFFFwrL
nH5o7LXZECf5avNpkCS26dhyVD3rJJa1dd/snU2okPUGAPizHEl1skdpy9oVlB1xn+Z2BR
27p3H/SF2xQOIPUMlYqCXO/GYjhO/veLslvfKvUX9/dx53LKT9GMfRjwLiHZQZsn/jyrjp
8bbCCdIO/yH9+WgxXb1C3DXwKexa+1AAAAwQD4jAqDFwMOhZPeIxb/+c9gHxgk/p/6L/CR
UJKDNYRlq7wBN4DOtC9D2iFq0YbUzRhwnNxRw3pvSWpZxV2NBKo2EQAgqcLniUc7UJowIC
nz7vzhR95afDv+6HuN27McM3wkKRoLay54uLaon8OoFPSYN8XkWhkHKdAsRXs7BZmRbZzO
ftAUzIrPCgqq8UJfbSEusPAFpT0HZAOYrhbHAInzno+QJKD+P0w6sCcSp+JQBrbGZAUD+V
j80/AYdG9O3+0AAAATMTUyMzY2NzQ3MTJAMTYzLmNvbQ==
-----END OPENSSH PRIVATE KEY-----
6.6. Configure GitHub trust list
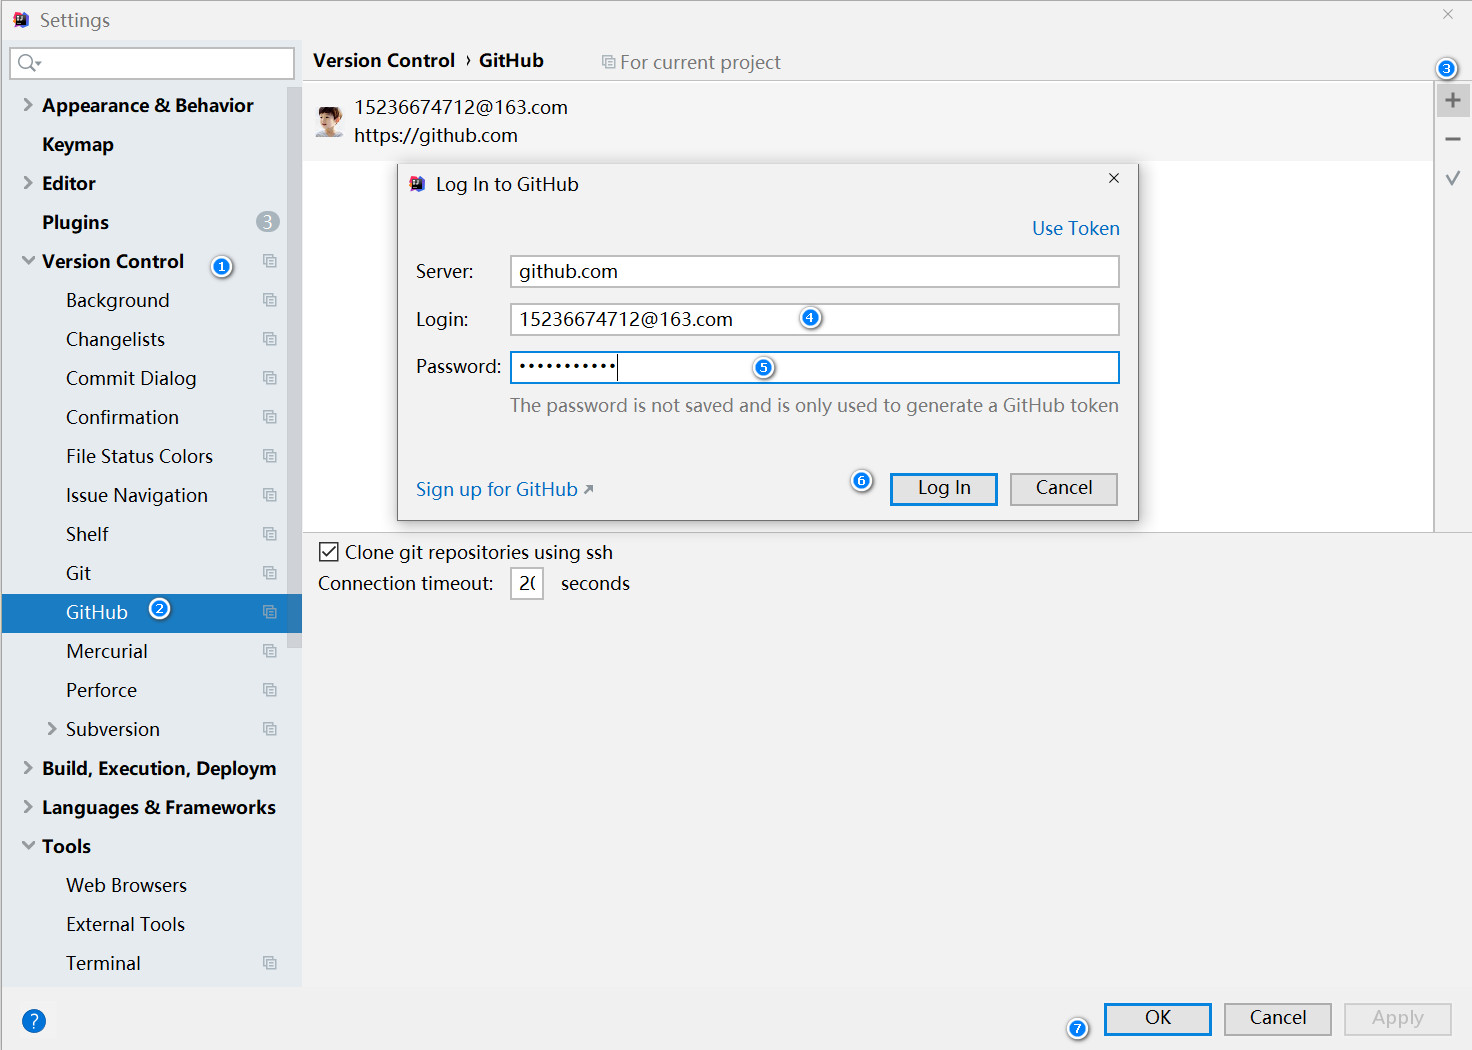
Step 2: log in to GitHub, click the avatar, select "Settings", and open the "SSH and GPG keys" page:
Then, click "New ssh Key", fill in any Title, and paste ID in the Key text box_ Contents of rsa.pub file:
6.6. Pull the remote warehouse to the local
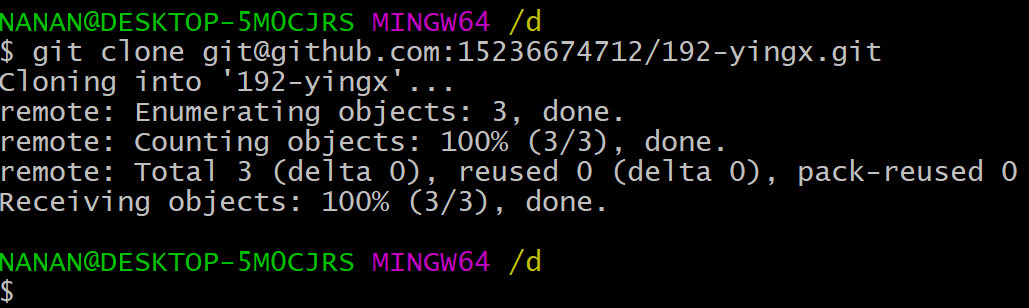
$ git clone git@github.com:15236674712/192-yingx.git
Cloning succeeded
6.7. Push local modifications to remote
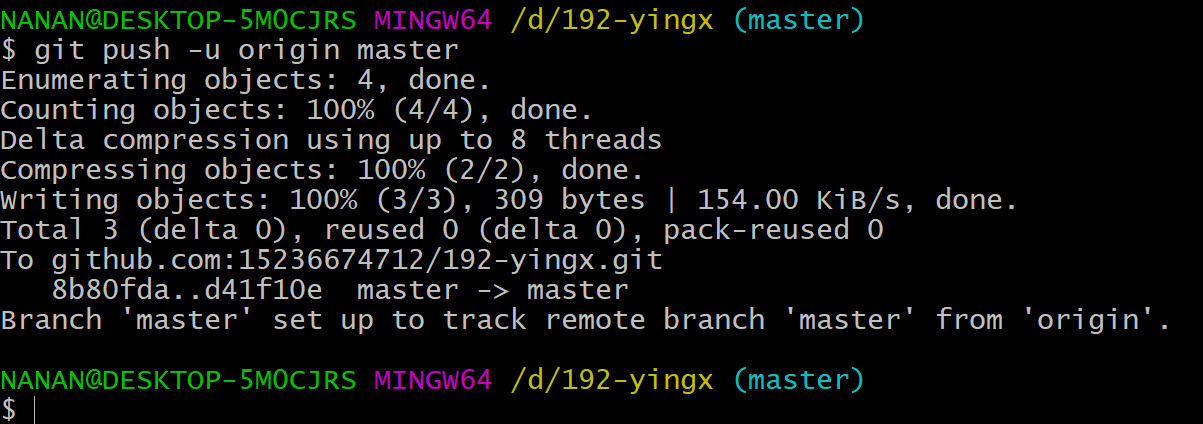
$ git push -u origin master  #First push modification
$ git push origin master
After adding, the name of the remote library is origin, which is the default name of Git. It can also be changed to other names, but the name origin can be known as the remote library at a glance.
Next, you can push all the contents of the local library to the remote library:
Push the contents of the local library to the remote. Using the git push command actually pushes the current branch master to the remote.
Because the remote library is empty, when we first push the master branch, we add the - u parameter. Git will not only push the contents of the local master branch to the new remote master branch, but also associate the local master branch with the remote master branch. In future push or pull, we can simplify the command.
6.8. Synchronize remote modifications to local
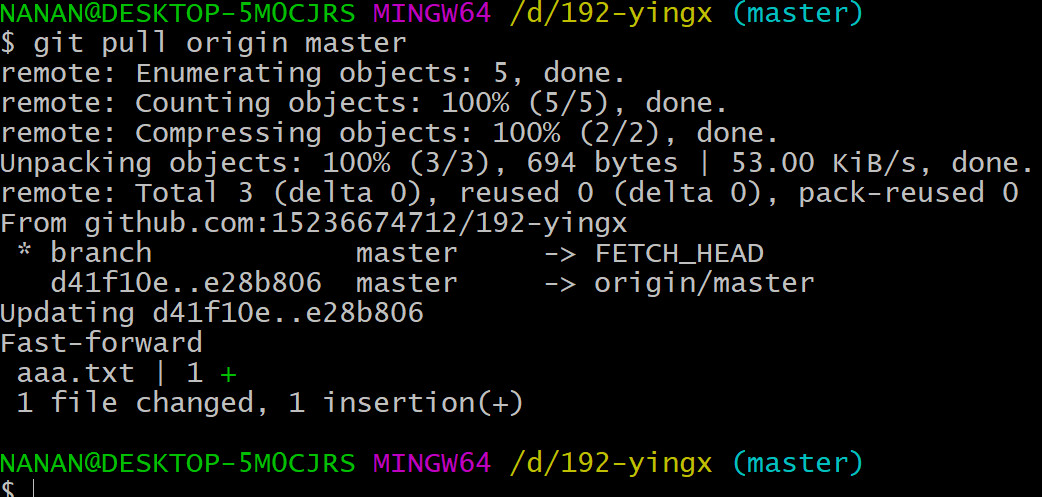
$ git pull origin master
6.9. Push local projects to Github
6.9.1. Prepare a project
6.9.2.Github creates a directory
The directory name is consistent with the project name
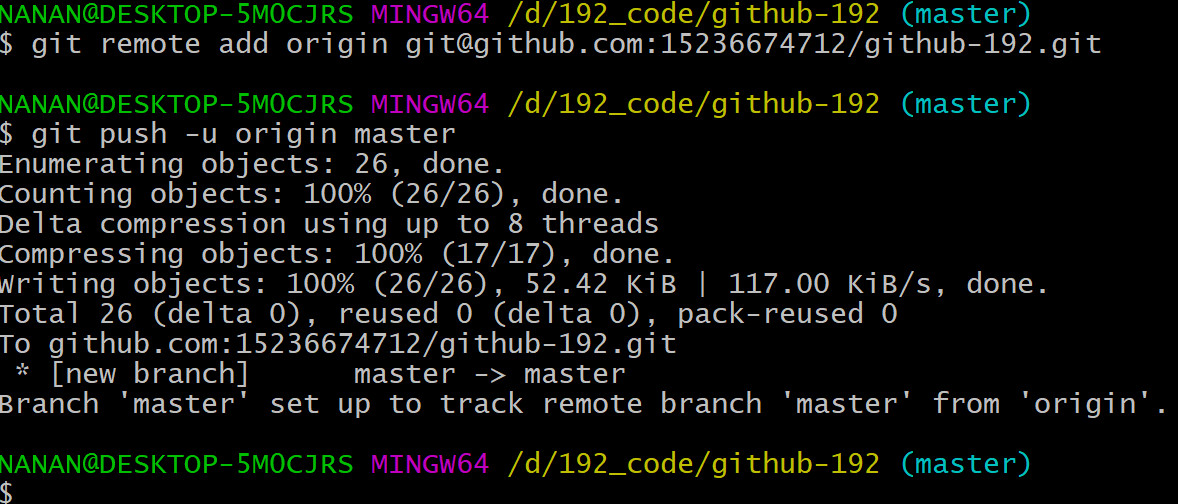
6.9.3. Initialize Git warehouse of local project and push it to remote Github
$ git init
$ git add .
$ git commit -m "first commit"
$ git remote add origin git@github.com:15236674712/github-192.git  #Establish a connection with a remote GitHub (an empty directory with the same name)
$ git push -u origin master  #Push local warehouse (project) to remote Github
7.Git branch
What is the use of branching in practice? Suppose you are ready to develop a new function, but it takes two weeks to complete it. In the first week, you wrote 50% of the code. If you submit it immediately, because the code has not been written, the incomplete code base will cause others to be unable to work. If you wait for the code to be written and submitted again, there is a huge risk of losing your daily progress.
Now that there are branches, don't be afraid. You create a branch that belongs to you and others can't see it. You continue to work normally on the original branch. You work on your own branch and submit it if you want. After the development is completed, you can merge it into the original branch at one time. In this way, it is safe and does not affect the work of others.
Other version control systems, such as SVN, have branch management, but after using it, you will find that these version control systems create and switch branches more slowly than snails, which is unbearable. As a result, the branch function has become a decoration and everyone doesn't use it.
But Git's branches are different. Whether creating, switching or deleting branches, Git can complete them in 1 second! Whether your version library is 1 file or 10000 files.

1. Create branch
$ git branch dev #dev branch name
2. Switch branches
$ git checkout dev #dev branch name
3. Create and switch branches
$ git checkout -b dev #dev branch name
4. View branches
$ git branch
5. Consolidated branches
$ git merge  dev
#Note: if you want to merge the dev branch to the master branch, switch to the master branch to perform the merge
6. Delete branch
$ git branch -d dev #-d delete dev branch name
7. Branch strategy
In actual development, we should carry out branch management according to several basic principles:
First, the master branch should be very stable, that is, it is only used to release new versions and cannot work on it at ordinary times;
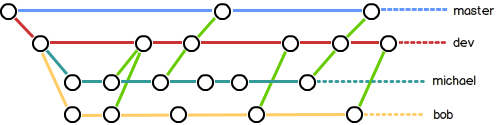
Where do you work? All work is on the dev branch, that is, the dev branch is unstable. At some time, for example, when version 1.0 is released, merge the dev branch into the master, and release version 1.0 on the master branch;
You and your friends, everyone works on the dev branch. Everyone has his own branch. Just merge on the dev branch from time to time.
So the branch of teamwork looks like this:
8.Git integrated IDEA
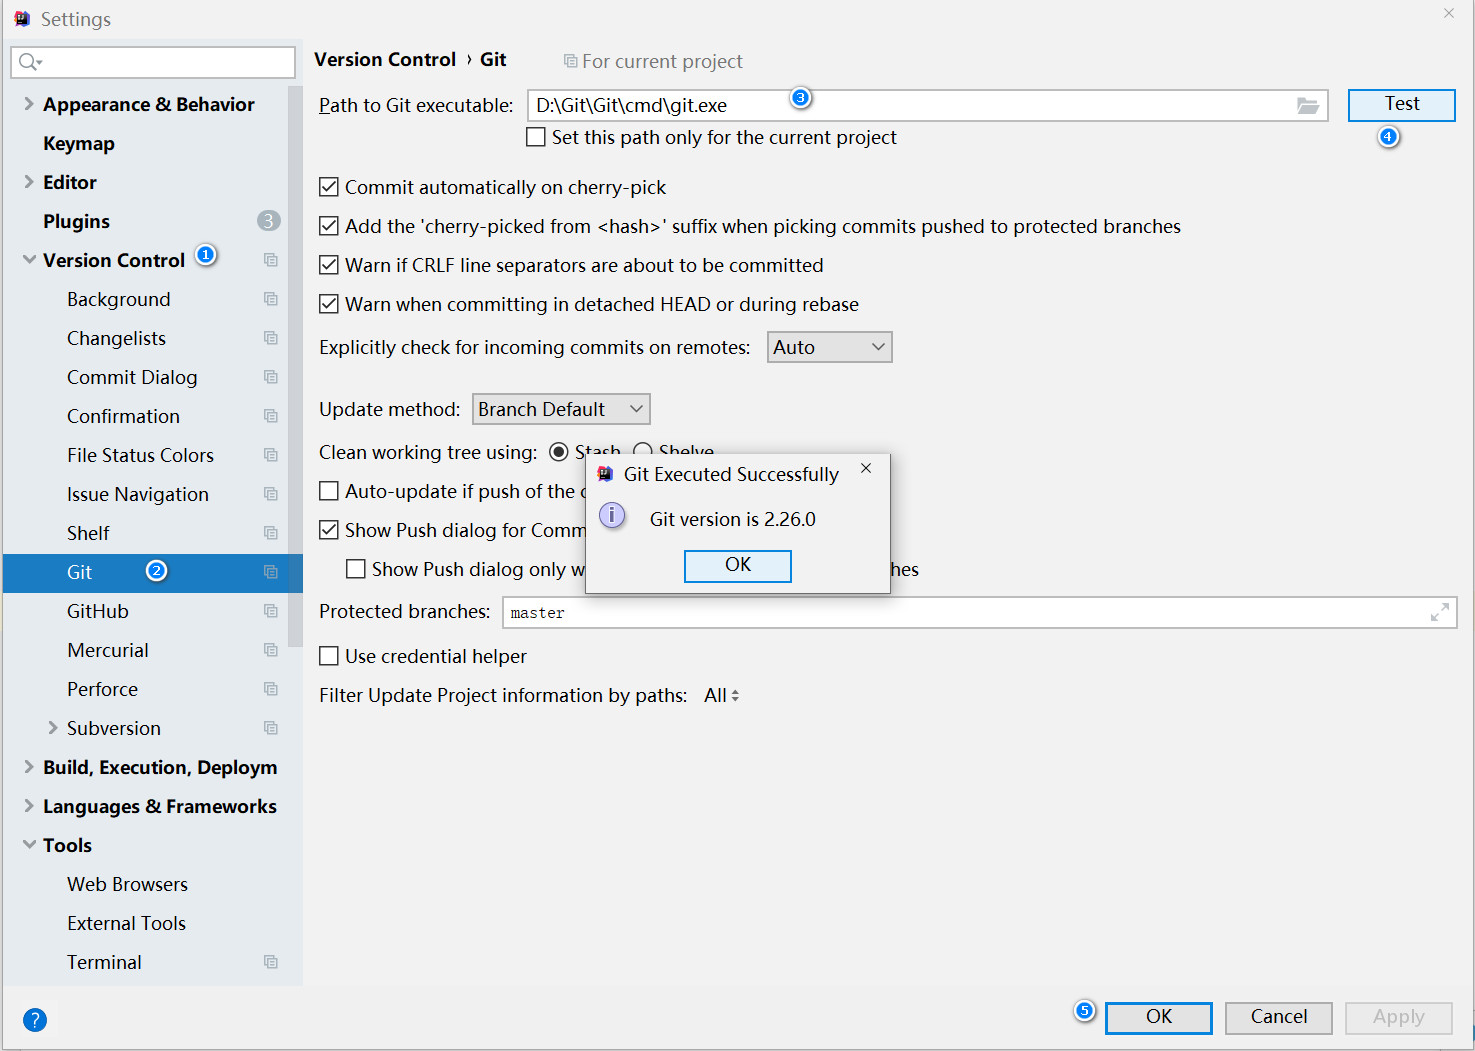
8.1. Configure Git
8.2. Configuring Github
8.3. Modify idea terminal to Git bash
Modify the console shell path: setting - > tools - > Terminal - > shell path, and modify it to git installation path.
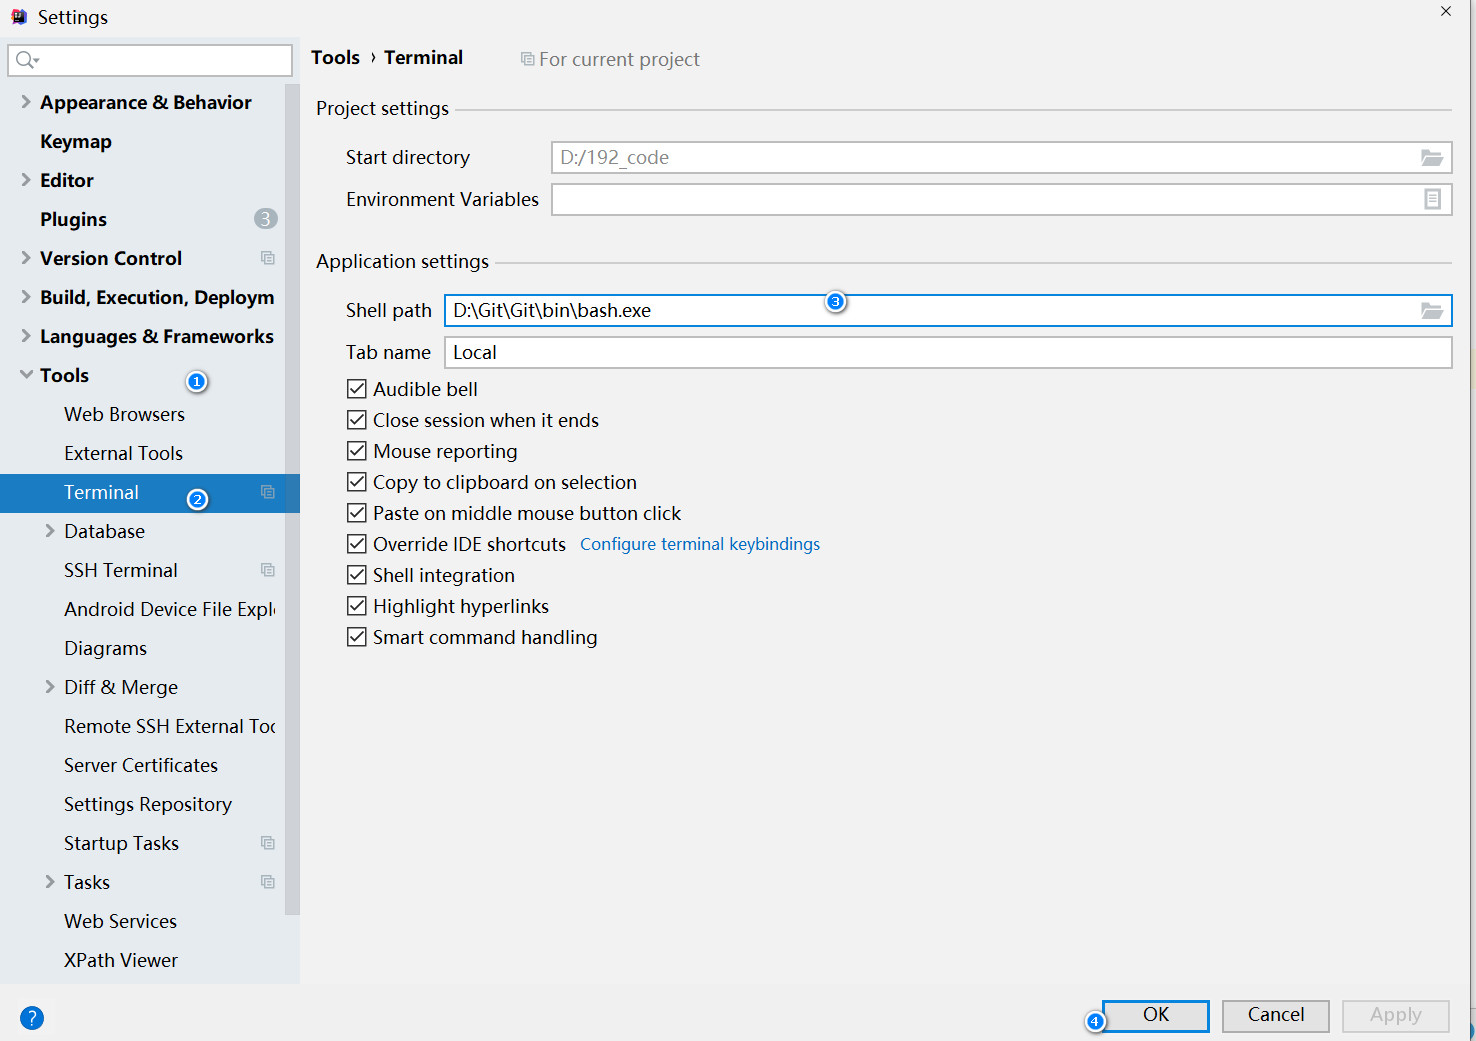
8.3.Terminal Chinese garbled code
After we configure the idea terminal to bash.cmd of git, Chinese garbled code will appear
resolvent:
1. There is a bash.bashrc file under the etc file under the GIT installation path, and the following is added at the end of this file:
export LANG="zh_CN.UTF-8"
export LC_ALL="zh_CN.UTF-8"
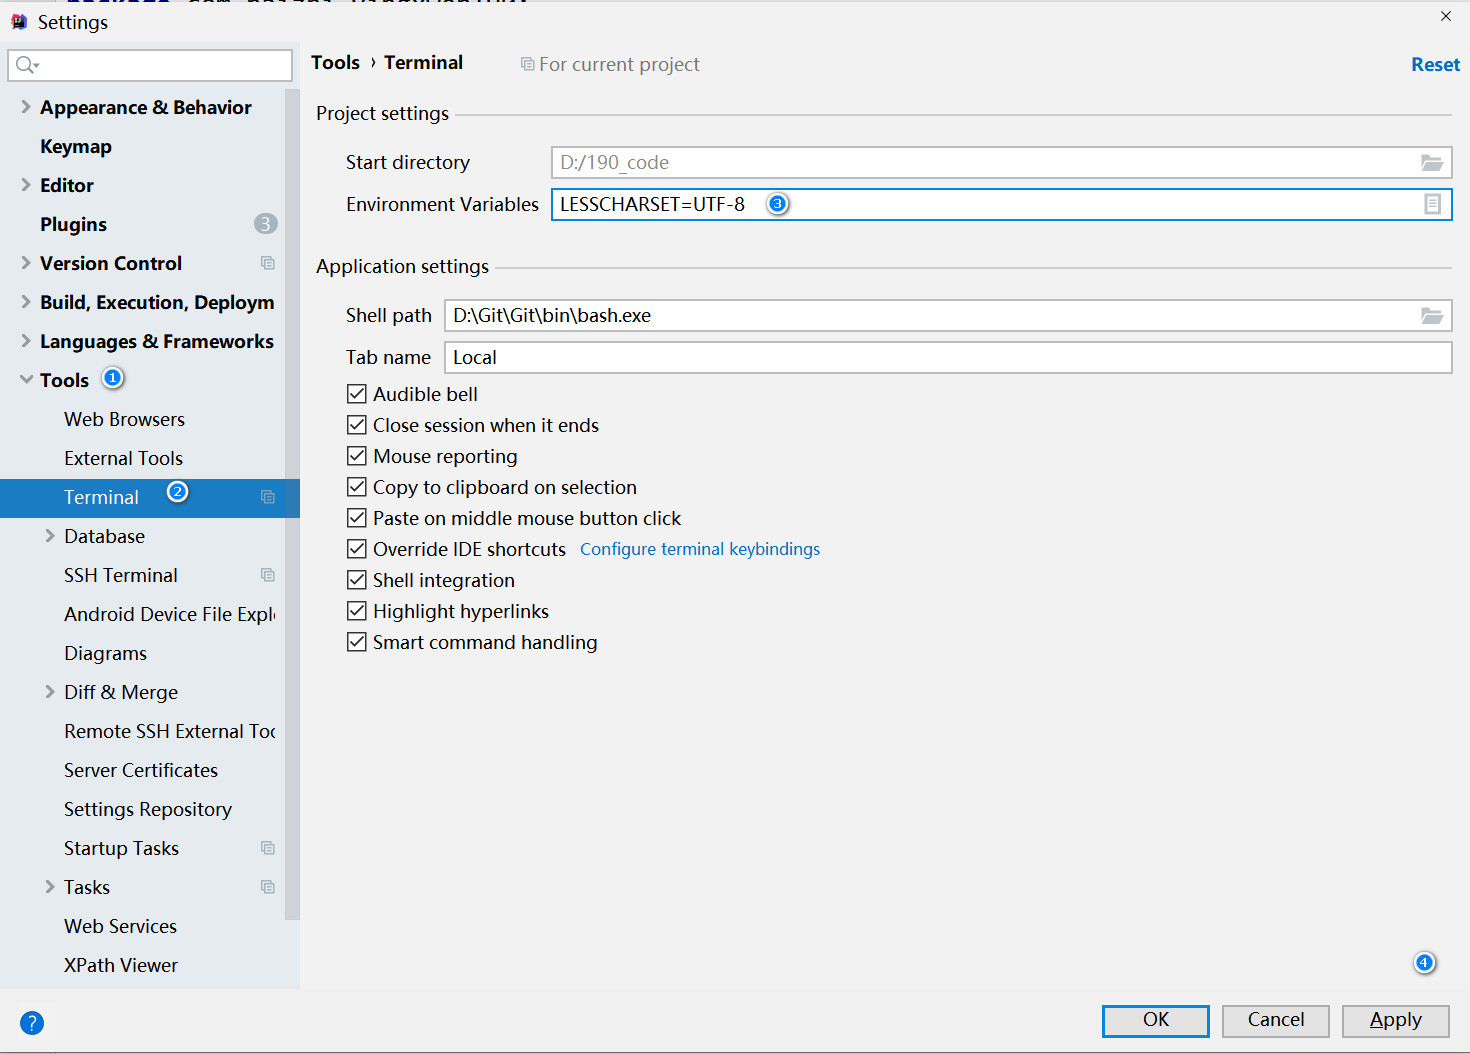
2. Chinese garbled code
- Find the idea.exe.vmoptions and idea64.exe.vmoptions files in the idea installation directory, and add the following at the end of the file:
-Dfile.encoding=UTF-8
- Find the etc/bash.bashrc file in the git installation directory, and add the following at the end of the file:
export LANG="zh_CN.UTF-8"
export LC_ALL="zh_CN.UTF-8"
-
On the Terminal console, enter: set LESSCHARSET=utf-8
-
Exit the console and re-enter. exit
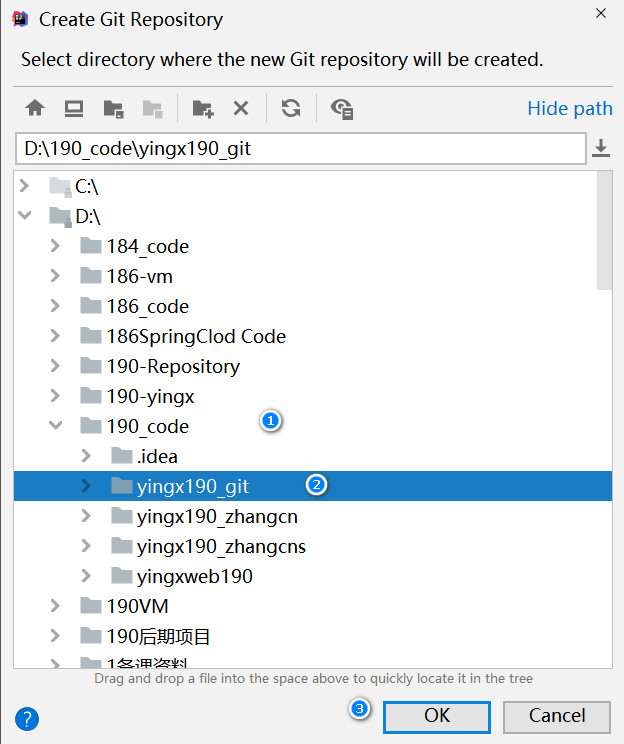
8.4. Initialize Git warehouse
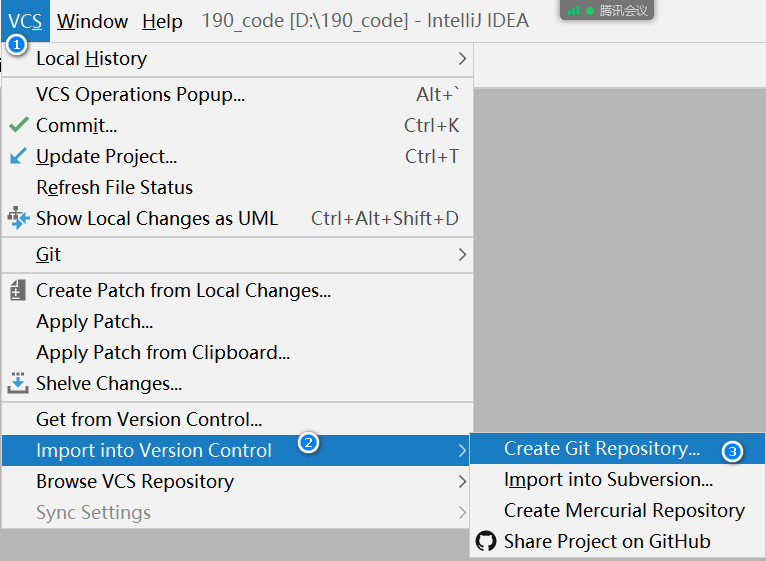
Select the item to initialize the warehouse
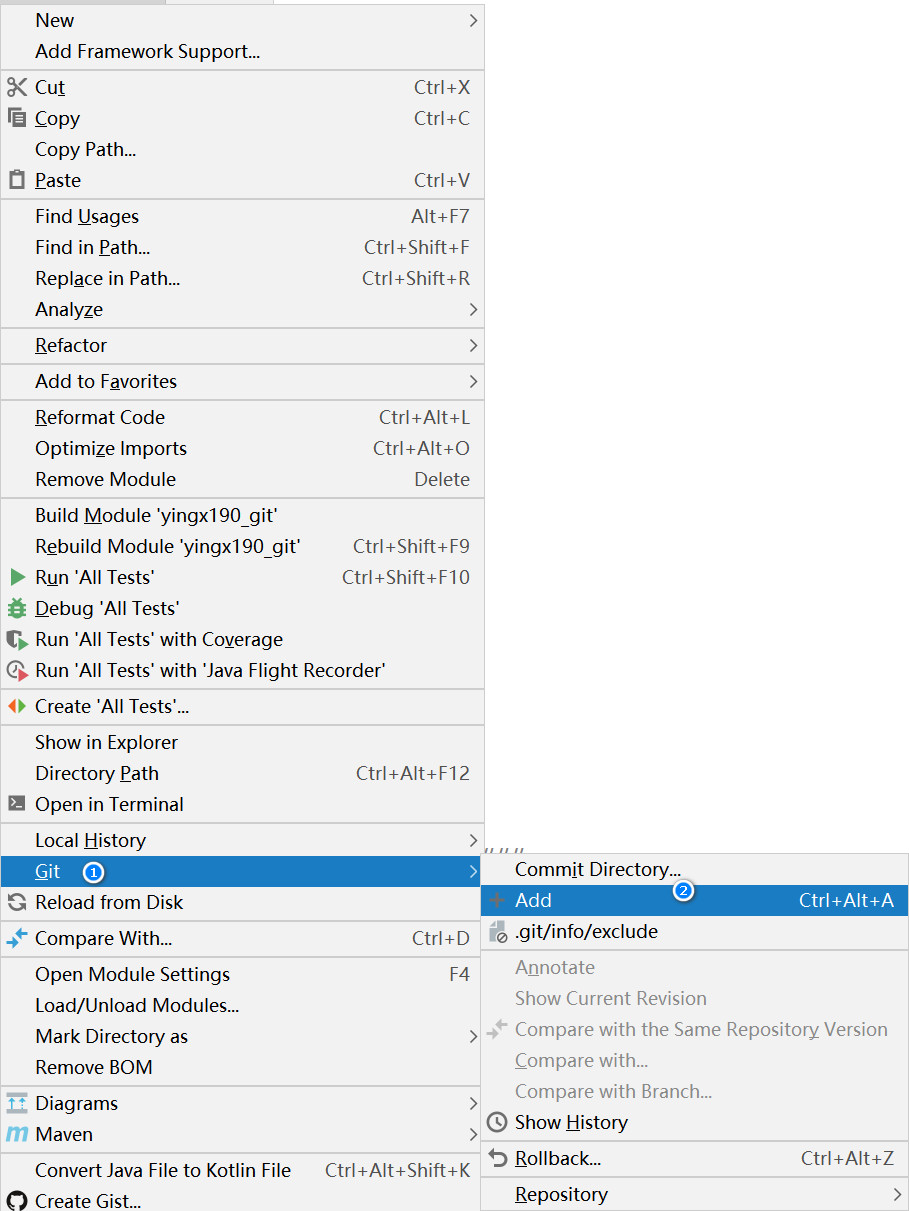
8.5. Add to staging area add
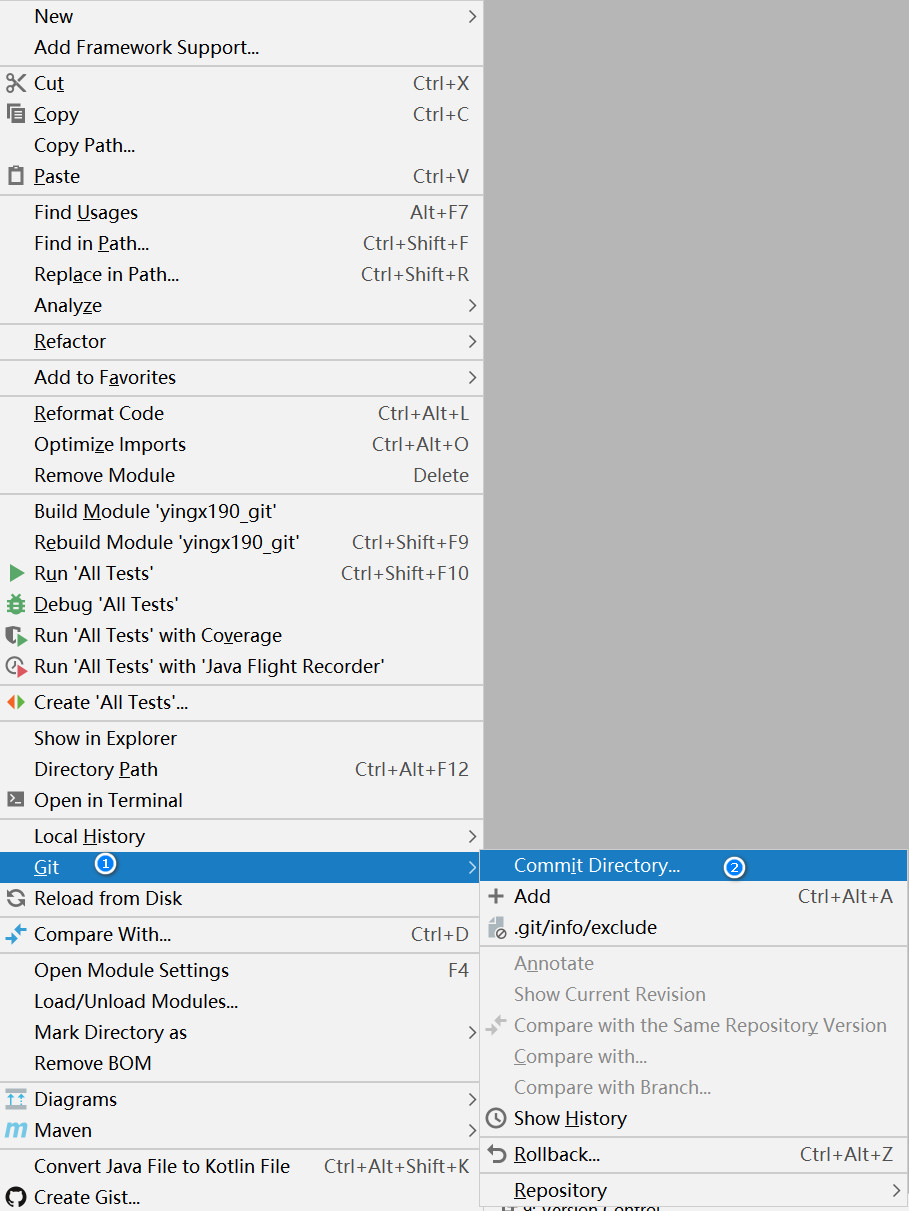
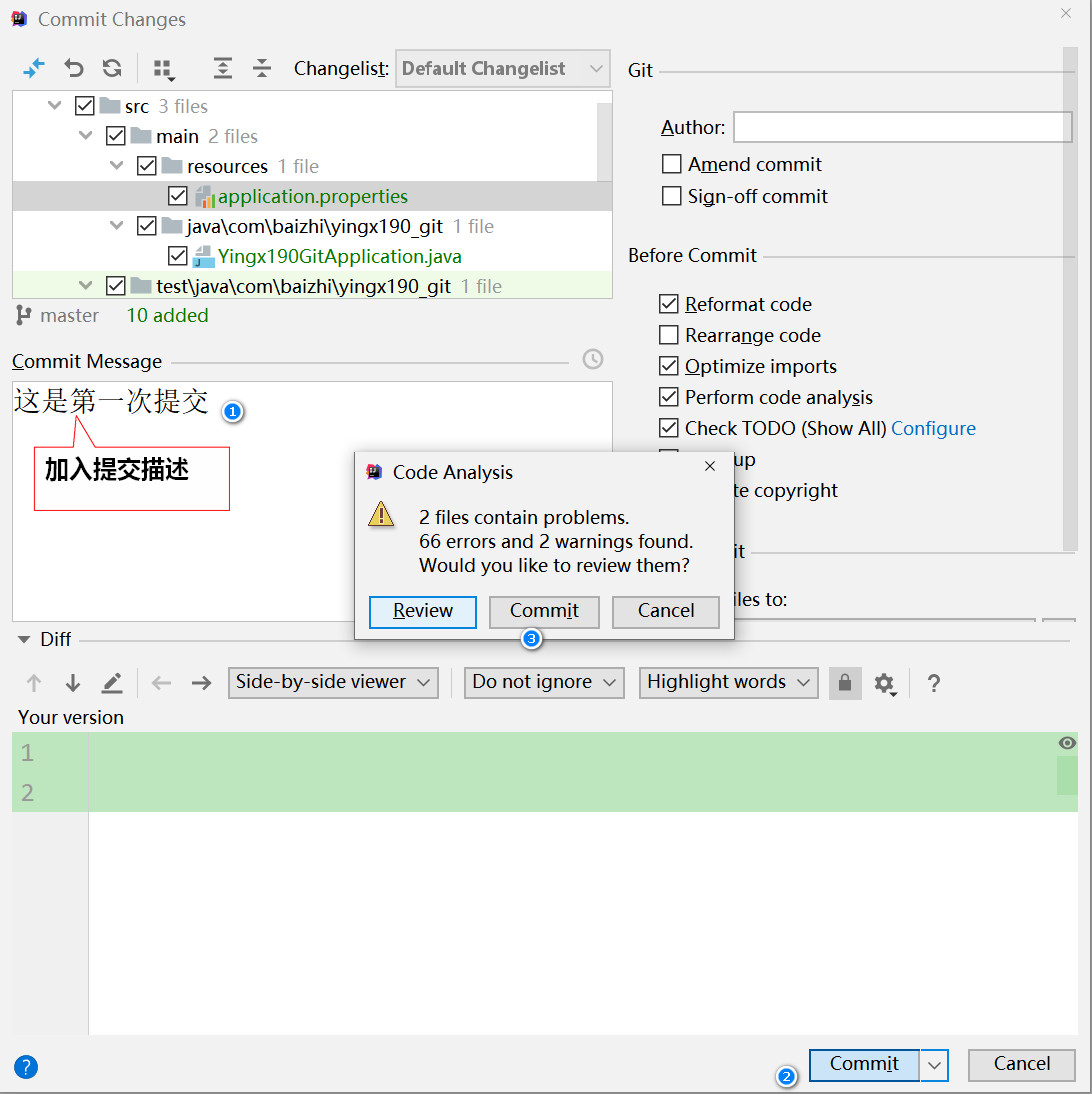
8.6. commit to version Library
Add prompt
8.7. Color of class in idea
- Red: the workspace has been modified and not added to the staging area
- Green: the modification has been added to the staging area and has not been submitted to the version library
- White: the version library is consistent with the workspace
- Blue: it has been submitted to the version library and has been modified
8.8. View historical submission version

Show historical submission version

8.9. Revocation of modification
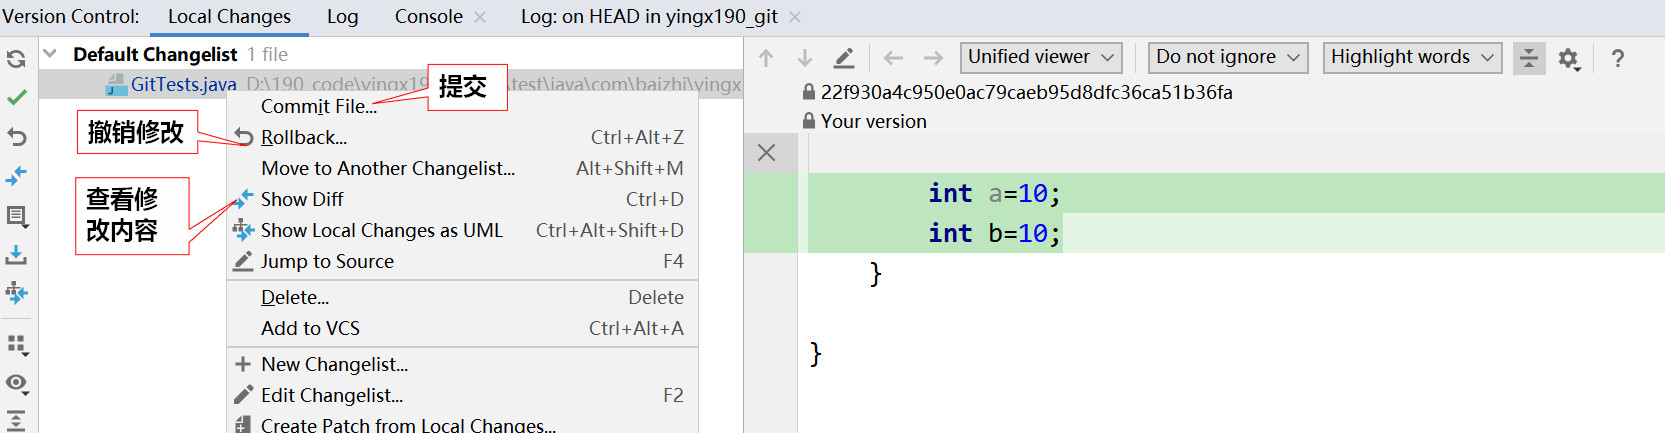
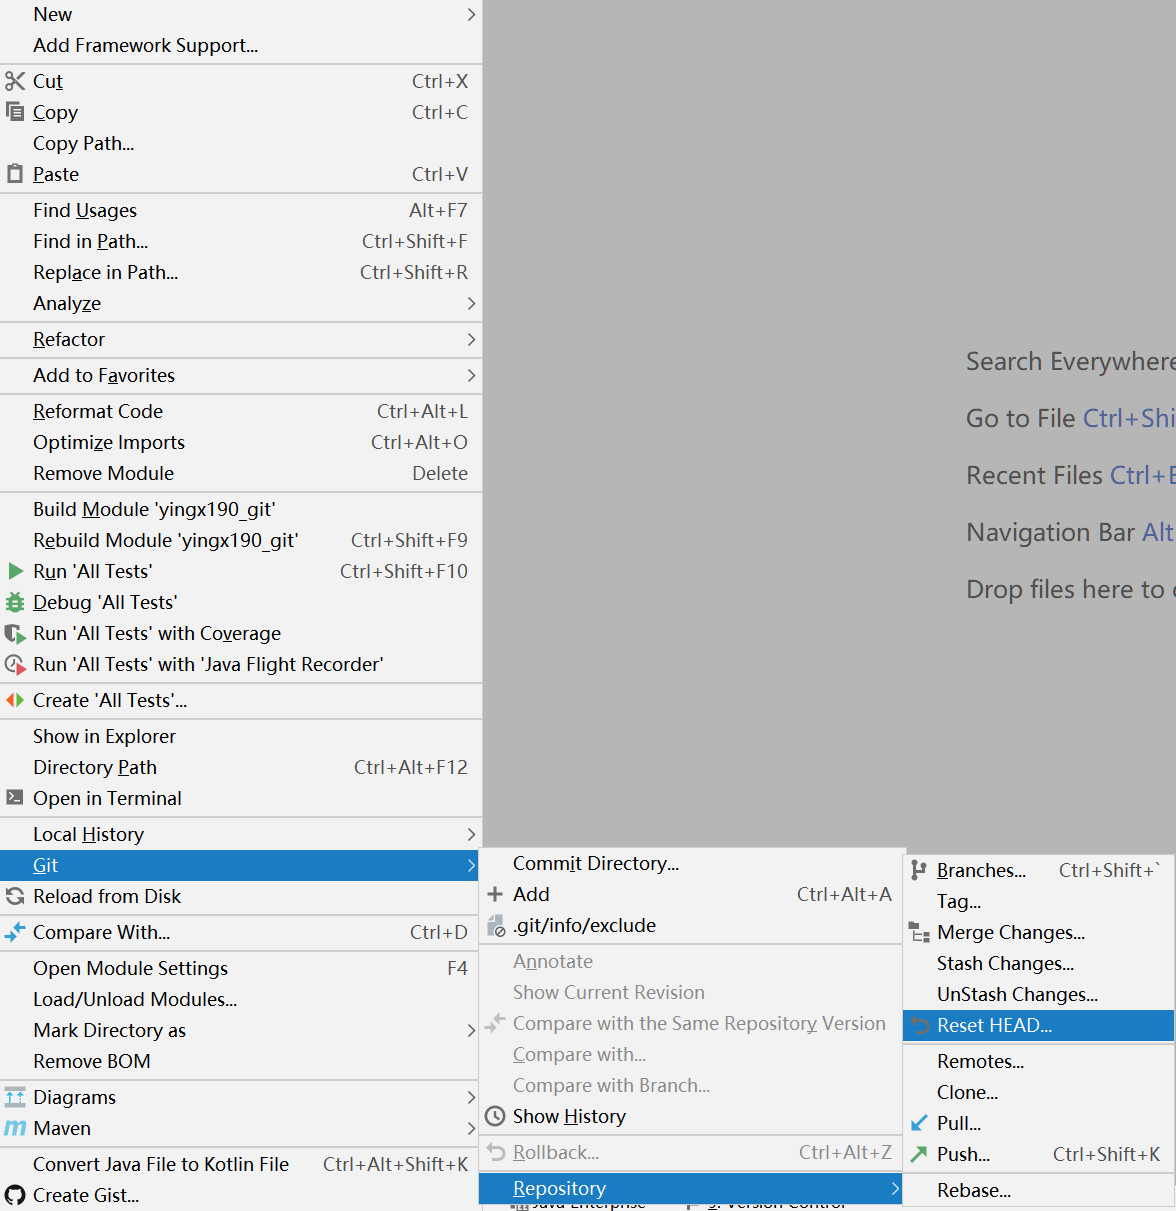
8.10. Version fallback
8.10.1 select a fallback version to directly fallback
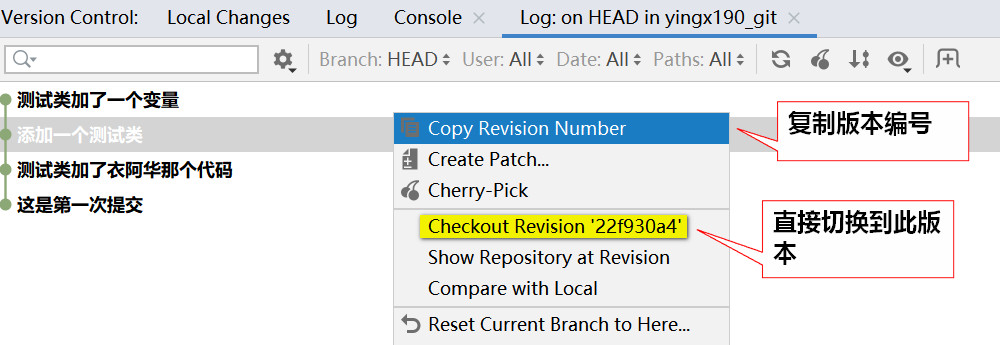
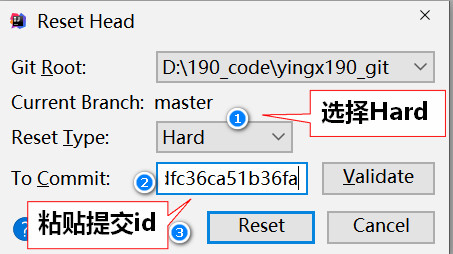
8.10.2 rollback based on version submission id(commitId)
Copy version submission number

Select switch version
Enter the version number to switch
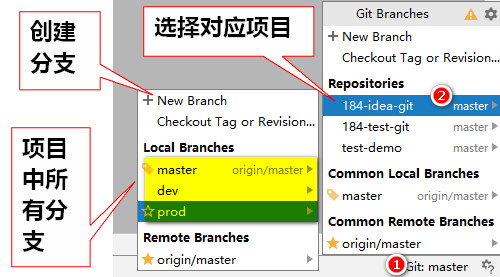
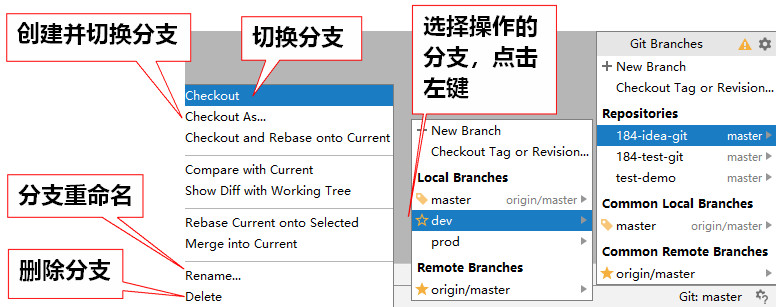
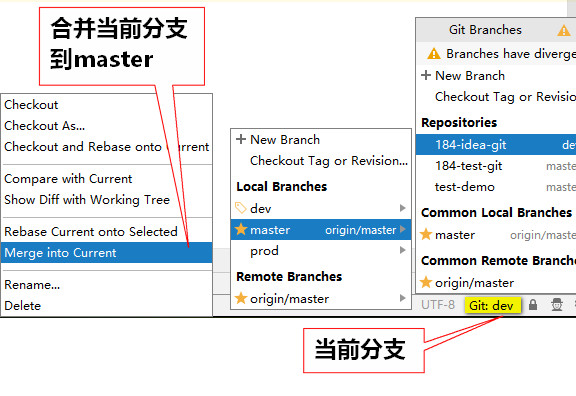
8.11. Branch
View / add branch
Branch operation
Merge branch
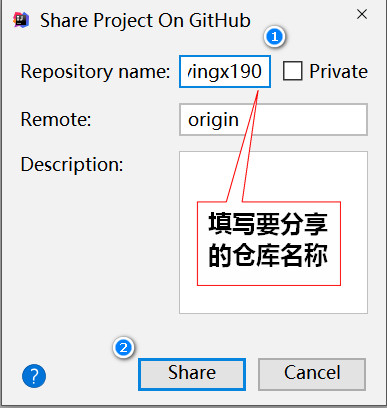
8.12. Push local projects to Github
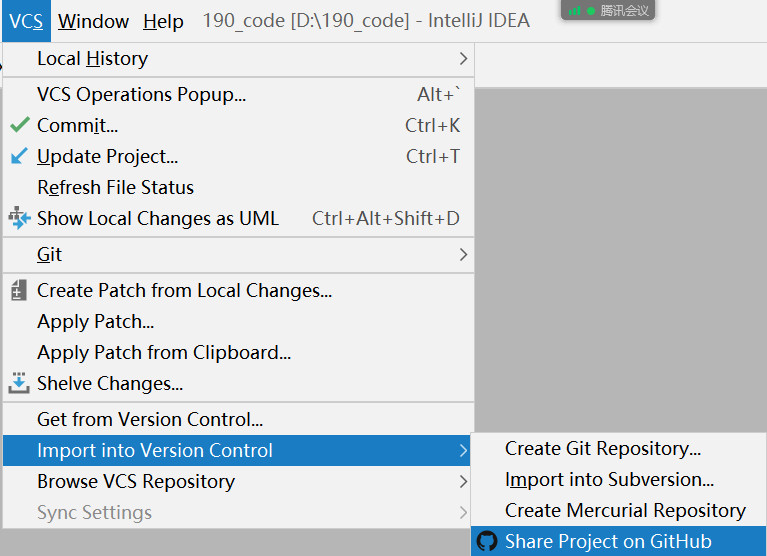
Fill in the name of the item to share
Share success

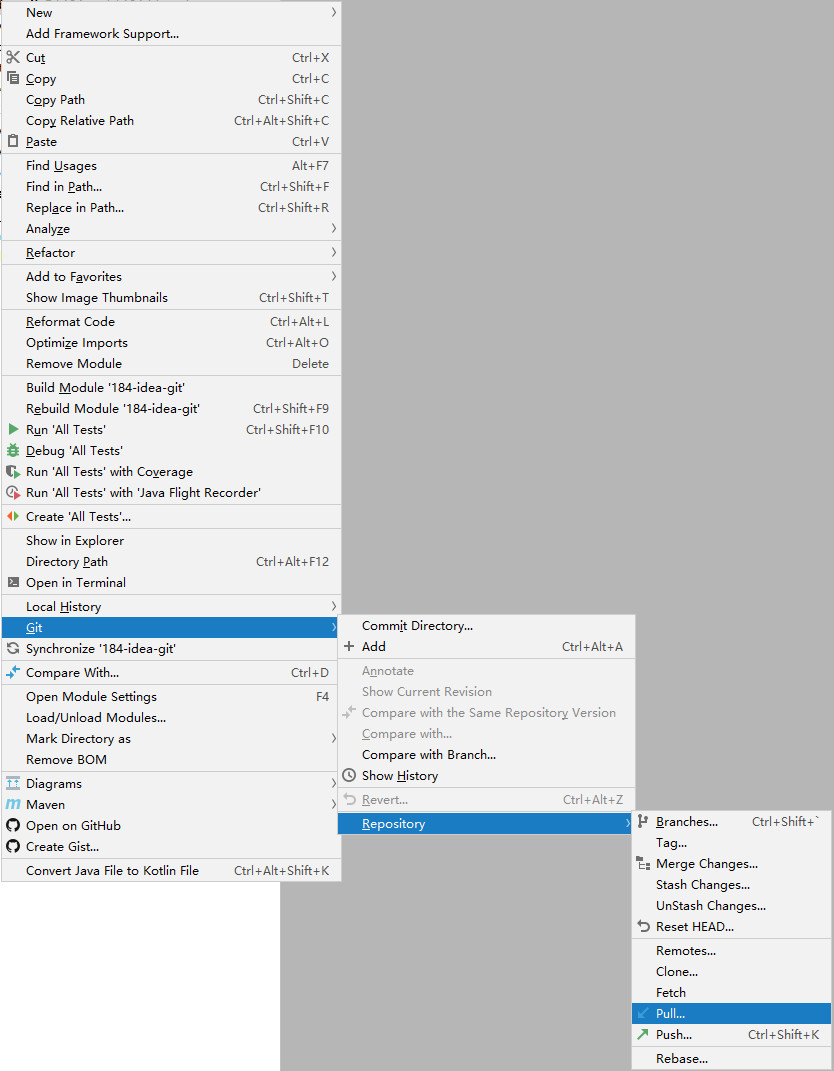
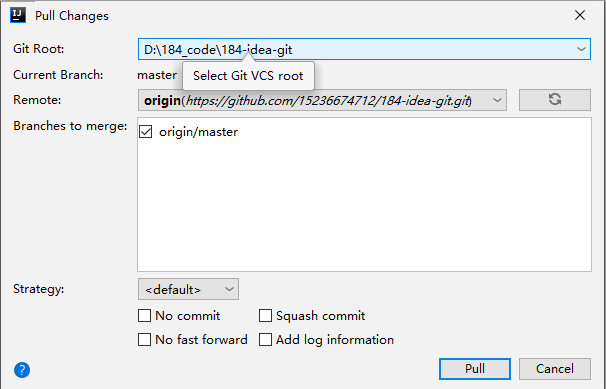
8.13. Update Github's modification to local
8.14. Push local modifications to Github
Commit and Push

push

Push succeeded

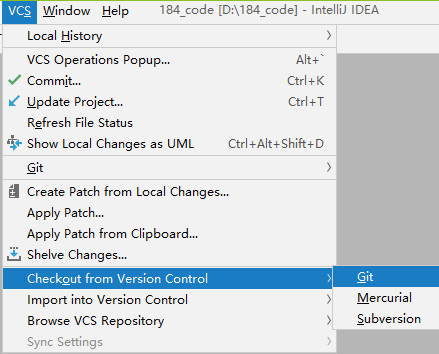
8.15. Clone and open a remote project using idea
Cloning projects using Git
Create local folders, clone projects
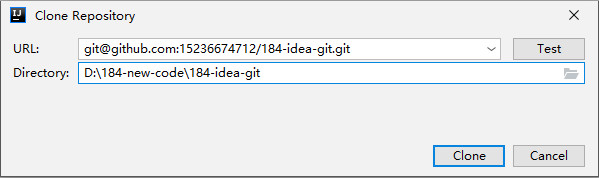
Open project
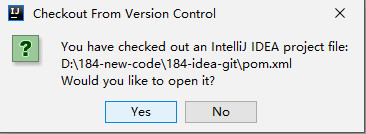
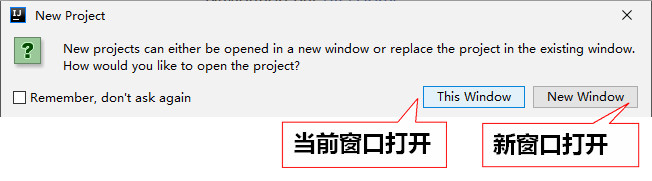
How do you open the project
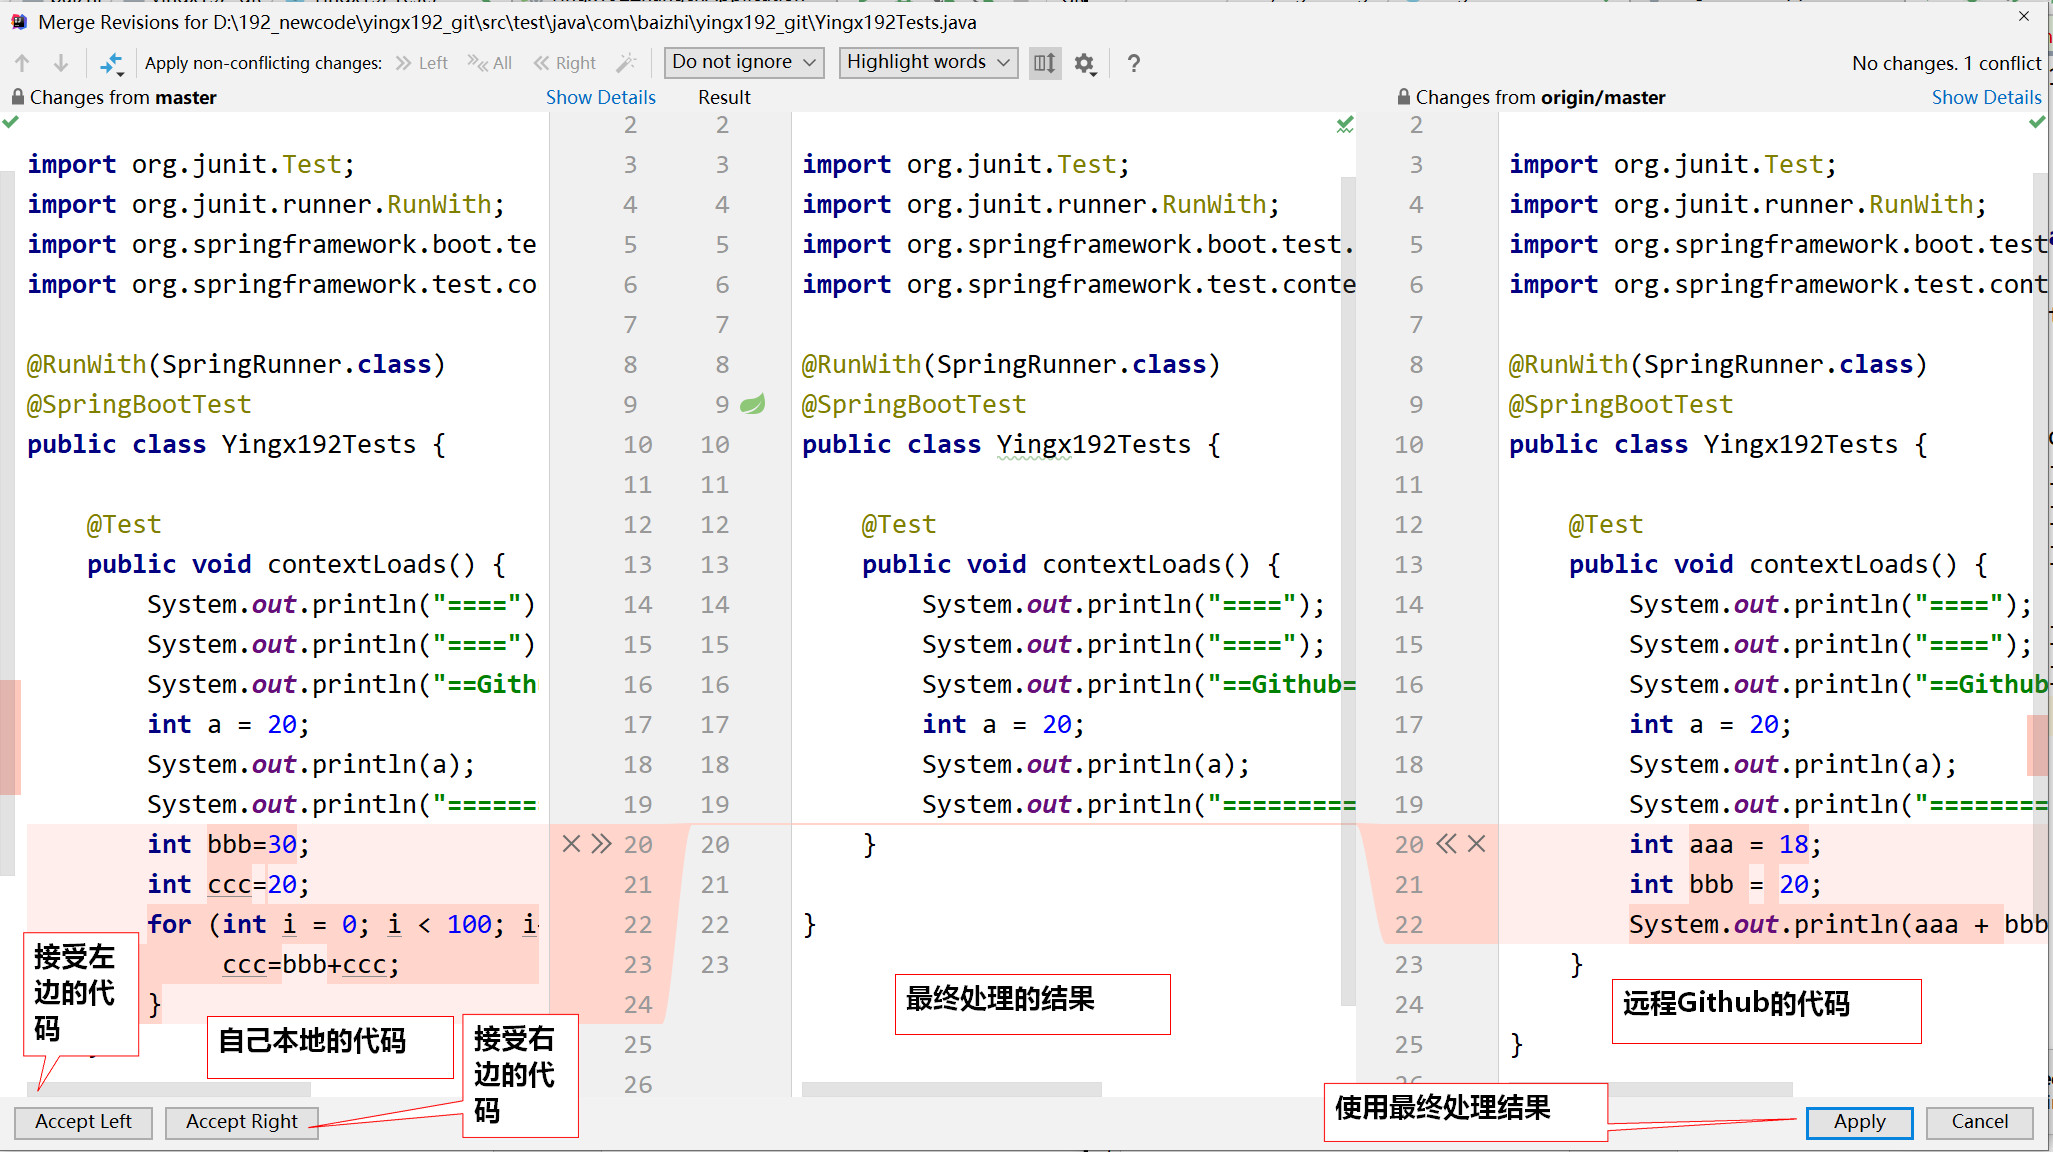
8.16. Resolving code conflicts
Conflict encountered while push ing
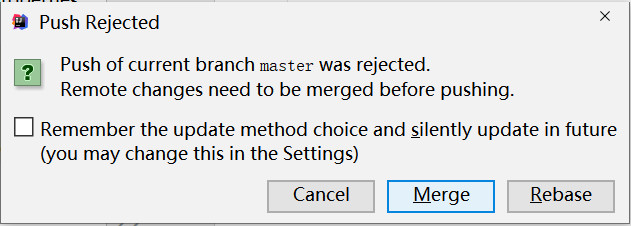
The push of the current branch supervisor is rejected
Remote changes need to be merged before push
In case of conflict during push, pull first and then push
Judge whether the code has intersection, and idea will judge automatically
-
1. No code intersection
Direct pull successful
-
2. Code intersection
Conflicts occur when two developers operate on a file at the same time
When two developers encounter the intersection of conflicting Codes: two people negotiate to solve the problem, then push the code to Github, and the other person will modify it synchronously
pull encountered a conflict
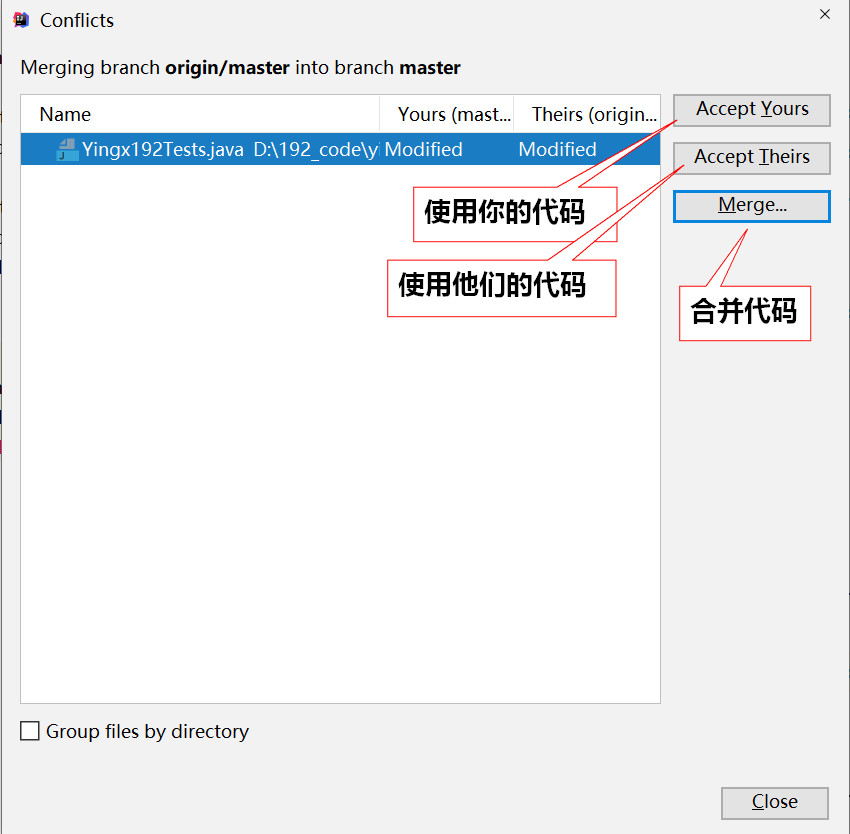
Resolving conflict cases