Git project management
1. Git download and common commands:
1.1 Click to download: Git official download address
1.2 basic configuration
1.2.1 open Git Bash
1.2.2 setting user information
git config --global user.name "Arther"
git config --global user.email "li.xiangcheng@qq.com"
1.2.3 viewing configuration user information
git config --global user.name
git config --global user.email
1.2.4 configuring aliases for common instructions (optional)
#Create a. bashrc file
touch ~/.bashrc
#Used to output git submission log (save the command in. bash_profile file)
alias git-log='git log --pretty=oneline --all --graph --abbrev --commit'
git config --global alias.lg "log --graph --pretty=format:'%Cred%h%Creset -%C(yellow)%d%Creset %s %Cgreen(%cr) %C(bold blue)<%an>%Creset' --abbrev-commit --date=relative"
#Used to output all files and basic information in the current directory
alias ll='ls -al'
1.2.5 solve GitBash garbled code problem
# 1. Open GitBash and execute the following command
git config --global core.quotepath false
# 2. Add two lines at the end of ${git_home} / etc / bash.bashrc file
export LANG="zh_CN.UTF-8"
export LC_ALL="zh_CN.UTF-8"
1.3 obtaining local warehouse
To version control our code using Git, we first need to obtain a local repository
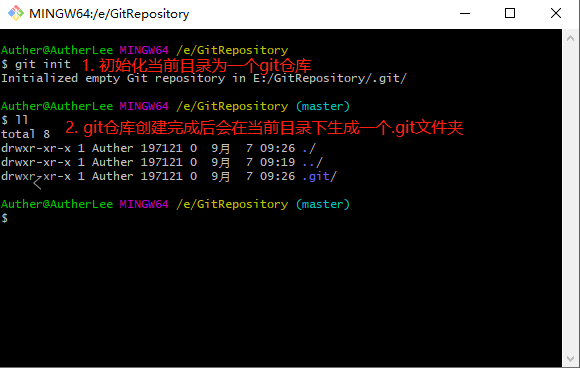
1.3.1 create an empty directory (such as TestRepository) anywhere on the computer
1.3.2 enter this directory and right-click to open the Git Bash window
1.3.3 execute git init
1.3.4 if it is created successfully, you can see the hidden. git directory under the folder
1.4 basic operation instructions
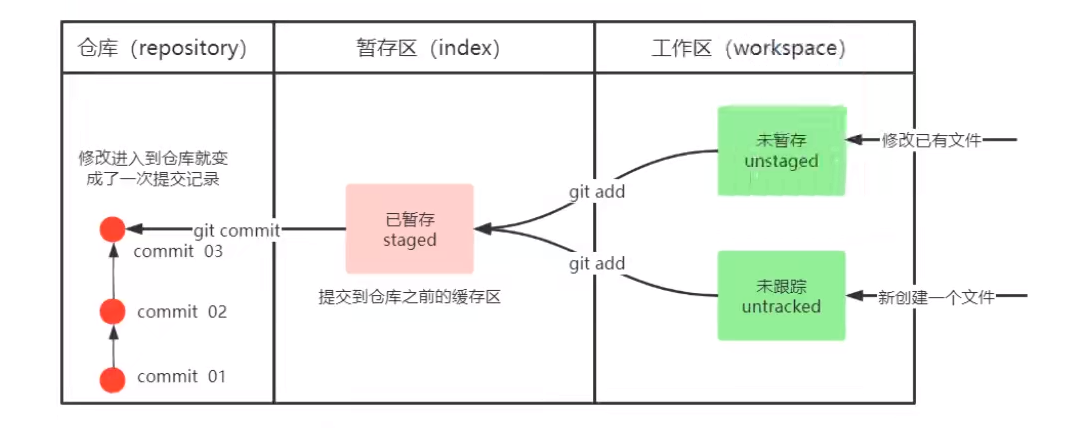
Under git working directory (all directories and files except. Git folder), there will be several states for file modification (addition, deletion and update). The state of these modifications will change as we execute git command
1.4.1 * view modification status
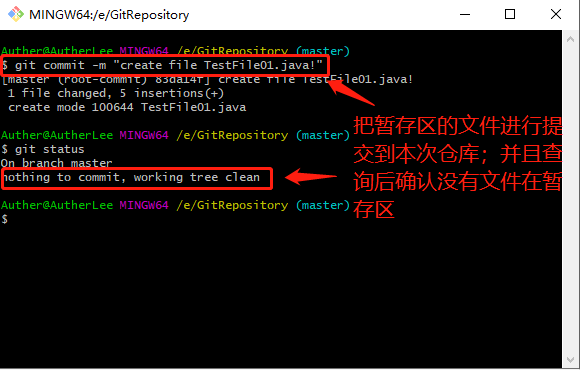
# Function: view the status of modification (workspace, staging area)
git status
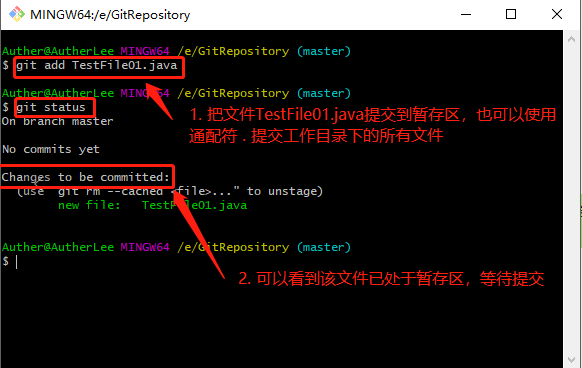
1.4.2 * workspace -- > staging area
# Role: add one or more files in the workspace to the staging area
# You can specify a single file name
git add TestFile01.java
# Wildcards can be used to transfer all modified files to the staging area
git add .
1.4.3 * staging area -- > local warehouse
# Function: submit the contents of the staging area to the current branch of the current warehouse
git commit -m "Note Content "
1.4.4 * view log information
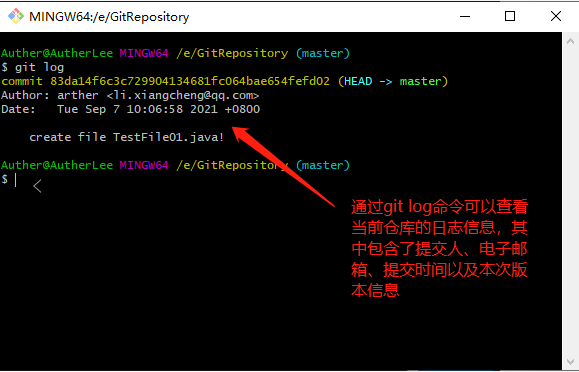
# Role: View submission records
git log [option]
[options]:
--all Show all branches
--pretty=oneline Display submission information as one line
--abbrev-commit Make output commitId Shorter
--graph Display as a graph
1.4.5 version fallback
# Function: version fallback to the specified version; The commitId can be viewed using the git log command
git reset --hard commitId
# How to view deleted records? The following command can see the deleted submission record
git reflog
1.4.6 add file to ignore list
In general, there are always some files that do not need to be included in Git version management, and we do not want them to always appear in the list of untracked files. They are usually automatically generated files or temporary files created during compilation. In this case, we can create a file named. gitignore in the working directory (the file name is fixed and modification is prohibited), and list the files that need to be ignored
# Files that do not contain pro.sql
pro.sql
# Files with suffix. a are not included
*.a
# Even if you ignore the. a file, include the lib.a file
!lib.a
#
1.5 branch
Almost all version control systems support branching in some form. Using branches means that you can separate your work from the development main line, make major BUG modifications and develop new functions, so as not to affect the development main line.
1.5.1 view local branches
# General Command
git branch
1.5.2 create local branch
# General Command
git branch Branch name
1.5.3 * switch branch (checkout)
# General Command
git checkout Branch name
# You can also switch to a branch that does not exist (create and switch)
git checkout -b Branch name
1.5.4 * merge
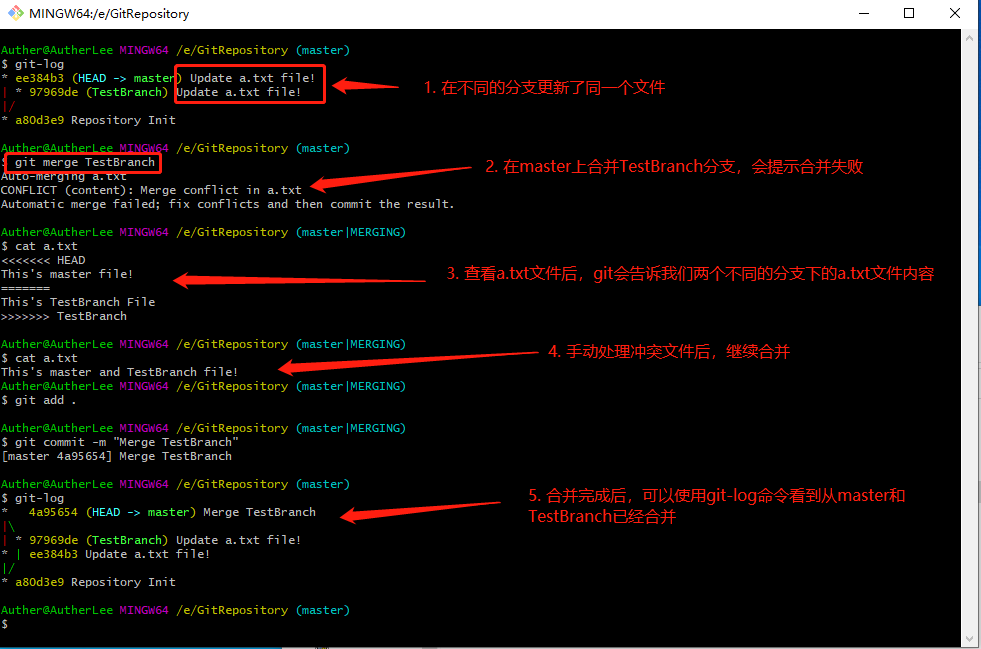
# Submissions on one branch can be merged into another branch
git merge Branch name
1.5.5 delete branch
The current branch cannot be deleted, only other branches can be deleted
# Various checks are required when deleting branches
git branch -d Branch name
# When deleting a branch, do not check and force the deletion
git branch -D Branch name
1.5.6 conflict resolution
When the modification of files on two branches may conflict, for example, the same line of the same file is modified at the same time, the conflict needs to be solved manually
- Handling conflicts in files
- File staging area (add) that will resolve conflicts
- Submit to warehouse (commit)
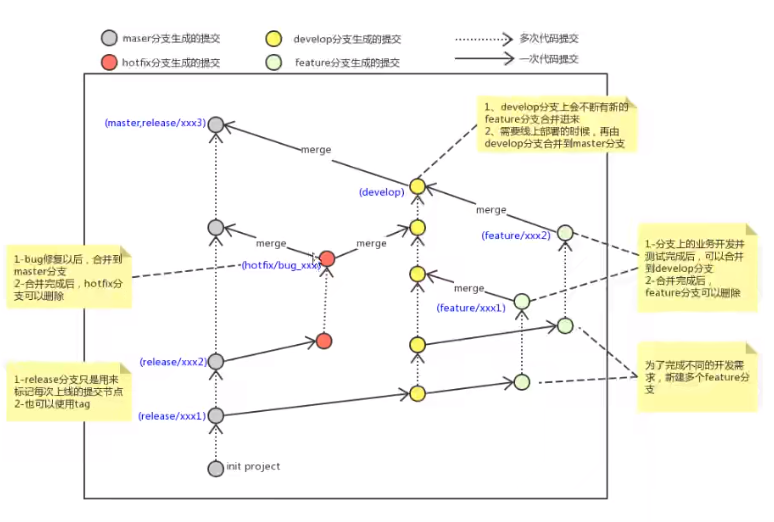
1.5.7 principles and processes for branch use in development
Almost all version control systems support branching in some form. Using branching means that you can separate your work from the development main line, make major BUG modifications and develop new functions, so as not to affect the development main line.
In development, there are generally the following branch use principles and processes
-
master branch
Online branch, main branch, and small and medium-sized projects as branches corresponding to online applications;
-
Development Branch
It is a branch created from the master. Generally, it is the main development branch of the development department. If there are no other parallel development requirements for launching in different stages, it can be developed in this version. After the stage development is completed, it needs to be merged into the master branch and ready for launching;
-
feature/xxx branch
The branches created from developep are generally developed in parallel in the same period, but they are created from the branches launched in different periods. After the R & D tasks on the branches are completed, they are merged into the developep branch;
-
hotfix/xxx branch
Branches derived from master are generally used for online BUG repair. After repair, they need to be merged into master, test and develop ment branches.
-
There are other branches that will not be described in detail again, such as test branch (for code testing), pre branch (pre online branch), etc.
2. Git remote warehouse
2.1 common hosting services [remote warehouse]
We already know that there are two types of warehouses in Git, namely, local warehouse and remote warehouse, so how do we build Git remote warehouse? We can implement it with the help of some code hosting services provided on the Internet, including GitHub, code cloud, GitLab, etc.
- GitHub (address: https://github.com/ )It is a hosting platform for open source and private software projects, because it only supports Git is managed as the only version library format, with the name GitHub;
- Code cloud (address: https://gitee.com/ )It is a code hosting platform in China. Because the server is in China, it is compared with GitHub, the code cloud speed will be faster;
- GitLab (address: https://about.gitlab.com/ )Is an open source project for warehouse management system, using Git is a code management tool and a web service built on this basis. It is generally used to build git private servers in internal networks such as enterprises and schools;
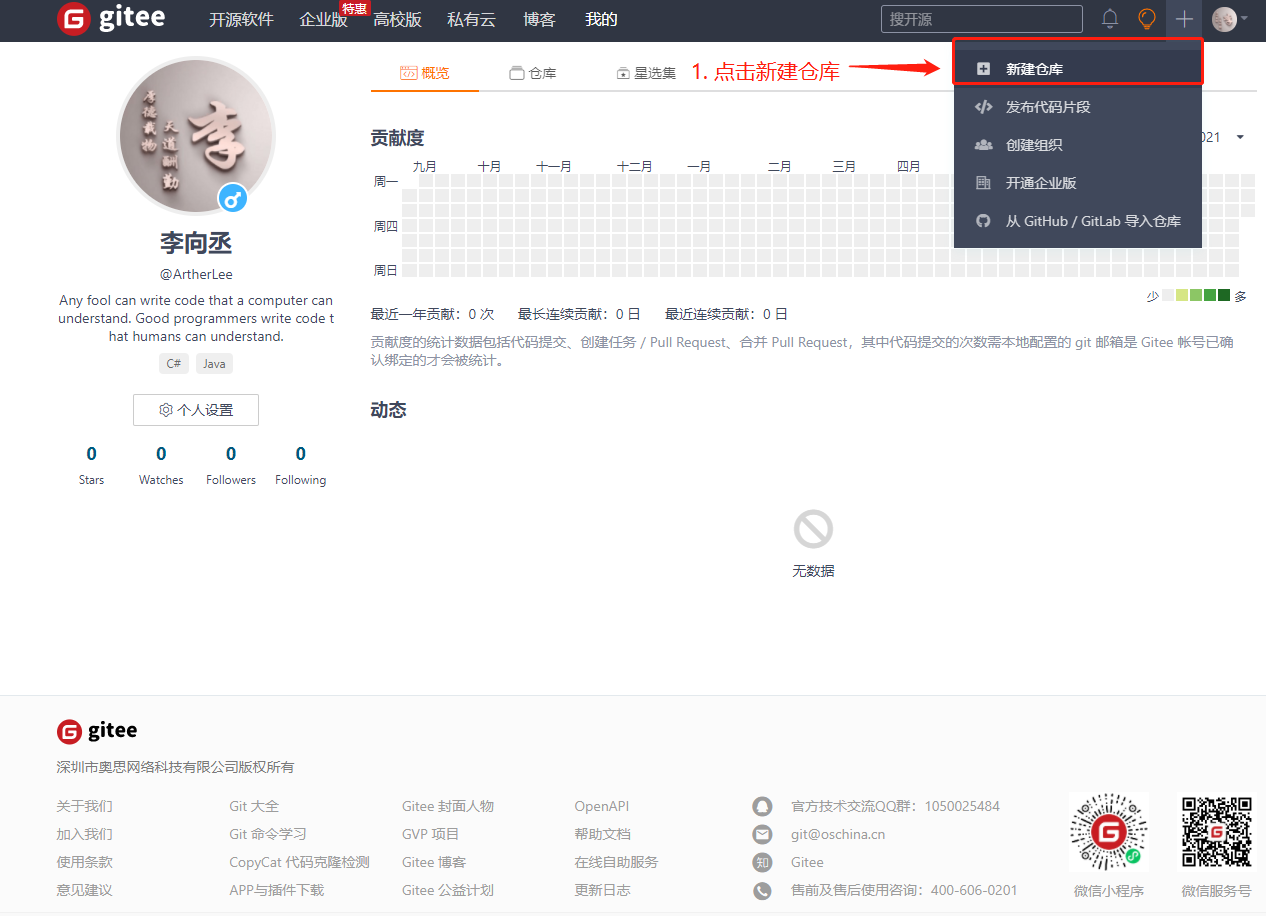
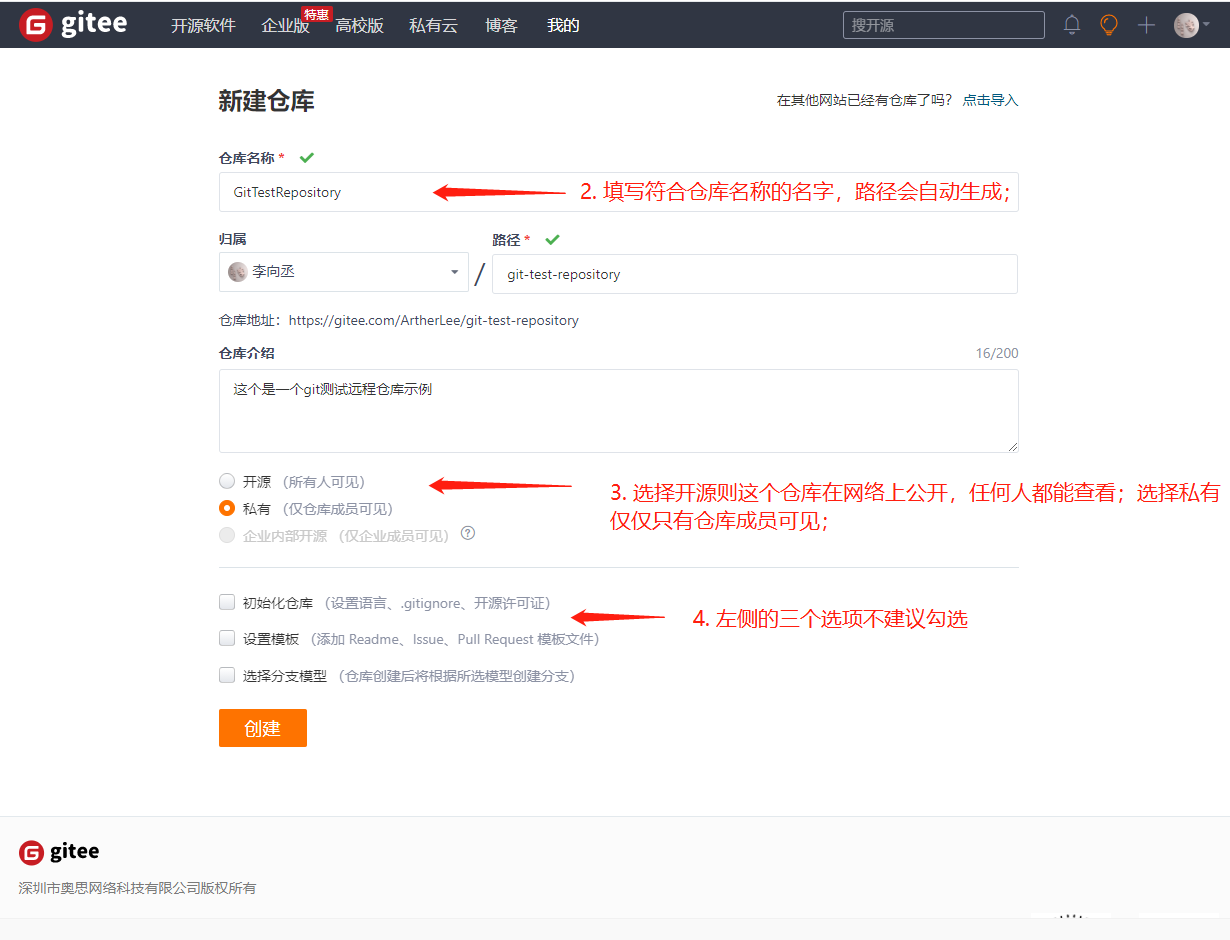
2.2 creating a remote warehouse
2.3 configure SSH public key
-
Generate SSH public key
-
ssh-keygen -t rsa
-
Keep returning
-
If the public key already exists, it will be overwritten automatically
-
-
Gitee set account public key
-
Get public key
cat ~/.ssh/id_rsa.pub
-
Configure account public key
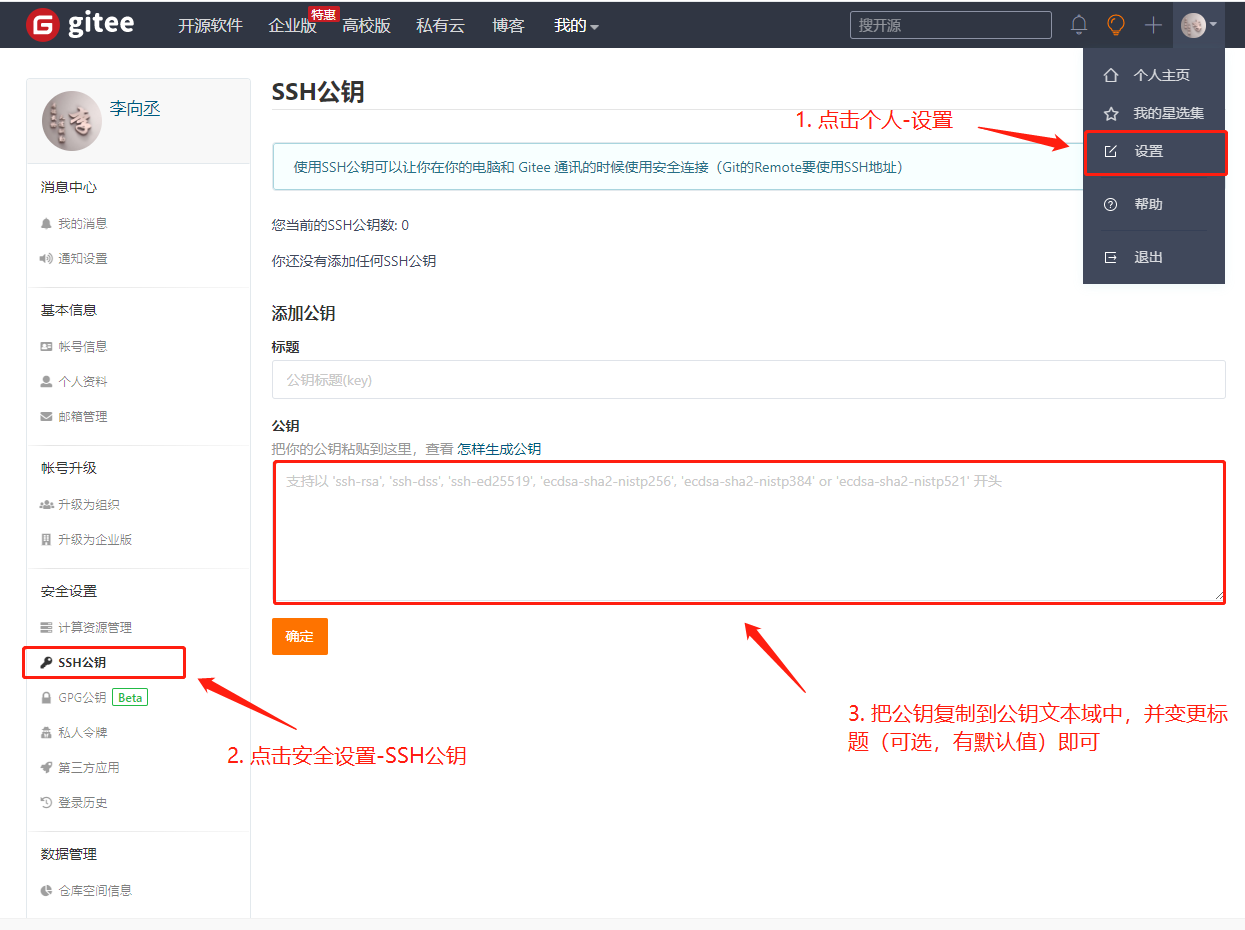
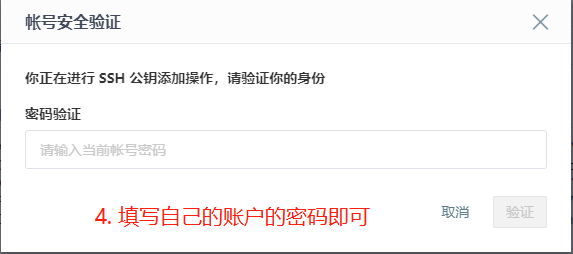
-
-
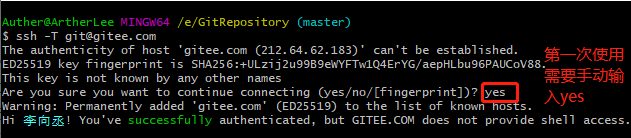
Verify that the configuration is successful
ssh -T git@gitee.com
2.4 operation of remote warehouse
2.4.1 add remote warehouse
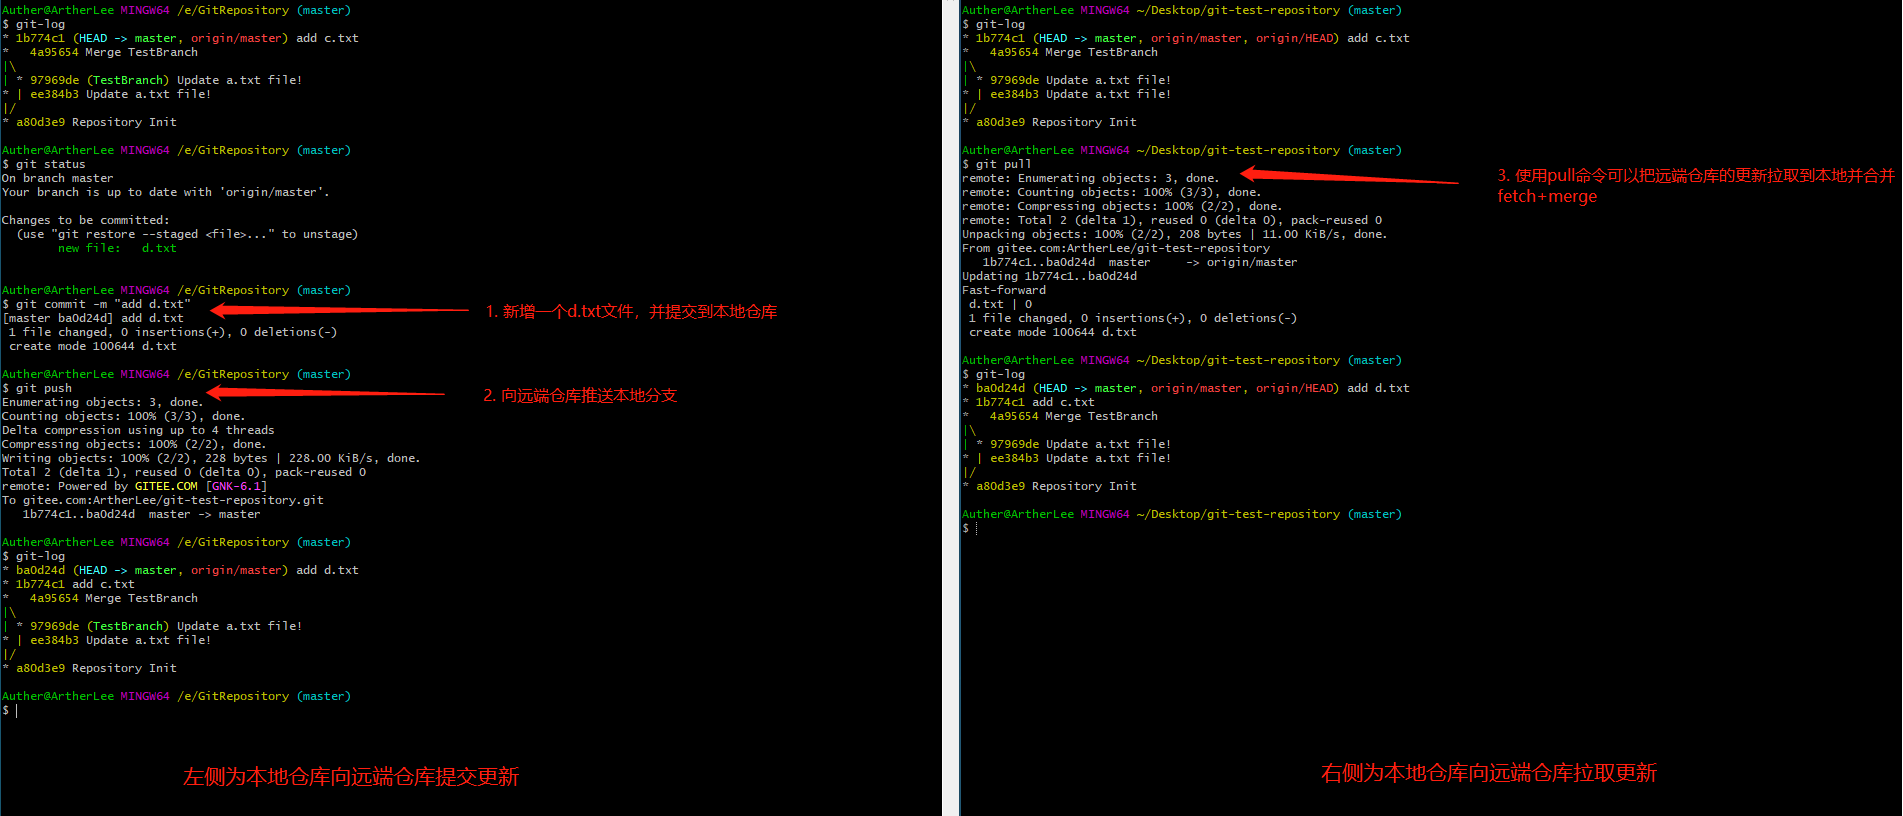
# command
# Remote name: origin is recommended, depending on the remote server settings
# Warehouse Path: obtain this URL from the remote server (use SSH address instead of HTTPS address)
git remote add <Remote name> <Warehouse Path>
# for example
git remote add origin git@gitee.com:ArtherLee/git-test-repository.git

2.4.2 view remote warehouse
# command
git remote

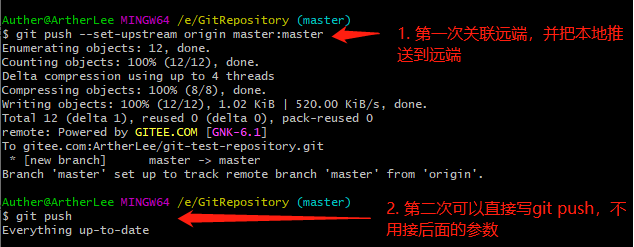
2.4.3 push to remote warehouse
# command
# -f: Indicates that the local branch forcibly overwrites the remote branch (generally disabled)
# --Set upstream: establish an association with the remote branch while pushing to the remote
git push [-f] [--set-upstream] [Remote name] [Local branch name] [:Remote branch name]

# Example 1: Standard Writing
git push origin --set-upstream master:master
# Example 2: if the remote branch name is the same as the local branch name, you can write only the local branch
git push origin master
# Example 3: use the parameter -- set upstream
git push --set-upstream origin master
# Following example 3, the following parameters can be omitted after association
git push
2.4.4 association relationship between local branch and member branch
# command
git branch -vv

2.4.5 cloning from remote warehouse
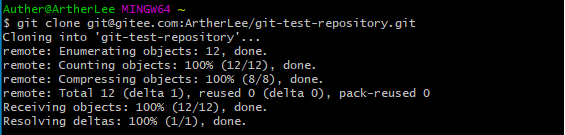
If we already have a remote warehouse, we can clone it locally
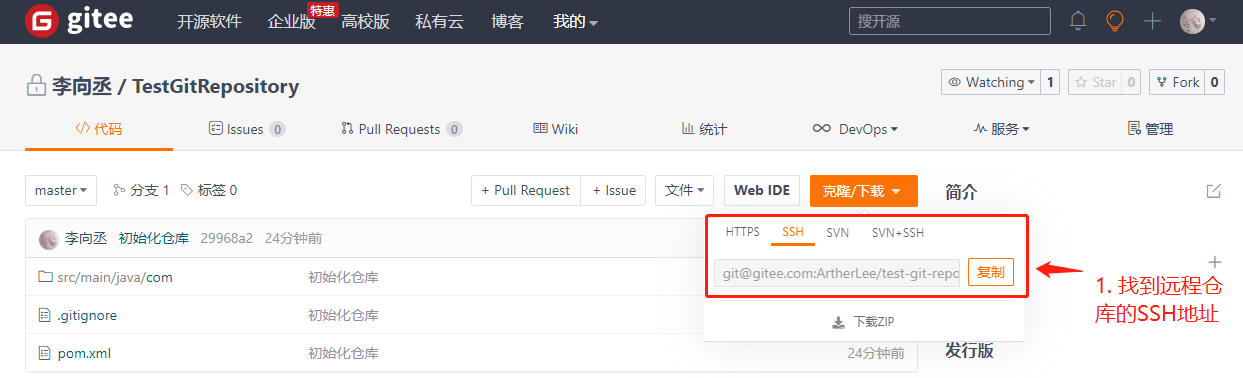
# command
# The local directory can be omitted and a. git name will be automatically generated
git clone <Warehouse Path> [Local directory]
# example:
git clone git@gitee.com:ArtherLee/git-test-repository.git
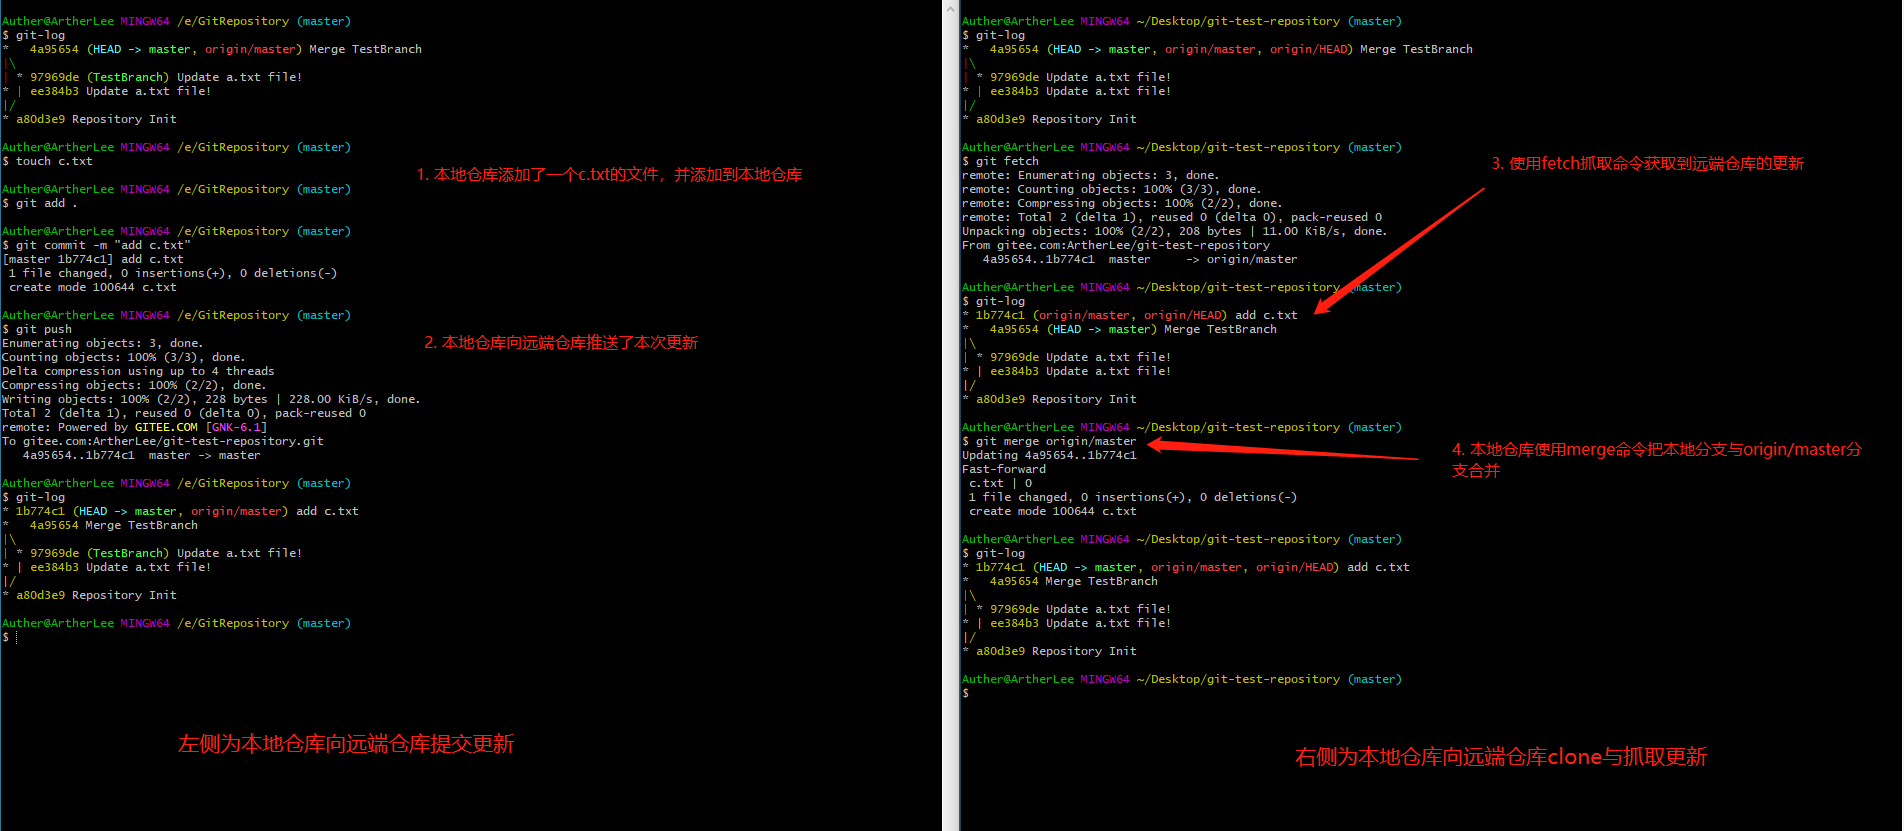
2.4.6 grab and pull from remote warehouse
The remote branch is the same as the local branch. We can merge, but we need to download all the updates in the remote warehouse to the local warehouse (clone) before operation.
- Grab command: the grab command is to grab all the updates in the remote warehouse locally and not merge them; If the remote name and branch name are not specified, all branches are fetched.
# command
git fetch [remote name] [branch name]
- Pull command: the pull command is to pull the updates in the remote warehouse locally and merge them automatically, which is equivalent to fetch+merge; If the remote name and branch name are not specified, pull all branches and update the current branch;
# command
git pull [remote name] [branch name]
2.4.7 resolving merger conflicts
During A period of time, when users A and B modify the same file and modify the code at the same line position, A merge conflict will occur.
User A first pushes the code to the remote warehouse after revising it locally. At this time, user B also needs to push the code to the remote warehouse after submitting it to the current warehouse. At this time, user B is later than user A, so it needs to pull the submission of the remote warehouse first and push it to the remote warehouse branch after consolidation, as shown in the figure:
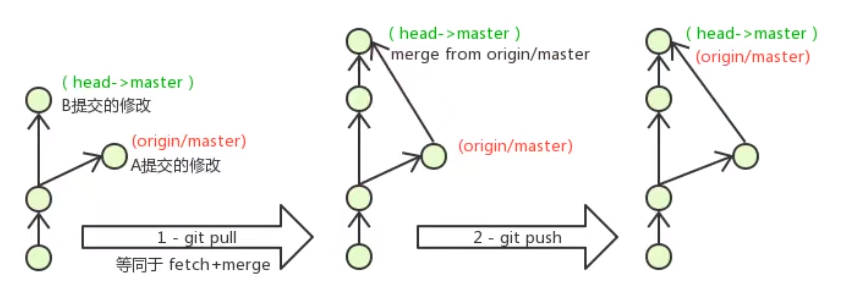
When user B pulls updates, merging conflicts occur because A and B revise the same location of the same file at the same time.
Solution: the remote branch is also a branch, so the solution of conflict during merging is the same as that of local branch conflict.
be careful:
- After user B resolves the local conflict, be sure to push first and let user A also pull the update;
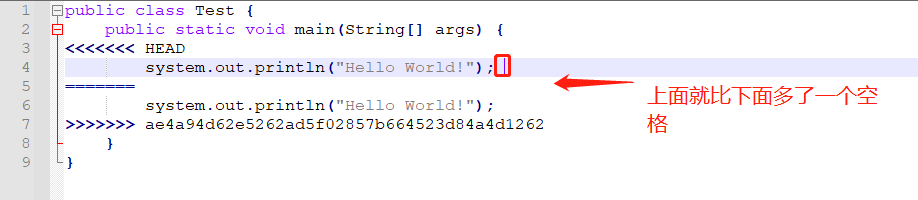
- In the same line of code, even if there is one more space character at the end of the line, it will still prompt the merge conflict;
3. Use Git in IDEA
3.1 configuring Git in IDEA
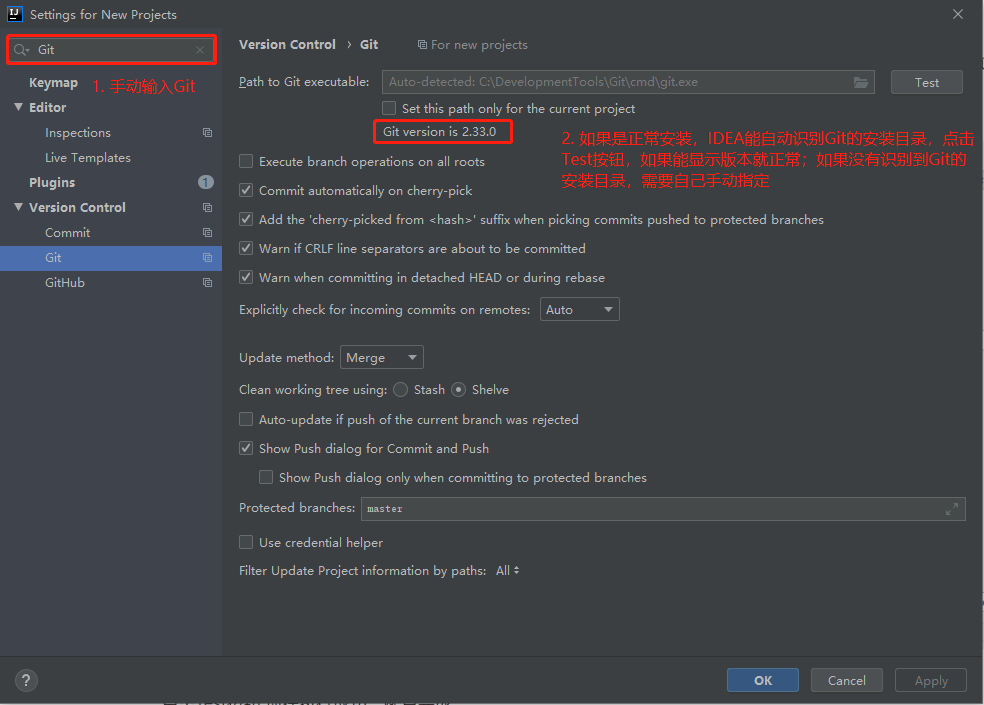
After installing IntelliJ IDEA, if Git is installed in the default path of GIT, the IDEA will automatically find the location of GIT. If the installation location of Git is changed, you need to manually configure the path of GIT. Select File -- > settings to open the setting window and find the GIT option under Version Control
3.2 operating Git in IDEA
Scenario: there is already a local project, but it is not a Git project. We need to place this project in the code cloud warehouse and develop it together with other developers.
3.2.1 create project remote warehouse (refer to 2.2)
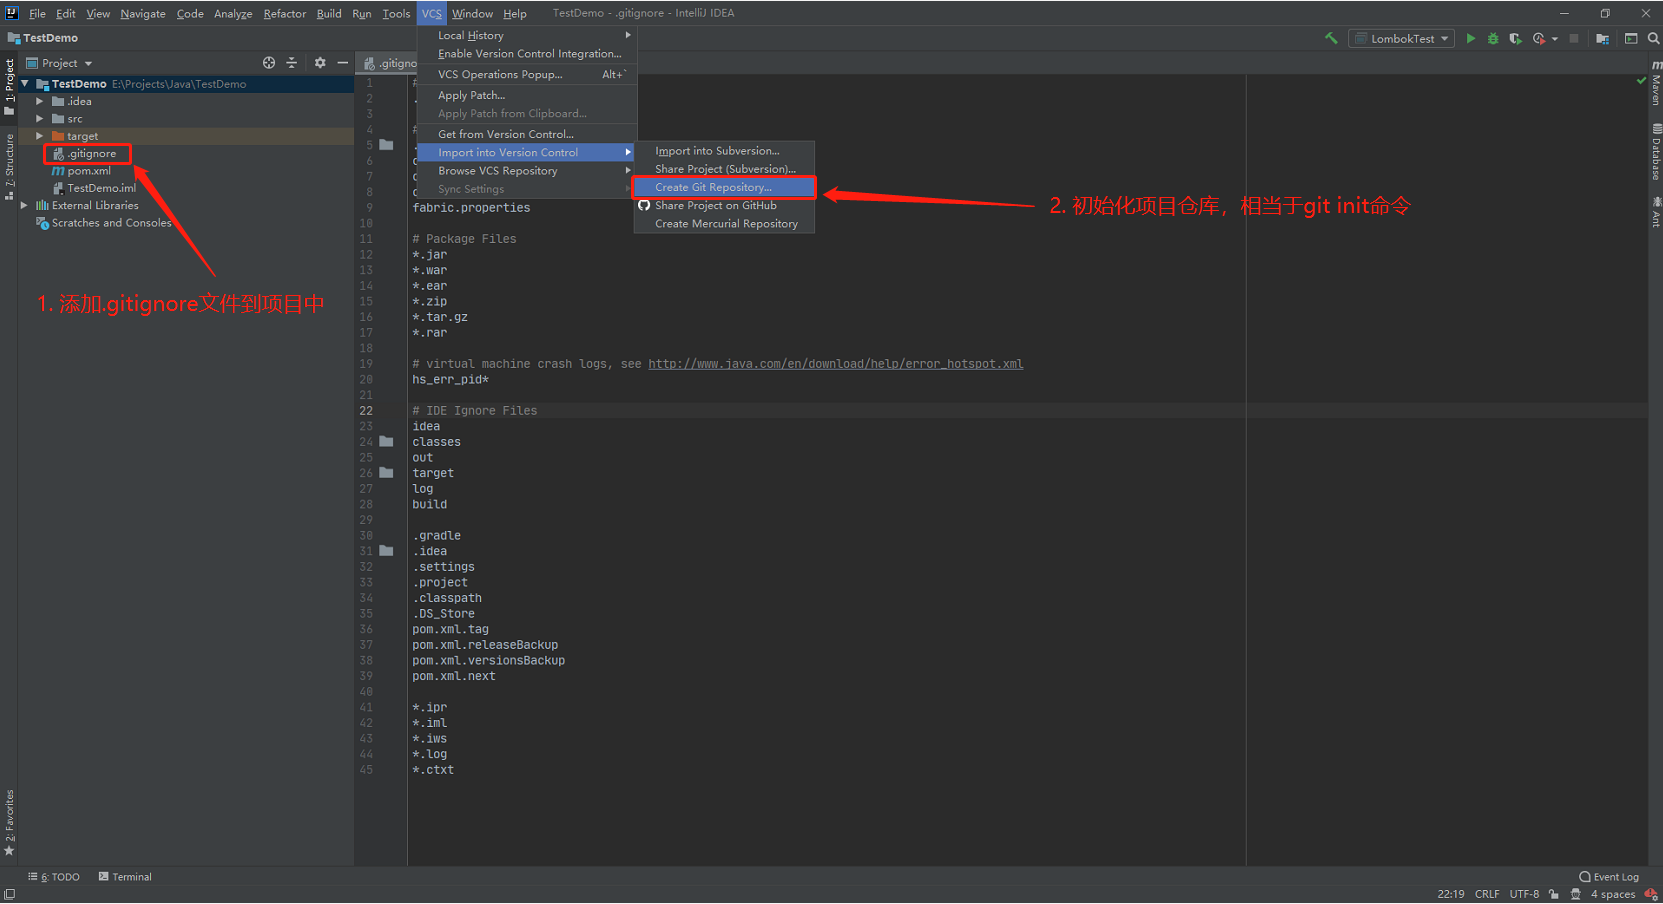
3.2.2 initialize project warehouse
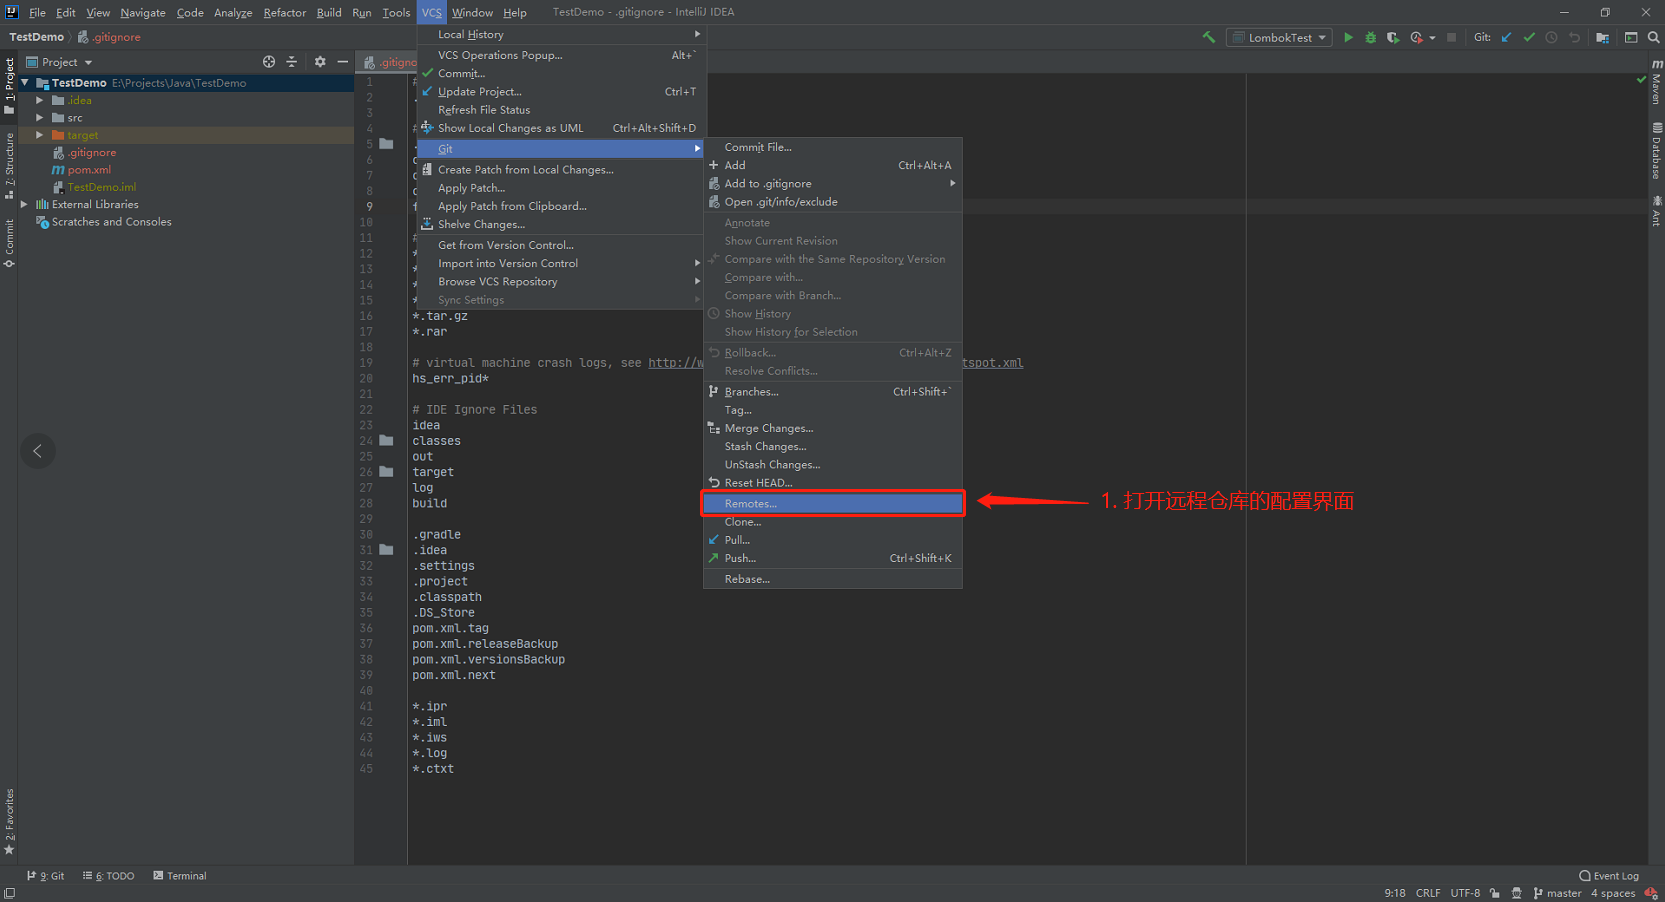
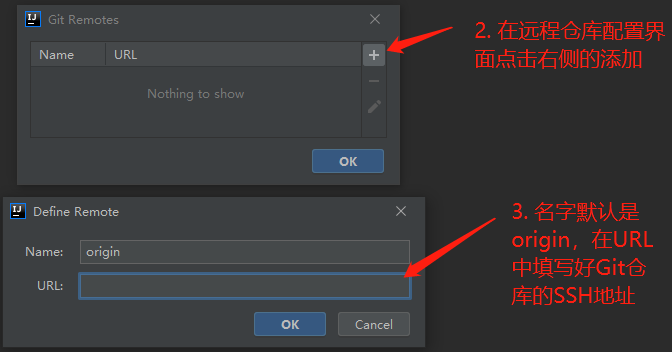
3.2.3 setting up remote warehouse
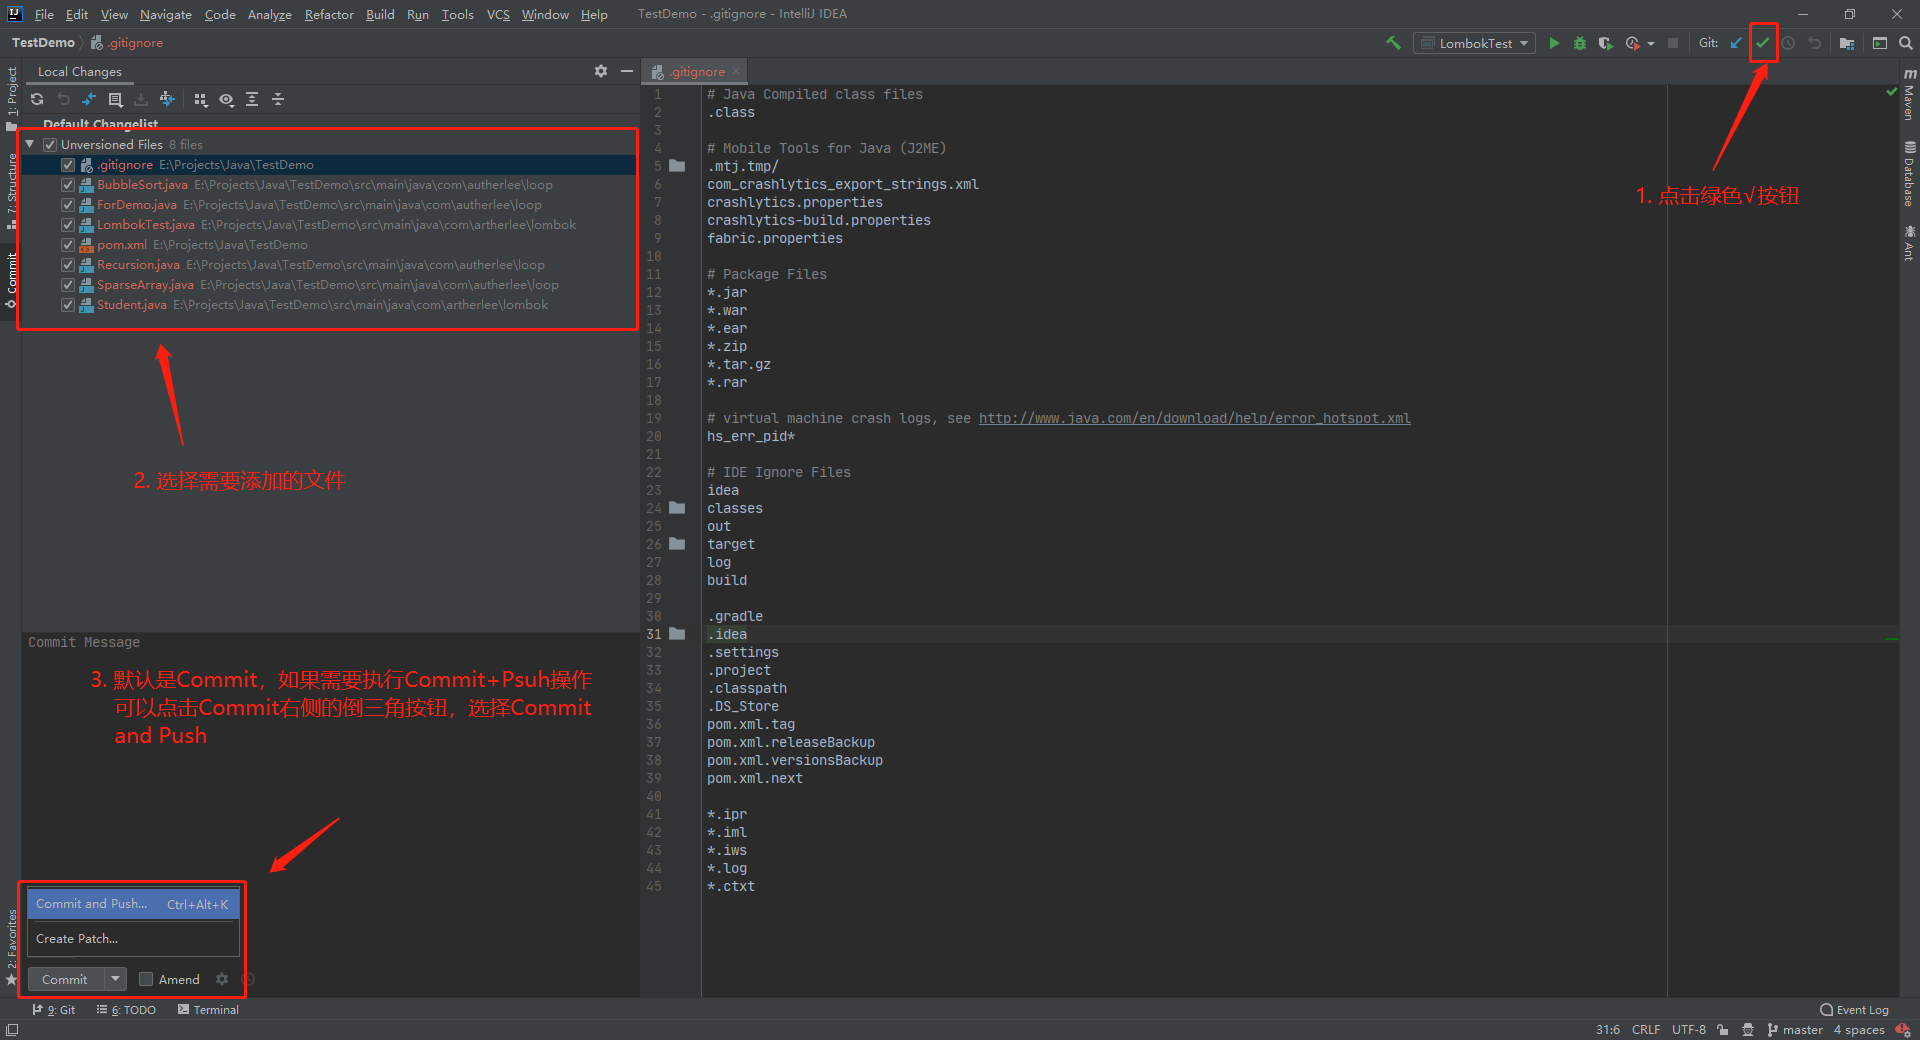
3.2.4 submit / push to local warehouse
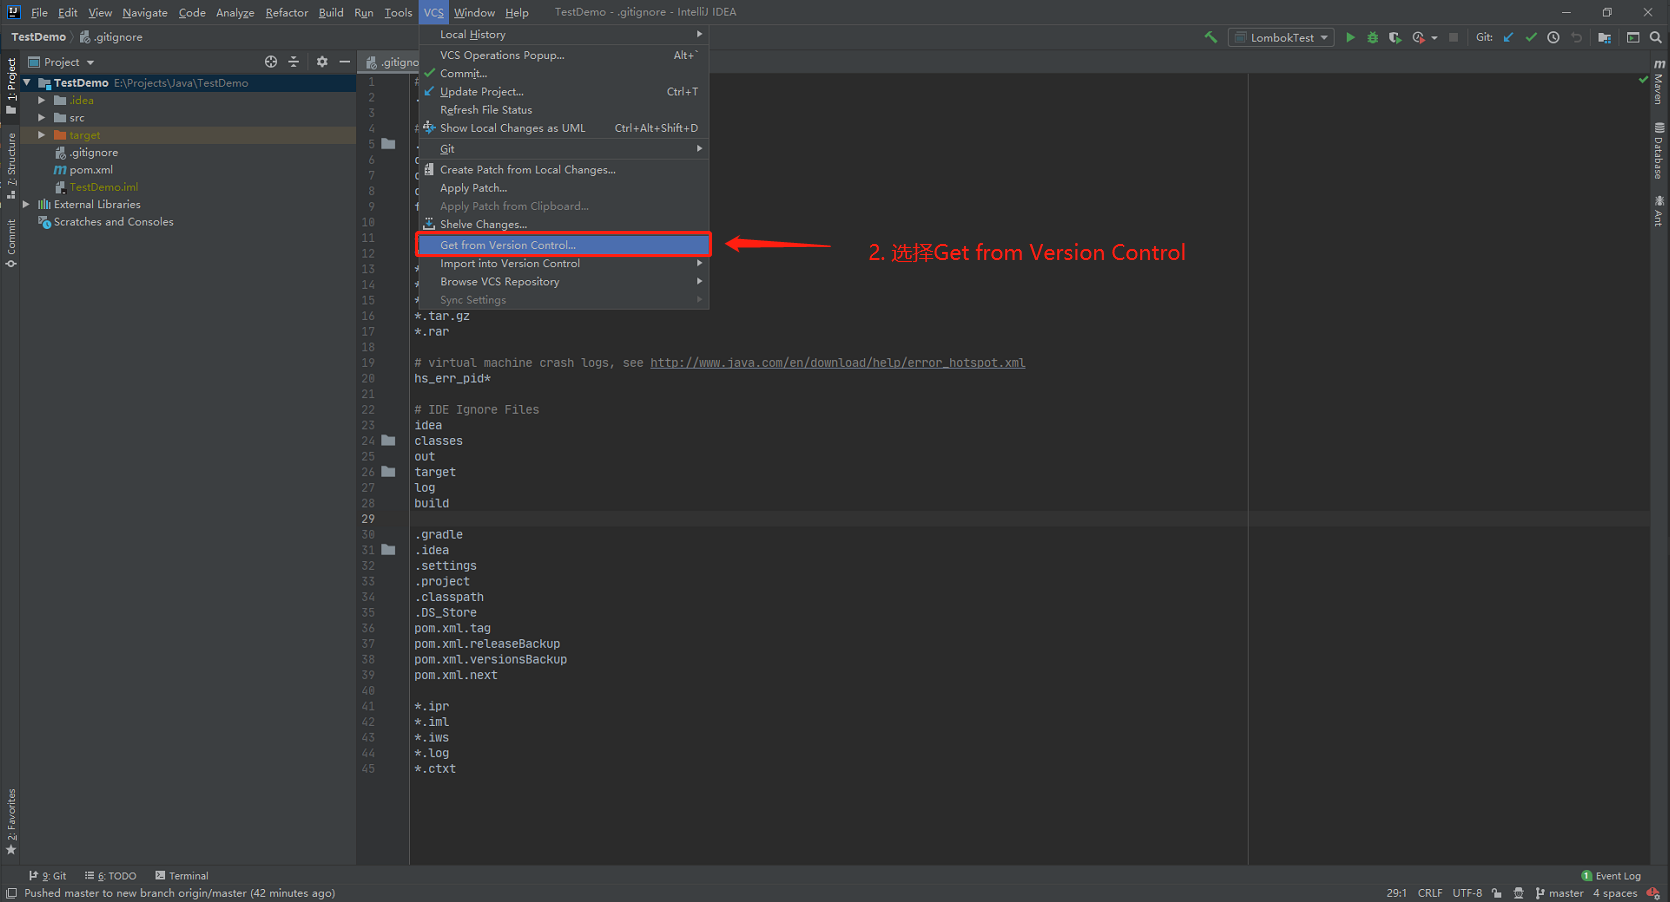
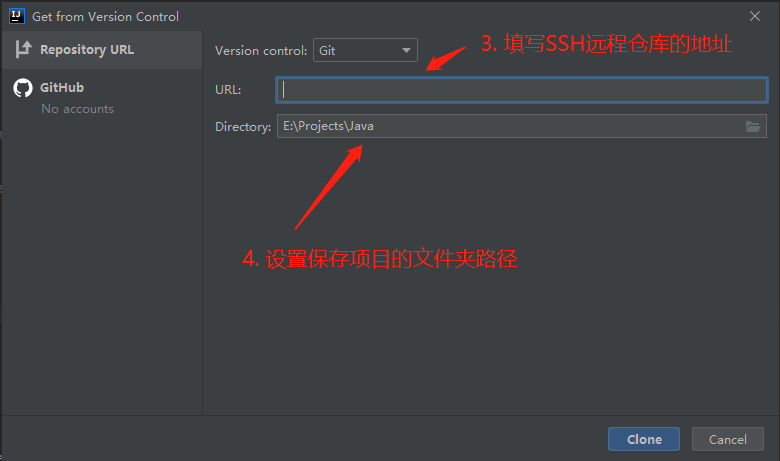
3.2.5 clone remote warehouse to local
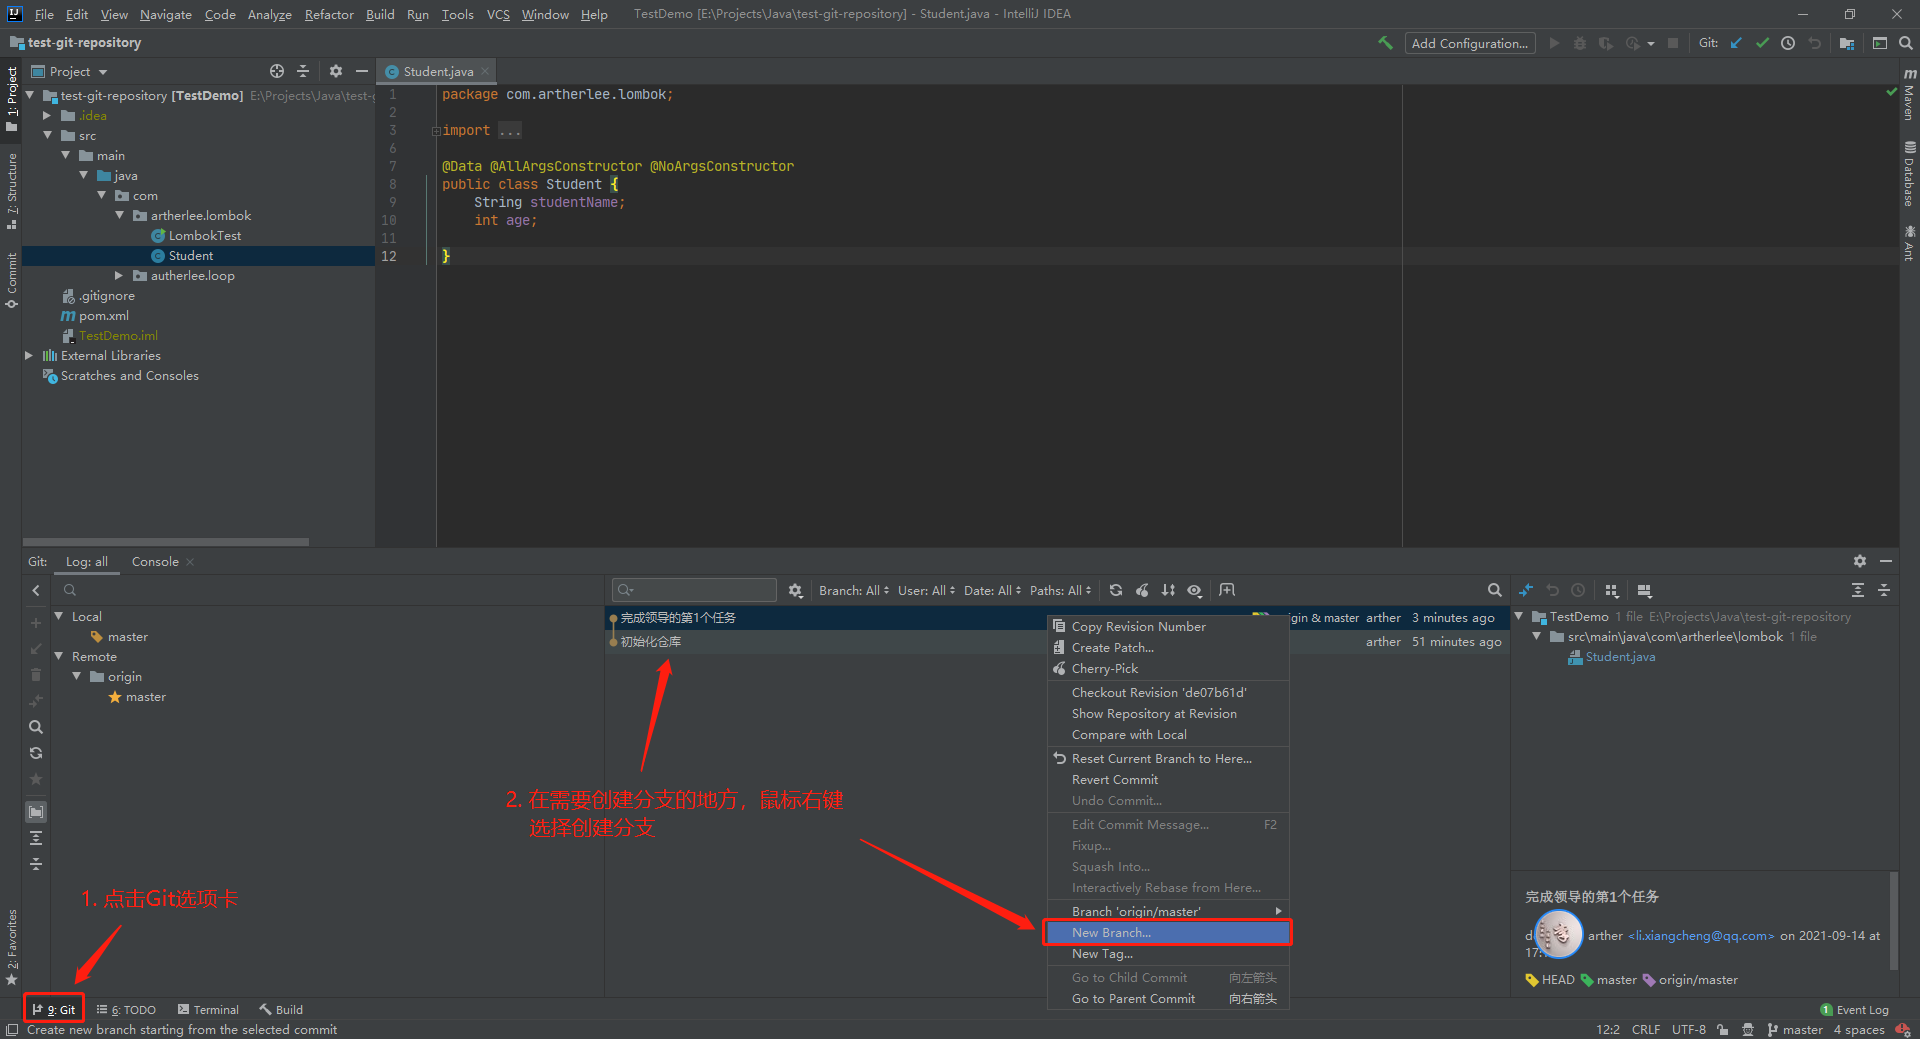
3.2.6 create branch