git config
Configure Git related parameters.
Git has three profiles:
- Warehouse level configuration file: in. git/.gitconfig of the warehouse, the configuration file is only valid for the warehouse.
- Global configuration file: Mac system in ~ /. gitconfig, Windows system in C: \ users \ < user name >. gitconfig.
- System level configuration file: gitconfig in the etc folder under the Git installation directory (the Mac installation directory is / usr/local/git).
# View configuration information
# --local: warehouse level, - Global: global level, - system: system level
$ git config <--local | --global | --system> -l
# View the currently effective configuration information
$ git config -l
# Edit profile
# --local: warehouse level, - Global: global level, - system: system level
$ git config <--local | --global | --system> -e
# Add configuration item
# --local: warehouse level, - Global: global level, - system: system level
$ git config <--local | --global | --system> --add <name> <value>
# Get configuration item
$ git config <--local | --global | --system> --get <name>
# Delete configuration item
$ git config <--local | --global | --system> --unset <name>
# Configure user information in submission records
$ git config --global user.name <user name>
$ git config --global user.email <e-mail address>
# Change the size of the Git cache
# If the submitted content is large and the default cache is small, the submission will fail
# Cache size unit: B, for example: 524288000 (500MB)
$ git config --global http.postBuffer <Cache size>
# When the git status/git diff command is called, the change status is highlighted or colored
$ git config --global color.ui true
# Configure to cache passwords. The default cache time is 15 minutes
$ git config --global credential.helper cache
# Configure password cache time
# Cache time in seconds
$ git config --global credential.helper 'cache --timeout=<Cache time>'
# Configure long-term storage password
$ git config --global credential.helper store
git clone
Clone a version library from a remote repository to a local repository.
# By default, a folder with the same name as the version library is created in the current directory and the version is downloaded to this folder
$ git clone <Web address of remote warehouse>
# Specify the directory of the local warehouse
$ git clone <Web address of remote warehouse> <Local directory>
# -b specifies the branch to be cloned. The default is the master branch
$ git clone <Web address of remote warehouse> -b <Branch name> <Local directory>
git init
Initialize the directory where the project is located. After initialization, a directory named. git will appear in the current directory.
# Initialize the local warehouse and generate the. git folder in the current directory
$ git init
git status
View the status of the local warehouse.
# View the status of the local warehouse
$ git status
# View the status of the local warehouse in short mode
# Two columns are displayed. The first column is the status of the file and the second column is the corresponding file
# File status: A: add, M: modify, D: delete, D: delete,?? Not added to Git
$ git status -s
git remote
Operate the remote library.
# List existing remote warehouses
$ git remote
# List the details of the remote warehouse and the URL address after the alias
$ git remote -v
$ git remote --verbose
# Add remote warehouse
$ git remote add <Alias of remote warehouse> <Remote warehouse URL address>
# Modify alias of remote warehouse
$ git remote rename <Alias of the original remote warehouse> <New alias>
# Delete the remote warehouse with the specified name
$ git remote remove <Alias of remote warehouse>
# Modify the URL address of the remote warehouse
$ git remote set-url <Alias of remote warehouse> <New remote warehouse URL address>
git branch
Branch command to manipulate Git.
# List all local branches, and the current branch is marked with "*"
$ git branch
# List all local branches and display the last submission. The current branch is marked with "*"
$ git branch -v
# Create a new branch based on the last commit
$ git branch <Branch name>
# Modify branch name
# If the original branch name is not specified, it is the current branch
$ git branch -m [<Original branch name>] <New branch name>
# Force modification of branch name
$ git branch -M [<Original branch name>] <New branch name>
# Deletes the specified local branch
$ git branch -d <Branch name>

# Force deletion of the specified local branch
$ git branch -D <Branch name>
git checkout
Check out commands for creating, switching branches, and so on.
# Switch to the specified branch that already exists
$ git checkout <Branch name>
# Create and switch to the specified branch and keep all submission records
# It is equivalent to the combination of "git branch" and "git checkout"
$ git checkout -b <Branch name>
# Create and switch to the specified branch and delete all submission records
$ git checkout --orphan <Branch name>
# Replace the local changes, and the newly added files and contents that have been added to the staging area will not be affected
$ git checkout <File path>
git cherry-pick
Merge the submitted records into the current branch.
# Merge the submitted records into the current branch
$ git cherry-pick <commit ID>
git add
Add the information of the file to be submitted to the staging area. When git commit is used, the file will be submitted according to the contents in the staging area.
# Adds the specified file to the staging area
$ git add <File path>
# Add all modified and deleted files to the staging area
$ git add -u [<File path>]
$ git add --update [<File path>]
# Add all modified, deleted and newly added files to the temporary storage area. Omitting < file path > is the current directory
$ git add -A [<File path>]
$ git add --all [<File path>]
# View all modified, deleted but not submitted files and enter a sub command system
$ git add -i [<File path>]
$ git add --interactive [<File path>]
git commit
Submit the files in the staging area to the local warehouse.
# Submit the files in the temporary storage area to the local warehouse, and call the text editor to enter the description of the submission
$ git commit
# Submit the files in the staging area to the local warehouse and add description information
$ git commit -m "<Description information submitted>"
# Submit all modified and deleted files to the local warehouse
# Excluding files that are not tracked by the version library is equivalent to calling "git add -u" first
$ git commit -a -m "<Description information submitted>"
# Modify the last submitted description
$ git commit --amend
git fetch
Get the latest version from the remote warehouse to the local tmp branch.
# Retrieve the latest versions of all branches of the remote warehouse to the local
$ git fetch <Alias of remote warehouse>
# Retrieve the latest version of the specified branch of the remote warehouse to the local
$ git fetch <Remote host name> <Branch name>
git merge
Merge branches.
# Merge the specified branch under the current branch
$ git merge <Branch name>
git diff
Compare differences between versions.
# Compare the difference between the current file and the file in the staging area, and display the changes that have not been staged
$ git diff
# Compare the difference between the files in the staging area and the last submission
$ git diff --cached
$ git diff --staged
# Compare the difference between the current file and the last submission
$ git diff HEAD
# View changes since the specified version
$ git diff <commit ID>
# Compare the differences between the two branches
$ git diff <Branch name> <Branch name>
# View the changes of the two branches after they are separated
$ git diff <Branch name>...<Branch name>
git pull
Get the latest version from the remote warehouse and merge it locally.
First, execute git fetch, and then execute git merge to merge the HEAD of the obtained branch into the current branch.
# Get the latest version from the remote warehouse.
$ git pull
git push
Push the submission from the local warehouse to the remote warehouse.
# Push the branch of the local warehouse to the specified branch of the remote warehouse
$ git push <Alias of remote warehouse> <Local branch name>:<Remote branch name>
# Deletes the branch of the specified remote warehouse
$ git push <Alias of remote warehouse> :<Remote branch name>
$ git push <Alias of remote warehouse> --delete <Remote branch name>
git log
Displays submitted records.
# Print all submission records
$ git log
# Print records from the first submission to the specified submission
$ git log <commit ID>
# Prints the specified number of newly submitted records
$ git log -<Specified quantity>
git reset
Restore submitted records.
# The staging area is reset, but the files are not affected
# It is equivalent to withdrawing the contents updated to the staging area with the "git add" command from the staging area. You can specify the file
# If no commit ID is specified, the default is the current HEAD
$ git reset [<File path>]
$ git reset --mixed [<File path>]
# Change the direction of HEAD to the specified submission record, and the file is not modified
$ git reset <commit ID>
$ git reset --mixed <commit ID>
# Change the direction of HEAD to the specified submission record, and the file is not modified
# It is equivalent to calling the "git reset --mixed" command and then doing "git add" again
$ git reset --soft <commit ID>
# Change the direction of HEAD to the specified submission record, and the file is also modified
$ git reset --hard <commit ID>
git revert
Generate a new submission to undo a submission. All submissions before this submission will be retained.
# Generate a new submission to undo a submission
$ git revert <commit ID>
git tag
Commands for manipulating labels.
# Print all labels
$ git tag
# Add a lightweight label to point to the reference of the submission object, and you can specify the previous submission record
$ git tag <Label name> [<commit ID>]
# Add a note label with descriptive information to specify previous submission records
$ git tag -a <Label name> -m <Label description information> [<commit ID>]
# Switch to the specified label
$ git checkout <Label name>
# View label information
$ git show <Label name>
# Deletes the specified label
$ git tag -d <Label name>
# Submit the specified label to the remote warehouse
$ git push <Alias of remote warehouse> <Label name>
# Submit all local labels to the remote warehouse
$ git push <Alias of remote warehouse> –tags
git mv
Rename a file or folder.
# Rename the specified file or folder
$ git mv <source file/folder> <Target file/folder>
git rm
Delete a file or folder.
# Removes the tracking specified file and deletes it from the folder in the local warehouse
$ git rm <File path>
# Removes the tracking specified folder and deletes it from the folder in the local warehouse
$ git rm -r <Folder path>
# Remove the tracking specified file and keep it in the folder of the local warehouse
$ git rm --cached
Git operation scenario example
Work scenario 1 - new tasks (developing new features / fixing bug s)
- git st checks the status of the current project. If there are unsaved changes, save git add. And git ci -m "xyz" 1d23813 (head - > feat-1) develop feat-1 phase 3 a7e5705 develop feat-1 phase 2 2685240 init feat-1 suppose I have committed three times in feat-1, and the three commit message s are as shown above.
- Switch to the main development branch. If the main branch of the project is called development, use git co develop ment
- Ensure that the main branch is the latest version of GIT pull origin development
- Create a new branch git co -b feat-1 (create a new branch called feat-1)
- Start writing code
- If the current task is complicated and there is a large amount of code, I usually use git add. And git ci -m "xxx" to save the current code many times (remember to replace xxx with more meaningful words, such as git ci -m "init feature-1")
- After code development, sort out the commit message
- First, still use git st to ensure that all code is commit ted (not just git add and git ci)
- Step 2: git logl view the latest commit message under the current branch, such as
As mentioned earlier, the purpose of commit is to prevent accidental loss of code, but before pushing to the remote end, it is best to combine the once developed commit into one to avoid polluting the git commit message of the remote end
Because there are three commit s in this example, execute git rebase -i HEAD~3
Then you will see a VIM interface (for readers who are not familiar with the basic operation of vim, please consult and search by yourself)

Remember not to touch the top line, replace the pick at the beginning of the following lines with s, and then save it
Another vim interface is displayed
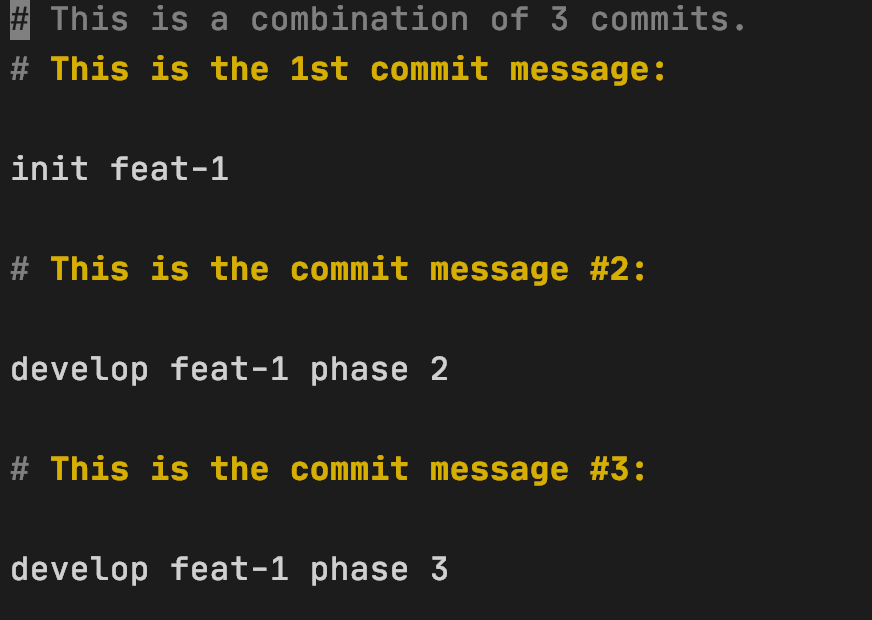
Delete all contents (# the beginning can be ignored), and then write a short and accurate sentence as the commit message of this development, such as

Then save
If you succeed, you can see such words

Finally, use git logl to confirm that all commit message s in this development are compressed into one
(only the simplest and direct usage of git rebase is introduced here. Interested readers can read the official documents for more detailed and advanced usage. For example, it is sometimes more convenient to use f instead of s in the vim interface for the first time.)
Finally, git push origin feat-1 pushes the local warehouse to the remote warehouse
Working scenario 2 - the development is in the middle, and the latest code of the remote main branch is required
Sometimes, when you develop a function locally and write half of the code, a colleague combines some important code into the remote main branch (such as the development branch) These important codes may greatly improve the efficiency of local development, may include some specification checks or code related to your current development - in short, you need to integrate that part of the code into your current local development environment.
In this case, I will
- git st checks the status of the current project. If there are unsaved changes, save git add. And git ci -m "xyz"
- Git pull -- rebase origin development uses this instruction to "combine" the remote main branch into the current branch in the form of rebase
- git logl check whether the commit message under the current branch meets the expectation
Why use -- rebase?
Because doing so can make git history the cleanest and cleanest - all locally developed commits will appear after the commit in the remote main branch; and it can avoid introducing an additional merge commit
Working scenario 3 - you want to copy the code corresponding to a commit in a branch to the current branch
Sometimes I will create some experimental branches and write some experimental codes. If the code is not feasible, I can directly discard this branch and return to the original development branch; if these experimental codes are feasible, I will return to the development branch and "copy" the code of the experimental branch. The specific operations are as follows:
- git st checks the status of the current project. If there are unsaved changes, save git add. And git ci -m "xyz"
- Suppose we need a commit of the branch feat-1. Use git logl feat-1 to view all the recent commit records of the branch, such as
Write down the hash value of the corresponding commit, that is, the first seven characters are garbled, as shown in c843c37 above
- Use git cherry pick c843c37 to copy the code corresponding to this commit to the current branch

In addition, GIT cherry pick can sometimes be used to save the field - retrieve the "lost" code on the premise that the corresponding commit hash value can be found.