1, Research and practice of mpp deployment
Hisilicon MPP reference learning: https://blog.csdn.net/flaoter/article/details/92402685
the Media Process Platform (MPP) provided by Hisilicon can support the rapid development of application software. The platform shields the complex underlying processing related to the chip for the application software, and directly provides MPI (MPP Program Interface) interface for the application software to complete the corresponding functions. The platform supports the application software to quickly develop the following functions: input video capture, H.265/H.264/JPEG coding, H.265/H.264/JPEG decoding, video output display, video image preprocessing (including denoising, enhancement and sharpening), image mosaic, image geometric correction, intelligence, audio capture and output, audio codec and so on.
1. Detailed explanation of mpp file structure

(1)ko

Some module files pre compiled by. ko Hisilicon are not completely open source. Let's analyze the load3518e file:
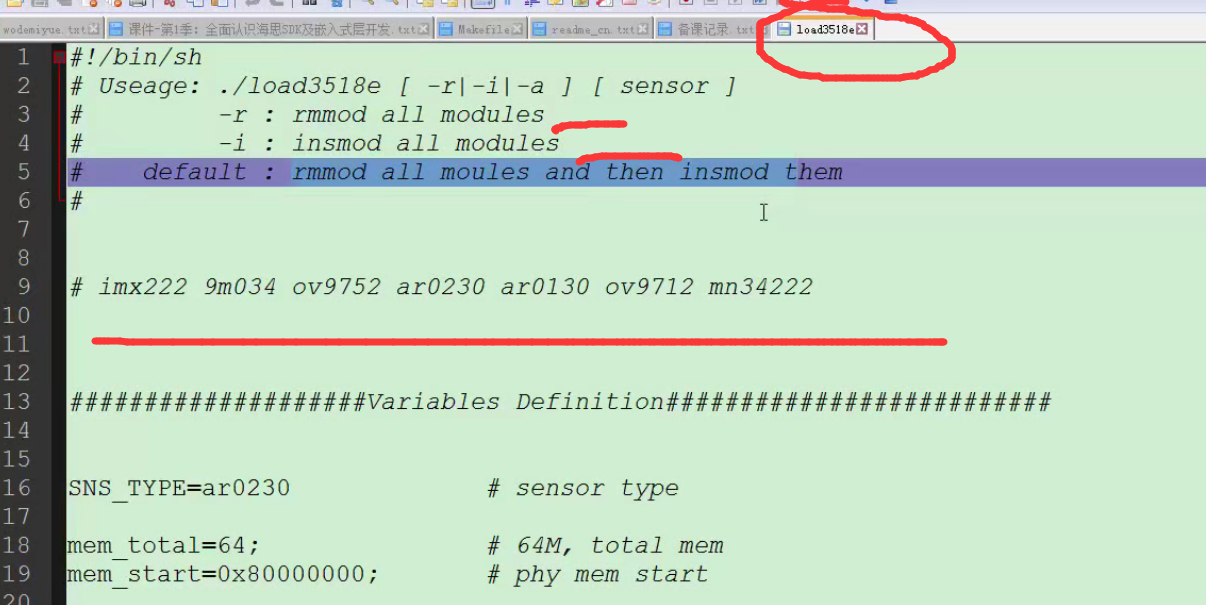
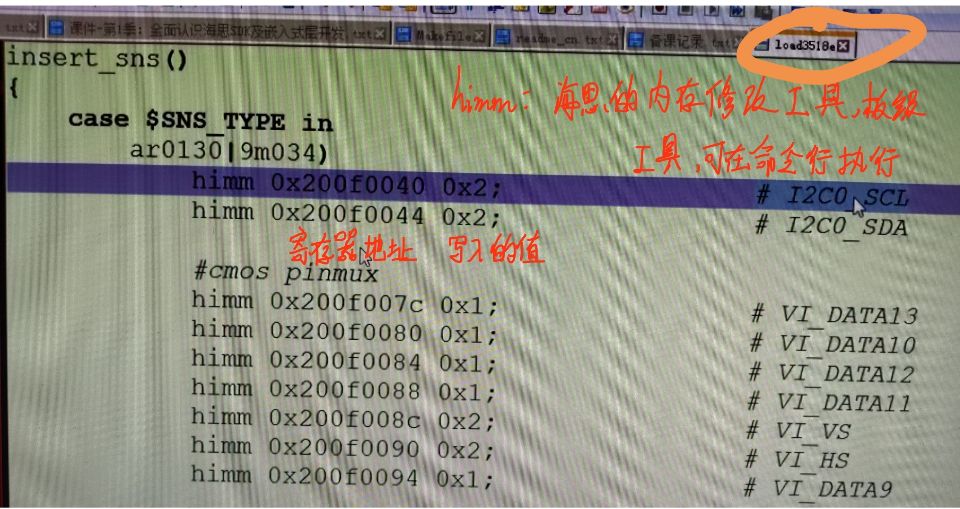
Unload and then load all modules to ensure normal operation. Some sensors are supported by default. Each sensor must be initialized before working.
# The beginning of load3518e file
SNS_TYPE=ar0230             # sensor type

mem_total=64;               # 64M, total mem
mem_start=0x80000000;       # phy mem start

os_mem_size=32;             # 32M, os mem
mmz_start=0x82000000;       # mmz start addr
mmz_size=32M;               # 32M, mmz size

# Middle part of load3518e file
insert_ko()
{
	# sys config
	sys_config;

	# driver load
	# mmz.ko memory management module divides part of the 64M internal memory of the chip for mpp, i.e. mmz
	# $mmz_start,$mmz_size is the range of memory used by mpp
	insmod mmz.ko mmz=anonymous,0,$mmz_start,$mmz_size anony=1 || report_error
	insmod hi_media.ko
	insmod hi3518e_base.ko

	insmod hi3518e_sys.ko vi_vpss_online=$b_arg_online sensor=$SNS_TYPE
	if [[ $? -ne 0 ]]; then
		exit;
	fi

	insmod hi3518e_tde.ko
	insmod hi3518e_region.ko
	insmod hi3518e_vgs.ko

	insert_isp;
	insmod hi3518e_viu.ko detect_err_frame=10;
	insmod hi3518e_vpss.ko rfr_frame_comp=1;
	insmod hi3518e_vou.ko
	#insmod hi3518e_vou.ko transparentTransmit=1 #enable transparentTransmit
	insmod hifb.ko video="hifb:vram0_size:1620"     # default pal

	insmod hi3518e_rc.ko
	insmod hi3518e_venc.ko
	insmod hi3518e_chnl.ko ChnlLowPower=1
	insmod hi3518e_h264e.ko
	insmod hi3518e_jpege.ko
	insmod hi3518e_ive.ko save_power=0;
#	insmod hi3518e_ive.ko
	insmod extdrv/sensor_i2c.ko
	echo "==== Your input Sensor type is $SNS_TYPE ===="
	insmod extdrv/pwm.ko
	insmod extdrv/piris.ko

	#insert_sns > /dev/null
	insert_sns
	insert_audio

	insmod hi_mipi.ko
	echo "==== Your input Sensor type is $SNS_TYPE ===="
}
(2)lib
We may not use all static and dynamic library files. We can delete them appropriately in order to save the space of the root file system in the future.
(3)sample
Official sample code
(4) Makefile.param: parameter file of makefile
(5) Several other folders, the tools folder contains some tool code. The exdrv folder contains the drivers of some external devices (devices connected and used outside the hi3518e chip). The ko folder contains the drivers for the internal devices.
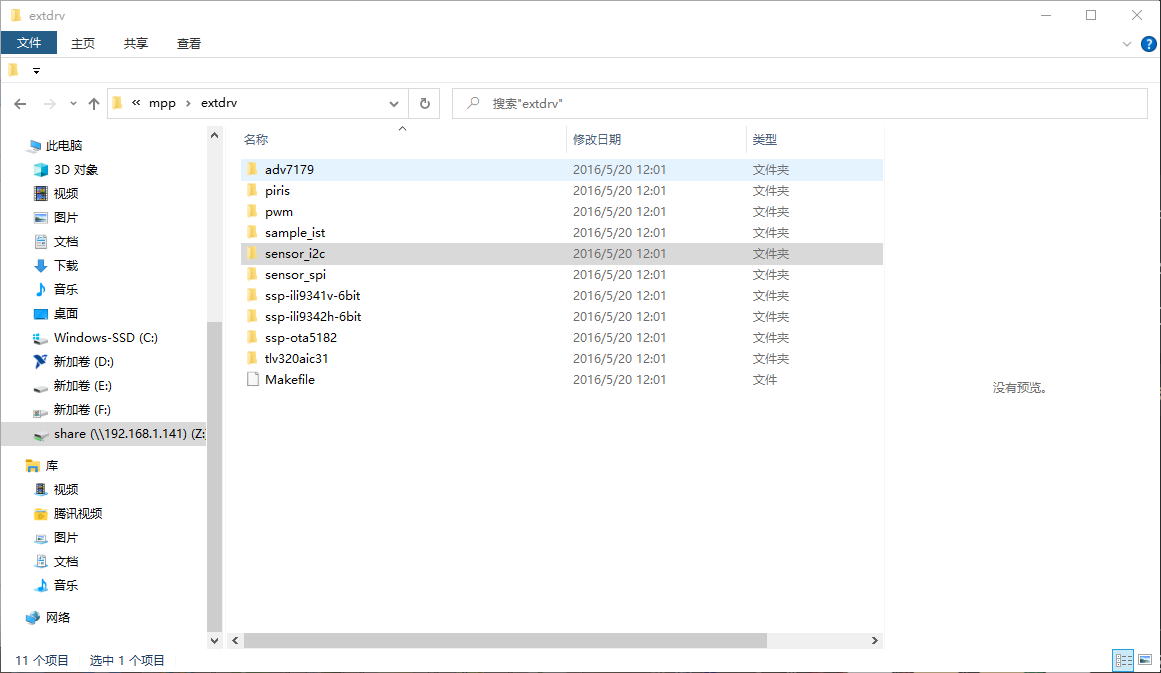
We focus on the ko and lib folders because they require our deployment.
2. Development board startup mount host
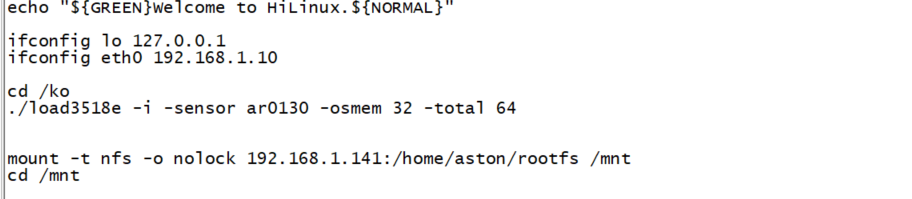
(1) Add and set the IP address of the network card at the end of the profile file
ifconfig lo 127.0.0.1
ifconfig eth0 192.168.1.10
(2) Mount the host nfs server after the development board is started
sudo showmount -e # View the mount directory of nfs server settings
mount -t nfs -o nolock 192.168.1.141:/home/aston/rootfs /mnt
3. Deploy ko files
ubuntu End execution:
cp ko lib ~/rootfs/ -rf

Development board end execution:
cp /mnt/ko / -rf
cp /mnt/lib/* /usr/lib/ -rf

modify profile Files, adding:
cd /ko
./load3518e -i -sensor ar0130 -osmem 32 -total 64
cd /mnt

-i: implement insert_ko()function
-sensor: Specify that sensor
-osmem: Memory occupied by operating system
-total: Built in chip SDRAM size
mmz = total-osmem
4. Deploy lib file
SDRAM Scope: 80000000-83FFFFFF
linux Memory: 0 x80000000-0x81FFFFFF
MMZ Memory: 0 x82000000-0x83FFFFFF

It has been done in the above 3. We don't need to operate again:
Ubuntu Medium:
cp ko lib ~/rootfs/ -rf

In the development board:
cp /mnt/lib/* /usr/lib/ -rf
2, Compilation and testing of sample
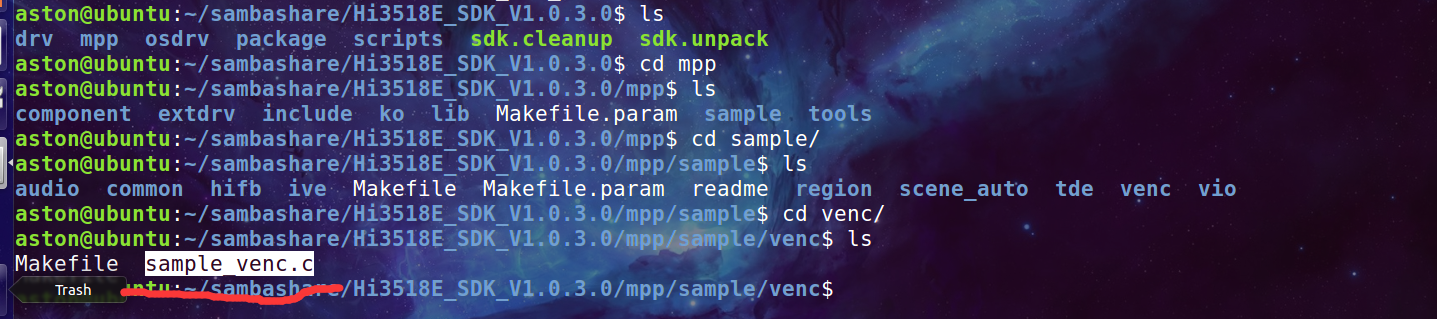
Each folder is a branch that demonstrates a different function, sample/venc/sample_venc.c realizes video capture and encoding into an H.264 code stream, and saves it locally, which can be viewed by VLC player. Files in other folders will be compiled using files in the common folder.
1. Compilation of sample
(1) Simple browsing of sample structure
(2)Makefile research
(3) Compile to get sample_venc
We can refer to the reading: sample/readme file to learn how to compile.
2. Compilation and Makefile
1) Compilation dependency descriptions
The compilation of the sample programs depends on MPP header files in /mpp/include and library files in mpp/lib.
2) Makefile descriptions
A Makefile is available on each service sample demo module (such as the vio and venc). The Makefile quotes the Makefile.param file in the sample directory, and this file quotes the Makefile.param file in the mpp directory.
mpp -- Makefile.param # Defines the variables required by the MPP compilation.
|---sample---Makefile.param # Defines the variables required by the sample compilation.
|--- vio/venc/...---Makefile # Sample compilation script
Run the make command on each service sample demo module to compile the module; run the make clean command to delete the executable files and target files after compilation; run the make cleanstream command to delete stream files generated after some of the sample programs run.
Run the make command in the sample directory to compile various service sample demo programs; run the make clean command to delete the executable files and target files after all service sample demo programs are compiled; run the make cleanall command to delete stream files generated after all service sample demo programs run.
3. Running Descriptions of Sample Programs
1) Sample program running depends on the media driver. Before running a sample demo program, execute the load3518e script in the mpp/ko to load a specified module.
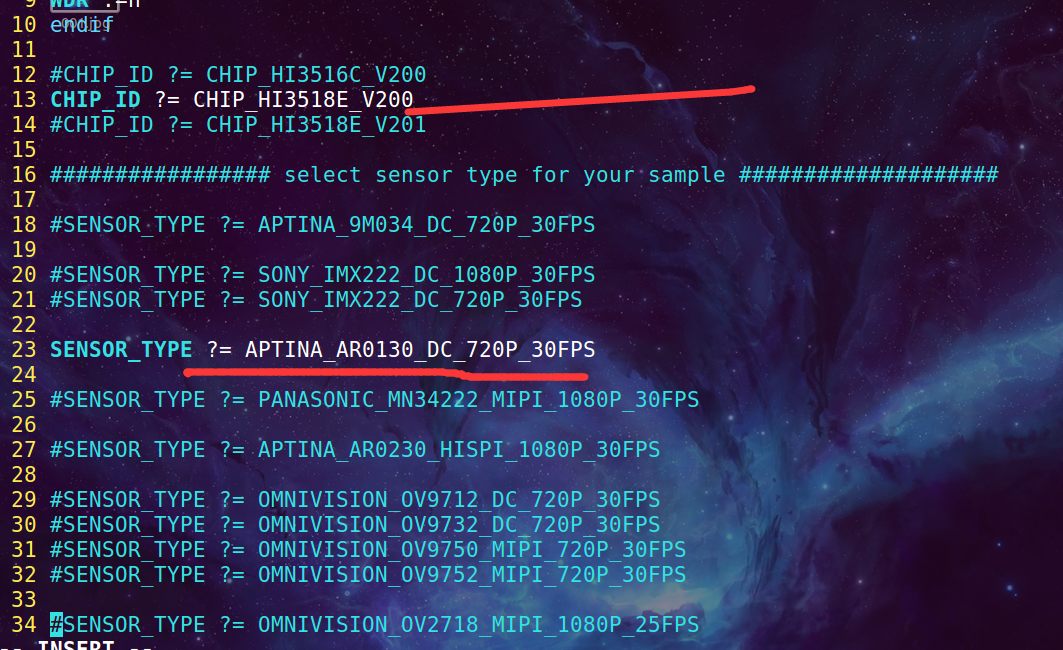
2) Note that the corresponding sensor library must be selected. The default sensor is Sony IMX122. If you want to select other sensors, modify the Makefile.param file. For example, if you select Sony IMX104, you should modify the Makefile.param file as follows:
#SENSOR_TYPE ?= APTINA_AR0130_DC_720P_30FPS
SENSOR_TYPE ?= SONY_IMX122_DC_1080P_30FPS
Youdao's translation is rather poor. Let's live and see:
2. Compilation and Makefile
1)Compile dependency description
The compilation of the sample program depends on/ MPP /include Medium MPP Header files and MPP /lib Library files in.
2) Makefile Description of
Each service example demonstration module(for example vio and venc)There's one on every Makefile. Makefile quote Makefile. param File, which references Makefile. MPP Under directory Param File.
mpp-Makefile. param #Define the variables required for MPP compilation.
| -sample- Makefile. param #Define the variables required for sample compilation.
|--- vio venc /...-Makefile #Sample compilation script
Run on each service sample demonstration module make Command compilation module;function make clean Command deletes the compiled executable and target files;implement make cleanstream Command to delete some stream files generated after the sample program is run.
stay sample Run under directory make Command to compile various service sample demo programs;After all the service sample demos have been compiled, run make clean Command to delete executable and target files;Execute command make cleanall,Delete all stream files generated after the service sample demo runs.
3.Running description of the sample program
1)The operation of the sample program depends on the media driver. Before running the sample demo mpp/ko Medium load3518e Script to load the specified module.
2)Note that the corresponding sensor library must be selected. The default sensor is Sony IMX122. If you want to select another sensor, modify it Makefile Parameter file. For example, if you select Sony IMX104,Then you should modify Makefile. The parameter files are as follows:
# SENSOR_TYPE ? = APTINA_AR0130_DC_720P_30FPS
SENSOR_TYPE ? = SONY_IMX122_DC_1080P_30FPS
modify sample Under directory Makefile.param: vi Makefile.param
cd venc
make
cp sample_venc ~/rootfs/ -f

A program generated by dynamic link.
2. Deployment and testing of sample
(1) Running sample in NFS mode
(2) Get the video file xx.h264
(3) Export xx.h264 to windows and play verification with vlc player
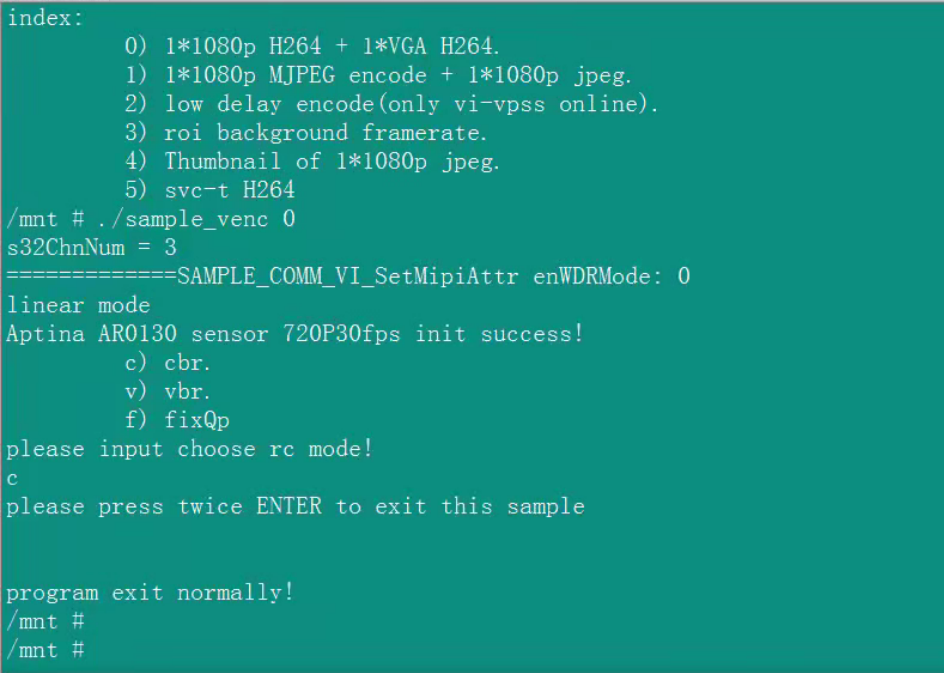
./sample_venc 0
c
 Press twice in succession ENTER Key to end program operation
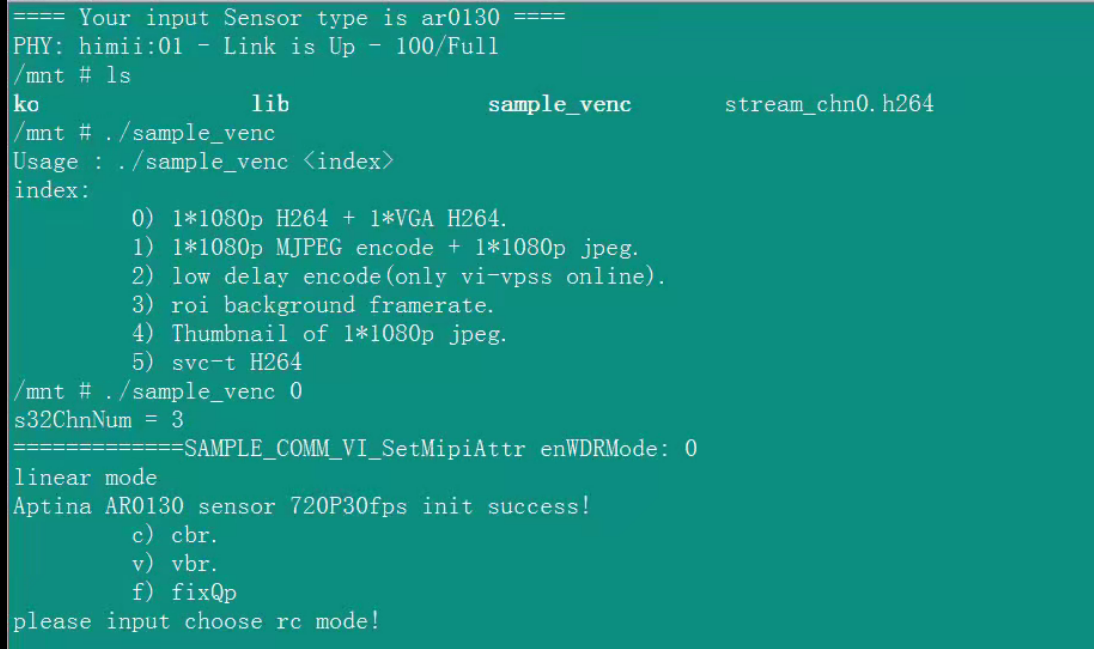

Three channels of videos are obtained. The contents of the three videos are the same, but the formats and parameters are different. Put these code streams into Windows and view them with VLC player.
3. Image remake
(1) Find rootfs under osdev/pub / in the compilation directory_ Uclibc.tgz, unzip
(2) Follow the steps in this article to verify successful deployment to deploy the entire rootfs
deploy ko and lib and modify the / etc/profile file
(3) After modifying the extracted root file system, manually create the rootfs.jffs2 image, and then burn the test
osdrv/pub/bin/pc/mkfs.jffs2 -d osdrv/pub/rootfs_uclibc -l -e 0x10000 -o osdrv/pub/rootfs_uclibc_64k.jffs2
4. Final summary
(1) At the end of season 1, the main content is the familiarity, compilation and deployment of Hisilicon SDK
(2) More directories, more simple pdf documents, more familiar concepts, practice makes perfect, and it is convenient to fill experience during the interview
(3) Pay attention to actual combat, don't just read the article and don't do it
Note: most of this material is compiled from the course notes of the Internet of things lecture hall of Mr. Zhu, and some other people's blogs are quoted. If there is infringement, please contact and delete it! The level is limited. If there are errors, you are welcome to communicate in the comment area.