Write Before
Last post was written on Picasso Basic Usage and Source Full Resolution Picasso's source code reads smoothly, and then comes to the Glide framework, which is also recommended for loading pictures on the Internet. Just as my current writing goal is to analyze some of the popular framework sources, it's also a good idea to analyze Glide's source code. And with the analysis of Picasso source code, I believe that Glide will be finalized soon and the result will be tragicNo, I can't get out of it. Glide's source is far from Picasso's. It's also quite difficult to read. I'm using the latest Glide 4.0, which is quite different from previous versions. There's no information available on the Internet. This is a tragedy. I'm working hard on it.Not until today did it emerge from the deep ditch, almost choking to death, haha.
text
The use of Glide is basically the same as that of Picasso, so let's not go further here, mainly because the source analysis is very long and thin, plus the basic use, which is much longer, and Picasso's basic use has been written in the previous article, which differs slightly from each other in usage, so this article goes directly to source analysis.
Glide Source Analysis
First add the following references to build.gradle:
compile 'com.github.bumptech.glide:glide:4.0.0-RC0'
Here I'm using Glide4.0, which is also the latest version, and 3.X is still very different in source code.You will know this article by looking at the 3.X source trust.
ok, like the analysis pattern of Picasso, we do a step-by-step in-depth analysis from the simplest code below:
Glide.with(MainActivity.this).load(url).into(headerImage);
with()
First let's see what we did when we called Glide's with method:

The with method can accept different types of Context, Activity, FragmentActivity, Fragment or even View, and it returns a RequestManager object that needs to be retrieved in RequestManagerRetriever. Let's see how RequestManagerRetriever gets it?See the source code for the getRetriever method:

Neither does the getRetriever method actually create the RequestManagerRetriever object, but it is derived from Glide's getRequestManagerRetriever method, so it is clear that all the work done is done in Glide's get method. Look at the source code of the get method:

At this point, we see a very familiar code design principle, that is, the single mode of double locking guarantees the uniqueness of Glide objects, so initGlide is the way to create Glide objects. See:
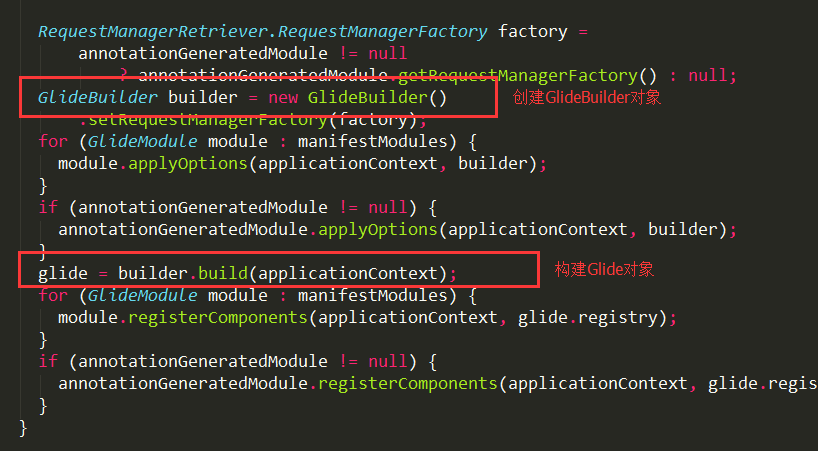
This is the most important code in the initGlide method. It creates a GlideBuilder object, then calls the build method to complete the creation of the Glide object. Without looking at the bulid method, you'll guess what's going to happen next. That's right, you can use the builder's design pattern to construct the Glide object perfectly:
public Glide build(Context context) {
    if (sourceExecutor == null) {
      sourceExecutor = GlideExecutor.newSourceExecutor();
    }

    if (diskCacheExecutor == null) {
      diskCacheExecutor = GlideExecutor.newDiskCacheExecutor();
    }

    if (memorySizeCalculator == null) {
      memorySizeCalculator = new MemorySizeCalculator.Builder(context).build();
    }

    if (connectivityMonitorFactory == null) {
      connectivityMonitorFactory = new DefaultConnectivityMonitorFactory();
    }

    if (bitmapPool == null) {
      int size = memorySizeCalculator.getBitmapPoolSize();
      bitmapPool = new LruBitmapPool(size);
    }

    if (arrayPool == null) {
      arrayPool = new LruArrayPool(memorySizeCalculator.getArrayPoolSizeInBytes());
    }

    if (memoryCache == null) {
      memoryCache = new LruResourceCache(memorySizeCalculator.getMemoryCacheSize());
    }

    if (diskCacheFactory == null) {
      diskCacheFactory = new InternalCacheDiskCacheFactory(context);
    }

    if (engine == null) {
      engine = new Engine(memoryCache, diskCacheFactory, diskCacheExecutor, sourceExecutor,
          GlideExecutor.newUnlimitedSourceExecutor());
    }

    RequestManagerRetriever requestManagerRetriever = new RequestManagerRetriever(
        requestManagerFactory);

    return new Glide(
        context,
        engine,
        memoryCache,
        bitmapPool,
        arrayPool,
        requestManagerRetriever,
        connectivityMonitorFactory,
        logLevel,
        defaultRequestOptions.lock());
  }
The main building methods are to build thread pools (including sourceExecutor, diskCacheExecutor), cache sizes and caches, default connection monitoring factories, Engine objects, RequestManagerRetriever objects, and so on.
There are several important object creations, so let's look at what they are built here:
1 Engine Object
Creating an Engine object passes several important parameters in the construction method, namely, the thread pool, the memory cache, and the hard disk cache object. Let's see how it builds an Engine object in the construction method:
Engine(MemoryCache cache,
      DiskCache.Factory diskCacheFactory,
      GlideExecutor diskCacheExecutor,
      GlideExecutor sourceExecutor,
      GlideExecutor sourceUnlimitedExecutor,
      Map<Key, EngineJob<?>> jobs,
      EngineKeyFactory keyFactory,
      Map<Key, WeakReference<EngineResource<?>>> activeResources,
      EngineJobFactory engineJobFactory,
      DecodeJobFactory decodeJobFactory,
      ResourceRecycler resourceRecycler) {
    this.cache = cache;
    this.diskCacheProvider = new LazyDiskCacheProvider(diskCacheFactory);

    if (activeResources == null) {
      activeResources = new HashMap<>();
    }
    this.activeResources = activeResources;

    if (keyFactory == null) {
      keyFactory = new EngineKeyFactory();
    }
    this.keyFactory = keyFactory;

    if (jobs == null) {
      jobs = new HashMap<>();
    }
    this.jobs = jobs;

    if (engineJobFactory == null) {
      engineJobFactory = new EngineJobFactory(diskCacheExecutor, sourceExecutor,
          sourceUnlimitedExecutor, this);
    }
    this.engineJobFactory = engineJobFactory;

    if (decodeJobFactory == null) {
      decodeJobFactory = new DecodeJobFactory(diskCacheProvider);
    }
    this.decodeJobFactory = decodeJobFactory;

    if (resourceRecycler == null) {
      resourceRecycler = new ResourceRecycler();
    }
    this.resourceRecycler = resourceRecycler;

    cache.setResourceRemovedListener(this);
  }
Create several factory object methods, such as EngineKeyFactory, EngineJobFactory and DecodeJobFactory, several HashMap type object collections, such as jobs, activeResources, and so on. Then assign these objects to Engine's member variables separately, so let's see what member variables were initialized when the Engine object was created:
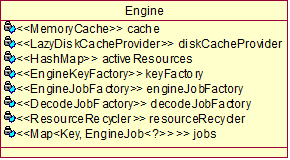
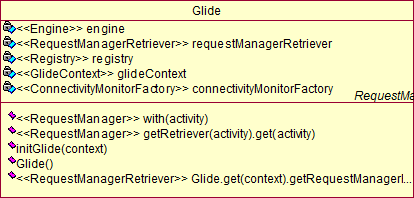
ok, Engine is a very important object, and plays an important role later. In order to understand the aspect that it has those objects that can be used, here I have made a class diagram showing them.
2 RequestManagerRetriever object
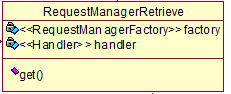
Let's also look at the creation of the RequestManagerRetriever object, which is relatively simple. Let's look at how it is constructed:

Since the requestManagerFactory we passed in is empty, the factory will use the default DEFAULT_FACTORY factory, which is where the RequestManager object is actually created, as described later.
This is just to let you know that the factory here is DEFAULT_FACTORY.
To see which members it has:
3 Glide Object
return new Gilde() in the build method, create a Glide object, and return it. What initialization did you do in the Gilde construction method?
Glide(
      Context context,
      Engine engine,
      MemoryCache memoryCache,
      BitmapPool bitmapPool,
      ArrayPool arrayPool,
      RequestManagerRetriever requestManagerRetriever,
      ConnectivityMonitorFactory connectivityMonitorFactory,
      int logLevel,
      RequestOptions defaultRequestOptions) {
    this.engine = engine;
    this.bitmapPool = bitmapPool;
    this.arrayPool = arrayPool;
    this.memoryCache = memoryCache;
    this.requestManagerRetriever = requestManagerRetriever;
    this.connectivityMonitorFactory = connectivityMonitorFactory;

    DecodeFormat decodeFormat = defaultRequestOptions.getOptions().get(Downsampler.DECODE_FORMAT);
    bitmapPreFiller = new BitmapPreFiller(memoryCache, bitmapPool, decodeFormat);

    final Resources resources = context.getResources();

    registry = new Registry();
    registry.register(new DefaultImageHeaderParser());

    registry.register()...append()...

    ImageViewTargetFactory imageViewTargetFactory = new ImageViewTargetFactory();
    glideContext = new GlideContext(context, registry, imageViewTargetFactory,
        defaultRequestOptions, engine, this, logLevel);
  }
Here you first assign the parameters passed in to the member variables, then create several important objects:
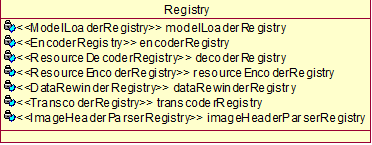
1: Registry object
Registry mainly adds a lot of ways to register or parse, which plays an important role in resolving how to get resources from memory, files, or networks later, and each type of parsing provides several methods. One way can't get resources will use another, until you know how to get resources, let's look at its register and append methods:
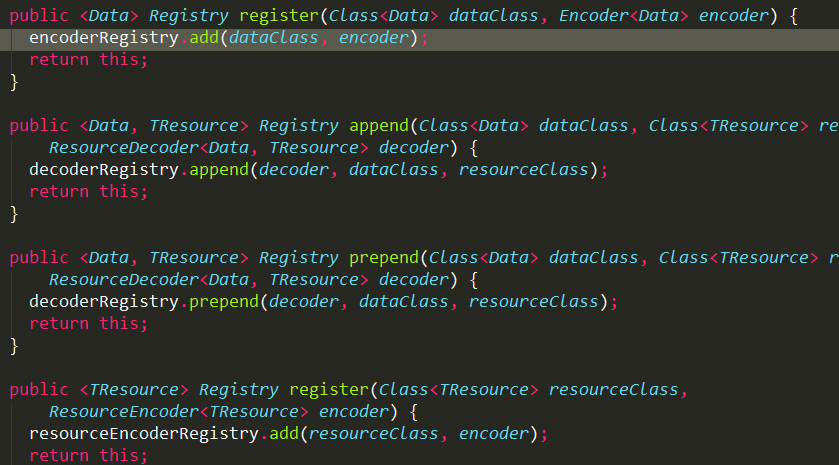
Mainly stored in collection variables in different objects.
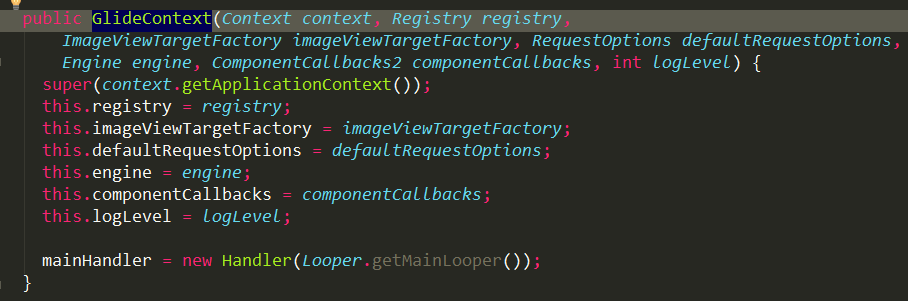
(2) GlideContext object
The GlideContext object also plays an important role later, and has been created so far only for initialization and assignment:
Summarize the parameters initialized by Glide, Registry, and GlideContext objects:
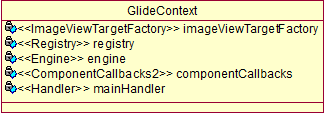
This is the member method and member variable owned by the object so far.
ok, go back to the build method above, call getRequestManagerRetriever() after returning the Glide object to get the RequestManagerRetriever object. From the Glide class diagram above, we can also see that the Glide object already contains the RequestManagerRetriever object.
One more step back, after getting the RequestManagerRetriever object in the getRetriever(activity) method, call get(activity) to get the RequestManager object, so let's see how it gets it?
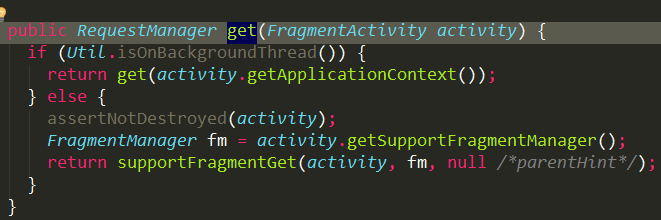
First determine whether the subthread is executing or not, otherwise call the supportFragmentGet method to get the RequestManager object, then look at its source code:

Remember who our RequestManagerRetriever has, don't you remember to go and look at its class diagram above, we can see from its source that it will use factory and call its build method, remember what factory is?The factory analyzed above is DEFAULT_FACTORY, so take a look at its source implementation:
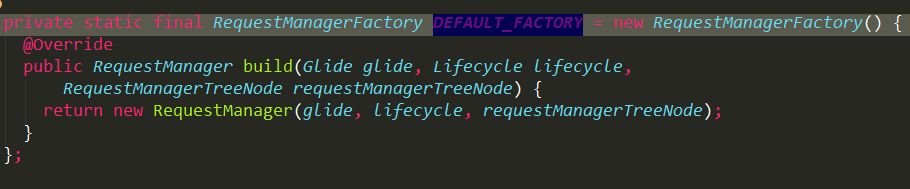
Create a RequestManager object in build and return to see what has been done in the RequestManager's construction method:
 RequestManager(
      Glide glide,
      Lifecycle lifecycle,
      RequestManagerTreeNode treeNode,
      RequestTracker requestTracker,
      ConnectivityMonitorFactory factory) {
    this.glide = glide;
    this.lifecycle = lifecycle;
    this.treeNode = treeNode;
    this.requestTracker = requestTracker;

    final Context context = glide.getGlideContext().getBaseContext();

    connectivityMonitor =
        factory.build(context, new RequestManagerConnectivityListener(requestTracker));

    if (Util.isOnBackgroundThread()) {
      mainHandler.post(addSelfToLifecycle);
    } else {
      lifecycle.addListener(this);
    }
    lifecycle.addListener(connectivityMonitor);

    setRequestOptions(glide.getGlideContext().getDefaultRequestOptions());

    glide.registerRequestManager(this);
  }
Mainly assignment, adding lifecycle listeners, setting request properties, and registering request managers, the code is simple and readable.
Take a look at its class diagram:

ok, so we've finished getting the RequestManager object in our with method.
Take a look at the sequence diagram of how the with method executes:
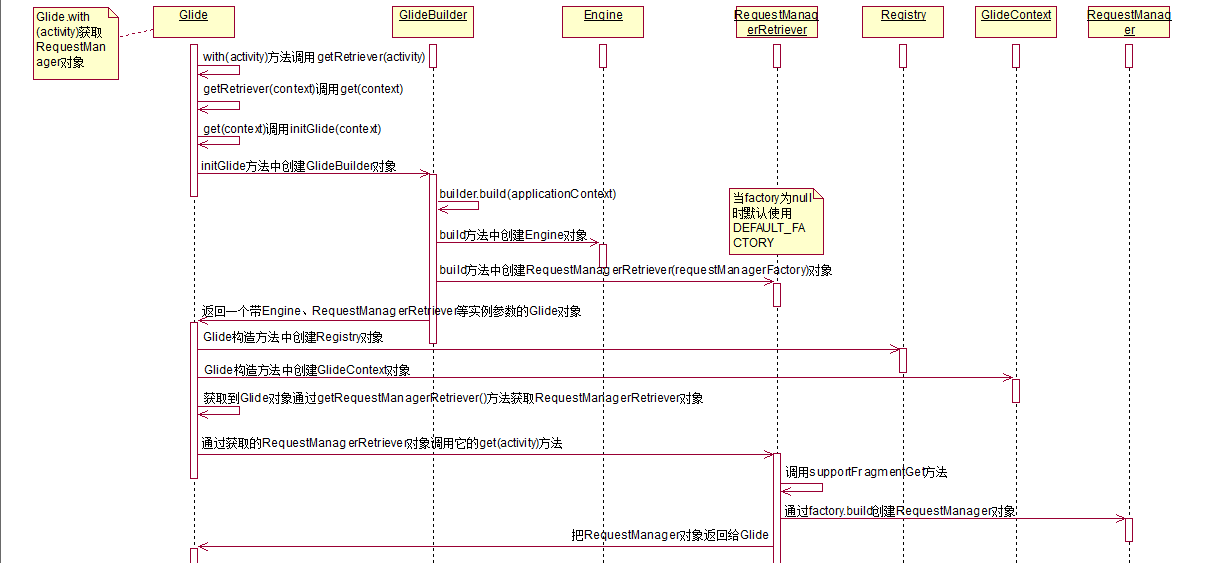
Note: The flowchart is not clear, you can choose to view it in "Open Picture in New Label".
load()
On the premise that the with method is called to get the RequestManager object, call the load method and pass in our url parameter to see its source code:

Instead of directly loading our url to get the resources, we first invoke the asDrawable method to configure the information of the picture. In fact, the image resources we get by loading are converted to drawale or bitmap or gif for picture display. By default, drawale is used, and you can also use asGif()/asBitmap() to set how it is presented.Here we will analyze it by default.
The purpose of the load method is to get the RequestBuilder object, so let's decompose its source code in one step:
First, look at the source code for asDrawable():

The asDrawable() first calls the as method and passes in Drawable.class as a parameter to see the source of the as method:

From the as method, we can see that it creates a RequestBuilder object directly and passes in the relevant parameters. Note that the resourceClass is Drawable.class, which is used when there is a later selective branch.
See what initialization layouts were done in the construction method of RequestBuilder.
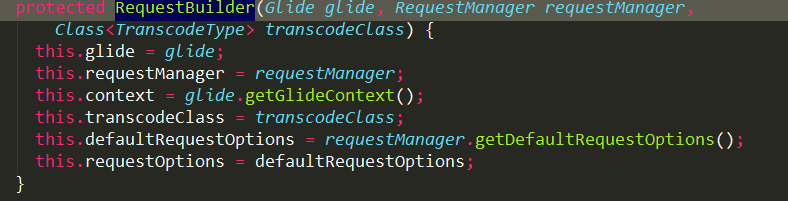
Simple assignment, but note here that transcodeClass is the Drawable.class class class.
ok, after getting the RequestBuilder object, it does a further assignment, which is in the transition method.

Assign the created DrawableTransitionOptions object to the transitionOptions variable.
ok, look up again, after the asDrawable method has been created on RequestBuilder, call the load method to pass our url address. Actually, there is nothing to do with the load, that is, a transit station, go to the loadGeneric method. Look at:

There's not much more to do in the loadGeneric method. It also saves our url and the isModelSet is set to true, which means the Model is already set.Take a look at its class diagram:
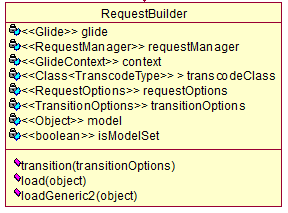
It has so far included member variables and methods here.
ok, so now that our load method is analyzed, let's take a look at its flowchart:
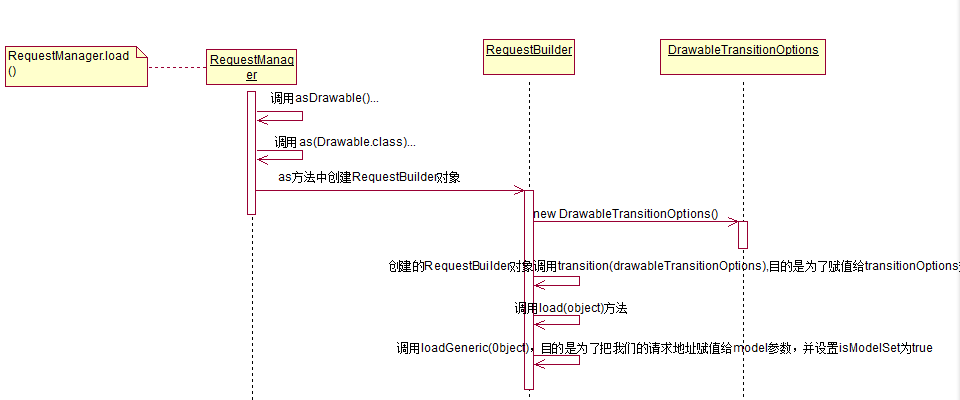
Note: The flowchart is not clear, you can choose to view it in "Open Picture in New Label".
Because the Glide source code is very complex and long to write, it can only be published in two articles. The first one analyzes the source code of Glide's with and load methods. The second one will analyze the into methods. To be honest, the into methods are much more complex than the sum of with and load methods, but it's OK to maintain a consistent style, and analyze the execution process step by step. I believe you will certainly finish learning.Have a complete understanding of its source structure.
ok, let's start with this post today.
If there is something you don't understand, or if what I'm saying here is not thorough enough, or where I made a mistake, please leave a message to correct it and let us make progress together. Thank you.
At the same time, please sweep your attention to my WeChat public number. Although it is not written very often, every one has quality assurance, so that you can learn real knowledge.