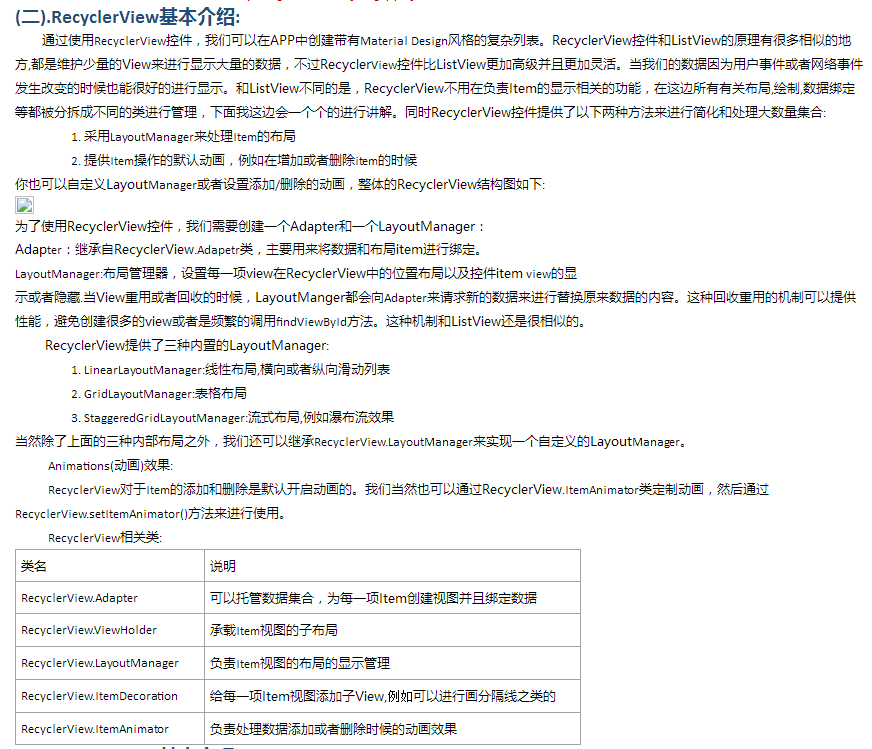
introduce
RecyclerView is similar to ListView in principle: it maintains only a small number of Views and can display a large number of data sets. RecyclerView simplifies data presentation and processing in two ways:
Use Layout Manager to determine how each item is arranged.
Provide default animation effects for adding and deleting items.
You can also define your own Layout Manager and add and delete animations. The RecyclerView project structure is as follows: 
Adapter: Before using RecyclerView, you need an adapter that inherits from RecyclerView.Adapter and binds data to the interface of each item.
Layout Manager: Used to determine how each item is arranged and when it is displayed and hidden. When a View is reclaimed or reused, LayoutManager requests the adapter for new data to replace old data, a mechanism that avoids creating too many Views and calling findViewById methods frequently (similar to ListView principles).
At present, three Layout Managers are provided in SDK:
LinearLayoutManager
GridLayoutManager
StaggeredGridLayoutManager
recyclerView = (RecyclerView) findViewById(R.id.recyclerView);
LinearLayoutManager layoutManager = new LinearLayoutManager(this );
//Setting up Layout Manager
recyclerView.setLayoutManager(layoutManager);
//Set to vertical layout, which is also the default
layoutManager.setOrientation(OrientationHelper. VERTICAL);
//Setting up Adapter
recyclerView.setAdapter( recycleAdapter);
 //Setting up the divider
recyclerView.addItemDecoration( new DividerGridItemDecoration(this ));
//Set animation for adding or deleting entries
recyclerView.setItemAnimator( new DefaultItemAnimator()); - 1
- 2
- 3
- 4
- 5
- 6
- 7
- 8
- 9
- 10
- 11
- 12
①onCreateViewHolder()
This method generates a View for each Item inflater, but the method returns a ViewHolder. This method encapsulates View directly in ViewHolder, and then we are facing the instance of ViewHolder, which of course needs to be written by ourselves. These tedious steps of convertView.setTag(holder) and convertView.getTag() are directly omitted.
②onBindViewHolder()
This method is mainly used for adapting rendered data to View. The method gives you a viewHolder instead of the original convertView.
③getItemCount()
This method is similar to the getCount method of BaseAdapter, that is, how many entries are there in total.
Reference Blog for Advanced Control Use Explanations
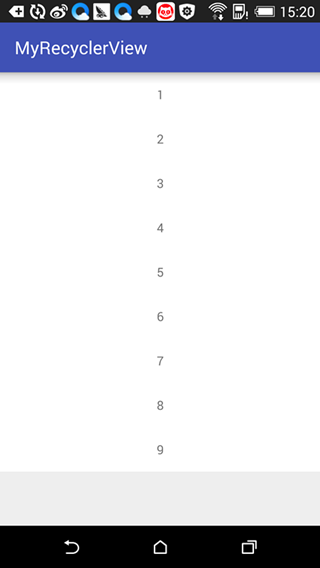
Simple RecyclerView usage
1. Adding dependencies
compile 'com.android.support:recyclerview-v7:24.2.1'- 1
2. Use Recycler View
<android.support.v7.widget.RecyclerView
        android:id="@+id/rv"
        android:layout_width="match_parent"
        android:layout_height="match_parent"
/>- 1
- 2
- 3
- 4
- 5
3. Create adapter settings for RecyclerView
View view = inflater.inflate(R.layout.fragment_home, container, false);
        //Get the rv control
        RecyclerView rv = (RecyclerView) view.findViewById(R.id.rv);
        rv.setLayoutManager(new LinearLayoutManager(getContext()));
        //Setting up Adapter
        MyAdapter adapter = new MyAdapter();
        rv.setAdapter(adapter);
return view;- 1
- 2
- 3
- 4
- 5
- 6
- 7
- 8
4. Create an adapter
private class MyAdapter extends  RecyclerView.Adapter<MyHolder>{
        private final List<String> list;
        public MyAdapter(){
            list =  new ArrayList<String>();
            for (int i = 0; i < 30; i++) {
                list.add("Commodity record" + i)}

}
       //OnCreateViewHolder is used to create caches for rv

     public MyHolder onCreateViewHolder(ViewGroup parent, int viewType) {
            //Parametric 3: Judgment condition true 1. Is inflated 2. Add to parent
            View view = LayoutInflater.from(getContext()).inflate(R.layout.main_recyclerview_item,parent,false);
            MyHolder holder = new MyHolder(view);
            return holder;
        }
        //Setting Data for Cache Controls
        public void onBindViewHolder(MyHolder holder, int position) {

            String item = list.get(position);
            holder.textView.setText(item);
            holder.icon.setImageResource(R.drawable.ic_default);
        }
        //Get the number of records

  public int getItemCount() {
            return list.size();
      }
- 1
- 2
- 3
- 4
- 5
- 6
- 7
- 8
- 9
- 10
- 11
- 12
- 13
- 14
- 15
- 16
- 17
- 18
- 19
- 20
- 21
- 22
- 23
- 24
- 25
- 26
- 27
- 28
- 29
5. Create HolderView
public class MyHolder extends RecyclerView.ViewHolder {
    public ImageView icon;
    public TextView textView;
    //Method of realization
    public MyHolder(View itemView) {
        super(itemView);
        icon= (ImageView) itemView.findViewById(R.id.item_iv_icon);
        textView= (TextView) itemView.findViewById(R.id.item_tv_title);
    }
} - 1
- 2
- 3
- 4
- 5
- 6
- 7
- 8
- 9
- 10
Packaging RecyclerView Universal Adapter
Benefits: 1. Quantity dynamics 2. Type-unlimited Map < Integer, View >
         Function: Encapsulates the redundant code written by Adapter, providing a concise base class
- 1
- 2
- 3
Idea: Instead of writing dead space variables, use Map.
Step: First of all, pay attention to the use of control libraries of comparative fire, see the benefits of learning the underlying source code for your own hands-on experience
(1) encapsulated BaseHolder
//Extracting BaseHolder inherits RecyclerView.ViewHolder
public class BaseHolder extends RecyclerView.ViewHolder {
    //Instead of writing dead control variables, use Map
    private HashMap<Integer, View> mViews = new HashMap<>();
    public BaseHolder(View itemView) {
        super(itemView);
    }
    /**
     *Method of Getting Controls
     */
    public<T> T getView(Integer viewId){
        //Strongly converts to this type based on the type of saved variable
        View view = mViews.get(viewId);
        if(view==null){
           view= itemView.findViewById(viewId);
            //cache
            mViews.put(viewId,view);
        }
        return (T)view;
    }
    /**
     *Pass in the text control id and set the text value, set the text
     */
    public BaseHolder setText(Integer viewId, String value){
        TextView textView = getView(viewId);
        if (textView != null) {
            textView.setText(value);
        }
        return this;
    }
    /**
     * Pass in the picture control ID and resource id, set the picture
     */
    public BaseHolder setImageResource(Integer viewId, Integer resId) {
        ImageView imageView = getView(viewId);
        if (imageView != null) {
            imageView.setImageResource(resId);
        }
        return this;
    }
    //... can also be extended to a variety of controls.
    //Fluent API chain API obj. setXXX (). setyy ()....
}- 1
- 2
- 3
- 4
- 5
- 6
- 7
- 8
- 9
- 10
- 11
- 12
- 13
- 14
- 15
- 16
- 17
- 18
- 19
- 20
- 21
- 22
- 23
- 24
- 25
- 26
- 27
- 28
- 29
- 30
- 31
- 32
- 33
- 34
- 35
- 36
- 37
- 38
- 39
- 40
- 41
- 42
- 43
(2) After the Holder is encapsulated, the BaseAdapter is encapsulated.
When encapsulating, some parameters can be selected by external constructors orsetMethod
    public class BaseAdapter<T> extends RecyclerView.Adapter<BaseHolder> {
        private List<T> mList = new ArrayList<>();
        private int layoutId;
        public BaseAdapter(int layoutId,List<T> list){
            this.layoutId=layoutId;
            this. mList=list;
        }
        //onCreateViewHolder is used to create a cache for rv
        @Override
        public BaseHolder onCreateViewHolder(ViewGroup parent, int viewType) {
           //Parameter 3 Judgment condition true 1. Gas 2. Add to paraent
            // false 1. Encourage (refer to parent width)
            View view =   LayoutInflater.from(parent.getContext()).inflate(layoutId, parent, false);
            BaseHolder holder = new BaseHolder(view);
            return holder;
        }
       //onBindViewHolder sets data for caching controls
        @Override
        public void onBindViewHolder(BaseHolder holder, int position) {
            T item = mList.get(position);
            convert(holder,item);
        }
    protected void convert(BaseHolder holder, T item) {
        //Nothing has been done.
    }
        //Obtain recorded data
        @Override
        public int getItemCount() {
            return mList.size();
        }
}- 1
- 2
- 3
- 4
- 5
- 6
- 7
- 8
- 9
- 10
- 11
- 12
- 13
- 14
- 15
- 16
- 17
- 18
- 19
- 20
- 21
- 22
- 23
- 24
- 25
- 26
- 27
- 28
- 29
- 30
- 31
- 32
(3) After encapsulation, the implementation of inheritance
/**
 *1.extends  Inherit the code of the parent class. You can write a lot less code.
 *2.Because it's all the code that's brought in, not all of it fits the current situation. For code that is not suitable for the current code (method)
 * We have a choice.@Override Overwrite
 */
public class MyHomeAdapter extends BaseAdapter<String> {
    public MyHomeAdapter(List<String> list) {
        super(R.layout.main_recyclerview_item, list);
    }
    @Override
    protected void convert(BaseHolder holder, String item) {
        holder.setText(R.id.item_tv_title,item).setImageResource(R.id.image,R.drawable.ic_default);
    }
}- 1
- 2
- 3
- 4
- 5
- 6
- 7
- 8
- 9
- 10
- 11
- 12
- 13
- 14
After encapsulation, code implementation
public class HomeFragment extends Fragment {
    private List<String> list;
    @Override
    public View onCreateView(LayoutInflater inflater, @Nullable ViewGroup container, @Nullable Bundle savedInstanceState) {
        View view = inflater.inflate(R.layout.fragment_home, container, false);
        //Get the rv control
        RecyclerView rv = (RecyclerView) view.findViewById(R.id.rv); b
        rv.setLayoutManager(new LinearLayoutManager(getContext()));
        initData();
        //Setting up Adapter
        MyHomeAdapter adapter = new MyHomeAdapter(list);
        rv.setAdapter(adapter);
return view;- 1
- 2
- 3
- 4
- 5
- 6
- 7
- 8
- 9
- 10
- 11
- 12
- 13
Case 1
rely on
Layout file activity_recycler_view.xml:
<?xml version="1.0" encoding="utf-8"?>
<RelativeLayout xmlns:android="http://schemas.android.com/apk/res/android"
xmlns:tools="http://schemas.android.com/tools"
android:layout_width="match_parent"
android:layout_height="match_parent" >

<android.support.v7.widget.RecyclerView
    android:id="@+id/id_recyclerview"
    android:divider="#FFB900"
    android:dividerHeight="1dp"
    android:layout_width="match_parent"
    android:layout_height="match_parent"/>

</RelativeLayout>- 1
- 2
- 3
- 4
- 5
- 6
- 7
- 8
- 9
- 10
- 11
- 12
- 13
- 14
Let's take a look at the most changing Adaper:
class HomeAdapter extends RecyclerView.Adapter<HomeAdapter.MyViewHolder>
{
    private List<String> mList;
    private Context mContext;;
    public HomeAdapter(Context mContext,List<String>mList){
        this.mContext=mContext;
        this.mList=mList;
    }

    public void removeData(int position) {
        mList.remove(position);
        notifyItemRemoved(position);
    }
    @Override
    public MyViewHolder onCreateViewHolder(ViewGroup parent, int viewType)
    {
        MyViewHolder holder = new MyViewHolder(LayoutInflater.from(
                mContext).inflate(R.layout.item_recycler, parent,
                false));
        return holder;
    }

    @Override
    public void onBindViewHolder(final MyViewHolder holder, final int position)
    {
        holder.tv.setText(mList.get(position));
    }

    @Override
    public int getItemCount()
    {
        return mList.size();
    }

    class MyViewHolder extends RecyclerView.ViewHolder
    {

        TextView tv;
        public MyViewHolder(View view)
        {
            super(view);
            tv = (TextView) view.findViewById(R.id.tv_item);
        }
    }
}- 1
- 2
- 3
- 4
- 5
- 6
- 7
- 8
- 9
- 10
- 11
- 12
- 13
- 14
- 15
- 16
- 17
- 18
- 19
- 20
- 21
- 22
- 23
- 24
- 25
- 26
- 27
- 28
- 29
- 30
- 31
- 32
- 33
- 34
- 35
- 36
- 37
- 38
- 39
- 40
- 41
- 42
- 43
- 44
- 45
The biggest improvement is to encapsulate and define ViewHolder without customizing it. In addition, Adaper inherits RecyclerView.Adapter, loads entry layout in onCreateViewHolder, and binds views to data in onBindViewHolder.
The layout file item_recycler.xml:
<?xml version="1.0" encoding="utf-8"?>
<FrameLayout xmlns:android="http://schemas.android.com/apk/res/android"
    android:layout_width="match_parent"
    android:background="@android:color/white"
    android:layout_height="wrap_content"
    >

    <TextView
        android:id="@+id/tv_item"
        android:layout_width="match_parent"
        android:layout_height="50dp"
        android:gravity="center"
        android:text="moon" />
</FrameLayout>- 1
- 2
- 3
- 4
- 5
- 6
- 7
- 8
- 9
- 10
- 11
- 12
- 13
- 14
                                            <link rel="stylesheet" href="https://csdnimg.cn/release/phoenix/production/markdown_views-ea0013b516.css">
                                </div>