WebP introduction
WebP It is a picture format launched by Google that provides both lossy and lossless compression methods. Its advantages are reflected in its excellent image compression algorithm, which can bring smaller picture volume and higher image quality. According to official instructions, WebP can reduce the volume by 26% compared with PNG in lossless compression and 25% - 34% compared with JPEG in lossy compression.
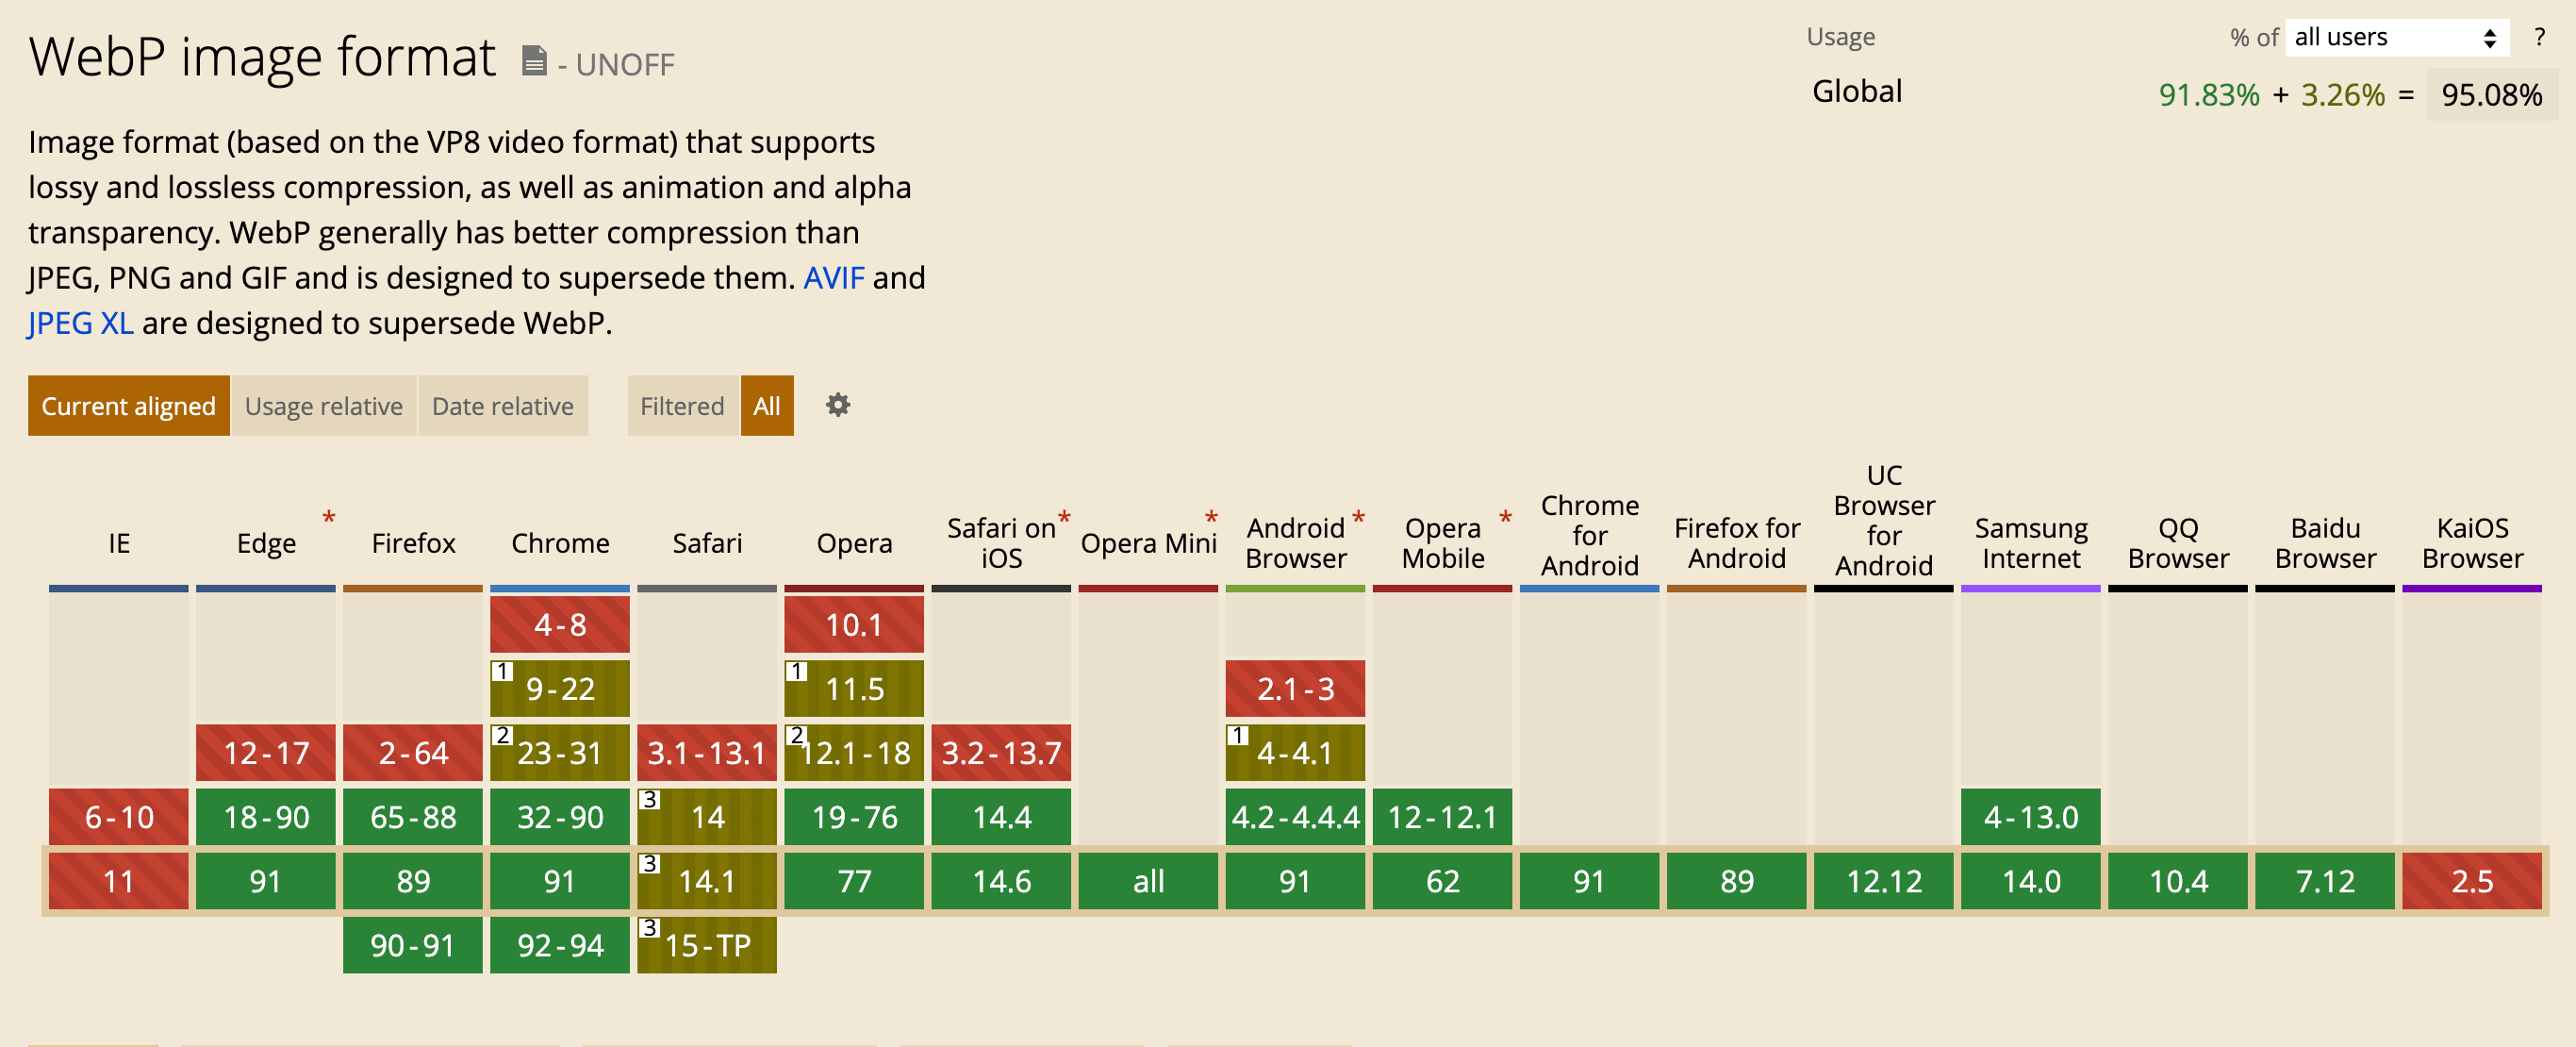
As can be seen from the following figure, compared with the traditional image format, WebP format has browser compatibility problems. This paper realizes the adaptive loading of WebP format by means of engineering.

Traditional practice
In order to use the WebP format in front-end projects and be compatible with browsers that do not support the format, the common practice is to judge the browser support and introduce WebP pictures or pictures in other general formats. There are several processing methods for the three scenes of introducing pictures: HTML, JS and CSS:
HTML
With the help of the characteristics of label adaptive loading, as follows, the WebP format is placed on the label and covered with JPEG, PNG and other general formats.
<picture>

  <source srcSet="https://p3-imagex.byteimg.com/imagex-rc/preview.jpg~tplv-19tz3ytenx-147.webp" type="image/webp" />

  <img decoding="async" loading="lazy" src="https://p3-imagex.byteimg.com/imagex-rc/preview.jpg~tplv-19tz3ytenx-147.jpeg" />

</picture>
JS
Judge whether the browser supports WebP through JS. If yes, introduce pictures in WebP format. If not, introduce general formats such as JPEG and PNG. There are two judgment methods:
- canvas judgment
isSupportWebp = document.createElement("canvas").toDataURL("image/webp").indexOf("data:image/webp") === 0;
- Load WebP image judgment
function isSupportWebp(callback) {

    var img = new Image();

    img.onload = function () {

         var result = (img.width > 0) && (img.height > 0);

         callback(result);

    };

    img.onerror = function () {

        callback(false);

    };

    img.src = 'data:image/webp;base64,UklGRiIAAABXRUJQVlA4IBYAAAAwAQCdASoBAAEADsD+JaQAA3AAAAAA';

}
CSS
First, you need to judge whether the browser supports WebP format. If so, add the class name ID in the HTML root node.
document.documentElement.classList.add('webp')
Then, the priority of the selector is used to achieve the adaptive loading of WebP. The way of introducing pictures into CSS is changed as follows:
.img { background-image: url('https://p3-imagex.byteimg.com/imagex-rc/preview.jpg~tplv-19tz3ytenx-147.jpeg') }

.webp .img { background-image: url('https://p3-imagex.byteimg.com/imagex-rc/preview.jpg~tplv-19tz3ytenx-147.webp') }
Automatic processing
When a large number of local pictures are imported into the project, the manual processing method is cumbersome. In addition to processing separately according to the import method of pictures, all pictures need to be converted to WebP format in advance.
Considering that most front-end projects are built by Webpack, we try to develop a Webpack plug-in to support the conversion of pictures in the project to WebP format and the adaptation of picture format.
conceptual design
First, the pictures in the project need to be converted to WebP format. Considering the time-consuming local conversion, this step is more suitable for the cloud. The service for processing pictures in the cloud is also relatively mature, which is provided by most cloud service manufacturers, and the volume of packaged products can be significantly reduced after the pictures are uploaded.
Upload pictures
The first step is to collect the image files in the project and upload them to the cloud, file-loader The file imported by import/require() can be written to the target folder and parsed into url, so it can be modified on the basis of file loader. The scheme is as follows:
- Obtain the image file matched by the loader, upload the image to the cloud, and generate the image in WebP format in the cloud;
- Replace the original picture file with the URL generated by the picture service;
- If the image upload fails, it will be degraded to the processing flow of file loader and the image will be transferred to the output folder.
Insert tag
In the process of processing, there are many places that depend on the browser's compatibility with webp, so a global tag is required. By injecting judgment code into the tag, if the browser supports webp format, add the "webp" class name identification in the root node to obtain the browser's compatibility with webp format before page rendering.
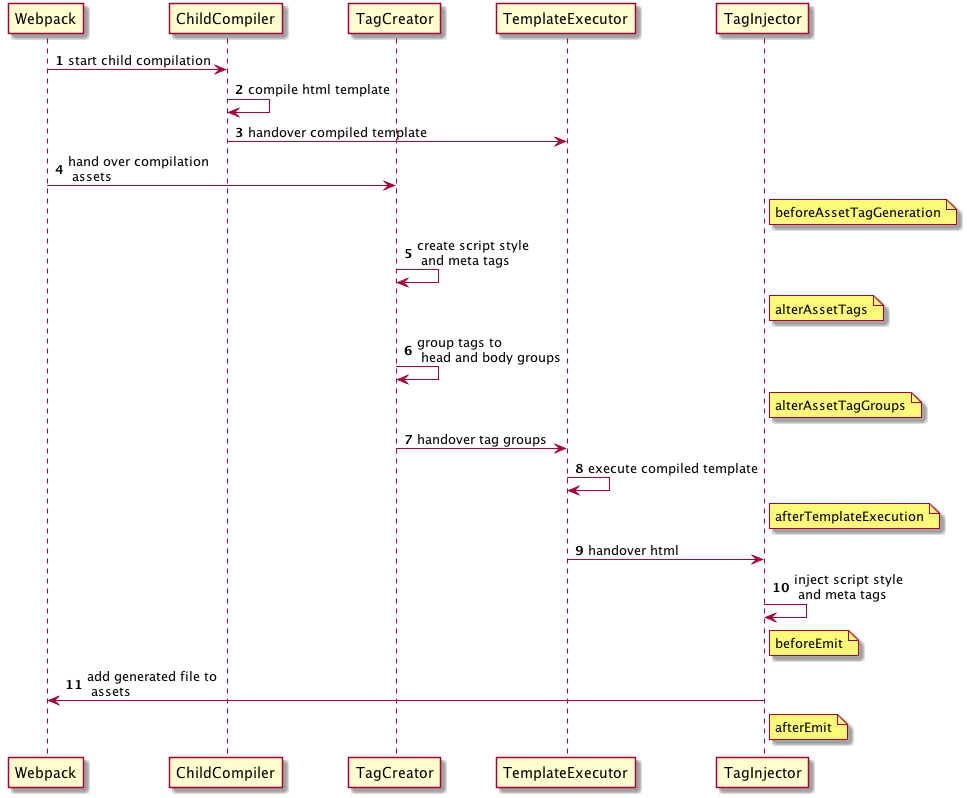
Front end projects usually use html-webpack-plugin , the plug-in can help create HTML files and automatically introduce bundle s generated by Webpack. Multiple hook s are provided in the plug-in, as shown in the following figure. To ensure that the head and body tags have been generated, you can choose to inject relevant judgment code in the alterAssetTagGroup phase.

Replace picture
Next, replace the picture with the corresponding url according to the global identity. According to the location where the picture is introduced, it can be divided into the following two cases:
- Pictures are introduced in JS. Replace the picture module with a JS code, and return the picture url in WebP or general format according to the class name identification;
- Images are introduced in CSS. If JS code is introduced into the CSS module, on the one hand, there will be execution errors, on the other hand, CSS loader will execute this code in the compilation stage, which can not judge WebP compatibility on the browser side. Therefore, the CSS part needs to be handled separately.
Handling CSS
There are two schemes for processing images introduced in CSS:
- Use CSS selector priority. Insert a style with webp class selector behind the class introduced by pictures in CSS. The principle is the same as that of dealing with CSS during manual replacement.
- Generate WebP CSS in full. That is, the pictures introduced in the file are in WebP format. When linking the style file, judge the root node class name identification, and introduce WebP CSS or original CSS.
The disadvantage of the first scheme is that it changes the priority of some styles, which may affect the overall style, so the second scheme is adopted.
Scheme implementation
The scheme of this paper selects the one provided by volcanic engine veImageX picture service To process the picture. veImageX is the overall picture solution provided by the volcano engine, which can convert pictures into WebP, HEIF, AVIF and other formats, and support the complete process from picture upload, storage, processing to distribution.
After the pictures are uploaded to veImageX, you can quickly access various cloud processing capabilities of veImageX, such as cutting, rotation, filter, eraser, content erasure and other AI processing capabilities, and you can easily obtain pictures in different formats by changing the URL suffix. Therefore, the following scheme is implemented based on veImageX deployment.
- Access veImageX picture service , obtain the accessKey, secretKey and service ID. for specific access methods, please refer to the documentation;
- The Webpack plug-in is divided into two parts. Upload and replace images in the loader, generate webp class name tags in the plugin, and process the images introduced in CSS. Get the picture files in the project through Webpack loader, and use the information provided by volcano engine SDK Upload the picture to veImageX and replace the picture module with the URL generated by the service. Change the URL suffix based on veImageX to obtain the characteristics of the corresponding image format, and do different processing according to the location where the image is introduced.
As follows, the pictures introduced in JS are judged according to the browser compatibility, and the pictures introduced in CSS return to the general format.
result = `var ret = '';

if (typeof document === 'object') {

var format = '';

document.documentElement.classList.forEach(item => { if (item.match(/__(\w+)__/)) format = (item.match(/__(\w+)__/))[1]})

if (format) {

  ret = "//${formatDomain}${imagexUri}~${options.template}${urlParams}." + format;

} else {

  ret = "//${formatDomain}${imagexUri}~${options.template}${urlParams}.image";

}

} else {

ret = "//${formatDomain}${imagexUri}~${options.template}${urlParams}.image";

}

${esModule ? 'export default' : 'module.exports ='} ret`;
This part is separately encapsulated into veimagex-webpack-loader , it supports uploading the pictures in the project to veImageX. You can directly use the loader if you do not need the adaptive ability of WebP.
- Insert the code of browser webp compatibility judgment in the alterAssetTagGroup hook of HTML webpack plugin. This part of the code is executed on the browser side. If the browser supports webp, add the "webp" class name ID on the root node, as follows:
compiler.hooks.compilation.tap('ImagexWebpackPlugin', function (compilation) {

    const hooks = self.htmlWebpackPlugin.getHooks(compilation);

    hooks.alterAssetTagGroups.tapAsync(

      'ImagexWebpackPlugin',

      self.checkSupportWebp.bind(self)

    );

  });


ImagexWebpackPlugin.prototype.checkSupportFormat = function (

  htmlPluginData,

  callback

) {

  htmlPluginData.headTags.unshift({

    tagName: 'script',

    closeTag: true,

    attributes: {

      type: 'text/javascript'

    },

    innerHTML: `

      var isSupportFormat = !![].map && document.createElement('canvas').toDataURL('image/${this.options.format}').indexOf('data:image/${this.options.format}') == 0;

      if (isSupportFormat) document.documentElement.classList.add('__${this.options.format}__');

    `

  });

  callback(null, htmlPluginData);

};
- The processing of CSS files is a scheme to generate full amount of WebP CSS, so the imported CSS files need to be processed in alterAssetTagGroup hook, which will be converted to