Front end unit test
background
- For a long time, unit testing is not a skill that front-end engineers must have. In the domestic development environment, it is generally required to be fast, so the code quality of the project is often ignored, which affects the maintainability and scalability of the project. With the increasingly engineering development of the front end, the project is becoming more and more complex, and the code is increasingly pursuing high reusability, which urges us to improve the code quality. It is more and more important to be familiar with unit testing. It is a key to ensure the high-quality operation of our code.
- This paper aims to explore the writing idea of unit test, its impact on the project, and some thoughts on daily development habits. It will involve the jest library, detailed environment preparation, and API usage rules. Please refer to the jest official website, which will not be repeated here.
concept
- Black box test: regardless of the internal implementation mechanism of the program, only see whether the input and output of the outermost layer meet the expectations.
- E2E test: (End To End) that is, end-to-end test, which belongs to black box test. For example, if there is an additive function with input parameters and return values, write multiple test cases to automatically simulate the user's input operation to verify the correctness of this function function. This is called E2E test.
- White box test: test through the source code of the program, rather than simply observing the test using the user interface. In essence, it is tested through code inspection.
- Unit test: write test code for some internal core implementation logic to check and verify the smallest testable unit in the program. It can also be called integration testing, that is, collecting multiple tested units for testing. They are all white box tests.
How to write unit tests
-
The first step is to find the input and output of the test unit
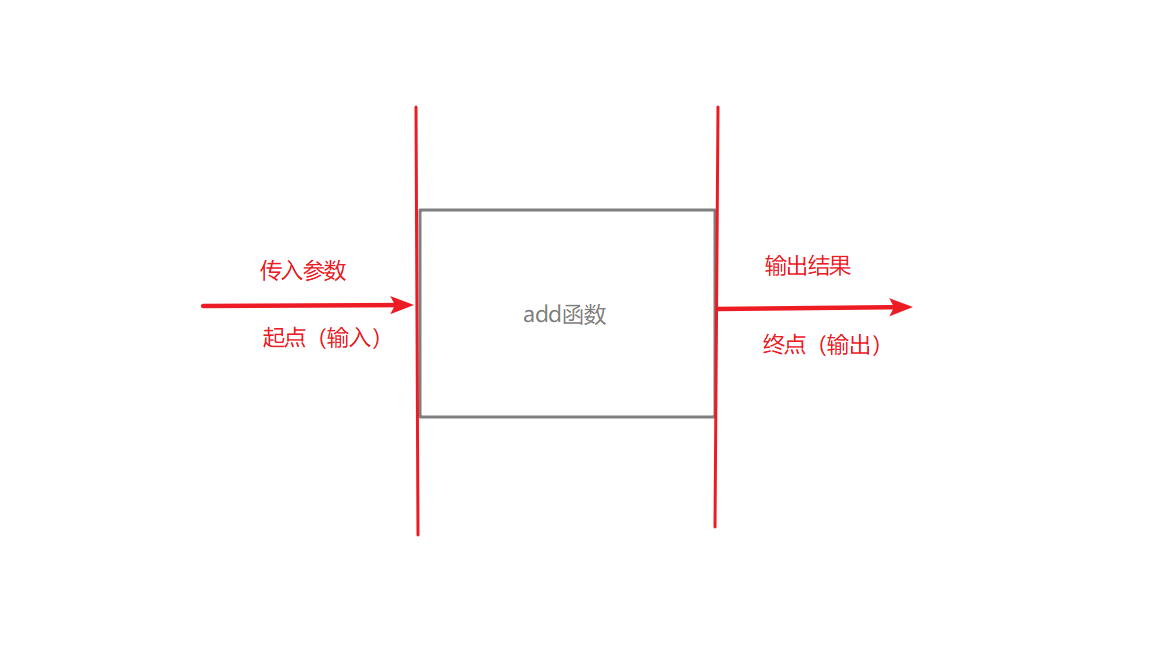
How to do handwritten unit testing? First of all, we should know how to grasp the head and tail of the program unit, that is, the critical point of testing. For example, there is a summation function add, and now you want to write unit tests to it. What are its key nodes?
// add.js // Summation function module.exports = { add(a, b) { return a + b; }, }; When we call the add function, we will first pass in two parameters. After the function is executed, we will get a result. Therefore, we can write test cases with the incoming parameters as the starting point (input) and the output value as the end point (output).
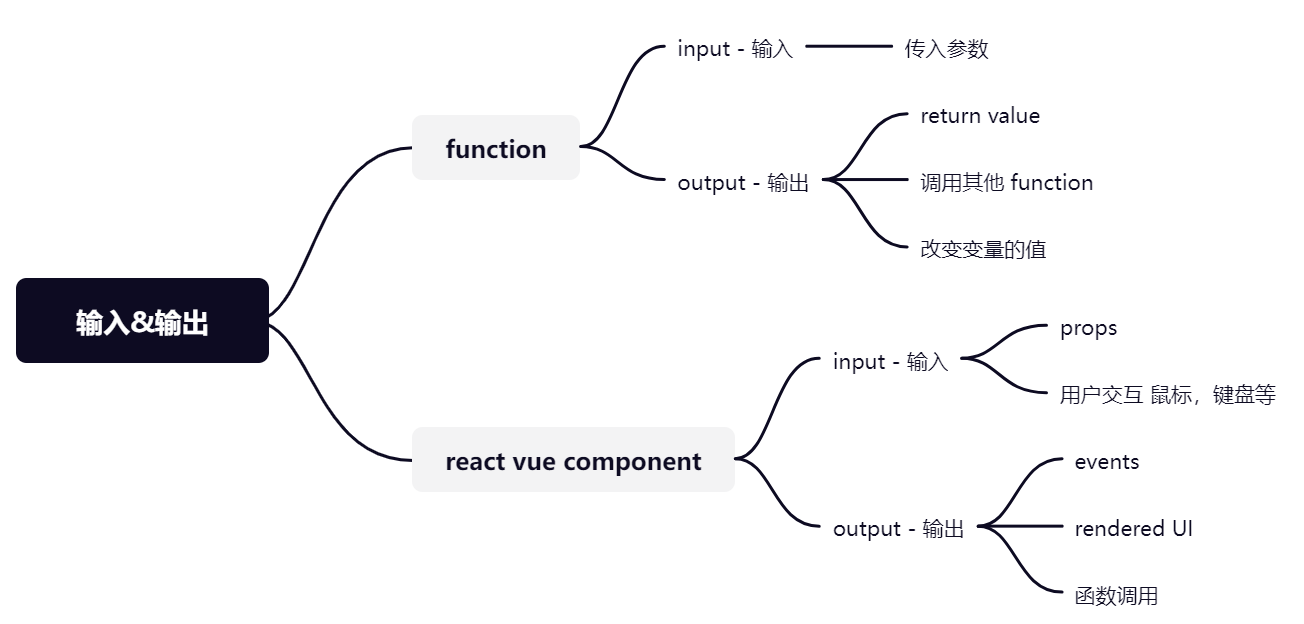
The scenarios in our daily development can be roughly summarized as shown in the figure below:
-
The second step is to test the model, sort out the input and output of the program, and then write the unit test according to the following three steps
- Prepare test data (given).
- Simulate the test action (when).
- Verify the results (then).
Or write a test suite with the function add as an example:
// add.spec.js const { add } = require("./add"); it("test add Summation function", () => { // Given - > prepare test data const a = 1; const b = 1; // When - > simulate test action const result = add(a, b); // Then - > verification results expect(result).toBe(2); }); -
Summary
In fact, the above operations can be imagined as taking the function or component we want to test as a refrigerator. Put a bottle of water in the refrigerator and get a bottle of ice water after a period of time. Then put a bottle of water into the refrigerator as input and take out a bottle of ice water as output. No matter how complex our program is, we can also find the critical point first according to the above. In this way, we will know where to start the test and where to end it, so as to demonstrate the results according to the test steps and simulation procedures.
TDD mode
We have learned how to write unit test cases above. How can we use unit tests to help us produce reasonable results? Like the example of the add function above, we implemented the function first, and then tested the function. If unit testing is only used to produce in this way, it would be too chicken rib. Recall that our current conventional development model is to get the requirements, implement the requirements, and then test whether our program meets the delivery requirements. TDD mode completely subverts this process. It first writes unit test cases to determine what code to write and what functions to realize through unit test cases, that is, Test Driven Development.
-
Core idea
Write test code before developing function code.
-
essence
Our common development mode is to realize the function first and then test. In the implementation process, we may need to consider what the requirements are, how to implement them, how to design the code, better scalability, easier maintenance and so on. Every time we implement a function, we have to consider these problems. Sometimes we feel that we don't know how to write it. TDD mode is to peel off the concerns in the development process and do only one thing at a time:
- demand
- realization
- Design
-
Write test cases in TDD mode to realize the requirement steps
- According to the requirements, assuming that the requirements function has been implemented, write a test that fails to run first. (focus only on requirements)
- Write real function code to make the test code run successfully. (focus only on Implementation)
- Based on the successful running of the test code, reconstruct the function code. (focus on design only)
-
Example - Mars probe
Suppose there is a need:
You are responsible for software development in the Mars exploration team. Now you have to write a control program to control the action of the rover according to the control instructions sent by the earth. The Mars probe will receive the following instructions:
-
Initial position information: the landing point of the Rover (x, y) and the orientation of the Rover (N, S, E, W).
-
Steering command: the rover accepts the left and right commands, turns the front and faces the corresponding direction (N, S, E, W).
-
Movement command: the rover receives movement command, forward or backward.
Due to space, only the functions of initializing information position and left steering command through TDD mode are shown. First, disassemble the requirements:
-
Get the position of the initialization vehicle (coordinate position and direction)
-
Realize the left turn command:
-
input - turnLeft
-
output, pass in a direction and return to the direction after it turns left:
-
North --- West
-
West --- South
-
South --- East
-
East --- North
-
-
-

Mars probe function realization:
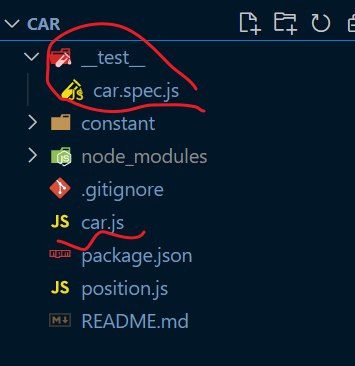
- Installation environment (package.json and file directory):
{
  "name": "car",
  "version": "1.0.0",
  "description": "",
  "main": "car.js",
  "scripts": {
    "test": "jest --watchAll"
  },
  "keywords": [],
  "author": "",
  "license": "ISC",
  "dependencies": {
    "@types/jest": "^27.0.1",
    "jest": "^27.1.0"
  }
}
-
Test whether the environment is set up
Execute npm run test to run the following test code and check whether the console information passes. If it passes, you can start writing test cases.
// car.spec.js test('jest', () => { expect(1).toBe(1) }) -
Write corresponding test cases as required.
// car.spec.js
// Assuming that the function of obtaining the initial landing coordinates and orientation of the rover has been realized, write the test case directly, assuming that the initial coordinates are (0,0) and facing north.
// Position is a class used to set the coordinates of the rover.
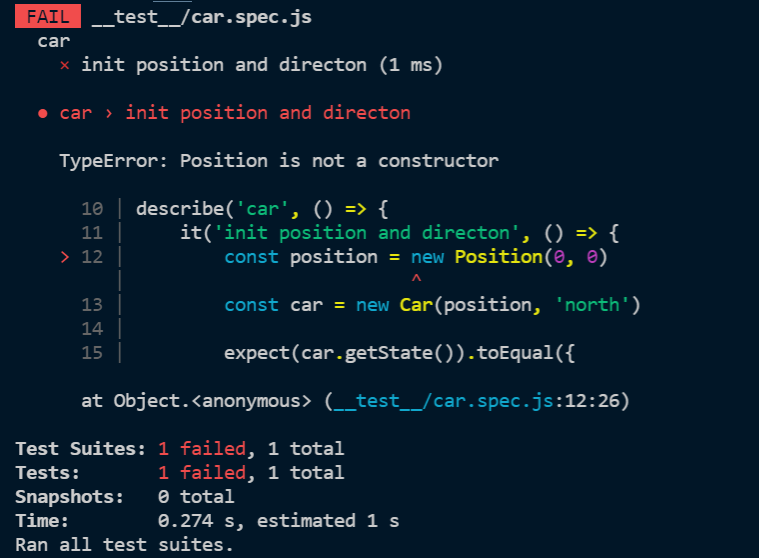
// Car is a class. It contains two command functions required: obtaining the initial position and sending a left turn command to make the rover turn correctly.
// At this time, the car.js and position.js files have not been written, and the actual function has not been realized. At this time, the console displays a red error message, and the test fails.
const Position = require('../position')
const Car = require('../car')
describe('car', () => {
it('init position and directon', () => {
const position = new Position(0, 0)
const car = new Car(position, 'north')
expect(car.getState()).toEqual({
position: {
x: 0,
y: 0
},
direction: 'north'
})
})
})
-
Realize the function according to the test case and turn the red error message into green pass.
// car.js

module.exports = class Car{
    constructor(position, direction) {
        this.position = position
        this.direction = direction
    }
    getState() {
        return {
            position: this.position,
            direction: this.direction
        }
    }
}
// position.js module.exports = class Position{ constructor(x, y) { this.x = x this.y = y } }
-
Even if the initialization information is obtained, follow the same routine to realize the left turn instruction
// car.spec.js

const Position = require('../position')
const Car = require('../car')
describe('car', () => {
    it('init position and directon', () => {
        const position = new Position(0, 0)
        const car = new Car(position, "north")

        expect(car.getState()).toEqual({
            position: {
                x: 0,
                y: 0
            },
            direction: "north"
        })
    })

    describe('turnLeft', () => {
        it('North  --- West', () => {
            const car = new Car(new Position(0, 0), "north")
            car.turnLeft()
            expect(car.getState()).toEqual({
                position: {
                    x: 0,
                    y: 0,
                },
                direction: "west",
            })
        })
        it('West  --- South', () => {
            const car = new Car(new Position(0, 0), "west")
            car.turnLeft()
            expect(car.getState()).toEqual({
                position: {
                    x: 0,
                    y: 0,
                },
                direction: "south",
            })
        })
        it('South --- East', () => {
            const car = new Car(new Position(0, 0), "south")
            car.turnLeft()
            expect(car.getState()).toEqual({
                position: {
                    x: 0,
                    y: 0,
                },
                direction: "east",
            })
        })
        it('East --- North', () => {
            const car = new Car(new Position(0, 0), "east")
            car.turnLeft()
            expect(car.getState()).toEqual({
                position: {
                    x: 0,
                    y: 0,
                },
                direction: "north",
            })
        })
    })

})
// car.js module.exports = class Car{ constructor(position, direction) { this.position = position this.direction = direction } getState() { return { position: this.position, direction: this.direction } } // Turn left turnLeft() { if(this.direction === "north"){ this.direction = "west" return } if(this.direction === "west"){ this.direction = "south" return } if(this.direction === "south"){ this.direction = "east" return } if(this.direction === "east"){ this.direction = "north" return } } } -
The function is implemented, but the code is not elegant. For example, it is dangerous to write these constants like this. If you are not careful, you will report an error. There is also the turnLeft function, in which the process is exactly the same, and the public logic can be extracted. Because we now have unit tests, we can safely and boldly transform the functions. The unit tests will tell us in real time where the program will have problems. We don't need to adjust the code as before, just go to console.log or debug on the page. Now we just need to ensure that the error output from the console is adjusted to the pass state, The modified code is as follows:
// ../constant/direction

// Constant extraction
module.exports={
    N: "north",
    W: "west",
    S: "south",
    E: "east",
}
// ../constant/directionMap const Direction = require('./direction') const map = { [Direction.N]: { left: Direction.W }, [Direction.W]: { left: Direction.S }, [Direction.S]: { left: Direction.E }, [Direction.E]: { left: Direction.N } } // The flow pulls away. When we pass in a direction, we return to the direction after turning left module.exports = { turnLeft: direction => map[direction].left }// car.spec.js const Direction = require('../constant/direction') const Position = require('../position') const Car = require('../car') describe('car', () => { it('init position and directon', () => { const position = new Position(0, 0) const car = new Car(position, Direction.N) expect(car.getState()).toEqual({ position: { x: 0, y: 0 }, direction: Direction.N }) }) describe('turnLeft', () => { it('North --- West', () => { const car = new Car(new Position(0, 0), Direction.N) car.turnLeft() expect(car.getState()).toEqual({ position: { x: 0, y: 0, }, direction: Direction.W, }) }) it('West --- South', () => { const car = new Car(new Position(0, 0), Direction.W) car.turnLeft() expect(car.getState()).toEqual({ position: { x: 0, y: 0, }, direction: Direction.S, }) }) it('South --- East', () => { const car = new Car(new Position(0, 0), Direction.S) car.turnLeft() expect(car.getState()).toEqual({ position: { x: 0, y: 0, }, direction: Direction.E, }) }) it('East --- North', () => { const car = new Car(new Position(0, 0), Direction.E) car.turnLeft() expect(car.getState()).toEqual({ position: { x: 0, y: 0, }, direction: Direction.N, }) }) }) })// car.js const Direction = require('./constant/direction') const { turnLeft } = require('./constant/directionMap') module.exports = class Car{ constructor(position, direction) { this.position = position this.direction = direction } getState() { return { position: this.position, direction: this.direction } } turnLeft() { this.direction = turnLeft(this.direction) } }
Test coverage
-
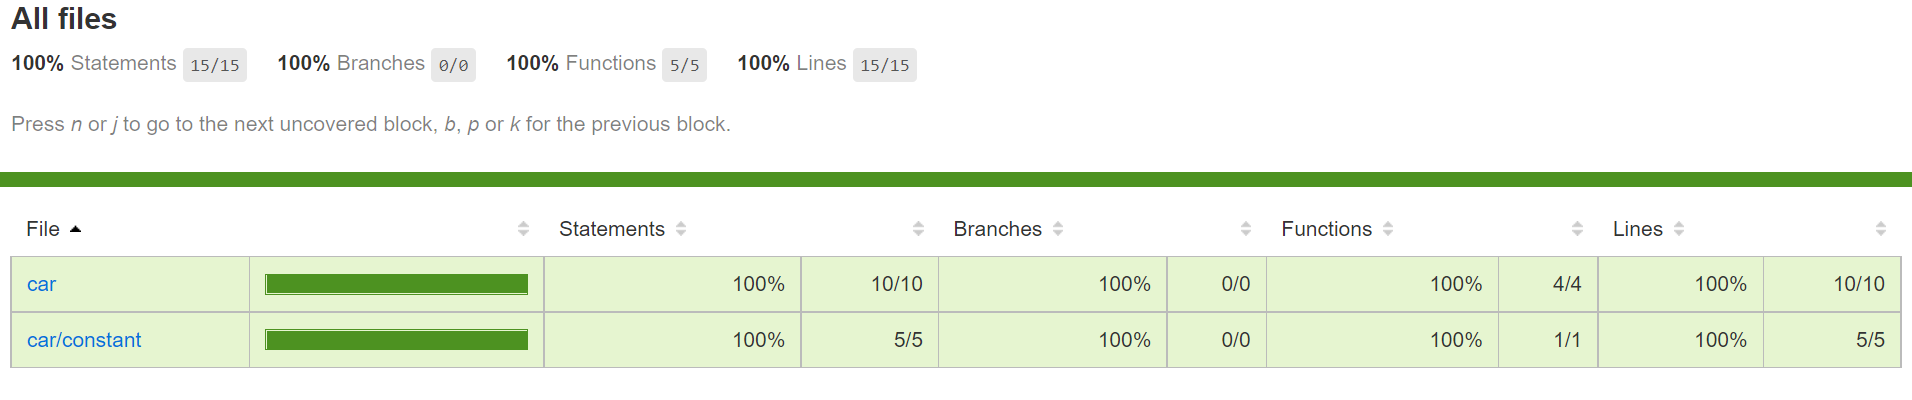
If the project has been written, how to view the project test coverage and adjust the code according to the test coverage? Modify the scripts in the package.json file, execute the script and execute npm run test. A coverage folder will be generated in the root directory. Find the index.html in the lcov report file under this folder and open it in the browser to view the test case coverage of each file.
package.json
"scripts": {
    "test": "jest --coverage"
 }
coverage/lcov-report/index.html
summary
- Benefits of unit testing:
- Fully understand the requirements and disassemble the requirements.
- The code structure design is more concise, easy to debug, and the code is more robust.
- Easy to refactor.
- Debugging is fast.
- Real time documents and key function points have corresponding use cases. You won't see where you are.
- Open source project verification code is required.
- Thoughts on current projects and development habits through unit testing:
- Whether we fully understand the requirements in our daily development.
- Can we design components according to the rules of unit testing to reduce the problems of difficult maintenance and expansion caused by deep nesting.
- For logic separation with high reusability, can unit testing be added appropriately.
- How to refactor code with minimal impact.