Foreword: There is still no foreword... The article is written too fast, the life has too many rules and regulations, the preface does not know what to write...
Related articles:
1,One of the Detailed Explanations of Fragment - Overview
2,Fragment Detailed Explanation II - Basic Usage
3,Fragment Detailed Explanation 3 - Managing Fragment (1)
4,Fragment IV: Managing Fragment (2)
5,Fragment Detailed Explanation V: Parametric Transfer Between Fragments
6. Fragment Detailed Explanation 6: How to Monitor Back Events in Fragment and How to Preserve Fragment Status
In the last article, we briefly talked about what Fragment is used for and the life cycle. In this article, we use examples to see how we use Fragment in our code.
Here we use all of them. Android - The Fragment in support-v4.jar package does not need the system's own Fragment; the two are basically the same, but the relative function in V4 package is more powerful.
I. Static Fragment Addition
Create a new project, harvicBlog2Static, in which add a layout: fragment1.xml:
-
<LinearLayout xmlns:android="http://schemas.android.com/apk/res/android"
-
android:layout_width="match_parent"
-
android:layout_height="match_parent"
-
android:background="#00ff00" >
-
-
<TextView
-
android:layout_width="wrap_content"
-
android:layout_height="wrap_content"
-
android:text="This is fragment 1"
-
android:textColor="#000000"
-
android:textSize="25sp" />
-
-
</LinearLayout>
As you can see, this layout file is very simple, with only one Linear Layout, which has a TextView added. As we did, we created a new fragment 2.xml:
-
<LinearLayout xmlns:android="http://schemas.android.com/apk/res/android"
-
android:layout_width="match_parent"
-
android:layout_height="match_parent"
-
android:background="#ffff00" >
-
-
<TextView
-
android:layout_width="wrap_content"
-
android:layout_height="wrap_content"
-
android:text="This is fragment 2"
-
android:textColor="#000000"
-
android:textSize="25sp" />
-
-
</LinearLayout>
Then create a new class Fragment 1, which inherits from Fragment:
-
import android.os.Bundle;
-
import android.support.v4.app.Fragment;
-
import android.view.LayoutInflater;
-
import android.view.View;
-
import android.view.ViewGroup;
-
-
-
-
-
public class Fragment1 extends Fragment {
-
@Override
-
public View onCreateView(LayoutInflater inflater, ViewGroup container, Bundle savedInstanceState) {
-
return inflater.inflate(R.layout.fragment1, container, false);
-
}
-
}
Note the Fragment in the V4 package used! The main code here is to load and return the fragment1.xml layout file we just wrote. In the same way, let's write Fragment2:
-
import android.os.Bundle;
-
import android.support.v4.app.Fragment;
-
import android.view.LayoutInflater;
-
import android.view.View;
-
import android.view.ViewGroup;
-
-
-
-
-
public class Fragment2 extends Fragment {
-
@Override
-
public View onCreateView(LayoutInflater inflater, ViewGroup container, Bundle savedInstanceState) {
-
return inflater.inflate(R.layout.fragment2, container, false);
-
}
-
}
Then open or create activity_main.xml as the layout file of the main Activity, add two Fragment references to it, and use the android:name prefix to refer to the specific Fragment:
-
<LinearLayout xmlns:android="http://schemas.android.com/apk/res/android"
-
android:layout_width="match_parent"
-
android:layout_height="match_parent"
-
android:baselineAligned="false" >
-
-
<fragment
-
android:id="@+id/fragment1"
-
android:name="com.harvic.com.harvicblog2.Fragment1"
-
android:layout_width="0dip"
-
android:layout_height="match_parent"
-
android:layout_weight="1" />
-
-
<fragment
-
android:id="@+id/fragment2"
-
android:name="com.harvic.com.harvicblog2.Fragment2"
-
android:layout_width="0dip"
-
android:layout_height="match_parent"
-
android:layout_weight="1" />
-
-
</LinearLayout>
As for MainActivity, because of the V4 package we use, we must derive MainActivity from FragmentActivity, otherwise we can't start the program at all! Because the Activity of the system can only be used to hold fragments that come with the system, but not fragments in the V4 package, because the Activity of the system can not recognize fragments in the V4 package, because it is not a piece of code at all! If you don't use V4 packages, you don't have to derive MainActivity from FragmentActivity by using Fragmentation that comes with the system.
-
import android.os.Bundle;
-
import android.support.v4.app.FragmentActivity;
-
-
public class MainActivity extends FragmentActivity {
-
-
@Override
-
protected void onCreate(Bundle savedInstanceState) {
-
super.onCreate(savedInstanceState);
-
setContentView(R.layout.activity_main);
-
}
-
}
The results are as follows:
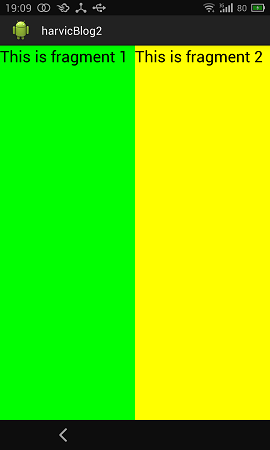
The source code is given at the bottom of the article.
2. Dynamic Fragment Addition
You've learned how to use Fragment in XML, but that's just the simplest function of Fragment. The real power of Fragment is that it can be added to Activity dynamically, so that's what you have to master. When you learn to add Fragments to Activity while the program is running, the interface of the program can be customized more diversified. Now let's take a look at how to add fragments dynamically.
Or to modify it on the basis of the previous section, open activity_main.xml, delete all the code, and change it to the following:
-
<LinearLayout xmlns:android="http://schemas.android.com/apk/res/android"
-
android:layout_width="match_parent"
-
android:layout_height="match_parent"
-
android:orientation="vertical"
-
android:baselineAligned="false" >
-
-
<Button
-
android:id="@+id/btn_show_fragment1"
-
android:layout_width="match_parent"
-
android:layout_height="wrap_content"
-
android:text="display Fragment1"/>
-
-
<Button
-
android:id="@+id/btn_show_fragment2"
-
android:layout_width="match_parent"
-
android:layout_height="wrap_content"
-
android:text="display Fragment2"/>
-
-
<FrameLayout
-
android:id="@+id/fragment_container"
-
android:layout_width="match_parent"
-
android:layout_height="match_parent"/>
-
-
</LinearLayout>
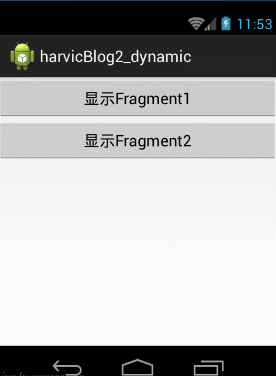
There are two buttons and a FrameLayout layout on the main interface. These two buttons are used to load instances of Fragment1 and Fragment2 in this FrameLayout, respectively. The results are as follows:
(The background of fragment1 was changed to purple because of the problem of green when recording GIF)
The rest of the code did not move, mainly in MainActivity, when clicking the two buttons to do the processing:
-
public class MainActivity extends FragmentActivity {
-
-
@Override
-
protected void onCreate(Bundle savedInstanceState) {
-
super.onCreate(savedInstanceState);
-
setContentView(R.layout.activity_main);
-
-
Button btnLoadFrag1 = (Button)findViewById(R.id.btn_show_fragment1);
-
btnLoadFrag1.setOnClickListener(new View.OnClickListener() {
-
@Override
-
public void onClick(View v) {
-
FragmentManager manager = getSupportFragmentManager();
-
FragmentTransaction transaction = manager.beginTransaction();
-
Fragment1 fragment1 = new Fragment1();
-
transaction.add(R.id.fragment_container, fragment1);
-
transaction.commit();
-
}
-
});
-
-
Button btnLoagFrag2 = (Button)findViewById(R.id.btn_show_fragment2);
-
btnLoagFrag2.setOnClickListener(new View.OnClickListener() {
-
@Override
-
public void onClick(View v) {
-
FragmentManager manager = getSupportFragmentManager();
-
FragmentTransaction transaction = manager.beginTransaction();
-
Fragment2 fragment2 = new Fragment2();
-
transaction.add(R.id.fragment_container, fragment2);
-
transaction.commit();
-
}
-
});
-
}
-
}
Looking at the above code, it's easy to understand that when you click on the button, you do something similar:
-
FragmentManager manager = getSupportFragmentManager();
-
FragmentTransaction transaction = manager.beginTransaction();
-
Fragment1 fragment1 = new Fragment1();
-
transaction.add(R.id.fragment_container, fragment1);
-
transaction.commit();
Dynamic Fragment ation is divided into four steps:
- 1. Get Fragment Manager, in V4 package through getSupportFragment Manager, in the system native Fragment is obtained through getFragment Manager.
- 2. Open a transaction by calling the beginTransaction method.
- 3. Fragment is added to the container, which is usually implemented by the add or replace method. The id and fragment instances of the container need to be passed in.
- 4. Submit the transaction and call the commit method to commit.
It doesn't matter that we don't understand the operation of fragments in this part. In the next section, we will talk about the management of fragments in detail.
If this article helps you, remember to pay more attention to it.
Source address: http://download.csdn.net/detail/harvic880925/8572761
Please respect the copyright of the originator. Please indicate the origin when reproducing: http://blog.csdn.net/harvic880925/article/details/44927363,
Thank you!