Preface
This article mainly introduces the UI Application, UI Windows and the start-up process of the program. Through this article, I believe that you will understand the iOS application start-up process and app application level knowledge better.
UIApplication
Brief introduction
One of the main tasks of UI Application is to process user events. It will set up a queue, put all user events into the queue, and process them one by one. When processing, it will send the current event to a suitable target control to handle the event. In addition, the UI Application instance maintains a window list (UI Window instance) opened in the application so that it can access any UIView object in the application. UIApplication instances are assigned a proxy object, UIApplication Delegate, to handle application life cycle events (such as program startup and shutdown), system events (such as calls, note warnings), and so on.
1.UIApplication object is the symbol of an application, and a UIApplication object represents an application.
2. Each application has its own UI Application object, and it is singular. If you try to create a new UI Application object in the program, you will be prompted for an error.
3. This singleton object can be obtained through UI Application haredApplication.
4. The first object created after an iOS program starts is the UI Application object, and there is only one object (two UI Application objects are obtained by code, and the address is identical by printing address).
5. Some application-level operations can be performed by using UI Application objects.
Application-level operational examples
- Set the Red Alert number in the upper right corner of the application icon (@property (nonatomic) NSInteger application IconBadgeNumber)
- Setting the visibility of the networking indicator (isNetwork Activity Indicator Visible)
- The status bar settings in iOS (the status bar in iOS 9 has expired and is managed by the controller UIViewController)
- Application boundaries jump (openURL)
1. Set the red reminder number in the upper right corner of the application icon (for example, when QQ message is sent, 1, 2, 3 new information will be displayed on the icon).
@property(nonatomic) NSInteger applicationIconBadgeNumber;

UIApplication *app=[UIApplication sharedApplication];
app.applicationIconBadgeNumber=123;
II. Visibility of Setting up Networking Indicators
@property(nonatomic,getter=isNetworkActivityIndicatorVisible) BOOL networkActivityIndicatorVisible;

Code and effect:
UIApplication *app=[UIApplication sharedApplication];
// Networking Animation for Setting Indicators
app.networkActivityIndicatorVisible=YES;
Management Status Bar
Manage through UI Application (which unifies the status bar of an application)

 If you want to use UI Application to manage the status bar, you first need to modify the settings of Info.plist.

 View controller-based status bar appearance : NO
 Status bar is initially hidden  : NO
 Status bar style : Opaque black style
This way, the status bar is white after the Info.plist is set, and the status bar can be modified freely in a single VC through UI Application.
4. Application boundaries jump (openURL)
This method can open other local applications and remote connections.
URL supplement:
URL s: Unified resource locators, used to uniquely represent a resource.
URL format: protocol header: // host address / resource path
 Network resources: http/ ftp, etc. means the address of a picture on Baidu at http://www.baidu.com/images/20140603/abc.png
 Local resources: file:///users/apple/desktop/abc.png (host address omitted)
UIApplication Delegate
When an app is disturbed, some system events are generated, and UI Application notifies its delegate object and lets the delegate agent handle these system events. When the application is started, it will be called (system call automatically).
- Application life cycle events (start, close, go into the background)
- Application Level Jump (Acceptance of openURL)
- Notice of registration, push, etc.
- Memory warning
  # When the application is started, it will be called (system automatic call)
 - (BOOL)application:(UIApplication *)application didFinishLaunchingWithOptions:(NSDictionary *)launchOptions

 # Call when you are about to lose active state (loss of focus, non-interaction)
 - (void)applicationWillResignActive:(UIApplication *)application

 # Re-focus (able to interact with users)
 - (void)applicationDidBecomeActive:(UIApplication *)application

  # Called when the application enters the background
  # Generally, it saves application data and state in this method.
 - (void)applicationDidEnterBackground:(UIApplication *)application

 # Called when the application is about to enter the foreground
 #Generally, in this method, the data and state of the application are restored.
 - (void)applicationWillEnterForeground:(UIApplication *)application

  # This method is called when the application is about to be destroyed
  #Note: This method cannot be invoked if the application is suspended
 - (void)applicationWillTerminate:(UIApplication *)application

  #Application Level Jump (Acceptance of openURL)
  - (BOOL)application:(UIApplication *)application   openURL:(NSURL *)url   sourceApplication:(NSString *)sourceApplication    annotation:(id)annotation
  // NOTE: Use the new API interface after 9.0
  - (BOOL)application:(UIApplication *)app openURL:(NSURL *)url options:(NSDictionary<NSString*, id> *)options

  #Notice of registration, push, etc.
  - (void)application:(UIApplication *)application  didRegisterForRemoteNotificationsWithDeviceToken:(NSData *)deviceToken
  -(void)application:(UIApplication *)application didFailToRegisterForRemoteNotificationsWithError:(NSError *)error

  # When an application receives a memory warning, it calls it
  # In general, unnecessary memory is freed in this method.
  - (void)applicationDidReceiveMemoryWarning:(UIApplication *)application
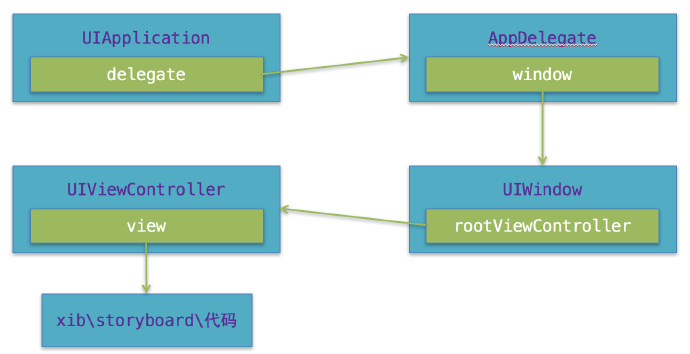
UIWindow
- UIWindow is a special UIView. Usually there is only one UIWindow in a program, but it can create multiple UIWindows manually and add them to the program at the same time.
- After the iOS program is started, the first view control created is UIWindow, and then the View of the controller is created. Finally, the View of the controller is added to the UIWindow, and the View of the controller is displayed on the screen.
- The reason why an iOS program can be displayed on the screen is because it has UIWindows, that is to say, no UI interface can be seen without UIWindows.
- The status bar and keyboard are special UIWindow s.
So how does UIWindow s display View s on the screen?
There are three important objects: UIScreen, UIWindow and UIView.
- UIScreen Object Recognition Physical Screen connects to the device.
- UIWindow objects provide painting support to the screen.
- UIView paints, and when Windows want to display content, UIView draws their content and attaches it to the window.
So the View is displayed in the window.
Loading UIWindow with Code
- (BOOL)application:(UIApplication *)application didFinishLaunchingWithOptions:(NSDictionary *)launchOptions {

  // 1. Create windows
  self.window = [[UIWindow alloc] initWithFrame:[UIScreen mainScreen].bounds];

  *************************** Class files**********************************
  //Create the root controller of the window and assign values
  UIViewController *rootVc = [[UIViewController alloc]init];
    self.window.rootViewController = rootVc;
  ************************  main.storyboard  ****************************
  // 2. Load main.storyboard and create the controller described by main.storyboard
  // UIStoryboard is specifically designed to load stroyboard
  // name:storyboard name does not need suffix
  UIStoryboard *stroyboard = [UIStoryboard storyboardWithName:@"Main" bundle:nil];

  // Loading the controller described by sotryboard
  // Load arrow pointing controller
    UIViewController *vc = [stroyboard instantiateInitialViewController];
  //Load according to the binding identifier
  //UIViewController *vc = [stroyboard instantiateViewControllerWithIdentifier:@"red"];

  // Setting the Root Controller of the Window
  self.window.rootViewController = vc;

  *****************************  xib ****************************
  // Create the root controller of the window
  // Creating Controller through xib
  ViewController *vc = [[ViewController alloc] initWithNibName:@"VC" bundle:nil];
  self.window.rootViewController = vc;

  // 3. Display window
  [self.window makeKeyAndVisible];
  return YES;
}
KeyWindow
What is key window? The key window is the one that is designated to receive keyboard and other non-touch related events. Only one window at a time may be the key window. In other words, keywindow is designated to receive keyboard and non-touch messages, and there can only be one windo at any time in the program. W is keyWindow.
Four Notices on Windows Change:
   UIWindowDidBecomeVisibleNotification
   UIWindowDidBecomeHiddenNotification
   UIWindowDidBecomeKeyNotification
   UIWindowDidResignKeyNotification
The objects in these four notification objects represent the currently displayed (hidden) window objects that have become keyWindow (non-keyWindow), where userInfo is empty. So we can register these four messages, print information to observe the changes of keyWindow and the display and hidden changes of windows.
Hierarchy of UIWindow s
UIWindow s is hierarchical. The higher the hierarchy, the outermost. When the hierarchy is the same, the more backward the call is, the outermost.
UIKIT_EXTERN const UIWindowLevel UIWindowLevelNormal; //By default, the value is 0
UIKIT_EXTERN const UIWindowLevel UIWindowLevelAlert; //The value is 2000.
UIKIT_EXTERN const UIWindowLevel UIWindowLevelStatusBar ; // The value is 1000.
So UIWindows Level Normal < UIWindows Level StatusBar < UIWindows Level Alert
And the level is self. window. windowLevel = UIWindows Level Alert + 1, which can be added or subtracted.
- (BOOL)application:(UIApplication *)application didFinishLaunchingWithOptions:(NSDictionary *)launchOptions
{
    self.window = [[[UIWindow alloc] initWithFrame:[[UIScreen mainScreen] bounds]] autorelease];
    self.window.backgroundColor = [UIColor yellowColor];
    [self.window makeKeyAndVisible];

    UIWindow *normalWindow = [[UIWindow alloc] initWithFrame:[[UIScreen mainScreen] bounds]];
   normalWindow.backgroundColor = [UIColor blueColor];
    normalWindow.windowLevel = UIWindowLevelNormal;
    [normalWindow makeKeyAndVisible];

    CGRect windowRect = CGRectMake(50, 50,  [[UIScreen mainScreen] bounds].size.width- 100,   [[UIScreen mainScreen] bounds].size.height - 100);
    UIWindow *alertLevelWindow = [[UIWindow alloc] initWithFrame:windowRect];
    alertLevelWindow.windowLevel = UIWindowLevelAlert;
    alertLevelWindow.backgroundColor = [UIColor redColor];
      [alertLevelWindow makeKeyAndVisible];

   UIWindow *statusLevelWindow = [[UIWindow alloc] initWithFrame:CGRectMake(0, 50, 320, 20)];
    statusLevelWindow.windowLevel = UIWindowLevelStatusBar;
    statusLevelWindow.backgroundColor = [UIColor blackColor];
    [statusLevelWindow makeKeyAndVisible];

    NSLog(@"Normal window level: %f", UIWindowLevelNormal);
    NSLog(@"Normal window level: %f", UIWindowLevelAlert);
    NSLog(@"Normal window level: %f", UIWindowLevelStatusBar);

    return  YES;
}
Two points can be noted from the results of the operation:
1) Although the normal Windows we generated called makeKey AndVisible after the first default window, it still did not show up. This means that when the Level level is the same, only the first KeyWindow display will be displayed, and the second KeyWindows display will not be displayed at the same level.
2) statusLevel Windows calls makeKey AndVisible after alert Level Windows, and the light is still just displayed below alert Level Windows. This shows that the UI Windows display is Level priority regardless of who KeyWindow s is, that is, the highest level always appears in the front.
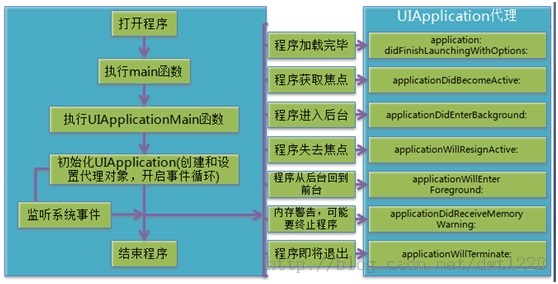
Starting process of program
Let's find the entry main function of the program and see how the program starts.
int main(int argc, char * argv[]) {
    @autoreleasepool {
      return UIApplicationMain(argc, argv, nil, NSStringFromClass([AppDelegate class]));
    }
}
This default iOS program is executed from the main function, but in the main function we can only see a method, which is a message loop (equivalent to a dead loop), so the program will not automatically exit after running the UI Application Main method, but only when the user manually closes the loop. At this point, we can understand the process of program startup according to the UI Application Main function.
- The first parameter and the second parameter are actually the parameters of main function, which represent the number of parameters and the content of parameters respectively.
- The third parameter represents the UI Application class (or subclass) string, which defaults to nil and to UI Application class by default. Users can customize a class to inherit from this class; if nil, it is equivalent to NSStringFromClass([UIApplication class]).
- The fourth parameter is the proxy class string of UI Application, which is generated by default by AppDelegate class. This class is mainly used to monitor the events of the whole application life cycle. When an event is triggered during the operation of UI Application, the corresponding method in the proxy is invoked.
Complete process of program startup
1. main function
2.UIApplicationMain
Create the corresponding UIApplication object based on the third parameter
Create and specify this object as a proxy for UI Application based on the fourth parameter AppDelegate.
Open the main event loop of the main run cycle to process events. UI Application will open a message loop to continuously monitor the activities of the application. When the application life cycle changes, UI Application will call the corresponding method of the agent.-
3. When the program starts, create window and load info.plist.
(Suppose you have storyboard) According to the Main storyboard file base name field in Info.plist, get the file name of the most important storyboard and load the corresponding storyboard.
The system does three things when loading storyboard
1. Create window UIWindow.
2. Load mian.storyboard and instantiate view controller
3. Allocate the new view controller to the window root view controller, and then make the window appear on the display screen.(Without storyboard) Storyboard would not be loaded and UIWindow s would not be created for us, so we would need to create it ourselves in the didFinish Launching WithOptions method when the program is started.
1. Create window UIWindow.
2. Create and instantiate view controller
3. Allocate the new view controller to the window root view controller, and then make the window appear on the display screen.
Four Object Diagrams and Program Start Flow Charts