preface
opencv version 4.1.2.30 (4. X > = version) and my version 4.5.3 are required
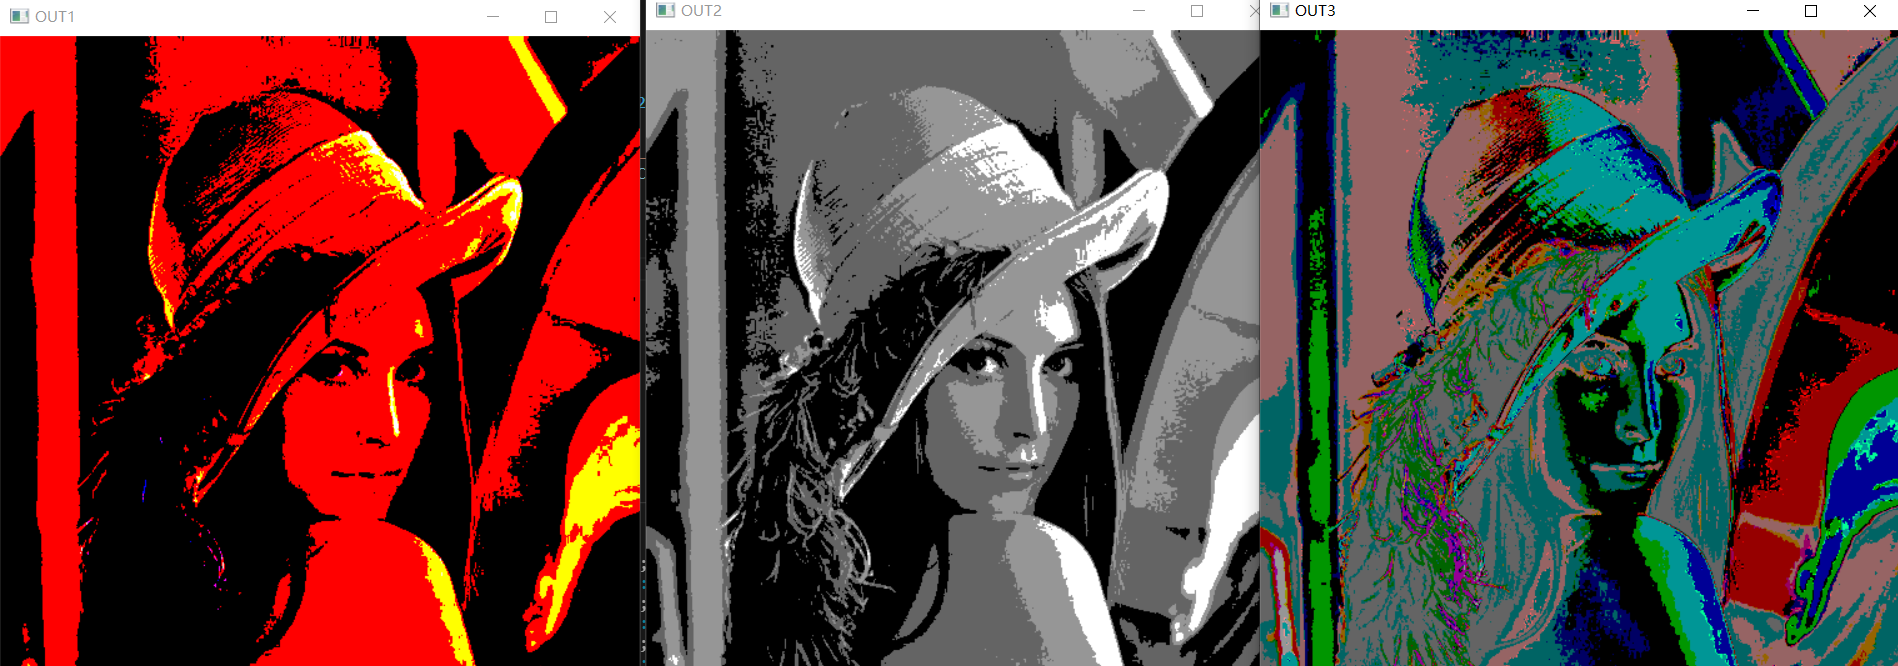
1, LUT
There is only one threshold in the threshold comparison method described above. If you need to compare with multiple thresholds, you need to use a look-up table (LUT). LUT is a gray value mapping table, which takes the gray image value as the index and the value after gray value mapping as the content of the table.
dst = cv.LUT(src,lut)
src: input image
LUT: lookup table of 256 gray values
The second parameter is a 1x256 matrix, which stores the mapped value of each gray value
LUT.py code example
import cv2 as cv
import numpy as np
import sys

from numpy.core.numeric import zeros_like

if __name__=='__main__':
    #LUT 1st floor
    LUT_1 = np.zeros(256,dtype='uint8')
    LUT_1[1101:201]=100
    LUT_1[201:]=255
    #LUT layer 2
    LUT_2 = np.zeros(256,dtype='uint8')
    LUT_2[101:151]=100
    LUT_2[151:201]=150
    LUT_2[201:]=255
    #LUT layer 3
    LUT_3=np.zeros(256,dtype='uint8')
    LUT_3[0:101]=100
    LUT_3[151:201]=150
    LUT_3[201]=255
    #merge
    LUT = cv.merge((LUT_1,LUT_2,LUT_3))
    #Read picture
    img = cv.imread('./chapter_3/lena.jpg')
    gray = cv.cvtColor(img,cv.COLOR_BGR2GRAY)
    out1= cv.LUT(img,LUT_1)
    out2 = cv.LUT(gray,LUT_2)
    out3 = cv.LUT(img,LUT_3)

    cv.imshow('OUT1',out1)
    cv.imshow('OUT2',out2)
    cv.imshow('OUT3',out3)

    cv.waitKey(0)
    cv.destroyAllWindows()
Display of operation results
2, Image connection and image change
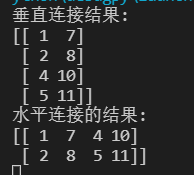
2.1 cv.vconcat() cv.hconcat() function:
dst=cv.vconcat(src) vertical connection of images
dst=cv.hconcat(src) horizontal connection of images
Two images with the same height or width are required to be connected
2.1.1 Concat.py code example
import cv2 as cv
import numpy as np
import sys
if __name__=='__main__':
A = np.array([[1,7],[2,8]])
B = np.array([[4,10],[5,11]])
#Vertical connection
V_C = cv.vconcat((A,B))
#Horizontal connection
H_C=cv.hconcat((A,B))
print('Vertical connection results:\n{}'.format(V_C))
print('Results of horizontal connection:\n{}'.format(H_C))
#Read 2 pictures
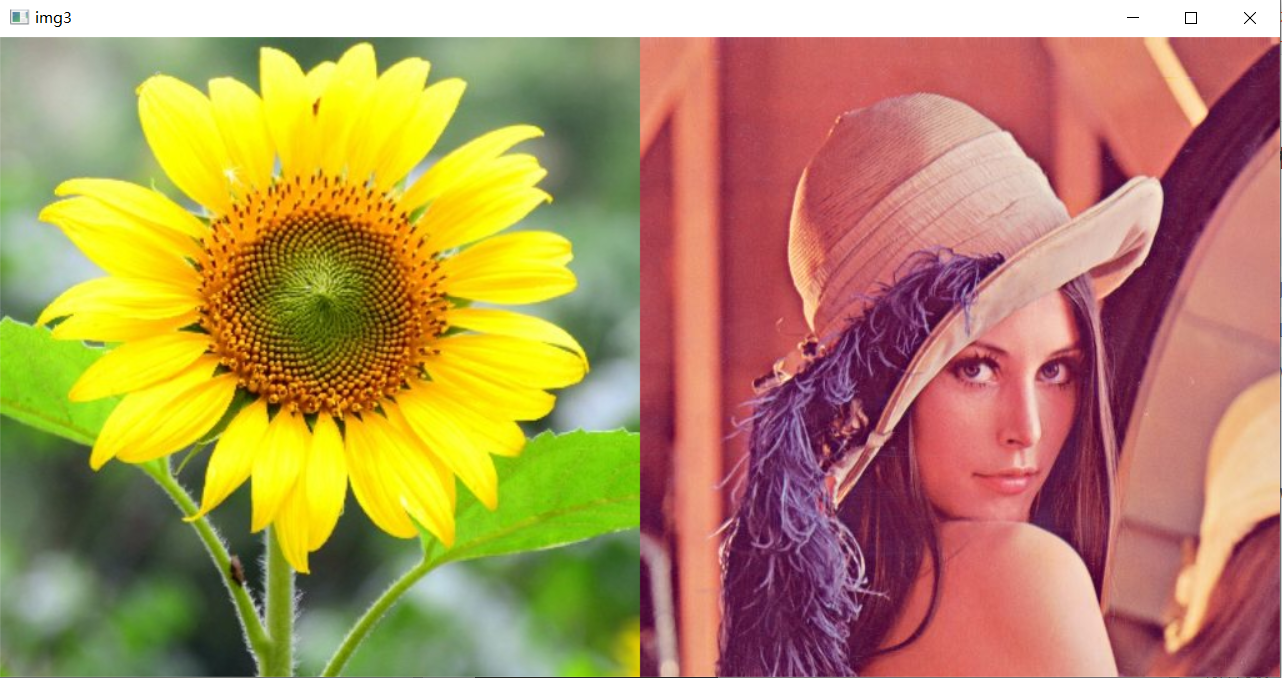
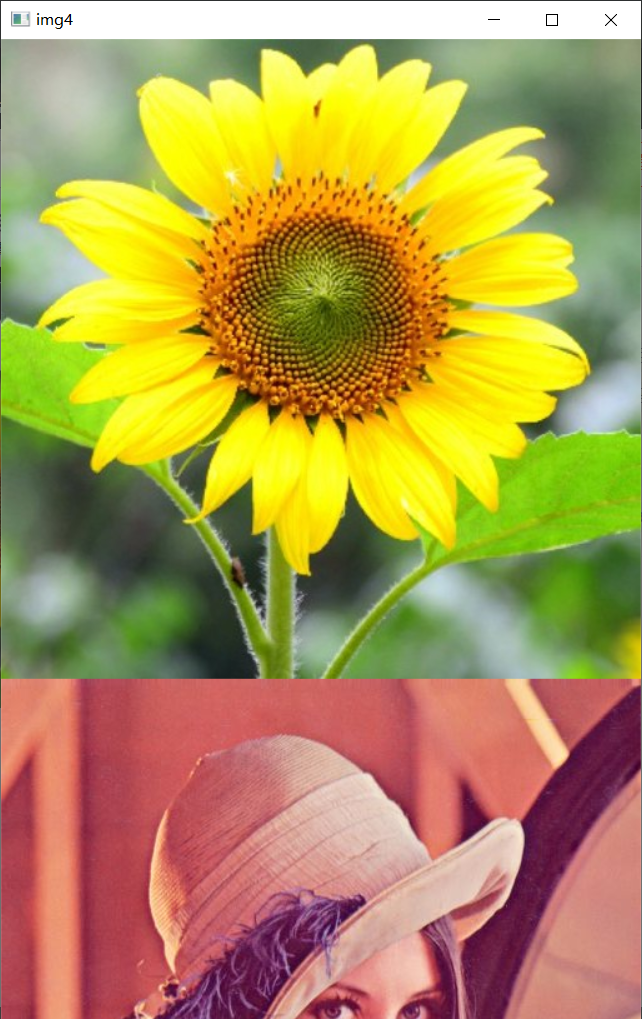
img1=cv.imread('./chapter_3/flower.jpg')
img2=cv.imread('./chapter_3/lena.jpg')
img3=cv.hconcat((img1,img2))
img4=cv.vconcat((img1,img2))
cv.imshow('img3',img3)
cv.imshow('img4',img4)
cv.waitKey(0)
cv.destroyAllWindows()
2.1.2 result display:
2.2 image size change
cv.resize() to zoom the picture
dst = cv.resize(src,dsize,fx,fy,interpolation)
src: input image
dsize: the size of the output image
dst: output image
fx: the scale factor of the horizontal axis. If the image is magnified to 2 times the original along the horizontal axis, it is specified as 2
fy: scale factor of vertical axis
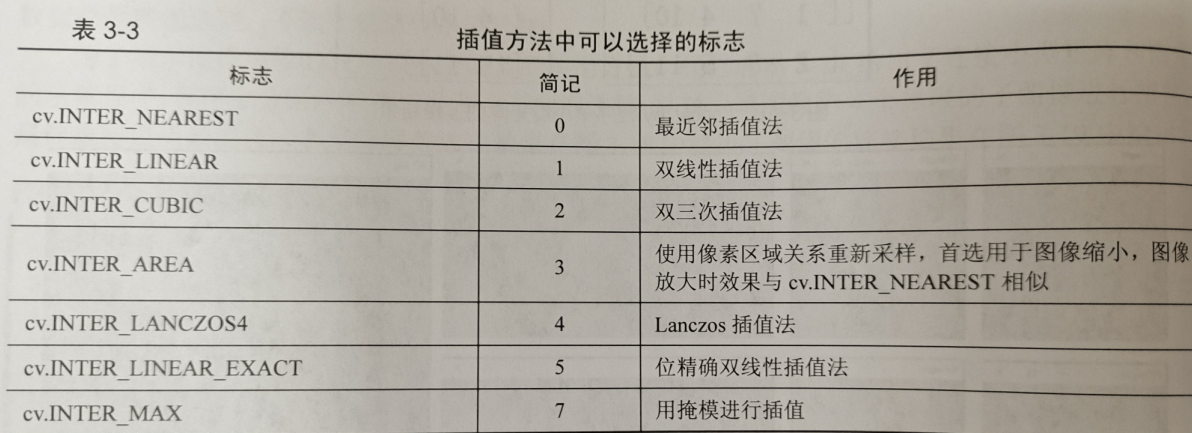
Interpolation: Flag of interpolation
dsize and fx,fy only need to use one class in practice
The relationship between dsize and fx,fy is as follows:
dsize=Size(round(fxsrc.cols),round(fysrc.row))
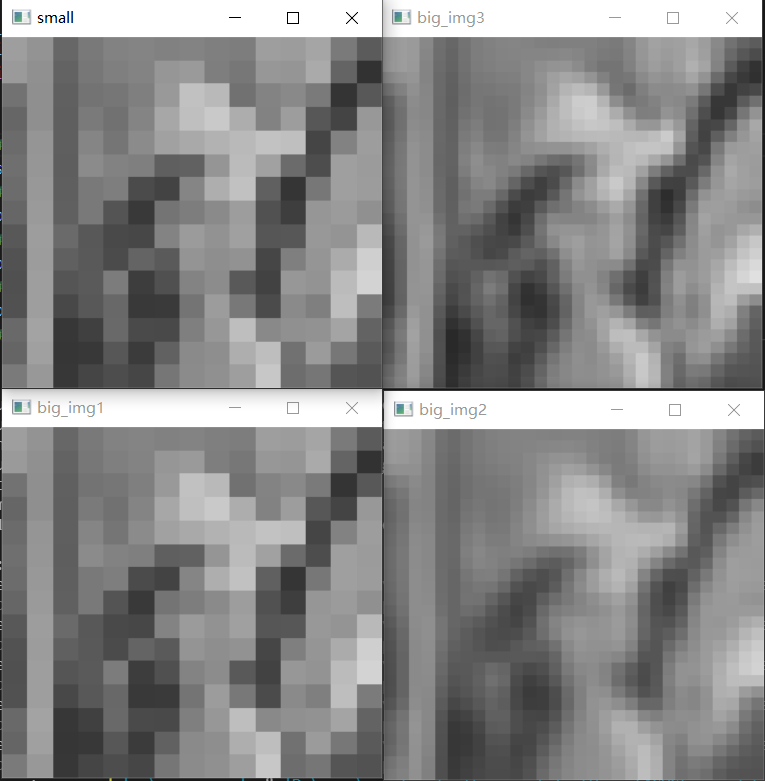
Zooming out is usually done with cv.INTER_AREA
Zooming in is usually done with cv.inter_ Cubic (good but slow) and cv.inter_ Linear (faster than the former)
2.2.1 code example of resize.py:
import cv2 as cv
import sys

if __name__ =='__main__':
    img = cv.imread('./chapter_3/lena.jpg',cv.IMREAD_GRAYSCALE)
    if img is None:
        print("Failed to read img")
        sys.exit()
    #Zoom out the image
    small_img = cv.resize(img,(15,15),fx=0,fy=0,interpolation=cv.INTER_AREA)
    #Nearest neighbor interpolation
    big_img1=cv.resize(small_img,(30,30),fx=0,fy=0,interpolation=cv.INTER_NEAREST)
    #bilinear interpolation
    big_img2=cv.resize(small_img,(30,30),fx=0,fy=0,interpolation=cv.INTER_LINEAR)
    #Bicubic interpolation
    big_img3=cv.resize(small_img,(30,30),fx=0,fy=0,interpolation=cv.INTER_CUBIC)
    #Show results
    cv.namedWindow('small',cv.WINDOW_NORMAL)
    cv.imshow('small',small_img)
    cv.namedWindow('big_img1',cv.WINDOW_NORMAL)
    cv.imshow('big_img1',big_img1)
    cv.namedWindow('big_img2',cv.WINDOW_NORMAL)
    cv.imshow('big_img2',big_img2)
    cv.namedWindow('big_img3',cv.WINDOW_NORMAL)
    cv.imshow('big_img3',big_img3)

    cv.waitKey(0)
    cv.destroyAllWindows()
2.2.2 operation results
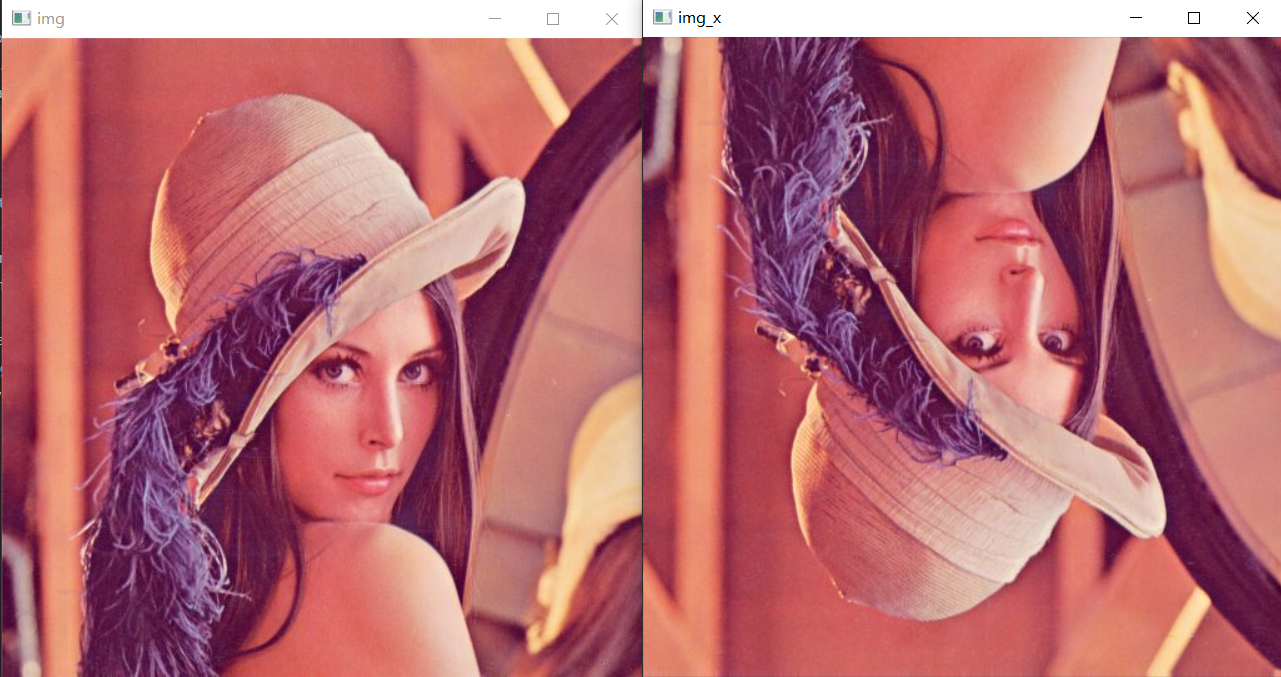
2.3 image flip change
Function: dst = cv.flip(src,flipCode)
src: input image
flipCode: Flag of flip mode. If the value is greater than 0, it means turning around the y-axis; If the value is equal to 0, it means turning around the x-axis; If the value is less than 0, it indicates rotation around two axes.
2.3.1 Flip.py code example
import cv2 as cv
import sys

if __name__ =='__main__':
    img=cv.imread('./chapter_3/lena.jpg')
    if img is None:
        print('Failed to read img')
        sys.exit()
    #Flip along x axis
    img_x=cv.flip(img,0)
    #Flip along y axis
    img_y=cv.flip(img,1)
    #First flip along the x axis and then flip along the y axis
    img_xy=cv.flip(img,-1)
    #Show results
    cv.imshow('img',img)
    cv.imshow('img_x',img_x)
    cv.imshow('img_y',img_y)
    cv.imshow('img_xy',img_xy)

    cv.waitKey(0)
    cv.destroyAllWindows()
Result display
2.4 image affine change
Affine change is the general term of image rotation, translation and scaling operations, which can be expressed as the superposition of linear transformation and translation change. The mathematical expression of affine change is to multiply a linear change matrix A and then add a translation vector, in which the linear change matrix is a 2x2 matrix and the translation vector B is a 2x1 vector. So you need to enter a 2x3 matrix M = [a, b]
Opencv4 has no special function for image rotation, but realizes image rotation through affine change of image. Firstly, the rotation matrix is determined, and the image rotation is realized by affine change.
Two functions are used to solve the rotation matrix:
retval=cv.getRotationMatrix2D(center,angle,scale)
Center: rotation center of the image
Angle: the rotation angle of the image, in degrees. A positive value represents counterclockwise rotation
Scale: the scale along the two axes. If not, set 1
retval=cv.getAffineTransform(src,dst)
src: coordinates of three pixels in the original image
dst: coordinates of 3 pixels in the target image
The return value of both functions is a change matrix of 2x3
Get the target image through cv.warpAffine()
dst = cv.warpAffine(sec,M,dsize,flags,borderMode,borderValue)
src: input image
M:2x3 change matrix
dsize: the size of the output image
flags: Flag of interpolation method
borderMode: Flag of pixel boundary extrapolation
borderValue: the value of the filling boundary. The default value is 0
2.4.1 code example of warpaffine.py:
import cv2 as cv
import numpy as np
import sys

if __name__=='__main__':
    img = cv.imread('./chapter_3/lena.jpg')
    #Set image rotation angle, size, rotation center and other parameters
    angle =30
    h,w=img.shape[:-1]
    size = (w,h)
    center = (w/2,h/2)
    #Computing affine transformation matrix
    rotation0=cv.getRotationMatrix2D(center,angle,1)
    #Affine transformation
    img_warp0 =cv.warpAffine(img,rotation0,size)
    #Affine changes are made according to the three defined points
    src_points=np.array([[0,0],[0,h-1],[w-1,h-1]],dtype='float32')
    dst_points=np.array([[w*0.11,h*0.2],[w*0.15,h*0.7],[w*0.81,h*0.85]],dtype='float32')
    rotation1=cv.getAffineTransform(src_points,dst_points)
    img_warp1=cv.warpAffine(img,rotation1,size)

    cv.imshow('img_warp0',img_warp0)
    cv.imshow('img_warp1',img_warp1)

    cv.waitKey(0)
    cv.destroyAllWindows()
2.4.2 result display:
2.5 perspective change of image
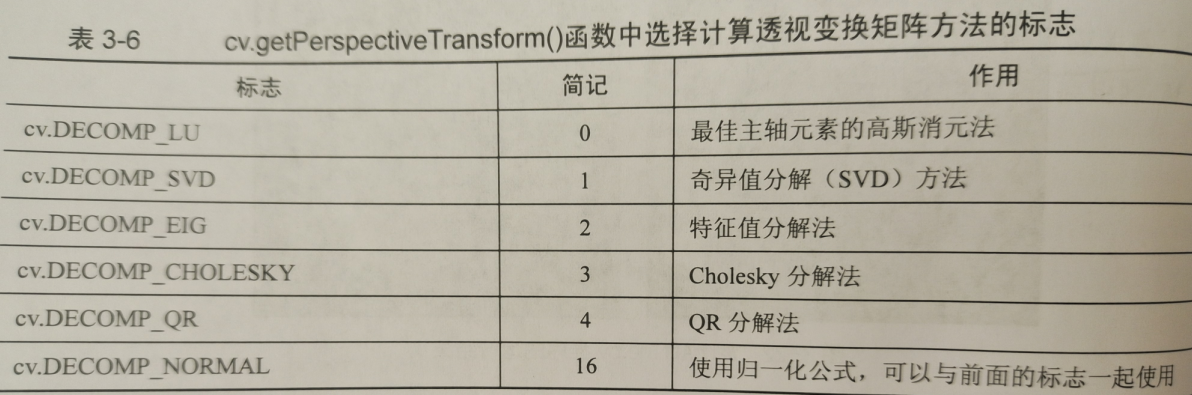
Perspective change refers to the transformation according to the law of object imaging projection, that is, the object is re projected onto a new imaging plane. The correction of object image can be realized through perspective change. The change relationship before and after perspective requires a 3x3 change matrix, which can be obtained through four corresponding points in the two images, which can be obtained through the function cv.getPerspectiveTransform(), and then the target image can be obtained through cv. Warpsperspetive()
retal = cv.getPerspectiveTransform(src,dst,solveMethod)
src: coordinates of 4 pixels in the original image
dst: coordinates of 4 pixels in the target image
solveMethod: select the flag of the method for calculating the perspective change matrix (the default is cv.DECOMP_LU Gauss elimination method)
dst = cv.warpPerspective(src,M,dsize,flags,borderMode,borderValue)
src: input image
M:2x3 change matrix
dsize: the size of the output image
flags: Flag of interpolation method
borderMode: Flag of pixel boundary extrapolation
borderValue: the value of the filling boundary. The default value is 0
(the same meaning as the above cv.warpAffine() parameter)
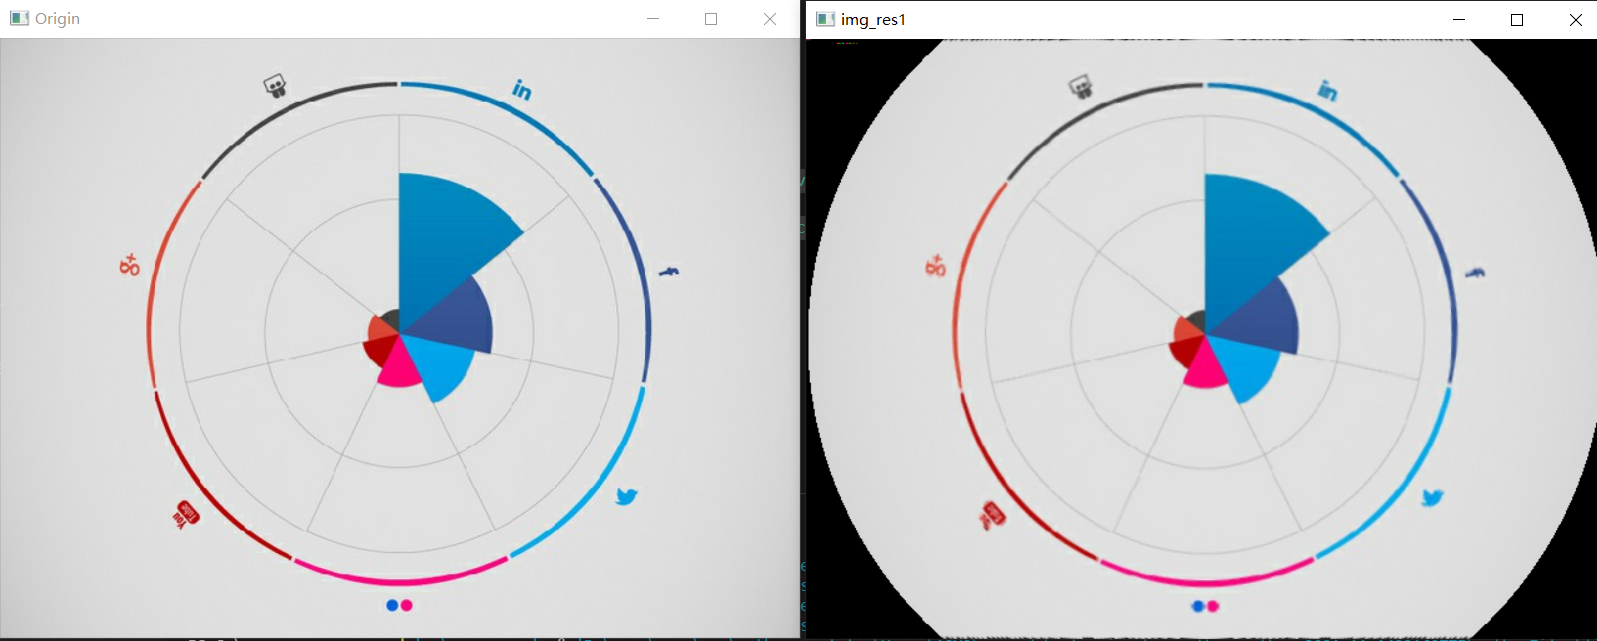
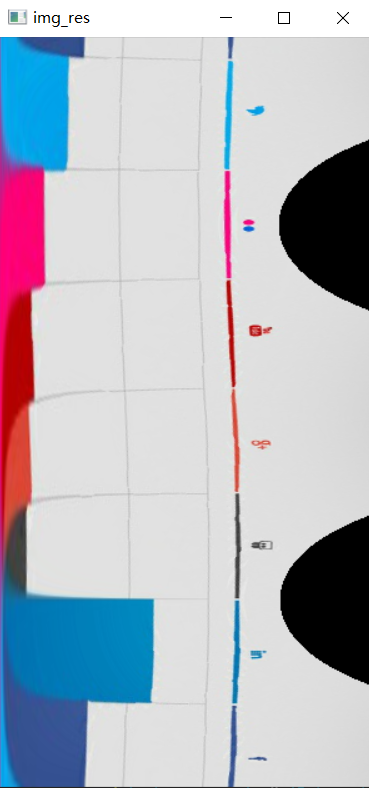
2.6 polar coordinate change
Polar coordinate change is to change the image from rectangular coordinate system to polar coordinate system. (easy for character recognition and detection)
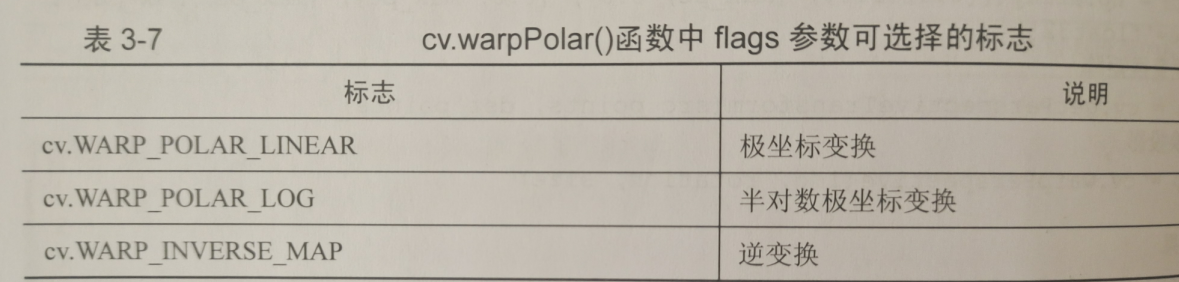
Change via cv.warpPolar()
dst=warpPolar(src,dsize,center,maxRadius,flags)
src: original image
dsize: the size of the target image
center: the origin of the polar coordinate in the image when the polar coordinate changes.
maxRadius: the radius of the boundary circle when it changes
flags: marks of interpolation method and polar mapping method
2.6.1 code example of warppolar.py:
import cv2 as cv
import numpy as np
import sys

if __name__=='__main__':
    img = cv.imread('./chapter_3/dial.jpg')
    if img is None:
        print('failed to read img')
        sys.exit()
    h,w=img.shape[:-1]
    center=(w/2,h/2)
    #Polar coordinate positive change
    img_res=cv.warpPolar(img,(300,600),center,center[0],cv.INTER_LINEAR+cv.WARP_POLAR_LINEAR)
    #Polar coordinate inverse change
    img_res1=cv.warpPolar(img_res,(w,h),center,center[0],cv.INTER_LINEAR+cv.WARP_POLAR_LINEAR+cv.WARP_INVERSE_MAP)

    cv.imshow('Origin',img)
    cv.imshow('img_res',img_res)
    cv.imshow('img_res1',img_res1)

    cv.waitKey(0)
    cv.destroyAllWindows()
2.6.2 result display: