This article is the end of the trilogy of Flink's DataSource. The previous studies are all about Flink's existing data source functions. However, if these cannot meet the needs, you need to customize the data source (such as obtaining data from the database), which is the content of today's actual combat, as shown in the red box below: ###Flink's DataSource trilogy article link
- One of Flink's DataSource Trilogy: direct API
- Flink's DataSource trilogy II: built in connector
- Flink's DataSource Trilogy 3: customization
Environment and version
The actual combat environment and version are as follows:
- JDK: 1.8.0_211
- Flink: 1.9.2
- Maven: 3.6.0
- Operating system: macOS Catalina 10.15.3 (MacBook Pro 13 inch, 2018)
- IDEA: 2018.3.5 (Ultimate Edition)
Set up Flink service on the server
- The programs in the previous two chapters are run on IDEA. In this chapter, you need to observe the results of the operation through Flink's web ui. Therefore, to deploy Flink service separately, I deployed it in CentOS environment through docker compose. The following is the content of docker compose.yml for reference:
version: "2.1"
services:
  jobmanager:
    image: flink:1.9.2-scala_2.12
    expose:
      - "6123"
    ports:
      - "8081:8081"
    command: jobmanager
    environment:
      - JOB_MANAGER_RPC_ADDRESS=jobmanager
  taskmanager1:
    image: flink:1.9.2-scala_2.12
    expose:
      - "6121"
      - "6122"
    depends_on:
      - jobmanager
    command: taskmanager
    links:
      - "jobmanager:jobmanager"
    environment:
      - JOB_MANAGER_RPC_ADDRESS=jobmanager
  taskmanager2:
    image: flink:1.9.2-scala_2.12
    expose:
      - "6121"
      - "6122"
    depends_on:
      - jobmanager
    command: taskmanager
    links:
      - "jobmanager:jobmanager"
    environment:
      - JOB_MANAGER_RPC_ADDRESS=jobmanager
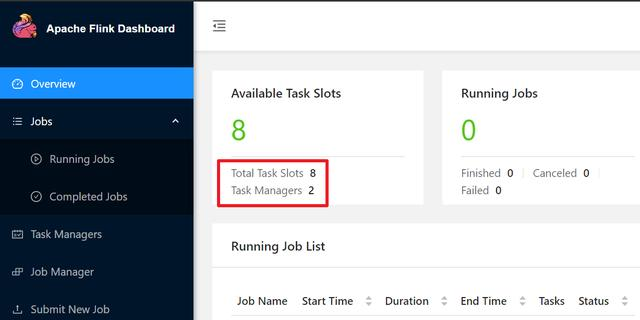
- The following figure shows my Flink situation. There are two tasks maganer, and eight slots are all available:
Source download
If you don't want to write code, the source code of the whole series can be downloaded to GitHub. The address and link information are shown in the following table (https://github.com/zq2599/blog'demos):
| Name | link | Remarks |
|---|---|---|
| Project Home | https://github.com/zq2599/blog_demos | The project's home page on GitHub |
| git warehouse address (https) | https://github.com/zq2599/blog_demos.git | The warehouse address of the source code of the project, https protocol |
| git warehouse address (ssh) | git@github.com:zq2599/blog_demos.git | The warehouse address of the source code of the project, ssh protocol |
There are multiple folders in this git project. The application of this chapter is under the flinkdatasourcedemo folder, as shown in the red box below: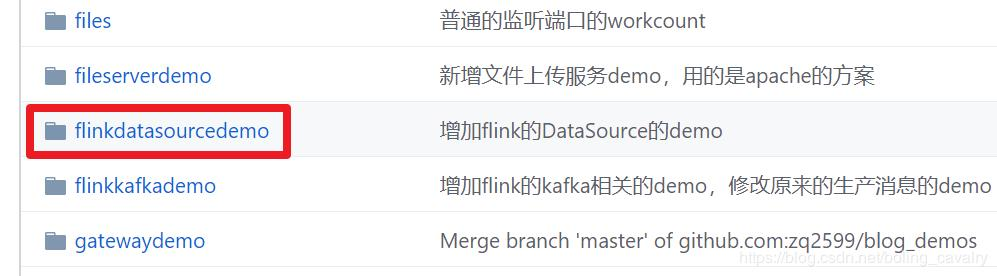
Ready to start development;
DataSource that implements the SourceFunctionDemo interface
- From the simplest point of view, develop a non parallel data source and verify it;
- To implement the SourceFunction interface, add SourceFunctionDemo.java to the project flinkdatasourcedemo:
package com.bolingcavalry.customize;

import org.apache.flink.api.java.tuple.Tuple2;
import org.apache.flink.streaming.api.datastream.DataStream;
import org.apache.flink.streaming.api.environment.StreamExecutionEnvironment;
import org.apache.flink.streaming.api.functions.source.SourceFunction;
import org.apache.flink.streaming.api.windowing.time.Time;

public class SourceFunctionDemo {
    public static void main(String[] args) throws Exception {
        final StreamExecutionEnvironment env = StreamExecutionEnvironment.getExecutionEnvironment();
        //Parallelism is 2
        env.setParallelism(2);

        DataStream<Tuple2<Integer,Integer>> dataStream = env.addSource(new SourceFunction<Tuple2<Integer, Integer>>() {

            private volatile boolean isRunning = true;

            @Override
            public void run(SourceContext<Tuple2<Integer, Integer>> ctx) throws Exception {
                int i = 0;
                while (isRunning) {
                    ctx.collect(new Tuple2<>(i++ % 5, 1));
                    Thread.sleep(1000);
                    if(i>9){
                        break;
                    }
                }
            }

            @Override
            public void cancel() {
                isRunning = false;
            }
        });

        dataStream
                .keyBy(0)
                .timeWindow(Time.seconds(2))
                .sum(1)
                .print();

        env.execute("Customize DataSource demo : SourceFunction");
    }
}
- It can be seen from the above code that an anonymous class instance is passed to the addSource method, which implements the SourceFunction interface;
- Only run and cancel methods are needed to implement the SourceFunction interface;
- The run method generates data. In order to simplify the operation, an instance of Tuple2 is generated every second. Since there is a keyBy operation in the next operator, the first field of Tuple2 always keeps a remainder of 5, so that several keys can be added to disperse into different slot s;
- In order to check whether the data is accurate, there is no unlimited data transmission, but only 10 Tuple2 instances are sent;
- cancel is the method executed when the job is cancelled;
- The overall parallelism is explicitly set to 2;
- After coding, execute the MVN clean package-u-dskiptests construction, and get the file flinkdatasourcedemo-1.0-SNAPSHOT.jar in the target directory;
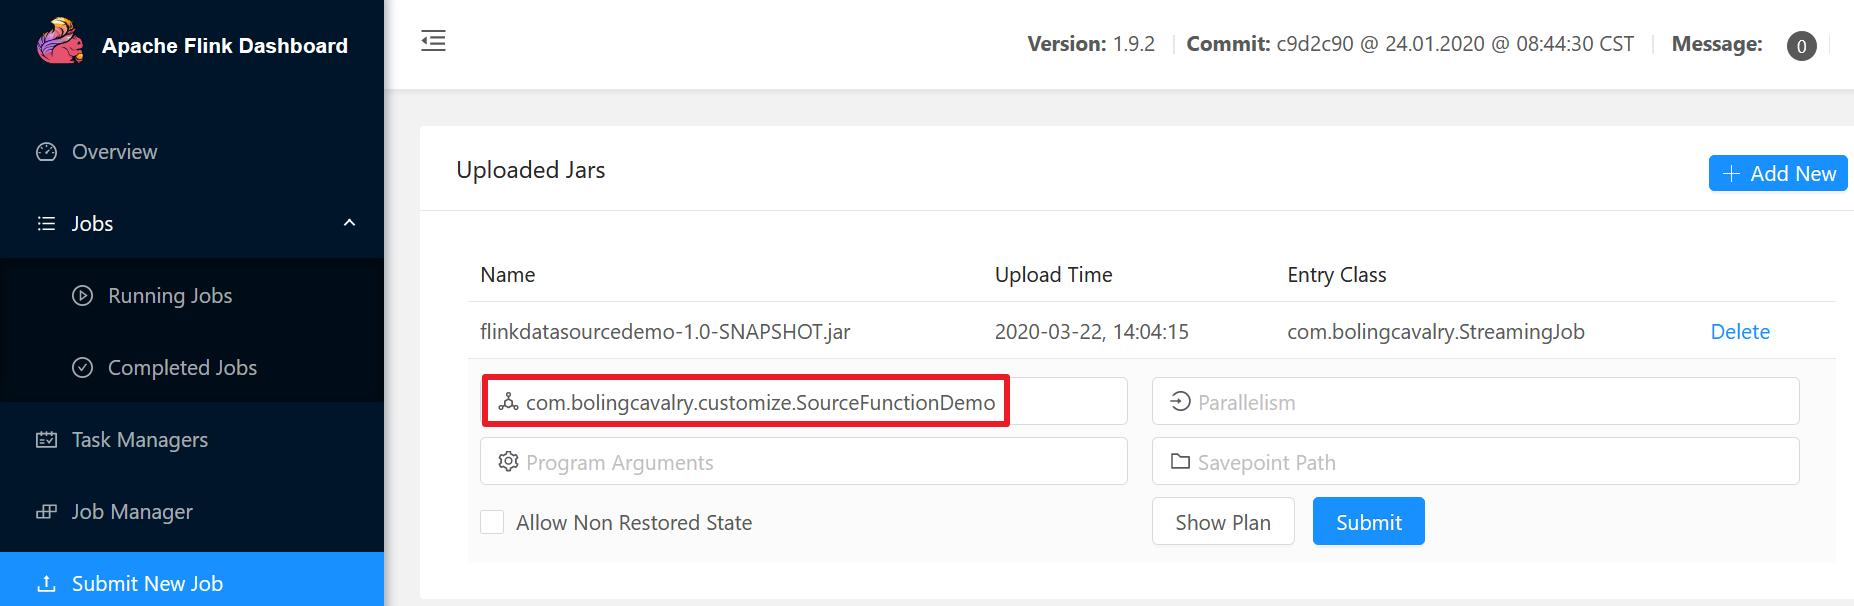
- Upload flinkdatasourcedemo-1.0-SNAPSHOT.jar in Flink's web UI, and specify the execution class, as shown in the red box below:
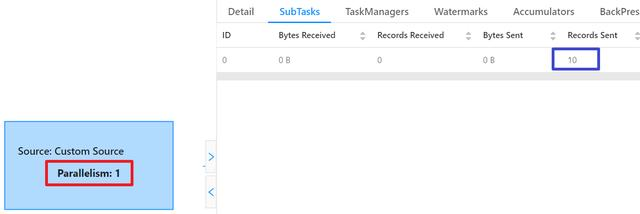
- After the task is executed, you can see on the Completed Jobs page that the parallelism of DataSource is 1 (red box), and the corresponding SubTask has sent a total of 10 records (blue box), which is consistent with our code;
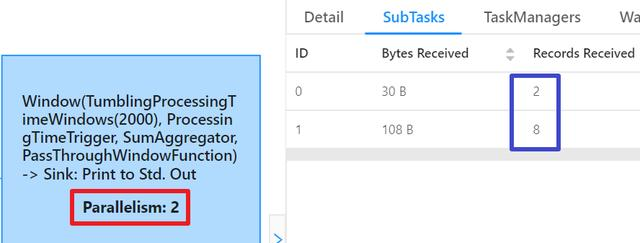
- Then look at the sub tasks of consumption, as shown in the following figure. The red box shows that the parallelism is 2, which is consistent with the setting in the previous code. The blue box shows that the two sub tasks received a total of 10 data records, which is consistent with the number of upstream sent data records:
- Next, we try multi parallelism DataSource;
DataSource that implements the ParallelSourceFunction interface
- If there are complex or time-consuming operations in a custom DataSource, increasing the parallelism of the DataSource and allowing multiple subtasks to perform these operations simultaneously can effectively improve the overall throughput (provided that there are sufficient hardware resources);
- The principle of the data source that can be executed in parallel is that DataSource implements the ParallelSourceFunction interface. The code is as follows. It can be seen that it is almost the same as the SourceFunctionDemo, except that the input parameter sent by addSource is different, which is still an anonymous class, but the implemented interface becomes ParallelSourceFunction:
package com.bolingcavalry.customize;

import org.apache.flink.api.java.tuple.Tuple2;
import org.apache.flink.streaming.api.datastream.DataStream;
import org.apache.flink.streaming.api.environment.StreamExecutionEnvironment;
import org.apache.flink.streaming.api.functions.source.ParallelSourceFunction;
import org.apache.flink.streaming.api.windowing.time.Time;

public class ParrelSourceFunctionDemo {
    public static void main(String[] args) throws Exception {
        final StreamExecutionEnvironment env = StreamExecutionEnvironment.getExecutionEnvironment();
        //Parallelism is 2
        env.setParallelism(2);

        DataStream<Tuple2<Integer,Integer>> dataStream = env.addSource(new ParallelSourceFunction<Tuple2<Integer, Integer>>() {

            private volatile boolean isRunning = true;

            @Override
            public void run(SourceContext<Tuple2<Integer, Integer>> ctx) throws Exception {
                int i = 0;
                while (isRunning) {
                    ctx.collect(new Tuple2<>(i++ % 5, 1));
                    Thread.sleep(1000);
                    if(i>9){
                        break;
                    }
                }
            }

            @Override
            public void cancel() {
                isRunning = false;
            }
        });

        dataStream
                .keyBy(0)
                .timeWindow(Time.seconds(2))
                .sum(1)
                .print();

        env.execute("Customize DataSource demo : ParallelSourceFunction");
    }
}
- After coding, execute the MVN clean package-u-dskiptests construction, and get the file flinkdatasourcedemo-1.0-SNAPSHOT.jar in the target directory;
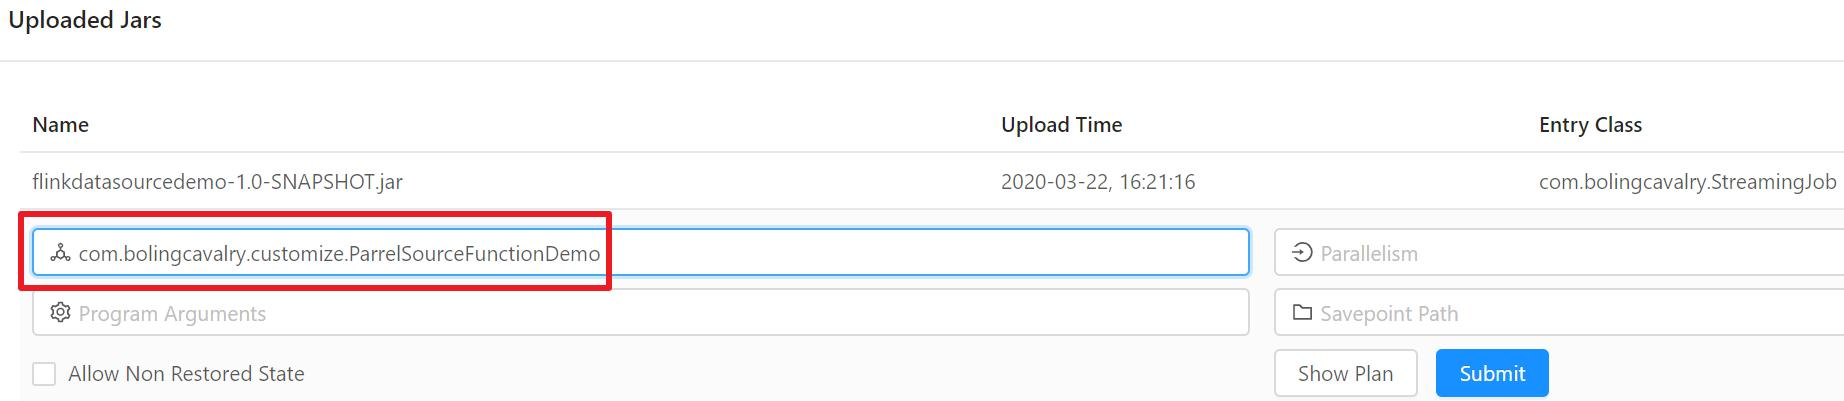
- Upload flinkdatasourcedemo-1.0-SNAPSHOT.jar in Flink's web UI, and specify the execution class, as shown in the red box below:
- After task execution, you can see from the Completed Jobs page that the parallelism of DataSource is 2 (red box), and the corresponding SubTask has sent 20 records (blue box), which is consistent with our code. The green box shows that the Task Manager of two subtasks is the same:

- Why does DataSource send a total of 20 records? Because there is an instance of the ParallelSourceFunction anonymous class in each SubTask, and the corresponding run method is executed separately, 10 subtasks are sent;
- Then look at the subtasks of consumption data, as shown in the figure below. The red box shows that the parallelism is consistent with the number set in the code. The blue box shows that two subtasks consume a total of 20 records, which is consistent with the number of Records issued by the data source. In addition, the green box shows the tasks of two subtasks The manager is the same, and the Task Manager of DataSource is the same, so the whole job is carried out in the same TaskManager, without the extra cost of cross machine:

- Next, the content to be practiced is related to another important abstract class;
DataSource inheriting abstract class RichSourceFunction
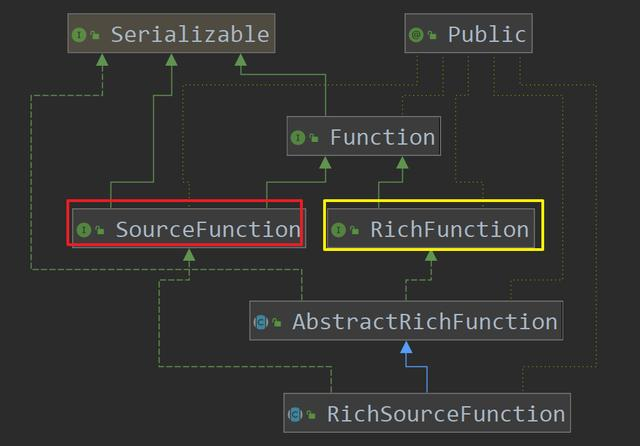
- The understanding of RichSourceFunction starts from the inheritance relationship, as shown in the following figure. The features of SourceFunction and RichFunction are finally reflected in RichSourceFunction. The features of SourceFunction are data generation (run method), and the features of RichFunction are connection and release of resources (open and close methods)
- The next step is to start the actual combat. The goal is to obtain data from MySQL as a DataSource, and then consume the data;
- Please prepare the available MySql database in advance and execute the following SQL to create the database, table and record:
DROP DATABASE IF EXISTS flinkdemo;
CREATE DATABASE IF NOT EXISTS flinkdemo;
USE flinkdemo;

SELECT 'CREATING DATABASE STRUCTURE' as 'INFO';

DROP TABLE IF EXISTS `student`;
CREATE TABLE `student` (
  `id` int(11) unsigned NOT NULL AUTO_INCREMENT,
  `name` varchar(25) COLLATE utf8_bin DEFAULT NULL,
  PRIMARY KEY (`id`)
) ENGINE=InnoDB AUTO_INCREMENT=5 DEFAULT CHARSET=utf8 COLLATE=utf8_bin;

INSERT INTO `student` VALUES ('1', 'student01'), ('2', 'student02'), ('3', 'student03'), ('4', 'student04'), ('5', 'student05'), ('6', 'student06');
COMMIT;
- Add mysql dependency in pom.xml:
<dependency>
  <groupId>mysql</groupId>
  <artifactId>mysql-connector-java</artifactId>
  <version>5.1.34</version>
</dependency>
- Add MySQL datasource.java as follows:
package com.bolingcavalry.customize;

import com.bolingcavalry.Student;
import org.apache.flink.configuration.Configuration;
import org.apache.flink.streaming.api.functions.source.RichSourceFunction;
import java.sql.Connection;
import java.sql.DriverManager;
import java.sql.PreparedStatement;
import java.sql.ResultSet;

public class MySQLDataSource extends RichSourceFunction<Student> {

    private Connection connection = null;

    private PreparedStatement preparedStatement = null;

    private volatile boolean isRunning = true;

    @Override
    public void open(Configuration parameters) throws Exception {
        super.open(parameters);

        if(null==connection) {
            Class.forName("com.mysql.jdbc.Driver");
            connection = DriverManager.getConnection("jdbc:mysql://192.168.50.43:3306/flinkdemo?useUnicode=true&characterEncoding=UTF-8", "root", "123456");
        }

        if(null==preparedStatement) {
            preparedStatement = connection.prepareStatement("select id, name from student");
        }
    }

    /**
     * Release resources
     * @throws Exception
     */
    @Override
    public void close() throws Exception {
        super.close();

        if(null!=preparedStatement) {
            try {
                preparedStatement.close();
            } catch (Exception exception) {
                exception.printStackTrace();
            }
        }

        if(null==connection) {
            connection.close();
        }
    }

    @Override
    public void run(SourceContext<Student> ctx) throws Exception {
        ResultSet resultSet = preparedStatement.executeQuery();
        while (resultSet.next() && isRunning) {
            Student student = new Student();
            student.setId(resultSet.getInt("id"));
            student.setName(resultSet.getString("name"));
            ctx.collect(student);
        }
    }

    @Override
    public void cancel() {
        isRunning = false;
    }
}
- In the above code, MySQLDataSource inherits the RichSourceFunction. As a DataSource, it can be used as the input parameter of addSource method;
- Both the open and close methods are called by SubTask of data source. Open is responsible for creating database connection object and close is responsible for releasing resources;
- In the open method, the configuration related to the database is directly written (not desirable);
- The run method is called after open. It is in charge of production data as in the previous DataSource example. Here, the prepared preparedStatement object is used to fetch data directly from the database;
- Next, write a Demo class to use MySQL datasource:
package com.bolingcavalry.customize;

import com.bolingcavalry.Student;
import org.apache.flink.streaming.api.datastream.DataStream;
import org.apache.flink.streaming.api.environment.StreamExecutionEnvironment;

public class RichSourceFunctionDemo {

    public static void main(String[] args) throws Exception {
        final StreamExecutionEnvironment env = StreamExecutionEnvironment.getExecutionEnvironment();
        //Parallelism is 2
        env.setParallelism(2);

        DataStream<Student> dataStream = env.addSource(new MySQLDataSource());
        dataStream.print();

        env.execute("Customize DataSource demo : RichSourceFunction");
    }
}
- From the above code, it can be seen that the MySQL datasource instance can create a dataset by passing in the addSource method;
- As before, compile and build, submit to Flink, and specify the task class to start the task;
- The execution result is shown in the figure below. The parallelism of DataSource is 1, and six records are sent, that is, all records of student table:

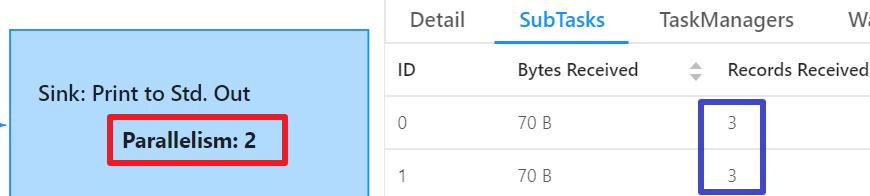
- There are two subtasks processing data, each processing three messages:
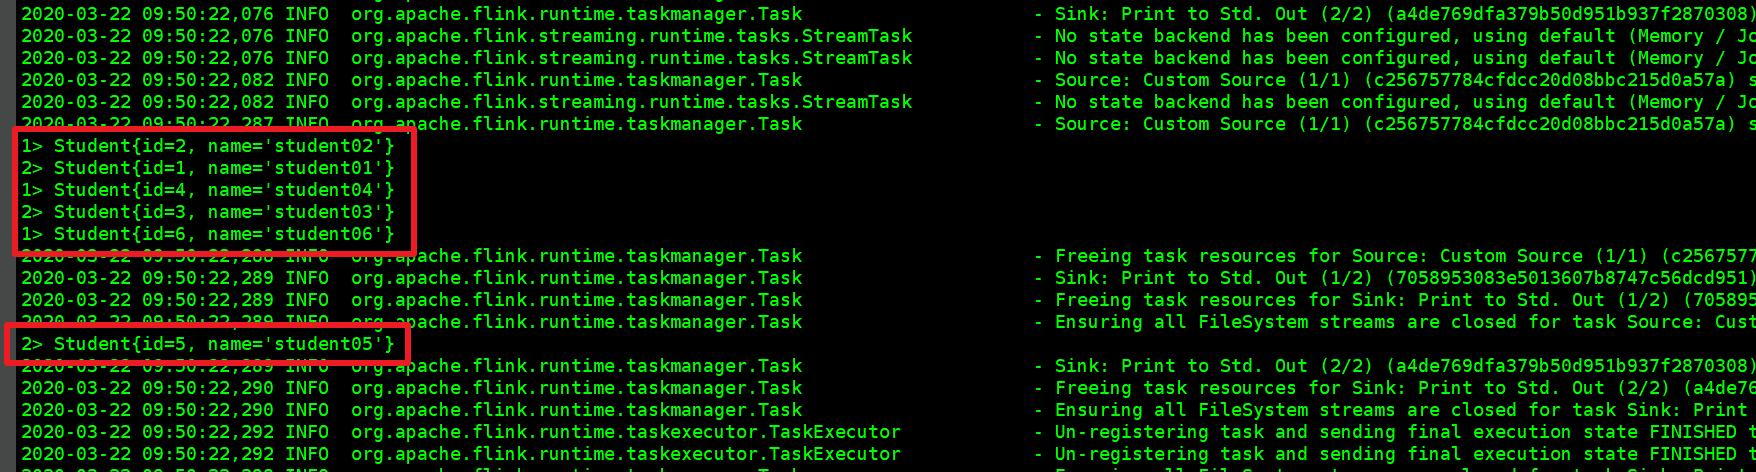
- Because print() is executed on the dataset in the code, the data output in the TaskManager console is as shown in the red box below:
About RichParallelSourceFunction
- We haven't tried the abstract class of RichParallelSourceFunction, but I don't think we need to talk about it in the article. Let's put together the class diagram of RichlSourceFunction and RichParallelSourceFunction:
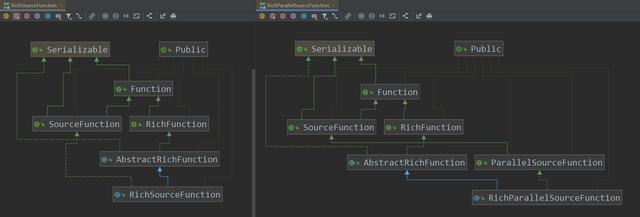
- It can be seen from the above figure that in the inheritance relationship of richfunctions, they are the same. In the inheritance relationship of sourcefunctions, RichlSourceFunction and RichParallelSourceFunction are slightly different. RichParallelSourceFunction follows the line of ParallelSourceFunction, while the difference between SourceFunction and ParallelSourceFunction has been mentioned before. Therefore, the result is self-evident The parallelism of the DataSource that supports the RichParallelSourceFunction can be greater than 1;
- If you are interested, you can change the previous MySQL DataSource to inherit the RichParallelSourceFunction and try again. The parallelism of DataSource will exceed 1, but it is not the only change. The DAG chart shows that Flink will also do some operators Chain processing, but this is not the focus of this chapter, only that the result is correct (SubTask of two datasources, a total of 12 records are sent), we suggest you try;
So far, "Flink's DataSource Trilogy" series has been completed. A good start is half the success. After getting the data, there are many knowledge points to learn and master. The next article will continue to go deep into Flink's wonderful journey;
Welcome to my official account: programmer Xin Chen.