Zero, preface
I've been summarizing Android recently, and I've forgotten about the front-end.
Flex layout has been heard before, but it has not been studied in detail. Take the opportunity to play with React.
How to learn a new knowledge, a lot of parameters are confusing, my favorite sentence is: the only way to deal with change is change itself.
Use your own abilities to make the object of study non-static, just like communicating with you is a living person rather than a doll.
This article is not a React basic tutorial, nor a Flex layout tutorial. It's just a Flex layout demo.
See the end of the source code shorthand specification
No nonsense, Liutu Town Building:
First, build React project:
1. Create + scss configuration
Personally, SCSS is preferred. The latest web pack of create-react-app has already configured scss.
Just add node-sass. It's true that you should gradually become familiar with the native control dom of js, but now I still can't do without jQuery.
npm i create-react-app
npm i node-sass -D

<!--jquery.js-->
<script src="https://cdnjs.cloudflare.com/ajax/libs/jquery/3.3.1/jquery.min.js"></script>
2. Building static pages
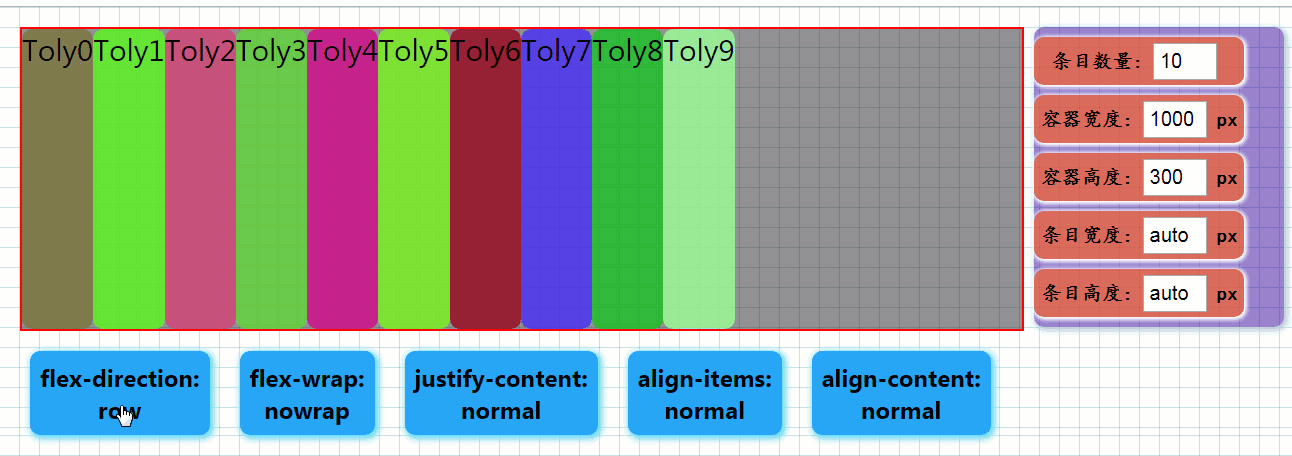
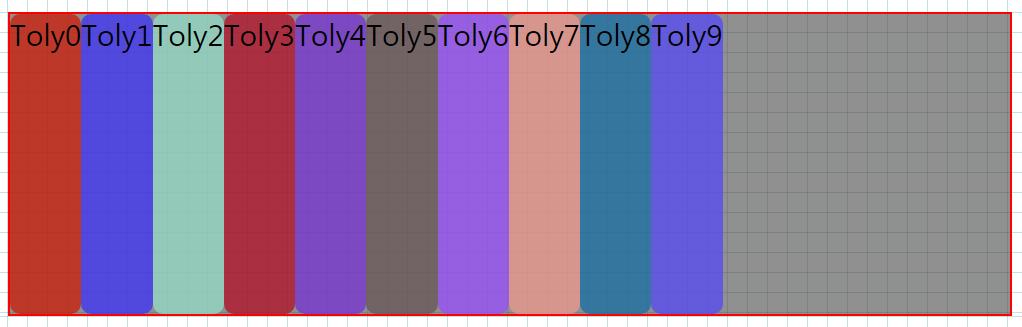
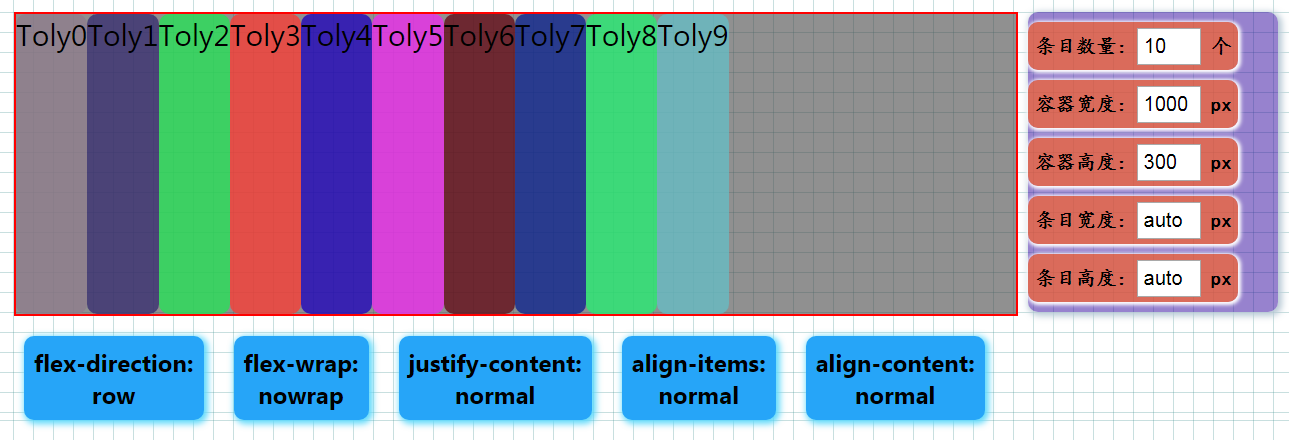
2.1:. Flex rectangular div (default length and width 1000*300px)
.Flex {
  border: red 2px solid;
  margin-top: 20px;
  margin-left: 20px;
  width: 1000px;
  height: 300px;
  background-color: rgba(71,71,71,.6);
  display: flex;
  .title {
    border-radius: 10px;
    font-size: 30px;
    text-align: center;
  }
}
2.2: Generate several entries
 <div className="Flex">
     {this.formItem()}
 </div>
Auxiliary function: Random color: Logic. random RGB
/**
 * Random colors
 * @param a Transparency -- default 1
 * @returns {string}
 */
static randomRGB(a = 1) {
    return `rgba(${this.rangeInt(0, 255)},${this.rangeInt(0, 255)},${this.rangeInt(0, 255)},${a})`
}
Dynamic generation of random color entries based on arrays: Flex.formItem
formItem() {
    let color = [];//Color array
    for (let i = 0; i < 10; i++) {
        color.push(Logic.randomRGB(.8))
    }
    return (
        color.map((item, index) => {
            return (
                <div className={"title"} style={{backgroundColor: item}} key={index}>
                    Toly{index}
                </div>
            )
        })
    )
}
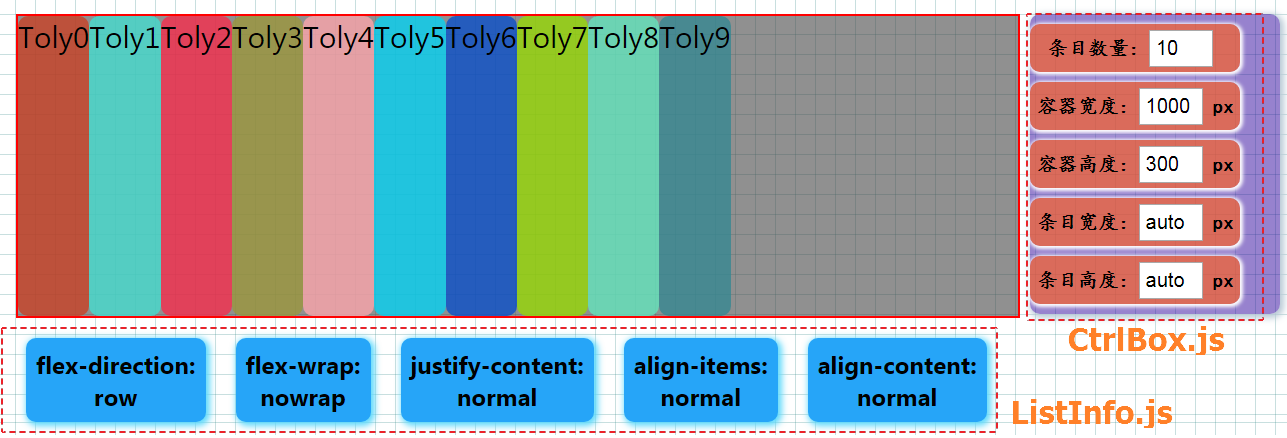
3. Components in the bottom column: ListInfo.js
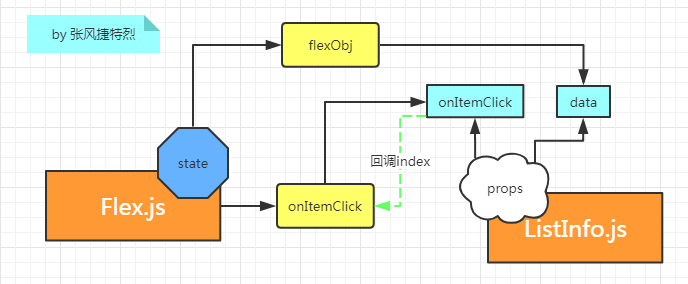
<ListInfo data={this.state.flexObj}
          onItemClick={this.onItemClick.bind(this)}/>
3.1: Data acquisition: flexObj:
It can be said that it is the way to treat others, using the. Flexdiv's own attributes to automatically generate objects.
notifyChanged() {
    let $Flex = $(".Flex");
    let flexObj = {
        "flex-direction": $Flex.css("flex-direction"),//Element Arrangement Direction
        "flex-wrap": $Flex.css("flex-wrap"),//Line feed
        // "flex-flow": $Flex.css("flex-flow"), //newline + element alignment direction
        "justify-content": $Flex.css("justify-content"),//align
        "align-items": $Flex.css("align-items"),//valign
        "align-content": $Flex.css("align-content"),//Multi-line Vertical Alignment
    };
    this.setState({
        flexObj: flexObj
    });
}
3.2: Data display: ListInfo.js
import React, {Component} from 'react';
import './ListInfo.scss'

class ListInfo extends Component {
    render() {
        return (
            <div className="ListInfo" >
                {this.formList(this.props.data)}
            </div>
        )
    }

    formList(data) {//Object transformation array
        let datas = [];
        for (let key in data) {
            datas.push({
                    name: key,
                    data: data[key]
                }
            );
        }

        return (
            <div id="list-container">
                {datas.map((item, index) => {
                    return (//Click here to call back onItemClick to capture the index
                        <div key={index} className="card" onClick={() => {
                            this.props.onItemClick && this.props.onItemClick(index);
                        }}>
                            {item.name}:<br/>
                            {item.data}<br/>
                        </div>
                    )
                })}
            </div>
        )
    }
}
3.3: Style: ListInfo.scss
#list-container {
  display: flex;

  .card{
    background-color: #26A5F8;
    cursor: pointer;
    margin-top: 20px;
    margin-left: 30px;
    padding: 10px;
    font-weight: bold;
    font-size: 24px;
    border-radius: 10px;
    box-shadow: #61dafb 2px 2px 10px 2px;
  }
}
4. Control interface in the right column:
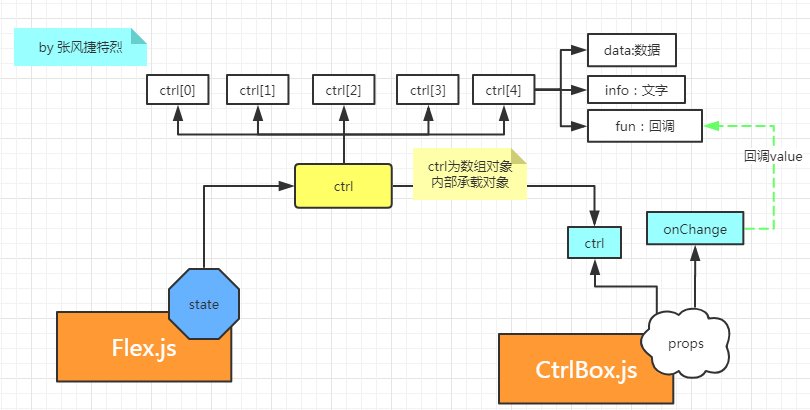
4.1: Data Style: Flex.js
this.state = {
    flexObj: '',
    ctrl: [
        {
            data: 10,
            info: "Number of entries",
            fun: this.onCountChanged.bind(this)
        },
        {
            data: 1000,
            info: "Container width",
            fun: this.onBoxWidthChanged.bind(this)
        },
        {
            data: 300,
            info: "Vessel height",
            fun: this.onBoxHeightChanged.bind(this)
        },
        {
            data: "auto",
            info: "Item width",
            fun: this.onItemWidthChanged.bind(this)
        },
        {
            data: "auto",
            info: "Item height",
            fun: this.onItemHeightChanged.bind(this)
        }
    ]
}
4.2: Receive data, render interface + callback CtrlBox.js
import React, {Component} from 'react';
import './CtrlBox.scss'

class CtrlBox extends Component {
    constructor(props) {
        super();
        this.state = {
            value: 'toly'
        }
    }
    render() {
        return (
            <div className="right-ctrl">
                <div className={"container"}>
                    <label>{this.props.ctrl[0].info}:</label>
                    <input
                        onChange={(v) => {
                            this.props.onCountChanged && this.props.onCountChanged(v.target.value);
                        }}
                        defaultValue={this.props.ctrl[0].data}/>
                    <label>individual</label>
                </div>
                <div className={"container"}>
                    <label>{this.props.ctrl[1].info}:</label>
                    <input
                        onChange={(v) => {
                            this.props.onBoxWidthChanged && this.props.onBoxWidthChanged(v.target.value);
                        }}
                        defaultValue={this.props.ctrl[1].data}/>
                    <label>px</label>
                </div>
                <div className={"container"}>
                    <label>{this.props.ctrl[2].info}:</label>
                    <input
                        onChange={(v) => {
                            this.props.onBoxHeightChanged && this.props.onBoxHeightChanged(v.target.value);
                        }}
                        defaultValue={this.props.ctrl[2].data}/>
                    <label>px</label>
                </div>
                <div className={"container"}>
                    <label>{this.props.ctrl[3].info}:</label>
                    <input
                        onChange={(v) => {
                            this.props.onItemWidthChanged && this.props.onItemWidthChanged(v.target.value);
                        }}
                        defaultValue={this.props.ctrl[3].data}/>
                    <label>px</label>
                </div>
                <div className={"container"}>
                    <label>{this.props.ctrl[4].info}:</label>
                    <input
                        onChange={(v) => {
                            this.props.onItemHeightChanged && this.props.onItemHeightChanged(v.target.value);
                        }}
                        defaultValue={this.props.ctrl[4].data}/>
                    <label>px</label>
                </div>
            </div>
        )
    }
}
export default CtrlBox;
4.3. Callback function and use: Flex.js
<CtrlBox
    ctrl={this.state.ctrl}
    onCountChanged={this.state.ctrl[0].fun}
    onBoxWidthChanged={this.state.ctrl[1].fun}
    onBoxHeightChanged={this.state.ctrl[2].fun}
    onItemWidthChanged={this.state.ctrl[3].fun}
    onItemHeightChanged={this.state.ctrl[4].fun}/>
/**
 * Processing when quantity changes
 * @param count
 */
onCountChanged(count) {

}
/**
 * flex Handling when box width changes
 * @param num
 */
onBoxWidthChanged(num) {

}
/**
 * flex Handling when box height changes
 * @param num
 */
onBoxHeightChanged(num) {

}
/**
 * item Handling with Wide Change
 * @param num
 */
onItemWidthChanged(num) {

}
/**
 * item Dealing with High Change
 * @param num
 */
onItemHeightChanged(num) {

}
In this way, both static pages and callbacks are implemented. Next, we just need to write the specific logic of callbacks.
III. The Specific Logic of Callback
1. Preparing dynamic data
let justifyContent = {
    index: 0,
    data: ["normal", "flex-start", "flex-end", "center", "space-between", "space-around"]
};
let flexDirection = {
    index: 0,
    data: ["row", "row-reverse", "column", "column-reverse"]
};
let flexWrap = {
    index: 0,
    data: ["nowrap", "wrap", "wrap-reverse"]
};
let alignItems = {
    index: 0,
    data: ["normal", "stretch", "flex-start", "flex-end", "center", "baseline"]
};
let alignContent = {
    index: 0,
    data: ["normal", "stretch", "flex-start", "flex-end", "center", "space-between", "space-around"]
};
2. Change the data dynamically when you click on the entry below
/**
 * Click on the entry below
 * @param index
 */
onItemClick(index) {
    let $Flex = $(".Flex");
    switch (index) {
        case 0:
            flexDirection.index++;
            $Flex.css({
                flexDirection: flexDirection.data[flexDirection.index % flexDirection.data.length]
            });
            break;
        case 1:
            flexWrap.index++;
            $Flex.css({
                flexWrap: flexWrap.data[flexWrap.index % flexWrap.data.length]
            });
            break;
        case 2:
            justifyContent.index++;
            $Flex.css({
                justifyContent: justifyContent.data[justifyContent.index % justifyContent.data.length]
            });
            break;
        case 3:
            alignItems.index++;
            $Flex.css({
                alignItems: alignItems.data[alignItems.index % alignItems.data.length]
            });
            break;
        case 4:
            alignContent.index++;
            $Flex.css({
                alignContent: alignContent.data[alignContent.index % alignContent.data.length]
            });
            break;
    }
    this.notifyChanged();
}
3. Input box callback:
/**
 * Processing when quantity changes
 * @param count
 */
onCountChanged(count) {
    let ctrl = this.state.ctrl;
    ctrl[0].data = count;
    this.setState({
        ctrl
    })
}
/**
 * flex Handling when box width changes
 * @param num
 */
onBoxWidthChanged(num) {
    let ctrl = this.state.ctrl;
    ctrl[1].data = num;
    this.setState({
        ctrl
    });
    $(".Flex").width(this.state.ctrl[1].data);
}
/**
 * flex Handling when box height changes
 * @param num
 */
onBoxHeightChanged(num) {
    let ctrl = this.state.ctrl;
    ctrl[2].data = num;
    this.setState({
        ctrl
    });
    $(".Flex").height(this.state.ctrl[2].data);
}
/**
 * item Handling with Wide Change
 * @param num
 */
onItemWidthChanged(num) {
    let ctrl = this.state.ctrl;
    ctrl[3].data = num;
    this.setState({
        ctrl
    });
    $(".title").width(this.state.ctrl[3].data);
}
Seemingly complex functions, in fact, this code, focusing on the grasp of data and object encapsulation
I was not able to integrate the data in this way at the beginning, but also met with the problem of merging, merging, scattered attributes looking upset.
It also depends on Android (or java) to let me have a deep understanding of the object, so what is connected, thinking, everything is easy to do.
Postscript: Jasper Specification
1. The Growth Record and Corrigendum List of this Paper
| Project source code | date | Remarks |
|---|---|---|
| V0.1--github | 2018-12-9 | Flex Layout in React Warfare Notes (Part I - Container Properties) |
2. More about me
| Pen name | hobby | ||
|---|---|---|---|
| Zhang Fengjie | 1981462002 | zdl1994328 | language |
| My github | My short book | My Nuggets | Personal website |
3. statement
1. This article was originally created by Zhang Fengjie and reproduced by him.
2. Welcome all programming enthusiasts to communicate with each other
3. Individual ability is limited. If there is something wrong, you are welcome to criticize and testify. You must correct it modestly.
4 - Seeing this, I would like to thank you for your love and support.