I. Preface
Let's start with the main framework and features of the main graphics libraries: (personal opinions)
Django: python develops a heavyweight web framework, which integrates MVC and ORM technologies. It was designed to make it easy to develop complex, database-driven websites. However, for various reasons, few enterprises use it to develop large-scale websites, but they use it for operation and maintenance development. It focuses on reusability and "pluggability" of components.
Flask: A lightweight web framework developed by python. It uses a simple core and extensions to add other functions. The extensions are flexible and easy to use.
Echars: Baidu's open source image library, the interface can do very dazzling, but mainly based on JS, Django, flask support for it is not very good, especially in the background with python processing data display to the front desk is very complex.
Highchars: A graphics library written in pure JavaScript that is compatible and cross-platform. But its data needs to be converted to json format to display, and it is also a burden for data that needs to be processed by python in the background. Django and Flask are not very supportive.
Pygal: A Python-developed dynamic SVG graph library may not have the powerful functions of Echars or Highchars, but it is better than a python-developed library, which uses python's native grammar. It is very convenient to use and does not require much complex transformation. And flask supports it very well, and Django's support for pygal is relatively poor.
The database selected sqlite3, a lightweight relational database. Because the data are all statistical data, the amount of data is small, and there is no need for particularly complex operations.
In summary, the architecture of Flask+pygal+sqlite3 is determined after various attempts.
II. Environmental preparation
1. Install Python
1). Python version:
3.4.3: Pay attention to the choice of adding python to environment variables during installation
2. Description
It is recommended to choose a higher version of Python, because the latter two libraries need to be installed using the pip tool that comes with python. Otherwise, if you download the installation package of the library directly, it will easily fail to install, mainly because of the corresponding version and the lack of dependent libraries.
2. Installing Flask Framework
Execute in command line mode:
pip install Flask
3. Installing Graphics Library
Execute in command line mode:
pip install pygal
4. Install ORM mapping Library
Execute in command line mode:
pip install flask-sqlalchemy
5. Download sqlite3 database
Download directly from the official website: http://www.sqlite.org/download.html
Selection: sqlite-tools-win32-x86-3170000.zip
The decompressed file contains three executable files
Three Platform building process
1. Create a database
1) In command line mode, switch to sqlite3 directory and execute the following commands:
sqlite3.exe dzj.db
2) Then enter sqlite3 command line mode:
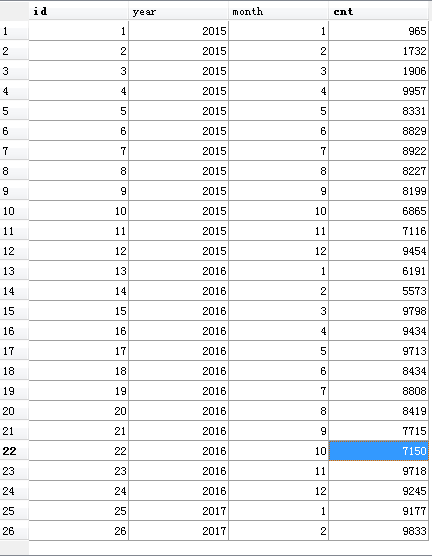
          create table appinfo(
                id integer key autoincrement,
                year varchar(32),
                month varchar(32),
                cnt   varchar(32));
3) Field description (primary key must be set)
Year
Month month
Number of Cnt licenses
4) Insert data
2. Platform building process
1) Create project file directory (dzj)
2) Create static folder and templates folder under project file directory (dzj)
3) Copy the created dzj.db database to the current directory (dzj directory)
4) Add the dzj.py file under the project file directory (dzj), and add the following code:
from flask import Flask, render_template
import pygal
from dbconnect import db
from models import Appinfo
app = Flask(__name__)


@app.route('/')
def APPLYTBLINFO():
    db.create_all() #You can execute it on the first call.
    appinfos = Appinfo.query.all()
    ##Year of choice
    list_year = []
    ##Select month
    list_month = []
    ##Number corresponding to month
    map_cnt = {}
    for info in appinfos:
        if info.year not in list_year:
            list_year.append(info.year)
            map_cnt[info.year] = [int(info.cnt)]
        else:
            map_cnt[info.year].append(int(info.cnt))
        if info.month not in list_month:
            list_month.append(info.month)
    line_chart = pygal.Line()
    line_chart.title = 'information'
    line_chart.x_labels = map(str, list_month)
    for year in list_year :
        line_chart.add(str(year)+"year", map_cnt[year])
    return render_template('index.html', chart=line_chart)
    if __name__ == '__main__':
    app.run(debug=True)
5) Add dbconnect.py file under the project file directory (dzj), code as follows:
from flask import Flask
from flask_sqlalchemy import SQLAlchemy
import os
app = Flask(__name__)
dbpath = app.root_path.replace("\\", "/")
#Pay attention to the direction of the diagonal
app.config['SQLALCHEMY_DATABASE_URI'] = r'sqlite:///'+dbpath+'/dzj.db'
#app.config['SQLALCHEMY_DATABASE_URI'] = r'sqlite:///D:/Python/dzj/dzj.db'
app.config['SQLALCHEMY_TRACK_MODIFICATIONS'] = True
#print(app.config['SQLALCHEMY_DATABASE_URI'])
db = SQLAlchemy(app)
6) Add models.py file under the project file directory (dzj), code as follows:
from dbconnect import db

##Quantity of license applications
class Appinfo(db.Model):
    __tablename__='appinfo' ##Note that there are some examples on the Internet that do not exist.
    ##Primary keys must be set
    id = db.Column(db.Integer, primary_key=True)
    year = db.Column(db.String(20))
    month = db.Column(db.String(20))
    cnt = db.Column(db.String(20))

    def __init__(self, year, month, cnt):
        self.year = year
        self.month = month
        self.cnt = cnt

    def __str__(self):
        return self.year+":"+self.month+":"+self.cnt

    def __repr__(self):
        return self.year+":"+self.month+":"+self.cnt

    def save(self):
        db.session.add(self)
        db.session.commit()
7) Add index.html under the templates file, the code is as follows:
<body style="width: 1000px;margin: auto">
<div  id="container">
    <div id="header" style="background: burlywood;height: 50px;">
        <h2 style="font-size: 30px;  position: absolute; margin-top: 10px;margin-left: 300px;
        text-align:center;">Data Trend Chart Analysis</h2>
    </div>
    <div id="leftbar" style="width: 200px;height: 600px;background: cadetblue;float: left">
        <h2 style="margin-left: 20px">Overview of data maps</h2><br/>
        <table>
            <tr>
                <td>
                   <a name="appinfo" href="appinfo.html" style="margin-left: 20px;">Quantitative analysis chart</a><br>
                </td>
            </tr>
        </table>
    </div>
    <div id="chart" style="width: 800px;float: left">
       <embed type="image/svg+xml" src= {{ chart.render_data_uri()|safe }} />
    </div>
</div>
</body>
8) Switch to the directory where dzj is located at the command line and execute:
python dzj.py
No errors are reported in the following figure, which indicates that the operation was successful:

9) Input in browser: http://127.0.0.1:5000/ View results
