brief introduction
Airflow is a platform for creating, scheduling and monitoring workflows programmatically.
Use Airflow to create a workflow as a directed acyclic graph (DAG) task. The Airflow scheduler executes your tasks on a set of workers according to the dependencies you specify. At the same time, Airflow has rich command-line utilities, which makes it easy to carry out complex diagnosis on DAG. It also provides a rich user interface, which makes it very easy to visualize the workflow running in production, monitor progress and troubleshoot problems.
When workflows are defined as code, they become easier to maintain, versionable, testable, and collaborative.

main features
- Dynamic: Airflow workflow is configured in the form of code (Python), allowing dynamic workflow (DAG) generation. It also allows you to write code for dynamic instance workflow.
- Extensible: easily define your own operators, executors, and extend libraries to meet the level of abstraction that suits your environment.
- Elegant: simple and elegant design. Use the powerful Jinja template engine to build the parameterized script into the core of Airflow.
- Scalable: airflow has a modular architecture and uses message queues to orchestrate any number of workers. Airflow was born for unlimited expansion.
framework
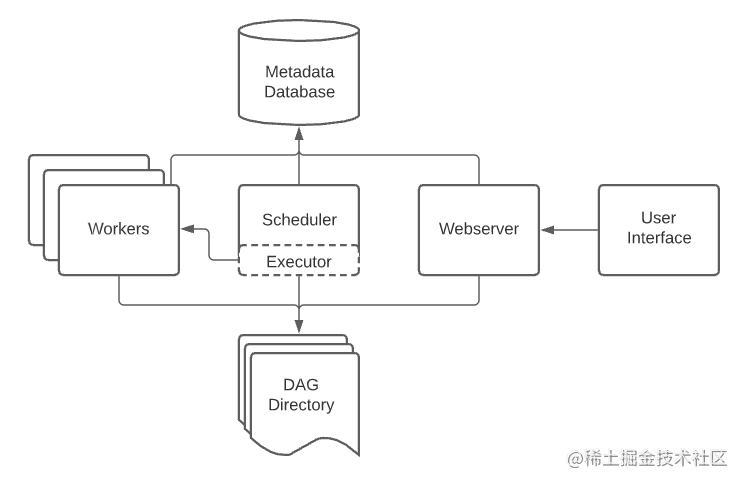
Airflow usually consists of the following components:
- A scheduler: it handles triggering workflow scheduling and submits tasks to the executor for execution.
- An actuator: it handles running tasks. In the default Airflow installation, it runs everything in the scheduler, but most suitable production actuators actually push task execution to workers.
- A WEB server: it provides a convenient user interface to check, trigger and debug the operation of DAG and tasks.
- A folder containing DAG files: read by the scheduler and the executor (and any workers owned by the executor)
- A metadata database: used by scheduler, actuator and WEB server to store state.
Airflow installation and initialization
Install Airflow
# airflow needs a HOME directory. The default is ~ / airflow directory. You can also set it to other places
export AIRFLOW_HOME=~/airflow

# Install dependent Libraries
AIRFLOW_VERSION=2.1.2
PYTHON_VERSION="$(python --version | cut -d " " -f 2 | cut -d "." -f 1-2)"
# For example: 3.6
CONSTRAINT_URL="https://raw.githubusercontent.com/apache/airflow/constraints-${AIRFLOW_VERSION}/constraints-${PYTHON_VERSION}.txt"

# For example: https://raw.githubusercontent.com/apache/airflow/constraints-2.1.2/constraints-3.6.txt
pip install "apache-airflow==${AIRFLOW_VERSION}" --constraint "${CONSTRAINT_URL}"
Initialize the database and create users
# Initialize database
airflow db init

# Create user and password
airflow users create \
 --username admin \
 --firstname Peter \
 --lastname Parker \
 --role Admin \
 --email spiderman@superhero.org
Start WEB service and scheduler
# Start the web service. The default port is 8080
airflow webserver --port 8080

# Start scheduler
airflow scheduler

# Browse 10.247.128.69:8080 in the browser and open example dag on the home page
Run the official website Demo
# Run the first task instance
# run your first task instance
airflow tasks run example_bash_operator runme_0 2015-01-01

# Run a two-day task
# run a backfill over 2 days
airflow dags backfill example_bash_operator \
 --start-date 2015-01-01 \
 --end-date 2015-01-02
Example
Define workflow
~/airflow/dags/tutorial.py
from datetime import timedelta
from textwrap import dedent
# The DAG object; we'll need this to instantiate a DAG
from airflow import DAG
# Operators; we need this to operate!
from airflow.operators.bash import BashOperator
from airflow.utils.dates import days_ago
# Define default parameters
# These parameters are passed to each operator
# You can override them based on each task during operator initialization
default_args = {
'owner': 'airflow',
'depends_on_past': False,
'email': ['airflow@example.com'],
'email_on_failure': False,
'email_on_retry': False,
'retries': 1,
'retry_delay': timedelta(minutes=5),
# 'queue': 'bash_queue',
# 'pool': 'backfill',
# 'priority_weight': 10,
# 'end_date': datetime(2016, 1, 1),
# 'wait_for_downstream': False,
# 'dag': dag,
# 'sla': timedelta(hours=2),
# 'execution_timeout': timedelta(seconds=300),
# 'on_failure_callback': some_function,
# 'on_success_callback': some_other_function,
# 'on_retry_callback': another_function,
# 'sla_miss_callback': yet_another_function,
# 'trigger_rule': 'all_success'
}
# Instantiate a DAG
# We need a DAG object to nest our tasks.
# Here, we pass a definition dag_id, which is used as the unique identifier of the DAG.
# We also passed the default parameter dictionary just defined,
# The schedule_interval is defined as 1 day for DAG.
with DAG(
'tutorial',
default_args=default_args,
description='A simple tutorial DAG',
schedule_interval=timedelta(days=1),
start_date=days_ago(2),
tags=['example'],
) as dag:
# A task is generated when the Operator object is instantiated.
# Objects instantiated from the Operator are called tasks. The first parameter is task_id acts as a unique identifier for the task.
# t1, t2 and t3 are examples of tasks created by instantiating operators
t1 = BashOperator(
task_id='print_date',
bash_command='date',
)
t2 = BashOperator(
task_id='sleep',
depends_on_past=False,
bash_command='sleep 5',
retries=3,
)
# Add workflow and task questions
t1.doc_md = dedent(
"""\
#### Task Documentation
You can document your task using the attributes `doc_md` (markdown),
`doc` (plain text), `doc_rst`, `doc_json`, `doc_yaml` which gets
rendered in the UI's Task Instance Details page.

"""
)
dag.doc_md = __doc__ # If you have a document string at the beginning of the DAG
dag.doc_md = """
This is a documentation placed anywhere
""" # Otherwise, type it like this
# Jinja template
templated_command = dedent(
"""
{% for i in range(5) %}
echo "{{ ds }}"
echo "{{ macros.ds_add(ds, 7)}}"
echo "{{ params.my_param }}"
{% endfor %}
"""
)
t3 = BashOperator(
task_id='templated',
depends_on_past=False,
bash_command=templated_command,
params={'my_param': 'Parameter I passed in'},
)
# Set task dependencies
t1 >> [t2, t3]
Note: when executing your script, Airflow throws an exception if it finds a loop or multiple reference dependencies in your DAG.
test
Run script
First, let's ensure that the workflow is successfully parsed.
python ~/airflow/dags/tutorial.py
If the script does not throw an exception, it means that you have not made any very serious errors, and your Airflow environment looks intact.
Command line metadata validation
# initialize the database tables
airflow db init

# print the list of active DAGs
airflow dags list

# prints the list of tasks in the "tutorial" DAG
airflow tasks list tutorial

# prints the hierarchy of tasks in the "tutorial" DAG
airflow tasks list tutorial --tree
Test task and Jinja template task
Let's test by running an actual task instance on a specific date. In the context, passing is called execution_ The date field specifies the date. This is a logical date that simulates the scheduler running your task or dag on a specific date and time so that it actually runs now (or when its dependencies are met).
# command layout: command subcommand dag_id task_id date

# testing print_date
airflow tasks test tutorial print_date 2015-06-01

# testing sleep
airflow tasks test tutorial sleep 2015-06-01
# testing templated
# The detailed event log is displayed, and finally your bash command line runs and prints the results
airflow tasks test tutorial templated 2015-06-01
Note: the airflow task test command runs task instances locally and outputs their logs to standard output (on the screen), which does not affect dependencies, and does not pass the status (run, success, failure...) to the database. It just tests a single task instance.
The same applies to airflow dags test [dag_id] [execution_date] at the DAG level. It performs a DAG run for a given DAG id. Although it does consider task dependencies, it does not register status in the database. With this in mind, it is convenient to test the complete operation of DAG locally. If a task in your DAG requires data from a location, the data is available.
backfill
Backfill will send logs to a file and interact with the database to record the status according to your dependencies.
If you have a web service, you will be able to track progress. If you are interested in tracking progress visually during backfilling, the airflow web server will start a web service.
# Optionally, start a WEB service in Debug mode in the background
# airflow webserver --debug &

# start your backfill on a date range
airflow dags backfill tutorial \
 --start-date 2015-06-01 \
 --end-date 2015-06-07
be careful:
If you use dependencies_ on_ If past = true, a single task instance will depend on the success of its previous task instance (i.e. the previous one according to execution_date). With execution_ date==start_ Task instances of date will ignore this dependency because past task instances will not be created for them.
Using dependencies_ on_ When past = true, you may also need to consider wait_for_downstream=True. Although dependencies_ on_ Past = true causes the task instance to depend on the success of its previous task instance, but wait_for_downstream=True will cause the task instance to also wait for all task instances downstream of the previous task instance to succeed.
summary
Apache Airflow allows tasks of a workflow to be executed simultaneously on multiple worker s; The task dependencies are constructed by means of directed acyclic graph; At the same time, each task in the workflow is atomic retrieable. If a task fails in a certain phase of a workflow, it can be retried automatically or manually without starting the task from scratch.
In a word, Apache Airflow is not only the most popular workflow tool, but also the most versatile workflow tool.