Start with what you can see and explore Activity
1.Activity
Activity is a component that can contain an application user interface, mainly for interacting with users.
An application can contain zero or more activities. Although an application can have no activities, it is best to have them, since they are meant to interact with the user and the interaction requires them.
2. Create Activity
You can create a main Activity by default when you create a project
You can also right-click the package name to create an Activity
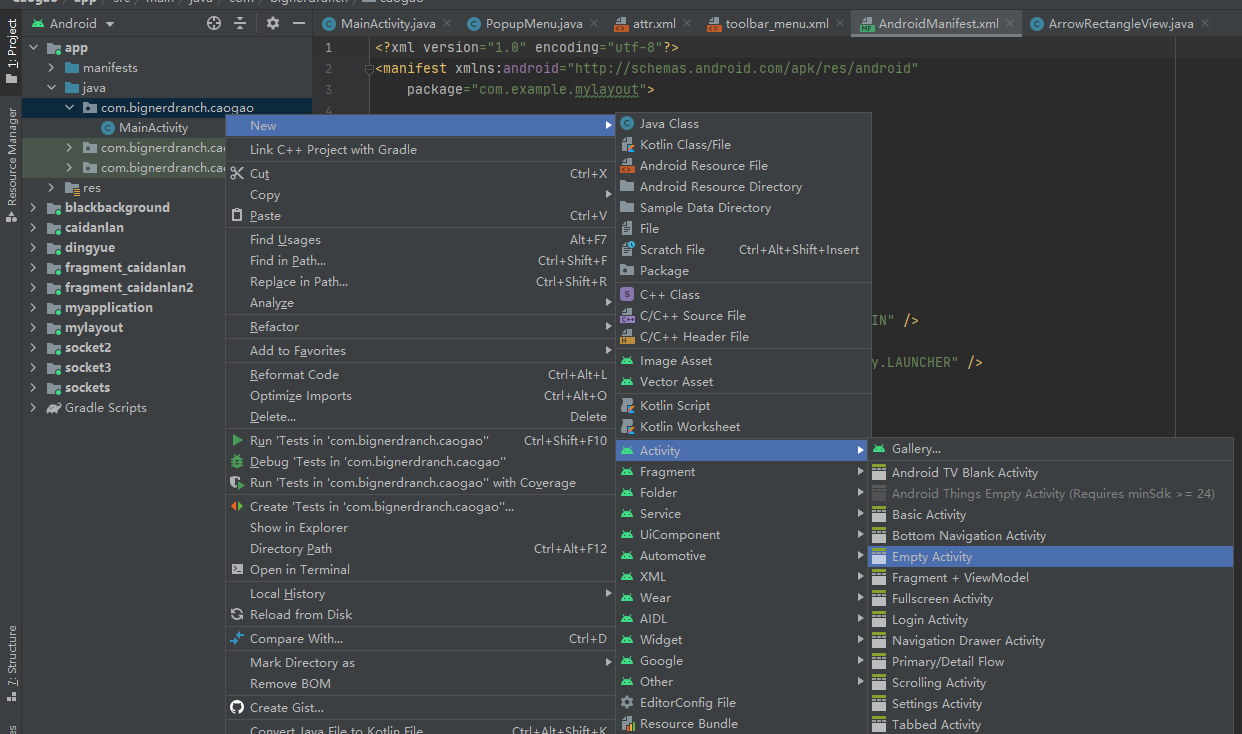
There are several options for creating an Activity
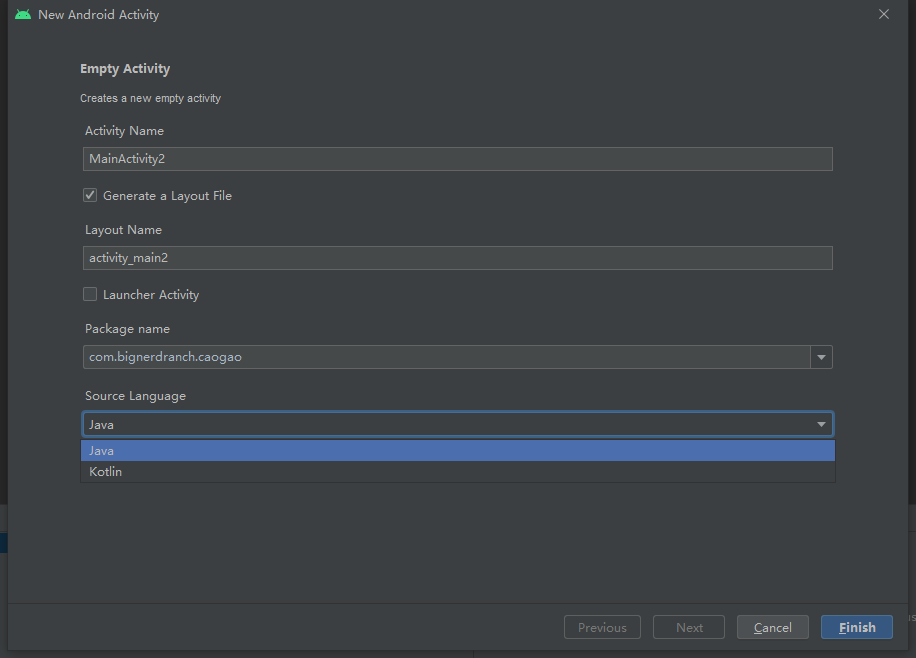
The first is the name of the Activity
The second is Generate Layout File, choosing whether to add a layout file automatically
The third is the name of the layout file xml, which only happens if the second option is chosen
The fourth is Launcher Activity, whether it is set as the primary activity or not, which is the first activity that the application starts
The fifth one is the package name, which is usually unchanged, because in which package name you created it, you usually created it there.
The sixth is to choose a programming language. There are two kinds, Java and Kotlin. Now we're going to learn the first line of code, so we'll use the Kotlin speaker.
3. Register Activity
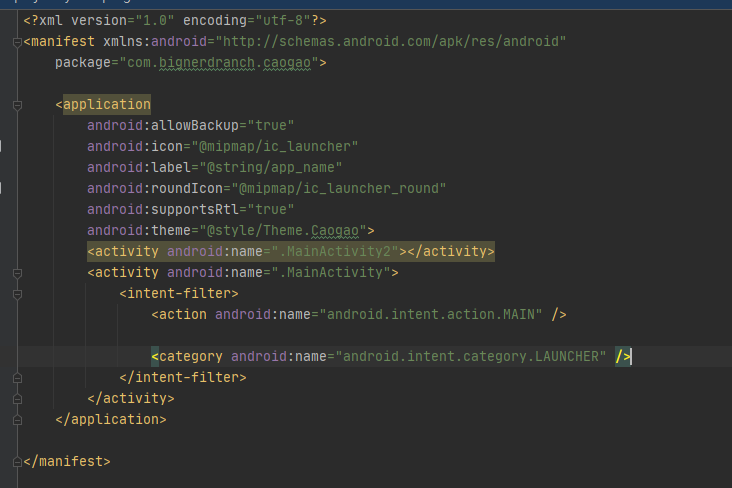
Once an activity is created, MainActivity 2 is automatically registered in AndroidManifest, which is how you register an activity. If you choose Launcher Activity when you create an activity, MainActivity will be generated because the two tags inside are used to declare that the activity is the primary activity.
4. Use Toast and Menu in Activity
//Toast
override fun onCreate(savedInstanceState: Bundle?) {
	super.onCreate(savedInstanceState)
	setContentView(R.layout.activity_main)
	val button1 : Button = findViewById(R.id.button1)
	//The first parameter is context, the second parameter is pop-up content, and the third parameter is pop-up time, with LENGTH_SHORT and LENGTH_ Two options for LONG
	button.setOnclickListener {
		Toast.makeText(this, "You clicked Button 1", Toast.LENGTH_SHORT).show()
	}
}
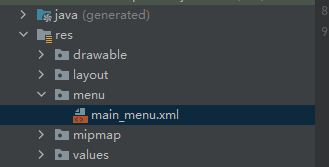
//Create a menu folder under the res folder and an xml file in the menu folder
<?xml version="1.0" encoding="utf-8"?>
<menu xmlns:android="http://schemas.android.com/apk/res/android">
    <item
        android:id="@+id/add_item"
        android:title="Add" />
    <item
        android:id="@+id/remove_item"
        android:title="Remove" />
</menu>
Kotlin Small Features
In Java, you set up a simple class that automatically generates Getter and Setter methods that access the fields within the class, such as:
public class Book{
	private int pages;
	public int getPages(){
		return pages;
	}
	public void setPages(int pages){
		this.pages = pages;
	}
}
But in Kotlin, there is a simpler way
val book = Book()
book.pages = 500 //Set pages for book to 500
val bookPages = book.pages //Number of pages to get book pages
So writing in Activity can be abbreviated
//Create talent menu bar
override fun onCreateOptionsMenu(menu: Menu?): Boolean {
	//Here, menuInflater is a shorthand of the object obtained through getMenuInflater()
    menuInflater.inflate(R.menu.main_menu, menu)
    return true
}
//Menu Click Event Listening
override fun onOptionsItemSelected(item: MenuItem): Boolean {
     when(item.itemId){
         R.id.add_item -> Toast.makeText(this, "You Clicked Add", Toast.LENGTH_SHORT).show()
         R.id.remove_item -> Toast.makeText(this, "You Clicked Remove", Toast.LENGTH_SHORT).show()
     }
     return true
    }
5.Intent
Intent is used for interaction and communication, while Intent is used for jumping between activities in an Activity.
Intent is divided into Show Intent and Implicit Intent
5.1 Explicit Intent
The explicit meaning is to tell you exactly who I'm looking for.
Add a Button to the first Activity, set the Button's listening event, and trigger the following code to jump the Activity as soon as you press it
class MainActivity : AppCompatActivity() {
    override fun onCreate(savedInstanceState: Bundle?) {
        super.onCreate(savedInstanceState)
        setContentView(R.layout.activity_main)
        btn.setOnClickListener{
        	//The second activity, which indicates where I want to jump, has a very obvious purpose
            val intent = Intent(this, SecondActivity::class.java)
            startActivity(intent)
        }
    }
}
The big guys who take code seriously should know that there is one missing code in my code to initialize Button
val btn: Button = findViewById(R.id.btn1)
I actually added a plugin that Kotlin can automatically help us compile variables with the same name as the layout file
But he actually uses findViewById internally to call
plugins {
    id 'com.android.application'
    id 'kotlin-android'
    id 'kotlin-android-extensions'
}
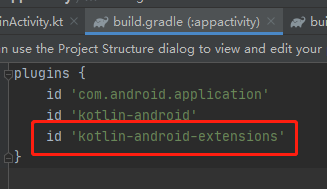
However, for now, this plug-in is no longer used by default because it has been abandoned by Google and now the recommended use is ViewBinding
5.2 Implicit Intent
It does not indicate who I want to start, but rather lets the system analyze which Activity I want to start by itself through a series of abstract information
SecondActivity has two tags set. Only tags and tags can respond at the same time can intent jump
One is the label, set to respond to com.example.appactivity.ACTION_START
Another is the tag, which contains additional information to more precisely indicate what the current Activity can respond to. There can be multiple tags in an Activity
<activity android:name=".SecondActivity">
      <intent-filter>
          <action android:name="com.example.appactivity.ACTION_START"/>
          <category android:name="android.intent.category.DEFAULT"/>
      </intent-filter>
  </activity>
It's working here, but don't you mean you have to have both tags corresponding? There's a default tag, android.intent.category.DEFAULT.
btn.setOnClickListener{
	val intent = Intent("com.example.appactivity.ACTION_START")
    startActivity(intent)
}
When we added the tag for category and ran it, we found that the error was reported because the system could not find an Activity whose attribute is com.example.appactivity.MY_CATEGORY
btn.setOnClickListener{
	val intent = Intent("com.example.appactivity.ACTION_START")
	intent.addCategory("com.example.appactivity.MY_CATEGORY")
    startActivity(intent)
}
We've added an entry to Second Activity's registration
<activity android:name=".SecondActivity">
      <intent-filter>
          <action android:name="com.example.appactivity.ACTION_START"/>
          <category android:name="android.intent.category.DEFAULT"/>
          <category android:name="com.example.appactivity.My_CATEGORY"/>
      </intent-filter>
  </activity>
5.3 More Implicit Intent s
Activity used to start other programs
val btn : Button = findViewById(R.id.btn)
btn.setOnClickListener{
	//Open Browser
    val intent = Intent(Intent.ACTION_VIEW)
    intent.data = Uri.parse("https://www.baidu.com")
    startActivity(intent)
    //Call
    val intent = Intent(Intent.ACTION_DIAL)
    intent.data = Uri.parse("tel:10086")
    startActivity(intent)
}
5.4 companion object
All methods in this keyword are similar to Java static methods and can be used directly through UIUitl.actionStart().
6.Activity Delivers Data
Activity passes data using Intent's accompanying data. First it builds Intent intent, then it passes data through intent.putExtra() method. The first parameter is data name, the second is data (key-value pair)
//FirstActivity
val btn : Button = findViewById(R.id.btn)
btn.setOnClickListener{
    val data = "Hello SecondActivity"
    val intent = Intent(this, SecondActivity::class.java)
    intent.putExtra("extra_data", data)
    startActivity(intent)
}
//In SecondActivity, data is typically retrieved in onCreate
//Only getStringExtra is used here, corresponding to other getIntExtra, etc., corresponding to the type of data that should be passed
val extraData = intent.getStringExtra("extra_data")
Return data to FirstActivity. That is, SecondActivity returns data to FirstActivity
//FirstActivity Jump
//This is similar to the above, except that startActivity() is used above, and startActivityForResult() is used here, which is just an Activity jump
val btn : Button = findViewById(R.id.btn)
btn.setOnClickListener{
    val data = "Hello SecondActivity"
    val intent = Intent(this, SecondActivity::class.java)
    intent.putExtra("extra_data", data)
    startActivityForResult(intent, 1)
}
//Operation of SecondActivity
btn.setOnClickListener{
    val data = "Hello FirstActivity"
    val intent = Intent()
    intent.putExtra("extra_data", data)
    setResult(2, intent) //Return results
    finish()//Log off the current page before returning to the previous page
}

//Processing of returned data
//Why there are requestCode and resultCode, because a page may have many different jumps, and a page may have many different returns, so that you can know exactly where you came from
override fun onActivityResult(requestCode: Int, resultCode: Int, data: Intent?) {
    super.onActivityResult(requestCode, resultCode, data)
    if(requestCode == 1){ //This is the result Code of the send jump
        if(resultCode == 2){ //This is the returned result Code
            //Processing logic, the third data, is the intent that comes with the second page jump, which may contain additional data
        }
    }
}
7.Activity
Status of 7.1 Activity
- Running state, interactive with users, Activity that the system is least willing to recycle
- Pause state, can be seen, but can not interact, for example, when a Dialog is popped on an Activity, the Activity is paused, you can see, you cannot interact, all your interactions will be on the Dialog, only when the memory pole is possible to recycle
- Stop state, can't interact, can't see, Activity is not at the top of the stack, but will save various variables and states, memory is not enough, may be recycled
- Destroy state, pushed from the task stack, the system will quickly recycle the Activity to ensure sufficient memory
7.2 Activity Life Cycle
- onCreate(), which is called when the Activity is first created and is typically used to initialize operations
- onStart(), called when Activity is not visible, the user is visible but not interactive
- OnResume(). Called when the Activity is ready to interact with the user. Currently the Activity is at the top of the stack, so it can interact
- onPause(), called when ready to call or reply to other activities, should release some resources and save some important data
- The main difference between onStop(), which is called when the activity is completely invisible, and onPause(), is that if you call Activity of a dialog box, the method will not be called
- onDestroy(), called after the Activity is destroyed money, becomes destroyed and waits to be recycled
- onRestart(), called when changing from a stop state to a running state, is the restart of the stopped Activity
7.3 Activity Life Cycle Diagram
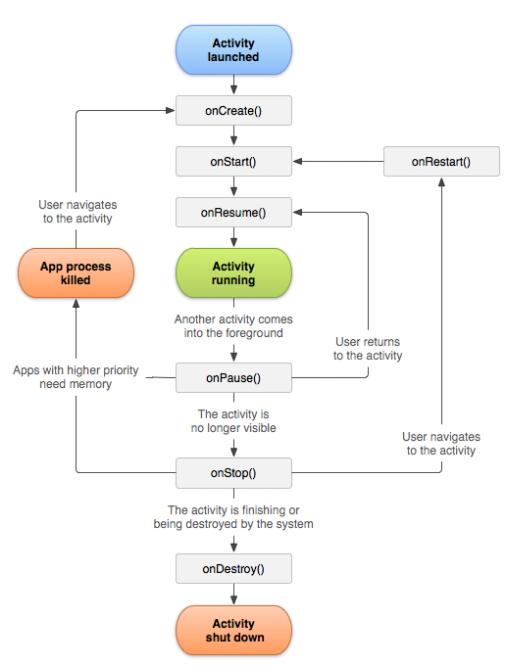
7.4 Life Cycle
Seven life cycle approaches, corresponding to three lifetimes
Full lifetime: onCreate() and onDestroy(), created to destroy
Visible Lifetime: onStart() and onStop(), the cycle, visible but not necessarily interactive
Foreground lifetime: onResume() and onPause(), which are at the top of the stack and are visible for interaction
7.5 Activity Recycled Issues
In the above life cycle, the Activity may be recycled when it stops. I'm sure you have the same thing: open a page of an App, cut it to the background, and don't delete it, but the next time you come in, the page will restart, because the page is recycled and when you click it again, it will restart the Activity. There's a problem with the data here
So Activity provides an onSaveInstanceState() to hold the data
This method takes a Bundle-type parameter and stores the data
//This method can save parameters
override fun onSaveInstanceState(outState: Bundle, outPersistentState: PersistableBundle) {
    super.onSaveInstanceState(outState, outPersistentState)
    val tempData = "Something you just type"
    outState.putString("data_key", tempData)
}
//The onCreate method passes in saveInstanceState
override fun onCreate(savedInstanceState: Bundle?) {
    super.onCreate(savedInstanceState)
    setContentView(R.layout.activity_main)
    //Here you can tell if there is data, because there is no data when you first enter the activity, but Activity restarted after you saved the data has data
    if(savedInstanceState != null){
        val tempData = savedInstanceState.getString("data_key")
    }
}
8. Activity Startup Mode
Activity starts in four modes
8.1 standard
Default startup mode, as soon as an activity is created, a new activity is added to the top of the stack. Whether or not the activity has created an instance before
FirstActivity starts a Second Activity, SecondActivity starts a FirstActivity, FirstActivity starts a FirstActivity
Stack situation: FirstActivity - FirstActivity - SecondActivity - FirstActivity (from high to low)
//Without any modification, the default is fine
val btn : Button = findViewById(R.id.btn)
btn.setOnClickListener {
    val intent = Intent(this, MainActivity::class.java)
    startActivity(intent)
}
8.2 singleTop
Stack top reuse mode, as long as a new activity instance is created, but the activity instance at the top of the stack is the activity of that class, the activity at the top of the stack will be reused
FirstActivity starts a Second Activity, SecondActivity starts a FirstActivity, FirstActivity starts a FirstActivity
Stack situation: FirstActivity - SecondActivity - FirstActivity (from high to low)
<activity android:name=".MainActivity"
    android:launchMode="singleTop">
    <intent-filter>
        <action android:name="android.intent.action.MAIN" />
        <category android:name="android.intent.category.LAUNCHER" />
    </intent-filter>
</activity>
8.3 singleTask
In-stack reuse mode, as long as the created Activity instance exists in the stack, then the instance is set to the top, and all the above pop-ups
FirstActivity starts a SecondActivity, SecondActivity starts a ThirdActivity, and ThirdActivity starts a SecondActivity
Stack case: SecondActivity - FirstActivity (from top to bottom)
<activity android:name=".MainActivity"
    android:launchMode="singleTask">
    <intent-filter>
        <action android:name="android.intent.action.MAIN" />
        <category android:name="android.intent.category.LAUNCHER" />
    </intent-filter>
</activity>
8.4 singleInstance
Singleton mode, obviously, uses a stack for a single Activity, which is the only Activity
<activity android:name=".MainActivity"
    android:launchMode="singleInstance">
    <intent-filter>
        <action android:name="android.intent.action.MAIN" />
        <category android:name="android.intent.category.LAUNCHER" />
    </intent-filter>
</activity>
9.Kotlin Classroom
9.1 with function
The with() function makes the code simpler when using multiple methods on the same object in a row
The with() function takes two arguments, one for any type of object and the second for a Lambda expression, which provides the context of the first argument object and the last row returned as a return value
val list = listOf("Apple", "Apple", "Apple", "Apple", "Apple")
val builder = StringBuilder()
builder.append("Start eating fruits.\n")
for(fruit in list){
    builder.append(fruit).append("\n")
}
builder.append("Ate all fruits.")
val result = builder.toString()
println(result)
//After brief with
//StringBuilder() takes a StringBuilder object, passes in a Lambda expression, and returns the object's toString method
val list = listOf("Apple", "Apple", "Apple", "Apple", "Apple")
val result = with(StringBuilder()){
    append("Start eating fruits.\n")
    for(fruit in list){
        append(fruit).append("\n")
    }
    append("Ate all fruits.")
    toString()
}
println(result)
9.2run function
Run is similar to with, but the difference is that run is called through an object with only one parameter: a Lambda expression whose context is the object
val list = listOf("Apple", "Apple", "Apple", "Apple", "Apple")
val result = StringBuilder().run {
    append("Start eating fruits.\n")
    for(fruit in list){
        append(fruit).append("\n")
    }
    append("Ate all fruits.")
    toString()
}
println(result)
9.3 apply function
Apply and run would also like to call through objects, accept only one Lambda object, and provide the object as context in the Lambda expression, but apply does not return a value, but automatically returns the object itself
val list = listOf("Apple", "Apple", "Apple", "Apple", "Apple")
val result = StringBuilder().apply {
    append("Start eating fruits.\n")
    for(fruit in list){
        append(fruit).append("\n")
    }
    append("Ate all fruits.")
}
println(result.toString())
9.4 Static Method
In Java, a static method can be declared in a method by static
//Static method
public class Util{
	public static void doSomething(){
		System.out.println("Hee-hee")
	}
}
//Usage method
Util.doSomething()
In Kotlin, the concept of static methods is weakened because there is a better way to use them in Kotlin, which is to create a single class.
object Util{
	fun doSomething(){
		println("Hee-hee")
	}
}
//Method of Use
Util.doSomething
//After using object to make a class a singleton class, all methods become the use of class static methods
//The keyword companion object has been around for so long that the only method in this code snippet for this class is the class static method
class Util{
	fun doSomething(){
		println("Hee-hee")
	}
	companion object{
		fun doAction(){
			println("Ha ha ha")
		}
	}
}
//Usage:
doSomething()Method must create an instance of this class to use
doAction()Methods can be invoked using class static methods Util.doAction()
The companion object keyword actually creates an accompanying class inside the class, and the doAction() method defines the instance method inside the accompanying class, while Kotlin guarantees that the class has only one accompanying class object, so the call to the Util.doAction() method is actually the call to the doAction() method of the accompanying class.
True static method creation: annotations and top-level methods
Notes:
If a method in a singleton class or companion object is annotated with @JvmStatic, the method is compiled into a static method. Note: If you add comments to other common methods, you will get an error
class Util{
	fun doSomething(){
		println("Hee-hee")
	}
	companion object{
		@JvmStatic
		fun doAction(){
			println("Ha ha ha")
		}
	}
}
Top-level method
Create a Kotlin file, define a method directly inside, without creating a class, which is the top-level method
//Create a Test.kt file with only the package name + three lines below
package com.example.text
fun doAction(){
	println("Ha ha ha")
}
doAction() can then be used directly anywhere without any modification
override fun onCreate(savedInstanceState: Bundle?) {
    super.onCreate(savedInstanceState)
    setContentView(R.layout.activity_main)
    doAction()
}
Kotlin automatically compiles the Test.kt file into a Java class for TestKt, so it can also be used in Java:
public void test(){
	TestKt.doAction()
}
Best practices for 9.5 intent
If you want to jump to SecondActivity, this is usually the call, so it's OK, but it's recommended that you write on top of the SecondActivity as a class static method and use the upper apply function at the same time:
//Original:
 val intent = Intent(this, MainActivity::class.java)
 intent.putExtra("data1", "text")
 intent.putExtra("data2", 10086)
 startActivity(intent)
 //Updated, straightforward
 class SecondActivity: AppCompatActivity() {
	companion object{
		val intent = Intent(context, SecondActivity::class.java).apply{
			putExtra("data1", "text")
			putExtra("data2", 10086)
		}
		context.startActivity(intent)
	}
}