FasterDFS Basic Configuration Installation
Basic overview
FastDFS is an open source, lightweight, distributed file system that manages files, including file storage, file synchronization, file access (file upload, file download), etc. It solves the problems of mass storage and load balancing.It is especially suitable for online services with files as carriers, such as photo album websites, video websites, etc.
FastDFS is tailored for the Internet, taking full account of redundant backup, load balancing, linear expansion and other mechanisms, and focusing on high availability, high performance and other indicators, it is easy to set up a high-performance file server cluster using FastDFS to provide file upload, download and other services.
Basic Structure Diagram
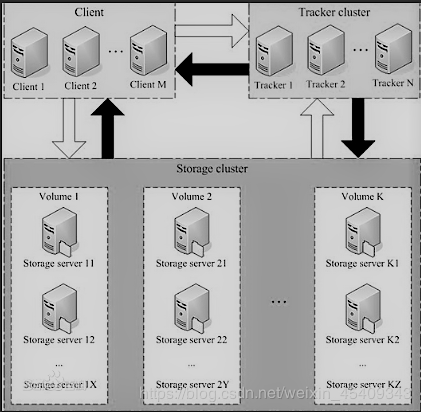
The FastDFS service side has two roles: a tracker and a storage node.Tracker mainly does scheduling work and plays a load balancing role in access.
Tracker and storage nodes can consist of one or more servers.Servers in the tracker and storage nodes can be added or taken offline at any time without affecting online services.All servers in the tracker are peer-to-peer and can be increased or decreased at any time depending on the server's pressure.
When a server is added to a volume, synchronization of existing files is automatically completed by the system. When synchronization is completed, the system automatically switches the new server to online for service.
Basic experimental deployment
1. Preparing for the experiment
| Name | role | IP Address |
|---|---|---|
| centos7-1 | tracker | 192.168.45.135 |
| centos7-2 | storage+nginx | 192.168.45.132 |
EXPERIMENTAL SOFTWARE PACKAGE EXTRACTION CODE
Links: https://pan.baidu.com/s/1_Xs09mdST6VNLue11dqhyQ
Extraction Code: 9ql5
2. Start Installation
Modify the names of both servers
Change one to tracker and one to storage
hostnamectl set-hostname tracker    storage
su
Install Basic Environment Package
yum -y install libevent libevent-devel perl make gcc zlib zlib-devel pcre pcre-devel gcc-c++ openssl-devel
Install the libfastcommon service (all nodes are installed)
mount.cifs //192.168.100.3/lzp /mnt
#Install libfastcommon service
cd /mnt/fastDFS/
tar zxvf libfastcommon-1.0.39.tar.gz -C /opt
cd /opt/libfastcommon-1.0.39/
#Compile and install and establish soft links to facilitate system identification
./make.sh && ./make.sh install
ln -s /usr/lib64/libfastcommon.so /usr/local/lib/libfastcommon.so
ln -s /usr/lib64/libfdfsclient.so /usr/local/lib/libfdfsclient.so
ln -s /usr/lib64/libfdfsclient.so /usr/lib/libfdfsclient.so
Install the FastDFS service (all nodes are installed)
cd /mnt/fastDFS/
tar zxvf fastdfs-5.11.tar.gz -C /opt
#Compile Installation
cd /opt/fastdfs-5.11/
./make.sh && ./make.sh install
 cd /etc/fdfs/
cp tracker.conf.sample tracker.conf
cp storage.conf.sample storage.conf
cp client.conf.sample client.conf
tracker Monitoring Configuration
# Create a directory for data and log files
[root@tracker ~]# mkdir -m 755 -p /opt/fastdfs

//Modify the tracker configuration file
[root@tracker ~]# vim /etc/fdfs/tracker.conf
#Modify the following configuration
#Port=22122//tracker service default port 22122 is sufficient
base_path=/opt/fastdfs      //The 22-line tracker stores the following paths for the data and log. The tracker must create the following paths for the data and log in advance. It must create the following paths in advance.
#Start HTTP service process on http.server_port=8080//tracker server without installing Ignore
#Open Service
fdfs_trackerd /etc/fdfs/tracker.conf start
#Set boot-up self-start
[root@tracker ~]# vim  /etc/rc.local
#Last Line Add
fdfs_trackerd   /etc/fdfs/tracker.conf start
#Turn off firewalls and security features
[root@tracker ~]# systemctl stop firewalld
[root@tracker ~]# setenforce 0
storage Service Side Modification
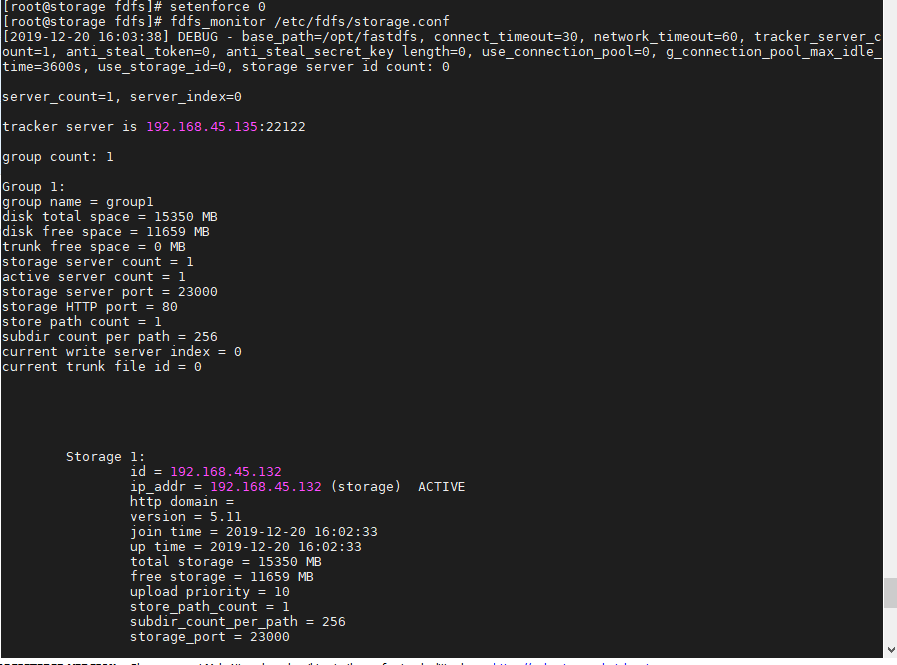
#Create a directory for data and log files
[root@storage ~]# mkdir -m 755 -p /opt/fastdfs

//Modify storage Profile
[root@storage ~]# vim /etc/fdfs/storage.conf
#Modify the following configuration
group_name=group1        //Default group name, modified as appropriate
port=23000       //storge default 23000, storage port number must be the same for the same group
base_path=/opt/fastdfs          //Root path of storage log file
store_path_count=1              //Same number of paths as below, default is 1
store_path0=/opt/fastdfs       //Storage path provided by 109 (stored with log files by default)
tracker_server=192.168.45.135:22122      //Own tracker server IP (focus!!!)
http.server_port=80            //The default port for http access files is 8888, and the listening ports configured in nginx are consistent

//Open the service and set the startup self-startup

#Open service (command supports start|stop|restart)
[root@storage ~]# fdfs_storaged  /etc/fdfs/storage.conf start
[root@storage ~]# netstat -atnp | grep 23000
tcp        0      0 0.0.0.0:23000           0.0.0.0:*               LISTEN      40430/fdfs_storaged

#Set boot-up self-start
[root@storage ~]# vim  /etc/rc.local
#Last Line Add
fdfs_storaged   /etc/fdfs/storage.conf start

[root@storage ~]# systemctl stop firewalld
[root@storage ~]# setenforce 0
//Check if association with tracker monitoring side succeeded
fdfs_monitor /etc/fdfs/storage.conf
Install nginx service (storage:192.168.45.132)
To reduce the number of virtual machine opens, install nginx on the storage side
cd /mnt/fastDFS/
[root@storage fastDFS]# tar zxvf nginx-1.12.0.tar.gz -C /opt
 tar zxvf fastdfs-nginx-module-1.20.tar.gz -C /opt
# Modify/opt/fastdfs-nginx-module-1.20/src/config file
[root@storage fastDFS]# vim /opt/fastdfs-nginx-module-1.20/src/config
ngx_module_incs="/usr/include/fastdfs /usr/include/fastcommon/"
CORE_INCS="$CORE_INCS /usr/include/fastdfs /usr/include/fastcommon/"
#Compile Installation
cd /opt/nginx-1.12.0/
[root@storage nginx-1.12.0]# ./configure \
--prefix=/usr/local/nginx \
--add-module=/opt/fastdfs-nginx-module-1.20/src/

make && make install

cd /opt/fastdfs-nginx-module-1.20/src
cp mod_fastdfs.conf /etc/fdfs/
#Modify fastdfs-nginx-module configuration file mod-fasts.conf
[root@storage nginx-1.12.0]# cd /etc/fdfs
[root@storage fdfs]# vim mod_fastdfs.conf
#Check Configuration
base_path=/opt/fastdfs         //Path to store data files, logs
tracker_server=192.168.45.135/:22122    //Address of tracker end (key!!!)
url_have_group_name = true  //Does url contain group name
storage_server_port=23000           //Requires the same configuration as storage
store_path_count=1              //Number of storage paths, need to match number of store_path s
store_path0=/opt/fastdfs               //62-line file storage location

#Modify nginx configuration file
[root@storage fdfs]# vim /usr/local/nginx/conf/nginx.conf
#Add at empty line in server
location ~/M00 {
                root /opt/fastdfs/data;
                ngx_fastdfs_module;
}
#Create soft links
[root@localhost ~]# ln -s /usr/local/nginx/sbin/nginx /usr/local/sbin/
#Check nginx Profile
[root@localhost ~]# nginx -t
nginx: the configuration file /usr/local/nginx/conf/nginx.conf syntax is ok
nginx: configuration file /usr/local/nginx/conf/nginx.conf test is successful
#start nginx
[root@localhost ~]# nginx

#Failure to do so by copying http.conf and mime.types from the fastdfs unzip directory may result in errors
[root@storage fdfs]# cd /opt/fastdfs-5.11/conf/
[root@storage conf]# cp mime.types http.conf /etc/fdfs/
Modify storage End
#Modify Profile
[root@storage ~]# vim /etc/fdfs/client.conf
#Check the following configuration
base_path=/opt/fastdfs     //tracker Server File Path
tracker_server=192.168.45.135:22122            //tracker server IP address and port number
http.tracker_server_port=8080                  // The http port number of the tracker server, must be
Upload Test File Command:
/usr/bin/fdfs_upload_file <config_file> <local_filename>
Command demonstration:
[root@localhost mnt]# /usr/bin/fdfs_upload_file /etc/fdfs/client.conf 1.jpg
group1/M00/00/00/wKgthF4AKVmAY9WYABIrwU4wXNs537.jpg

Download File Command:
/usr/bin/fdfs_download_file <config_file> <file_id> [local_filename]
Example
/usr/bin/fdfs_download_file /etc/fdfs/client.conf group1/M00/00/00/wKiOTV354W2AIf7GAAAAEh3TEws726.jpg test2.jpg**
Delete File command:
/usr/bin/fdfs_delete_file <config_file> <file_id>
Example:
fdfs_delete_file /etc/fdfs/client.conf group1/M00/00/00/wKiOTV354W2AIf7GAAAAEh3TEws726.jpg