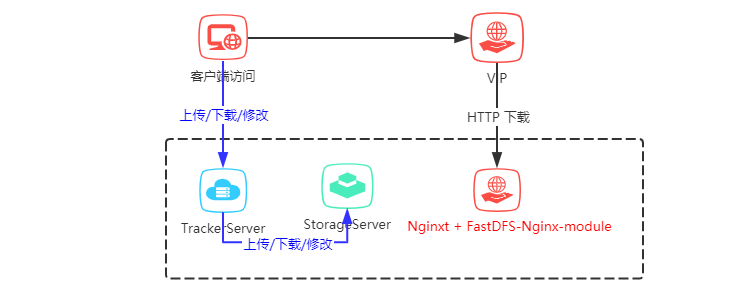
As I said before A picture of the network architecture of microservices , through this article, you can understand the stand-alone installation process in FastDFS components.
Stand alone architecture
The following are the installation steps of FastDFS
I. environmental preparation
CentOS 7.X
libfastcommon Version used: libfastcommon-1.0.41.tar.gz
FastDFS Version used: fastdfs-6.01.tar.gz
fastdfs-nginx-module Version used: fastdfs-nginx-module-1.21.tar.gz
nginx Version used: nginx-1.16.1.tar.gz
II. Installation process
1. Install libfastcommon-1.0.41.tar.gz
tar -zxvf libfastcommon-1.0.41.tar.gz
cd libfastcommon-1.0.41/
./make.sh
./make.sh install
2. Install FastDFS
tar -zxvf  fastdfs-6.01.tar.gz
cd fastdfs-6.01/
./make.sh
./make.sh install
Prepare profile
cp /etc/fdfs/tracker.conf.sample /etc/fdfs/tracker.conf
cp /etc/fdfs/storage.conf.sample /etc/fdfs/storage.conf
cp /etc/fdfs/client.conf.sample /etc/fdfs/client.conf
cd /opt/apps/fastdfs-6.01/conf
cp http.conf mime.types /etc/fdfs/
Tracker Server configuration
vim /etc/fdfs/tracker.conf
Modify the configuration as follows:
#tracker server port number
port=22122
#Root directory where logs and data are stored
base_path=/opt/fastdfs/tracker
#HTTP service port
http.server_port=80
Open firewall port
1. Open the tracking port
vim /etc/sysconfig/iptables
2. Add the following port lines:
-A INPUT -m state --state NEW -m tcp -p tcp --dport 22122 -j ACCEPT
3. Restart the firewall
service iptables restart
Start Tracker
/etc/init.d/fdfs_trackerd start
Storage Server configuration
vim /etc/fdfs/storage.conf
Modify the configuration as follows:
#storage server port number
port=23000
#Data and log file storage root
base_path=/opt/fastdfs/storage
#First storage directory
store_path0=/opt/fastdfs/storepath0
#tracker server IP and port
tracker_server=192.168.0.1:22122
#http access to the file port (8888 by default, modified according to the situation, consistent with nginx)
http.server_port=8888
Open firewall port
1. Open the tracking port
vim /etc/sysconfig/iptables
2. Add the following port lines:
-A INPUT -m state --state NEW -m tcp -p tcp --dport 23000 -j ACCEPT
3. Restart the firewall
service iptables restart
Start Storage
/etc/init.d/fdfs_storaged start
View cluster status
fdfs_monitor /etc/fdfs/storage.conf list
Check whether the status is normal
Storage 1:
id = 6.0.36.243
ip_addr = 6.0.36.243 (anantes-651-1-49-net.w2-0.abo.wanadoo.fr) ACTIVE
Client configuration
vim /etc/fdfs/client.conf
Modify the configuration as follows:
#
base_path=/opt/apps/fastdfs/client
#tracker server IP and port
tracker_server=192.168.0.1:22122
Upload a picture to test whether it can be uploaded successfully
fdfs_upload_file /etc/fdfs/client.conf test.jpg
test.jpg is a picture uploaded locally for testing. Please fill in the path correctly
3. Install Nginx and fastdfs Nginx module
#Decompress fastdfs nginx module
tar -zxvf fastdfs-nginx-module-1.21.tar.gz
cd fastdfs-nginx-module-1.21/
cp ./src/mod_fastdfs.conf /etc/fdfs
#Decompression nginx
tar -zxvf nginx-1.16.1.tar.gz
cd nginx-1.16.1/
#Install nginx? HTTP? Image? Filter? Module
yum -y install gd-devel
yum -y install zlib zlib-devel openssl openssl--devel pcre pcre-devel
#add module
./configure --add-module=../fastdfs-nginx-module-1.21/src --prefix=/usr/local/nginx --with-http_image_filter_module
#Compile nginx
make
#Install nginx
make install
Check whether the installation is successful
/usr/local/nginx/sbin/nginx -V
Check whether the plug-in is installed successfully
[root@FastDFS nginx-1.16.1]# /usr/local/nginx/sbin/nginx -V
nginx version: nginx/1.16.1
built by gcc 4.8.5 20150623 (Red Hat 4.8.5-11) (GCC)
configure arguments: --add-module=../fastdfs-nginx-module-1.21/src --prefix=/usr/local/nginx --with-http_image_filter_module
[root@FastDFS nginx-1.16.1]#
Modify Nginx access
vim /etc/fdfs/mod_fastdfs.conf
Modify the configuration as follows:
#
connect_timeout=10
#tracker server IP and port
tracker_server=192.168.0.1:22122
#Enable group group name
url_have_group_name=true
#
store_path0=/opt/fastdfs/storepath0
To modify the Nginx configuration:
vim /usr/local/nginx/conf/nginx.conf
Modify the configuration as follows:
server {
    listen       80;
    server_name  localhost;

    #charset koi8-r;

    #access_log  logs/host.access.log  main;

    location / {
        root   html;
        index  index.html index.htm;
    }
    #Picture with compression access
    location ~ /group1/M00/(.*)\.(jpg|gif|png)!format=([0-9]+)_([0-9]+) {
        alias  /home/fastdfs/storage/data/;
        ngx_fastdfs_module;
        set $w $3;
        set $h $4;

        rewrite group1/M00(.+)\.(jpg|gif|png)!format=([0-9]+)_([0-9]+)$ group1/M00$1.$2 break;

        image_filter resize $w $h;
        image_filter_buffer 5M;
    }
    #Main graph access
    location ~ /group([0-9])/M00/(.+)\.?(.+) {
        alias /home/fastdfs/storage/data/;
        ngx_fastdfs_module;
    }
...
}
Start Nginx
#start-up
/usr/local/nginx/sbin/nginx
#Stop it
/usr/local/nginx/sbin/nginx -s stop
#restart
/usr/local/nginx/sbin/nginx -s reload
Through the above configuration, the FastDFS is built.
Test picture access
Picture access example:
Main graph access
http://218.2.204.124:30308/group1/M00/00/03/BgAk813IvTCAIxxxAAD44NFKFPc908.png
Compressed picture (add! format = width? Height after main picture) access
http://218.2.204.124:30308/group1/M00/00/03/BgAk813IvTCAIxxxAAD44NFKFPc908.png!format=400_10
Unresolved issues
format = width? Height after using main image for compressed image
This article is based on the platform of blog one article multiple sending OpenWrite Release!
Thanks again!!! You have read the full text, welcome to pay attention to WeChat public number ape code, your support is my motivation to keep updating the article.