**
Installation and configuration of Fastdfs in Ubuntu environment
**
FastDFS [1]:
Contents:
I. Preface
2, FastDFS introduction
3, FastDFS download and installation
4, Configure tracker and storage
Five, test
Six, summary
1, Foreword:
This paper implements the installation and test of FastDFS
System environment: ubantu16.04
FastDFS version: 5.0.5
2, FastDFS introduces FastDFS is an open source lightweight distributed file system implemented by C language. It manages files, including file storage, file synchronization, file access (file upload, download), etc. It solves the problems of mass storage and load balancing. It is especially suitable for online services based on documents. Such as album website, video website and so on.
//Similar distributed files include Google's GFS, HDFS (Hadoop), TFS (Taobao)
//FastDFS has two roles: Tracker and Storage node
//Tracker: it is mainly used for scheduling and load balancing; it is responsible for managing all Storage and groups. After each Storage is restarted, it will connect to tracker, inform its Group, and maintain periodic heartbeat.
//Storage: storage node, which mainly provides capacity and backup services; in groups, there can be multiple storage units in each Group, and data can be backed up to each other.
Official architecture: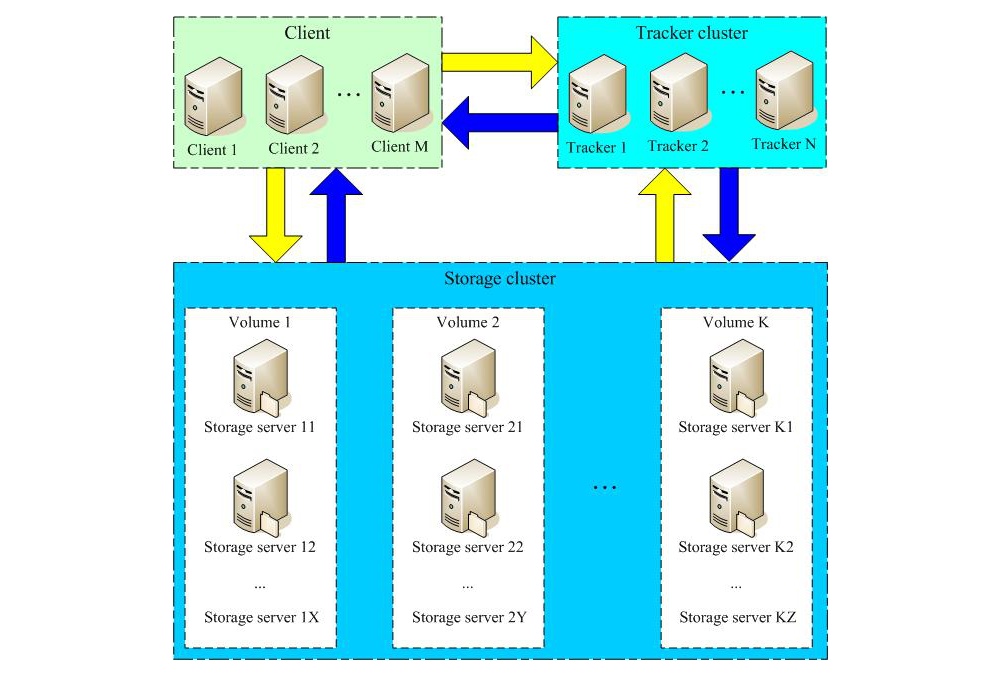
The architecture of this paper is two servers: one Tracker and one Storage
Tracker: 172.16.18.64
Storage: 172.16.18.58
3, FastDFS installation (both servers need to be installed)
1. Download and install libfastcommon
Since fastdfs5.0.5 relies on libfastcommon, install libfastcommon first
Download: This article is downloaded in the / opt/fastdfs file, command:
wget https://github.com/happyfish100/libfastcommon/archive/V1.0.7.tar.gz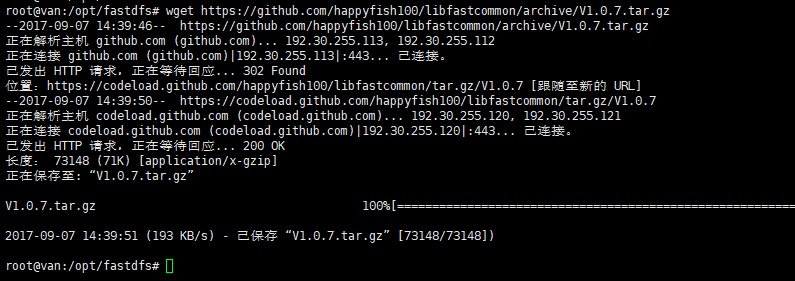
Unzip libfastcommon, command:
tar -zxvf V1.0.7.tar.gzCompile, enter the directory libfastcommon-1.0.7, command:
cd libfastcommon-1.0.7
  ./make.sh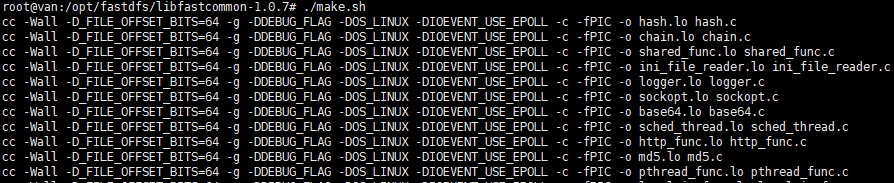
Installation, command:
./make.sh install
As shown in the figure above, libfastcommon is installed successfully
Set soft connection, command:
ln -s /usr/lib64/libfastcommon.so /usr/local/lib/libfastcommon.so
ln -s /usr/lib64/libfastcommon.so /usr/lib/libfastcommon.so
ln -s /usr/lib64/libfdfsclient.so /usr/local/lib/libfdfsclient.so
ln -s /usr/lib64/libfdfsclient.so /usr/lib/libfdfsclient.so
2. Download and install FastDFS,
Order:
wget https://github.com/happyfish100/fastdfs/archive/V5.05.tar.gz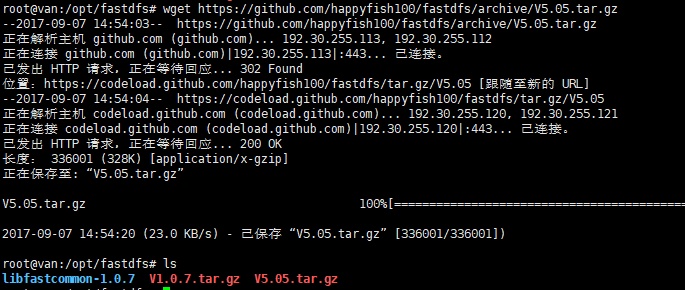
Unzip FastDFS, command:
tar -zxvf V5.05.tar.gzCompile, enter fastfds-5.05 directory, command:
cd fastdfs-5.05
./make.sh
Installation, command:
./make.sh install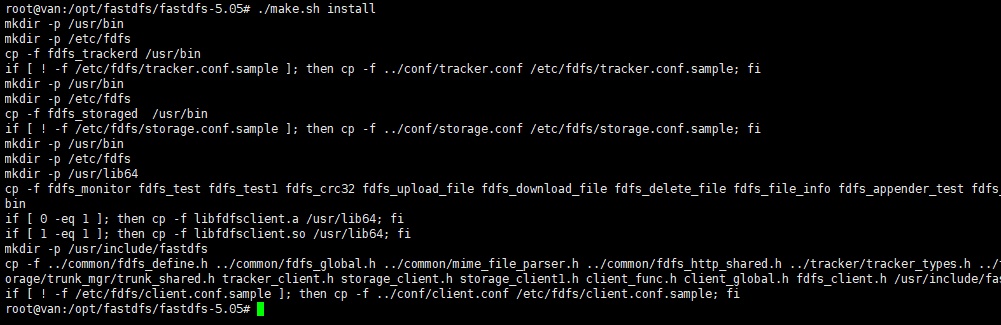
As shown in the figure above, FastDFS is installed successfully
4, Configure Tracker and Storage
After FastDFS is installed successfully, there will be an fdfs directory in the / etc directory. Enter fdfs, and you will find three sample files with the. Sample suffix.
1. Configure the Tracker server (172.16.18.64 is used in this article)
In the / etc/fdfs directory, modify tracker.conf and command:
cp tracker.conf.sample tracker.conf
   vim tracker.conf
Open tracker.conf and modify it as follows:
 # the base path to store data and log files
base_path=/data/fastdfs/tracker
Of course, the premise is to create the / data/fastdfs/tracker directory first. Command:
mkdir -p /data/fastdfs/trackerModify and save, start the tracker service, command:
fdfs_trackerd /etc/fdfs/tracker.conf start
Close the tracker service with a similar command:
fdfs_trackerd /etc/fdfs/tracker.conf stop
After starting the tracker service, view the listening, command:
netstat -unltp|grep fdfs

tracker default port 22122
Check the directory file / data/fastdfs/tracker, and two more files are found for storing data and logs
Now the tracker is installed successfully.
2. Configure Storage server (172.16.18.58)
Also enter the directory / etc/fdfs, command:
cp storage.conf.sample storage.conf
vim storage.conf
Open storage.conf and modify it as follows:
# the base path to store data and log files
base_path=/data/fastdfs/storage
# store_path#, based 0, if store_path0 not exists, it's value is base_path
# the paths must be exist
store_path0=/data/fastdfs/storage
# tracker_server can ocur more than once, and tracker_server format is
#  "host:port", host can be hostname or ip address
#Configure the tracker ip port
tracker_server=172.16.18.64:22122
Of course, the premise is to create the / data/fastdfs/storage directory first. Command:
mkdir -p /data/fastdfs/storageAfter modifying and saving, start the storage service, command: (it may be a little slow)
fdfs_storaged /etc/fdfs/storage.conf start
There is an error in startup, which can be viewed through / data/fastdfs/storage/logs
View the file contents under / data/fastdfs/storage, and generate logs and data directories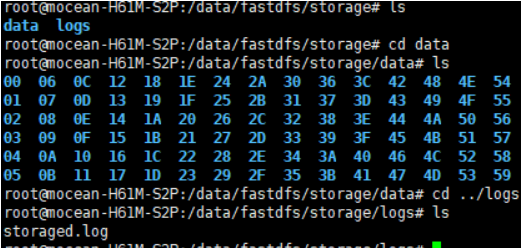
View the following port listening commands:
netstat -unltp|grep fdfs

storage default port 23000
The Storage storage node installation succeeded.
After all storage nodes are started, you can use the following command on any storage node to view the status information of the cluster:
/usr/bin/fdfs_monitor /etc/fdfs/storage.conf
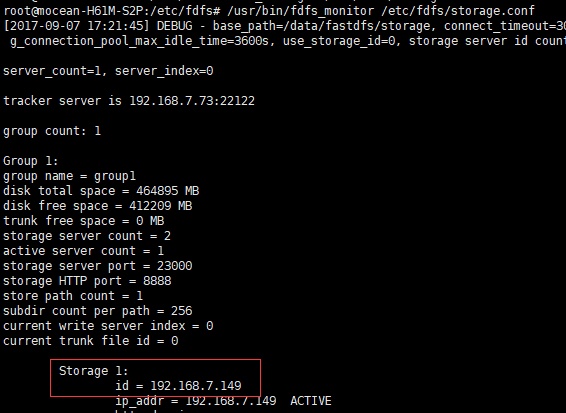
As can be seen from the above two figures, both storage are Active and the configuration is successful
5, Test upload file
Choose any server. Here I choose 172.16.18.58 server
Also enter the / etc/fdfs directory, compile client.conf, and the command is as follows:
cp /etc/fdfs/client.conf.sample /etc/fdfs/client.conf
vim /etc/fdfs/client.conf
Amend to read:
# the base path to store log files
base_path=/data/fastdfs/client

# tracker_server can ocur more than once, and tracker_server format is
#  "host:port", host can be hostname or ip address
#Configure the tracker ip port
tracker_server=192.168.7.73:22122
The same premise is to create the / data/fastdfs/client directory first. Command:
mkdir -p /data/fastdfs/clientUpload a picture of / opt directory (named: 14.jpg, put the picture in the directory in advance), command:
fdfs_test /etc/fdfs/client.conf upload /opt/14.jpg
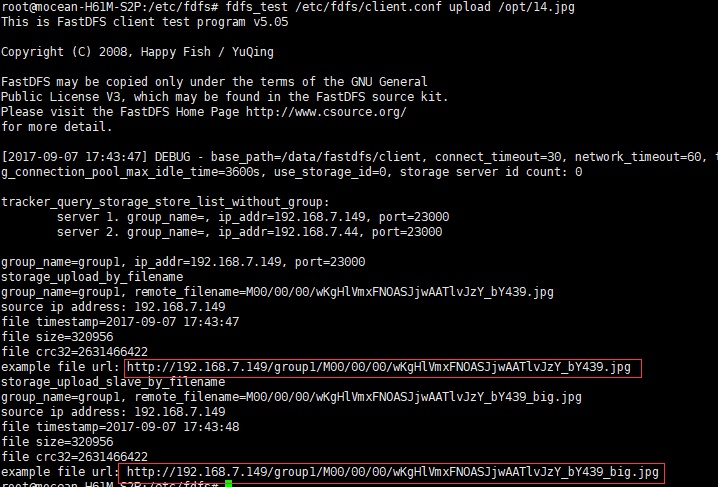
As shown in the figure above, upload succeeded,
Enter the directory / data/fastdfs/storage/data/00/00 of the two storage servers respectively. You can find that the file is saved successfully
So far, the file upload test is successful!!!
6, Summarize this article
This paper introduces the installation and test of FastDFS on ubantu.
If there is a bad place to write, please leave a message or private letter....
It's a traditional virtue in China to like you at will

