Fabric CA is a certificate management tool of Hyperledger Fabric, which is very convenient for development and testing. In this tutorial, we will explore the use of fabric Ca and use it to complete user registration / Register and registration / Enrollment.
Hyperledger Fabric is a licensed blockchain platform. Before accessing the Fabric network, you must first identify and obtain access permission. Identity in Fabric network is realized by digital certificate, so CA is needed to deal with certificate management.
Although the Hyperledger Fabric allows the use of third-party CA software to manage user certificates, it also brings a Fabric CA tool as a Ca in the Fabric network for convenience. Since all the application instances of Fabric are using Fabric Ca, we will explore Fabric Ca in this tutorial, especially its application in user registration.
In this article, we use the Fabcar application deployed on the First network. This example application includes chain code and client application. Enrolladmin.js and registerUser.js realize the registration based on Fabric CA.
In order to make the whole process more clear, we adjusted the code. At the same time, we will also check the database of Fabric CA to better understand the operation mechanism of Fabric CA when registering and registering.
Recommended courses:
1, installation
We need a Fabric node to run the demonstration of Fabric CA, which should contain all the software related to the Hyperledger Fabric. If you do not have a Fabric node, please refer to This article Create one.
Once the Fabric node is ready, you can run the following command to start the Fabcar demonstration:
cd fabric-samples/fabcar
./startFabric.sh
This script will start the First network, as well as the CA of each organization. Let's focus on fabric CA of Org1.
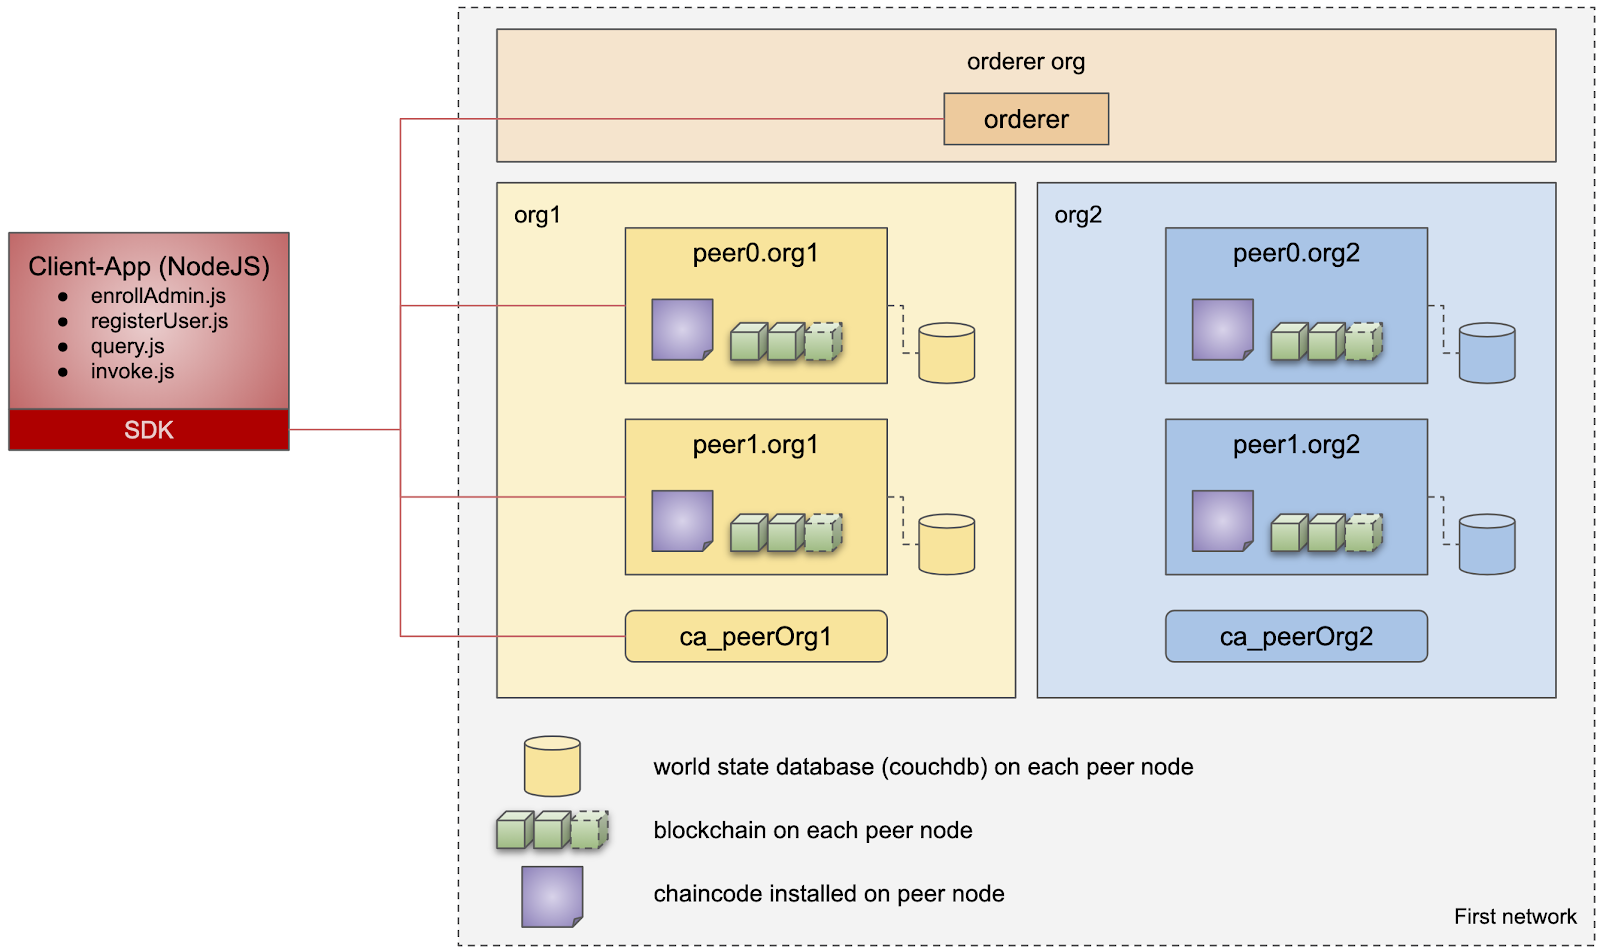
We use JavaScript code in the Fabcar application, especially enrollAdmin.js and registerUser.js, because these two parts of code use SDK to access Fabric CA and Fabric network.
This is the First network and the interaction between the client application and the Fabric network. Let's focus again on Ca? Peerorg1 and the code for registration.
2. Fabric CA registration code
There are two processes involved in accessing Fabric CA. Registration refers to that the user requests and obtains the digital certificate from the designated ca. registration is usually completed by the Registrar, who is responsible for telling the CA to issue the digital certificate.
There are several different ways to issue digital certificates to users. The process of Fabcar script is similar to the following:
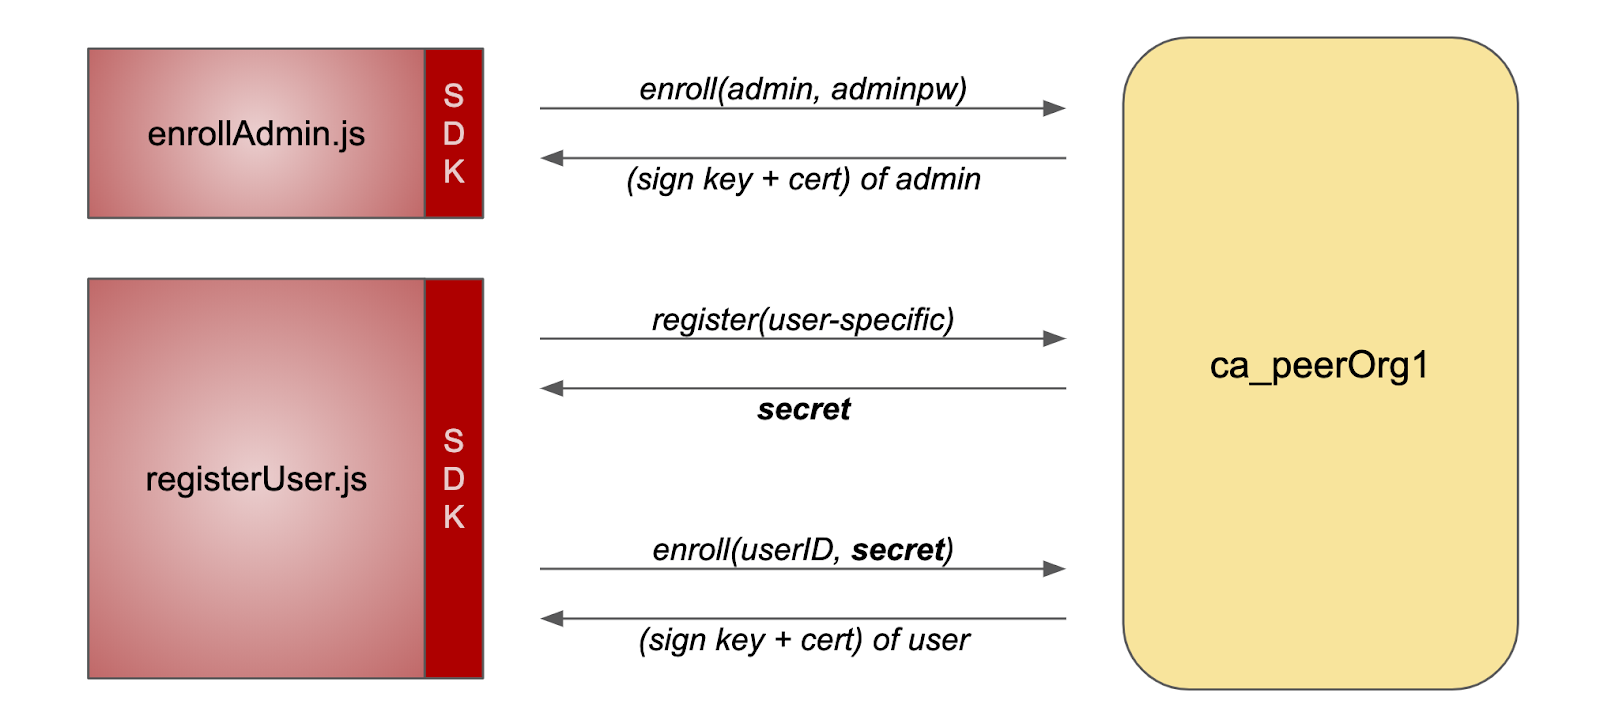
- Register the administrator in Fabric CA, and then the administrator receives the signed private key and certificate, which are stored in the wallet/admin directory
- Administrator registers user1 in Fabric CA, CA returns a ciphertext
- The ciphertext returned by the CA is used to register user1 in the Fabric CA. after registration, the private key and certificate signed by user1 are obtained. These data are stored in the wallet/user1 directory and will be used for subsequent chain code interaction (query, transaction).
enrollAdmin.js performs step 1, registerUser.js performs steps 2 and 3:
3. Modify Fabric CA example code
We didn't modify enrollAdmin.js. It simply uses the default administrator information (admin:adminpw), which is preset in docker-compose-ca.yaml under fabric samples / first network / directory. As a result, the private key and certificate of the admin signature are saved in the wallet/admin directory.
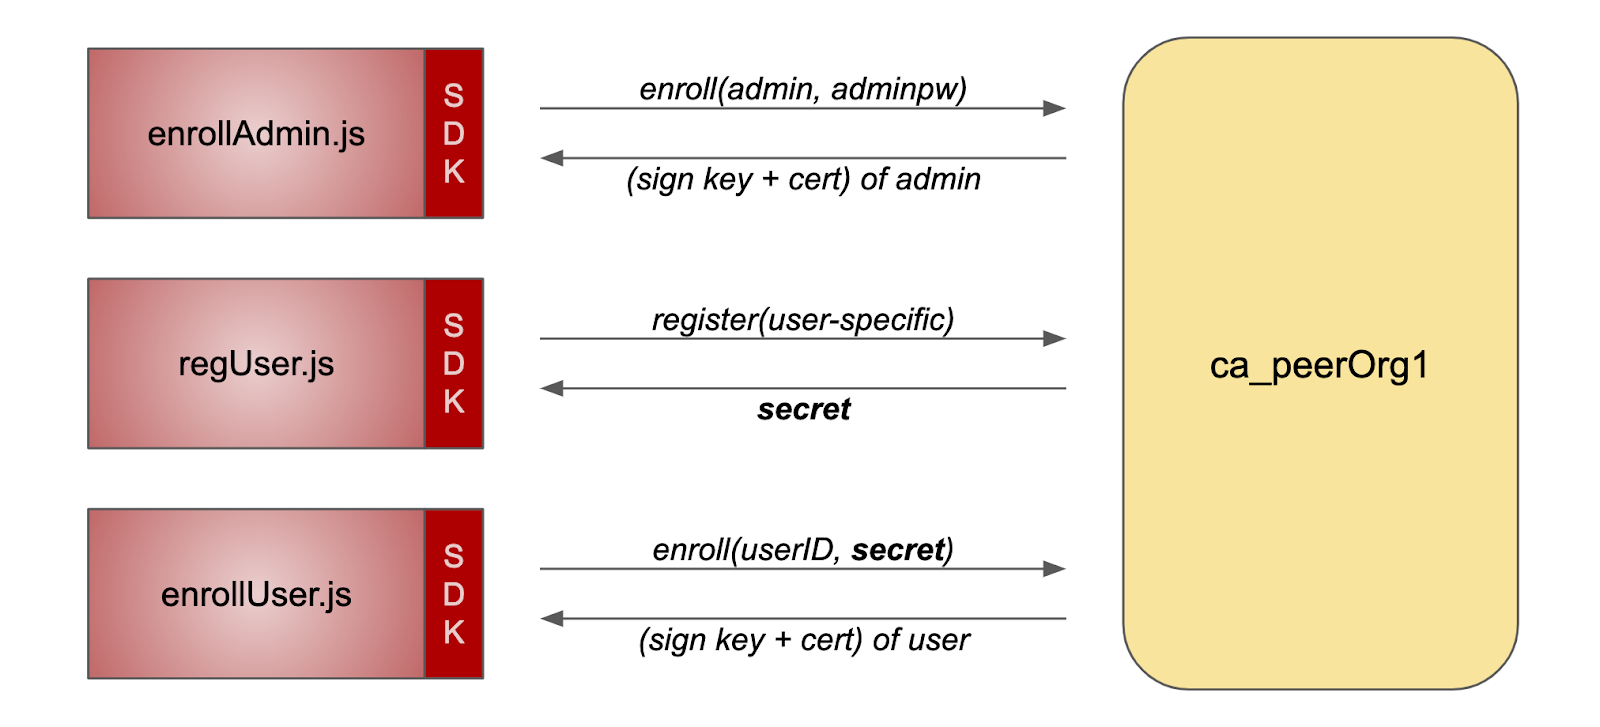
regsiterUser.js is split into two files: regUser.js and enrollUser.js. The reasons for this are:
- We can see the difference between Fabric CA user registration and registration.
- We can see that these two steps are actually performed by different roles: the registration step is operated by the Registrar (admin), and the registration step is completed by the user himself using the obtained ciphertext, which is very important, because only the user himself can know the key, and the administrator should not know it.
- We can extract the hard coded part of the code as parameters, which can make the code adapt to other application scenarios of Fabric CA.
The following is the schematic after rewriting the code:
4. Fabric CA user registration: regUser.js
regUser.js needs a parameter: Registration ID. the returned result is a ciphertext, which will be used for user registration later. Note that the execution of regUser.js requires the presence of the admin wallet in the Fabric CA.
node regUser.js <enrollmentID>
Most of the code is copied from the original registerUser.js:
/*
 * SPDX-License-Identifier: Apache-2.0
 */

'use strict';

const { FileSystemWallet, Gateway, X509WalletMixin } = require('fabric-network');
const path = require('path');

const ccpPath = path.resolve(__dirname, '..', '..', 'first-network', 'connection-org1.json');

async function main() {
    try {

        // Create a new file system based wallet for managing identities.
        const walletPath = path.join(process.cwd(), 'wallet');
        const wallet = new FileSystemWallet(walletPath);
        console.log(`Wallet path: ${walletPath}`);

	const user = process.argv[2];

        // Check to see if we've already enrolled the user.
        const userExists = await wallet.exists(user);
        if (userExists) {
            console.log('An identity for the user ' + user + ' already exists in the wallet');
            return;
        }

        // Check to see if we've already enrolled the admin user.
        const adminExists = await wallet.exists('admin');
        if (!adminExists) {
            console.log('An identity for the admin user "admin" does not exist in the wallet');
            console.log('Run the enrollAdmin.js application before retrying');
            return;
        }

        // Create a new gateway for connecting to our peer node.
        const gateway = new Gateway();
        await gateway.connect(ccpPath, { wallet, identity: 'admin', discovery: { enabled: true, asLocalhost: true } });

        // Get the CA client object from the gateway for interacting with the CA.
        const ca = gateway.getClient().getCertificateAuthority();
        const adminIdentity = gateway.getCurrentIdentity();

        // Register the user, enroll the user, and import the new identity into the wallet.
        const secret = await ca.register({ affiliation: 'org1.department1', enrollmentID: user, role: 'client' }, adminIdentity);
        console.log('Successfully registered user ' + user + ' and the secret is ' + secret );

    } catch (error) {
        console.error(`Failed to register user ${user}: ${error}`);
        process.exit(1);
    }
}

main();
5. Fabric CA registration user: enrollUser.js
enrollUser.js needs two parameters: the registration ID and the ciphertext obtained during registration. The returned result is the wallet created in the wallet directory. Note that the operation of enrollUser.js does not require the existence of the admin wallet in the Fabric CA. The file should be executed by the user himself.
node enrollUser.js <enrollmentID> <secret>
Most of the code comes from the original enrollAdmin.js:
/*
 * SPDX-License-Identifier: Apache-2.0
 */

'use strict';

const FabricCAServices = require('fabric-ca-client');
const { FileSystemWallet, X509WalletMixin } = require('fabric-network');
const fs = require('fs');
const path = require('path');

const ccpPath = path.resolve(__dirname, '..', '..', 'first-network', 'connection-org1.json');
const ccpJSON = fs.readFileSync(ccpPath, 'utf8');
const ccp = JSON.parse(ccpJSON);

async function main() {
    try {

        // Create a new CA client for interacting with the CA.
        const caInfo = ccp.certificateAuthorities['ca.org1.example.com'];
        const caTLSCACerts = caInfo.tlsCACerts.pem;
        const ca = new FabricCAServices(caInfo.url, { trustedRoots: caTLSCACerts, verify: false }, caInfo.caName);

        // Create a new file system based wallet for managing identities.
        const walletPath = path.join(process.cwd(), 'wallet');
        const wallet = new FileSystemWallet(walletPath);
        console.log(`Wallet path: ${walletPath}`);

	const user = process.argv[2];
	const secret = process.argv[3];

        // Check to see if we've already enrolled the admin user.
        const userExists = await wallet.exists(user);
        if (userExists) {
            console.log('An identity for this user already exists in the wallet');
            return;
        }

        // Enroll the admin user, and import the new identity into the wallet.
        const enrollment = await ca.enroll({ enrollmentID: user, enrollmentSecret: secret });
        const identity = X509WalletMixin.createIdentity('Org1MSP', enrollment.certificate, enrollment.key.toBytes());
        await wallet.import(user, identity);
        console.log(`Successfully enrolled user ${user} and imported it into the wallet`);

    } catch (error) {
        console.error(`Failed to enroll admin user "admin": ${error}`);
        process.exit(1);
    }
}

main();
6, demonstration
Now let's see how to use these three scripts to register the user1 user in the Fabric CA for the Fabcar application.
First, run fabcar/startFabric.sh
Make sure the Fabric CA's wallet directory is empty before running.
cd fabric-samples/fabcar
./startFabric.shcd javascript
rm -rf wallet
The results are as follows:

Second, install the dependent module.
npm install
Step 3: install sqlite3 for Fabric CA of org1
Because we want to view the database of Fabric CA, sqlite3 is installed.
Open another terminal:
docker exec -it ca_peerOrg1 bash
To install sqlite3 for Ca ﹣ peerorg1:
apt-get update
apt-get install sqlite3
The database path of Fabric CA is / etc / hyperledger / Fabric CA server / Fabric CA server.db. Now we can check the database:
cd /etc/hyperledger/fabric-ca-server
sqlite3 fabric-ca-server.db
Now you have entered the command line of sqlite3:
sqlite> .tables
The results are as follows:
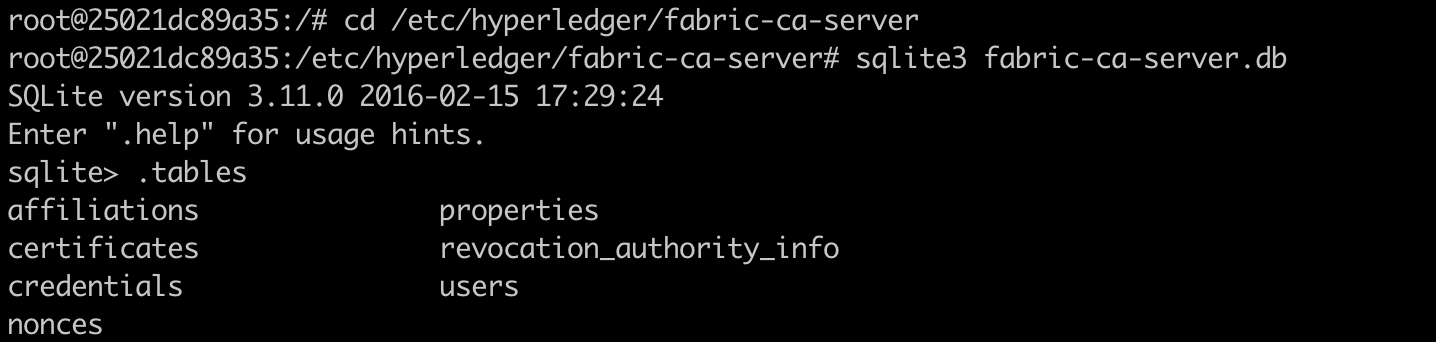
Our interest is in the users table and certificates table of Fabric CA, and we can use SQL statements to view their contents:
sqlite> select * from users;
sqlite> select * from certificates;
The results are as follows:
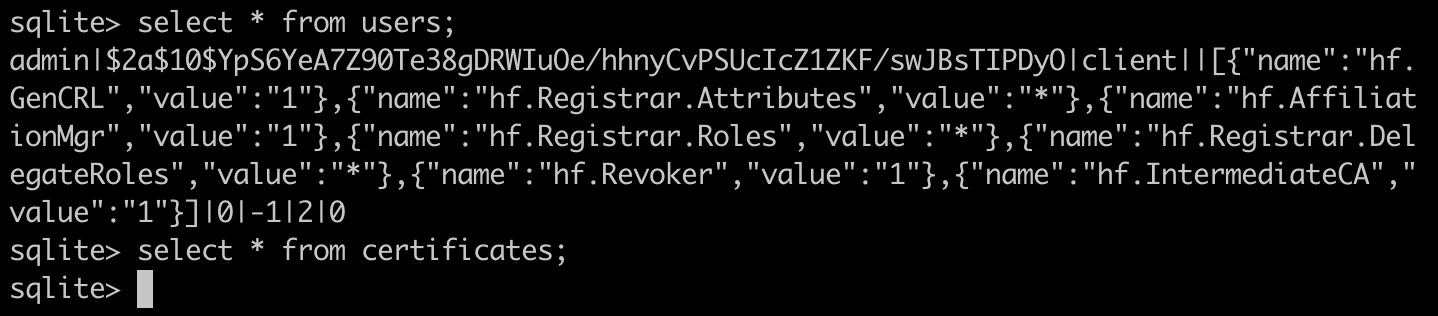
We see that the user admin is already in the database. This is generated when Fabric CA starts. This admin has almost all roles, but no certificate has been generated yet.
Now we can start the first registration: register admin.
Step 4: register admin in Fabric CA
First register admin to obtain its signature private key and certificate. The result is stored in wallet/admin:
node enrollAdmin.js
Result:

Now let's look at the users table:

You can see that a field of admin has changed from 0 to 1, which is its status field, indicating that a certificate has been issued.
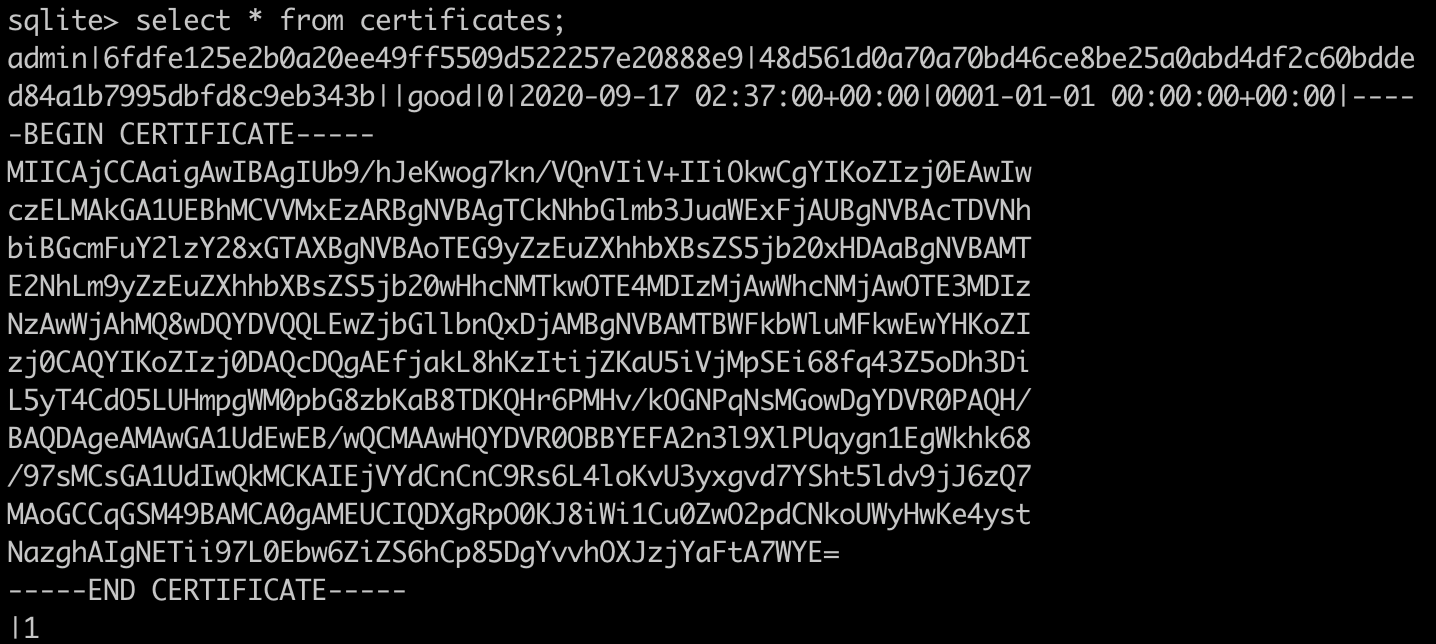
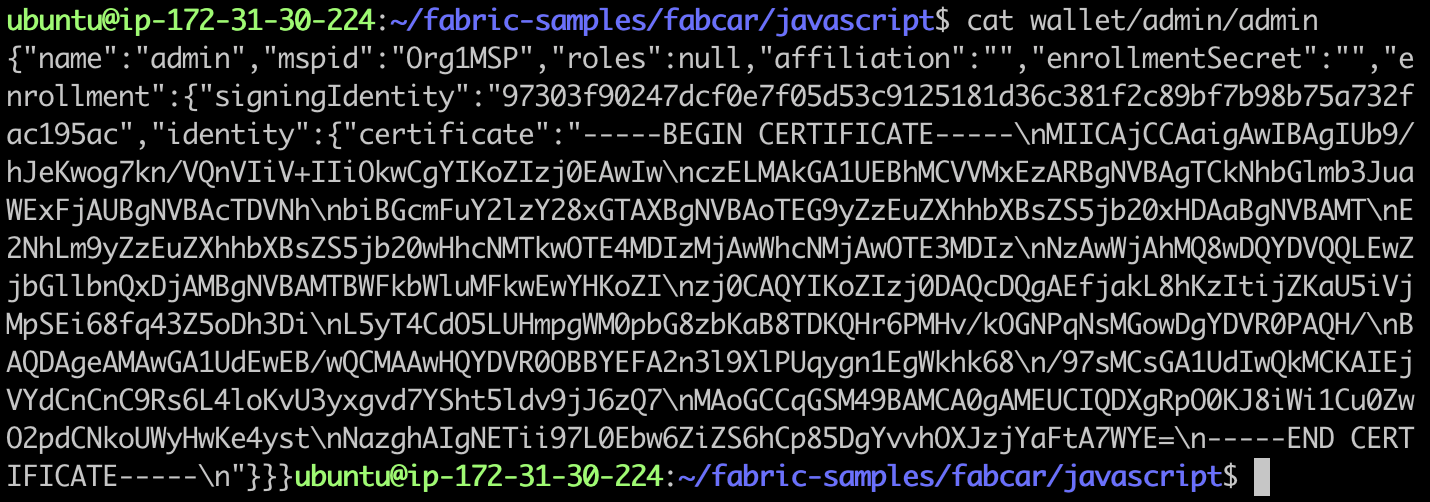
If we quickly compare it with the file in the Fabric CA wallet directory wallet/admin, we will see the real certificate of admin:
Now register user1 in Fabric CA:
node regUser.js user1
The results are as follows:

We have now received the ciphertext MDF riauccsna, which is required for user registration. In Fabric CA's wallet directory, we haven't seen user1's wallet yet.
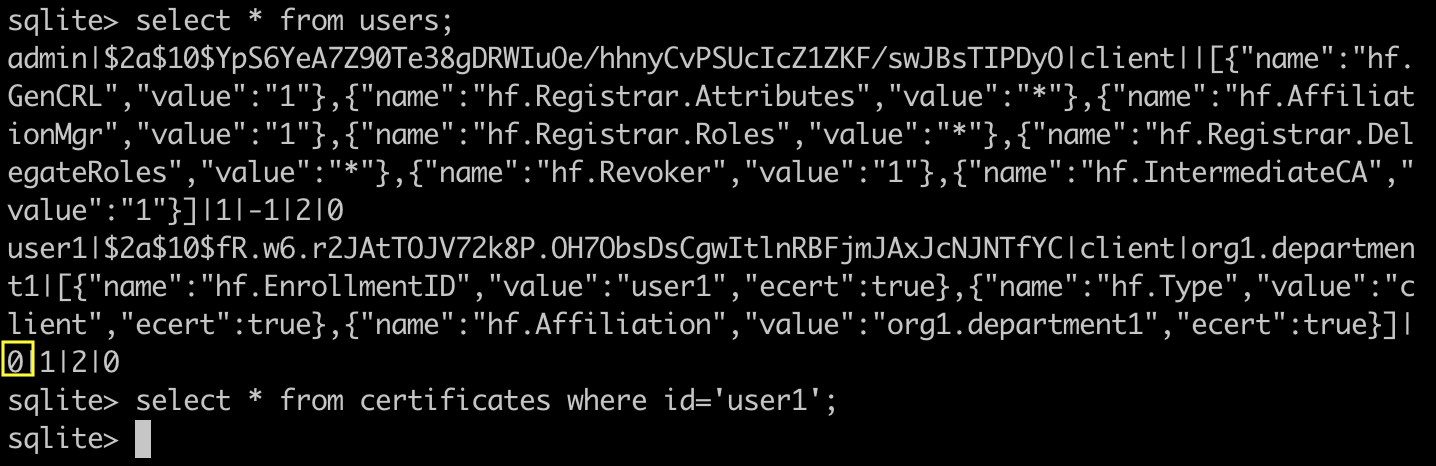
At this time, you can see clearly what happened by looking at the Fabric CA database. We see that users1 is added to the users table, but its certificate has not been issued. The properties of user1 are consistent with the information of regUser.js. In addition, the status of user1 is 0, indicating that its certificate has not been issued.
Step 5: register user1 in Fabric CA to obtain private key and certificate
Run enrollUser.js to register user1:
node enrollUser.js user1 MDfRiAUccsna
The results are as follows:

We see user1 now in Fabric CA's wallet. We also see that the certificate of user1 in the Fabric CA database has been created:
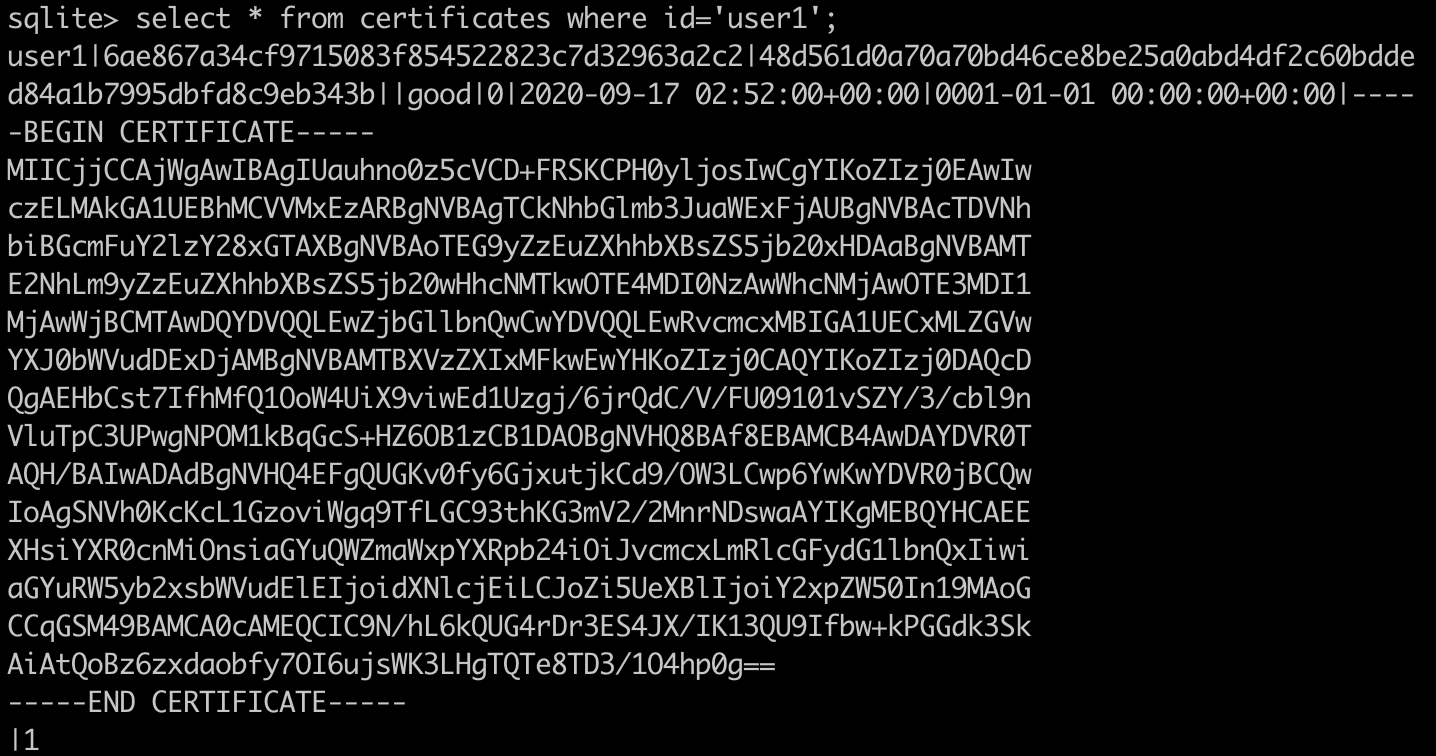
Status migrated from 0 to 1, indicating certificate issued:

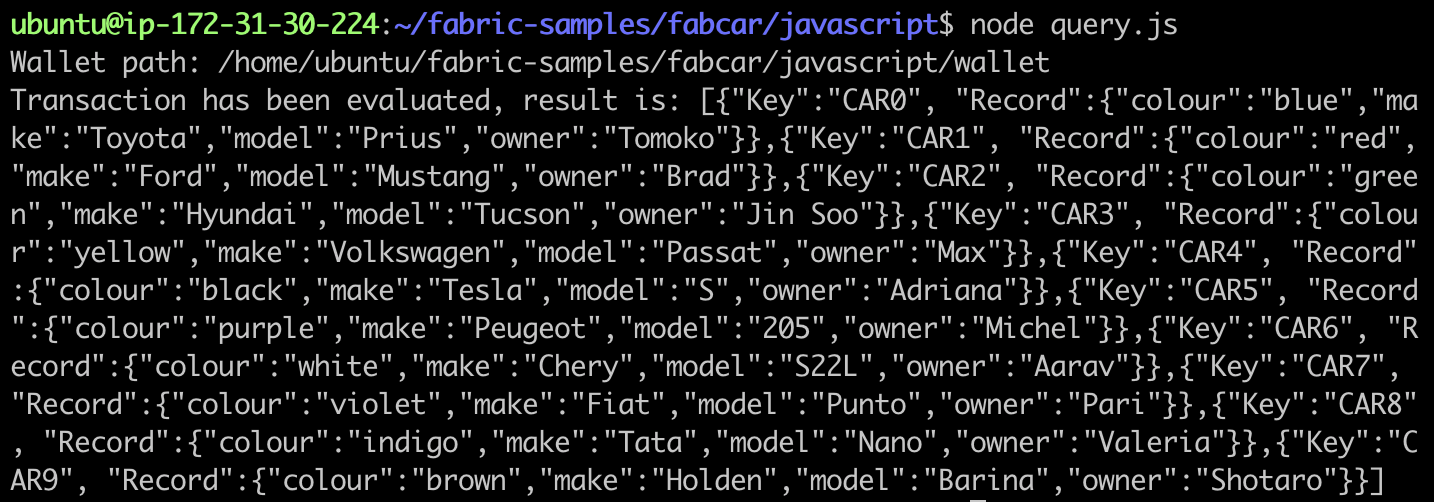
Step 6: run the query script with user1 to check if you have permission
node query.js
The results are as follows:
Original link: Faric CA tutorial - huizhi.com