
In the field of Web technology, canvas is a widely used function, which can support developers to expand the vector graphics rendering ability in addition to the original HTML ability. It is often used to realize vector animation, particle special effects, charts, games and so on. Canvas is just a canvas in HTML. It doesn't have drawing ability. It needs to rely on JS script to draw graphics.
Canvas is one of the W3C (World Wide Web Consortium) standards. At present, this function is mainly implemented in browsers. For most IoT terminals, the browser is a too complex system, including its performance and resource occupation, which can not be borne by most IoT terminals. At present, more and more GUI frameworks in the IoT field have begun to introduce front-end technology and support the use of JS to write UI, so canvas has also become a great advanced function, including Hongmeng's JS application, RTT's persimmon UI and Alibaba cloud IoT's HaaS UI, which partially or completely support the canvas function.
Therefore, this paper mainly discusses the basic methods of using quickjs engine and Skia graphics engine to expand 2D canvas scene in the field of IoT with screen.
QuickJS
QuickJS (official website address: QuickJS Javascript Engine )It is a small and embeddable JS engine. It is an open source solution launched by Bellard God (the author of Qemu and FFmpeg) in 2019. Compared with other embedded JS engines, QuickJS performs well in terms of performance and standard support. In terms of running performance, it is almost comparable to the V8 engine of jitless, and the starting performance is even better; And QuickJS supports the latest ES2020 specification, including modules, asynchrony and so on. Therefore, frameworks such as Hongmeng JS application and Alibaba cloud IoT HaaS light application have begun to embrace and use QuickJS as their JS running engine. Therefore, we also choose to use QuickJS to expand the interface of canvas 2D.
The following figure shows the benchmark test released by QuickJS authors to compare different JS engines. The higher the score, the better the performance:

Engine start
The operating environment of QuickJS mainly has two key information:
- JSRuntime: JS Runtime can have multiple runtimes at the same time, which are independent of each other. In the Runtime dimension, multithreading is not supported, so QuickJS does not support cross thread calls and callbacks
- JSContext: JS context environment. Each JSContext has its own global object. A JSRuntime can create multiple jscontexts, and they can share JS objects by reference (general JS extensions, including cfunction and cmodule extensions, take context as the carrier)
The following is a code example of a QuickJS instance startup:
// Create Runtime
JSRuntime *rt = JS_NewRuntime();
// Create Context
JSContext *ctx = JS_NewContext(rt);

// Here, you can add various cfunction and cmmodule extensions to JS calls

// eval js
JSValue val = JS_Eval(ctx, buf, buf_len, filename, eval_flags);
JS_FreeValue(ctx, val); // For reference counting, users should pay attention to managing js object references
// Or eval binary (quickjs supports exporting bytecode to speed up execution)
// js_std_eval_binary, refer to quickjs-libc.c

// Here is thread loop (used to receive and execute pending tasks such as timer, Promise, and other thread callback messages)
// On Linux system, you can use the built-in JS in quickjs-libc.c_ std_ loop
// For some RTOS systems, it can be adapted after reference

// Exit loop
// Destroy Context
JS_FreeContext(ctx);
// Destroy Runtime
JS_FreeRuntime(rt);
C function / attribute extension
After the null engine is initialized, only the JS syntax defined in the ES specification will be included. For most real use scenarios, it is necessary to expand the extension functions necessary for business scenarios, and all JS engines will support such extension capabilities. Extensions are generally used to bind some C functions and attributes to global objects (or to other objects):
// C function to bind
JSValue wrap_Foo(JSContext* ctx, JSValueConst this_val, int argc, JSValueConst* argv) {
    // argv is the parameter list
    printf("run global.foo(arg).\n");
    int a = 0;
    if (argc > 0) {
        JS_ToInt32(ctx, &a, argv[0]);
    }
    // return a+1
    return JS_NewInt32(ctx, a + 1);
}

// Get the global object of the current context
JSValue global_obj = JS_GetGlobalObject(ctx);
// Bind env attribute to global object
JSValue environment = JS_NewObject(ctx);
// globalThis.$env.platform
JS_SetPropertyStr(ctx, environment, "platform",
                      JS_NewString(ctx, "AliOS Things"));
// globalThis.$env.version
JS_SetPropertyStr(ctx, environment, "version",
                      JS_NewString(ctx, "0.0.1"));
// globalThis.$env
JS_SetPropertyStr(ctx, global_obj, "$env",
                      environment);

// Bind c function to global object
// C function prototype
// typedef JSValue JSCFunction(JSContext *ctx, JSValueConst this_val, int argc, JSValueConst *argv);
JS_SetPropertyStr(ctx, global_obj, "foo",
                      JS_NewCFunction(ctx, wrap_Foo, "foo", 1));

JS_FreeValue(ctx, global_obj);
After expansion, use the following on the JS side:
// console.log needs to be extended according to the method of c function extension
console.log("platform:", globalThis.$env.platform);
// Print platform:AliOS Things
console.log("version:", globalThis.$env.version);
// Print version:0.0.1

console.log("foo:", globalThis.foo(1));
// Print foo:2
C module (ES6 module) extension
The module is a specification in ES6(2015), which is not supported by engines that support ES5, such as Jerry script and Duktape. The following is the method to extend a module in QuickJS.
Module definition:
JSModuleDef
Key functions:
- JS_NewCModule: used to create a JSModuleDef,
Function prototype:
JSModuleDef *JS_NewCModule(JSContext *ctx, const char *name_str,
JSModuleInitFunc *func);
Parameter list: context, name (module name), initfunc (module initialization function)
- JS_AddModuleExportList: used to add a module export list
- JS_AddModuleExport: used to add a module export
Similar to exports.xxx = xxx on js side
Refer to JS in quickjs libc. C_ init_ module_ STD and js_init_module_os
Usage at JS end:
// The example is to open a file using the std module
import * as std from "std";
let f = std.open("xxx.txt");
let buf = new Uint8Array(10);
f.read(buf, 0, 10);
f.close();
Extend 2dcanvas
As mentioned at the beginning, Skia will be used as the vector engine required by the underlying 2D canvas. As an example, in order to facilitate the migration of Skia to IoT scenarios (Linux and RTOS systems), an older Skia version is selected, but its function can fully support the capabilities required by 2D canvas.
The specific standard content of 2dcanvas can be invigilated: HTML Standard ; Or you can refer to w3cschool: HTML Canvas reference manual . Including 40 + interfaces, covering "color, style, line, path, matrix transformation", etc.
In the browser, the main steps to use 2D canvas are as follows: 1. Create a canvas label; 2. Create 2D canvas context; 3. Call api to perform drawing operation.
// Create a canvas tag, and then insert the node through domApi (you can also create it directly through html)
var canvas = document.createElement("canvas");
// Get 2d context
var ctx = canvas.getContext("2d");
// Set fill pattern
ctx.fillStyle = "#FF0000";
// Fill rectangular area
ctx.fillRect(20,20,150,100);
Here, because it is not in the browser scenario, the key is to support the creation of the context environment of 2D canvas. Here, I support the creation of the context by extending the createCanvasContext interface on quickjs.
Create 2D canvas context
First, implement a createCanvasContext function according to the C function extension method of quickjs above, and bind a C context object. Because Skia is implemented in C + +, we also use C + + to implement it here. First, construct a C context object:
// First, build a basic context object, including the Skia canvas that needs to be rendered
struct CanvasContext
{
    // Canvas object for Skia graphics engine
    SkCanvas* canvas;
    SkBitmap* bitmap;
    // Brush used when drawing filled objects
    SkPaint fillPaint;
    // Brush used when drawing stroke objects
    SkPaint strokePaint;
    // The Path object used when drawing the drawing
    SkPath path;
};
Then extend the createCanvasContext function to quickjs:
// Declare the js class corresponding to canvas
static JSClassID _js_canvas_class_id;
static void _js_canvas_finalizer(JSRuntime* rt, JSValue val)
{
    // It is used to destroy the CanvasContext object of C before the js canvas object is GC
    CanvasContext* context = (CanvasContext*)JS_GetOpaque(val, _js_canvas_class_id);
    if (context) {
        delete context->bitmap;
        delete context->canvas;
        delete context;
    }
}
static JSClassDef _js_canvas_class = {
        "Canvas",
        .finalizer = _js_canvas_finalizer,  // Canvascontext resource recycling before GC
};

// C function to bind
JSValue createCanvasContext(JSContext* ctx, JSValueConst this_val, int argc, JSValueConst* argv)
{
    // Create C's context object
    CanvasContext* context = new CanvasContext;
    SkBitmap* bmp = new SkBitmap;
    // Here, you need to create an image buffer when Skia draws, and connect it to the device screen
    // bmp->setConfig(SkBitmap::kARGB_8888_Config, screenWidth, screenHeight);
    // bmp->setPixels(fb_buf);
    // The TODO example first uses the memory buffer to create a 200x200 buffer
    bmp->setConfig(SkBitmap::kARGB_8888_Config, 200, 200);
    bmp->allocPixels();
    // Initialize empty canvas
    memset(bmp->getPixels(), 0, bmp->getSize());
    context->bitmap = bmp;
    context->canvas = new SkCanvas(*bmp);
    // Set stroke style
    context-strokePaint.setStyle(SkPaint::kStroke_Style);

    // Create JS object corresponding to canvas
    JSValue obj = JS_NewObjectClass(ctx, _js_canvas_class_id);
    // After TODO, you need to mount all the APIs of 2dcanvas here

    // Bind canvas object
    JS_SetOpaque(obj, context);
    // Return jscanvas object
    return obj;
}

// Define the canvas class of JS
JS_NewClassID(&_js_canvas_class_id);
JS_NewClass(JS_GetRuntime(ctx), _js_canvas_class_id, &_js_canvas_class);
// Extend the createCanvasContext function according to the quickjs extension method
JS_SetPropertyStr(ctx, globalObject, "createCanvasContext", JS_NewCFunction(context, &createCanvasContext, "createCanvasContext", 0));
Through the above extensions, the JS side can create canvas context through createCanvasContext. However, at present, there is no API for 2D canvas mounted on this context object, so next, let's try to extend the API for filling rectangles.
Extend the first API
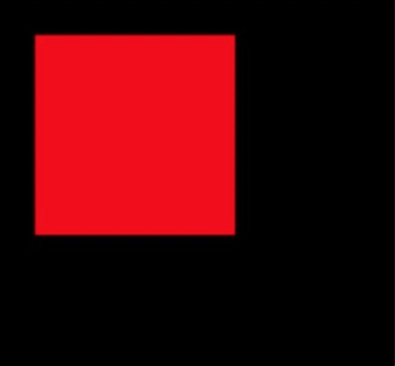
First, extend a simpler API for filling rectangles. Filling rectangle is mainly divided into two steps: 1. Set brush style fillStyle; 2. Call the fillRect interface to draw a rectangle. JS script is as follows:
// Create the canvas context, which is the C function extended in the previous step
var ctx = createCanvasContext();
// Set fill pattern
ctx.fillStyle = "#FF0000";
// Fill rectangular area, x=20,y=20,w=100,h=100
ctx.fillRect(20,20,100,100);
Therefore, we need to extend two API s, fillStyle and fillRect. First, add the setting of fillStyle, because it is a property setting rather than an interface call. This is not mentioned in quickjs extension above. In fact, it is similar. You can extend the getter/setter method of the object through quickjs; And extend a fillRect function. The specific implementation code is as follows:
// Set fill pattern
JSValue setFillStyle(JSContext* ctx, JSValue this_val, int argc, JSValue* argv)
{
    // Gets the bound CanvasContext object
    CanvasContext* canvasCtx = static_cast< CanvasContext* >(JS_GetOpaque(this_val, _js_canvas_class_id));
    if (canvasCtx == NULL) return JS_EXCEPTION;
    if (argc < 1) return JS_EXCEPTION;

    if (JS_IsString(argv[0])) {
        const char* jcolor = JS_ToCString(ctx, argv[0]);
        // Parse to RGBA color value through string
        // The color formats may be #RGB, #RRGGBB, rgb(r,g,b), rgba(r,g,b,a), HSL, and so on
        // Let's not implement it here. Let's simply write it in red first
        // Set color for fillPaint
        canvasCtx->fillPaint.setColor(SkColorSetARGB(0xFF, 0xFF, 0x0, 0x0));
        JS_FreeCString(ctx, jcolor);
	} else if (JS_IsObject(argv[0])) {
        // Look at the W3C Standard Specification. fillStyle may be canvas gradient, including linear gradient and radial gradient. It will not be implemented here first
    }
}
// Fill rectangle
JSValue fillRect(JSContext* ctx, JSValue this_val, int argc, JSValue* argv)
{
    // Gets the bound CanvasContext object
    CanvasContext* canvasCtx = static_cast< CanvasContext* >(JS_GetOpaque(this_val,_js_canvas_class_id1));
    if (canvasCtx == NULL) return JS_EXCEPTION;
    if (argc < 4) return JS_EXCEPTION;

    double x, y, w, h;
    if (JS_ToFloat64(ctx, &x, argv[0]) == 0
        && JS_ToFloat64(ctx, &y, argv[1]) == 0
        && JS_ToFloat64(ctx, &w, argv[2]) == 0
        && JS_ToFloat64(ctx, &h, argv[3]) == 0) {
        SkRect rect;
        rect.set(x, y, x + w, y + h);
        // Call canvas to draw a rectangle
        canvasCtx->canvas->drawRect(rect, canvasCtx->fillPaint);
    }
    return JS_UNDEFINED;
}

JSValue createCanvasContext(JSContext* ctx, JSValueConst this_val, int argc, JSValueConst* argv)
{
    ... Omit other codes

    // Create JS object corresponding to canvas
    JSValue obj = JS_NewObjectClass(ctx, _js_canvas_class_id);
    // After TODO, you need to mount all the APIs of 2dcanvas here
    // Set fillStyle style
    JS_DefinePropertyGetSet(ctx, obj, JS_NewAtom(ctx, "fillStyle"), JS_UNDEFINED, JS_NewCFunction(ctx, &setFillStyle, "fillStyle", 1), 0);
    // fillRect api for filling rectangles
    JS_SetPropertyStr(ctx, obj, "fillRect", JS_NewCFunction(ctx, &fillRect, "fillRect", 1));

    ...
}
In this way, the extension of the interface supporting fillRect to fill the rectangular area is completed, and then run the JS script above through quickjs in the program to draw the following figure
Drawing complex paths
Through the above extension method, you can start to extend more interfaces. Next, try to extend the drawing of complex Path. There are several interfaces related to Path that need to be extended. As can be seen in the specification, the interfaces related to Path include the following common interfaces:
- beginPath: start a path, or reset the current path
- closePath: creates a path from the current point back to the starting point
- moveTo: move the path to the specified point in the canvas without creating a line
- lineTo: add a new point, and then create a line from the point to the last specified point in the canvas
- quadraticCurveTo: creating quadratic Bezier curves
- bezierCurveTo: creating cubic Bezier curves
- arcTo: creates an arc / curve between two tangents
- Arc: create arc / curve (used to create a circle or part of a circle)
- rect: create rectangle
- Fill: fill the current drawing (path)
- Stroke: draw a defined path (stroke)
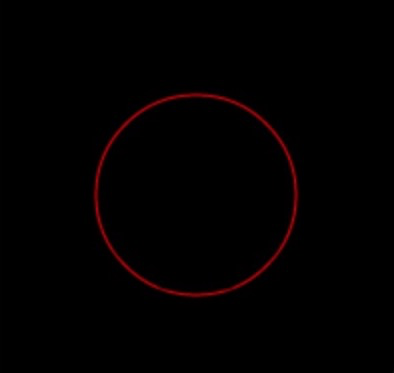
Through the above interfaces, various rich vector graphics can be realized. For example, you can draw arcs through the arc interface:
var ctx = createCanvasContext();
ctx.strokeStyle = 'red';
ctx.beginPath();
// Center coordinate x, center coordinate y, radius, startAngle, endAngle
ctx.arc(100, 100, 50, 0, 2 * Math.PI);
ctx.stroke();
Extend the benginPath, arc and stroke interfaces as required by the example:
// Fill rectangle
JSValue beginPath(JSContext* ctx, JSValue this_val, int argc, JSValue* argv)
{
    // Gets the bound CanvasContext object
    CanvasContext* canvasCtx = static_cast< CanvasContext* >(JS_GetOpaque(this_val,_js_canvas_class_id1));
    if (canvasCtx == NULL) return JS_EXCEPTION;
    // Reset Path
    canvasCtx->path.reset();
    return JS_UNDEFINED;
}
// Interface for creating arcs
JSValue arc(JSContext* ctx, JSValue this_val, int argc, JSValue* argv)
{
    // Gets the bound CanvasContext object
    CanvasContext* canvasCtx = static_cast< CanvasContext* >(JS_GetOpaque(this_val,_js_canvas_class_id1));
    if (canvasCtx == NULL) return JS_EXCEPTION;
    if (argc < 4) return JS_EXCEPTION;
    // Create arc
    double x, y, radius, startAngle, endAngle;
    if (JS_ToFloat64(ctx, &x, argv[0]) == 0
        && JS_ToFloat64(ctx, &y, argv[1]) == 0
        && JS_ToFloat64(ctx, &radius, argv[2]) == 0
        && JS_ToFloat64(ctx, &startAngle, argv[3]) == 0
        && JS_ToFloat64(ctx, &endAngle, argv[4]) == 0) {
        SkRect oval;
        oval.set(x - radius, y - radius, x + radius, y + radius);
        // Radian to angle
        startAngle = startAngle * 180.f / M_PI;
    	double sweepAngle = endAngle * 180.f / M_PI - startAngle;
        // Create arc
        canvasCtx->path.addArc(oval, startAngle, sweepAngle);
    }
    return JS_UNDEFINED;
}
// Interface for drawing lines
JSValue stroke(JSContext* ctx, JSValue this_val, int argc, JSValue* argv)
{
    // Gets the bound CanvasContext object
    CanvasContext* canvasCtx = static_cast< CanvasContext* >(JS_GetOpaque(this_val,_js_canvas_class_id1));
    if (canvasCtx == NULL) return JS_EXCEPTION;
    // Use strokePaint to paint path lines
    if (!canvasCtx->path.empty()) {
        canvasCtx->canvas->drawPath(canvasCtx->path, canvasCtx->strokePaint);
    }
    return JS_UNDEFINED;
}

JSValue createCanvasContext(JSContext* ctx, JSValueConst this_val, int argc, JSValueConst* argv)
{
    ... Omit other codes

    // Create JS object corresponding to canvas
    JSValue obj = JS_NewObjectClass(ctx, _js_canvas_class_id);
    // After TODO, you need to mount all the APIs of 2dcanvas here
    // beginPath reset path
    JS_SetPropertyStr(ctx, obj, "beginPath", JS_NewCFunction(ctx, &beginPath, "beginPath", 0));
    JS_SetPropertyStr(ctx, obj, "arc", JS_NewCFunction(ctx, &arc, "arc", 0));
    JS_SetPropertyStr(ctx, obj, "stroke", JS_NewCFunction(ctx, &stroke, "stroke", 0));

    ...
}
After implementing these interfaces, run the above JS script to draw the following graphics:
More extensions
With the above interface extension experience, all interfaces in the 2dcanvas specification can be extended in a similar way. The Skia engine can fully support the 2dcanvas Standard Specification. I won't elaborate one by one here.
animation
In the field of Web development, after 2D canvas, vector animation based on canvas is also a very common function; The basic working principle of animation is to recall the drawn graphics every certain time, and the difference of the graphics drawn in each frame is calculated according to the time stamp, so that the graphics have the effect of smooth transition.
The simplest implementation is to draw graphics regularly by calling setTimeout timing on JS. In quickjs, the setTimeout function has a reference implementation in quickjs-libc.c. if it is an RTOS system, you can refer to it for implementation. It will not be expanded here.
epilogue
The main content of this paper is to discuss a basic method of using quickjs and Skia to realize the specification of 2D canvas in W3C in the field of IoT (mainly on the screen devices of Linux and RTOS). If quickjs and Skia have been adapted and transplanted, it is easy to implement. The main idea is to extend some of Skia's interfaces to the JS layer with the help of quickjs's C function extension method. I hope it can help you.
Developer Support
For more technical support, you can add a nail developer group or pay attention to the official account of WeChat.
For more technology and solution introduction, please visit HaaS official website https://haas.iot.aliyun.com.