Introduction to express
Express is a third-party module used to quickly build the server (instead of http module)
Express is a fast, open and minimalist web development framework based on Node.js platform.
Express retains the basic API of http module. When using express, you can also use http API
express also encapsulates some new methods to make it easier for us to build the server
Express provides middleware functions, and many other powerful third-party modules are developed based on express
Install express
In the project folder, execute npm i express. You can download and install express.
Note: Express cannot be installed in the express folder. Otherwise, the installation fails.
Constructing a Web server using Express
Steps:
1. Load the express module
2. Create an express server
3. Turn on the server
4. Listen for browser requests and process them
// Building a web server using express
// 1) Load express module
const express = require('express');

// 2) Create an express server
const app = express();

// 3) Turn on the server
app.listen(3006, () => console.log('express The server is working'));

// 4) Listen for browser requests and process them

app.get('GET Requested address', Processing function);

app.post('POST Requested address', Processing function);
The reason why express can build a web server is that it encapsulates the core module http.
After encapsulation, express provides a very convenient and easy-to-use method.
For example, app.get() and app.post() are the new methods of express encapsulation.
Here is another res.send() method
This method can replace the previous res.end method and is better than res.end method
res.send() is used to respond
The content of the response cannot be numeric
If the response is a JS object, the method will automatically convert the object to JSON format.
And the content type response header will be added automatically
If you have responded, don't respond again.
const express = require('express');
const app = express();
app.listen(3006, () => console.log('It's on'));

// Write interface
app.get('/api/test', (req, res) => {
  // res.end('hello world, ha ha ')// The response Chinese will be garbled. You must add your own response header
  res.end(JSON.stringify({ status: 0, message: 'login was successful' })); // Only response string or buffer type can be used

  // The send method provided by express can solve the above two problems
  res.send({ status: 0, message: 'login was successful' }); // The send method will automatically set the response header; And it will automatically convert the object to JSON string
});
Note that in express, we can still use the methods and properties in the http module, such as req.url.
Express routing
Routing: the mapping relationship between request and handler.
Benefits of using routing
Reduce matching times and improve performance
Classified management interface, easier to maintain and upgrade
login.js
// ---------------------To use routing----------------------
// 1. Load express
const express = require('express');
// 2. Creating a routing object is actually a function type
const router = express.Router();

// 3. Write the interface and mount the interface to the router
router.post('/reguser', (req, res) => {});
router.post('/login', (req, res) => {});

// Be sure to export router
module.exports = router;
index.js
// Three lines of required code to start the service
const express = require('express');
const app = express();
// Load the customized routing module and register the middleware
let loginRouter = require('./routers/login');
app.use('/api', loginRouter);
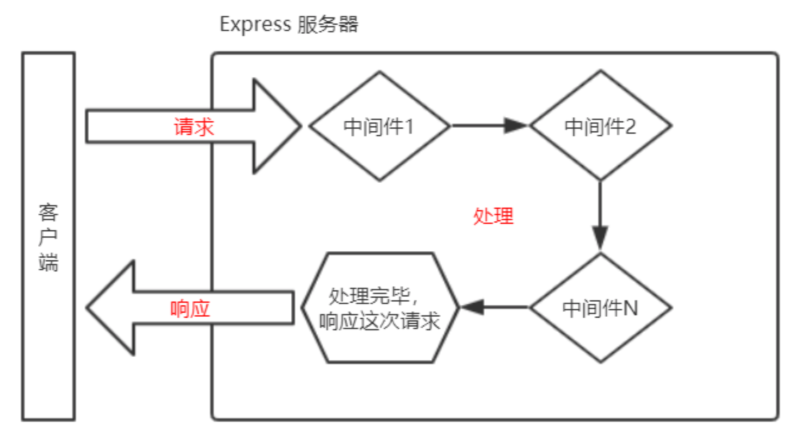
app.listen(3006, () => console.log('It's on'));Express Middleware
Middleware, especially the intermediate processing link of business process.
Middleware is not only the biggest feature of express, but also the most important design
Many third-party modules can be used as express middleware to make development easier with express.
An express application is completed by a variety of middleware combinations
Middleware is essentially a function
Middleware principle
Several forms of Middleware
// The following middleware only serves the current interface / my/userinfo
app.get('/my/userinfo', Middleware function);

// The following middleware handles the / api/login interface
app.post('/api/login', Middleware function, Middleware function, Middleware function, Middleware function .....);

// The middleware in app.use can handle all GET requests and all POST requests. If no path is specified, it can handle all interfaces
app.use(Middleware function);

// The following middleware functions only handle the interfaces beginning with / api
app.use('/api', Middleware function);

// The following middleware functions handle the / abcd and / abd interfaces
app.use('/abc?d', Middleware function);
Middleware syntax
Middleware is a function
There are four basic parameters in the middleware function, err, req, res and next
Middleware classification
Application level middleware (Middleware in index.js, globally valid)
Routing level middleware (the middleware in the routing file is only valid in the current routing file)
Error handling middleware (all four parameters need to be filled in, usually put at the end)
Built in middleware (built in express, such as express.urlencoded ({extended: true}))
Third party middleware (such as multer, express JWT, express session,...)
Set ignore file (. gitignore)
# Only nodes in the root directory are ignored_ modules
/node_modules

# Ignore all nodes_ Modules folder
node_modules/

# Ignore all. a files
*.a

# But track all lib.a, even if you ignored the. a file earlier
!lib.a

# Only TODO files in the current directory are ignored, not subdir/TODO
/TODO

# Ignore the folder named build in any directory
build/

# Ignore doc/notes.txt, but do not ignore doc/server/arch.txt
doc/*.txt

# Ignore. pdf files in the doc / directory and all its subdirectories
doc/**/*.pdf
Verify that the user name exists
Query according to the user name to see whether the data can be found.
// Complete interface project
// The first three lines start the service
const express = require('express');
const app = express();
app.listen(3006, () => console.log('It's on'));

// Configuration + write interface

app.use(urlencoded({ extended: true }));

// --------------------Register interface----------------------
// Request body: username password
app.post('/api/reguser', (req, res) => {
  // 1. The interface shall receive data
  console.log(req.body); // { username: 'laotang', password: '123456' }
  let { username, password } = req.body;
  // 2. Judge whether the account has been occupied
  db('select * from user where username="${username}"', (err, result) => {
    if (err) throw err;
    // console.log(result); //  Information is found, and result is a non empty array; No information found. Result is an empty array
    if (result.length > 0) {
      res.send({ status: 1, message: 'The user name is occupied' });
    } else {
      // Not occupied
      // 3. If it is not occupied, add the account and password to the database

    }
  })
});
Complete registration
// --------------------Register interface----------------------
// Request body: username password
app.post('/api/reguser', (req, res) => {
  // 1. The interface shall receive data
  // console.log(req.body); // { username: 'laotang', password: '123456' }
  let { username, password } = req.body;
  // 2. Judge whether the account has been occupied
  db(`select * from user where username='${username}'`, (err, result) => {
    if (err) throw err;
    // console.log(result); //  Information is found, and result is a non empty array; No information found. Result is an empty array
    if (result.length > 0) {
      res.send({ status: 1, message: 'The user name is occupied' });
    } else {
      // Not occupied
      // 3. If it is not occupied, add the account and password to the database
      db(`insert into user set username='${username}', password='${password}'`, (e, r) => {
        if (e) throw e;
        res.send({ status: 0, message: 'login was successful' });
      });
    }
  });
});
md5 encrypt password
The commonly used encryption method is md5.
Download and install the third-party encryption module and deconstruct the md5 method inside
let { md5 } = require('utility')Encrypt password
password = md5(password)
Complete login interface
/**
 * Login interface
 * Request method: POST
 * Interface address: / api/login
 * Request body: username | password
 */
app.post('/api/login', (req, res) => {
  // console.log(req.body); // { username: 'laotang', password: '123456' }
  let { username, password } = req.body;
  password = md5(password);
  // Use username and encrypted password as conditions to query.
  let sql = `select * from user where username='${username}' and password='${password}'`;
  db(sql, (err, result) => {
    if (err) throw err;
    // console.log(result); //  No result is found and an empty array is obtained; The result is a non empty array
    if (result.length > 0) {
      res.send({ status: 0, message: 'Login succeeded' })
    } else {
      res.send({ status: 1, message: 'Wrong account or password' })
    }
  })
});
Create token
Create a token string using the third-party module jsonwebtoken.
Download and install npm i jsonwebtoken
Load module const jwt = require('jsonwebtoken ');
if (result.length > 0) {
  // Login succeeded and a token is generated
  // Save the user's id in the token
  // "Bearer" must be added before the token. Pay attention to the space
  let token = 'Bearer ' + jwt.sign({ id: result[0].id }, 'sfsws23s', { expiresIn: '2h' });
  res.send({ status: 0, message: 'Login succeeded', token })
} else {
  res.send({ status: 1, message: 'Wrong account or password' })
}
Verification Middleware
// The middleware must be registered here to complete the data verification
router.use((req, res, next) => {
  // Get username and password
  let { username, password } = req.body;
  // Verify user name
  if (!/^[a-zA-Z][0-9a-zA-Z_]{1,9}$/.test(username)) {
    next('User name can only contain array letters, underscores, length 2~10 Bit, beginning with a letter');
  } else if (!/^\S{6,12}$/.test(password)) {
    next('Password 6~12 Bits and no spaces');
  } else {
    next();
  }
});
Error handling Middleware
// Error handling Middleware
router.use((err, req, res, next) => {
  // err is the parameter value from next
  res.send({ status: 1, message: err })
});
Code implementation authentication
Download and install:
npm i express-jwt
const jwt = require('express-jwt');
// app.use(jwt().unless());
// jwt() is used to parse the token and assign the data saved in the token to req.user
// unless() completes authentication
app.use(jwt({
  secret: 'sfsws23s', // The keys when generating token s must be unified
  algorithms: ['HS256'] // Required, encryption algorithm, no need to know
}).unless({
  path: ['/api/login', '/api/reguser'] // In addition to these two interfaces, other interfaces need authentication
}));
After the above code is completed, when a request is sent to the server, the Authorization field in the request header will be verified
If there is no problem
Assign the user id saved in the token to req.user
next().
Therefore, it is also necessary to add error handling middleware at the end of index.js to prompt token errors
app.use((err, req, res, next) => {
  if (err.name === 'UnauthorizedError') {
    // res.status(401).send('invalid token...');
    res.status(401).send({ status: 1, message: 'Identity authentication failed!' });
  }
});
Case - personal center interface
Using routing module / routers/user.js
// user routing file
const express = require('express');
const router = express.Router();


// export
module.exports = router;
Load the routing module in index.js and register the middleware
app.use('/my/user', require('./routers/user'));Get user information interface
// ***************************Get user information***************************/
/**
 * Request method: GET
 * Interface address: / my/user/userinfo
 * Parameter: None
 */
router.get('/userinfo', (req, res) => {
  // console.log(req.user); // { id: 1, iat: 1611537302, exp: 1611544502 }
  // return;
  // Query the information of the current login account, not everyone's information
  db('select * from user where id=' + req.user.id, (err, result) => {
    if (err) throw err;
    res.send({
      status: 0,
      message: 'User information obtained successfully',
      data: result[0]
    })
  });
});
Replace avatar interface
// ***************************Replace avatar interface***************************/
/**
 * Request method: POST
 * Interface address: / my/user/avatar
 * Content-Type: application/x-www-form-urlencoded
 * Request body: avatar
 */
router.post('/avatar', (req, res) => {
  // console.log(req.body); // { avatar: 'data:image/png;base64,iVBORw0KGgoAAAANSUhEUgAAAHg' }
  let sql = `update user set user_pic='${req.body.avatar}' where id=${req.user.id}`;
  db(sql, (err, result) => {
    if (err) throw err;
    res.send({ status: 0, message: 'Successfully replaced the Avatar' })
  })
});
Case article related interface
Using routing module / routers/article.js
// category routing file
const express = require('express');
const router = express.Router();


// export
module.exports = router;
Load the routing module in index.js and register the middleware
app.use('/my/article', require('./routers/article'));Paging get article interface
// ----------------Paging to get the article list----------------
// Interface requirements:
/**
 * Request method: GET
 * Requested url: / my/article/list
 * Request parameters:
 *  - pagenum -- Page number value
 *  - pagesize -- How many pieces of data are displayed per page
 *  - cate_id -- Id of article classification
 *  - state -- Status of the article, either draft or published
 */
router.get('/list', (req, res) => {
    // console.log(req.query);
    // Set variables and receive request parameters
    let { pagenum, pagesize, cate_id, state } = req.query;
    // console.log(cate_id, state);
    // According to cat_ ID and state are the conditions for making SQL statements
    let w = '';
    if (cate_id) {
        w += ` and cate_id=${cate_id} `;
    }
    if (state) {
        w += ` and state='${state}' `;
    }
    // SQL for paging query data (this SQL uses linked table query and uses many variable combinations)
    let sql1 = `select a.id, a.title, a.state, a.pub_date, c.name cate_name from article a
    join category c on a.cate_id=c.id
    where author_id=${req.user.id} and is_delete=0 ${w}
    limit ${(pagenum - 1) * pagesize}, ${pagesize}`;
    // Query the SQL of total records. The query criteria must be consistent with the previous query data
    let sql2 = `select count(*) total from article a
    join category c on a.cate_id=c.id
    where author_id=${req.user.id} and is_delete=0 ${w}`;
    // Execute two SQL queries respectively (because db query database is an asynchronous method, you must nest queries)
    db(sql1, (err, result1) => {
        if (err) throw err;
        db(sql2, (e, result2) => {
            if (e) throw e;
            res.send({
                status: 0,
                message: 'Successfully obtained article list data',
                data: result1,
                total: result2[0].total
            });
        })
    })
});
Add article interface
This is an interface whose request body is of type FormData.
Installation: npm i multer
Load: const multer= require('multer ')
Configuration upload file path: const upload = multer ({desc: 'uploads /'})
Used in the interface:
router.post('/add', upload.single('cover_img'), (req, res) => {
  // The upload.single() method is used to handle single file upload
  // cover_ Name of img picture field

  // Receive the request body of text type through req.body, such as title,content, etc
  // Get the uploaded file information through req.file
});
var multer = require('multer')
var upload = multer({ dest: 'uploads/' }); // Configure the directory of uploaded files
const moment = require('moment');
router.post('/add', upload.single('cover_img'), (req, res) => {
// req.body represents text information
// req.file indicates the uploaded file information
// console.log(req.file); // req.file.filename indicates the file name after uploading
// Add data to the data table and save it
// req.body = { title: 'xx', content: 'xx', cate_id: 1, state: 'xx' }
let { title, content, cate_id, state } = req.body;
// Other fields
let pub_date = moment().format('YYYY-MM-DD HH:mm:ss');
let cover_img = req.file.filename;
let author_id = req.user.id;
// console.log(obj);
// return;
let sql = `insert into article set title='${title}', content='${content}', cate_id=${cate_id}, state='${state}', pub_date='${pub_date}', cover_img='${cover_img}', author_id=${author_id}`;
db(sql (err, result) => {
if (err) throw err;
if (result.affectedRows > 0) {
res.send({ status: 0, message: 'Published successfully' })
} else {
res.send({ status: 1, message: 'Publishing failed' })
}
})
});Delete article interface
// ----------------Delete file interface--------------------
/**
 * Request method: GET
 * Interface address: / my/article/delete/2
 * Request parameters: id, url parameters
 */
// router.get('/delete/:id/:age/:name', (req, res) => {
router.get('/delete/:id', (req, res) => {
  let id = req.params.id;
  let sql = `update article set is_delete=1 where id=${id} and author_id=${req.user.id}`;
  db(, (err, result) => {
    if (err) throw err;
    if (result.affectedRows > 0) {
      res.send({ status: 0, message: 'Delete succeeded' })
    } else {
      res.send({ status: 1, message: 'Deletion failed' })
    }
  })
});
Update article interface
router.post('/update', upload.single('cover_img'), (req, res) => {
  // It's similar to adding an article interface. Note that the client submits more article IDS, which is the condition for us to modify the article
  // req.body = { title: 'xx', content: 'xx', cate_id: 1, state: 'xx', id: 6 }
  let { title, content, cate_id, state, id } = req.body;
  // Other fields (release time, not modification time, so it does not need to be changed, and the user id does not need to be changed)
  let cover_img = req.file.filename;
  // console.log(obj);
  // return;
  let sql = `update article set title='${title}', content='${content}', cate_id=${cate_id}, state='${state}', cover_img='${cover_img}' where id=${id}`;
  db(sql, (err, result) => {
    if (err) throw err;
    if (result.affectedRows > 0) {
      res.send({ status: 0, message: 'Article modified successfully' })
    } else {
      res.send({ status: 1, message: 'Failed to modify article' })
    }
  })
});
Express summary:
