concept
Error information can be fed back to users. Exceptions are also objects that can be manipulated. All exceptions are members of the base class Exception. Exceptions are defined in the exceptions module. Python automatically puts all Exception names in the built-in namespace, so the program can use exceptions without importing the exceptions module.
Once a SystemExit exception is thrown and not caught, program execution terminates. If an interactive session encounters an uncapped SystemExit exception, the session terminates.
Exception refers to the error caused when the program is running. The causes include division by zero, subscript out of bounds, file does not exist, network exception, type error, name error, dictionary key error, insufficient disk space, file does not exist, path writing error and indentation error. The assignment operator = = is confused with the comparison operator = =
When the Python interpreter encounters an exception, it stops the program and displays a traceback message.
SyntaxError; grammar
IndentationError: indent
TypeError: value cannot be modified. Connection string and non string Forget to add self for the first method in the class
NameError: variable not defined
Built in exception
It is defined in the exceptions module, which is automatically loaded when the Python interpreter starts


Exception handling structure
try......except......
The program accepts user input, and requires users to enter integers, and does not receive other types of input.
>>>while True:
   x = input('Please input:')
   try:
    x = int(x)
    print('You have input {0}'.format(x))
    break
   except Exception as e:
    print('Error.')
Please input:234c
Error.
Please input:5
You have input 5
try......except......else
>>>while True:
   x = input('Please input:')
   try:
      x = int(x)
   except Exception as e:
      print('Error')
   else:
      print('You have input [0]'.format(x))
   break
Please input:888c
Error.
Please input:888
You have input 888
try......except......finally
filename = input('Please enter a file name:')
try:
    fp = open(filename) #Attempt to open file
    try: #Try reading data and calculating and outputting
        print(int(fp.read())+5)
    except: #Code executed when a file is read or a calculation fails
        print('The file content format is incorrect.')
    finally: #Ensure that the file can be closed
        fp.close()
except: #Code to execute when opening a file fails
     print('file does not exist')
Instance of exception class and exception clearing
Whenever an exception is output, the exception class will create an instance that inherits all the properties of the exception class. (the most important is the args attribute)
try:
   x = [1,2,3]
   print(x[4])
except IndexError as err :
   print(err.args[0])

list index out of range
IndexError: list index out of range
Capture multiple exception handling structures
>>>try:
      x = float(input('Please enter an integer:'))
      y = float(input('Please enter divisor:'))
      z = x / y
    except ZeroDivisionError:
      print('Divisor cannot be zero')
    except ValueError:
      print('Divisor and divisor should be numeric type')
    except NameError:
      print('Variable does not exist')
    else:
      print(x,'/',y,'=',z)
>>> a = 3 >>> b = 5 >>> assert a==b, 'a must be equal to b' AssertionError: a must be equal to b
Trace view exception
When an exception occurs, python can remember the exception thrown and the current state of the program. Python also maintains a traceback object, which contains information related to the function call stack when the exception occurs. The exception may be thrown in a series of deeply nested function calls. When the program calls each function, python will insert the function name at the beginning of the "function call stack", Once an exception is thrown, python searches for a corresponding exception handler.
If there is no exception handler in the current function, the current function will terminate execution. Python will search the calling function of the current function and so on until a matching exception handler is found or Python reaches the main program. This process of finding an appropriate exception handler is called "stack unwrapping". On the one hand, the interpreter maintains information related to the functions placed on the stack, and on the other hand, it also maintains information related to the functions that have been "tossed" from the stack.
try:
   block
except:
   traceback.print_exc()
Assistance module with built-in exception
sys module
Exc in sys module_ Info() function to get the exception information exc currently being processed_ The info () function returns a tuple that contains three elements.
import sys
try:
   12/0
except:
   info = sys.exc_info()
   exc_type = info[0]
   exc_value = info[1]
   exc_traceback = info[2]
   print(ecx_type,':',exc_value)
import sys
  try:
   12/0
except :
  info=sys.exc_ info( )
  exc_ type=info[0]
  exc_ value = info[1]
  exc_ traceback = info[2]
  print(exc_ type, " :" ,exc_ value )
<class ' ZeroDivisionError'> : division by zero
traceback object
Exc using sys module_ The third element of the return value of the info() function will return a traceback object.
The interface function of the traceback object can capture, format, or output stack trace back information of Python programs.
import traceback
  try:
     12/0
  except :
     traceback.print exc()


Traceback (most recent call last) ;
File "<ipython- input- 19- 71f6b5a77e1e>", line 4, in <module>
12/0
ZeroDivisionError: division by zero
Throw exception
raise NameError ('An exception was thrown ')
raise NameError( 'Here is raise Thrown-Exceptions' )


NameError
Traceback (most recent cal1 last )
<ipython- input- 20-e274246dfc1f> in <module>
----> 1 raise NameError( 'Here is raise An exception thrown')
NameError:Here is raise An exception thrown
End the interpreter
The user can use the output SystemExit exception to force the end of the interpreter
Using the sys.exit() function will output a SystemExit exception, and sys.exit() will end the thread
import sys

try:
    sys.exit()
except SystemExit:
    print('The interpreter cannot be ended at this time')

#If you want to end the operation of the interpreter normally, you'd better use the OS module_ exit() function
Leave nested loop
Use the raise statement to leave the nested loop
class ExitLoop(Exception):
      pass

try:
    i = 1
    while i < 10:
        for j in range(1, 10):
            print(i, j)
            if (i == 2) and (j == 2):
                raise(ExitLoop)
            i += 1
except ExitLoop:
    print('When i = 2, j = 2 Leave nested loop when')
1 1
2 2
Leave loop nesting when i=2 and j=2
User defined exception class
class URLError(Exception):
        pass

try:
    raise URLError("URL ERROR")
except URLError as err:
    print(err.args[0])
URL ERROR
assert statement
Principle: check the code of the expression. When the expression evaluates to true, everything is normal; However, if the expression evaluates to false, pause the program, print a message, and start the debugger if possible.
assert <Test code>[, parameter]
#principle

a = 10
assert (a != 0),"Error happened, a = 0"
print(a)
If a = 0, an error occurred is thrown
__ debug__ Built in variable
if __debug__:
    if not (<Test code>):
       raise AssertionError [, parameter]
import types
def checkType(arg):
    if__debug__:
        if not (type(arg) == str):
            raise AssertionError("The parameter type is not a string")

checkType(1)
Asser t ionError
Traceback (most recent ca11 last)
<ipython- input- 30-c6dc6612ea27> in <module>
5
raise AssertionError("parameter type is not string")
6
----> 7 checkType(1)
<ipython- input-30-c6dc6612ea27> in checkType (arg)
3
debug__
4
if not (type(arg) == str):
----> 5
raise AssertionError("parameter type is not string")
6
7 checkType(1)
AssertionError: parameter type is not a string
Assertions and context management statements
- The context manager statement with can automatically manage resources. No matter what reason (even if the code raises an exception) jumps out of the with block, it can always ensure that the file is closed correctly, and can automatically restore the scene when entering the code block after the code block is executed. It is commonly used for file operation, database connection, network communication connection, multithreading Multi process synchronization and other occasions.
- The usage of the with statement for file operation is as follows:
with open(filename, mode, encoding) as fp:
# Code for manipulating files through file object fp
tkinter introduction
Tkinter is a Python standard library. It can be used directly without additional installation. It is relatively convenient. It has been favored by many people and has become the mainstream module for GUI development. In addition to providing a large number of components in the main module of Tkinter library, tkinter.ttk also provides components such as Combobox, Progressbar and Treeview, tkinter.scrolltext provides text boxes with scroll bars, and messagebox, commondialog, dialog, colorchooser, simpledialog, filedialog and other modules provide various forms of dialog boxes.
Common components
| Component name | explain |
| Button | Button |
| Canvas | Canvas, used to draw lines, ellipses, polygons and other graphics |
| Checkbutton | Buttons in the form of check boxes |
| Entry | Single line text box |
| Frame | frame |
| Label | Labels, commonly used to display text |
| Listbox | list box |
| Menu | menu |
| Message | Multiline text box |
| Radiobutton | Radio |
| Scrollbar | scroll bar |
| Toplevel | Create new window |
Basic steps of Tkinter development:
Write common code, such as database operations
PAGE can be used to build the interface, place components and set component properties
Write event handling code for the component
Start the application and start the message main loop
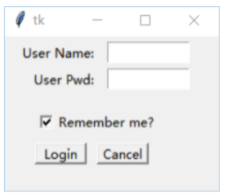
User login interface
import tkinter
import tkinter.messagebox
import os
import os.path

path = os.getenv('temp')
filename = os.path.join(path, 'info.txt')
#Create application window
root = tkinter.Tk()
#Define window size
root['height'] = 140
root['width'] = 200

#Create label component on window
labelName = tkinter.Label(root,
                             text='User Name:',
                             justify=tkinter.RIGHT,
                             anchor = 'e',
                             width=80)
#Place the component in the specified area on the window
labelName.place(x=10, y=5, width=80, height=20)

varName = tkinter.StringVar(root, value='')
entryName = tkinter.Entry(root,
                             width=80,
                             textvariable=varName)
entryName.place(x=100, y=5, width=80, height=20)

labelPwd = tkinter.Label(root,
                            text='User Pwd:',
                            justify=tkinter.RIGHT,
                            anchor = 'e',
                            width=80)
labelPwd.place(x=10, y=30, width=80, height=20)

#Create password text box
varPwd = tkinter.StringVar(root, value='')
entryPwd = tkinter.Entry(root,
                            show='*',    #No matter what you enter, an asterisk is displayed
                            width=80,
                            textvariable=varPwd)
entryPwd.place(x=100, y=30, width=80, height=20)

#Try filling in the user name and password automatically
try:
    with open(filename) as fp:
        n, p = fp.read().strip().split(',')
        varName.set(n)
        varPwd.set(p)
except:
	pass
	#Remember me, check box
rememberMe = tkinter.IntVar(root, value=1)
checkRemember = tkinter.Checkbutton(root,
                                        text='Remember me?',
                                        variable=rememberMe,
                                        onvalue=1,
                                        offvalue=0)
checkRemember.place(x=30, y=70, width=120, height=20)

#Login button event handler
def login():
    #Get user name and password
    name = entryName.get()
    pwd = entryPwd.get()
    if name=='admin' and pwd=='123456':
        tkinter.messagebox.showinfo(title='congratulations',
                                       message='Login succeeded!')
        if rememberMe.get() == 1:
            #Write the information of successful login to the temporary file
            with open(filename, 'w') as fp:
                fp.write(','.join((name,pwd)))
        else:
            try:
                #Delete the temporary file used to record user names and passwords
                os.remove(filename)
            except:
                pass
    else:
        tkinter.messagebox.showerror('warning',
                                        message='Wrong user name or password')
#Create button components and set button event handling functions
buttonOk = tkinter.Button(root,
                            text='Login',  #Sets the text displayed on the button
                            command=login) #Set the click event handler for the button
buttonOk.place(x=30, y=100, width=50, height=20)

#Event handler for cancel button
def cancel():
    #Clear the user name and password entered by the user
    varName.set('')
    varPwd.set('')
buttonCancel = tkinter.Button(root,
                                 text='Cancel',
                                 command=cancel)
buttonCancel.place(x=90, y=100, width=50, height=20)
#Start message loop
root.mainloop()
Example 12-2  tkinter Comprehensive application cases of radio buttons, check boxes, combo boxes and list boxes.
import tkinter
import tkinter.messagebox
import tkinter.ttk

#Create tkinter application
root = tkinter.Tk()
#Set window title
root.title('Selection widgets')
#Define window size
root['height'] = 400
root['width'] = 320

#Variable associated with name
varName = tkinter.StringVar()
varName.set('')
#Create a label and place it on the window
labelName = tkinter.Label(root,
                            text='Name:',
                            justify=tkinter.RIGHT,
                            width=50)
labelName.place(x=10, y=5, width=50, height=20)
#Create a text box and set the associated variables
entryName = tkinter.Entry(root,
                             width=120,
                             textvariable=varName)
entryName.place(x=70, y=5, width=120, height=20)

labelGrade = tkinter.Label(root,
                             text='Grade:',
                             justify=tkinter.RIGHT, width=50)
labelGrade.place(x=10, y=40, width=50, height=20)
#Simulate the student's grade, the dictionary key is grade, and the dictionary value is class
studentClasses = {'1':['1', '2', '3', '4'],
                    '2':['1', '2'],
                    '3':['1', '2', '3']}
 #Student grade combo box
comboGrade = tkinter.ttk.Combobox(root,width=50,
                              values=tuple(studentClasses.keys()))
comboGrade.place(x=70, y=40, width=50, height=20)
#Event handler
def comboChange(event):
    grade = comboGrade.get()
  if grade:
        #Dynamically change combo box options
        comboClass["values"] = studentClasses.get(grade)
    else:
        comboClass.set([])
#Binding combo box event handler
comboGrade.bind('<<ComboboxSelected>>', comboChange)

labelClass = tkinter.Label(root,
                              text='Class:',
                              justify=tkinter.RIGHT, width=50)
labelClass.place(x=130, y=40, width=50, height=20)
#Student class combo box
comboClass = tkinter.ttk.Combobox(root, width=50)
comboClass.place(x=190, y=40, width=50, height=20)

labelSex = tkinter.Label(root,
                            text='Sex:',
                            justify=tkinter.RIGHT, width=50)
labelSex.place(x=10, y=70, width=50, height=20)
#Gender related variables, 1: male; 0: female, male by default
sex = tkinter.IntVar()
sex.set(1)
#Radio button, male
radioMan = tkinter.Radiobutton(root,
                                  variable=sex,
                                  value=1,
                                  text='Man')
radioMan.place(x=70, y=70, width=50, height=20)
#Radio button, female
radioWoman = tkinter.Radiobutton(root,
                                    variable=sex,
                                    value=0,
                                    text='Woman')
radioWoman.place(x=130, y=70, width=70, height=20)

#The variable associated with monitor. By default, the current student is not a monitor
monitor = tkinter.IntVar()
monitor.set(0)
#Check box. When selected, the variable value is 1. When not selected, the variable value is 0
checkMonitor = tkinter.Checkbutton(root,
                                      text='Is Monitor?',
                                      variable=monitor,
                                      onvalue=1,
                                      offvalue=0)
checkMonitor.place(x=20, y=100, width=100, height=20)
#Add button click event handler
def addInformation():
    result = 'Name:' + entryName.get()
    result = result + ';Grade:' + comboGrade.get()
    result = result + ';Class:' + comboClass.get()
    result = result + ';Sex:'\
              + ('Man' if sex.get() else 'Woman')
    result = result + ';Monitor:'\
              + ('Yes' if monitor.get() else 'No')
    #Insert information into the list box component
    listboxStudents.insert(0, result)
buttonAdd = tkinter.Button(root,
                             text='Add',
                             width=40,
                             command=addInformation)
buttonAdd.place(x=130, y=100, width=40, height=20)

#Event handler for delete button
def deleteSelection():
    selection = listboxStudents.curselection()
    if  not selection:
        tkinter.messagebox.showinfo(title='Information',
                                       message='No Selection')
    else:
        listboxStudents.delete(selection)
buttonDelete = tkinter.Button(root,
                                 text='DeleteSelection',
                                 width=100,
                                 command=deleteSelection)
buttonDelete.place(x=180, y=100, width=100, height=20)

#Create list box component
listboxStudents = tkinter.Listbox(root, width=300)
listboxStudents.place(x=10, y=130, width=300, height=200)

#Start message loop
root.mainloop()
import os
import tkinter
import tkinter.simpledialog
import tkinter.colorchooser
import tkinter.filedialog
#You need to execute PIP install pilot to install the extension library
from PIL import ImageGrab

root = tkinter.Tk()
root.title('My Paint----by Dong Fuguo')
root['width'] = 800
root['height'] = 600

#Variables that control whether drawing is allowed. 1: allowed, 0: not allowed
canDraw = tkinter.IntVar(value=0)

what = tkinter.IntVar(value=1)

#Variable for recording mouse position
X = tkinter.IntVar(value=0)
Y = tkinter.IntVar(value=0)

#Foreground and background color
foreColor = '#000000'
backColor = '#FFFFFF'

#Create canvas
image = tkinter.PhotoImage()
canvas = tkinter.Canvas(root,
                          bg='white',
                          width=800, height=600)
canvas.create_image(800, 600, image=image)

#Click with the left mouse button to allow drawing and record the current mouse position
def onLeftButtonDown(event):
    canDraw.set(1)
    X.set(event.x)
    Y.set(event.y)
    if what.get()==4:
        canvas.create_text(event.x, event.y, text=text)
canvas.bind('<Button-1>', onLeftButtonDown)

#Record the id of the last drawing
lastDraw = 0
#Hold down the left mouse button to move and draw
def onLeftButtonMove(event):
    global lastDraw
    if canDraw.get()==0:
        return
   if what.get()==1:
        #Draws a curve using the currently selected foreground color
        canvas.create_line(X.get(), Y.get(), event.x,
                             event.y, fill=foreColor)
        X.set(event.x)
        Y.set(event.y)
    elif what.get()==2:
        #To draw a straight line, first delete the line just drawn, and then draw a new line
        try:
            canvas.delete(lastDraw)
        except Exception as e:
            pass
        lastDraw = canvas.create_line(X.get(), Y.get(),
                                         event.x, event.y,
                                         fill=foreColor)
    elif what.get()==3:
        #To draw a rectangle, delete the rectangle just drawn, and then draw a new rectangle
        try:
            canvas.delete(lastDraw)
        except Exception as e:
            pass
        lastDraw = canvas.create_rectangle(X.get(), Y.get(),
                                              event.x, event.y,
                                              fill=backColor,
                                              outline=foreColor)
    elif what.get()==5:
        #Rubber, fill 10 * 10 rectangular area with background color
        canvas.create_rectangle(event.x-5, event.y-5,
                                   event.x+5, event.y+5,
                                   outline=backColor, fill=backColor)
canvas.bind('<B1-Motion>', onLeftButtonMove)

#The left mouse button is raised. No more drawing is allowed
def onLeftButtonUp(event):
    if what.get()==2:
        #draw a straight line
        canvas.create_line(X.get(),
                             Y.get(),
                             event.x,
                             event.y,
                             fill=foreColor)
    elif what.get()==3:
        #draw rectangle
        canvas.create_rectangle(X.get(),
                                  Y.get(),
                                  event.x,
                                event.y,
                                  fill=backColor,
                                  outline=foreColor)
    canDraw.set(0)
    global lastDraw
    #Prevent accidental deletion of the last drawing when switching drawings
    lastDraw = 0
canvas.bind('<ButtonRelease-1>', onLeftButtonUp)

#create menu
menu = tkinter.Menu(root, tearoff=0)
#Open image file
def Open():
    filename = tkinter.filedialog.askopenfilename(title='Open Image',
                            filetypes=[('image', '*.jpg *.png *.gif')])
    if filename:
        global image
        image = tkinter.PhotoImage(file=filename)
        canvas.create_image(80, 80, image=image)
menu.add_command(label='Open', command=Open)

def Save():
    #Obtain the location and size of the customer area and save the screenshot
    left = int(root.winfo_rootx())
    top = int(root.winfo_rooty())
    width = root.winfo_width()
    height = root.winfo_height()
    im = ImageGrab.grab((left,top,left+width,top+height))

    #Save drawn pictures
    filename = tkinter.filedialog.asksaveasfilename(title='Save picture',
                                       filetypes=[('Picture file','*.png')])
    if not filename:
        return
    if not filename.endswith('.png'):
        filename = filename+'.png'

    im.save(filename)
menu.add_command(label='Save', command=Save)

#Add menu, clear, traverse all images on the canvas, and delete them one by one
def Clear():
    for item in canvas.find_all():
        canvas.delete(item)
menu.add_command(label='Clear', command=Clear)
#Add split line
menu.add_separator()

#Create a submenu to select the drawing type
menuType = tkinter.Menu(menu, tearoff=0)
def drawCurve():
    what.set(1)
menuType.add_command(label='Curve', command=drawCurve)

def drawLine():
    what.set(2)
menuType.add_command(label='Line', command=drawLine)

def drawRectangle():
    what.set(3)
menuType.add_command(label='Rectangle', command=drawRectangle)

def drawText():
    global text
    text = tkinter.simpledialog.askstring(title='Input what you want to draw', prompt='')
    what.set(4)
menuType.add_command(label='Text', command=drawText)

menuType.add_separator()

#Select foreground color
def chooseForeColor():
    global foreColor
    foreColor = tkinter.colorchooser.askcolor()[1]
menuType.add_command(label='Choose Foreground Color',
                       command=chooseForeColor)

#Select background color
def chooseBackColor():
    global backColor
    backColor = tkinter.colorchooser.askcolor()[1]
menuType.add_command(label='Choose Background Color',
                       command=chooseBackColor)

#rubber
def onErase():
import tkinter
import tkinter.messagebox
import random
import threading
import itertools
import time
root = tkinter.Tk()
# Window title
root.title('Random questions')
# Initial window size and position
root.geometry('260x180+400+300')
# Changing the window size is not allowed
root.resizable(False, False)
# Close the function code executed when the program is closed and stop scrolling the student list
def closeWindow():
# Mark the flat variable as False and stop scrolling
root.flag = False
# Pause for 0.1 seconds and wait for the child thread used to scroll the list to end
time.sleep(0.1)
# Destroy the window and close the program
root.destroy()
# Bind the message handling function to trigger 'WM' when the window is closed_ DELETE_ Windows' message
root.protocol('WM_DELETE_WINDOW', closeWindow)
# Simulate a list of students whose names scroll through the window
students = ['Zhang San', 'Li Si', 'Wang Wu', 'Zhao Liu', 'Zhou Qi', 'Qian Ba']
# Variable to control whether to scroll the student list. By default, it does not scroll when started
root.flag = False
# Thread function for user scrolling list
def switch():
root.flag = True
# Randomly disrupt the student list
t = students[:]
random.shuffle(t)
# Create a cycle object for infinite repeated scrolling
t = itertools.cycle(t)
# Scroll until the value of flag is False
while root.flag:
# Scroll display
# Move the second person's name to the first
# Move the third person's name to the second
# Get a new person name and display it as the third one
lbFirst['text'] = lbSecond['text']
lbSecond['text'] = lbThird['text']
lbThird['text'] = next(t)
# The number can be modified to control the rolling speed
time.sleep(0.1)
def btnStartClick():
# Each time you click the start button, create and start a new thread
t = threading.Thread(target=switch)
t.start()
# Disable the start button to avoid repeated response clicks
btnStart['state'] = 'disabled'
# Enable the stop button
btnStop['state'] = 'normal'
btnStart = tkinter.Button(root,
text='start',
command=btnStartClick)
btnStart.place(x=30, y=10, width=80, height=20)
def btnStopClick():
# Click the stop button to end the scrolling display
root.flag = False
# Wait 0.3 seconds, stop scrolling completely, and then get the name of the winner
time.sleep(0.3)
tkinter.messagebox.showinfo('congratulations',
'Winning this time:'+lbSecond['text'])
# Enable the start button and disable the stop button
btnStart['state'] = 'normal'
btnStop['state'] = 'disabled'
btnStop = tkinter.Button(root,
text='stop',
command=btnStopClick)
# When the program starts, the "stop" button is initially set to disabled
btnStop['state'] = 'disabled'
btnStop.place(x=150, y=10, width=80, height=20)
# Three Label components used to scroll the student list
# You can add as needed, but you need to modify the thread function code above
lbFirst = tkinter.Label(root, text='')
lbFirst.place(x=80, y=60, width=100, height=20)
# The red Label component indicates the winning list
lbSecond = tkinter.Label(root, text='')
lbSecond['fg'] = 'red'
lbSecond.place(x=80, y=90, width=100, height=20)
lbThird = tkinter.Label(root, text='')
lbThird.place(x=80, y=120, width=100, height=20)
# Start the message main loop and start the application
root.mainloop()
Example 12-7 use tkinter Implement calculator program
import re
import tkinter
import tkinter.messagebox
root = tkinter.Tk()
# Set window size and position
root.geometry('300x270+400+100')
# Changing the window size is not allowed
root.resizable(False, False)
# Set window title
root.title('Clean Calculator Beta -Dong Fuguo')
# String variable
contentVar = tkinter.StringVar(root, '')
# The text box used to display the expression and set the associated variable
contentEntry = tkinter.Entry(root, textvariable=contentVar)
# Set as read-only, you can only enter the expression to be evaluated through the button
contentEntry['state'] = 'readonly'
contentEntry.place(x=10, y=10, width=280, height=20)
# Button general code. The parameter btn indicates which button the button is
def buttonClick(btn):
content = contentVar.get()
# If the existing content begins with a decimal point, add 0 before it
if content.startswith('.'):
content = '0' + content
# Make corresponding processing according to different buttons
if btn in '0123456789':
# Normal number button, directly connected to the end of the expression
content += btn
elif btn == '.':
# If there is already a decimal point in the last operand, an error will be prompted
lastPart = re.split(r'\+|-|\*|/]', content)[-1]
if '.' in lastPart:
tkinter.messagebox.showerror('error', 'There are too many decimal points')
return
else:
# There is no decimal point in the last operand. Connect the decimal point to the last operand
content += btn
elif btn == 'C':
# Clear entire expression
content = ''
elif btn == '=':
# Press the equal button to calculate the result
try:
# Attempt to evaluate the entered expression
content = str(eval(content))
except:
tkinter.messagebox.showerror('error', 'Expression error')
return
elif btn in operators:
# Press the operator button. Continuous operators are not allowed in the expression
if content.endswith(operators):
tkinter.messagebox.showerror('error',
'Continuous operators are not allowed')
return
content += btn
elif btn == 'Sqrt':
# take a square root
# Cut out integer and decimal parts
n = content.split('.')
# Numbers are required before and after the decimal point. If the expression contains operators, it does not meet the requirements
if all(map(lambda x: x.isdigit(), n)):
content = eval(content) ** 0.5
else:
tkinter.messagebox.showerror('error', 'Expression error')
return
# Display calculation results
contentVar.set(content)
# Place the clear button and the equal sign button
btnClear = tkinter.Button(root,
text='Clear',
command=lambda:buttonClick('C'))
btnClear.place(x=40, y=40, width=80, height=20)
btnCompute = tkinter.Button(root,
text='=',
command=lambda:buttonClick('='))
btnCompute.place(x=170, y=40, width=80, height=20)
#Button to place 10 numbers, decimal points and calculate square root
digits = list('0123456789.') + ['Sqrt']
index = 0
for row in range(4):
for col in range(3):
d = digits[index]
index += 1
btnDigit = tkinter.Button(root,
# What is displayed on the button
text=d,
# Function executed when the button is pressed
command=lambda x=d:buttonClick(x))
# Place the button on the window
btnDigit.place(x=20+col*70,
y=80+row*50,
width=50,
height=20)
# Place operator button
operators = ('+', '-', '*', '/', '**', '//')
for index, operator in enumerate(operators):
btnOperator = tkinter.Button(root,
text=operator,
command=lambda x=operator:buttonClick(x))
btnOperator.place(x=230, y=80+index*30, width=50, height=20)
# Start the message main loop and start the application
root.mainloop()
Example 12-8 use tkinter A window that automatically closes at a fixed time
import time
import tkinter
import threading
# Create an application window and set the title and size
root = tkinter.Tk()
root.title('Countdown automatically closes the window')
root['width'] = 400
root['height'] = 300
# Changing the window size is not allowed
root.resizable(False, False)
# Create a Text component and place some Text
richText = tkinter.Text(root, width=380)
richText.place(x=10, y=10, width=380, height=230)
# Insert 5 consecutive lines
# '0.0' indicates the insertion position, row 0, column 0
# If you want the inserted content to occupy one line, you need a newline character at the end of the string
for i in range(5):
# f String Syntax, replacing {i} with the current actual value of i
richText.insert(f'{i}.0',
'Suppose it takes 10 seconds to read these words\n')
# Label showing countdown
lbTime = tkinter.Label(root, fg='red', anchor='w')
lbTime.place(x=10, y=250, width=150)
def autoClose():
# Countdown 10 seconds
for i in range(10):
# f String Syntax to evaluate and replace the expression in {}
lbTime['text'] = f'How long before the window closes{10-i}second'
# Modify the prompt every second
time.sleep(1)
root.destroy()
# Create and start a thread
t = threading.Thread(target=autoClose)
t.start()
# Start the message main loop and start the application
root.mainloop()
import time
import tkinter
import threading
# Create an application window and set the title and size
root = tkinter.Tk()
root.title('Countdown automatically closes the window')
root['width'] = 400
root['height'] = 300
# Changing the window size is not allowed
root.resizable(False, False)
# Create a Text component and place some Text
richText = tkinter.Text(root, width=380)
richText.place(x=10, y=10, width=380, height=230)
# Insert 5 consecutive lines
# '0.0' indicates the insertion position, row 0, column 0
# If you want the inserted content to occupy one line, you need a newline character at the end of the string
for i in range(5):
# f String Syntax, replacing {i} with the current actual value of i
richText.insert(f'{i}.0',
'Suppose it takes 10 seconds to read these words\n')
# Label showing countdown
lbTime = tkinter.Label(root, fg='red', anchor='w')
lbTime.place(x=10, y=250, width=150)
def autoClose():
# Countdown 10 seconds
for i in range(10):
# f String Syntax to evaluate and replace the expression in {}
lbTime['text'] = f'How long before the window closes{10-i}second'
# Modify the prompt every second
time.sleep(1)
root.destroy()
# Create and start a thread
t = threading.Thread(target=autoClose)
t.start()
# Start the message main loop and start the application
root.mainloop()journal
logging library log level
level Level value Use timing
DEBUG ten Details, commonly used for debugging.
INFO twenty Some information generated during the normal operation of the program.
WARNING thirty Warn the user that although the program is still working properly, errors may occur.
ERROR forty Due to more serious problems, the program can no longer perform some functions.
CRITICAL fifty Serious error. The program can no longer run.
import logging

#print("This is a 10g. text")

logging. debug("This is debug log")
logging.info("This is info Log")
logging.warning("This is warning log")
logging.error("This is error Log")
logging.critical("This is critical log")
WARNING: root:This is wa rning log
ERROR: root:This is error Log
CRITICAL : root:This is critical Log

Process finished with exit code 0
import logging
#Use baseConfig() to specify the log output level
logging.basicConfig( leve1= logging. DEBUG)
print("This is a log text")
logging.debug("This is debug log" )
logging.info("This is info log")
logging.warning("This is warning log")
logging.error("This is error log")
logging.critical(This is critical log")
Output code:
DEBUG: root:This is debug log
INFO: root:This is info log
WARNING: root:This is warning log
ERROR: root:This is error log
CRITICAL: root:This is critical log
This is a log text
logging . basicConfig( filename='demo,Log', fi lemode= 'w's leve (= Logging . DEBUG
A new file called demo.log is generated. Every time the log is recorded, it will be rewritten. It is not appended in sequence. The default is append
loggingbasicConfig(format="%(message)s", level=logging.DEBUG)
name = "Zhang San"
age = 18
logging.debug("full name%s, Age%d", name, age )
You can only output information
logging.basicConfig(format="%(asctime)s|%(LeveLnames|%(filename)s:% (lineno)s|% (message)s
", leve L= logging. DEBUG)
2021-09-16 11:07:52, 161 DEBUG|2.2py:10 | name Zhang San, age 18
logging
Advanced applications, four components:
Loggers: loggers
Handlers: processor
Filters: Filters
Formatters: formatter
import logging
import logging.config

#Configuration file to process logs
logging.config.fileConfig('logging.config')

logger = logging.getLogger('applog')

#Print log
logger.debug("This is a debug log")
logger.info("This is a info log")
logger.warning("This is a warning log")
logger.error("This is a error log")
logger.critical("This is a critical log")