Environment Preparedness --- Configure tomcat (yum installation openjdk) under linux
Keywords:
PHP
Tomcat
Java
yum
Apache
What is tomcat? How does Tomcat work?
please Reference website https://tomcat.apache.org/tomcat-9.0-doc/index.html
For more information, please click on https://www.cnblogs.com/xdp-gacl/p/4097608.html
Method 1:
Download the tomcat installation package
decompression
Run. / startup.sh under bin file
- bin: It's about opening and changing Tomcat's commands.
- conf: Store some configuration files
- lib: Store some library files, just some jar packages
- logs: Store log files generated by running
- temp: Some temporary files are generated while saving the run
- webapps: Deploy applications to run in this directory
- work: the class file generated by the running process
Method 2:
From Shanghai Youyou https://www.cnblogs.com/yoyoketang/p/10186513.html
Preface
linux installed software, you can use yum very convenient, do not need to download decompression, an instruction can use yum to install java and tomcat environment.
Generally, a development package is a. war file, which requires an intermediate key, such as tomcat, which depends on the java environment, so install the java environment first.
Environmental preparation:
1.Linux System Server: CentOS 7
2.yum 3.4.3
3.java 1.8
4.tomcat
yum environment
yum (all called Yellow dog Updater, Modified) is a Shell front-end package manager in Fedora, Red Hat and CentOS. Based on RPM package management, RPM packages can be downloaded and installed automatically from designated servers, dependency relationships can be handled automatically, and all dependent packages can be installed at one time without tedious downloading and installation.
First check if there is any Yum tool in the current system, or if there is no need to install it. The system on my side shows that this tool already has yum-3.4.3, so there is no need to install it.
rpm -qa | grep yum
[root@yoyo ~]
java environment
Because jdk has been configured, there is no longer download and installation, because the method is different, so do this record!
First check to see if there is a java environment: rpm-qa | grep java
If you don't have a Java environment, go ahead and find the install packages available for java-1.8.0: yum list | grep java-1.8.0-openjdk


[root@yoyo ~]# yum list | grep java-1.8.0-openjdk
java-1.8.0-openjdk.i686                  1:1.8.0.191.b12-1.el7_6       updates
java-1.8.0-openjdk.x86_64                1:1.8.0.191.b12-1.el7_6       updates
java-1.8.0-openjdk-accessibility.i686    1:1.8.0.191.b12-1.el7_6       updates
java-1.8.0-openjdk-accessibility.x86_64  1:1.8.0.191.b12-1.el7_6       updates
java-1.8.0-openjdk-accessibility-debug.i686
java-1.8.0-openjdk-accessibility-debug.x86_64
java-1.8.0-openjdk-debug.i686            1:1.8.0.191.b12-1.el7_6       updates
java-1.8.0-openjdk-debug.x86_64          1:1.8.0.191.b12-1.el7_6       updates
java-1.8.0-openjdk-demo.i686             1:1.8.0.191.b12-1.el7_6       updates
java-1.8.0-openjdk-demo.x86_64           1:1.8.0.191.b12-1.el7_6       updates
java-1.8.0-openjdk-demo-debug.i686       1:1.8.0.191.b12-1.el7_6       updates
java-1.8.0-openjdk-demo-debug.x86_64     1:1.8.0.191.b12-1.el7_6       updates
java-1.8.0-openjdk-devel.i686            1:1.8.0.191.b12-1.el7_6       updates
java-1.8.0-openjdk-devel.x86_64          1:1.8.0.191.b12-1.el7_6       updates
java-1.8.0-openjdk-devel-debug.i686      1:1.8.0.191.b12-1.el7_6       updates
java-1.8.0-openjdk-devel-debug.x86_64    1:1.8.0.191.b12-1.el7_6       updates
java-1.8.0-openjdk-headless.i686         1:1.8.0.191.b12-1.el7_6       updates
java-1.8.0-openjdk-headless.x86_64       1:1.8.0.191.b12-1.el7_6       updates
java-1.8.0-openjdk-headless-debug.i686   1:1.8.0.191.b12-1.el7_6       updates
java-1.8.0-openjdk-headless-debug.x86_64 1:1.8.0.191.b12-1.el7_6       updates
java-1.8.0-openjdk-javadoc.noarch        1:1.8.0.191.b12-1.el7_6       updates
java-1.8.0-openjdk-javadoc-debug.noarch  1:1.8.0.191.b12-1.el7_6       updates
java-1.8.0-openjdk-javadoc-zip.noarch    1:1.8.0.191.b12-1.el7_6       updates
java-1.8.0-openjdk-javadoc-zip-debug.noarch
java-1.8.0-openjdk-src.i686              1:1.8.0.191.b12-1.el7_6       updates
java-1.8.0-openjdk-src.x86_64            1:1.8.0.191.b12-1.el7_6       updates
java-1.8.0-openjdk-src-debug.i686        1:1.8.0.191.b12-1.el7_6       updates
java-1.8.0-openjdk-src-debug.x86_64      1:1.8.0.191.b12-1.el7_6       updates
yum list | grep java-1.8.0-openjdk execution results
Install all files in java-1.8.0-openjdk
[root@yoyo ~]# yum -y install java-1.8.0-openjdk*
Installation process takes 1 - 2 minutes, a cup of coffee will be installed, check the version number: java -version
[root@yoyo ~]# java -version
openjdk version "1.8.0_191"
OpenJDK Runtime Environment (build 1.8.0_191-b12)
OpenJDK 64-Bit Server VM (build 25.191-b12, mixed mode)
Java-version result
Then enter javac, and if you can see the output of the content, you have installed it.
[root@yoyo ~]# javac
Usage: javac <options> <source files>
where possible options include:
  -g                         Generate all debugging info
  -g:none                    Generate no debugging info
  -g:{lines,vars,source}     Generate only some debugging info
  -nowarn                    Generate no warnings
  -verbose                   Output messages about what the compiler is doing
  -deprecation               Output source locations where deprecated APIs are used
  -classpath <path>          Specify where to find user class files and annotation processors
javac execution results
Partners who have installed java should know that environment variables need to be set after installation. The advantage of the previous installation through yum is that environment variables have been set automatically for us.
Is there not much difference between openjdk and jdk? Why did I bother to uninstall it before? Embarrassment
tomcat Installation -- yum Installation
tomcat installation can download the installation package first, then decompress it. You can also install it online directly with yum. It's more convenient for us to install it online directly with yum.
yum install tomcat
//perhaps
yum -y install tomcat
- Representatives of Y choose y when they are asked, so they don't need to input y manually during installation.
After the installation is completed, the installation directory is in "/usr/share/tomcat". We use the cd command to cut to the directory and use the ls (or ll) command to view the files in the directory.
[root@yoyo tomcat]# ls
bin  conf  lib  logs  temp  webapps  work
[root@yoyo tomcat]# ll
total 4
drwxr-xr-x 2 root root   4096 Dec 28 10:41 bin
lrwxrwxrwx 1 root tomcat   11 Dec 28 10:41 conf -> /etc/tomcat
lrwxrwxrwx 1 root tomcat   22 Dec 28 10:41 lib -> /usr/share/java/tomcat
lrwxrwxrwx 1 root tomcat   15 Dec 28 10:41 logs -> /var/log/tomcat
lrwxrwxrwx 1 root tomcat   22 Dec 28 10:41 temp -> /var/cache/tomcat/temp
lrwxrwxrwx 1 root tomcat   23 Dec 28 10:41 webapps -> /var/lib/tomcat/webapps
lrwxrwxrwx 1 root tomcat   22 Dec 28 10:41 work -> /var/cache/tomcat/work
Start the tomcat service
View the status of tomcat: system CTL status Tomcat
[root@yoyo tomcat]# systemctl status tomcat
● tomcat.service - Apache Tomcat Web Application Container
   Loaded: loaded (/usr/lib/systemd/system/tomcat.service; disabled; vendor preset: disabled)
   Active: inactive (dead)
Active: inactive (dead) means tomcat is dead (hanging) and the service is not running yet.
Start tomcat: system CTL start Tomcat (or system CTL start tomcat. service)
[root@yoyo tomcat]# systemctl start tomcat
[root@yoyo tomcat]# systemctl status tomcat
● tomcat.service - Apache Tomcat Web Application Container
   Loaded: loaded (/usr/lib/systemd/system/tomcat.service; disabled; vendor preset: disabled)
   Active: active (running) since Fri 2018-12-28 10:48:38 CST; 5s ago
 Main PID: 5216 (java)
   CGroup: /system.slice/tomcat.service
           └─5216 /usr/lib/jvm/jre/bin/java -classpath /usr/share/tomcat/bin/bootstrap.jar:/usr/share/tomcat/bin...

Dec 28 10:48:38 yoyo server[5216]: Dec 28, 2018 10:48:38 AM org.apache.catalina.core.StandardService startInternal
Dec 28 10:48:38 yoyo server[5216]: INFO: Starting service Catalina
Dec 28 10:48:38 yoyo server[5216]: Dec 28, 2018 10:48:38 AM org.apache.catalina.core.StandardEngine startInternal
Dec 28 10:48:38 yoyo server[5216]: INFO: Starting Servlet Engine: Apache Tomcat/7.0.76
Dec 28 10:48:38 yoyo server[5216]: Dec 28, 2018 10:48:38 AM org.apache.coyote.AbstractProtocol start
Dec 28 10:48:38 yoyo server[5216]: INFO: Starting ProtocolHandler ["http-bio-8080"]
Dec 28 10:48:38 yoyo server[5216]: Dec 28, 2018 10:48:38 AM org.apache.coyote.AbstractProtocol start
Dec 28 10:48:38 yoyo server[5216]: INFO: Starting ProtocolHandler ["ajp-bio-8009"]
Dec 28 10:48:38 yoyo server[5216]: Dec 28, 2018 10:48:38 AM org.apache.catalina.startup.Catalina start
Dec 28 10:48:38 yoyo server[5216]: INFO: Server startup in 61 ms
Hint: Some lines were ellipsized, use -l to show in full.
You can see that the state is Active: active (running), which means tomcat is running normally.
You can also see Main PID: 5216 (java) to know that the PID is 5216
Visit tomcat
tomcat default port is 8080, then browse the input address: http://server public network ip:8080/. This page is temporarily inaccessible
Since tomcat's web pages require plug-ins to be installed, two plug-in packages, tomcat-webapps and tomcat-admin-webapps, continue to be used here.
yum install tomcat-webapps tomcat-admin-webapps
Port, privilege, firewall issues - Solve them by yourself
Go to the browser and visit http://server public network ip:8080, then you can open tomcat's address.
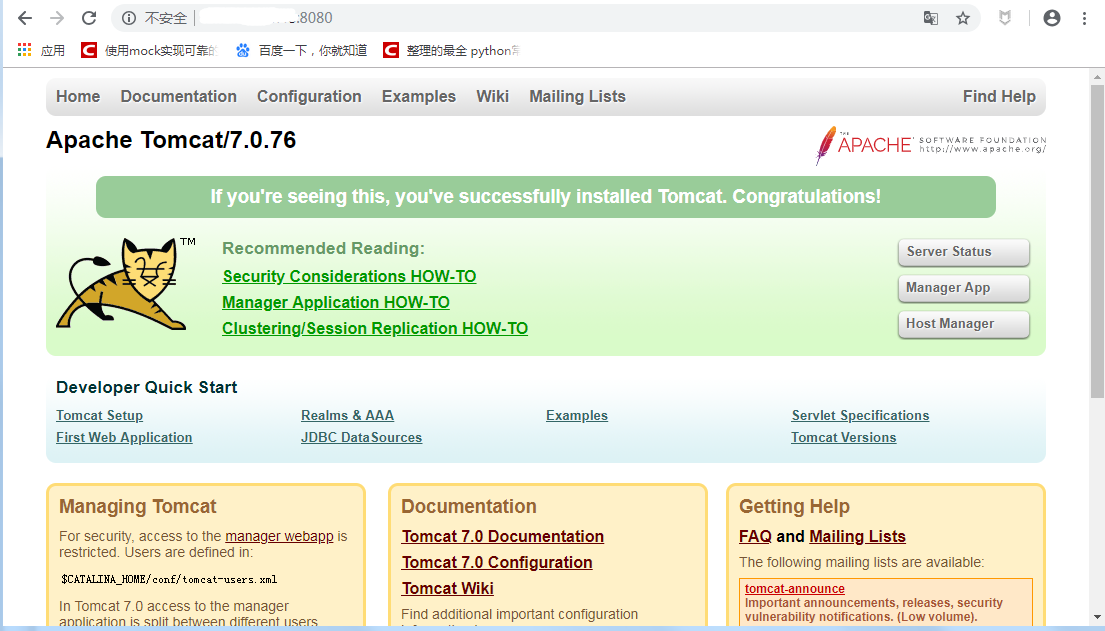
Doubt
So far, everything is normal, but I installed version 7.0.76! Perhaps only this version of yum is installed!
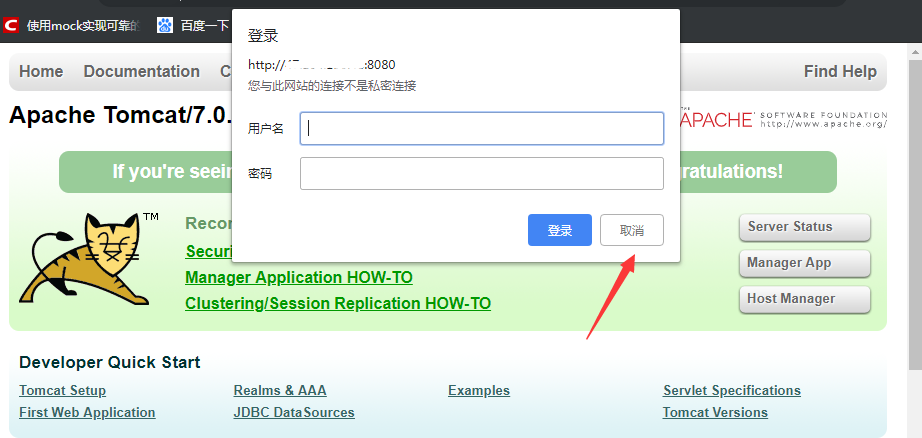
Manager App username and password
If you want to enter Manager App, there will be a pop-up box at the Home Point for Manager App to enter the username and password.

If the direct point is cancelled, 401 interface will appear.
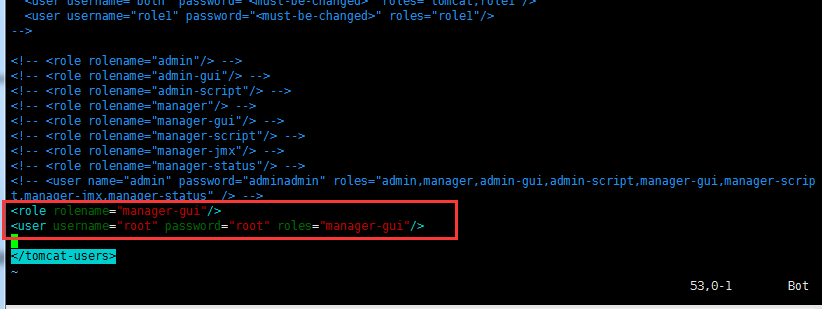
Copy the two lines of the red box and set username="root" password="root" directly.

<role rolename="manager-gui"/>
<user username="tomcat" password="s3cret" roles="manager-gui"/>
Then click on the xshell, enter the Tomcat installation directory (cd/usr/share/tomcat), enter the conf directory, open the tomcat-users.xml file, add the following configuration under the label:
<role rolename="manager-gui"/>
<user username="root" password="root" roles="manager-gui"/>
Edit files, you can use vi or vim point open files directly edit
cd  /usr/share/tomcat
cd conf
vim tomcat-users.xml
When vim is turned on, the keypad is the i key and enters the editing state. Mouse moves over the last line and pastes directly into it.
After editing, press ESC key, enter: wq Enter, save and exit
tomcat related commands
Stop tomcat Service - system CTL stop tomcat
Restart Tomcat - ----- system CTL restart Tomcat
Start-up - ------- system CTL enable Tomcat
View the status of tomcat - - - system CTL status tomcat
Start Tomcat - - - system CTL status Tomcat
Posted by Anti-Moronic on Mon, 05 Aug 2019 21:48:07 -0700