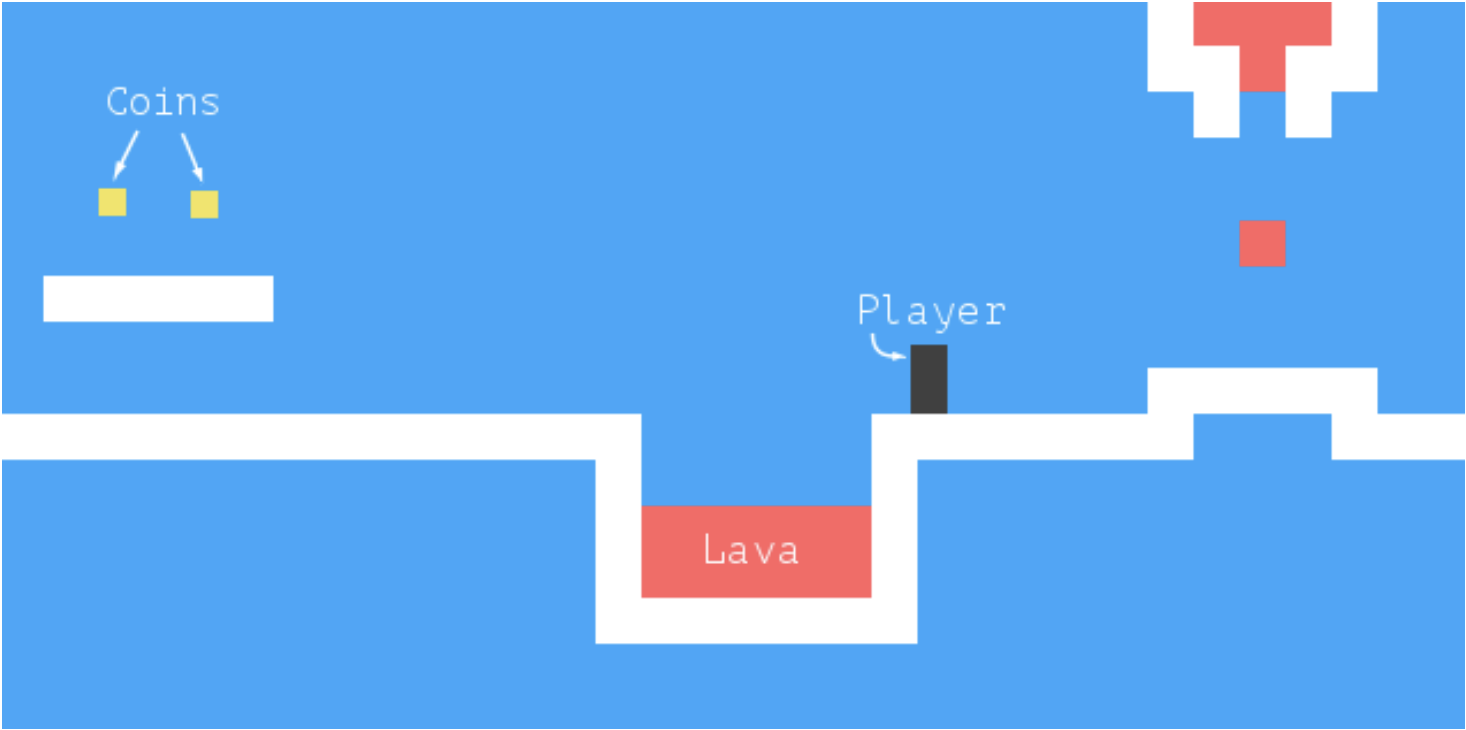
I haven't seen this kind of game scene for many years. Do you remember Super Mary? Red and white machines used to carry such games.
1. Introduction to the game:
1. The black box represents the player and can be controlled to move forward, backward and jump with the keyboard.
2. Red represents magma. If you encounter it, play over.
3. Yellow diamonds are gold coins. If you collect all the gold coins, you can pass the customs.
2. The Technology
1. Use DOM to display the game and get the user's keyboard input through key event.
2. Fixed scenes of games are stored in table s.
3. Movable objects are placed on the scene, using element s of absolute position.
3. Levels
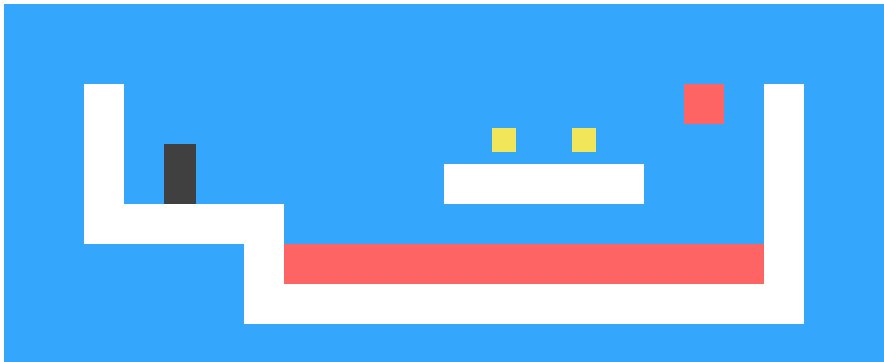
Like the grid in Chapter 7, the map scenarios in this Chapter are constructed using similar two-dimensional arrays. Fixed grids and mobile elements are included in the plan.var simpleLevelPlan = [ " ", " ", " x = x ", " x o o x ", " x @ xxxxx x ", " xxxxx x ", " x!!!!!!!!!!!!x ", " xxxxxxxxxxxxxx ", " " ];
1. x: Wall
2. Spaces: Blank areas
3.!: Unmovable magma
4. @: player's location at the beginning of the game
5. o: Gold coins
6. =: Magma moving horizontally to and fro
7. |: Vertically moving magma
8. v: dripping magma
The whole game contains multiple levels. Collect all the gold coins, the current level is over, and enter the next level. When it comes to magma, Benlevel starts all over again.
4. Reading a Level
Level is the level of the game, including all the scene information, including:
width: Map width
height: Map height
grid: Map, a two-dimensional array, each array element contains a type of "still life" (null blank, x wall,! Immobile lava)
actors: Movable objects (player, coin, movable lava)
player: player
status: Game status, Failure or Pass
finishDelay: After clearance, the scene of the game remains for some time, and the animation of the game continues to be displayed. In this way, switching to the next level is less abrupt.
function Level(plan) {
  this.width = plan[0].length;
  this.height = plan.length;
  this.grid = [];
  this.actors = [];

  for (var y = 0; y < this.height; y++) {
    var line = plan[y], gridLine = [];
    for (var x = 0; x < this.width; x++) {
      var ch = line[x], fieldType = null;
      var Actor = actorChars[ch];
      if (Actor)
        this.actors.push(new Actor(new Vector(x, y), ch));
      else if (ch == "x")
        fieldType = "wall";
      else if (ch == "!")
        fieldType = "lava";
      gridLine.push(fieldType);
    }
    this.grid.push(gridLine);
  }

  this.player = this.actors.filter(function(actor) {
    return actor.type == "player";
  })[0];
  this.status = this.finishDelay = null;
}

Level.prototype.isFinished = function() {
  return this.status != null && this.finishDelay < 0;
};Actor Chars, Actors, Vector s, all of which are used to build actors, are defined in the next section.
5. Actors
5.1. Vector
Look at Vector first. Chapters 6 and 7 have all been used:
function Vector(x, y) {
  this.x = x; this.y = y;
}
Vector.prototype.plus = function(other) {
  return new Vector(this.x + other.x, this.y + other.y);
};
Vector.prototype.times = function(factor) {
  return new Vector(this.x * factor, this.y * factor);
};5.2. actorChars
var actorChars = {
  "@": Player,
  "o": Coin,
  "=": Lava, "|": Lava, "v": Lava
};5.3. Player
function Player(pos) {
this.pos = pos.plus(new Vector(0, -0.5));
this.size = new Vector(0.8, 1.5);
this.speed = new Vector(0, 0);
}
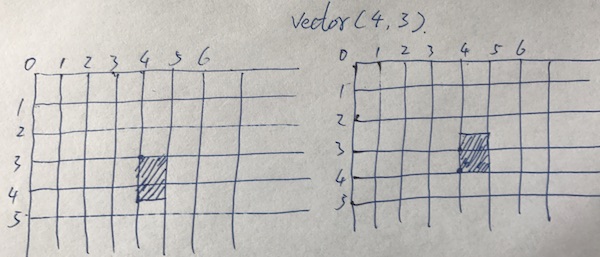
Player.prototype.type = "player";The coordinates on the map are not in pixel s, but a custom box, which will be discussed later. Therefore, the location-related units are blocks, such as Vector, size, speed, pos, etc.
size: player width is 0.8 blocks, height is 1.5 blocks
speed: Used to simulate motion and gravity
pos: coordinates. Note that the screen coordinates extend downward. player's height is 1.5, so its bottom is not aligned with grid (left figure), so when constructing, subtract y from 0.5 (right figure).
5.4. Lava
function Lava(pos, ch) {
  this.pos = pos;
  this.size = new Vector(1, 1);
  if (ch == "=") {
    this.speed = new Vector(2, 0);
  } else if (ch == "|") {
    this.speed = new Vector(0, 2);
  } else if (ch == "v") {
    this.speed = new Vector(0, 3);
    this.repeatPos = pos;
  }
}
Lava.prototype.type = "lava";function Coin(pos) {
this.basePos = this.pos = pos.plus(new Vector(0.2, 0.1));
this.size = new Vector(0.6, 0.6);
this.wobble = Math.random() * Math.PI * 2;
}
Coin.prototype.type = "coin";All right, Level needs all the elements.
var simpleLevel = new Level(simpleLevelPlan);
    console.log(simpleLevel.width, "by", simpleLevel.height);
6. Encapsulation as a Burden
7. Drawing
7.1. DOMDisplay
How does Level draw to the screen? We need to define a display object, which is displayed here with DOM elements, so this object is called DOMDisplay.
function DOMDisplay(parent, level) {
  this.wrap = parent.appendChild(elt("div", "game"));
  this.level = level;

  this.wrap.appendChild(this.drawBackground());
  this.actorLayer = null;
  this.drawFrame();
}

function elt(name, className) {
  var elt = document.createElement(name);
  if (className) elt.className = className;
  return elt;
}7.2. drawBackground()
var scale = 20;

DOMDisplay.prototype.drawBackground = function() {
  var table = elt("table", "background");
  table.style.width = this.level.width * scale + "px";
  this.level.grid.forEach(function(row) {
    var rowElt = table.appendChild(elt("tr"));
    rowElt.style.height = scale + "px";
    row.forEach(function(type) {
      rowElt.appendChild(elt("td", type));
    });
  });
  return table;
};background is a < table >, each line in grid is a < tr > and each grid is a < TD >.
CSS needs to be added to display different field types on the background s:
.background    { background: rgb(52, 166, 251);
                 table-layout: fixed;
                 border-spacing: 0;              }
.background td { padding: 0;                     }
.lava          { background: rgb(255, 100, 100); }
.wall          { background: white;              }
7.3. drawActors()
DOMDisplay.prototype.drawActors = function() {
  var wrap = elt("div");
  this.level.actors.forEach(function(actor) {
    var rect = wrap.appendChild(elt("div",
                                    "actor " + actor.type));
    rect.style.width = actor.size.x * scale + "px";
    rect.style.height = actor.size.y * scale + "px";
    rect.style.left = actor.pos.x * scale + "px";
    rect.style.top = actor.pos.y * scale + "px";
  });
  return wrap;
};
.actor { position: absolute; }
.coin { background: rgb(241, 229, 89); }
.player { background: rgb(64, 64, 64); }Each actor is a < div > and its position is absolute.
7.4. drawFrame()
DOMDisplay.prototype.drawFrame = function() {
  if (this.actorLayer)
    this.wrap.removeChild(this.actorLayer);
  this.actorLayer = this.wrap.appendChild(this.drawActors());
  this.wrap.className = "game " + (this.level.status || "");
  this.scrollPlayerIntoView();
};When winning or losing, the player's style changes slightly:
.lost .player {
  background: rgb(160, 64, 64);
}
.won .player {
  box-shadow: -4px -7px 8px white, 4px -7px 8px white;
}.game {
overflow: hidden;
max-width: 600px;
max-height: 450px;
position: relative;
}7.5. scrollPlayerIntoView()
DOMDisplay.prototype.scrollPlayerIntoView = function() {
  var width = this.wrap.clientWidth;
  var height = this.wrap.clientHeight;
  var margin = width / 3;

  // The viewport
  var left = this.wrap.scrollLeft, right = left + width;
  var top = this.wrap.scrollTop, bottom = top + height;

  var player = this.level.player;
  var center = player.pos.plus(player.size.times(0.5)).times(scale);

  if (center.x < left + margin)
    this.wrap.scrollLeft = center.x - margin;
  else if (center.x > right - margin)
    this.wrap.scrollLeft = center.x + margin - width;
  if (center.y < top + margin)
    this.wrap.scrollTop = center.y - margin;
  else if (center.y > bottom - margin)
    this.wrap.scrollTop = center.y + margin - height;
};
7.6. Enter the next level and delete the current scene
DOMDisplay.prototype.clear = function() {
  this.wrap.parentNode.removeChild(this.wrap);
};var simpleLevel = new Level(simpleLevelPlan); var display = new DOMDisplay(document.body, simpleLevel);
8. Motion and Collision
Motion: Each actor has a speed attribute, and speed * duration is its next location. In order to display smoothly and smoothly, it needs to be moved (redrawn) every short period of time (e.g. 20ms).
Collision: Collision detection. player will encounter walls, lava, coin, and mobile lava will encounter walls. After collision, each actor has its own specific behavior (stop, collect coins, rebound, etc.). Similar to Motion, Collision detection also needs to be done every short period of time to make the animation smoother.
8.1. Collision detection methods for background objects: (only static objects on maps, excluding actors)
Level.prototype.obstacleAt = function(pos, size) {
  var xStart = Math.floor(pos.x);
  var xEnd = Math.ceil(pos.x + size.x);
  var yStart = Math.floor(pos.y);
  var yEnd = Math.ceil(pos.y + size.y);

  if (xStart < 0 || xEnd > this.width || yStart < 0)
    return "wall";
  if (yEnd > this.height)
    return "lava";
  for (var y = yStart; y < yEnd; y++) {
    for (var x = xStart; x < xEnd; x++) {
      var fieldType = this.grid[y][x];
      if (fieldType) return fieldType;
    }
  }
};
The second if judges whether to run to the lower boundary of the map. If it goes beyond the lower boundary, it will be regarded as encountering lava.
In the for loop, determine whether it overlaps with other object s (wall, lava).
8.2. Judging whether to collide with other actors
Level.prototype.actorAt = function(actor) {
  for (var i = 0; i < this.actors.length; i++) {
    var other = this.actors[i];
    if (other != actor &&
        actor.pos.x + actor.size.x > other.pos.x &&
        actor.pos.x < other.pos.x + other.size.x &&
        actor.pos.y + actor.size.y > other.pos.y &&
        actor.pos.y < other.pos.y + other.size.y)
      return other;
  }
};
9. Actors and Actions
9.1. Level's animate method
var maxStep = 0.05;

Level.prototype.animate = function(step, keys) {
  if (this.status != null)
    this.finishDelay -= step;

  while (step > 0) {
    var thisStep = Math.min(step, maxStep);
    this.actors.forEach(function(actor) {
      actor.act(thisStep, this, keys);
    }, this);
    step -= thisStep;
  }
};Note that step is a time value (the interval between two calls to the animate function). In the while loop, we divide the step into small time slices, that is, maxStep, for 0.05 seconds. That is to say, the maximum length of each action of the actor is 50 ms.
The first if is to determine whether the current level is over: won or lost. If it's over, actors will continue to perform actions until finishDelay runs out of time.
Keys are keyboard events that are handled by actor s themselves. Actually, only player needs to deal with keys and change the direction of movement.
9.2. Lava's act()
Lava.prototype.act = function(step, level) {
  var newPos = this.pos.plus(this.speed.times(step));
  if (!level.obstacleAt(newPos, this.size))
    this.pos = newPos;
  else if (this.repeatPos)
    this.pos = this.repeatPos;
  else
    this.speed = this.speed.times(-1);
};Then, determine whether to touch another object, if not, move to the next position.
If it happens, for dropping lava, it has an attribute repeatPos (initial position), which moves directly to repeatPos;
lava without repeatPos can move back and forth, bounce back after hitting the wall, that is, speed reversal.
9.3. Coin's act()
var wobbleSpeed = 8, wobbleDist = 0.07;

Coin.prototype.act = function(step) {
  this.wobble += step * wobbleSpeed;
  var wobblePos = Math.sin(this.wobble) * wobbleDist;
  this.pos = this.basePos.plus(new Vector(0, wobblePos));
};9.4. Player's act()
act() :
Player.prototype.act = function(step, level, keys) {
  this.moveX(step, level, keys);
  this.moveY(step, level, keys);

  var otherActor = level.actorAt(this);
  if (otherActor)
    level.playerTouched(otherActor.type, otherActor);

  // Losing animation
  if (level.status == "lost") {
    this.pos.y += step;
    this.size.y -= step;
  }
};
It is mainly divided into four parts:
1. Move moveX() horizontally;
2. Moving moveY() vertically;
3. Collision detection Level.playerTouched();
4. Game failure handling lost.
Moving on a plane can be divided into two steps: first moving horizontally, then moving vertically. Because the time slice of each movement is very short (50ms), the distance will be very short, which can not be seen from the visual effect into two steps.
moveX() :
var playerXSpeed = 7;

Player.prototype.moveX = function(step, level, keys) {
  this.speed.x = 0;
  if (keys.left) this.speed.x -= playerXSpeed;
  if (keys.right) this.speed.x += playerXSpeed;

  var motion = new Vector(this.speed.x * step, 0);
  var newPos = this.pos.plus(motion);
  var obstacle = level.obstacleAt(newPos, this.size);
  if (obstacle)
    level.playerTouched(obstacle);
  else
    this.pos = newPos;
};moveY() :
var gravity = 30;
var jumpSpeed = 17;

Player.prototype.moveY = function(step, level, keys) {
  this.speed.y += step * gravity;
  var motion = new Vector(0, this.speed.y * step);
  var newPos = this.pos.plus(motion);
  var obstacle = level.obstacleAt(newPos, this.size);
  if (obstacle) {
    level.playerTouched(obstacle);
    if (keys.up && this.speed.y > 0)
      this.speed.y = -jumpSpeed;
    else
      this.speed.y = 0;
  } else {
    this.pos = newPos;
  }
};
MoeY () needs to consider the acceleration of gravity. If there is no collision, the acceleration in the y direction will continue to increase step * gravity.
Level.playerTouched() :
Level.prototype.playerTouched = function(type, actor) {
  if (type == "lava" && this.status == null) {
    this.status = "lost";
    this.finishDelay = 1;
  } else if (type == "coin") {
    this.actors = this.actors.filter(function(other) {
      return other != actor;
    });
    if (!this.actors.some(function(actor) {
      return actor.type == "coin";
    })) {
      this.status = "won";
      this.finishDelay = 1;
    }
  }
};10. Tracking Keys
Keyboard events are tracked and three key events (left, top and right) are bound.
Because the game is refreshed regularly, it is not necessary to change the game scene directly every time the keyboard event is received, but to record the status of the keys and process the event in the next time slot.
var arrowCodes = {37: "left", 38: "up", 39: "right"};

function trackKeys(codes) {
  var pressed = Object.create(null);
  function handler(event) {
    if (codes.hasOwnProperty(event.keyCode)) {
      var down = event.type == "keydown";
      pressed[codes[event.keyCode]] = down;
      event.preventDefault();
    }
  }
  addEventListener("keydown", handler);
  addEventListener("keyup", handler);
  return pressed;
}11. Running the Game
The previous article has repeatedly mentioned that game scenarios are refreshed on a regular basis, not with timers such as setInterval or setTimeout, but with the request Animation Frame () described in Chapter 13. This function informs the system that the screen needs to be refreshed, and the system will select the right time to execute the incoming function. This can better balance performance and game fluency.
We need to define an auxiliary function, runAnimation(), to organize the execution of the request Animation Frame ():
function runAnimation(frameFunc) {
  var lastTime = null;
  function frame(time) {
    var stop = false;
    if (lastTime != null) {
      var timeStep = Math.min(time - lastTime, 100) / 1000;
      stop = frameFunc(timeStep) === false;
    }
    lastTime = time;
    if (!stop)
      requestAnimationFrame(frame);
  }
  requestAnimationFrame(frame);
}2. The internal fame function has a time parameter, which is introduced by the system and is the current system time.
3. Note the var timeStep, which is the interval between the current time and the last refresh time. What's the maximum value (100ms) for it? Because, if the browser window (or tab) is hidden, the system stops refreshing the window until it reappears. This can serve as a pause for the game.
Game Master Control Function:
function runGame(plans, Display) {
  function startLevel(n) {
    runLevel(new Level(plans[n]), Display, function(status) {
      if (status == "lost")
        startLevel(n);
      else if (n < plans.length - 1)
        startLevel(n + 1);
      else
        console.log("You win!");
    });
  }
  startLevel(0);
}
var arrows = trackKeys(arrowCodes);
function runLevel(level, Display, andThen) {
var display = new Display(document.body, level);
runAnimation(function(step) {
level.animate(step, arrows);
display.drawFrame(step);
if (level.isFinished()) {
display.clear();
if (andThen)
andThen(level.status);
return false;
}
});
}12. Exercise: Game Over
Now player has countless lives, if a certain level fails, it can be repeated countless times. Give it an upper limit: three lives, and if you fail three times, start at the first level.
    function runGame(plans, Display) {
        var lifeCount = 3;
        function startLevel(n) {
            runLevel(new Level(plans[n]), Display, function(status) {
                if (status == "lost") {
                    lifeCount --;
                    if(lifeCount > 0) {
                        startLevel(n);
                    }
                    else {
                        startLevel(0);
                    }
                }
                else if (n < plans.length - 1)
                    startLevel(n + 1);
                else
                    console.log("You win!");
            });
        }
        startLevel(0);
    }
13. Exercise: Pausing the Game
function runLevel(level, Display, andThen) {
    var display = new Display(document.body, level);
    var running = "yes";
    function handleKey(event) {
      if (event.keyCode == 27) {
        if (running == "no") {
          running = "yes";
          runAnimation(animation);
        } else if (running == "pausing") {
          running = "yes";
        } else if (running == "yes") {
          running = "pausing";
        }
      }
    }
    addEventListener("keydown", handleKey);
    var arrows = trackKeys(arrowCodes);

    function animation(step) {
      if (running == "pausing") {
        running = "no";
        return false;
      }

      level.animate(step, arrows);
      display.drawFrame(step);
      if (level.isFinished()) {
        display.clear();
        // Here we remove all our event handlers
        removeEventListener("keydown", handleKey);
        arrows.unregister(); // (see change to trackKeys below)
        if (andThen)
          andThen(level.status);
        return false;
      }
    }
    runAnimation(animation);
  }

  function trackKeys(codes) {
    var pressed = Object.create(null);
    function handler(event) {
      if (codes.hasOwnProperty(event.keyCode)) {
        var state = event.type == "keydown";
        pressed[codes[event.keyCode]] = state;
        event.preventDefault();
      }
    }
    addEventListener("keydown", handler);
    addEventListener("keyup", handler);

    // This is new -- it allows runLevel to clean up its handlers
    pressed.unregister = function() {
      removeEventListener("keydown", handler);
      removeEventListener("keyup", handler);
    };
    // End of new code
    return pressed;
  }
The last question is rather complicated. Let's wait and see it later.